Ecube Labs CleanFLEX User manual

CleanFLEX
Installation and Activation
English v1.0.0
Copyright © 2018 Ecube Labs Co., Ltd. All Rights Reserved - Proprietary and Confidential.

CleanFLEX installation and Activation
- 2 -
Legal Notices
Trademarks
Ecube Labs, CleanCUBE, CleanCAP, CleanFLEX and CleanCityNetworks are trademarks
of Ecube Labs Co., Ltd. In this user manual, Ecube Labs®, CleanCUBE®, CleanCAP®,
CleanFLEX® and CleanCityNetworks® are referred to as Ecube Labs, CleanCUBE,
CleanCAP, CleanFLEX and CleanCityNetworks (CCN) respectively.
Copyright
Copyright © 2018 Ecube Labs Co., Ltd. All rights reserved.
No part of this publication may be reproduced, transmitted, transcribed, stored in a retrieval
system, or translated into any language or computer language, in any form or by any means,
electronic, mechanical, magnetic, optical, chemical, manual, or otherwise, without the prior
written permission of Ecube Labs Co., Ltd.
Notice
This user manual is provided for informational purposes only.
All information included herein is subject to change without notice. Ecube Labs makes no
warranty of any kind with regard to this user manual, either expressed or implied, except as
provided herein, including without limitation, thereof, warranties as to marketability,
merchantability, fitness for a particular purpose of use or against infringement of any patent.
Ecube Labs shall not be responsible for any direct, incidental, or consequential damages of
any nature, or losses or expenses resulting from the use of this user manual.

CleanFLEX installation and Activation
- 3 -
Table of Contents
1. Introduction to CleanFLEX .........................................................4
1.1 CleanFLEX contents ........................................................................ 4
1.1.1 Included in CleanFLEX box ...................................................... 4
1.1.2 Optional with CleanFLEX.......................................................... 5
1.2 Technical specification ..................................................................... 5
1.3 Features............................................................................................ 6
2. Installing CleanFLEX ..................................................................7
2.1 Installation prerequisites................................................................... 7
2.2 Installing CleanFLEX........................................................................ 8
3. Activating CleanFLEX ............................................................... 10
3.1 Checking CleanFLEX ON/OFF status........................................... 10
3.2 Turning CleanFLEX ON................................................................. 10
3.2.1 Prerequisites........................................................................... 10
3.3 Turning CleanFLEX OFF............................................................... 12
4. Bin profile .................................................................................. 14
4.1 Placing liner bag inside the waste bin......................................... 14
5. Customer support...................................................................... 16
5.1 Fill-level measurement issues ....................................................... 16
5.2 Telecommunication and Battery issues ........................................ 16
6. Regulatory Notices.................................................................... 17

CleanFLEX installation and Activation
- 4 -
1. Introduction to CleanFLEX
CleanFLEX is a smart ultrasonic fill-level sensor that can be easily installed on any type of
container. It uses robust ultrasonic technology, allowing it to monitor any type of substance.
CleanFLEX measures bin fill-level, monitors bin status, and sends real-time data to
CleanCityNetworks (CCN). CleanFLEX telecommunicates with CCN through WCDMA
networks. Obtaining real-time fill-level data of bins allows you to take action ahead of time.
1.1 CleanFLEX contents
When you receive CleanFLEX, ensure that you have all items mentioned in this section.
1.1.1 Included in CleanFLEX box
Each CleanFLEX box is shipped with the following items:
CleanFLEX (1 EA)
M6×12mm (2 EA), M6×8mm (2 EA)
Magnet (1 EA)
Torx driver (1 EA), Torx bit M3 (1 EA), Torx bit M6 (1 EA)

CleanFLEX installation and Activation
- 5 -
1.1.2 Optional with CleanFLEX
In certain cases, optional items (e.g. brackets) are required for installing CleanFLEX inside
a waste container. These items are customized to fit your waste containers and must be
ordered separately. Before ordering these items separately, you must provide information
about height, width, volume, and material of your waste container. Based on information
provided, Ecube Labs will calculate the exact height for installing CleanFLEX and will
provide appropriate bracket and kit for installing CleanFLEX inside the waste containers.
1.2 Technical specification
The technical specifications of CleanFLEX are shown in the following table.
Specification
Description
Sensor parameter
Technology
Ultrasonic
Range
2 –400 cm (~1” - ~157”)
Resolution
1 cm (0.4”)
Data
management
Accessibility
24/7 access through CleanCityNetworks (CCN)
mobile and web interface
Types
Container fill-level, container internal
temperature (optional), GPS coordinates
Software
Settings are configurable remotely
Communication
WCDMA
850/1900 MHz
Network
Internal SIM card
Dimensions
Size (L×W×H)
80×85×52 mm
Weight
300 g
Power
Battery Type
Replaceable 3.6V high performance lithium
battery1
Battery Life
Approx. 5 years2
Physical
Characteristics
Material
Shockproof ABS/Polycarbonate
Additional
installation parts
Mounting bracket, external antenna
Radio Spec
Frequency
USA/Canada: 1850 ~ 1910MHz, 824 ~

CleanFLEX installation and Activation
- 6 -
849MHz
RF Power
USA/Canada: 23.5dBm, 24dBm
1: Use of undesignated battery may affect product life, and performance.
2: Battery life assuming four transmissions per day with acceptable local network quality
1.3 Features
CleanFLEX provides the following features:
˙Mountabletoanytypeofbinorcontainer.
˙ItiscomplementarytoCleanCUBE andcanbeinstalledinareasnotfeasibleforCleanCUBE
installations.
˙DatafromCleanFLEXcanbeviewedonthesame software solutionthatdisplaysdatafrom
CleanCUBE.
˙Providesaccuratesensingwithultrasonictechnology.
˙Effectivelymonitorsbothsolidmaterialsandliquids.
˙Allowsyoutoconfigure sensors remotely.
˙Provides real-timewirelesstransmission ofbinfill-levelandbinstatusdatatoCleanCityNetworks.
˙Telecommunicationon WCDMAnetworksaresupported.
˙Provides locationinformationthroughGPSmodule.

CleanFLEX installation and Activation
- 7 -
2. Installing CleanFLEX
CleanFLEX can be installed on either under the lid or the inside of waste containers. If the
installation is for a waste container with a lid, CleanFLEX should be mounted under the lid.
If the installation is for a waste container without a lid, CleanFLEX should be mounted on
the inside of the waste container.
CleanFLEX must be installed, connected, commissioned, operated, and maintained
by suitably qualified personnel only.
2.1 Installation prerequisites
Performance of CleanFLEX is affected by installation location and environment. It is
recommended to install the bin with its base being perpendicular to the direction of ultrasonic
wave emitted from the sensor. If necessary, rotate the ultrasonic sensor to adjust the
measurement angle accordingly.
If the direction of the ultrasonic wave is not perpendicular to the base of the waste
bin, the reflected ultrasonic wave may not be detected by the sensor and this may
result in inaccurate measurements.
In order to receive accurate fill-level data, the user should enter the sensor and bin height
dimensions (bin profile) into CleanCityNetworks. Refer to the diagram below for fill-level
measurements.
Any substances between ultrasonic waves and base of the waste bin may affect
measured values.

CleanFLEX installation and Activation
- 8 -
1. Sensor
2. Sensor height
3. Bin
4. Waste Height
5. Bin base
2.2 Installing CleanFLEX
Actual frequency range of a sensor depends on how well it is mounted on the container.
Depending on container type, it may be necessary to seek advice on appropriate installation
location and method of the installation.
Ensure you have the following items before beginning the installation:
˙Stencil, marker
˙M6drillbit
˙Powerdrill
˙Torxdriver
˙M6torxbolts(2EA)
˙CleanFLEX
Take the following steps to install CleanFLEX under the lid or inside the bin.
1. On the surface where CleanFLEX is to be installed, find the spot that is center of the
bin base from where the measurements will be made. Use stencil to mark the location
of the hole.

CleanFLEX installation and Activation
- 9 -
2. Using a power drill with M6 drill bit, drill holes on the marked spots.
3. Position CleanFLEX on the installation surface and tighten with screws from the other
side.
4. Make sure the sensor is facing and centered on the base of the bin.
5. Adjust the angle of the ultrasonic sensor if necessary.
6. Make sure CleanFLEX is securely installed.
If the installing surface is too thick, use long M6 torx bolts to secure CleanFLEX.

CleanFLEX installation and Activation
- 10 -
3. Activating CleanFLEX
After installing CleanFLEX, activate the device and check its operation. If you contact Ecube
Labs or your point of purchase, you will be provided with more accurate activation
confirmation.
3.1 Checking CleanFLEX ON/OFF status
Perform the following to check the ON/OFF status of CleanFLEX.
1. Refer to the diagram and place the magnet on the following location. The magnet is
recognized only on this location.
A. If the LED light turns on for 1 second immediately after magnet is placed on the
indent: Power is OFF.
B. If the LED light flashes 1 second after magnet is placed on the indent: Power is
ON.
2. Remove the magnet after the LED light turns ON or flashes so that CleanFLEX returns
to its current ON/OFF status.
3.2 Turning CleanFLEX ON
Once CleanFLEX is installed, turn CleanFLEX ON to ensure it is working. Before turning
CleanFLEX ON, perform the tasks described in the following prerequisite section.
3.2.1 Prerequisites
Before turning CleanFLEX ON, log in to the CCN web interface, select the respective
CleanFLEX and click “Request GPS Update”. This ensures accurate GPS location updates
from CleanFLEX. Refer to the “
CleanCityNetworks Web User’s Manual”
for instructions on

CleanFLEX installation and Activation
- 11 -
requesting GPS update.
For CleanFLEX installed underground, it is highly recommended to perform “Set
Manual Location” as CleanFLEX installed underground does not provide accurate
GPS location coordinates.
Take the following steps to turn CleanFLEX ON.
1. Place the magnet on the indent located on the side of CleanFLEX.
2. LED light will flash five times. Remove the magnet after 5 flashes.
3. Wait until LED light flashes again. This process will take approximately 3 seconds.
4. After LED light flashes, place the magnet on again within 3 seconds.
5. LED light will flash 5 times. Remove magnet after 5 flashes.
6. 5 seconds after the end of flashing, the LED light will flash 1~3 times again to indicate
that CleanFLEX is ON.
7. For 1 minute, there will be no LED indication while CleanFLEX sets up communication.
8. After 1 minute, the LED light will flash once every 3 seconds until CleanFLEX is
connected to the server.
9. LED light will flash rapidly 5 times if CleanFLEX is successfully connected.

CleanFLEX installation and Activation
- 12 -
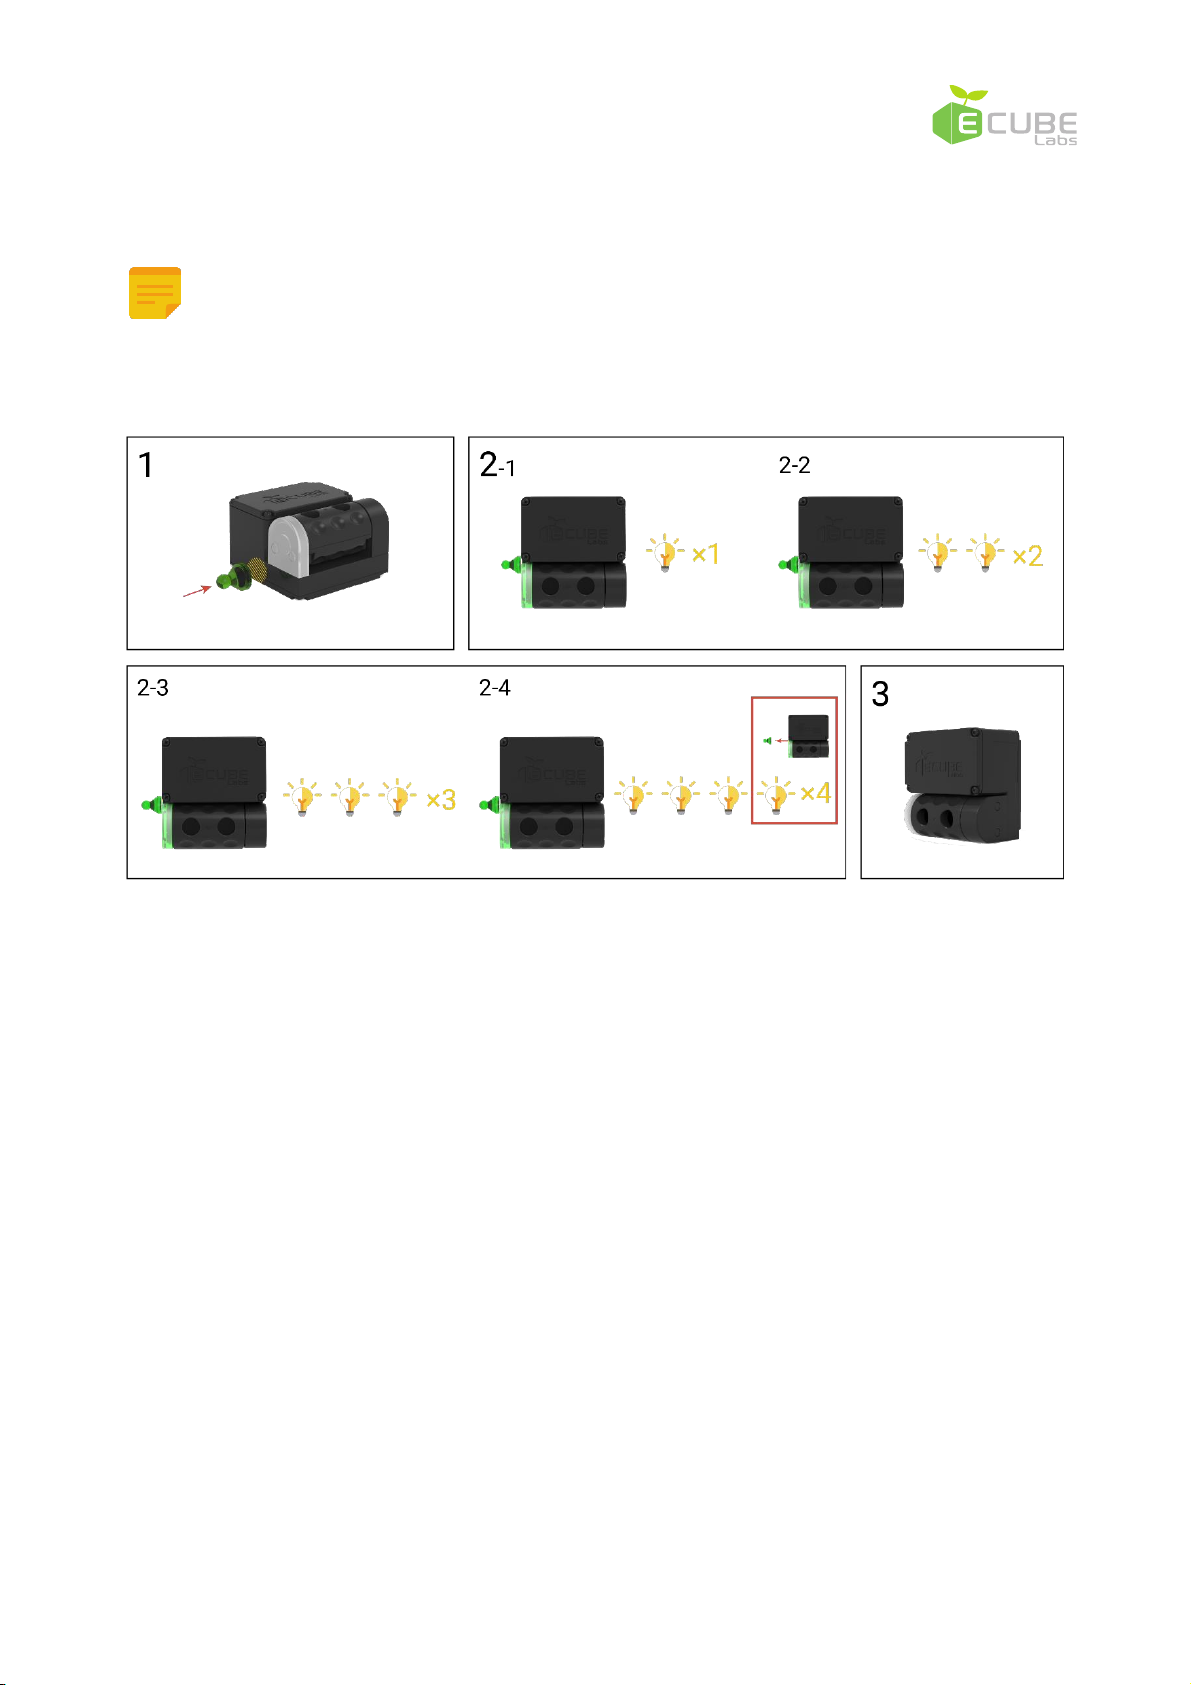
3.3 Turning CleanFLEX OFF
Take the following steps to turn CleanFLEX OFF.
1.
Place the magnet on the detector.
2-1.
After placing the magnet on the detector for 1 second, the LED light will flash 1
time.
2-2.
After another second, LED light will flash 2 times.
2-3.
After another second, LED light will flash 3 times.
2-4.
After another second, LED light will flash 4 times. Remove the magnet from the
detector while the LED light is flashing.
CleanFLEX installation and Activation
- 13 -
Avoid performing any procedures within ten minutes after turning CleanFLEX OFF.
If the user fails to perform the correct procedure while turning CleanFLEX OFF,
CleanFLEX will return to its previous ON status.
3.
Device is now turned OFF.

CleanFLEX installation and Activation
- 14 -
4. Bin profile
For accurate fill-level measurements, capture the following bin dimensions. If the direction
of the ultrasonic wave emitted from the sensor is not perpendicular to the bin base,
measurements for fill-level will not be accurate as they are based on travelled distance of
the ultrasonic wave.
˙Distancefromthebaseofthebintothesensor
˙Binwidth
˙Binheight
˙Bin volume
These dimensions are essential in creating bin profile for CleanFLEX on the CCN interface
for receiving accurate sensor data from CleanFLEX. If you fail to create bin profile for
CleanFLEX on CCN interface using these dimensions, then CleanFLEX is set to default bin
profile, which may lead to inaccurate measurement data. Refer to the “
CleanCityNetworks
User’s Manual”
for creating bin profiles for CleanFLEX.
1. Sensor
2. Sensor height
3. Bin
4. Waste height
5. Bin base
4.1 Placing liner bag inside the waste bin
If using bin liners, please ensure the following steps are followed. Failure to follow the

CleanFLEX installation and Activation
- 15 -
instructions may result in inaccurate fill-level readings.
1. Fill the bin liner with air before inserting it into the bin.
2. Fold the top of the bag over the top edge of the bin while pushing the bin liner against
the inside of the bin to keep the bag away from the center of the bin.
3. Fold the excess length of the bag over the outside of the bin.
The liner bag must be pushed completely to the sides of the bin. If the liner bag is folded at
the center of the bin, then it leads to inaccurate measurement data. After the liner bag is
placed in the bin, ensure the inside of the bin looks as illustrated below.

CleanFLEX installation and Activation
- 16 -
5. Customer support
If you experience network problems or operation issues after installing CleanFLEX, check
the following.
5.1 Fill-level measurement issues
Visually inspect the installed CleanFLEX and:
˙Checkwhethertheultrasonic sensoris surroundedbyforeignsubstances
˙Checkthestatusof linerbag
˙Checkfordamagesontheultrasonicsensor
If foreign substances are found around the ultrasonic sensor, remove them. If the liner bag
is not placed properly, refer to “
4. Bin profile
”and place the bag correctly. Also check whether
the ultrasonic sensor is physically damaged. In case of damage, contact Ecube Labs or
point of purchase.
5.2 Telecommunication and Battery issues
Other things to confirm are as follows:
˙RemainingBatteryLife
If remaining battery life is too low, you may experience network quality issues. If remaining
battery life is too low or if you have network connectivity issues related to low battery, contact
Ecube Labs or point of purchase.

CleanFLEX installation and Activation
- 17 -
6. Regulatory Notices
User notification
This device has been tested for compliance with the intended use in a commercial
environment. If the device is used in a domestic environment, it may cause radio interference.
FCC Part 15.19
This device complies with part 15 of the FCC Rules. Operation is subject to the following
two conditions: (1) This device may not cause harmful interference, and (2) this device must
accept any interference received, including interference that may cause undesired operation.
FCC Part 15.21
Any changes or modifications (including the antennas) to this device that are not expressly
approved by the manufacturer may void the user's authority to operate the equipment.
FCC RF Radiation Exposure Statement
This equipment complies with FCC RF Radiation exposure limits set forth for an uncontrolled
environment.
This device and its antenna must not be co-located or operating in conjunction with any
other antenna or transmitter.
This equipment should be installed and operated with a minimum distance of 20 cm between
the radiator and your body.
Industry Canada Statement:
This device complies with Industry Canada licence-exempt RSS standard(s).
Operation is subject to the following two conditions:
(1) this device may not cause interference, and (2) this device must accept any
interference, including interference that may cause undesired operation of the device.
Le présent appareil est conforme aux CNR d'Industrie Canada applicables aux appareils
radio exempts de licence.

CleanFLEX installation and Activation
- 18 -
L'exploitation est autorisée aux deux conditions suivantes :
(1) l'appareil ne doit pas produire de brouillage, et (2) l'utilisateur de l'appareil doit accepter
tout brouillage radioélectrique subi, mêmesi le brouillage est susceptible d'en compromettre
le fonctionnement.
Table of contents
Other Ecube Labs Accessories manuals

Popular Accessories manuals by other brands


Silvercrest
Silvercrest 43150 Assembly, operating and safety instructions

Silvercrest
Silvercrest Z32138 Assembly, operating and safety instructions

Phil & Teds
Phil & Teds TS 26 V3 quick start guide

1 BY ONE
1 BY ONE SimpleTaste instruction manual

Gearhead
Gearhead 1-5DPF360 user manual

Air-Met
Air-Met AirMetER-DX REMOVAL & REPLACEMENT


