Edey & Duff DOVEKIE User manual

OWNER'SMANUAL
Harbor Road, Mattapoisett
Massachusetts 02739 617-758-2743

*
DOVEKIE OWNERS MANUAL
1.
2.
3.
4.
5.
6.
7.
8.
9.
10.
11.
12.
13.
14.
15.
INDEXX
Subject Page
General
.................................................................. .2
Trailers & Trailering.. .............................................. 3
Getting Under Way................................................ .5
Trim & Tuning.. .................................................... -7
Reefing................................................................. 11
Putting Her to Bed............................................... .12
Rowing & Sculling............................................... .13
Anchors & Anchoring .......................................... .15
Safety................................................................... 16
Cooking, Stowage, & Domestic Arts..................... .17
Maintenance & Modifications ............................... .18
Heaving To......................................................... ..20
Help & Information ............................................. ..21
Cruising checklist.................................................. .22
Riging Lid.. ......................................................... 23
General Revision 03/94 ’j
Page 2
1. GENERAL: There areanumber of “immutable” rules concerning DOVEKIE that best
fall in this section. Also, this manual includes some subjective thoughts, aswell as
objective instructions. We recommend you follow them until you thoroughly understand
the boat and’its workings. Then feel f?eeto experiment. Pleasetell us if you find better
ways to do things!
k NEVER GO ON DECK. While DOVEKIE’S deck is strong enough to support
you, her stability is probably not. Everything you need to do to operateDOVEKJE can be
done Tom below. There is no anti-skid on the deck, and its crown is quite high. Both are
done to enhancethe prohibition againstgoing on deck. Of the few accidental capsizeswe
know of, one occurred becauseavery heavy man was on deck. He lost his balance,
grabbed the mast to regain it and simply levered the boat over...to windward! DON’T GO
ON DECK! The only exception to this is to’go out over the bow when you’ve beached
for apicnic, or whatever.
B. DOVEKIE is incredibly tough, soyou can afford to be a bit relaxed about piloting.
But KEEP AN EYE ON THE WEATHER. DOVEKIE is avery stable,seaworthy boat
but shehas limitations. Asking her to do more than shecan is rather unprofitable.
Excesseswill almost invariably be a result of inattention to the weather.
C. KEEP EVERYTBING AS LIGHT AS POSSIBLE. The more junk you leave at
home, the better. The Cruising Check List, Section 14,is amazingly long, but almost
everythmg you’d normally need on a cruising sailboatis there.
D. TERMINOLOGY: Nautical terminology is usedthroughout this manual. It is
perhaps the oldest form of jargon. Nautical terminology is aprecise, concise, shorthand
languagethat has evolved over 2000 years. We will useit here where ever it saveswords
over saying something in non nautical English. You’ll find most, if not all, of theseterms in
all but the slimmest of English dictionaries.
iVOT?T: A.UDOF5?Z~S amplteffy much the sami Howeker, since tbey appeared
io 1979, there have been some modSkabbos and e&.@men f changes done in the
split of hnprov&g their tiheren f good quaMt~. In th& Iaft& re@ion of, TKE
DOJG?iZUE OI;yNER’SIM;4NuAL *, we have done our beef not onIy to cover the
currant model and equipmend but also address the major opera fingpoinb of the
prevlbus models where there was a si@Skanf difference.
Page 3
2. TRAILERS AND TRAILERING:
A. Vehicle menarations for towinp a DOVEKIE
1.
Wiring: A wiring harnessto couple the DOVEKIE trailer wiring to your caris
included with the purchaseof the trailer. You should be ableto install and wire it yourself,
if you want. A competent auto mechanic should be ableto install and wire the socketin
two hours or’less. Wiring aloneshould takehim lessthan an hour.
2. The wiring socket may beinstalled:
a. Inside the car’strunk, attachedto something or left loose, aslong asthe wire
Tom the trailer, (which, in most cases,is flat), canpassbetween the trunk lid andsill
without being cut or chafed, or---
b. Outside, in ahole drilled through the body work, bumper, or in abracket you’ve
made for it. Locate it ascloseto the hitch aspossible. Use marine bedding compound to
sealthe wires in the hole.
3. Towing Hitch: ..
a. The hitch should be VERY robust! Except for “step” bumpers on trucks, a
bumper hitch should NOT beused. Use abolt-on hitch, such asthose made by Valley
Tow Rite, Reese,etc. The loads on thehitch will be: vertical = adjustable from 75-100
lbs, depending on how the boat is loaded, (Trailering Instructions will tell you how to
adjust this for proper towing.); Horizontal = the weight of trailer, boat andload (about
1350 lb. maximum).
b.
Ball size is 17/8. The top of the ball should be about 19” abovethe ground for
the beat to be level. An inch or two oneway or the other posesno problem.
B. Launchirw tech&we:
To avoid acceleratedcorrosion of the frame and to
reduce
the probability of bearing failure, usethe following instructions to launch andretrieve
DOVEKJE:
1.
Before backing down the launching ramp:
a. Walk down andhave alook atthe ramp. Is it crowded? Will you haveto
launch and be away quickly? Are there other boatsmilling about to confuse the issue?
Where is the wind, andhow strongis it? Decide now what you will do to vacate theramp
asexpeditiously, andwith aslittle confusion to other boats asthe conditions permit. If you
expect to have to row or scull away from the ramp, make asmany preparations aspossible
to do sobefore moving to the ramp.
b.
Remove the temporary leeboard pendantsandboat hold down strap.
c Install the rudder, shrouds, andmain sheet,if any-were removed for towing.
d.
Open the forward andmiddle hatches. Remove the canopy. Open and furl the
dodger.
e. Tie abow line to the forestay block stand. It should be at least20’ long, and
3/8” diameter.
X BE SURE THE DRAIN PLUG IS IN PLACE!
2. back the trailer down theramp sothe wheels areat the water’s edge.There is no
needfor anypart of the trailer to go into the water except aninch or two of the tires. ’
3. Setthe parking brake, put the transmission in Park, (or lst, if manual), and shut
the engiue off.
4. Releasethe winch yawl andtrailer bed tilt lock. Do not unhook the winch line.
Do notletgo of the winch handle.
Unwind 8-10 turns on the winch. ‘A small push will
get the boat moving aft. S671
withoutletG.uggo of the r,~incb handle,
unwind the winch
line.

Page 4
BE WARE: If you Jet go, ff~e handJc wiJJ spin rapidly, out of conirol The boat wiu
race back, also out of control and you ‘Uprobably break your wrikt should you &v
to stop tie winch handJe!
(Boats on EDEY & DUFF built.,flat, plank bed trailers, will require aconsiderably harder
push to launch.)
5.
Once afIoat, unhook the winch line.
6. Have your assistantor bystander, hold the boat, or securethe bow line somehow
to the ramp. Drive the car and trailer up the ramp, andpark them.
7. Go aboard.
C. Retrieval techniaue:
1.
Depending on congestion, spaceavailable, wind direction and strength, etc. atthe
ramp, sail, row, or scull to the ramp, or to the wharf serving it
2. Raise andlock the rudder blade, leeboards, andbow centerboard.
3.
Releasethe click stop on the winch. Haul the winch rope out until‘the hook is a
foot aft of the rear center roller.
4.
Back the trailer to the water’s edge. As when you launched, thereis no reasonto
get the trailer wet.
5. Move the bow of the boat to center of the center roller. Try to hold the stern out
so it’s in line with the trailer. Attach the winch line hook to the bow eye. Unlock trailer bed
tilt mechanism.
6. Crank asmall amount of tension into the winch line. Lock.the winch pawl. Now
take up on the winch in earnest. Line tension wiIl pull the bow right up over the roller.
The energy accumulated in the nylon winch line will do most of the work. Once the bow
surmounts the roller, cranking should become pretty easy. Line tension should straighten
the boat asit comes onto the trailer, but it may needsome help. Crank until the bow is
tight againstthe rubber V-block on the winch stand.
BE WARE: ne nylon wi0cJ1 fine wiu stretch a Jot as it is tensioned. As it
s&-e&her, tie nyJon absorbs ener&y...a LOT of energy! If tie fine shouJd break, or
come unhitched when s&etcJxed, #iaf energy wiu be d&s@aied vew quicMy. Should
you, or anyone else be standhg in the way of tbatproces, if wouJd do much more
than stiug. And stand&g at tie winch crankhgpufs yoy by a ratier vuloerable
position. So, it behooves you to be absolutely sure the snap hook between the winch
J&e and boaf is done up properJy, and that fhe Ji’e sfays in good conditi%nl
7. Move up to the parking area.
8. Securespars,install hatch covers and canvasfor travel. Install hold down strap.
9. Have anice ride home.
D. Towing tim:
1.
On the new type trailers thetongue weight canbe adjusted by moving the front
trailer standardforward or back. We adjust it at 85 lbs which is correct for most situations.
On trailers without adjustable standards,tongue weight is adjusted by moving equipment
and supplies forward or aft in the boat.
2.
Stop after the first 20-30 miles to check the trailer’s wheel bearings. Simply feel
the hubs to seeif they arewarm or hot. Ideally, they should be the sametemperature asthe
&ame
of the trailer--cool. If either is warm, stop after another 50-75 miles, andfeel them
again. If either is noticeably warm, keep an eye on it by checking every 25-50 miles.

Page5
Ifit is warmer than you can touch comfortably, drive slowly to the nearestgasstation, or
betteryet, the nearestRV/trailer service center.
If you must attend to it yourself:
a. Jack the wheel up.
b.
Remove the bearing cap. It is lightly pressedonto the hub. It should bepried
off with a screw driver, applied at severalplacesaround the perimeter.
c. Spin the wheel. Try to remember how it feels and sounds.
d. Remove the cotter pin. Loosen the nut l/6 of a revolution. Replace the cotter
pin but don’t spreadits legs.
e. Spin the wheel again. Compare feel andsound with the previous spin. Ifit feels
improved (your subjective impression), okay. If not, try loosening the nut another 1/6th
turn. Once you’re satisfied with the sound andfeel, try wiggling the wheel on the axle to
seeif yodve loosened the nut too much. Also examine the greaseto seeif you think it
might have suffered from being overheated. Again, you’ll have to depend onyour
subjective impressions.
f; Spreadthe legs of the cotter pin andtap the capback on.
g. Stop to check for overheatingfairly frequently. Go to agarageor trailer service
center, andhave them inspect the hub.
3. On EDEY & DUFF built trailers, beware of steepor abrupt entrancesto gas
stations, restaurants,etc, where DOVEKIE’S extreme length can causeher to dragher
stern. New type trailers arehigher which minimizes the problem.
4. When you back atrailer down alaunching ramp behind a darwith a standard
manual transmission, it’s agood ideato shut the engineoff to addit’s holding power to that
of the often questionableparking brake. Before you get out of the car, put the
transmission in first gear. DO NOT LEAVE IT IN REVERSE. Then if someone elsegets
in to drive the car and empty trailer away, it’ll bemore likely to go up the ramp than down.
5. Dimensions of DOVEIUE on her trailer. (Thesemeasurements arefor the current
generation of DOVEIUE trailers. All earlier models made by Edey & Duff are
lower, and some arewider).
a. LENGTH: 25’ including the rudder, 23’ with the rudder removed. (These
dimensions arewith the tongue blocked sothe boat is approximately level.)
b. WIDTH: 6’8” to the outside of thefender.
c. HEIGHT: 7’3” to the top of the mast stowed on its‘dhocks,with the tongue of
the trailer blocked sothe boat is level. With the tongue on theground, the tip of
the stowed mast risesto 8’2” high. 6’7” to the top of the gallows, with the mast
and sprit removed, andthe boatlevel. This height canbe reduced a bit by
raising the tongue.
d. WEIGHT: The tareweight of the trailer is 325 lbs. The maximum permissible
weight components is 1350 lbs. The G.V.W.R is 1675 lbs.
3. GETTING UNDER WAY
k If space is restricted. the wind doesnot serve,or for some other reasonyou
cannot sail away from the wharf, float, mooring, beach, launching ramp, or other starting
place, row or scull to an unobstructed area,deepenough to usethe leeboardsattheir full
depth. Anchor. (See separateinstructions about Rowing, Sculling, and,Anchoring.)

Page 6
B. Shit, and stow the oars.
C. Close sort covers. THIS IS VERY IMPORTANT! The amount of water that
could getin through an open oar port could bemore than embarrassing. In f&t it could
spoil your whole day!
D. Lower both leeboards: Rotate ahandle soit points out into themiddle of the
boat. This unlocks acam atthejunction of the handle andthe bronze beating. Holding
the handle pointed inboard, turn the other leg of the handle soit is pointed down. As you
probably noticed, this lowered the leeboard. Rotate the handle forward againstthe hull to
lock the cam. This holds the leeboard down. Should the Ieeboard hit something, the cam
will slip, allowing the leeboard to swing aft andup. Repeat to put the other leeboard down.
To raisethe leeboards,just reversethe operation.
E. Lower the rudder blade: Untie any stopper knots in the lift and downhaul
lanyards on the rudder. (Do not untie the figure eight knots in the bitter endsof the
lanyards.) Push the blade aft and down asfar asis convenient. Pull it the rest of the way
down with the downhaul lanyard. A paradox occurs here: the rudder is most effective,
andthe steeringforces least, with theblade all the way down. At this point, it will be
somewhat forward of vertical. Thus, ifit hits the bottom andtries to swing aft, it must lift
the stern alittle (pole vault) asit swings down to the vertical position. This puts alarge
stresson the rudder andits hardware. While everything is strong enough to withstand all
but the most violent of such encounters,it’ll scarethe pants off you., So if you expect to be
nearthe bottom, it’d beprudent to swing the blade until it’sjust aft of vertical.
F. Prepare the spars for raisins:
1. Shroud Lanyards: Lace the shroudsto the chainplates with the l/4” lanyards
spliced to the bottom thimbles asfollows:
a. Passthe lanyard through the chainplate, then back up through the shroud
thimble. Repeat twice more, sothere aresix lengths of line between the thimble and
chainplate.
6. The first time you sailyour DOVEIUE, adjust the lanyard so the spacing
between the thimble and the chainplate is 5 inches. This isjust atentative dimension.
You’ll probably needto readjust it oncethe sail is set. Secureit atthe 5” length by doing a
seriesof half hitches around itself The lanyards on the ends of the shrouds should be
adjusted sothe foot of the sailjust brushesthe top of the gallows. This moves the center
of sail areaasfar aft aspossible, to help avoid alee helm. It alsomaximizes the
effectiveness of the shrouds asbackstays.
2. Releasethe ties that hold the mast and sprit to the gallows. Seethat the mainsheet
is uncleated and canrun freely.
3. Releasethe snotter so that the mast can be moved aft.
4. Releaseall but the bottom loop of the shock cord that holds the furled sail to the
mast. Releasethe forestay from its cleatjust forward of the middle hatch. Move the mast
aft and toward the center of the boat. Engage the tenon fitting atits basewith the mast step
on the deck. Check the shrouds to seethat they will not get caught under anything asyou
raisethe mast. Check also that the shacklesat the hounds (where the shrouds and forestay
attach to the mast) lead fair. Be surethat the lanyards atthe bottom of the shrouds are
securedto the chainplates!

Page7
G. Raisiw the mast:
Stand in the middle hatch. Remove therowing seatand
anything elsethat could possible get in your way. Squat slightly, placeyour left shoulder
under the mast and standup straight. (This well lift the mast off of the gallows afew
inches.) Place both handsbetween the mast andyour shoulder andbraceyour feet. With
both hands, pressthe mast up and forward until the shrouds come up tight. Disregard the
forestay until you get the mast upright. Without letting go of the mast with your left
band, take up the slack in the forestay with your J&& band and hook it under the
rear horn of the forestay cleat on the deck in front of you. Push the mast up as tight
asyou can with your /efi
hand
and finish cleating it in with the J&Z&
H. Set the sail: Unhook the bottom loop of shock cord from around the sail. It will
unfurl itself. In very light airs, it may needalittle help to unfurl. Put the clew cringle, (the
ring in the aft bottom comer of the sail), onto the snapshackle atthe aft end of the sprit,
(aft hook on wood sprits). (Make surethe snapshackle slide on sprit is pulled all the way
aft and clew outhaul line cleated.) Pull in on the snotter. Setit up with moderate tension
and cleatit. Seethe next Section, on TRIM AND TUNING, for a discussionon snot&
tension.
I. Coil the lines andtidy up asnecessary. Get the anchor in. Have a pleasantsail.
4. TRIMANDTuNIN~ -.
A. MAIN SHEET:
1. Early boats areequipped with singlepart main sheets. That is, only a single line
goesfrom the block on the tiller to the endof the sprit. This systemhnsthe advantagesof
simplicity, aminimum of sheetto deal with, and the lightest weight to be supported by
wind pressurein light wind conditions. Its disadvantageis high sheetforces in fresh
breezes,particularly on the wind. Current boats aresupplied with atwo part main sheet.
(ie: The sheetstartsfrom a becket block on the tiller, goesup through ablock on the outer
end of the sprit, and back down through the block on the tiller.) This givesamechanical
advantageof two. It effectively halvesthe sheetloads, but doubles the length of the sheet.
Thus when you want to gybe, you haveto pull in a lot of line. And the addedweight
reducessail efficiency off the wind in light airs. A good way tohave your cakeand eatit, is
by attaching the sheetto the becket on the rudder block with a snapshacklerather than a
direct splice. Tie aknot in the sheetjust abovethe shackle. When the wind drops andyou
would like asingle part sheet, just releasethe shackle and let the sheetgo. The knot in the
end of the sheetwill catch up againstthe block on the sprit andyou will have asingle part
sheet!
2. When going to windward, shewill perform bestwith the foot of the sailjust
kissing the leeward-comer of the gallows. Trimmin g the sail inboard of that will just slow
the boat.
3. On one of your first sails,while running deaddownwind in anice breeze, let thei
sheetout until the sprit isjust shy of touching the shroud. Mark the sheetwith apen or
magic marker where it goesthrough the block on the rudderhead. If you tie afigure eight
knot in the sheetatthat mark, you cansimply let the sheetgo out to the knot when
running.

Page 8
4.
Beware
of the result of not letting the main sheet run free when you gybe. It is
probably the best way to cause a capsize.
Don’t sit on the sheet. Bring it in smartly hand-
over-hand asyou gybe. This reducesthelikelihood of the bight of the slack sheetcatching
on something. Hint: If you let the sheetdragin the water, you’ll not getrope burns when
you let it run through your hand and snubit, after agybe.
B. SNOTTER:
1. The
snotter is the line that controls the forward end of the sprit. It holds the sprit
up aswell asaft. By doing so, it applies adownward force on the clew of the sail, aswell
asholding it aft. This downward force doesexactly the samething asavang does,without
the vang’svery high unwanted loads.
2. Snotter tension alsocontrols the fullness or flatness of the sail.In light airsrelaxing
the snotter and the halyard abit increasesthe camber and thus wilI increase.thedrive from
the sail. As the breezefreshens, tighten the halyard up, andtake apull on the snotter.
Pushing the clew down tightens the leech. This pulls the mast aft, which flattens the
sail...just the thing for stronger breezes. In fact the tightened leechhassomewhat the
same effect asfull length battens. A DOVEIUE sail canbe featheredup to windward
almost entirely leg, with just theleastlittle bit drawing, without flogging. Experiment,
try things. We’re still finding ways to getmore from DOVEKIE’s rig. Undoubtedly you’ll
find things about yours that you canthen teach us.
1. The main
halyard is the line that hoists the sail up the mast, asit is on every other
boat. 2. The only thing necessaryto know about the halyard is that no matter how tightly
you setit up, the mast will bend, and the halyard and therefore the IufT of the sail will relax
abit. Because of this, the scallops thatform between the sail slidescannot beremoved.
3. In very light airsyou may find some benefit in slacking the halyard slightly. This
relaxes the sailcloth atthe luff to permit adeepercamber, which will improve performance.
D. FORESTAY: \
1.
This is the dacron line that goesover a block atthe stem and is usedto hold the
mast up.
2. The
forestay should be tight. It need not be astight asayoung gorilla, (heaving
with all his strength), can setit up. Tension appearsto have no effect on performance. Ifit
is slack, the annoyance of the thump of the mast flopping from sideto side when you tack
is the principal reasonto retension it. Of course, at some point astension is reduced, it’ll get
soslack the mast
w?ll
fall over the side.
Don’t let it get that slack!
E. LEEBOARDS:
1.
Unlike ahnost all other leeboardboats, DOVEIUE’s boardswork just aswell on
the weather side ason the lee side. They neednot beraised when you tack. When short
tacking, you may leave both down. When on a coursethat requireslong and short tacks,
you may sail the entire coursewith just the board that is on the lee sidefor the long track.

Page9
2. The leeboards can contribute appreciably to DOVEKIE’s stability. The leeboard
when lowered to thevertical position, immerses asubstantialvolume under water. This
volume has asubstantial buoyant force pushing up on the leeward side. At the sametime,
if you raise the weather board, its weight, (plus any water that hasleakedor beenallowed
to flow in through purposely drilled vent holes...seebelow), on the weather side of the boat
couldn’t be better located to reduce heel. As water leaksinto or out of the boards, this
windward heeling effect will decrease. From the standpoint of easeof raising andlowering
the boards, they should be kept free of water. The practicality is that it isvery diflicult to
build, and more diflicult to maintain leak fi-eeleeboards. So vent and flooding holes make
alot of sense,but frankly, we’re undecided asthe whether the pros outweigh the cons. To
make sureyou realize the obvious, if you sail with the leeboard up, andthe weather board
down (asI suggestedfor the short legsof along/short tack course),there is aheeling force
that works to increasethe angleof heel, sobeware!
3. Beware also of getting thefully lowered leeboard stuck in amuddy .orsandy
bottom. This could prevent the boat from heeling further, aswell asfrom going ahead.
Movement in either of thesedirections dissipatesenergy. If the boat is thus restrained, the
energyfrom apuff of wind that you normally canhandle with easemay causemore of a
problem than you’d expect. If you’re going to be sailing in thin water, particularly with a
sticky bottom, rake the leeboardsaft sothey’ll come up of their own accord rather than get
stuck in the bottom. In really shallow water, simply releasingthe locking cams works well,
asthe leeboardsfloat about 30 degreessubmerged, and will easilyride up over underwater
obstacles(Seeparagraph2a under Bow Centerboard section.) Use the bow centerboard to
help correct any trim problems.
4. The cam mechanisms atthe pivot points, that lock the boardsup, down, or at any
intermediate angle, must be adjustedto give optimum locking pressure. Optimum pressure
is the minimum neededto hold the boardsin place, so they will releaseeasily when you hit
something. Adjustment is done by screwing in the two nuts in the centerof thehub (with a
l/2” socket or nut driver). Tighten the two nuts evenly so theload on the two studsis
equal. (For older boatswithout this adjusting feature, we find that adding astainlesssteel
radiator hose clamp around the cam is agood method of tightening the leeboardswhen the
bronze pivot shows signs of wear.) This mechanism will benefit from being greased.
Automotive wheel bearing greaseis best. The one placeyou should not greaseis where
the perimeter of the leeboard touches thehull. Friction hereis tihat holds the boardsin
position.
F. BOW CENTERBOARD:
1. The original reasonfor adding the bow centerboard was to eliminate leehelm
when reefed. Lee helm exists when the bow wants to fd off (headdownwind) when you
let go of the tiller. It exists when you haveto push the tiller to leeward to hold the boat on
course. Lee helm is aninsidious robber of boat speedandis frequently accompanied by
excessiveleeway. Together they cheatyou by not letting theboat achievethe courseyou ’
think you’re steering. There areseveralways to eliminate thesedual menaces. The
centerboard may be the easiest. It certainly is your biggestgun to eliminate them. The
board is not very big, but is so far forward that it is quite effective. Experimenting with it is
the best way to understand its power.

Page 10
2. The centerboard will alsohelp you while going to windward, especially in a strong
breeze and in choppy water. At the bow, DOVEKIE is 30” abovethe water, but only 2”
underwater to hold againstany wind andwaves pushing againstthe topsides and forcing
her off the wind. Constant (and tiring) rudder action is required to counteract theseforces.
However, with the bow centerboard down, theseforces aregreatly reduced. Not only does
this result in an easiersail, but also allows the boat to point higher!
3. The centerboard alsopermits you to sail to windward in very shallow water.
To do so,lower the centerboard all the way. Raise the rudder blade to about 45 degrees.
From there, it’ll raise itself asmuch asneeded. Releasethe cam locks on the leeboards and
raise them all the way andlock them. (A little comer hanging down will add alittle useful
lateral plane.) All of the foregoing can be done without losing way. You should by now
be going upwind quite nicely, making abit of leeway, but getting convincingly to
windward.
4.
There’s alittle trick you’ll needto know to make her tack: asyou put the helm
down to tack, raisethe centerboard smartly. The centerboard could resisther swing
sticiently to stop her from achieving the.new tack. (lfyou leavethe board down shell
probably stop in irons in light air.) As soon asthe sail fills on the new tack, snapthe board
down. The bow, which will have beenskidding sideways, will suddenly feel asthough it’s
found aset of rails. She’ll immediately start tromping off to windward.
5. BE WARE-DD not Io wer the bo w centerboa& when go&g down wind. fits4
it’s oeitier necessm or useful. Second, ifyou gybe or round up quickly in a srtiff
breeze andrmgh seas, there & the chance of tile bow ‘%@pingff over fhe
centerboard kadtig to a possibly mpsiz!
G. RUDDER & TILLER:
1. The rudder is most effective with the blade in the fully down position. This puts it
abit aheadof vertical. Thus, ifit touches bottom, it will have to do alittle “pole vault”,
lifting the stern asit swings aft. This is normally not dangerousor harmfi& but will scare
you! You can avoid it by swinging the blade a little bit aft of vertical when you come into
shallow water. You’ll find an increasing difl?erencein steering asyou swing the blade alt.
It is both more acult, and lesseffective the farther aft you swing it. Thus, sail with the
rudder blade swung aft only when in very shoalwater.
2. On boatsprior to #145 you may find it necessaryto &as, therudder blade to
enableyou to raiseand lower it easily with the lanyards. We thought thelubricity of the
water and any slime that accumulated would be enough. Apparently we were wrong in
most cases. To greasethe blade, remove the l/2” dia. pivot bolt. You should be ableto
spreadthe rudder cheekswith your barehands, or atthe worst, with apair of long, thin,
tapered sticks. Once fi-ee,apply liberal, 4” wide bands of ordinary car greasearound the
large pivot hole, on both sidesof the blade. Reassemble the rudder and blade. Adjust the
tightness of the pivot bolt so the blade will stayup f?om friction alone. You’ll probably
have to adjust the pivot bolt severaltime before you get it just right. Renew the grease
annually. On the newer boats we have added aPVC bushing to the pivot and alower ’
turning block to eliminate the problem. We would he happy to senddetails to any of you.
3. When you tack, experience hasshown usthat you should put the tiller over only
to the comer of the combing. Further only actsasabrake. Put the helm down deliberately
to tack.You have only asmall amount of momentum to getyou about.
Dun ‘t squander it!
Page 11
H. WEIGHT DISTRIBUTION:
We made quite apoint in Section G.1. about
overcoming lee helm. Whereasthe centerboardis your big gun, weight distribution may be
consideredyour army. Lee helm appearsto be directly proportional to the angleof heel. It
is most likely to occur when you sailher flat in light air. Therefore if youll sit to leeward
to heel her, you should be ableto achieveabalanced or evena weather helm. Experiment
with this. Fore and aft weight distribution appearsto havelittle effect on trim or speed. .
S. REEFING .
.
Reefing is not sissy! It’s a sign of good seamanship. Overpowering aboat with too much
sailputs excessstresseson gear,is much more tiring, can be dangerousin anunballasted
monohull like DOVE=, and usually doesnot drive the boat asfast asshe’dgo with a
reef. DOVEKIE’s slab reefing system isvery easyand quick to use. Ifyou have never
reefed, We strongly recommend you try doing it severaltimes in light air for practice.
(Theseinstructions apply to the new slab orjZ@ reetig system only.)
A. ReefinP is done most easily while at anchor. You
won’t haveto contend with the
boat surging and sailing uncontrollably. Nor will you have to worry about where shegoes
while you reef. So come to anchor. If that’snot convenient, or possible,heaveher to.
She’ll lie quietly, headto wind, slowly easingherself backwards. To heaveto, lower the
bow centerboard, raisethe rudder andleeboards all the way out of the water. Shell lie head
to wind quite nicely while you do thefollowing: (Seesection 12-HEAVING TO.)
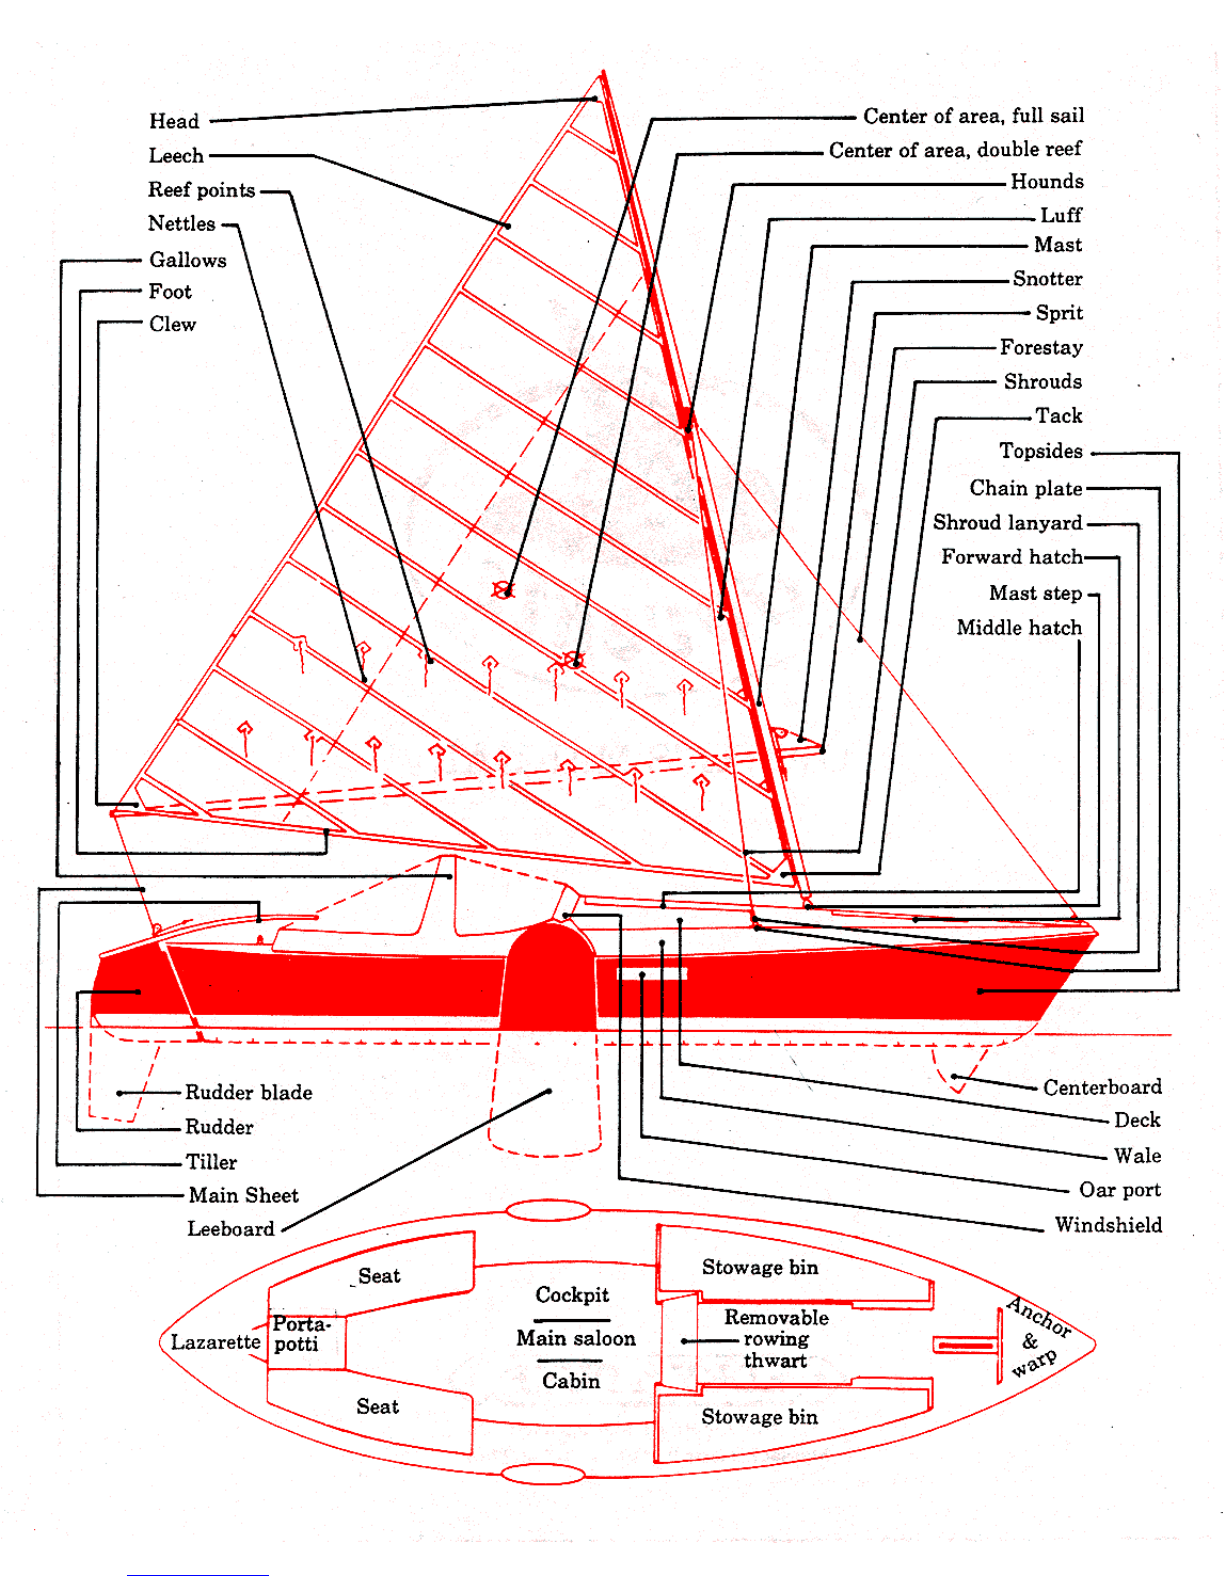
1. Lower the spritz
Stand in the middle hatch opening to starboardof the sail. .’
Reach around under the sail, andhold the sprit with your left hand. With your right,
releasethe snot&r. Pull the sprit forward and unshackle clew. (On wood sprits, rotate the
sprit to unhook the clew.) Hook the sprit in its chock an the deck forward andrest it in its
saddleon the gallows. Uncleat andadjust the clew outhaul line sothe clew shacklewill be
about 10” in from the end of the sprit for the 1streef, 20” in for the secondreef (Wood
spritshave reefing clew hooks fixed in thesepositions.)
2. Lower
the sail:
Uncleat the halyard (cleat at the port side of the baseof the
mast). Lower the sail until you canhook the tack cringle, (the ring in theluff of the sail in
line with the row of reef points) of thereef you want to use,,to one of the hooks at the base
of the mast. Hoist the sail to its reefedheight, pull the halyard astight aspossible, and
cleat it. Coil and stow the halyard on the mast, or drop it through the forward hatch into
one of the stowage bins.
3.
Re-rig sprit
Snapthe clew shackleinto the reef clew cringle for the reef you
want. (Wood sprits, put clew cringle on 1stor 2nd hook.) Setup hard on the snotter and
cleatit. You can getthe boat under way now if necessary,even though thefoot of the sail
is not furled.
4. To furl the_foot of the sail:
Fold the tack and clew comers of the sail in along the
reef line. Roll the excesssail into anice tight sausageasbestyou canunder the
conditions. Secureit by tying the nettles under the sausage. Do not tie the sausageto the
sprit. 5. Ifyou want to tie asecond, deeperreef into the sail, do Steps I-3, then step4,
tying the secondreef over the first.
6. When you put the boat away, shakeout the reef, hoist the sail to its full height,
and furl. Do not attempt to furla reefedsall with the crank.
Page 12
6. PUTTING HER TO BED:
A. Anchor. beach. or POalongside a float, wharf. etc.,*so that DOVEIUE is
HEADED INTO THE WIND. This is IMPORTANT. You’ll have difIiculty controlling
the mast asit comes down if you haveto compete with the wind.
J3
.
Lower the sprit: Stand in the middle hatch opening, to starboard of the sail.
Reach around under the sail, and hold the sprit with your left hand. Pull the sprit forward
andunshackle the clew. (Wood sprits, rotate the sprit to unhook the clew.) Hook the sprit
in its chock on the deck forward. Lay it into to its saddleon thegallows and tie it.
C. Furl the sail: while still in the middle hatch, pull the foot of the sail in until you
canreach the clew cringle. Hook the furling crank into it. Pull down on the handle of the
crank to pull the leech of the sail tight. Crank! (You will probably find the “pulling and
cranking’ action is easierdone while on your knees.) The sailwill be rolled.up on itself.
You’ll not be able to do the last couple of turns becausethe deck will interfere. Unhook
the crank and do them by hand. Pull the bottom loop of shock cord around the sail and
hook it to hold the sail furled. Ifit’s blowing very hard, furling this way may prove
impossible to do. In this case,lower the sail into the middle hatch opening. When the
breeze abates,hoist the sail and either furl it or sail with it.
D. Lower the Mast: This is the trickiest part of this whole evolution of setting and
striking sail on aDOVEKIE. The problem is that assoon asyou startto lower the mast,
the shroudsgo slack. Thus you must both easethe mast down, and control it sideways at
the same time. The latter we find most difhcult of all the things to do on the DOVEKIE.
We recommend the following procedure:
1. Have your passengers/crew stand or sit aft of the gallows or sit on the bottom
of the boat. Tell people that arenew to the boat what you areabout to do. Give the same
sort of preliminary and execution commands asyou would for tacking or gybing. DON’T
SURPRISE ANYONE.
2. Stand in the middle hatch opening. Hold the mast ashigh asis comfortable
with your left hand. With your right, uncleat the forestay, but keepthe lasthalf turn
hooked under the cleat. DO NOT RELEASE TENSION ON IT. If the boat is swinging,
or if the wind is puffy, wait for the boat to head directly into it,‘for alull, or for both.
Then, easethe for-stayout under the cleat. Control the lowering with the forestay in your
right hand. Resist sideways motion with your left hand. As the mast getslower, forestay
tension will become increasingly ineffective in controlling the descent,but your left hand
will become increasingly more effective in assisting. But by that time you can catch the
mast, cushioned by the furled sail, on your shoulder. (You canhave one of your crew act
asa catcher for thelast few inches, if you wish.) Squat down until the mast is laying on the
gallows. IMPORTm: No matter how &i~ and sfronlp YOUare. do not frv to rower
the mast bv grabbing if as binb as Dossible with bofb bands. and lowerizjg if
You would be holdhg if subsfan tiSfy below it3 center of graviity, and &dkect(v!
you let f&e base tie as liffle as 1’; if will d&engage fiiDm fhe masf step and, being
fop-heavy, will crash unconfro1Iably fo tie deck! Ifb just a caution f&at brute force
and awkwardness wiU very IikeIy get you jia frouble.
Page 13
E. Stow the Mast: Once the mast is down, hook the remaining loops of shock cord
around the sail. Unhook the mast from the step. Lift andslide it forward to engageit in its
chock forward on the deck. Keep the forestay from becoming twisted around the mast.
Lay the mast to its saddleon the gallows andtie it.
F. Haul the forestay taut and cleat it. Haul the snotter tight and cleat it. This
securesthe mast and sprit for towing. Stow the extra line asbest aspossible. (The sail
cover option is particularly handy here.)
G. Raise the bow centerboard. leeboards. and rudder blade.
1. Rather than cleating the rudder lift lanyard on the belaying pin on the tiller, I
suggestyou tie aslip knot in the lanyard to stopit from passingthrough the turning block
on the tiller. Then atug is all that’sneededto releaseit.
2. Place the pin in hole in the bow centerboard to hold it in the UP position.
a If you aregoing to leave the boat for more than a day or two, we recommend
you
put on the rigid hatch covers. They will withstand long-term exposuremuch better than
the coated fabric covers. They alsoshedrain better. The fabric covers will puddle, and
haveto belifted from below to empty them.
L We recommend you leavethe oarports open for ventilation unlessyou aregoing to
trailer it any distance. You should then closethem to keep dirt from blowing‘in.
7. ROWING AND SCULLING:
A. ROWING:
1. Put the rowing thwart in place.
2. To get the oars out:
a. Open the oar port covers.
b. Releasean oar from its stowage shock cords. Passthe blade of the oar through
the oar port opening. Repeat for the oar on the opposite side.
c. Sitting in the rowing position on the rowing thwart, push one of the oars out
about half way. Lift the oarlock horn up around oar anddrop into oarlock socket. Repeat
for the oar on the other side. (On boatswith stainlesssteeloarport frames, push the oar out
asabove, and to the forward end of the frame. Rotate the thole pin up to the vertical
position on the aft side of the oar and slide it aft to lock up.)
3. Rowing tips:
JZ.Some people will prefer something againstwhich to bracetheir feet. Then there
areother people who hate the things! So we don’t install afoot brace. The bestfootbrace
I’ve seenwas astrip of the anti-skid, self-adhesive tapethat 3M offers for industrial
applications.
6.
If you must row in competition with abreeze, lower aleeboard slightly andhave
someone steerwith the rudder, if possible. You’ll find going downwind will be the most
difficult asthe boat will try valiantly to weathercock. A leeboard will make coping with
such much easier.
c When propelling aheavy boat, the bestrowing technique is to use short, rapid
strokes, rather than the long graceful strokesyou’d usein alight pulling boat. This is
especially true if there is any
wind. We can’tjustify this to you, but we know
it’s the case.
Try it. If you’re more comfortable with the long graceful strokes,so beit.

Page 14
4.
To get the oars in:
3. With one hand hold both oars
by
their handlesin front of you. Hold them so
they arepointed straight athwarship. Pressdown on the handles sothe blades areout of the
water. With the other hand, lift one oar slightly atthe oarport andflip down the oarlock
horn. Repeat for the other oar. (For older boatsthat havemoveable thole pins. Hold the
oars asabove andfold the pins down.) Swing the oarsbehind you into the bow of the boat.
It’s okay to leave the bladessticking out through the ports.
b. Swing
around on the rowing thwart soyou arestraddling it, facing to one side.
Remove the oar in front of you from the oar port. Slide its handle behind the diagonal
spanof shock cord near the bow of theboat. Hook its blade under the loop of shock cord
under the deck in front of your.
c. Turn around and stow the other oar.
d. IMPORTANT: If you aregoing to sail, closeTHE OAR PORT,COVERS.
Failure to remember to do so could let copious quantities of water in. It could very well
spoil your day!
B. SCULLING
is avery old form of propulsion, It is rarely taught and few boats are
properly equipped for it. It is relatively simple to do, yet is a skill that will require a bit of
practice before it can be usedwith facility. Here’s how we suggestyou do it on
DOVEKIE:
1. Rake the
rudder blade all the way. This getsit out of the way. If the sprit is
stowed on its chock, snugdown themain sheetand cleatit to the pin on the tiller.
2. Put the bronze row lock in the socket on the quarterdeck.
3. Remove one of the oarsfrom its stowage under the deck. Put it in the sculling lock
with about 60-70% of its length aft of the lock. Put the blade in the water parallel to the
surface (soit would appearto act asabrake rather than asan auxiliary rudder blade). You
should be ableto move the blade from side to sidewith minimum resistancewith it
oriented thus.
4. To make the blade produce forward thrust, twist the oar slightly atthe end of each
sidewards swing. Hold it twisted asyou swing it back the other way. At the end of this
swing, twist it the opposite way, andhold it for the reverseswing. Tlezz are fwo ways to
twist
it2 One way ml.. cause fhe oar to press down against scuJIjnp lock when YOU
swing tie oarsidewavs...th& b theproper twistI
Twisting it the other way will causeit
to try to lift out of the lock. In effect what you’re doing is making apropeller blade from
the oar blade. Since you can’t continue the oar’sswing through 360 and still hold the
blade in the water you have to operateasthough you aretwo propellers, one right-handed,
the other left-handed. When you reversethe way you twist the oar atthe end of each
stroke, it is asthough you were changing propellers. There is quite aknack learning to do
this, so takeheart if you can’t master it at the first try. You’ll find that the amount of twist
bears on how much power you areableto impart to eachstroke. There aremany nuances
you’ll have to learn: the location of the sculling lock along thelength of the oar shaft, the
anglethe oar entersthe water, the amount you twist the handle (which determines the pitch
of the blade), the amount you swing, the frequency of swing, how to steerby swinging
more to one sidethan the other or by varying the pitch from one swing to the other, etc.
Sculling is avery useful skill. We recommend you try it first under flat Calm conditions,
where no one is around to distract you. Put one of theleeboards down. Also, try sculling
with the bow centerboard up and down. (We can seeno advantageeither way.)
Page 15
5. Sculling can beusedto go in reversealso. Onceyou havefigured out how
sculling works, you cantry it to go backwards. Since the thrust will lift the oar out of the
sculling lock, it can’tbe used. Stand facing aft on the sternseat. Hold the handle in one
hand, hold the shaft 4-5’ toward the blade with your other hand. The “other” hand
becomesyour sculling lock. Now swing the blade back andforth through thewater, with
the samekind of twist at the end of eachstroke. The twist should be opposite to the twist
you usefor forward thrust, of course. You may find this to be abetter way to learn sculling
than using the sculling lock, asyou canreally feel what’s happening. Try it!
C. MISCELLANEOUS:
1. Leave the handlesof your oarsbare. Painted or varnished handlesaregreatblister
makers.
2. You may want to addleathersto protect your oarsfi-om abuseby the oarhorns
and sculling lock. We recommend they be sewn on rather than tacked, particularly on ash
or maple oars. There areother protective methods on the market aswell. Your local
marine store can supply that need.
8. ANCHORS AND ANCHORING:
A. DOVEKlE’s main anchor is one of the new Bruce patent anchors,invented in
Scotland, for use,in enormous sizes, in the North Seaoil fields. Smaller sizes arenow
available for use on boats. The size we’ve chosenis 5kg (11 pound). That is rated asa
storm anchor for aboat of DOVEKIE’s size, yet is small enoughto behandled easily. It
hasseveralothervirtues. The most important is that it will hold with avery short scope. If
you initially put down 4:l scope,you canfrequently shortenthat to aslittle as2:l after it
has setitself. It is in onepiece. There areno moving parts to wear. As with all anchors, it
is adifiicult shapeto stow, but it is the most compact of all anchors, so stows more easily
than most. Three feet of hot dip galvanized proof coil chain aresupplied to go between the
anchor and the warp.
& The warp is 100feet of 3/8” nylon. A small hawsepipe is incorporated in the stem
iron. When we setup the boat, the bitter end of the warp is fed through it from the
outside. A figure-eight knot tied in the end is simple but effective insurance againstlosing
it. The warp is then hauled in andstowed in abin aheadof the centerboard. The anchor
and chain areshackled on the outboard end. They aretakenin through the forward hatch,
andstowed on the little bulkhead that forms the warp stowagebin. (In older boats, it would
beplaced in the areaforward of the combination bow seat/bulkhead.)On boatswith hard
hatch covers, thereis alip in the forward hatch cover to accommodate the warp where it
comes aboard.
C
.
TO SET h3E ANCHOR, go forward through the cabin (never go on deck!).
Stand in the forward hatch, pick the anchor and chain up. Lower them over the side.
Take careto seethat the chain doesn’tfoul the anchor when they hit the bottom. Let the’
warp stream out the hawse pipe until the proper amount of scopehasgone, then tie a slip
knot in the warp inside the boat. It will fetch up againstthe inside of the hawse pipe and
hold the warp. That’s all that needbe done. The anchorwill setitself. You neednot drag
the anchor back and forth with the engine or oarsto setit.

Page 16
D. If you areanchoring on arocky bottom, or where snagsor rubbish may bepresent,
prudence suggeststhat you useatripping line. This is asmall line that shacklesto the
opposite end of the anchor from the chain (with a3/16” galvamzed shackle). Then ifthe
anchor hangsup on something, it can almost always be releasedandretrieved by pulling on
the tripping line.
E. TO RAISE
THE
ANCHOR,
standin the forward hatch. Reach down under the
port bow, and pull the warp in. Let it trail astern. Ifit blew hard during the night, and the
bottom is soft, the Bruce will beburied. A steadyvertical pull on the warp, or atripping
line, if you rigged one, should break it loose Once off the bottom, haul the anchor smartly
to the surface. Swish it around to get rid of any muck. Then lift the anchor and chain
aboard through the hatch, and stow them. Now pull in the warp that’s been trailing astern
through the hawspipe.
F. If vou anchor in. an unusual Dlace,
particularly one that might be usedby another
boat in the middle of the night, we strongly recommend you show ananchor light. The
one shown on our price list is quite effective when hung on the aft end of the sprit when it
is stowed in its deck chock and on the gallows.
9. SAFETY:
A. BE SURE THE OAR PORT COVERS ARE CLOSED BEFORE YOU
SAIL!
B. KEEP AN EYE ON TI3E WEATHER.
DOVEKIE is avery stable, seaworthy
boat. In fact, sheis ultimately seaworthy asshewill not sink if filled with water (unless
you’re smuggling gold in her). But that’snot the sort of thing you should test while
cruising. So, be constantly aware of what’s happening to the weather aharound you,
particularly to windward. Listen to NOAA or other weather forecasts. Don’t be afraid to
stay at anchor if conditions are, or seemlikely to become, nasty. That’s the sign of agood
seaman,not asissy.
C. Unless vou are absolutely SURE of the stability of the breeze,
DO NOT
CLEAT THE MAIN SHEET. Instead, soyou can sail one handed, you can take aturn
around the top half of the belaying pin on the tiller, then aturn around the lower half of the
pin, andforward where you hold it with the samehand that’s holding the tiller. Thesemust
be turns, not hitches, sowhen you let go of the sheet,it will run freely and unimpeded.
D. NEVER GO ON DECK. While
DOVEKIE’s deck is strong enough to support
you, prudence dictates otherwise.
E. If vou suddenlv find vourself in wind too stronp to’furl the sail, you can
lower
it into the middle hatch opening.

Page 17
F. When sailitw a DOVEKIE in a &row breeze aud rowh seas,the biggest danger
is fi-om an accidental gybe. As well asficominattention, it canbe causedif you surgedown
the face of a wave andbury the bow in the next wave. Your momentum which must be
conserved can only be doneby slewing the stern oneway or the other. To prevent slewing
the wrong way and causingan accidentalgybe, do not headdirectly downwind. Then
you’ll belesslikely to bury the bow, andif you do, she’ll slew safely up into the wind. We
recommend you have both fore-and middle hatch covers on under such conditions. Nsu,
when sailing down wild hi my condition, he sure to r&e the bow centerboard! This
p-even& the possibib@ of the bow “trij@ng over it while gybing or rounding up.
G. DOVEKIE is incrediblv towh. We believe sheisvirtually indestructible. So you
can afford to be abit relaxed about piloting “Sail until the leeboardhits, then tack,” is a
reasonablephilosophy.
10. COOKING. STOWAGE. AND DOMESTIC ARTS:
The following arebasedon some of our personal preferences,observations, andgeneral
scuttlebutt that has come our way over the years.Everybody’s cruising habits and
requirements aredifferent. Therefore you should not consider theideasin this section as
gospel, but rather asstarting points for you to deviseyour own methods.
A. KEEPING DRY:
1. As you live, sit, and sleepdirectly on the bilge, you’ll want to keepit dry! The best
way to avoid the water that will find its way aboardin small, but potentially annoying
quantities, is the polyethylene floormat offered asan option. With or without the floor-mat,
however, water can bea problem. This is especially ifyou haveto sailin the rain, or forget
to closethe oar ports. Therefore, you should always have aboard:
a.
A large sponge. We strongly recommend you selecta cellulose sponge,such as
made by DuPont. The more readily availablepolyester spongesabsorbmore water, but
you can’t pick them up without losing most of it before you cangetthe spongeoverside to
squeezeit.
b.
A gallon-size plastic bottle, for useasabailer. We recommend you choose a
round bottle, with aplastic cap. Cut the bottom off with asharpknife. We recommend
againstcutting on anangleto make it look like agrain scoop. Itwill hold lesswater than if
you cut aslittle off the bottom aspossible. Appropriately, Clorox makes among the best
bailer bottles.
2. If you are cruising on salt water, do everything you canto keepit out of the living
spaces.Salt residuewill absorbprodigious amounts of moisture out of the air. Thus
everything that getssalt on it will get damp from dew, fog, high humidity, evenyour
breathing. The only cureis to wash or flush the saltaway with fi-eshwater. This sounds
like atrivial problem. If you think so, then disregardthe exhortation. I just hope you don’t
ruin awhole cruise learning its importance.
B. COOKING. CULINARY GEAR, FOOD STOWAGE. ETC.. ETC.
1. Cooking: Keep it simple! Planning before you leavehome, pays off. Starting
severaldaysbefore we leave, we make lists of breakfasts,lunches, and suppersneededto
cover the maximum time we’ll be gone.

Page 18
We like the freedom of cruising without ice. So cannedor dried food, with herbs to addto
the pot, plus some long-keeping veggies and fruits to augment the canned stuff (and offset
it with atouch of healthfulness!) comprise our galley stores. Ice cream is amajor treat we
try hard to find whenever we go ashore. In fact it’s the principle reasonfor us to go
ashore.
2. Culinary Gear: There aremany camp stoveson the market that would work in
DOVEKE, but we find that the newer, square,butane types areeasiestto use. They are
economical, compact, have built-in spark lighters and areconsiderably faster than alcohol
types. A variety of compact, nesting type pots and pans areavailable in camping equipment
stores.All our cutlery (4ea. knives, forks, spoons) and cooking utensils arestored in a
fabric “housewife”, aflat piece of fabric with pockets for eachutensil, that rolls up for
stowing, opens out flat for use. We usethe rowing thwart asacutting board/counter.
Whilst conducting our culinary endeavorin the “galley”, We 6nd the buoyant cushion or
two raisesus off the sole enough to sit con&ortably.
3. Food stowage: We group food in categories: 1. breakfasts, 2. suppers (usually
prepared and eatenat anchor), 3. lunches and snacks(underway afloat or ashore), 4.
dishesand wash-up supplies. Thesenumbers refer to large, rectangular plastic fish fillet
boxes with plastic lids found at abargain atthe local fish market.. We stow boxes 1 & 2
on the bottom, with 3 & 4 on top of them, at the aft end of the stowage bins. Small cans
of juice tuck in outboard of the boxes sothey stayrelatively cool, their weight low, and
they keep the boxes from shifting. Fresh fruit and veggies often Fordtheir way into the top
of a clothing duffel or towel, to keep from being bruised.
C. SLEEPING: We’ve seen,and used, ahmanner of boat cushions. Probably the
handiest we’ve found that work well on DOVEKIE are Thermarest self inflating air
mattressesmade by CascadeDesign, near Seattle, WA, and areavailable in camping
supply stores. They roll easilyinto tight sausagesand stow:
1. Standing upright in the narrow forward end of the stowage bins, or
2. We have rigged shock cord to hold them up under the deck, outboard of the oars,
againstthe side of the hull on our own boat.
D. KEEPING HER TIDY: Our practice of stowing 9&$ of our gearin the bins.
Advantages are:
1. We know better where everything is.
2. We don‘t trip and slide on unstowed gear.
3. Things stay clean and dry much longer.
4. Stowed gearis lessprone to theft.
5. The visually organized atmosphere is easieron our psyches.
11. MAINTENANCE AND MODIFICATIONS: .
A. Minimum maintenance was probably one of the reasonsyou bought your 3
DOVEKIE. The following tells you about the little bit there is to do to keep her in first
classorder.
Table of contents
Popular Boat manuals by other brands

Ocean Kayak
Ocean Kayak Trident 11 owner's manual

Scout Boats
Scout Boats 530 LXF owner's manual

Palfinger
Palfinger RSQ 450 Series Operation and maintenance manual

Aquaglide
Aquaglide BACKWOODS EXPEDITION 85 owner's manual

Dufour Yachts
Dufour Yachts 350 Grand Large 2015 owner's manual

Highfield
Highfield Reef Series owner's manual


