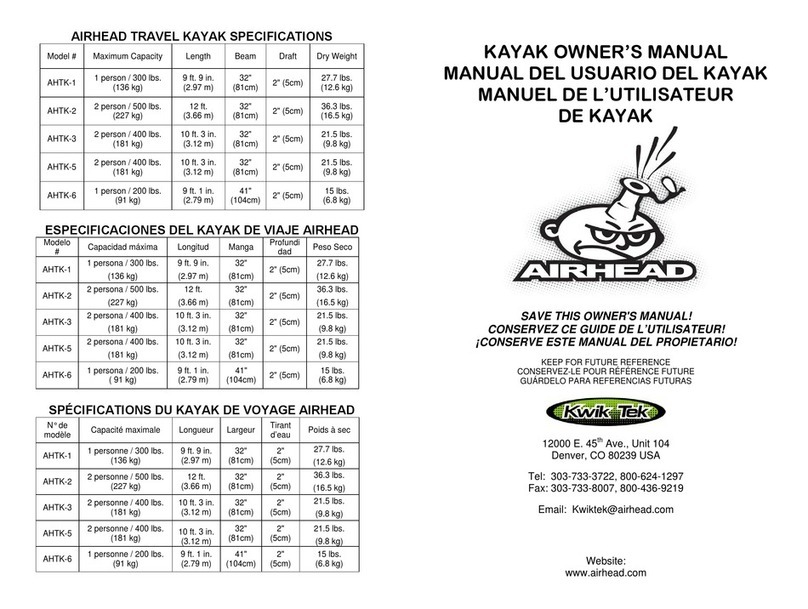
INTRODUCTION
Now that you are the proud owner of an AIRHEAD Inflatable Kayak, there are a
few things you should know about your responsibilities, safe usage, storage, and
maintenance. This will help you to properly enjoy your kayak for years to come.
WARNINGS
•IT IS THE OWNER’S RESPONSIBILITY TO CAREFULLY READ THE
MANUAL AND INSTRUCT ALL USERS HOW TO SAFELY OPERATE
THIS KAYAK.
•NEVER GO OUT ALONE. USE COMMON SENSE &
GOOD JUDGEMENT.
•NOT A LIFE SAVING DEVICE. ALWAYS USE COAST GUARD
APPROVED LIFE VESTS.
•DO NOT OVER-INFLATE ABOVE 2 psi. DEFLATE TO ALLOW FOR
EXPANSION IF LEFT IN DIRECT SUNLIGHT.
•ALWAYS CHECK WATER AND WEATHER CONDITIONS WITH
AUTHORITIES.
•OBSERVE ALL LOCAL AND FEDERAL LAWS.
•WEAR A HELMET & BE CAREFUL AROUND REEFS & RAPIDS.
•DO NOT PULL BEHIND A BOAT OR OTHER MOTORIZED VEHICLE.
•BEWARE OF WINDS, TIDES AND CURRENTS. DO NOT
UNDERESTIMATE THE FORCES OF NATURE.
•BEWARE OF ROCKS OR OTHER SHARP OBJECTS THAT COULD
DAMAGE KAYAK.
•DO NOT OVERESTIMATE YOUR STRENGTH, SKILL
OR ENDURANCE.
•DO NOT USE ALCOHOL OR DRUGS PRIOR TO & WHEN USING
THE KAYAK.
•DO NOT SQUEEZE FEET UNDER THE FOOT BRACE.
•DO NOT LEAVE THE KAYAK WITH ITS BLACK UNDERSIDE
EXPOSED TO DIRECT SUNLIGHT. INCREASED AIR PRESSURE
WILL CAUSE DAMAGE.
•DO NOT PADDLE IN HIGH WATER OR FLOOD CONDITIONS.
•CHECK EQUIPMENT PRIOR TO EACH USE. DO NOT USE IF YOU
NOTICE SIGNS OF WEAR OR FAILURE.
•THIS IS AN ACTION SPORT, THE POSSIBILITY OF INJURY OR
DEATH EXISTS.
REGISTRATION NUMBERS
Many localities require registration and to display a registration number on the
boat. Once you have been issued a number, it is best to affix it to the boat by
printing it directly on the material by the use of a permanent ink marker. A small
square registration sticker may also be issued. If so, this may be affixed to your
boat by placing the sticker on a mall board and securing to the kayak. Self
adhesive letters and numbers will not adhere directly to the kayak.
ASSEMBLY & INFLATION
AHTK-1 & 2 Nylon Covered Boats
1. Unfold your new kayak in an area that is free of sharp objects
and debris.
2. There are 3 air chambers, each with a Boston Valve. Lift the nylon flaps
to access. Make sure that the bases of the valves are screwed in tight.
3. Inflate the floor first, then the side chambers using a high volume / low
pressure pump meant for inflatables. Do not inflate above 2 psi. Use of
an air compressor may damage your product and void the warranties.
4. There are PVC bladders inside the nylon covers on both sides.
Occasionally, the bladders may shift, causing the kayak’s shape to
deform. To correct, deflate the bladders to about 30% full, and unzip
the zippers at both ends. Shift the bladder inside so that the seam is in
line with the zippers. Zip back up and re-inflate.
5. Inflate the seats with the stem valves found on the bottom, inside the
zipper. Then adjust seat straps and foot brace to a comfortable position.
AHTK-3, 5 & 6 PVC Boats
1. Unfold your new Kayak in an area that is free of sharp objects
and debris.
2. There are 3 main air chambers. The side chambers are equipped with
a Boston Valve. The center floor chamber is equipped with a Speed
Valve. Inflate in this order: Floor, Side Chambers, Spray Skirts, Seats.
3. Inflate using a high volume / low pressure pump meant for inflatables.
Do not inflate above 2 psi. Use of an air compressor may damage your
boat and void the warranties.
DEFLATION
To deflate a Boston valve, turn counter-clockwise to unscrew from the cup. The
bladder will deflate quickly. To deflate inflatables equipped with a stem valve,
either deflate with a deflating pump, or insert a small straw, or other small object
(no sharp objects) to hold the safety flap open. Remove and roll up towards the
valve to fully deflate. The Speed safety valve has three sections. To deflate a
Safety Speed Valve, pull tab until the first and second section have pulled out of
the third main valve section releasing the air.
STORING
1. To prevent mildew and foul odors, allow your kayak to completely dry
out before storing. Water will enter between the outer nylon cover and
the bladders. Open all zippers to allow it to air out and dry.
2. For long term storage in the sun, protect your boat with a breathable
cover.
3. Rodents chew on fabric including inflatable boat material. Store it away
from rodents.
4. If you choose to store your boat inflated, make sure you do not subject
it to deformations.


