EdgeStar DWP61ES User manual

For more information on other great EdgeStar products on the web, go to http://www.edgestar.com
Dishwasher
Owner’s Manual
DWP61ES

IMPORTANT SAFETY INFORMATION
ding
sion, and/or electric shock, resulting in
ersonal injury, or death.
only for its intended purpose as described in this
wner′s Manual.
ATER HEATER SAFETY PRECAUTION
ydrogen gas is flammable!
allow
ot smoke, use an open flame or use any appliance during this process.
ation in
tative if you are in
doubt whether the appliance is properly grounded.
proper electrical connection poses a risk of electric shock.
f your dishwasher unless it
vice maintenance should be completed by a qualified
appliance
from the power supply before attempting any maintenance.
T er OFF does not disconnect the appliance from
the power supply.
appliances, including any shipping and packaging
materials, properly.
Read all instructions carefully prior to use. For your safety, the information
detailed in this manual should be followed. Improper use and/or handling
can cause serious damage to the appliance and/or to the user inclu
but not limited to fire, explo
p
Use this appliance
O
W
H
Under certain conditions, hydrogen gas may be produced in a water
heater that has not been used for more than two weeks. To prevent the
possibility of damage and/or injury, turn on all hot water faucets and
them to run for several minutes. Do this before using any electrical
appliance connected to the hot water system. This simple procedure will
release any built-up hydrogen gas. Since hydrogen gas is flammable, do
n
PROPER INSTALLATION AND MAINTENANCE
When installing and servicing your dishwasher, refer to the following:
•This dishwasher should be properly installed and placed in a loc
accordance with the Installation Instructions prior to operation.
•Connect the dishwasher to a grounded permanent electrical system.
•Check with a qualified electrician or service represen
Im
•Do not attempt to repair or replace any part o
is specifically recommended in this manual.
•All other ser
technician.
•To minimize the possibility of electric shock, disconnect this
urning the dishwash
•Dispose of discarded

EdgeStar Dishwasher ii
PRECAUTIONS FOR OPERATION
g your dishwasher, follow basic precaution, including the
only for its intended purpose as described in this
ildren.
ed
or dishwashers may
lly.
stic
dishwasher safe, refer to the manufacturer’s
erate your dishwasher unless everything enclosed is securely
-handle, sit, or stand on the door or dish rack of the
ther
apors and liquids in the vicinity of this or any other
mode (if available) may be hot to the
r is connected to a wall switch, ensure tthe switch is
n, staining, and/or other damage to
the START/RESET button. This allows
the control system to reboot.
LEASE SAVE THESE INSTRUCTIONS
When usin
following:
•Use this appliance
Owner’s Manual.
•This appliance is not intended for use by children.
•Do not allow children to play with, on, or inside this or any appliance.
•Close supervision is necessary if this appliance is used near ch
•Use caution when opening or closing the door to avoid injury.
•Use only powder, tabs, liquid detergents, or rinse agents recommend
for use in a dishwasher and keep them out of the reach of children.
•Using a detergent that is not specifically designed f
have an undesired result such as excessive suds.
•To avoid damage to the door seal, place sharp items strategica
•Load sharp knives handle-side up to reduce the risk of injury.
•Do not wash plastic unless it is marked as dishwasher safe. For pla
items not marked as
recommendations.
•Do not op
in place.
•Do not tamper with controls.
•Do not rough
dishwasher.
•Do not discard the dishwasher without removing the door.
•Do not store or use combustible materials such as gasoline or o
flammable v
appliance.
•Contents washed in anti-bacterial
touch. Use care before handling.
•If your dishwashe
ON prior to use.
•Do not wash non-dishware items such as furnace filters, paint brushes,
etc. in your dishwasher. Discoloratio
dishwasher may result.
•If you choose to turn the switch OFF between wash cycles on
dishwashers with electronic controls, allow 5 - 10 seconds after turning
the switch ON before touching
P

iii
Table of Contents
PA
PR
IN
WA
CO
OP
CO
PR
CH
MA
CL
TR
DGESTARLIMITEDWARRANTY................................................................................23
IMPORTANTSAFETYINFORMATION............................................................................I
PRECAUTIONSFOROPERATION..................................................................................II
INTRODUCTION..........................................................................................................1
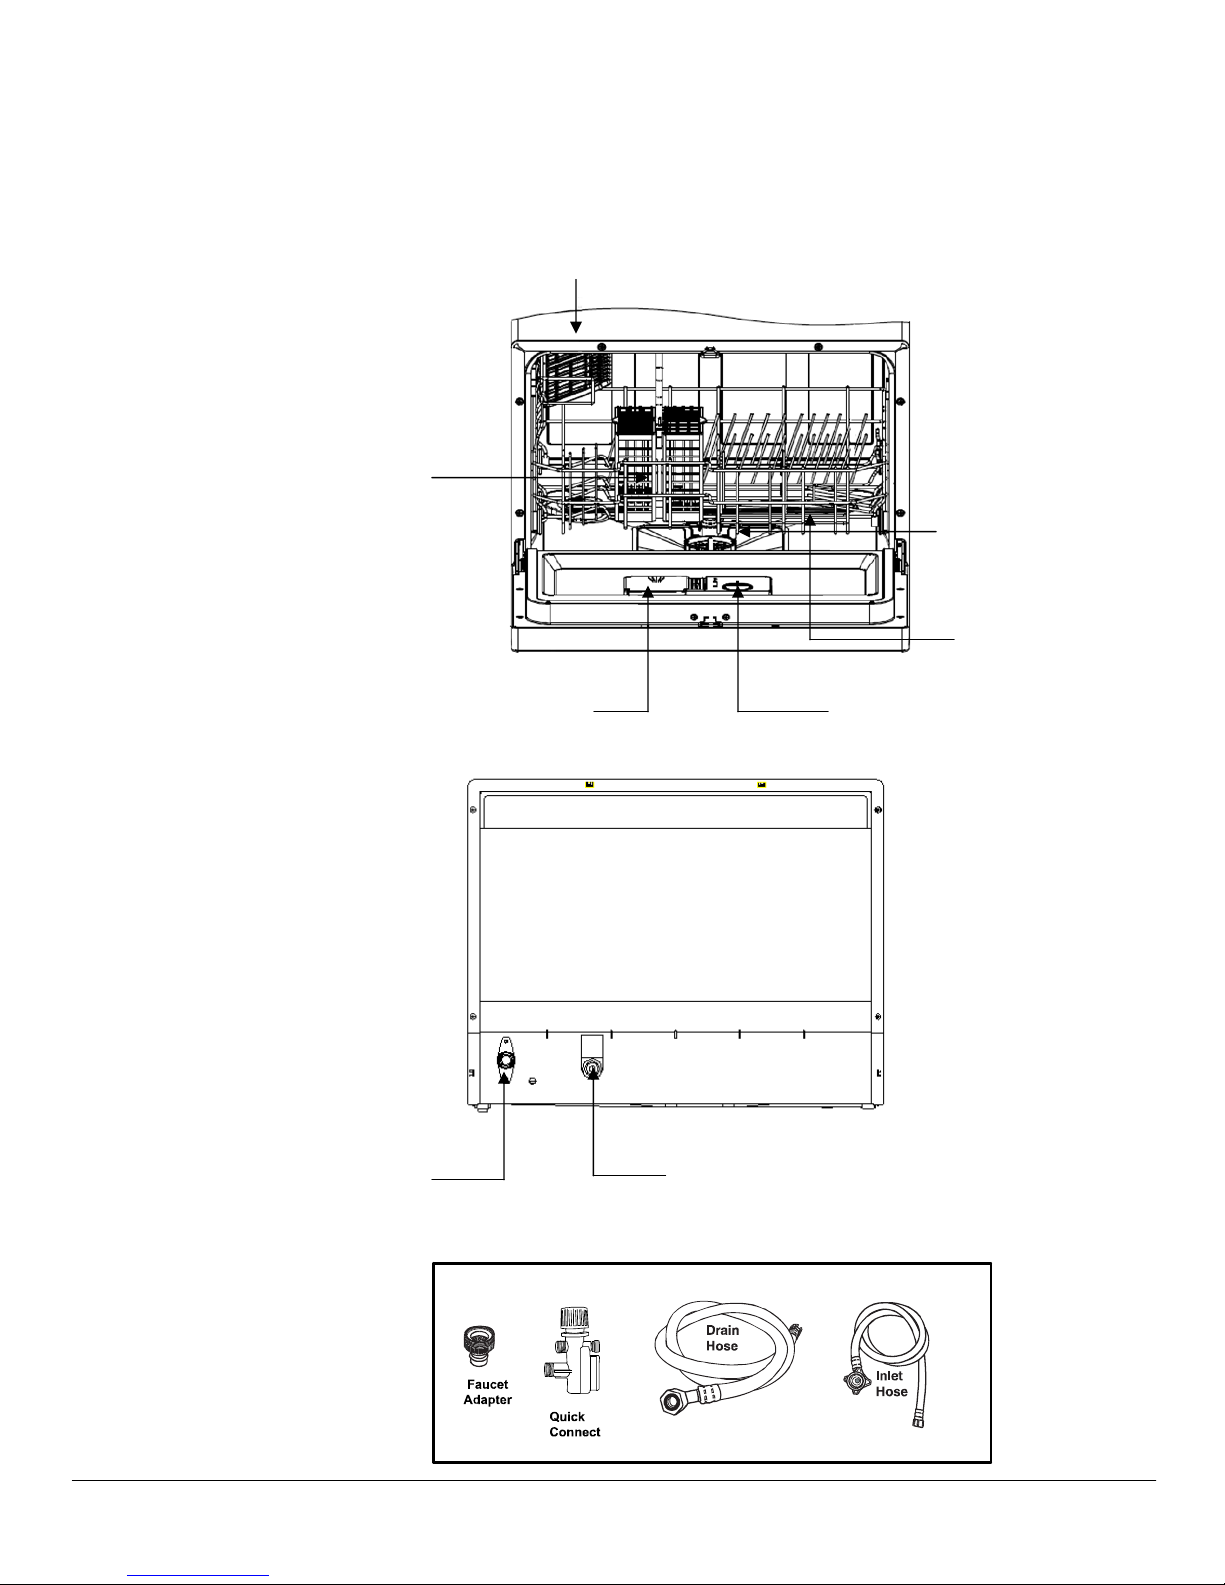
RTSIDENTIFICATION...............................................................................................2
FRONTVIEW......................................................................................................................2
BACKVIEW........................................................................................................................2
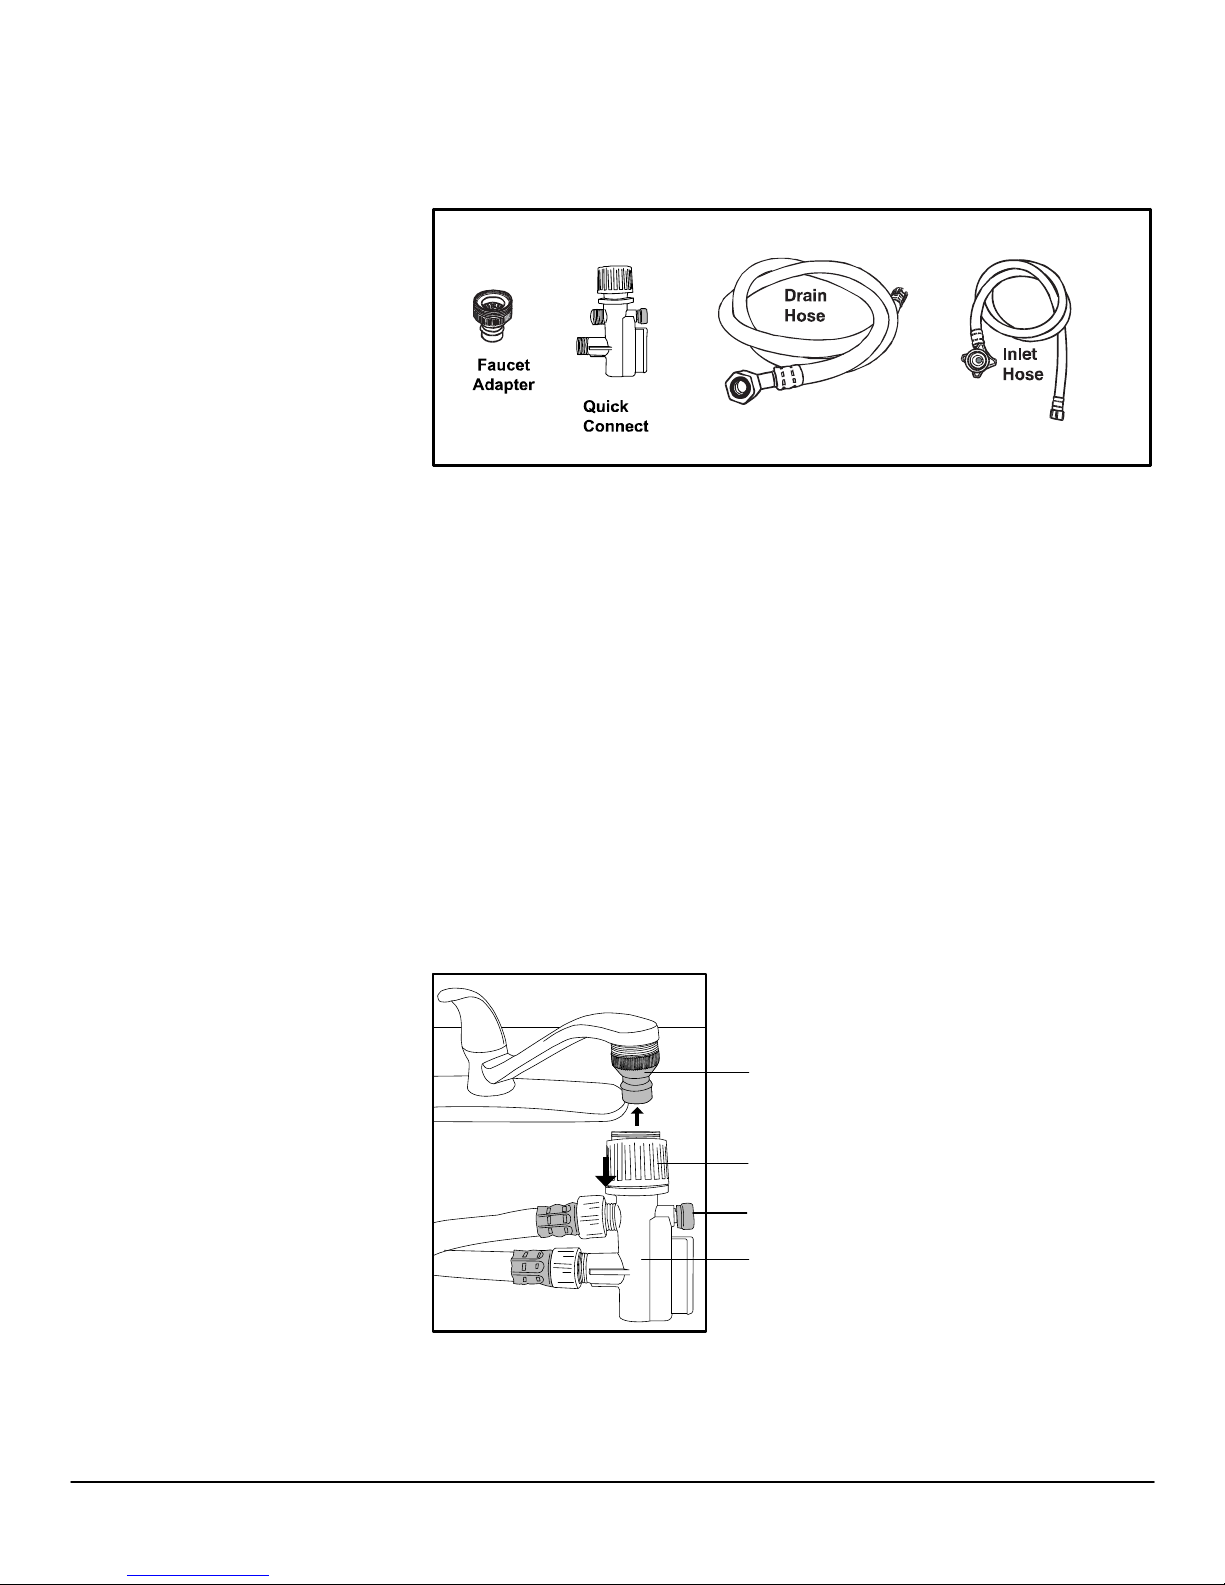
ACCESSORIES.....................................................................................................................2
EPARINGTHEDISHWASHERFORUSE......................................................................4
UNPACKINGTHEDISHWASHER..............................................................................................4
STALLATIONREQUIREMENTS..................................................................................4
CLEARANCEREQUIREMENTS.................................................................................................4
TERREQUIREMENTS.......................................................................................................4
WaterPressure..........................................................................................................4
WaterTemperature..................................................................................................4
ELECTRICALREQUIREMENTS..................................................................................................4
NNECTINGTHEHOSESTOTHEDISHWASHER..........................................................5
DISCONNECTINGYOURDISHWASHER......................................................................................6
ERATINGINSTRUCTIONS........................................................................................8
CHECKLISTBEFOREUSINGYOURDISHWASHER..........................................................................8
NTROLPANELFUNCTIONS................................................................................................8
ErrorCodes................................................................................................................8
WASHCYCLESCHART..........................................................................................................9
OPERLYLOADINGTHEDISHWASHER..................................................................................10
CutleryBasket.........................................................................................................11
ONLYUSEPROPERDETERGENT...........................................................................................11
USEJET‐DRYRINSEAGENT.................................................................................................13
STARTINGTHEWASHCYCLE...............................................................................................14
ANGINGTHECYCLE.......................................................................................................14
ForgettoAddaDish?..............................................................................................15
ATTHEENDOFTHEWASHCYCLE........................................................................................15
INTENANCE.........................................................................................................16
FILTERSYSTEM.................................................................................................................16
EANINGTHEDISHWASHER....................................................................................17
CLEANINGTHEDOOR........................................................................................................17
CLEANINGTHESPRAYARMS...............................................................................................17
PROTECTAGAINSTFREEZING....................................................................................17
GUIDETOKEEPINGTHEDISHWASHERINTOPSHAPE................................................18
OUBLESHOOTING.................................................................................................19
TROUBLESHOOTINGCONTINUED..........................................................................................21
SPECIFICATIONS........................................................................................................22
E

EdgeStar Dishwasher iv

1
Introduction
ou
. We will provide the customer support needed to nurture that
lationship.
al will ensure that your
roduct will work at its peak performance and efficiency.
ginal product packaging in case you need to safely transport
our dis
r
are
our
and is also needed for service under your
warranty.
ate of Purchase:
o better serve you, please do the following before contacting customer service:
ged product, immediately contact the dealer that
sold you the product.
fully to help you install, use
and maintain your portable air conditioner.
is manual as it will help you
diagnose and solve common issues.
5473.
Thank you for purchasing this EdgeStar dishwasher. We are glad you chose us.
We believe that your purchase of this product opens a relationship between y
and EdgeStar
re
This manual contains important information regarding the proper installation, use
and maintenance of your dishwasher. Following this manu
p
Please save the ori
y hwasher.
For Your Records:
Please write down the model number and serial numbe
below for future reference. You can locate your model
number on the tub wall just inside the door. Both numbers
needed to obtain warranty service. You may also want to
staple your receipt to this manual as it is the proof of y
purchase,
Model Number:
erial Number:
S
D
T
•If you received a dama
•Read and follow this instruction manual care
•Read the troubleshooting section of th
•Visit us on the web at http://www.edgestar.com for product guides,
additional troubleshooting resources and up-to-date information. If you
need service, our friendly customer service representatives are available
via em

P
arts Identification
EdgeStar Dishwasher 2
Front View
Back View
Accessories
Filter S
y
stem
Detergent Dispenser
Cu
p
Shelf
Rinse Aid Dispenser
S
p
ra
y
Arm
Drain Port Inlet Port
Cutler
y
Basket

3

Preparing the Dishwasher for Use
er has been designed for a countertop installation. Please follow
e instructions for clearance, water and electrical requirements.
t connection is within reach of the inlet and
plugged.
5ºC (130ºF). To prevent
er, the temperature of the incoming water supply should
a switch or
ectrical
ng
st be plugged
nding-type wall receptacle providing 110-120V,
ith the National Electrical Code and local codes
nd ordinances. If a mating wall receptacle is not available, it is the personal
e.
Unpacking the Dishwasher
Use at least two people to move and install the dishwasher to prevent back and
other types of injuries. Carefully remove the packaging materials. Remove any
shipping tape and glue from your dishwasher before using. Do not use sharp
instruments, rubbing alcohol, flammable fluids, or abrasive cleaners to remove
tape or glue. These products can damage the surface of your dishwasher. Check
to make sure the parts necessary for installation are included. If any parts are
missing, please contact our customer service. Put the dishwasher on a level and
flat surface that is able to support the entire weight of the dishwasher fully
loaded.
Installation Requirements
The dishwash
th
Clearance Requirements
The minimum height clearance required to install your dishwasher on a counter
top surface with overhead cupboards is 45cm (17.7”).
Water Requirements
Make sure the water supply/fauce
drain hose assembly (i.e., 58 cm / 22.8”). If your sink has a spray wand, it is
recommended that the hose be disconnected and the hole
WARNING: A hose that
attaches to a spray wand can
burst if it is installed on the
same water line as the
dishwasher.
Water Pressure
For best results, incoming water pressure should be between 15 and 20 pounds
per square inch (psi).
Water Temperature
For best results, the water temperature must be at least 5
damage to the dishwash
not exceed 65ºC (149ºF).
Electrical Requirements
Read all safety precautions listed at
recommended that you use recepta
pull chain.
Make sure there is an elec
power supply cord (195 cm / 6.3 ft).
The dishwasher is equipped with a po
grounding plug. To minimize possibl
into a mating 3-pronged and grou
0Hz, grounded in accordance
the beginning of this manual. It is
cles that cannot be turned off by
trical supply (outlet) within reach of the el
wer supply cord having a 3-pro
e shock hazard, the cord mu
WARNING! Do not, under any
circumstances, cut or remove
the third (ground) prong from
the power cord.
6 w
a
responsibility of the customer to have a properly grounded, 3-prong wall
receptacle installed by a certified electrician. Use a circuit that is rated for 10
amps.
WARNING: Do not use an extension cord or an adapter plug with this applianc
EdgeStar Dishwasher 4

Connecting the Dishwasher
Y nnect, Drain
yo
di
mpatible with faucets inclusive of either male (outside) or
net. To avoid damage to
threads, do not over-tighten.
ect the star-shaped connection of the inlet hose to the inlet port on the
om)
) male
hile pushing the quick
connect assembly upward onto the faucet adapter.
our dishwasher comes equipped with a Faucet Adapter, Quick Co
Hose and Inlet Hose. The faucet adapter must be installed on the faucet before
u can connect the dishwasher. This adapter is included inside your
shwasher.
The faucet adapter is co
female (inside) threaded faucet connections.
1. Screw the faucet adapter onto (or into) the faucet tap. Check for leaks (use
Teflon or plumbers tape to eliminate any leaks if necessary).
2. Connect the six-sided connection of the drain hose to the drain port
connection on the back of the dishwasher cabi
3. Conn
back of the dishwasher cabinet. Do not over-tighten.
4. Connect the circular connection of the drain hose onto the longer (bott
male connection on the quick connect.
5. Connect the circular connection of the inlet hose onto the shorter (top
connection on the quick connect.
6. Attach the Quick Connect assembly onto the faucet adapter, by pulling down
the outer locking collar on the Quick Connect, w
Faucet Adapter
Locking Collar
Pressure Relief Valve
Quick Connect assembly
7. Release the locking collar when the quick-connect assembly snaps onto the
faucet adapter. Verify the connection is secure.
5

EdgeStar Dishwasher 6
8. Slowly open the hot water line and c
connections. If leaks are located, imm
heck for any sign of water leaks at all
ediately close the water supply and
repair the hose connections.
plied, then the following procedures should be followed:
er) to your faucet.
If your existing faucet adapter is not compatible with the “quick connect” hose
assembly sup
• Connect the faucet adapter (included with dishwash
aded) connection, both rubber
faucet adapter.
ed) connection, use only the
standard rubber washer (0.2”/5mm thick) sup lied within the adapter. Remove
the second rubber washer.
rge
out
nd replaced with clean water at the end of each cycle (the number of times this
repeated depends on the wash cycle chosen).
formance of your
e’ (white film
stainless steel surface of the
ted in the sump underneath the
t in minimizing these conditions, it is
inside of the dishwasher (empty)
isconnecting your Dishwasher
1. Close the hot water supply at the faucet.
power supply cord.
release the water pressure inside the inlet hose.
re relief button on the
s.
. Disconnect the quick-connect hose assembly by pulling down on the outer
locking collar, thus releasing it from the faucet adapter.
•Failure to relieve water pressure before disconnecting the Quick
Connect assembly from the Faucet Adapter may result in backpressure
overspray.
•The inlet water temperature can be EXTREMELY HOT!
•Backpressure overspray could cause SEVERE BURNS and/or
SCALDING!
• If your faucet is inclusive of a ‘female’ type (thre
washers must be installed inside the
If your faucet is inclusive of a ‘male’ type (thread•
p
For Best Results:
our dishwasher cleans by spraying m n hot water and dete
nder pressure) against the soiled surfaces of dishes. The water is
rough a rotating spray arm, drained through a filter (removing food and soiled
articles) and pumped back through the spray arm. Soiled water is pumpe
Ynta ixture of clea
(u pumped
th
p
a
d
is
NOTE:
Hard water conditions will adversely affect the washing per
contribute to ‘limdishwasher. Hard water conditions will also
hesubstance) deposits and/or ‘scaling’ on t
dishwasher tub and heater element, loca
removable filter screen. To assis
recommended to periodically operate/rinse the
using 1 cup of white vinegar at least once a week.
D
2. Disconnect the
3. Remember to
4. The inlet hose is pressured when the water supply line is opened, even if
closed immediately.
5. To release pressure: press and hold the red pressu
quick-connect assembly until the flow of water stop
6

7
•Do NOT let children disc
children is always important aro
onnect the dishwasher. Close supervision of
und appliances.

EdgeStar Dishwasher 8
Operating Instructions
e using your Dishwasher
ould be checked before using the dishwasher.
l
opened
d inlet ports.
is connected to a grounded outlet
ontrol Panel Functions
Error Codes
E1 – Long water inlet time – Faucet may not be opened or water
pressure is too low.
E4 – Overflow – dishwasher may be leaking.
To get the best performance from your dishwasher, read all operating
instructions.
Checklist Befor
The following things sh
1. The dishwasher is leve
2. The hot water faucet is
the drain an3. There are no leaks at
. The unit’s power plug4
5. The power is switched on
6. There are no kinks in the drain and inlet hoses
7. All packing and printed materials are removed from the dishwasher
C
1. Power Button: Press to turn the unit ON/OFF.
2. Power Light: Indicates when the ON/OFF Button has been pressed.
3. Washing Program Selector: Rotate the knob to select the desired w sh cycle.
4. S n: Press to START or PAUSE the dishw
5. Dela t of wash cy
6. 3 IN 1 Button: Press this button to select 3 in 1 function
7. Child lock function: Press 3 in 1 button and delay at the same time.
8. Display: Shows delay time, rinse-aid warning, time remaining of wash cycle, child lock
function, 3 in 1 function, and program modes
a
tart/Pause Butto
y Button: Press this button t
asher.
cle.o DELAY star
7
2
1
345
8
6

9
Wash Cycles Chart

Properly Loading the Dishwasher
prop
e dis hermore
prop
his un
•
•
•6 large plates
•6 small plat
•6 dessert plates
•2 serving dishes
•6 sets of cut
osition the the wash
ycle. Dishes nder the spray
rms from pr e sure to
ecure dishes and uten y sprayed water.
A erly loaded dishwasher is key for optimal performance. Overfilling
hwasher can reduce the dishwasher’s efficiency. Furt
er placement of items can hinder the performance of the unit.
it is optimized for holding 6 place settings including:
6 cups
6 bowls
th
im
T
es
lery
dishes and cookware so they are secure during
and cutlery that shift in the wash cycle may hi
oper motion, resulting in an undesired result. B
sils so items cannot be moved b
P
c
a
s
Cutlery basket
6 Large Plates and
Serving Bowl/Plate
6 Small and 6
Dessert Plates
6-Glasses
placed below
6-cup shelf
Serving
Bowl/Plate
6-Bowls
EdgeStar Dishwasher 10

11
Cutlery Basket
Silverware should be placed in the cutlery basket with handles directed
oward the bottom. If the rack has side baskets, spoon
s should be loaded
ropriate slots. Knives and other sharp utensils
be
.
sket. This
y place all
•Be sure the similar pieces of silverware do not nest together.
re with handles-down.
er
The amount of detergent to use depends on whether your water is hard or
soft. With hard water, you need extra detergent to alleviate the deposits
that are left by the excessive minerals. Less detergent is needed for soft
water.
To identify whether your water is hard or soft, contact your water
department. A water softener is recommended for water that contains
twelve or more grains. Without it, lime can build up in the water valve,
which could stick while open and cause flooding. Too much detergent
with soft water can cause a permanent cloudiness of glassware, called
etching.
or heavily soiled loads, use the HEAVY WASH Cycle, fill one or both of
the interior cups, depending on the hardness of your water, and also fill
etergent to place in the dispenser:
Number of Grains Detergent Cups to Fill
t
individually into the app
should be placed in the basket with handles up. Longer utensils should
placed in the horizontal position on the cup shelf instead of in the basket
WARNING: Do not let any item extend through bottom of cutlery ba
may prevent the spray arm from spinning.
For personal safety and a highest quality wash, securel
silverware in the basket:
•Place most silverwa
•Place knives and other potentially dangerous utensils handles-up.
Only Use Proper Detergent
Use only detergent specifically made for use in dishwashers. Keep your
detergent fresh and dry. Do not put powder detergent into the dispens
until you are ready to wash dishes.
F
the open cup on the dispenser lid.
Use the information in the table below as a guideline to determine the
amount of automatic dishwasher d
Less than 4 15 cup
4 to 8 25 cup
8 to 12 15 and 25 cups
Greater than 12 15, 25 cups and the open cup

To open the wash cover:
Press the button and the cover will flip back revealing the detergent
dispensing cups. See below:
NOTE: DO NOT USE HAND DISH DETERGENT
Using a detergent that is not specifically designed for dishwashers will
ause the dishwasher to fill with suds. During operation, these suc ds will
pill out of the dishwasher vents.
Since so many detergent containers look similar, store the dishwasher
detergent in a separate space from all other cleaners. Show anyone who
may use the dishwasher where the correct detergent is stored.
While there may be no lasting damage to the dishwasher by using
dishwashing detergent that is not formulated to work with dishwashers,
your dishes may not get fully clean.
s
EdgeStar Dishwasher 12

13
Use Jet-Dry Rinse Agent
Jet-Dry nts new film build-up on
your di
Filling
The rin holds 3.5 oz. of rinse agent. Under normal
conditio nth. Try to keep it full, but
o not overfill.
.Turn the dispenser knob to the left and lift it out.
3.Add rinse agent until the indicator window looks full.
.Clean up any spilled rinse agent with a damp cloth.
.Replace the dispenser knob.
he final wash can be adjusted.
he factory setting is at the midpoint. If there are rings of calcium
e
rinse agent removes spots and preve
shes, glasses, flatware, cookware and plastic.
the Dispenser
se agent dispenser
ns, this will last approximately one mo
d
1.Make sure the dishwasher door is fully open.
2
4
5
Rinse Aid Setting
The amount of rinse agent released into t
T
(hard water) spots on dishes, try a higher setting.
To adjust the setting
Remove the dispenser knob; then turn the adjuster counterclockwis
to increase the amount of rinse agent.
Only use branded rinse aid for the dishwasher. Never
fill the rinse aid dispenser with any other substances
such as liquid detergent.

Starting the Wash Cycle
•Ensure that the unit is connected to the power supply.
•Ensure that the water supply is turned on to full pressure .
•Pour in the detergent
•Press the ON/OFF switch to power the dishwasher on.
•Rotate the knob to the desired cycle. The wash cycle will be
changed as following direction:
Heavy -> Normal -> Light -> Glass -> Speed -> Soak
•Press the START/PAUSE button, the dishwasher begins to start.
will stop blinking. Unless the
button is pressed to continue the cycle, an indicator beep
Once the dishwasher is fully loaded follow these procedures to start the
wash cycle:
NOTE:
When the START/PAUSE button is pressed during a wash cycle the cycle
is suspended and the program light
START/PAUSE
will be heard every minute.
Changing the Cycle
ing cycle, but only when the dishwasher has
ressing the START/PAUSE button for three seconds or more will put the
achine in a stand-by state. At this point the cycle setting can be
You can modify the wash
been running for a short time. Otherwise, detergent may have been
release, and the appliance may have already drained water. If this is the
case, the detergent dispenser must be refilled.
Opening the door during the wash cycle may result in injury from
calding hot water.s
P
m
changed.
NOTE:
If the door is opened during the wash cycle, the machine will be paused.
When the door is closed, the machine will restart in 10 seconds.
EdgeStar Dishwasher 14

15
Forget to Add a Dish?
me before the detergent cup opens.
3. You can open the door after the spray arms stop spinning.
ishes.
dish can be added any tiA
1. Press the START/PAUSE button.
2. Open the door slightly to stop the washing.
4. Add remaining d
5. Close the door.
6. Press the START/PAUSE button.
The dishwasher will restart after 10 seconds.
At the End of the Wash Cycle
hen the selected wash cycle has finished, the buzzer of the dishwasher
e dishes and
tensils while they are still hot.
1. Switch off the dishwasher by pressing the ON/OFF button.
w
e dishes
to cool and assist in the drying process.
4. Unload the dishwasher. It is normal for the dishwasher to be
you.
W
will sound for 8 seconds. Turn off the dishwasher using the ON/OFF
button, shut off the water supply and open the door. Wait a few minutes
before unloading the dishwasher to avoid handling th
u
Removing the Dishes
2. Turn off the water tap!
3. Open the door carefully. Leave the door ajar and wait a fe
minutes before removing the dishes. This will allow th
wet inside.
WARNING: It is dangerous to open the door when
washing as the hot water may scald
Other manuals for DWP61ES
1
Table of contents
Other EdgeStar Dishwasher manuals

EdgeStar
EdgeStar BIDW1802SS User manual

EdgeStar
EdgeStar BIDW18001SS User manual

EdgeStar
EdgeStar DWP63BL User manual

EdgeStar
EdgeStar DWP62BL User manual

EdgeStar
EdgeStar DWP40S User manual

EdgeStar
EdgeStar DWP60ES User manual

EdgeStar
EdgeStar DWP40W User manual

EdgeStar
EdgeStar DWP40W User manual

EdgeStar
EdgeStar BIDW18SS-1 User manual

EdgeStar
EdgeStar BIDW1802SS User manual