Edin univox GPA-770 User manual
Installation Guide
GPA-770
Portable active speaker
Part no 504772S
2
9
1
23 5678
10
11
12
13 14 15 16 17 18
4
19
20 24
21
22
23
25 26 27 28 29 30 31 32
31
33
26
27
30
34
35
36
29
37
28
38 40
39
25

3
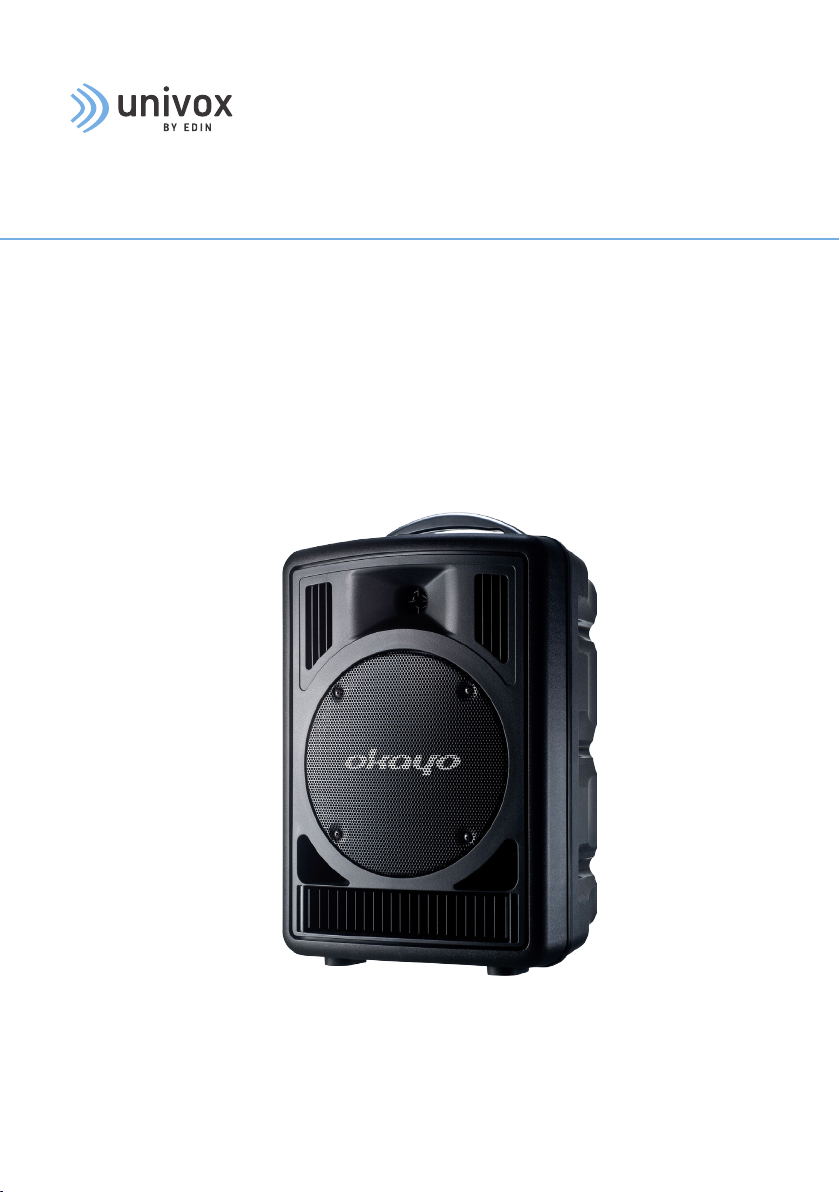
Speaker
1 POWER switch; lits up
2 MASTER for overall volume
3 TREBLE (high frequencies); BASS (low frequencies)
4 Volume control for MIC IN (8)
5 LINE OUT (RCA jacks) to pass on the mixed signal e. g. to a second active speaker system; the LINE OUT signal is
not affected by the control MASTER (2) but by the tone controls (3)
6 LINE IN (RCA jacks) for connection of an audio source with line signal level, e. g. CD/MP3 player, tape deck, radio
7 Volume control for the input signal of LINE IN (6)
8 MIC IN (combined jack XLR / 6.3mm jack, bal.) for connection of a microphone
9 Battery meter
10 VOICE PRIORITY indicator: When the button is pressed (LED lights up), the volume of the remaining audio
sources is substantially attenuated when announcements are made via the wireless transmitter or the
microphone connected.
11 DC Input (230 V~ / 50 Hz)
A. Wireless receiver
12 Display to indicate the transmission channel [indication of the radio frequency when keeping an arrow key (17) pressed]
13 Diversity LED: red: antenna A ; green: antenna B. Indicates which of the two internal reception antennas is active at present
14 LED RX: lights up when a matching transmitter is switched on and set to the channel of the receiver
15 LED AF: lights up when receiving an audio signal
16 SET to activate the channel selection mode (channel indication on the display flashes) and to confirm a channel
selection
17 Arrow keys and channel selection. The keys can also be used to shortly switch over the display to indicate the
radio frequency (keep the key pressed down).
18 On / off switch and volume control
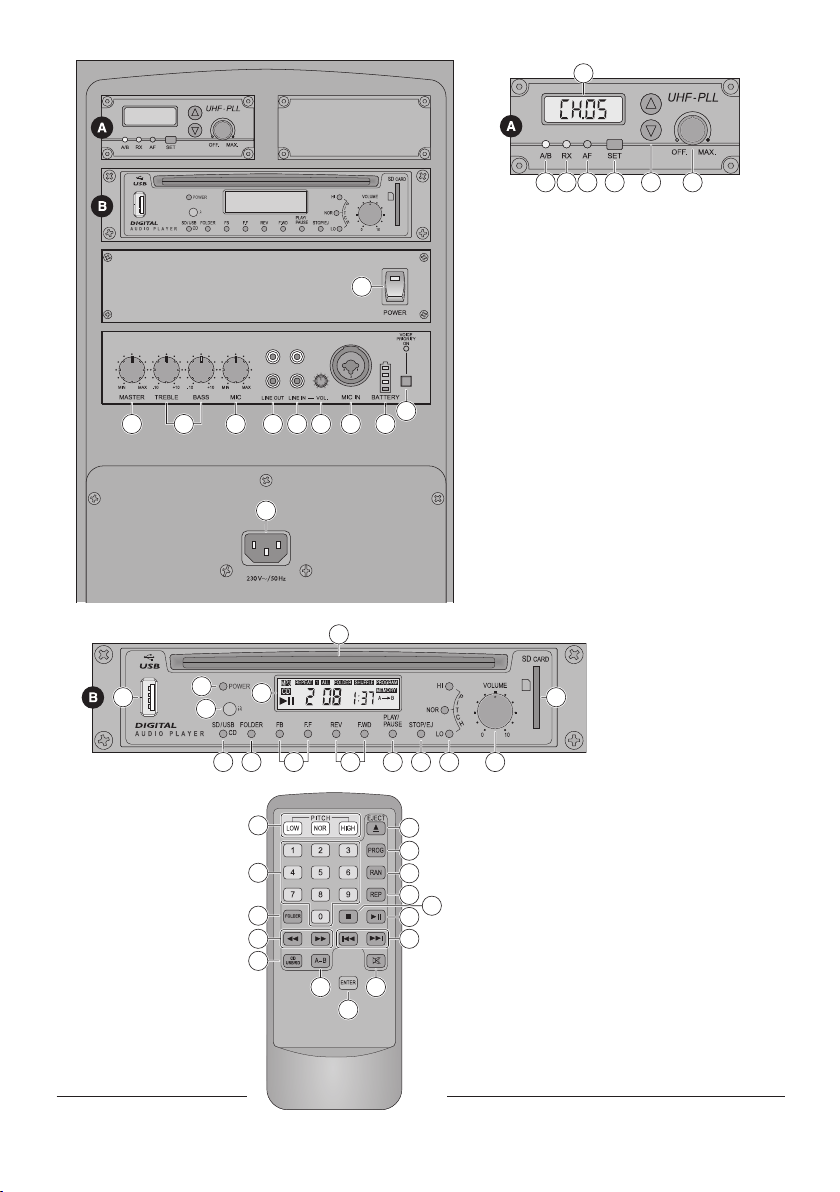
B. Player module (accessory)
19 CD slot
20 USB port for connection of a USB mass storage device
21 POWER button
22 IR sensor for the signals of the remote control
23 Display
For audio CDs
The insertion “CD” and the track number (in the stop mode: total number of tracks)

4
For MP3 playing media
The insertion “MP3”, the folder number and the track number in the folder (in the stop mode: total number of
folders and total number of tracks)
– the time played of the track (min. : sec.)
– for replay, for pause
– insertion for the repeat function selected (“REPEAT 1”, “REPEAT FOLDER” or “REPEAT ALL”) button REP (36)
– insertion “SHUFFLE” for replay of the tracks in a random order
– insertion “PROGRAM” when programming an individual track sequence
– insertion “MEMORY” for replaying a programmed track sequence
– insertion “A B” when replaying a loop
24 SD card slot
25 Button to select CD, USB storage device or SD card
26 Button FOLDER to select the next folder (for MP3 mode)
27 Button FF for fast forward and button FB for fast reverse: Shortly press the respective button and when the
desired spot is reached, press the replay/pause button (29).
28 Buttons for track selection REV = reverse, FWD = forward
29 Replay/ pause button
30 Button to change to the stop mode (the first time button is pressed) and to eject a CD (the second time
button is pressed)
31 Buttons to change the playing speed in 10 steps: press the button HI / HIGH (to increase speed) or LO / LOW (to
decrease speed) repeatedly until the desired speed is reached; to return to standard speed, press the button NOR.
32 Volume control
33 Numerical keys for track selection by entering its number (MP3 mode: number of the track on the playing
medium, not in the folder!)aer the input press the button ENTER (39) to confirm
34 Button to program an individual track sequence Se chapter 6.2.11
35 Button for track replay in a random order
36 Button to select
– ”REPEAT 1”: repeat of the track
– “REPEAT FOLDER” (for MP3 mode only): repeat of all tracks in the folder
– “REPEAT ALL”: repeat of all tracks of the playing medium
– No “REPEAT” insertion: no repeat function activated
37 Button to stop the replay
38 Button to replay a loop (repeat of a section in the track). The first time, button is pressed to define the starting
point of the section. The second time, button is pressed to define the end point of the section: replay of the
loop will start. The third time, button is pressed to terminate the replay of the loop.
39 Button to confirm an input, e. g. aer track selection via the numerical keys (33)
40 Button to activate / deactivate the sound

5
Applications
The active speaker system GPA-770 is a combination of a speaker system and an amplifier with two mixable inputs
(1 input for a microphone, 1 input for an audio source, e. g. CD player). A CD / MP3 player capable of replaying USB
mass storage devices and SD cards and a receiver for a wireless transmitter have been integrated. The 16-channel
receiver operates with Diversity technique in the range of 863 – 865 MHz. The matching transmitters are e. g. EJ-7XT
or EJ-701TM and other transmitters of the EJ-series. The transmission range depends on the local conditions and
may extend to up to approx. 30m.
The speaker system is specially designed for mains-independent operation. For power supply, two rechargeable NiMH
batteries are integrated which will be recharged in case of mains connection. The system is ideally suited for mobile
PA applications at events, lectures, etc. Via a line output the mixed signal can be passed on to another amplifier
system. The speaker system can be placed as desired or be mounted onto a PA speaker stand via the stand sleeve on
its lower side.
Power supply
The unit can be operated at a mains socket or via the internal rechargeable batteries.
Mains operation/ recharging the batteries
1) To operate the active speaker system via the mains and / or to recharge the internal batteries, connect the mains
cable provided to the mains jack (11) and to a mains socket (100-240V).
2) In case of mains connection, the automatic charging for the batteries is active: During the charging process the
four LEDs of the battery indication (9) light up successively. For charging, it is not necessary to switch on the unit.
It is possible to operate it during charging. When the charging process is terminated, the upper green LED lights up
continuously.
3) Aer the operation or aer charging the batteries, disconnect the unit from the mains socket to prevent
unnecessary power consumption.
Battery operation
Prior to the first use, fully recharge the batteries (see above). During battery operation the charging status of the
batteries is shown on the respective LED of the battery indication (9):
green battery charged 80 – 100%
green battery charged less than 80%
yellow battery charged less than 50%
red battery charged less than 20%
To prevent damage to the batteries due to deep discharge, please note: Recharge discharged batteries as soon as
possible. When storing the unit, consider the selfdischarge of the batteries: Charge the batteries sufficiently prior to
storage and during storage regularly check their charging status and recharge them, if required.

6
Audio Connections
All connections should only be made with the speaker system switched off.
Inputs MIC IN and LINE IN
A microphone and an audio unit with line output level (e. g. CD / MP3 player, tape deck, radio) may be connected as
audio sources :
• Connect the microphone via an XLR cable or a 6.3 mm cable to the jack MIC IN (8). The microphone input is
balanced.
• Connect the audio unit to the stereo input LINE IN (6) via RCA cable. The signals of the le and the right
channels are converted to a mono signal.
Output LINE OUT
A recorder or another active speaker system for PA applications can be connected to the RCA jacks LINE OUT (5). At
both jacks the mixed mono signal of the speaker system is available.
The control MASTER (2) does not affect the LINE OUT signal. However, it is affected by the adjustment of the tone
controls (3).
It is possible to set up several active speaker systems GPA-770 which receive and reproduce the signal of one
wireless transmitter. No additional cabling is required.
Operation
CAUTION Never adjust the active speaker system to a very high volume. Permanent high volumes may damage your
hearing!
1) Prior to switching on the speaker system, set the control MASTER (2) to “MIN”.
2) Turn on the speaker system with the POWER switch (1). The switch lights up. The battery indication (9) shows the
charging status of the batteries (chapter 4).
3) Turn on the audio sources used: microphone / audio unit connected, wireless receiver (see Wireless receiver),
CD / MP3 player (See CD/MP3 player).
4) Turn the control MASTER (2) for the overall volume of the speaker system to the desired level.
5) Mix the signals of the audio sources in the desired volume ratio or fade in and out single sources as required:
• for the unit at the input LINE IN (6) use the volume control VOL. (7)
• for the microphone at the input MIC IN (8) use the volume control MIC (4)
• for the signal received of the wireless transmitter use the receiver volume control (18)
• for the CD / MP3 player use the volume control VOLUME (32)
Set the volume controls of the sources not used to minimum or switch off the sources.
6) Adjust the sound with the control TREBLE for the high frequencies and the control BASS (3) for the low
frequencies and the definitive volume for the active speaker system with the control MASTER.

7
7) The priority feature of the microphone may be activated with the button VOICE PRIORITY (10). When the button is
pressed (LED above it will light up), the volume of the music currently replayed will be substantially attenuated when
announcements are made via the microphone connected or via the wireless transmitter used. To deactivate the
feature, disengage the button.
Note: The priority feature of the microphone will also affect the output signal of the jacks LINE OUT (5).
8) Aer operation and, to prevent unnecessary battery discharge, also for longer breaks, switch off the speaker
system with the POWER switch.
Wireless receiver
Turn receiver power on/off control and volume control (18) clockwise from the position “OFF” until a click occurs.
The LED A / B (13) shows red or green, depending on the internal receiving antenna (A or B) which is active at
present. The display (12) shows the transmission channel adjusted. To display the radio frequency of the channel,
press down button (17).
2) For selection of an unused channel free of interference, leave the transmitter switched off and adjust the channel
at the receiver first:
1. Press the button SET (16) to st channel: The channel indication on the display flashes.
2. Select the channel with the arrow keys (17): for channel selection “up” or for channel selection “down”.
3. Press the button SET to confirm. Note: If no button is pressed in the selection mode for 10 seconds, it is exited.
If the LED RX (14) lights up aer the channel adjustment with the transmitter switched off, signals of interference or
signals of other transmitters are received on this channel. In this case choose another channel.
3) Turn on the transmitter and adjust it to the same channel. The LED RX lights up to indicate that a radio signal
is received. The LED AF (15) lights up when the transmitter transmits an audio signal with sufficient level on the
channel.
4) Adjust the volume for the audio signal received with the control (18).
CD/MP3 player (Accessory)
The player allows to replay standard audio CDs and CDs, USB mass storage devices and SD cards with MP3 files.
Note: With rewritable CDs (CD-RW), problems may occur when replaying according to the CD type, the CD burner and
the burning programme used.
The anti-shock memory of the player will be able to compensate temporary shocks or vibrations occurring during the
CD sampling; however, it will not be able to compensate continuous, severe vibrations. For CD operation, the system
must therefore always be operated in a stationary way, i. e. it must be placed on a solid, immobile ground.
Note concerning sound interruptions and reading errors
Cigarette smoke and dust will easily penetrate through all openings of the unit and also settle on the optics of the
laser sampling system. This deposit may cause reading errors and sound interruptions.

8
Remote control
The IR remote control for the player is supplied with a battery. Prior to initial operation, remove the foil from the
battery holder. When pressing a button, always direct it to the infrared sensor (22) of the player. There must be no
obstacles between the sensor and the remote control.
If the unit is not used for a longer time, remove the battery from the remote control as a precaution so that it will not
be damaged in case the battery should leak.
Replacing the battery:
1) Push the latch of the battery holder to the right and remove the holder.
2) Remove the old battery and insert the new battery (3 V button cell, type CR 2025) into the holder with the
positive pole pointing upwards.
3) Push the holder back into the remote control.
Turning on and off/inserting and removing the playing medium
The player is turned on and off with the POWER button (21).
Inserting a playing medium:
• Insert a CD with the lettering showing upwards into the CD slot (19) until it is retracted automatically and / or
• connect a USB storage device (e. g. USB flash drive, USB hard disk with separate power supply) to the USB port
(20) and / or
• insert an SD card (bevelled corner upward and contacts to the right) into the slot (24).
Removing a playing medium:
To extract the CD, press the eject button STOP/EJ or EJECT (30) twice (first time: switching to stop, second time: CD is
ejected). Aer ejecting, the CD can be retracted again by pressing the eject button.
Disconnect the USB storage device from the USB port and to remove the SD card, first unlock it by pushing it into the
slot, then remove it. USB storage device and SD card should not be removed during their replay.
Selecting the playing medium
Each time the speaker system is activated, the CD player mechanism is automatically selected. It is possible to select
the playing media with the button CD / USB / SD (25): Aer pressing the button, the selected medium is shown on
the display. Shortly aer that its replay will start.
If a USB storage device or an SD card has been selected and is then removed, the player automatically switches over
to the CD player mechanism. The same happens when a new CD is retracted.
Replay /pause/stop
Aer reading in the playing medium, the replay starts. To interrupt the replay and to continue it again, press the
button PLAY/ PAUSE or (29). The display shows the time already played of the track (min.: sec.).
To stop the replay, the following buttons may be pressed:
• Button (37)

9
• Button STOP/ EJ or EJECT (30)
In the stop mode the display is switched to the time indication “00 : 00”. To restart the replay with the first track,
press the button PLAY/ PAUSE.
Adjusting the volume/muting
Adjust the volume with the control VOLUME (32). To deactivate and reactivate the sound, press the button (40).
Track selection
Audio CDs
For audio CDs (insertion “CD”) the display shows the track number during replay and pause and the total number of
all tracks in the stop mode.
1. Advancing or reversing tracks: Use the buttons REV/ F.WD 28) = return to the beginning of the played track, then
one more track is reversed each time the button is pressed, F.WD = one track forward.
2. Entering track number: Enter the track number via the numerical keys (33) and confirm with the button ENTER
(39).
MP3 playing media
For playing media with MP3 files (insertion “MP3”) the display shows the folder number and the track number within
the folder during replay and pause. Tracks without folder in the main directory are assigned to folder No. 1. In the
stop mode the total number of the folders and the total number of the tracks of the playing medium are shown.
1. Advancing or reversing tracks: Each time the button FOLDER (26) is pressed, the player goes to the next folder. For
track selection use the buttons REV/ F.WD = return to the track beginning first, then one more track is reversed, each
time the button is pressed, F.WD = one track forward.
2. Entering the track number: Via the numerical keys (33) enter the number of the track on the playing medium (not
the number within the folder!) and confirm with the button ENTER (39).
Note: In some cases the player does not go to the beginning of the played track when pressing the return button but
immediately goes to the previous track (e. g. in case of CD operation in the pause mode)
Repeat functions/random track
Three repeat functions are available. The selected function is shown on the display.
Use the button REP (36) to select:
• “REPEAT 1”: continuous repeat of the track
• “REPEAT FOLDER” (for MP3 mode only): continuous repeat of all tracks in the folder
• “REPEAT ALL”: continuous repeat of all tracks on the playing medium
• No REPEAT insertion: no repeat function activated; aer playing all tracks, the player is set to stop
To replay the tracks in a random order, press the button RAN (35). “SHUFFLE” is inserted on the display. To turn off
the shuffle function, press the button again.
An activated repeat function is deactivated when activating the shuffle function and vice versa.

10
Playing a loop
A section within a track can be continuously repeated as a loop.
1) If the starting point of the section is reached in the track currently playing, press the button A – B (38). The
display shows “A ”.
2) If the end point of the section to be repeated is reached, press the button again. The display shows “A B”. The
section is repeated permanently.
3) To finish the loop, press the button a third time. “A – B” will be removed.
Changing the replay speed and pitch
The PITCH buttons (31) allow to change the replay speed and thus the pitch.
• button HI or HIGH: to increase the replay speed in 10 steps
• button LO or LOW: to decrease the replay speed in 10 steps
Press the corresponding button repeatedly until the desired speed is reached. Each time the button is pressed, the
display shortly shows the selected adjustment.
To return to standard speed, press the button NOR once.
Programming a track sequence
1) To switch to the programming mode, press the button PROG (34). “PROGRAM” is inserted on the display.
2) Select the first track of the track sequence: either
• go to the track with the buttons REV/ F.WD (28); for MP3 operation first select the folder with the button
FOLDER (26), if required or
• enter the track number directly via the numerical keys (28) [for MP3 operation: the number of the track on the
playing medium, not in the folder! and press the button ENTER (39) to confirm.
The display shows the memory location number instead of the time indication.
For all further tracks proceed the same way until the complete track sequence (10 max.) has been programmed.
3) To start the track sequence, press the button PLAY/ PAUSE or (29). “PROGRAM” will be removed and “MEMORY”
will be inserted. To return to replay in standard order, press the button PROG. “MEMORY” will be removed and the
programming will be deleted.
4) If no repeat function is activated , the player is set to stop aer playing the track sequence, thus the track
sequence is deleted. (“REPEAT 1” and “REPEAT ALL” are available in chapter Repeat functions/Random track)

11
Specifications
Amplifier power: 80WMAX/50WRMS
Frequency range: 70 – 16 000 Hz
Input sensitivity
MIC IN: 6mV
LINE IN: 700mV
Level LINE OUT: 1 V
Audio connections
MIC IN: combined jack XLR/6.3 mm, balanced
LINE IN, LINE OUT: RCA jacks
Tone control
BASS: ±15 dB / 100 Hz
TREBLE: ±10 dB / 10 kHz
Radio frequency range: 863 – 865 MHz, divided into 16 channels (table below)
Power supply: via internal batteries (2 × rechargeable NiMH battery pack 12 V/4.5 Ah) or via mains
connection (230 V~ / 50 Hz / 150 VA)
Operating time of
rechargeable batteries: up to 6 – 7 hours approx.
Charging time of batteries: 11 – 12 hours approx.
Ambient temperature: 0 – 40 °C
Dimensions: 300 × 470 × 230mm
Weight: 9.8 kg
Channel Frequency Channel Frequency
1 863.1 MHzv 9 863.2 MHz
2 864.1 MHz 10 864.2 MHz
3 863.6 MHzv 11 863.7 MHz
4 864.6 MHz 12 864.7 MHz
5 863.3 MHz 13 863.4 MHz
6 864.3 MHz 14 864.4 MHz
7 863.8 MHz 15 863.9 MHz
8 864.8 MHz 16 864.9 MHz

Hearing excellence since 1965
(Univox) Bo Edin AB
Stockby Hantverksby 3,
SE-181 75 Lidingö, Sweden
+46 (0)8 767 18 18
www.univox.eu
gps-770-du.gb-151007 Bo Edin AB
Safety and warranty
• The equipment should be installed by a competent audio visual technician observing 'good electrical and audio
practice' at all times and following all the instructions contained within this document.
• The installer is responsible for installing the product in a way that may not cause risk of fire.
Do not remove any covers as there is a risk of electric shock. Please observe that the product
warranty doesn't include faults caused by tampering with the product, carelessness, incorrect
connection/ mounting or maintenance.
• The unit is suitable for indoor use only. Protect it against dripping water and splash water, high air humidity and
heat (admissible ambient temperature range 0 – 40 °C).
• Do not place any vessels filled with liquid, e. g. a drinking glass, on the unit.
• Do not set the unit into operation, and immediately disconnect the mains plug from the mains socket
1. if there is visible damage to the unit or to the mains cable,
2. if a defect might have occurred aer a drop or similar accident,
3. if malfunctions occur.
• Never pull the mains cable to disconnect the mains plug from the mains socket, always seize the plug.
Maintenance
Under normal circumstances the product does not need any special maintenance. Should the unit become dirty, wipe
it with a clean damp cloth. Do not use solvent or strong detergents.
Environment
Please follow existing disposal regulations in your country. If you respect these instructions you ensure human health
and environmental protection.
Table of contents


