Edison Party System 1240 User manual

Party System 1240
Home Entertainment Bluetooth
and Karaoke System

2
WARNING: SHOCK HAZARD - DO NOT OPEN
AVIS: RISQUE DE CHOC ÉLECTRIQUE - NE PAS OUVRIR
The lightning flash with arrowhead symbol, within
an equilateral triangle, is intended to alert the
user to the presence of uninsulated “dangerous
voltage” within the product's enclosure that may be of
sufficient magnitude to constitute a risk of electric shock to
persons.
The exclamation point within an equilateral triangle
is intended to alert the user to the presence of
important operating and maintenance (servicing)
instructions in the literature accompanying the appliance.
Important Safety Instructions
1) Read these instructions.
2) Keep these instructions.
3) Heed all warnings.
4) Follow all instructions.
5) Do not use this apparatus near water.
6) Clean only with dry cloth.
7) Do not block any ventilation openings. Install in
accordance with the manufacturer's instructions.
8) Do not install near any heat sources such as radiators,
heat registers, stoves, or other apparatus (including
amplifiers) that produce heat.
9) Do not defeat the safety purpose of the polarized or
grounding-type plug. A polarized plug has two blades
with one wider than the other. A grounding type plug
has two blades and a third grounding prong. The wide
blade or the third prong are provided for your safety. If
the provided plug does not fit into your outlet, consult an
electrician for replacement of the obsolete outlet.
10) Protect the power cord from being walked on or pinched
particularly at plugs, convenience receptacles, and the
point where they exit from the apparatus.
11) Only use attachments/accessories specified by the
manufacturer.
12) Use only with the cart, stand, tripod, bracket, or table
specified by the manufacturer, or sold with the apparatus.
When a cart is used, use caution when moving the cart/
apparatus combination to avoid injury from tip-over.
13) Unplug this apparatus during lightning storms or when
unused for long periods of time.
14) Refer all servicing to qualified service personnel.
Servicing is required when the apparatus has been
damaged in any way, such as power-supply cord or plug
is damaged, liquid has been spilled or objects have fallen
into the apparatus, the apparatus has been exposed to
rain or moisture, does not operate normally, or has been
dropped.
CAUTION
To prevent electric shock hazard, do not connect to
mains power supply while grille is removed.minimum
distances 10cm around the apparatus for sufficient
ventilation;the ventilation should not be impeded by
covering the ventilation openings with items, such as
newspapers, table-cloths, curtains, etc.;no naked flame
sources, such as lighted candles, should be placed on
the apparatus;attention should be drawn to the
environmental aspects of battery disposal;the use of
apparatus in moderate climates.the apparatus shall not
be exposed to dripping or splashing and that no objects
filled with liquids, such as vases, shall be placed on the
apparatus.Where the MAINS plug or an appliance
coupler is used as the disconnect device, the disconnect
device shall remain readily operable.Batteries (battery
pack or batteries installed) shall not be exposed to
excessive heat such as sunshine, fire or the like.“To
reduce the risk of fire or electric shock, do not expose
this apparatus to rain or moisture”Caution Marking and
rating plate was located at rear enclosure of the
apparatus.
CAUTION
Danger of explosion if battery is incorrectly replaced.
Replace only with the same or equivalent type.
CAUTION
FCC warning:
Any Changes or modifications not expressly approved
by the party responsible for compliance could void the
user's authority to operate the equipment.
Note: This equipment has been tested and found to
comply with the limits for a Class B digital device,
pursuant to part 15 of the FCC Rules. These limits are
designed to provide reasonable protection against
harmful interference in a residential installation. This
equipment generates uses and can radiate radio
frequency energy and, if not installed and used in
accordance with the instructions, may cause harmful
interference to radio communications. However, there
is no guarantee that interference will not occur in a
particular installation. If this equipment does cause
harmful interference to radio or television reception,
which can be determined by turning the equipment off
and on, the user is encouraged to try to correct the
interference by one or more of the following measures:
-Reorient or relocate the receiving antenna.
-Increase the separation between the equipment and
receiver.
-Connect the equipment into an outlet on a circuit
different from that to which the receiver is connected.
-Consult the dealer or an experienced radio/TV
technician for help.
This equipment complies with FCC radiation exposure
limits set forth for an uncontrolled environment. This
equipment should be installed and operated with
minimum distance 20cm between the radiator & your
body.

3
CAUTION :
To reduce the risk of electric shock, do not remove the cover. Refer servicing to qualified service
personnel. Please read the manual carefully before operating. Keep it in a safe place for future
reference.
-This is a Class I Apparatus:
Apparatus with Class 1 construction must be connected to a mains socket with a protective earthing
coating
USER INSTRUCTIONS FOR DVD PLAYER
Please Do Not:
• Put the player in sunshine,on or next to any radiation devices such as heaters, stoves or other
appliances that produce heat.
• Put the player in badly ventilated dusty or high moisture areas or in unsteady or vibrating areas.
;
• Expose the unit to rain or water.
• Play discs that are scratched or warped as they may damage the unit.
POWER SUPPLY
• The power supply required is AC 100-240V~, 50/60Hz.
• When not planning to use this unit for long periods of time, disconnect the AC power plug from the
outlet.
• To prolong the life of this unit, the changeover period between switch-on and switch-off should not
be less than ten seconds.
DVD PLAYER FEATURES
1. Fully compatible with DVD, SVCD, VCD, MP3,CD-R and CD-RW with high error correction ability.
2. Reads picture CD to realize digital picture display.
3. 10 bit digital video converter, resolution is more than 500 lines.
4. 24bit/96KHz digital audio converter, high quality sound effects, professional Hi-Fi level.
5. Video component signal output, S-video output, Composite video output, Optical, Coaxial HDMI
and YUV output for selection.
6. Eight languages and 32 caption modes can be selected.
7. Various TV screen display selection and preferred story selection to view.
LASER HEAD OVER CURRENT PROTECTION SYSTEM
Laser head is the most important and critical part of the whole machine.Its performance is directly
linked to the whole equipment's service life and error correction function. When a common player reads
a scratched disc or a non-standard disc the laser intensity will be 2-4 times or even up to 20 times the
;
normal level, thus greatly reducing its service life.This appliance is provided with a unique laser head
over current protection system,which will ensure constant laser current and thus greatly extend the
service life of the laser head.
4
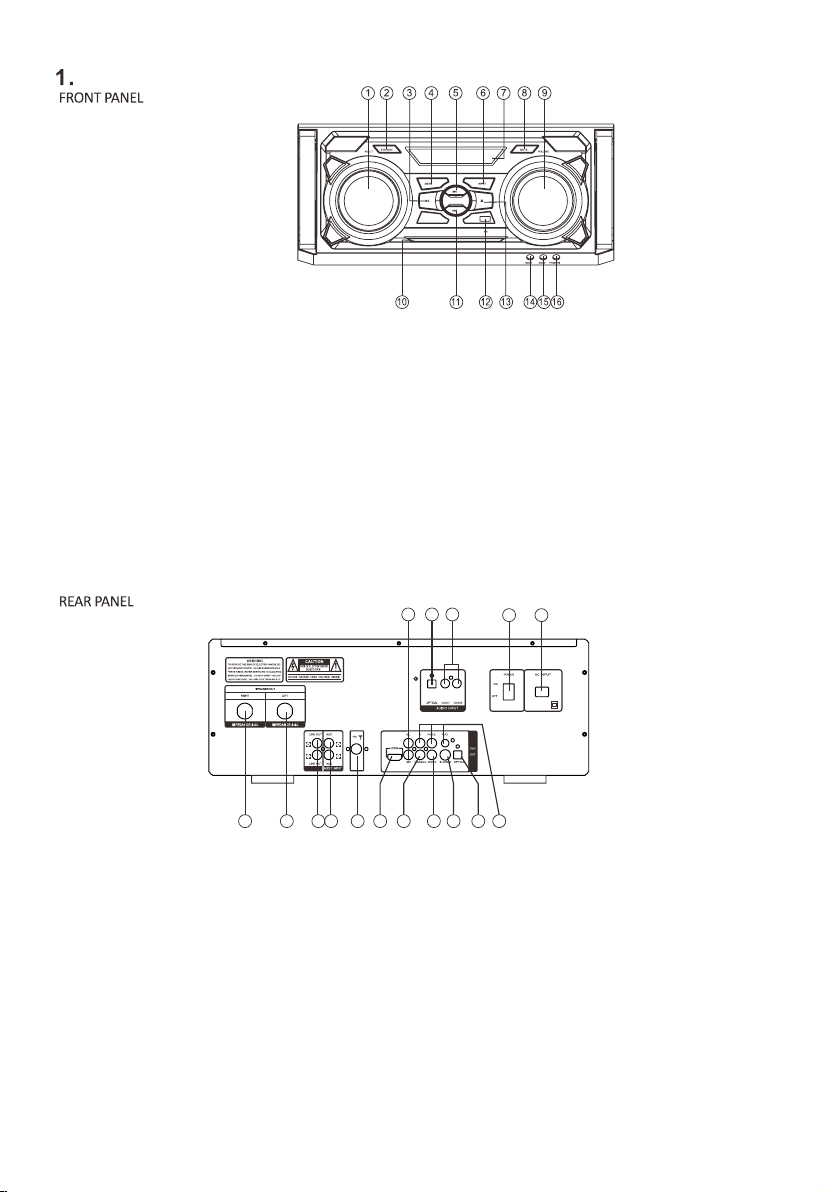
AUDIO OUTPUT
Controls
1. (RIGHT) SPEAKER OUTPUT JACK
2. (LEFT) SPEAKER OUTPUT JACK
3. LINE OUT OUTPUT JACK
4. AUX AUDIO INPUT
5. FM ANTENNA JACK
6. HDMI OUTPUT JACK
7. DIGITAL SIGNAL COAXIAL OUTPUT
8. VIDEO OUTPUT JACK
9. S-VIDEO OUTPUT JACK
10.DIGITAL SIGNAL OPTICAL OUTPUT
11.COMPONENT(YUV) VIDEO OUTPUT JACK
.AC INPUT(100-240V~,50/60Hz)12
13.POWER SWITCH
14.COAXIAL DIGITAL INPUT
15.OPTICAL DIGITAL INPUT
16.AUDIO OUTPUT JACK
1. MULTIFUNCTION BUTTON
2. STANDBY
3. PLAY/PAUSE
4. MENU
5. NEXT
6. INPUT
7. LED DISPLAY
8. MUTE
9. VOLUME
10. COMPARTMENT DOOR
11. PREVIOUS
12. USB JACK
13.OPEN/CLOSE
14. MICROPHONE 1 JACK
15. MICROPHONE 2 JACK
16. PHONES
1 2 3 4 5 6 7 8 9 10 11
1213141516
100-240~,
50/60Hz
5
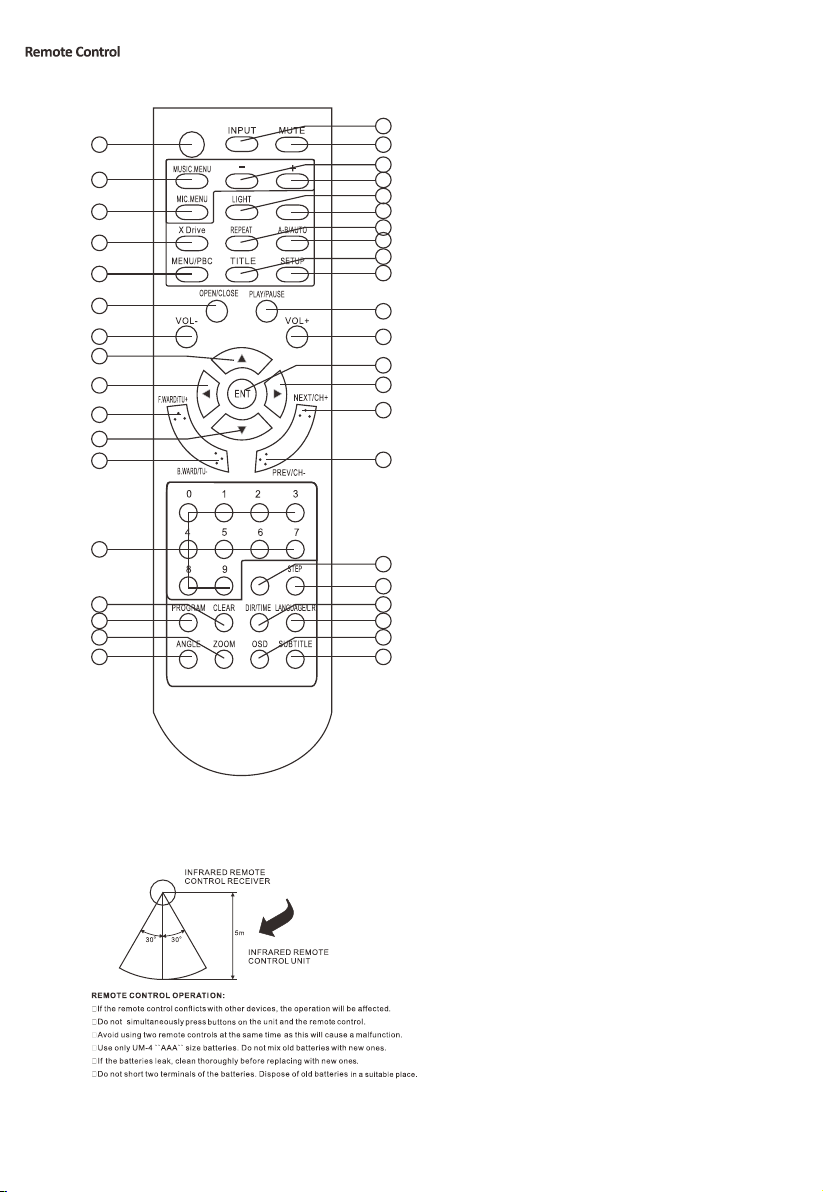
1. STANDBY
2. MUSIC.MENU
3. MIC.MENU
4. XDRIVE
5. MENU/PBC
6. OPEN/CLOSE
7. VOLUME-
8. UP
9. LEFT
10. F.WARD/TUNING+
11. DOWN
12. B.WARD/TUNING-
13. NUMBER BUTTON
14. CLEAR
15. PROGRAM
16. ZOOM
17. ANGLE
18. SUBTITLE
19. OSD
20. LANGUAGE/L.R
21. DIR/TIME
22. STEP
23. SLOW
24. PREVIOUS/CHANNEL-
25. NEXT/CHANNEL+
26. RIGHT
27. ENTER
28. VOLUME+
29. PLAY/PAUSE
30. SETUP
31. TITLE
32. A-B/AUTO
33. REPEAT
34. DISCONNECT
35. LIGHT
36. MIC/MUSIC.MENU ADJUST+
37. MIC/MUSIC.MENU ADJUST-
38. MUTE
39. INPUT
STANDBY
DISCONNECT
1
2
3
4
5
6
7
8
9
10
11
12
13
14
15
16
17 18
19
20
21
22
23
24
25
26
27
28
29
30
31
32
33
34
35
36
37
39
SLOW
38

6
AUDIO OUTPUT
2. Preparation
2.1 Instal batteries in the remote control
Place two AAA batteries in the battery compartment. Ensure that the polarities are correct.
There should be no large obstacles between the remote control and the main unit.
2.2 System connection
1. When connecting this unit and other components, be sure that the power is off on all the units.
2. Audio/Video cables are connected by matching the various colours. Fit cables firmly.
3. Scheme of connection illustration:
100-240~,
50/60Hz
7
3. DVD Basic operation
Once all the connections and settings have been
done, the DVD unit is ready for normal use. Prior
to playback, make sure the following operations
have been carried out.
,
1. Switch on TV and select AV mode. lf it s
S-Video connect select S-Video mode.
2. Switch on this DVD unit.
3. Press the key SOURCE on the front panel
or on the remote control, select DVD.
Step 1: Press POWER key, DISC LOADING
shown on screen:
POWER
lf there is no disc, NO DISC shown on screen:
Step 2: Press OPEN/CLOSE key, the tray
comes out automatically.
Step 3: Place disc on the tray, press the key
OPEN/CLOSE to close the tray, the disc type
will be shown on the up-left corner of the
screen as well as shown on LED screen.
No disc
Open
Loading...
3.1 Play disc
,
Once it s read the disc, this machine will start
playing automatically.
lf it is a DVD, the machine will show the DVD
menu or title menu.
lf it is a CD ,this machine will start playing in
the sequence.
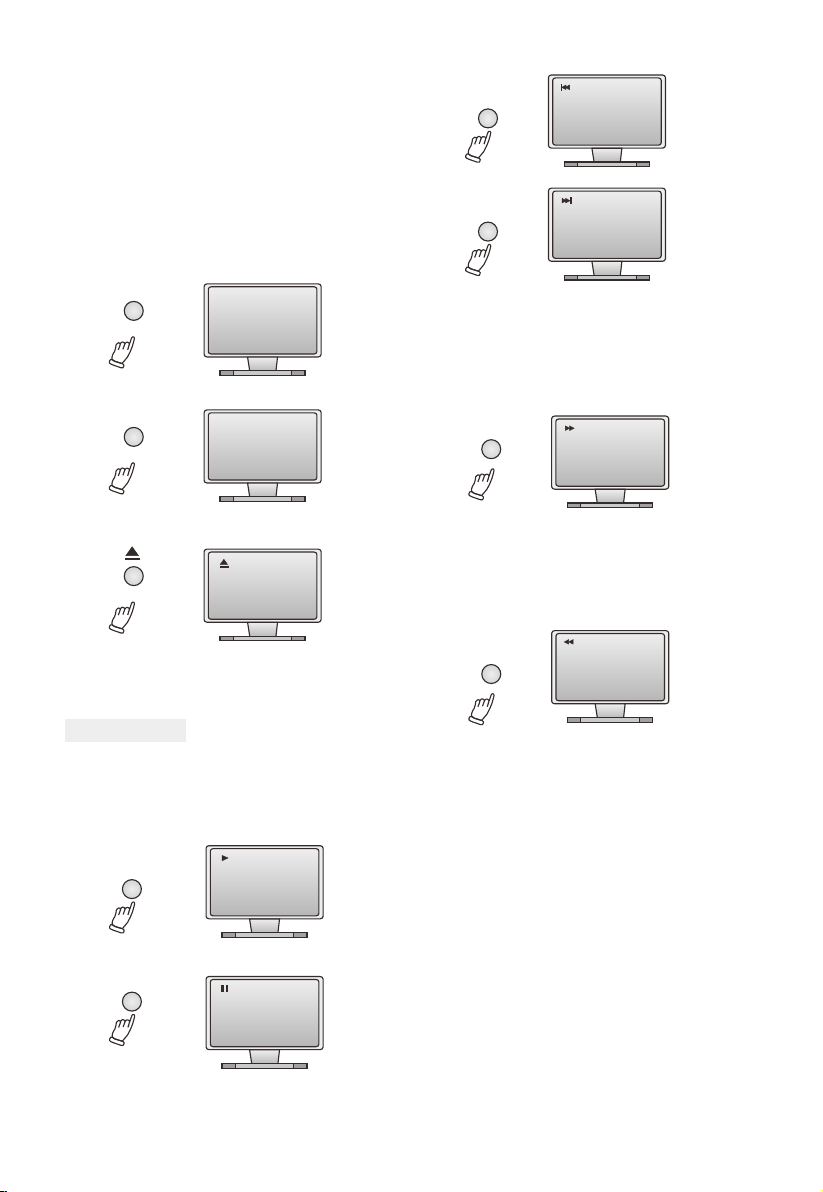
PLAY
PAUSE
Press PAUSE key:
Play
Pause
Press PREV key:
PREV
Prev
Next
Press NEXT key:
NEXT
2X
F.WARD
Press F.WARD key to get 2X, 4X ,8X, 16X,32X,
normal play circular fast forward function of
DVD disc playing.
Press F.WARD key to get 2X, 4X, 8X, 16X,32X,
normal play circular fast forward function of
other type of disc playing.
Press B.WARD key to get 2X,4X, 8X, 16X, 32X,
normal play circular fast reverse function of DVD
disc playing.
Press B.WARD key to get 2X, 4X, 8X, 16X, 32X,
normal play circular fast reverse function of other
disc playing.
B.WARD
2X

8
4. DVD Description of function
4.1 Subtitle
This DVD function may enable you to select
multi subtitle languages (as many as 32 kinds
and only for the disc with multi subtitle encoded).
Press SUBTITLE key to get desired display.
For example, to select language 2 English
from 8 options.
SUBTITLE 02/08 English
Off
4.2 Title
Press TITLE key to get title menu.
(This operation works only for the disc with
multi title encoded).
4.3 Menu
Press MENU key to return to main menu for
DVD disc playing.
4.4 Direction key
During playing discs, the four direction keys
enable you to select at your option in title,
menu or setup.
4.5 Number key
Press relevant number key for direct access
according to picture titles.
When playing a DVD, press TIME key.
The following will be displayed:
TIME
ln the condition of SVCD, VCD disc in
PBC OFF:
You may press the numbered buttons to enter
the desired playing time.
For example 55:50,stands for 55 minutes and
50 seconds.
4.7 PBC play
In the PBC ON mode, song selection can only
be done from the main menu.
4.8 Repeat from A to B
First press of A-B key to set initial point (A):
A-B A
TT: 01/03 CH : /12
4.6 Time
TIME
Select Track: --/13
Disc Go To: --:--
Track Go To: --:--
A-B
AB
Second press of A-B key, to set endpoint(B):
TIME
TT: 01/03 Time : :
TIME
CH: 03/12 Time : :

9
4.9 Repeat
In DVD mode, press REPEAT key. The following
will be displayed:
REPEAT
Chapter repeat on
Chapter
REPEAT
REPEAT
REPEAT
Title repeat on
Repeat all
Repeat off
Title
All
4.10 Z o o m
REPEAT
REPEAT
Repeat all
Repeat single
ln SVCD/VCD mode, press PBC key to
get PBC off, then press REPEAT key.
The following will be displayed:
Track
All
During a sport match, concert or theatrical
program, press ANGLE key continually on
remote controller to select various angles
to view the same image
(This operation works only for the disc with
multi angle encoded).
Angle 2/2
2
4.11 Angle
The picture may be enlarged by up to 4 times
to facilitate you to enjoy a particular action
or still picture. Press this button 4 times,
the zoom scales will be 2X,3X,4X,1/2,1/3,1/4,OFF
respectively.

10
General Setup Page
General Setup Page
Set Last Memory State
Set OSD Lang
TV Display
Angle Mark
OSD Lang
Captions
Screen Saver
Last Memory
TV Display
Angle Mark
OSD Lang
Captions
Screen Saver
HDCD
Last Memory
PS
On
Eng
Off
On
On
4:3PS
Off
Eng
Off
On
Off
On
On
Off
English
French
German
Italian
Spanish
Portuguese
General Setup Page
General Audio Video
Go To General Setup Page
TV Display
Angle Mark
OSD Lang
Captions
Screen Saver
HDCD
Last Memory
4:3/PS
Off
Eng
Off
On
Off
On
5.1.3 Last Memory
5.2 Audio Setup
5.2.1 Speaker Setup
5.2.1.1 Downmix
a) LT/RT Choose this setting when you are
connected to a 2 channel Analog
Audio input.
b) Stereo Choose this setting when the DVD
player is connected to a TV or the
Therefore modulator.
c) V Surr Choose this setting to listen to the
soundtrackeffects, recorded on a disc
formatted in Surround Sound.
5.1.2 Language
Audio setup include: Speaker setup, Spdif
setup, CH EQ setup, 3D Processing.
The system setup options are illustrated below:
The system setup options are illustrated below:
General Setup Page
Set TV Display Mode
TV Display
Angle Mark
OSD Lang
Captions
Screen Saver
HDCD
Last Memory
4:3PS
Off
Eng
Off
On
Off
On
4:3/PS
4:3/LB
16:9
Audio Setup Page
Go To Audio Setup Page
Speaker Setup
Spdif Setup
CH EQ Setup
3D Process
Speaker Setup Page
Set Downmix Mode
Downmix STR
LT/RT
Stereo
Preference
General Audio Video Preference
General Audio Video Preference
General Audio Video Preference
5.DVD Setting of the system
Press the SETUP button on the remote controller,
the SETUP MENU (main) will be displayed.
1.Press the Left or Right arrow buttons to highlight
the icon of the desired page,then press the Down
or Up arrow button to activate that page.
Press the Down arrow button to highlight the
desired option. Press Enter or press Right to
select, the choices of that option appear on
the right.
2. Press the Arrow buttons to highlight the Cross option,
then press Enter or Setup again to exit Setup Menu.
5.1 General Setup
5.1.1 TV Display
The system setup options are illustrated below:
Highlight the TV Display mode option, and press
the Arrow buttons to choose the TV Display mode
you prefer. Press Enter to confirm.
The user may set the language of creen display,
subtitle, audio, DVD menu to English.
Highlight the Last Memory mode option,and
press the Arrow buttons to choose On or Off.
Press Enter to confirm.
If it is set state On, during playing disc, open
the tray, then close and play it again, it plays
from the last memory.
General Audio Video Preference
General Audio Video Preference

11
Spdif Setup Page
Setup Spdif
Spdif Output RAW
Spdif Off
Spdif/Raw
Spdif/Pcm
CH EQU Page
Select EQ Type
Type None None
Rock
POP
Live
Dance
Tecco
Classic
Soft
5.2.3 EQ Type setup
The system setup options are illustrated below:
General Audio Video Preference
General Audio Video Preference
5.2.2 Spdif Output
The system setup options are illustrated below:
Highlight the Spdif option, and press the Arrow
buttons to choose the Spdif output you prefer.
There are 3 optional modes: Spdif Off, Spdif/Raw,
and Spdif/Pcm.
a) Spdif Off: From the Coaxial Output jack and
Optical Output jack no signal is output.
b) Spdif/Raw: Choose this setting if your DVD player
is connected to a disc recorded with Dolgy Digital.
DTS and MPEG audio formats, the corresponding
digital signals will be output from the Coaxial
Output jack or Optical Output jack. This players
digital output jacks are designed for a connection to
DTS, or MPEG receiver or decoder.
c) Spdif/Pcm: Choose this setting if your DVD player
is connected to a 2-channel digital stereo amplifier.
When playing a disc recorded with Dolby Digital and
MPEG audio formats,audio signals will be modulated
into a 2-channel PCM signal, and it will be output
from the Coaxial Output jack or Optical Output jack.
Highlight the EQ Type option, and press the Arrow
buttons to choose Equalizer type. There are 8 EQ
type: None, Rock, POP, Live, Dance, Techno,
Classic, Soft.
3D Processing Page
Reverb Mode
Reverb Mode Off
Concert
Living Room
Hall
Bathroom
Cave
Arena
Church
5.2.4 3D Processing
The system setup options are illustrated below:
Off
Choose Reverb Mode to set up the 3D Processing
mode. There are eight modes in this option: Off,
Concert, Living Room, Hall, Bathroom, Cave,
Arena, Church
General Audio Video Preference
Video Setup Page
Go To Video Setup Page
Component
Resolution
Quality
HDMI Setup
S-Video
5.4 Video setup
The system setup options are illustrated below:
Video setup includes: Component, Resolution,
Quality, HDMI Setup.
General Audio Video Preference

12
Video Setup Page
Compenent
Resolution
Quality
HDMI Setup
Compenent
S-Video S-Video
YUV
Video Setup Page
Video Quality Setup
Compenent
Resolution
Quality
HDMI Setup
Sharpness
Brightness
Contrast
Resolution
Sharpness
5.4.1 Component
5.4.2 Resolution
5.4.3 Quality
Component is set to S-Video or YUV.
Resolution is set to 480I, 576I, 720p(50Hz),
720p(60Hz),1080i(50Hz),1080i(60Hz),
1080p(50Hz),1080p(60Hz)
You can set the video quality.
The system setup options are illustrated below:
The system setup options are illustrated below:
The system setup options are illustrated below:
General Audio Video Preference
General Audio Video Preference
General Audio Video Preference
480I
576I
720p(50Hz)
720p(60Hz)
1080i(50Hz)
1080i(60Hz)
1080p(50Hz)
1080p(60Hz)
Mid
00
00
High
Medium
Low
Go To HDMI Setup Page
HDMI
HDMI Setup
HDMI Setup Page
HDMI Setup Page
HDMI
Audio Source
On
AUTO
On
Off
Audio Source
HDMI
Audio Source
On
AUTO AUTO
PCM
5.4.4 HDMI setup
The system setup options are illustrated below:
Choose HDMI on or off.
Choose Audio Source Auto or PCM.
Compenent
Resolution
Quality
HDMI Setup
Relevant information :what is HDMI
The High-Definition Multimedia Interface (HDMI)
is a compact audio/video connector interface for
transmitting uncompressed digital streams. It
represents a digital alternative to consumer
analog standards such as Radio Frequency (RF)
coaxial cable, composite video, S-Video, SCART,
component video, D-Terminal, and VGA.
HDMI connects digital audio/video sources such
as set-top boxes, Blu-ray Disc players, personal
computers, video game consoles, and AV
receivers to compatible digital audio devices,
video monitors, and digital televisions (DTV).
The world's first HDMI products started shipping
in the fall of 2003 and currently over 800 CE and
PC companies have adopted the HDMI
specification (HDMI Adopters). HDMI began to
appear on consumer HDTV camcorders and
expensive digital still cameras in 2006.
Shipments of HDMI are expected to exceed that
of Digital Visual Interface (DVI) in 2008, driven
primarily by the Consumer Electronics (CE)
Market.
General Audio Video Preference
General Audio Video Preference
General Audio Video Preference

13
Password Setup Page
Password Setup Page
Go To Password Mode
Go To Password Mode
Password Mode
Password
Password Mode
Password
On
On
On
Off
Change
Preference Page
Go To Preference Page
TV Type
Audio
Subtitle
Disc Menu
Parental
Password
Default
PAL
ENG
ENG
ENG
Load Factory Setting
Reset
Preference Page
TV Type
Audio
Subtitle
Disc Menu
Parental
Password
Default
PAL
English
English
English
5.5 preference
When it is no disc, highlight the Preference option.
The system setup options are illustrated below:
You can setup the Preference state.
If you want to reset the setting of the system
(default value), highlight the Reset option,
and press Enter to confirm.
5.5.1 Password setup
5.5.2 Default
The user can set the password.
Select Password Mode on.
The default old password is 0000.
General Audio Video Preference
General Audio Video Preference
General Audio Video Preference
General Audio Video Preference

14
6.1.Operation of Mp3 function
Mp3 is an audio compression mode using Level 3 of the international standard MPEG, whereby
sound signal is compressed in a rate of 12:1 A Mp3 disc can record music for play of over 600
minutes or record over 170 songs, rivalrous CDs in sound quality.
To play a Mp3 disc
1.Follow the basic operating instructions to insert a Mp3 disc, this machine will start to search the
information on the disc and show it in the display.
2.Press the number buttons to select the track number desired.
3.Press stop key then direction key to select other menu.
Select the track using numbered buttons
Repeat play
Using this function, the user will be able to enjoy a particular song or all the songs on the disc over
and over again.
1.Choose a particular song to be repeated.
2.Press the REPEAT button , the Screen will display as illustrated
3.Exit repeat play, the screen will display as illustrated.
4.Cancel the repeat function, folder will be on screen.
Others functions:
when a Mp3 disc is played, the features of mute, volume control, pause and forwards and backward
search will also be available. The operations are the same with those of CDs.
6.2.JPEG
JPEG adopting the most efficient compression is widely used as picture storage type flattened
and stored format.
Even if pictures are compressed 15-20 times. They still have good effect. Supported by most
picture precessing software, fit for picture storage,it has small data and easy use. This machine
can read .JPEG format picture CD discs
Press revelant number key to select picture display.
1.Put in disc correctly ,the machine begins to search disc information.
2.Press number key to select picture.
3.lt s efficient only in present picture when number key pressed .
,
Select to play by menu
1.Insert disc, machine searches disc information and main menu displays on screen. Press
number key to select picture. Press play key to enter play mode
2.Press direction key to select picture then press. Play key.
3.ln condition of stop. press direction key to select other pictures.
4.ln condition of stop. Select the first line file item on the right. Then press play key, to return to
upper menu.
6.3. Disc protection
Protection
a. When loading or removing the discs, always hold them by the centre and edge.
b. Do not stick or write anything on the surface. Protect discs against any finger prints.
Cleaning
Wipe the discs from time to time using a soft cloth. Always wipe from the centre toward the edge.
Storage
a. Never warp the discs. During non-use periods, store them in their cases, which should be
kept vertically. Do not expose discs to high temperature, dampness or extremely low
temperature, or else it may cause damage to the discs.
b. Do not expose discs to direct sunlight.

15
7. Operating theAmplifier
7.1. Normal function
1. Be sure to switch off the power and to connect the outputs to corresponding input jacks.
2. Turn on the power and wait 3-4 seconds until the speaker functions are connected.
3. Select an audio source by pressing the INPUT key on the front panel or on the remote control to display USB,
BT,FM,AUX,OPTI,COA1,COA2,DISC.
4. Adjust the VOLUME knob on the front panel or the VOL+/- key on the remote control to adjust the setting of the
main volume.
5. Press the MENU key on the front panel to display BASS, TRE, MICV, ECHO, XDRIVE(ON/OFF), SPEAKER
LIGHT, then adjust the knob or press MENU adjust+/-to change music treble, bass and MIC effect.
6. Press the MUTE key on the remote control to mute, press it again to reset.
7. Press X Drive on the remote to turn on/off X-Bass effect.
8. LED1,LED2,LED3,OFFPress the LIGHT button on remote control to change the light mode.
7.2. Tuner applications
1. Before using the radio functions, you must attach the supplied antenna. Adjust the antenna to obtain optimum
reception. Press the INPUT key on the front panel (amplifier) or on the remote control,to select "FM" function.
2. Press the CH+/CH- key on the remote control to find radio bands that you have previously saved.
3. Press or hold the TU+/TU- key on the remote control to adjust the radio frequency manually.
4. Press the AUTO key on the remote control, the machine will scan radio channels from low-frequency to high-
frequency by itself and memorize the channels one by one.
7.3 Karaoke functions
1. The machine can auto detect whether MIC1, MIC2 is inserted.
Please turn off the microphone volume and adjust the volume gradually after inserting the microphone.
2. Press MIC.MENU on the remote control to display MVOL, then press + /-, to change the microphone VOLUME.
3. Press MIC.MENU on the remote control to display ECHO, then press +/- to change the microphone ECHO.
Note: Do not touch the top of the microphone when singing in order to avoid a howling effect.
Adiust the microphone volume gradually to avoid howling effect.
7.4.BT pair and connect
• Turn off any BT devices previously paired (linked) with this unit.
• Turn on the BT features on your phone or music player.
• Turn on and set this unit to BT mode.
• Set your phone or music player to search for BT devices.
• Select Party System 1240 from search results on your phone or music player
• Select OK or YES to pair this unit with your phone or music player
• If protected, enter 0000 for passkey.
8. Speaker Assembly:
Carefully slide section 2 on to the top
of speaker cabinet 3, then carefully
slide section 1, on to the top of section 2 .

16
8. Troubleshooting Guide
Before taking your unit to an authorised service centre, check the following.
No sound:
• Make sure that there is a good connection between the player and other appliances such as the power amplifier or
the TV.
• Make sure that you are operating the TV and the power amplifier correctly.
No picture:
• Make sure that there is a good connection between the player and other appliances such as the TV.
• Make sure the TV is switched on and the correct AV input is selected.
Disc does not play:
• Make sure the disc is loaded correctly (label side is facing up on the disc tray.)
• Make sure the disc is clean.
Remote control does not work:
• Remote any obstacles between the player and the remote cotrol.
• Point the remote control at the remote control sensor.
• Check the batteries.
Picture dividing:
• Make sure the disc is clean and not scratched.
• If the player is controlled by a micro-computer and encounters problems, switch the power off, wait a few
seconds and then switch it on again. If no error message is displayed, the player should work properly.
9. Technical Specifications
Type
Play mode
Disc mode
Video Characteristics
Resolution
Video S/N ratio
Audio Characteristics
Total output power
FM frequency
Audio S/N ratio
Dynamic range
Distortion
D/A converter
Output Characteristics
Video output
Audio output
Digital audio output
Power voltage
Power consumption
Amplifier/DVD
NTSC/PAL
DVD, DVD+R/RW, CD, CD-R/RW, HDCD, MP3, MPEG4
≥500 lines
≥56dB
150WX2
87.5-108MHZ
≥86dB
≥90dB
<0.1% (Max)
192KHz/24bit
Composite video, S-Video, Component video (Y, Cb, Cr), HDMI
ML/MR,Line out
Coaxial, Optical
AC 100-240V~, 50/60Hz
150W
Table of contents
Other Edison Karaoke System manuals


