MASINGO Spinto G3 - Shark User manual

It's a Karaoke all night long
Party
Karaoke Machine
Spinto G3 - Shark
USER
MANUAL

Performer’sManual
Karaoke Machine Spinto G3 - Shark

5
]Welcome[
Congratulations!
You’ve just taken your party
game up a notch
Whether you’re celebrating with a few friends or with the whole gang—
in the comfort of your home or in a big event space—your parties will
be peppier with the beautifully designed, deceptively compact Spinto
G3 Shark - Karaoke Machine from Masingo.
Choose from Bluetooth, AUX, USB, or MicroSD and get the music going—
or simply connect to your TV. Sing out some show tunes with Grandma,
blast out some big hits with your pals, or serenade your sweetheart.
You can even adjust your volume and vocal eects to enhance your
performance. No matter what your skill level, this box of magic is sure
to delight vocalists of all ages—from 5 to 125.
Need to send out some announcements during your big bash? No
problem! This portable, multi-functional machine doubles as a punchy
PA system. Simply turn o the music and speak into the mic for volume-
adjustable, crystal-clear announcements. Plus, the contoured speaker
grill directs the sound up and out so you can be sure your voice is heard.
When all is said and sung, just turn o the machine and plug the
microphones into the convenient, built-in charging docks. In no time at
all, you’ll be ready for an encore.
Sing on!

6 7
Take note:
Parts & features
]Parts & Features[
]Parts & features[
Volume +/-
On / O
Echo +/-
Equalizer A-B (frequency)
LED Display
Mode
Karaoke
Mode Play / Pause
Volume -/
Previous Volume + /
Next
TFTF
On / O
MicroSD
Slot
USB PortCharging
Port
AUX
Line In
Microphone Power
Indicators Charging Light
Indicator
What’s included…
1 x Masingo Karaoke Machine
2 x Rechargeable microphones
1 x 3.5 mm AUX cable
1 x 3.5 mm AUX - RCA cable
1 x Type C charging cable
1 x USB charger plug
1 x Performer’s manual

98
Let’s begin...
Machine assembly
Ready, set, sing!
Quick-start guide
Note: See the “Usage Guide” section of this manual for more information
on how to operate your machine.
Do not turn on the
microphones while they are
charging.
Use caution when charging
microphones in docks while
machine is unplugged.
Battery will deplete quickly.
Clean and store the machine
after each use.
Check the machine for
damage before each use.
Do not use the machine with
attachments not approved
by the manufacturer.
Keep the machine away from
heat, steam & water.
#1
Charge the machine and microphones before each use.
#2
Turn the machine and microphones on.
#3
Choose your preferred playback setting.
#4
Display your lyrics.
#5
Rock on!
How to install the shark fins
Installation is quick and easy! Gently attach each of the baby
shark’s fins, one on the top and the other two at its sides. If done
correctly, the pieces should fit easily and snugly. We recommend
that you remove these pieces when transporting the machine to
avoid accidental damage. Now you’re all set - happy singing!
]Machine Assembly[
]Quick-Start Guide[

10 11
Never miss a note
Detailed usage guide
Machine
How to charge the machine
Connect the USB charger plug or a compatible micro-USB cord
into the machine and to a polarized outlet. Be sure to charge
fully before each use. The indicator light on the back of the
machine will turn on to indicate charging and power.
How to turn the machine on
Turn the Power switch on the back of the machine to the “on”
position.
Microphones
How to charge the microphones
Place the microphones in the charging docks on the machine
or plug them into a compatible charger using the micro-USB
charging cable. Be sure to charge fully before each use. While
charging, the top bar of the battery icon on the display will flash,
then stop flashing when the battery is full.
How to turn the microphones on
Remove the microphones from the charging docks and turn them
on using the power button on the handle. They will automatically
connect to the machine.
Note: Microphones will automatically turn o after 15 minutes of
no use.
How to set up the microphone
The A-B button controls both the microphone’s channel and the
microphone’s frequency band.
IMPORTANT: When using both microphones simultaneously, each
microphone must be set to a dierent frequency band (that is,
one must be set to CHA while the other one is set to CHB). If both
microphones are set to the same frequency band, the microphone
audio may cut in and out.
Changing the Frequency Band: The frequency band is represented
by the letters CHA or CHB in the bottom left corner of the LED display.
To change the microphone’s frequency band, hold the A-B button
for one second until the desired band is reached. One microphone
MUST be set to CHA while the other MUST be set to CHB.
Changing the Microphone Channel: Channel is represented on the
microphone LED screen as a number from CH1 to CH8. To cycle
through possible channels, click the A-B button until the desired
channel is reached. Unlike frequency bands, having both mics on the
same numbered channel will not negatively impact performance.
]Detailed Usage Guide[

12 13
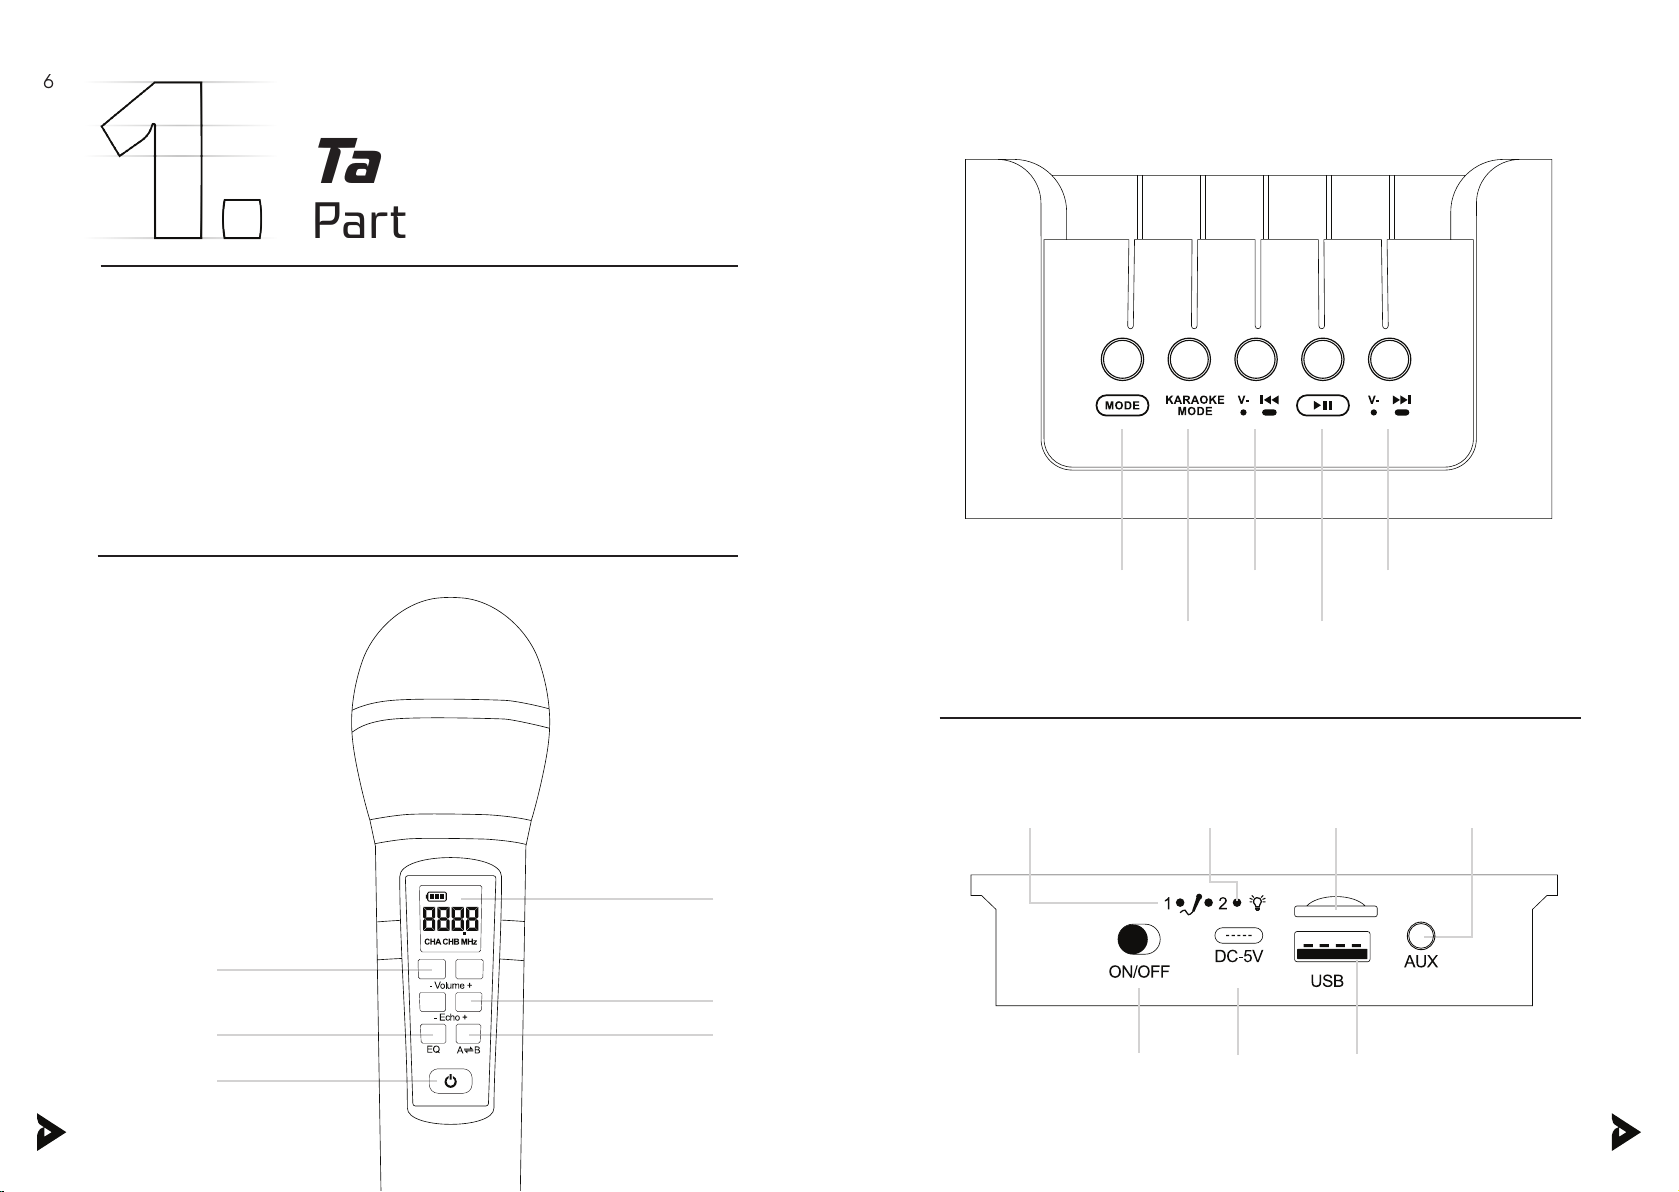
How to customize your microphone vocal mix
To adjust the volume of your singing over the music, click the
Volume +/- buttons up or down until it reaches your preferred
volume.
To modify the reverb eect on your singing, click the Echo +/-
buttons up or down as desired. Use the EQ button to choose
between 5 dierent equalizer selections.
Music
How to set up playback
Your machine has 5 dierent playback options: Bluetooth, SD,
AUX, USB, PA. Each has its own hookup location (see diagram in
the “Contents/Parts” section) and setup method (see the “Music”
subsection below). See the aforementioned sections for more
information on how to set up your preferred playback mode.
If desired, you can also place your phone or tablet in the mount on
the front of the machine to display your song lyrics.
How to connect to Bluetooth
Playing music from your device:
This machine will be ready to connect via Bluetooth as soon as you
turn it on. To use this feature, simply search for the machine name
(“MASINGO”) under your playback device’s Bluetooth connection
settings and click to connect.
How to use SD mode
Playing music from an SD card:
Plug your MicroSD card into the designated slot on the back of the
machine. Playback will begin immediately. Use operation instructions
in the “Music” subsection below to adjust settings.
How to start AUX mode
Playing music from an AUX-compatible device:
Plug the AUX or AUX-RCA cable into the designated slot on the back
of the machine to activate AUX mode. Then, plug the other end of
the adapter into the designated inputs on your device and play your
music just as you normally would.
How to start USB mode
Playing music from a USB drive:
Plug a USB stick into the designated slot on the back of the machine.
Your music will begin playing automatically. You can also use this slot
to charge your phone using a compatible USB cable. Use operation
instructions in the “Music” subsection below to adjust settings.
How to use PA mode
When there is no music playing, this machine will automatically start
PA mode. Simply use the microphones as directed in the above
subsection.
How to use multiple playback modes
To use playback modes interchangeably, simply activate each mode
according to the instructions above, then click the Mode button to
switch between the inputs.
How to customize your music
Karaoke mode allows you to instantaneously convert a song into a
karaoke version by muting the vocals. In order to do so:
1. Connect your device via Bluetooth as instructed in the “How to
connect to Bluetooth” section.
2. Press the “Karaoke Mode” button on the machine’s function
board until the song’s vocals are muted. To restore vocals, simply
press the “Karaoke Mode” button again.
]Detailed Usage Guide[

1514
]Troubleshooting[
How to connect to an external media source
Playing music from a MP3 player, phone, or TV:
Plug the AUX or AUX-RCA cable into the designated slot on the back
of the machine. Then, plug in your preferred compatible device into
the other end of the adapter and use the machine as indicated.
Maintenance
How to clean
Turn the machine and microphones o and unplug from the wall
and from the machine speaker.
Gently wipe the outside of the machine using a clean, dry cloth.
Keep all vents, buttons, and openings free of lint and dirt. Do not
immerse the machine in water and do not use any harsh cleaners.
How to store
Charge the machine and microphones so that they are ready for
next use.
Make sure that the machine is clean and dry. Bind the unplugged
cord gently with an electrician-approved fastener. Do not wrap
the cord around the machine.
Store the machine in a cool, dry place away from damaging
elements.
For best results, clean and store the machine after each use.
When things go flat
Troubleshooting
Problem Solution
Battery
icon on the
microphone
screen is
blinking
Microphone
will not turn on
The microphone battery is low or depleted.
Charge before use.
Machine will
not turn on
The battery is depleted. Be sure to charge the
machine after each use and, when charging
the microphones in the charging docks, keep
the machine plugged in.
Machine is
not playing
microphone
vocals
Ensure that each microphone is on a separate
frequency band. This is represented by CHA or
CHB in the bottom left corner of the microphone
LED screen. (To switch channels, hold down the
A-B button for one second.) Microphones will
not work properly unless one mic is set to CHA
while the other mic is set to CHB.
After 15 minutes of inactivity, the microphones
will turn o.
If any of these issues persist or if any part of the machine becomes
damaged, discontinue use and consult a licensed electrician for repair.
Do not attempt to modify or repair the machine yourself. You can also
contact our customer service department (see back cover).
FCC:
This device complies with part 15 of the FCC Rules. Operation is
subject to the following two conditions: (1) This device may not cause
harmful interference, and (2) this device must accept any interference
received, including interference that may cause undesired operation.
]Detailed Usage Guide[

844-262-7464 support@masingo.com www.masingo.com
We’re here for you.
If you encounter any issues with your machine or
have any questions or comments, please feel free
to contact us. Have your warranty information on
hand for faster service.
90-DAY
LIMITED
WARRANTY
Love your new machine?
We want to hear about it!
Table of contents
Other MASINGO Karaoke System manuals

MASINGO
MASINGO Illuminato Q4 User manual

MASINGO
MASINGO Lento X5 User manual

MASINGO
MASINGO Soprano X1 User manual

MASINGO
MASINGO Alto X6 User manual

MASINGO
MASINGO Burletta C10 User manual

MASINGO
MASINGO Spirito H11 User manual

MASINGO
MASINGO Soprano X1 User manual

MASINGO
MASINGO Soprano X1 User manual

MASINGO
MASINGO Allegro X8 User manual

MASINGO
MASINGO Presto G2 User manual