eesens SHIELD User manual

1 / 24 SHIELD-SET-MANUAL-EN-Rev.02
SHIELD SMART TAIL LIGHT
User Manual

2 / 24 SHIELD-SET-MANUAL-EN-Rev.02
Welcome to the EESENS family
Thank you for choosing EESENS’ product. We strive to build
something unique and useful for cyclers by embodying smart
technologies, creativeness and design.
Connect to EESENS
www.eesens.com
Facebook.com/Eesens.inc
3 / 24 SHIELD-SET-MANUAL-EN-Rev.02
Safety Information
Read the manual carefully before using your SHIELD.
SHIELD is designed for paved road. Recommend not to use
it in trail to prevent damaging the tail light.
Always pay attention to the remaining battery power
while using.
Charge devices when the ambient temperature is between
41°F and 104°F (5°C and 40°C).
Cool and dry storage is recommended. Charge the battery
at least 60 minutes every 3 months. Check regularly that
the tail light is attached securely.
Dispose the device according to local regulations
SHIELD is designed to be a supplement, and NOT a
replacement to hand signals. Please comply to local traffic
regulation, when you ride on road. Having lights is good
practice, but is no guarantee against preventing an
accident or collision.
SHIELD’s Anti-theft Alarms provides better security to your
bike, but it doesn’t guarantee your bike won’t be stolen.
Qualified bike locks and secure parking location are still
needed.

4 / 24 SHIELD-SET-MANUAL-EN-Rev.02
Package Content

5 / 24 SHIELD-SET-MANUAL-EN-Rev.02
Overview
Tail Light
Fit to round seatpost / Li-Ion rechargeable battery / 5V USB
charging / Bluetooth 5 & FSK wireless / 6-axis motion sensor /
60 lumens*5 / Capacitive touch / Status LED / 100dB Buzzer
1 Status LED | 2 Left turn signal | 3 Wide-angle light | 4 High
beam | 5 Right turn signal | 6 Touch Button | 7 Buzzer | 8
USB port

6 / 24 SHIELD-SET-MANUAL-EN-Rev.02
Sensing Controller
Li-Ion rechargeable battery / 5V USB charging / FSK wireless /
6-axis motion sensor / Capacitive touch / Status LED / 60dB
Buzzer
1 Status LED | 6 Touch Button | 7 Buzzer | 8 USB port

7 / 24 SHIELD-SET-MANUAL-EN-Rev.02
Getting Started
1. Activate and Charge Devices
2. Connecting Devices with APP
3. Install Tail Light to Seat post
4. Install Controller to Helmet
1. Activate and Charge Devices
Before using you will need to activate the SHIELD device. Pull
the silicone lid over the port. Then, plug in USB-C cable into
the charging port. Charging the device from empty to full
(Status LED is solid green) with 5V 1A adapter takes about 2
hours.
2. Connecting Devices with APP
1. Download Eesens App to your smart phone:
• Android: Google Play Store > Eesens
• iOS: App Store > Eesens
2. Activate Bluetooth on your device and authorize all
necessary permissions required by the app.
8 / 24 SHIELD-SET-MANUAL-EN-Rev.02
(You can read our privacy policy at
https://www.eesens.com)
3. Follow instructions in app to connect to your SHIELD
device.
4. Once connected, you can control your SHIELD and
configure the settings.
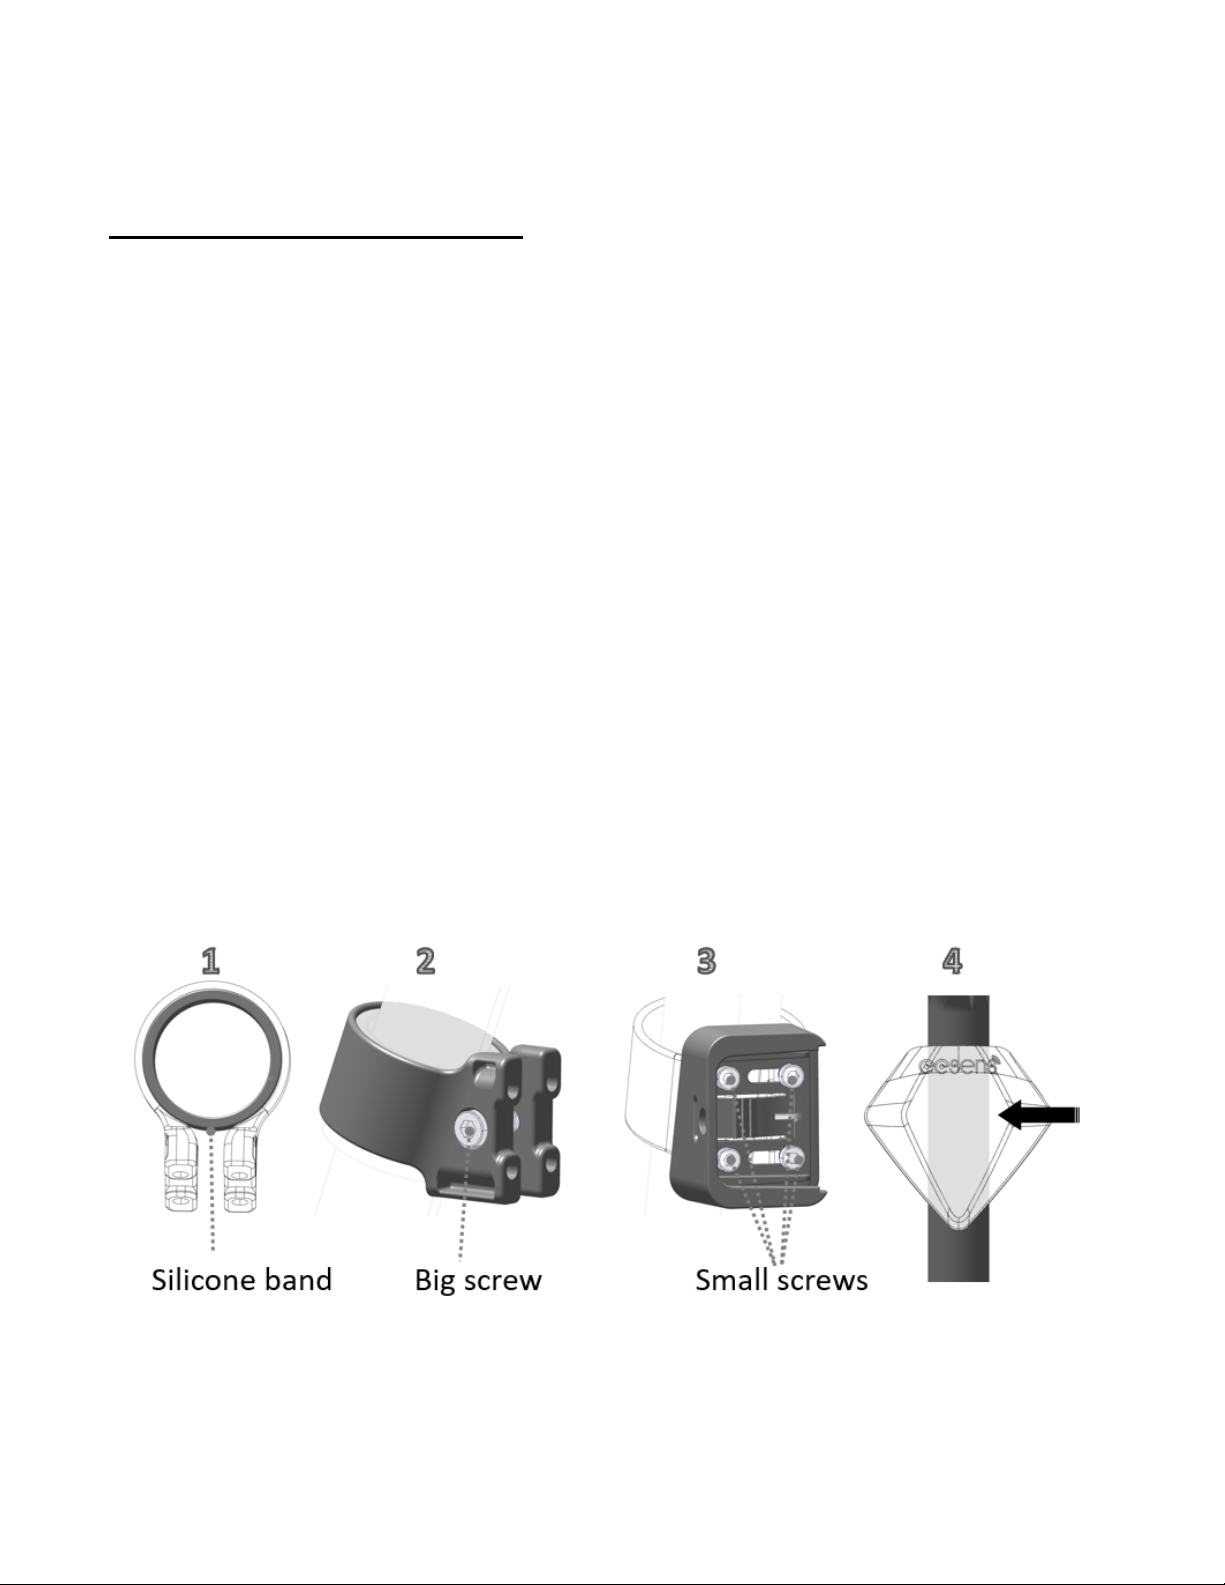
3. Install Tail Light to Seat post
1. Adjust the fitting with the Silicone Band by inserting it
inside the Seat Post Fixture.
2. Attach the Fixture to seat post, secure it use the Big
Screw.
3. Attach the Tail Light Mount to the fixture, with 4 Small
Screws.
4. Slide the Tail Light into the mount until you hear a click.

9 / 24 SHIELD-SET-MANUAL-EN-Rev.02
5. Take off the Tail Light by using a Release Tool in the box.
Push the release tool into the side hole. Slide the Tail
Light out of the mount.
6. You can add a Small Screw to fix the Tail Light on the
mount more securely.
4. Install Controller to Helmet
Attach Sensing Controller to helmet, according to the shape
of your helmet. Ensure that you install the
controller correctly.
1. Use the Zip Tie to mount on the back of helmet
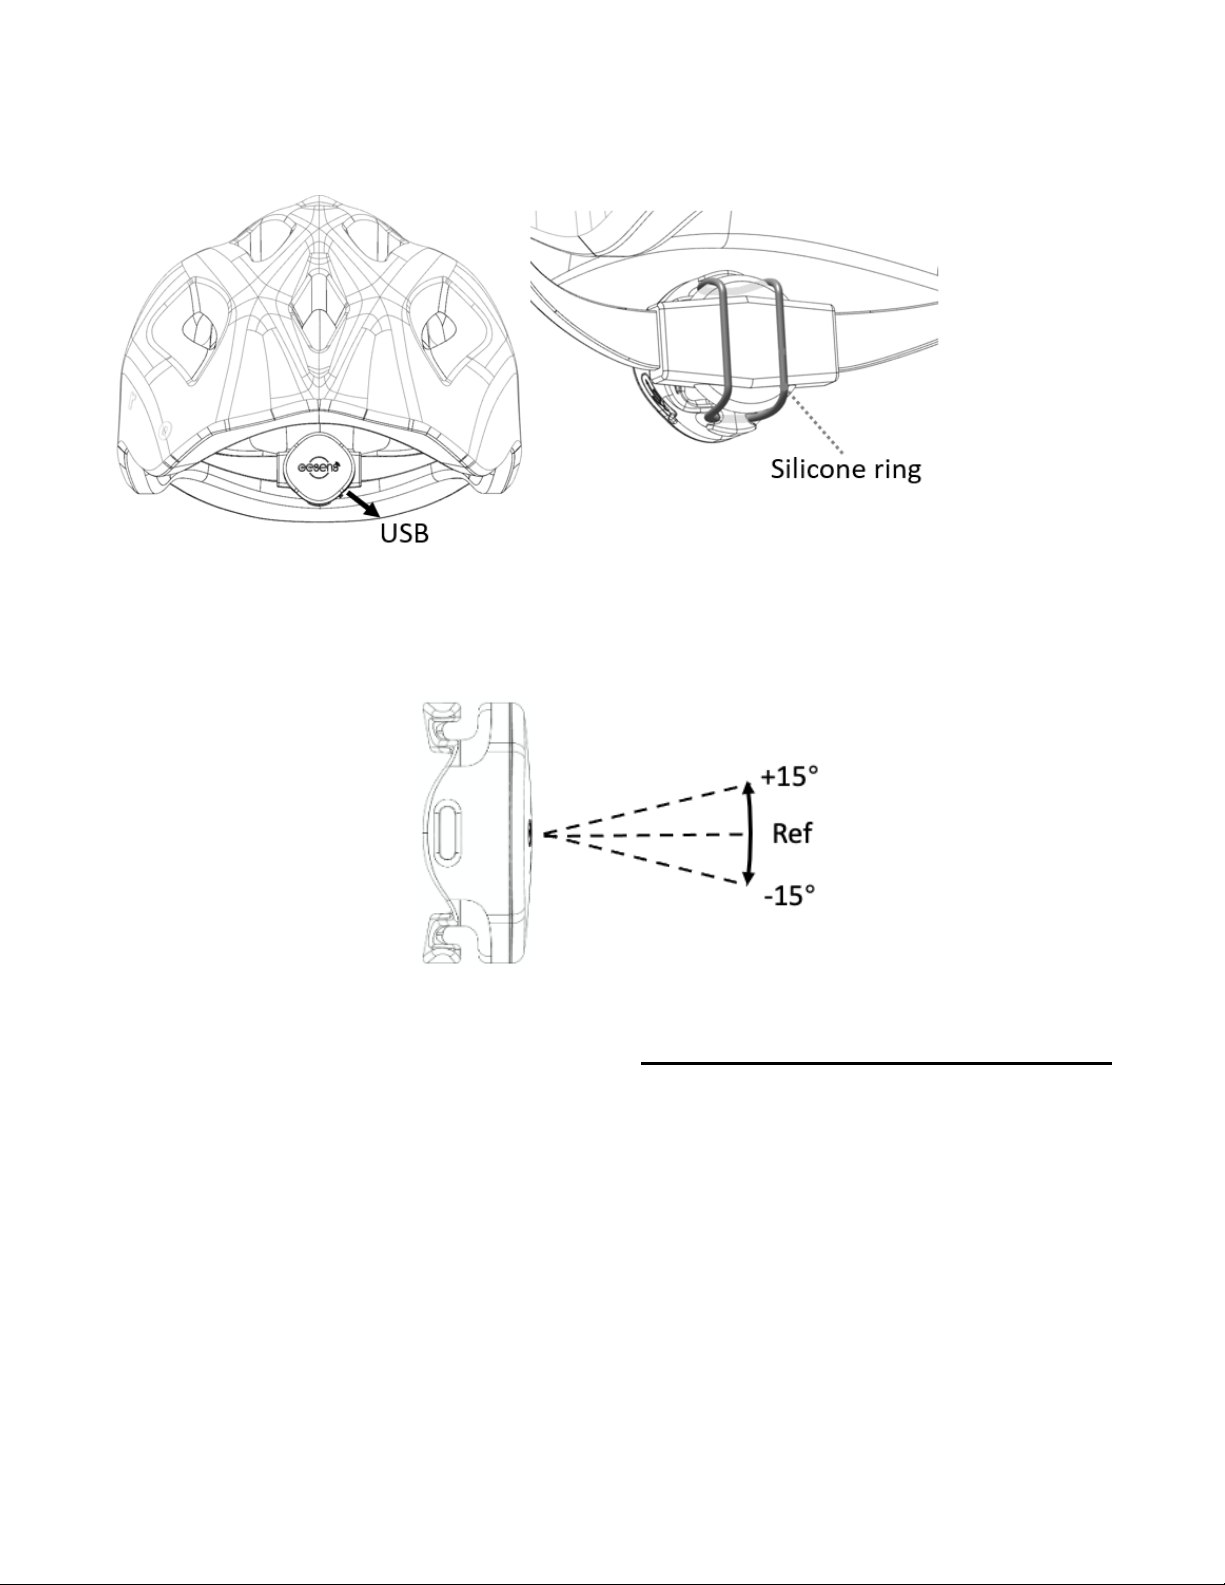
10 / 24 SHIELD-SET-MANUAL-EN-Rev.02
2. Use the Silicone Ring to mount on size adjustment wheel
To accurately read rotation angle, the controller is
recommended to +/- 15° to horizontal line vertically.
Tutorial videos are shared at https://www.eesens.com
and Eesens’ YouTube channel
11 / 24 SHIELD-SET-MANUAL-EN-Rev.02
Using SHIELD
Control the SHIELD devices in three ways:
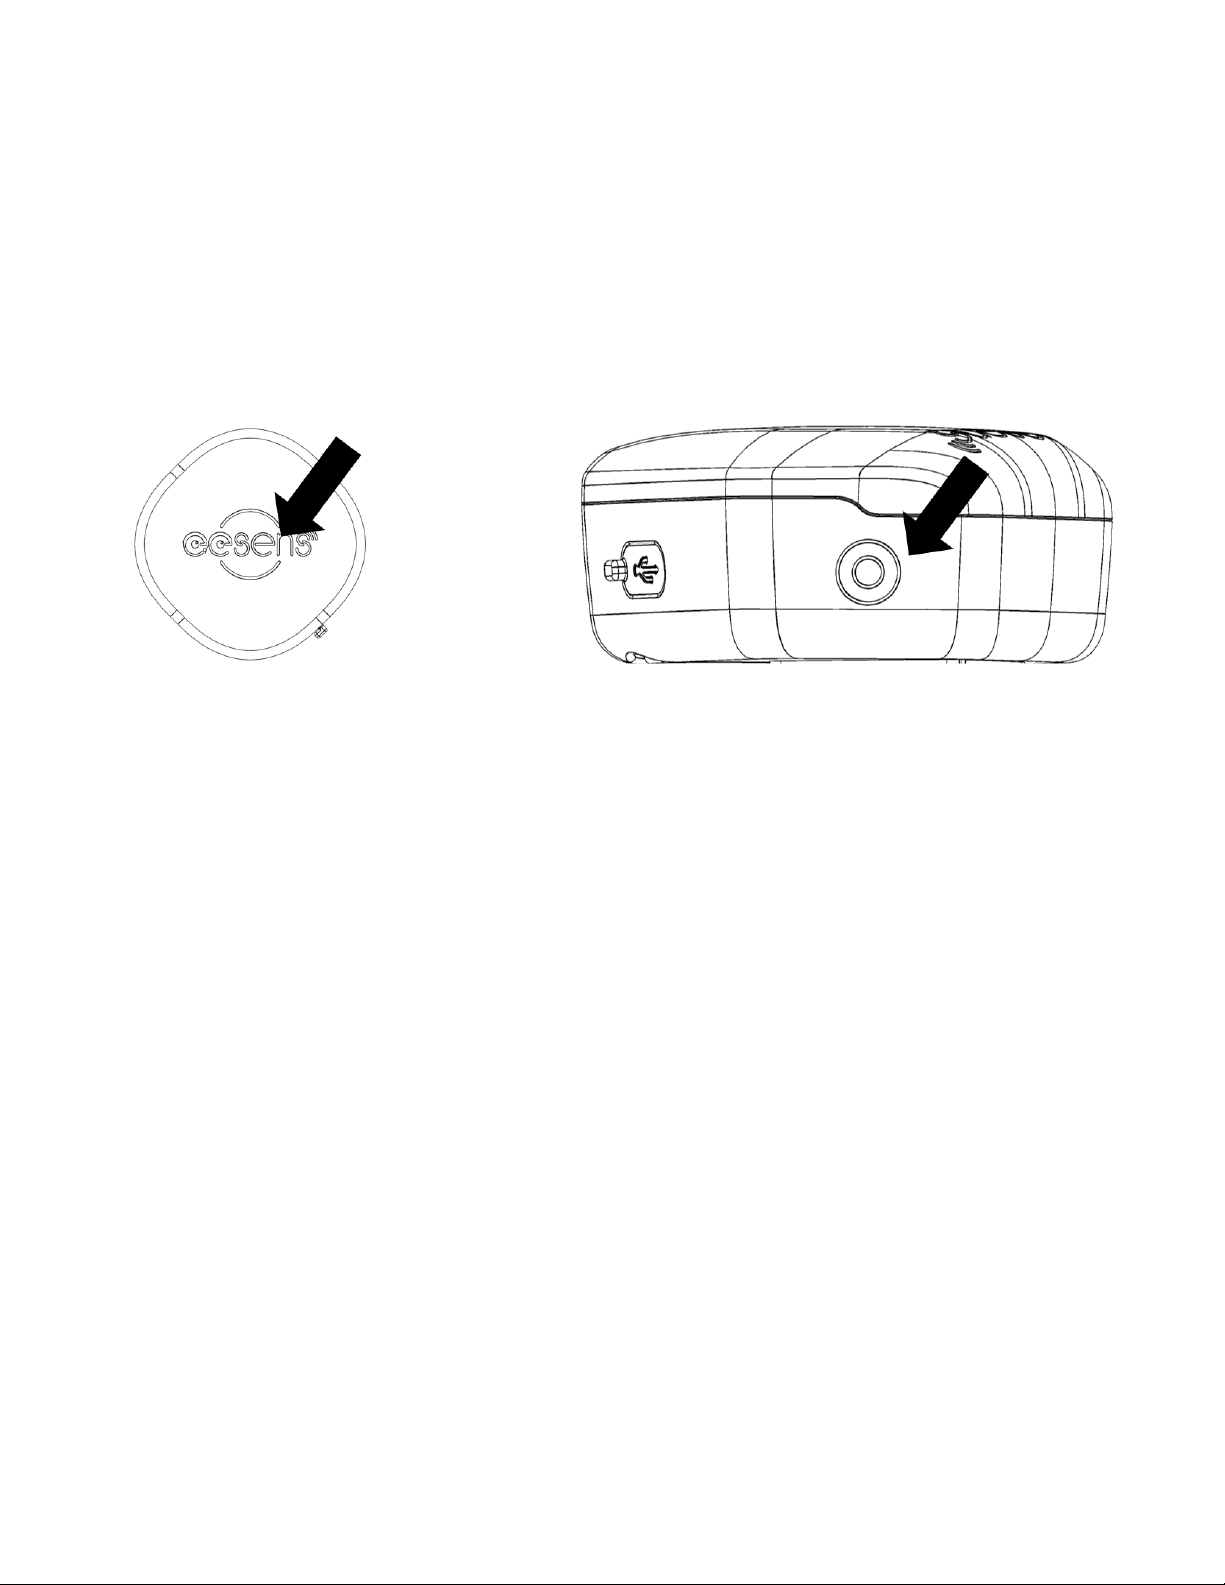
1. Multifunctional touch button: SHIELD uses capacitive
touch button for input. The location of touch is shown
below.
2. Feedback of devices includes LED and beeps to notify you
the status or command result of device.
Motion: SHIELD devices can detect motion to execute
automation functions, like on/off, brake or head-gesture.
3. Eesens APP can control all functions, customize settings
and update features of your tail light and controller.
The devices will light up and beep to notify you the status or
command results. Basic functions of SHIELD are described
below.
Basic Functions of Touch
Tapping the touch button triggers a green LED flash. Then,
holding for every second triggers a green LED flash and a
beep.

12 / 24 SHIELD-SET-MANUAL-EN-Rev.02
Tail Light
Tap
1 tap: Check battery capacity
2 taps: Enter tapcode to disarm tail light
Tap and
hold
2 seconds: Turn off ride light manually
3 seconds: Paring mode to link new controller
5 seconds: Turn on/off Carry Mode
>10 seconds: Restart device
Sensing Controller
Tap
1 tap: Check battery capacity
3 taps: Enable “Find my bike”. Sensing
controller will trigger Tail Light to blast loud
sound and bright light, helping you to locate
your bike.
Tap and
hold
3 seconds: Paring mode to link new Tail Light
5 seconds: Turn on/off Carry Mode
>10 seconds: Restart device
Status Indicators
System
3 flashing red: input wrong actions
Repeated flashing red: rebooting system
5 flashing red/green: enter/exit Carry Mode
2 flashing yellow: start entering disarm
tapcode

13 / 24 SHIELD-SET-MANUAL-EN-Rev.02
Battery
and Power
Indicator
Green: 70% or more of full charge
Yellow: 30% to 70% of full charge
Red: 20% to 30% of full charge
Fast flashing red: 20% or less, in PowerSave
mode
Flash slowly – charging
Wireless
connection
Solid blue: Bluetooth is connecting
Flashing Blue: device is in pairing mode
Fast flashing blue: device is transferring data
Motion Functions
Auto On / Off
SHIELD device turns on itself, when the device is moved for
short time. If the working device isn’t moved for a while, it
will sleep to save power. The auto-off timer can be
configured in Eesens APP.
Trigger/Cancel Turn Signals
You can trigger and cancel Turn Signals of SHIELD tail light by
moving your head. You can customize your pattern in Eesens
APP.
Trigger Turn signal
1. Turning your head quickly
2. Turn head on the side → Select “Turning Angle” in APP

14 / 24 SHIELD-SET-MANUAL-EN-Rev.02
3. Look back over shoulder → Select “Hold Time” in APP
4. Controller notifies you successful triggering with a beep →
Enable” Beep notification” in APP
5. Check if you can trigger turn signals of both sides with the
settings
Cancel Turn signal
You can cancel turn signal by lowering your head within 6
seconds after triggering turn signal. Controller notifies you
successful canceling with beeps.
Practice the action before using SHIELD for your ride
Sensing Brake
Deceleration triggers brake light. The sensitive level can be
configured in Eesens APP → select” Brake Sensitivity” in APP
Anti-theft Alarm
SHIELD’s alarm system works by detecting vibration and
movement
on the device. You can turn on the alarm manually in APP.
The tail light can also switch on itself, if Auto-armed setting is
ON in APP.
If the armed tail light is moved, alarm will be triggered.
Meanwhile, the tail light alerts to linked controller/APP to
notify owner to check bike. The alarm stops, 10 seconds after
the movement stops.

15 / 24 SHIELD-SET-MANUAL-EN-Rev.02
You can turn off the alarm by Eesens APP or entering disarm
tapcode on Tail Light.
All functions may be updated with new release of software.
Read the release note to know the changes in Eesens
website. Subscribe our newsletter or follow our Facebook
page to get latest information.
Device Settings in APP
Tail Light
Light Mode
Select a light mode, like steady, flash and so on
Auto-off
Set timer of automatic switching off ride light,
starting from Tail Light is unmoved
Day flash
In bright environment, light mode switches to
Day flash automatically. If Day flash is Off, ride
light is off in bright environment.
Brake
Sensitivity
Choose how much deceleration your brake
light is given with. 1 is the most and 9 is the
least level
Auto-armed
Tail light turns on anti-theft alarm
automatically, 1 min after ride light is off
Disarm
tapcode
With the setting ON, a tapcode can be set up.
You can then disarm the alarm by entering the
tapcode on your device
16 / 24 SHIELD-SET-MANUAL-EN-Rev.02
Sensing Controller
Turning
angle &
hold time
customize turning head pattern for triggering
turn signals. The setting has three presetting
schemes
Turn signal
beeps
Controller beeps when a gesture is triggered
Working
indicator
LED flashes when controller works
Firmware Update
Update devices to the latest firmware for new features or
fixes. The update button will appear if Eesens APP detects
newer firmware is available for your device. Tapping on the
button starts updating. Don’t interrupt the updating process
by quitting the App, turning off Bluetooth/phone or rebooting
devices. This may cause the devices failure. We recommend
strongly you to charge SHIELD to high battery level and to
follow the instructions in Eesens APP before update.
Some functions may be changed with the new software.
Read the release notes in Eesens’ website to know the
changes.

17 / 24 SHIELD-SET-MANUAL-EN-Rev.02
Functional Modes of Tail Light
SHIELD Tail Light has other functional modes, which stop ride
lights. You need to switch back to ride mode before riding
bike.
Security mode
Turn on the anti-theft alarm manually or by device
automatically for securing your bike. Moving tail light trigger
alarms. Turn off the mode by APP or by entering tapcode on
tail light. You can set a tapcode in APP. Using tapcode on tail
light as following steps:
1. Tap twice on the touch of the armed tail light
2. After 2 yellow LED flashes, start entering your tapcode
3. Green LED flashes means the tail light is disarmed. Red
LED flashes means your tapcode is wrong.
Carry mode
Turn off all functions related to ride lights and alarm. Entering
this mode with touch command, for transportation. Exiting
with charging, rebooting and touch command.
PowerSave mode
With low battery level, SHIELD device enables PowerSave
mode to extend the use time for riding safely at night. Some
functions, such as Day Flash, with high power consumption

18 / 24 SHIELD-SET-MANUAL-EN-Rev.02
are limited. Ride light is set to lowest intensity. SHIELD shows
warning indication of low battery level. Charge your device as
soon as possible.

19 / 24 SHIELD-SET-MANUAL-EN-Rev.02
Troubleshooting
If you are having trouble with your SHIELD, follow these
steps.
Not powering on
Charge the device using the USB-C cable.
Not charging
Make sure the USB-C power source is switched on and
plugged correctly. The LED indicator will display a slow pulse
when charging.
Ride light doesn’t work
Tail Light may be set Day Flash off or in Carry or Security
modes
Tail light makes loud noise when I move it
Turn off anti-theft alarm and the settings of Auto-armed and
Brake Notification in APP.
SHIELD device doesn’t work normally
Try rebooting the device by tap and hold for 10 seconds. In
rare situation, you have to run out of the battery.
APP can’t pair or connect to Eesens device
The device may have been connected by another phone. Or,
location service (Android) and Bluetooth need to be turned
on. All permissions need to be granted to Eesens APP.

20 / 24 SHIELD-SET-MANUAL-EN-Rev.02
Warranty
EESENS warrants all products sold by EESENS to be free of
defects in material and workmanship for a period of one (1)
year from the date of purchase. If the product fails to work
during normal use, EESENS will be responsible for replacing or
repairing the defective parts only. No warranty regarding the
life of the batteries used in Eesens’ product. The warranty is
only valid if the parts are not been tampered or intentional
damage. Please keep your proof of purchase. The proof must
be presented in the event of any claim.
If you purchase the product from an authorized retailer, the
retailer will be in charge of the warranty. Please read its
warranty terms.
Warranty service must be performed by EESENS or an
authorized retailer. Contract EESENS’ customer service before
you claim the service. The complete warranty terms are
published in Eesens’ website (https://www.eesens.com).
Table of contents


