VANPOWERS DP C240.CAN User manual

Vanpowers Bike
Display
User Manual
For Seine

USER GUIDE
DP C240.CAN

Contents
1. Important Notice ............................................................................................................................ 4
2. Display Introduction .......................................................................................................................4
3. Product Description ....................................................................................................................... 5
3.1 Specifications ............................................................................................................................ 5
3.2 Overview of Functions .............................................................................................................. 5
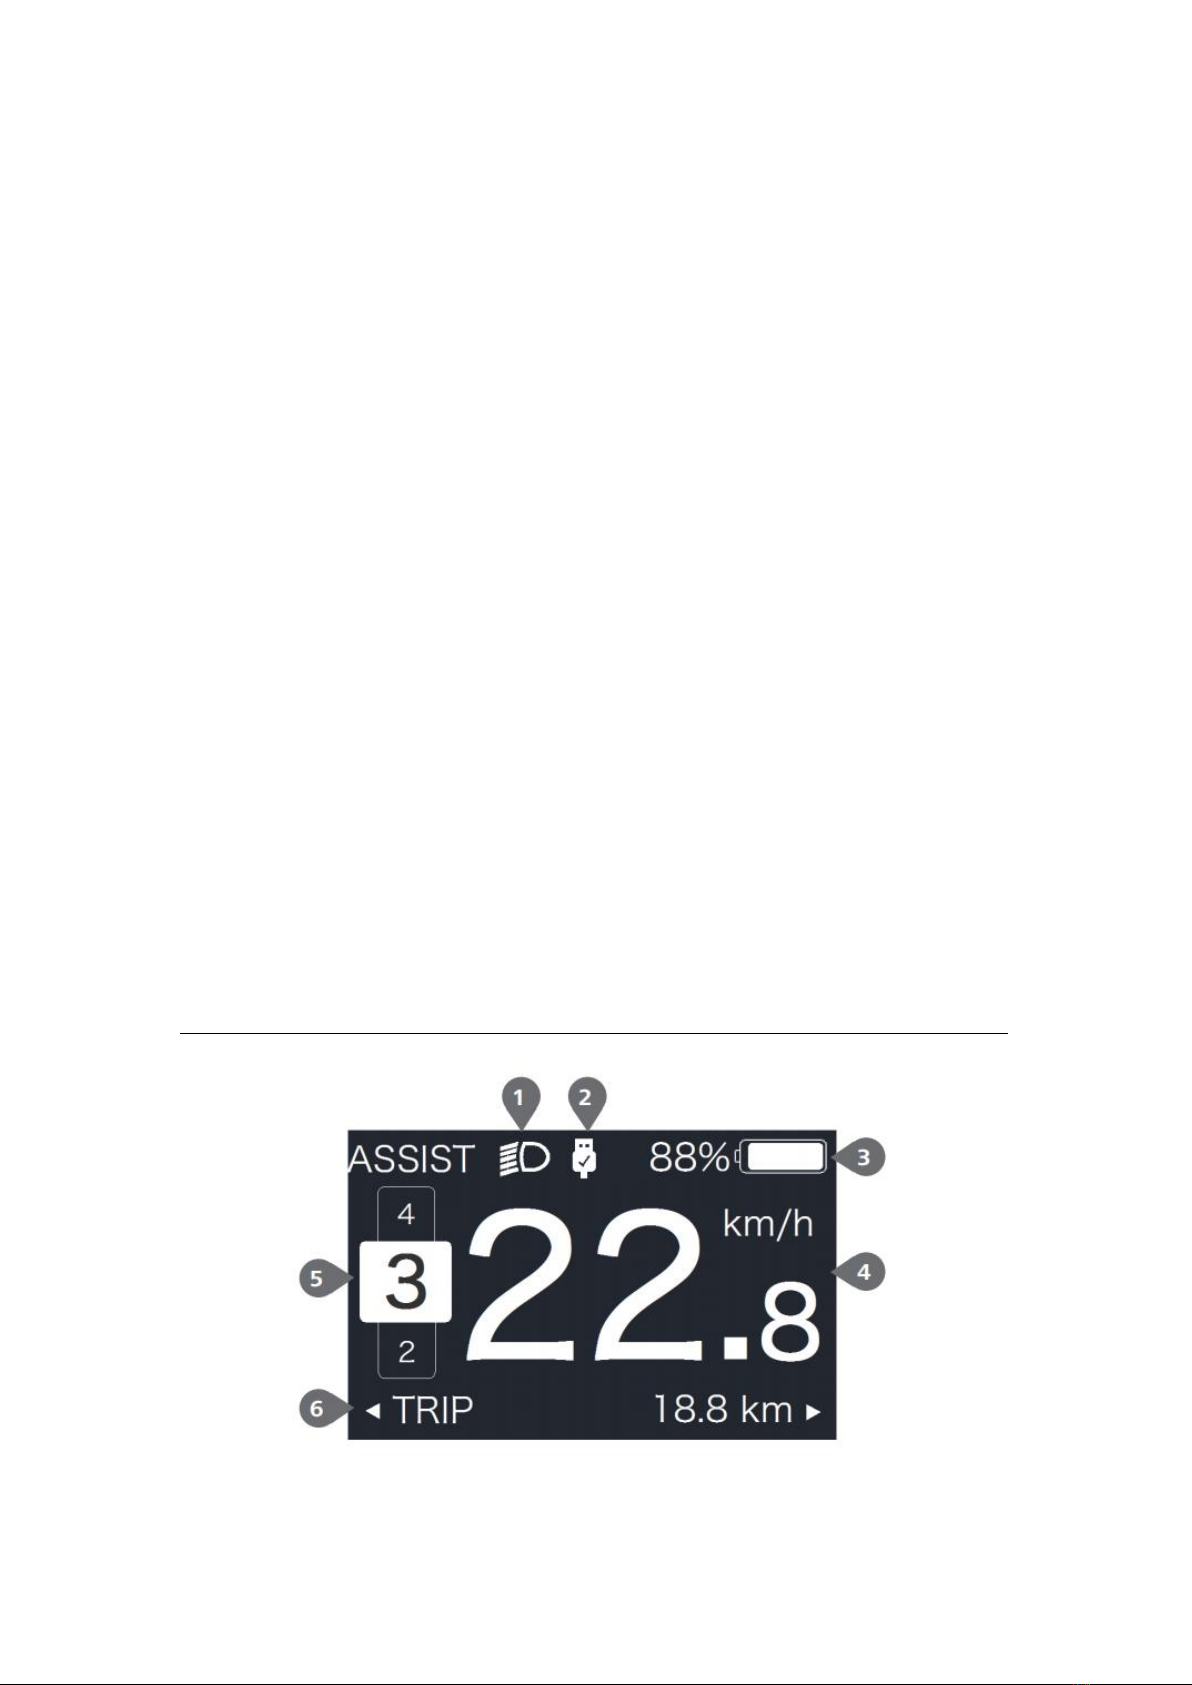
4. Display Example Image .................................................................................................................. 6
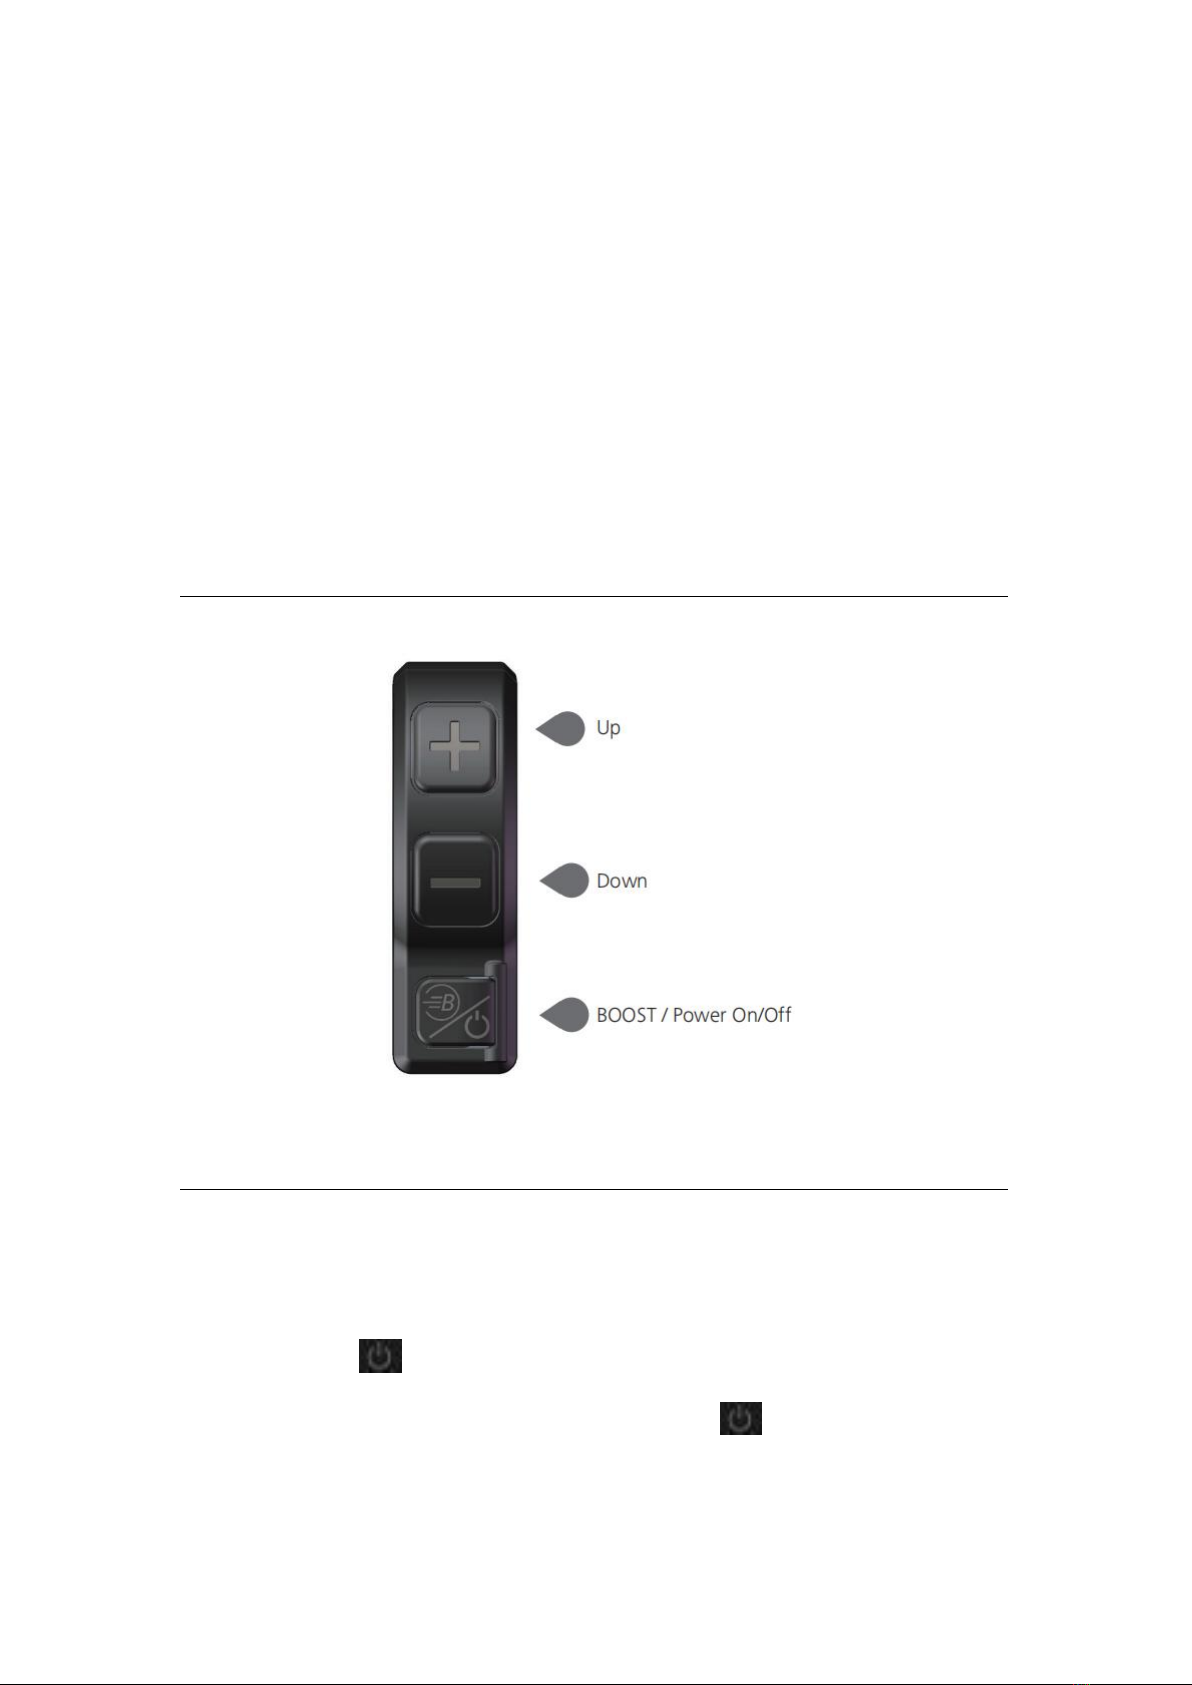
5. Buttons ........................................................................................................................................... 7
6. Normal Operation .......................................................................................................................... 7
6.1 Power On/Off ............................................................................................................................7
6.2 Assist Level Selection ................................................................................................................ 8
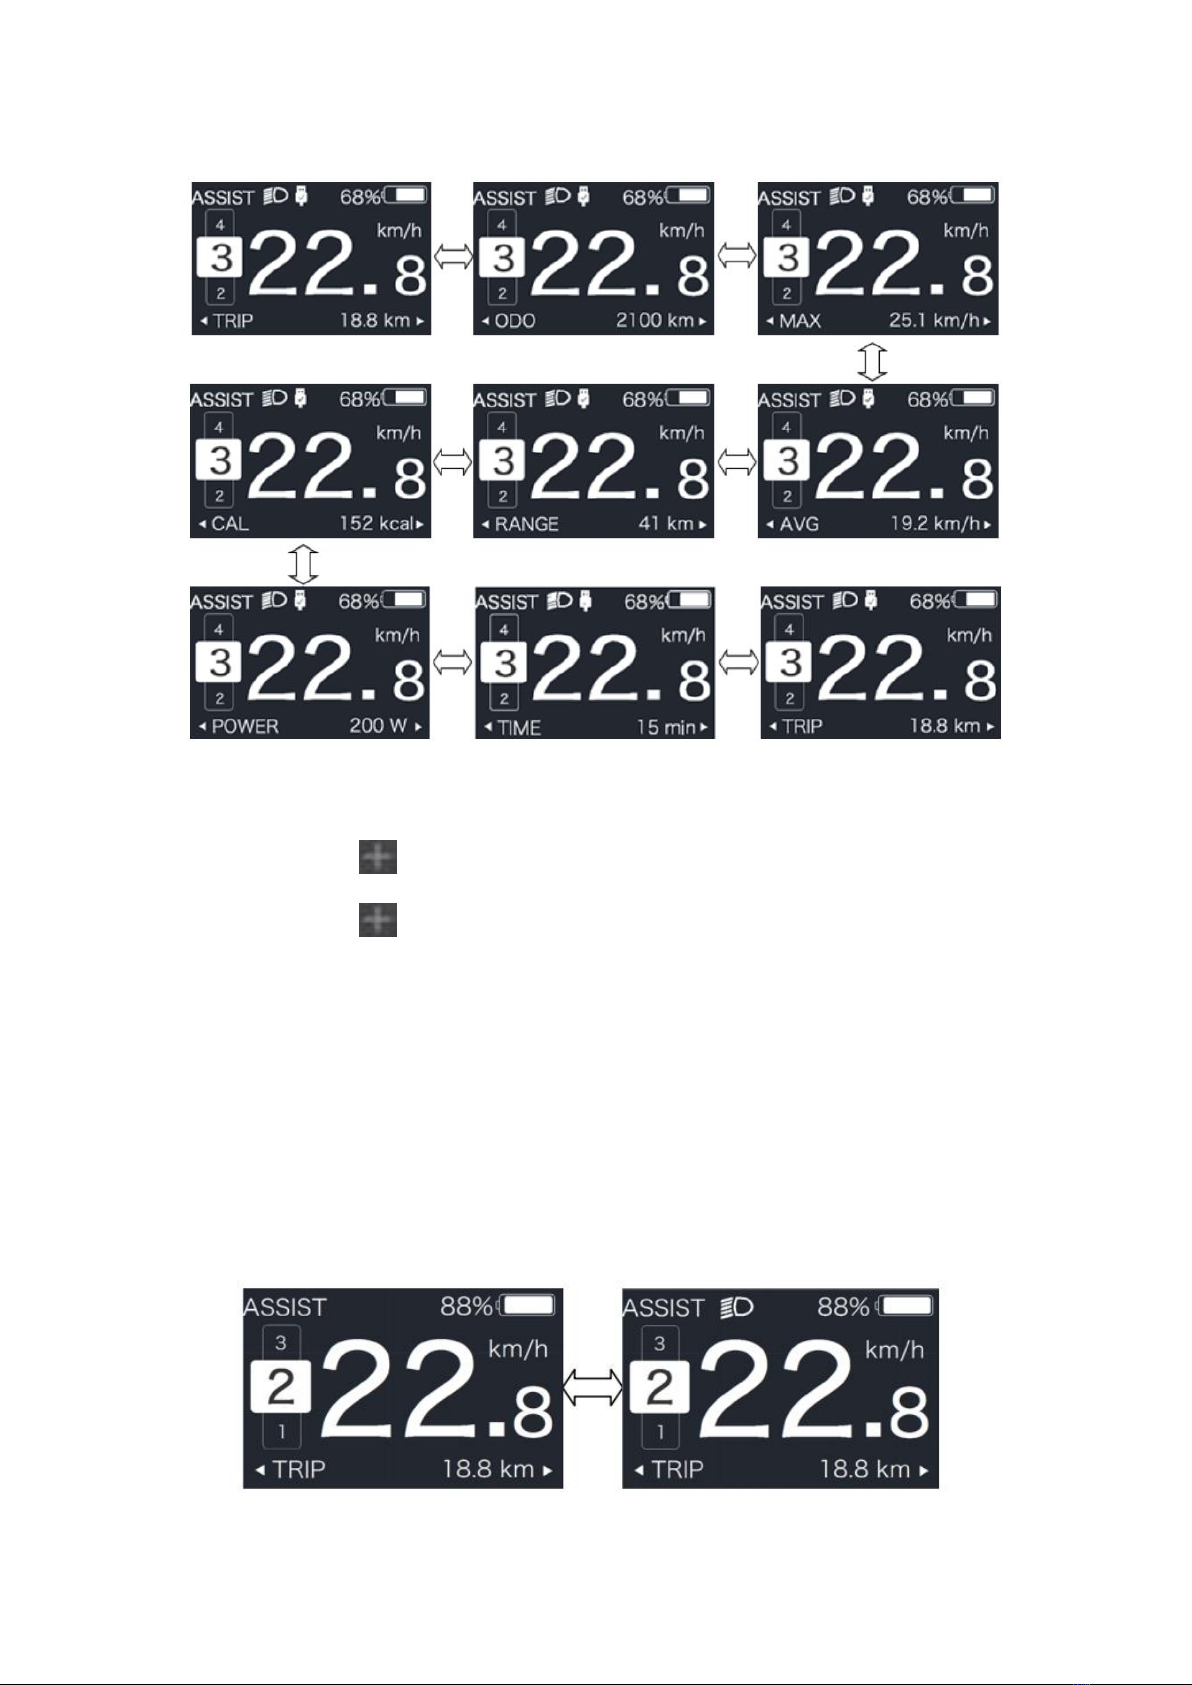
6.3 Ride Information ....................................................................................................................... 9
6.4 Backlight and Headlight ..........................................................................................................10
6.5 Walk Assist .............................................................................................................................. 11
6.6 BOOST Function ...................................................................................................................... 11
6.7 Battery Capacity ......................................................................................................................12
6.8 USB Charging ...........................................................................................................................12
7. Settings .........................................................................................................................................13
7.1 Display Settings .......................................................................................................................13
7.2 Information ............................................................................................................................. 17

1. Important Notice
If an error code on the display does not go away after following the
recommended instructions, please contact your retailer.
This product is designed to be waterproof. However, it is highly
recommended that you avoid submerging the display completely.
Do not clean the display with a steam jet, high-pressure cleaner, or
water hose.
Please exercise caution when using this product.
Do not use paint thinners or other solvents to clean the display, as
these substances can cause damage.
Wear and tear due to normal use/aging is not covered by the
warranty.
2. Display Introduction
Model: DP C240.CAN BUS
The housing material is polycarbonate (PC); the display window is
made of acrylic materials.
The label marking is as follows:

Note: Please keep the QR code label attached to the display cable. It can
be used to access possible software updates.
3. Product Description
3.1 Specifications
Operating temperature: –20 ℃–45 ℃
Storage temperature: –20 ℃–50 ℃
Waterproof rating: IP65
Storage room humidity: 30–70% RH
3.2 Overview of Functions
Speed indicator (including real-time speed, maximum trip speed, and
average trip speed)
Imperial and metric unit options
Battery capacity indicator
Automatic lighting system
Backlight brightness settings
Support instructions

Odometer (including single-trip distance, total distance, and
remaining distance before recharge)
BOOST function (with compatible controller)
Assist level indicator
Ride time indicator
Motor power usage indicator
Walk assist function
Error message indicator
Calories burned indicator (with compatible controller)
Distance to recharge indicator (with compatible controller)
Button vibration settings
USB charging (5V and 500mA)
4. Display Example Image
1: Headlight indicator

2: USB connection indicator
3: Battery capacity
4: Real-time speed
5: Assist level
6: Data mode indicator
5. Buttons
6. Normal Operation
6.1 Power On/Off
Press and hold (>2 seconds) to turn on the display (the screen
should show the boot up logo). Press and hold again (>2 seconds)
to turn off the display.

The display will automatically power down if not used for the amount of
time designated by the Auto Off setting.
6.2 Assist Level Selection
When the display turned on, short press or to change the
assist level (the level of motor power provided by the controller), The
lowest level is 0 (no assistance), and the highest level is 5. The interface
looks like this:
Note: If the controller on your e-bike has the BOOST function, you can
activate it by short pressing .

6.3 Ride Information
Short press the button to cycle through settings information.
For systems with a torque sensor, the settings list is as follows:
current trip distance (TRIP, mi or km) → total distance (ODO, mi or
km) → maximum trip speed (MAX, mph or km/h) → average trip
speed (AVG, mph or km/h) → distance until recharge (RANGE, mi or
km) → energy consumption (CALORIES/CAL, kCal) → real-time power
usage (POWER, W) → current trip time (TIME, min).
For systems with a speed sensor, the settings list is as follows: current
trip distance (TRIP, mi or km) → total distance (ODO, mi or km) →
maximum trip speed (MAX, mph or km/h) → average trip speed (AVG,
mph or km/h) → distance until recharge (RANGE, mi or km) →
current trip time (TIME, min).

6.4 Backlight and Headlight
Press and hold (>2 seconds) to turn on the backlight and headlight.
Press and hold again (>2 seconds) to turn off the backlight and
headlight. The brightness of the backlight can be changed using the
Brightness setting. If the display is turned on in a dark environment, the
backlight and headlight will be turned on automatically. However, if the
backlight and headlight are turned off manually, they will need to be
turned on again manually.

6.5 Walk Assist
The walk assist function should only be activated when the bike is
stationary.
To turn on walk assist, short press the button so that the
symbol appears. Next, with the symbol displayed, hold down the
button. Walk assist should now be activated. The symbol will
flash and the bike will move at approximately 3.7 mph (6 km/h).
Releasing the button will cause the motor to stop automatically,
and if no action is detected within 5 seconds, the motor will
automatically return to level 0.
6.6 BOOST Function
While riding, when your speed reaches 15.5 mph (25km/h), you can
press and hold the button (>2 seconds) to enter BOOST mode. The
indicator will flash and the motor will switch to maximum output.
Releasing the button or otherwise using the display will deactivate
BOOST mode.
Note: If the bike has not reached 15.5 mph (25 km/h), the BOOST
function cannot be activated. Pressing and holding the button (>2
seconds) under these circumstances will cause the display to power off.

6.7 Battery Capacity
The current battery capacity is displayed on the screen in accordance
with the figure below.
6.8 USB Charging
When the display is off, you can insert a USB adapter into the charging
port and then turn on the display to charge the connected device. The
maximum charging voltage is 5V, and the maximum charging current is
500mA.

7. Settings
With the display on, press and hold the and buttons to enter
the settings menu. Short press the or button to select Settings,
Information, or Exit, then short press the button to confirm.
You can press and hold the and buttons to return to the main
menu.
7.1 Display Settings
With the display powered on, press and hold the and buttons
to enter the settings menu. Short press or to select Settings
and short press to confirm.
7.1.1 Unit Settings
Short press or to select Units, then short press to enter
the menu. Choose between Metric (kilometers) and Imperial (miles)

using the and buttons. Press the button to save your
changes and exit back to Settings.
7.1.2 Auto Shutoff Time
Short press or to select Auto Off, then short press to
enter the menu. Set the automatic shutoff time by selecting OFF or a
number from 1 to 9 using the and buttons. Short press the
button to save your changes and exit back to Settings.
Note: OFF means this function is off, and 1 through 9 is the shutoff time
in minutes.
7.1.3 Display Brightness
Short press or to select Brightness, then short press to
enter the menu. Select from 10%, 30%, 50%, 75%, and 100% with the
and buttons. Short press the button to save your changes
and exit back to Settings.
Note: 10% is the weakest brightness and 100% is the strongest.

7.1.4 Power Usage Settings
Short press or to select Power View, then short press to
enter the menu. Select the power usage display mode as Power or
Current with the and buttons. Short press the button to
save your changes and exit back to Setting.
7.1.5 Automatic Light Sensitivity
Short press or to select AL Sensitivity, then short press to
enter the menu. Select the level of sensitivity from 0 to 5 using the
and buttons. Short press the button to save your changes and
exit back to Settings.
Notice: Level 0 means the automatic light sensor is off, 1 is the weakest
sensitivity, and 5 is the strongest sensitivity.

7.1.6 Trip Reset
Short press or to select Trip Reset, then short press to
enter the menu. Select YES or NO (YES to clear, NO to cancel) with the
or button. Short press the button to save your changes
and exit back to Settings.
Note: The current ride time (TIME), average trip speed (AVG), and
maximum trip speed (MAX) will also be reset when you reset a trip.
7.1.7 Button Vibration
Short press or to select Vibration, then short press to
enter the menu. Select YES or NO (YES meaning button vibration is on,
NO meaning button vibration is off) with the or button. Short
press the button to save your changes and exit back to Settings.

7.1.8 Service Indicator
Short press or to select Service, then short press to enter
the menu. Select YES or NO (YES meaning the service indicator is on, NO
meaning the service indicator is off) with the or button. Short
press the button to save your changes and exit back to Settings.
7.1.9 Maximum Assist Level
Short press or to select Assist Mode, then short press to
enter the menu. Select a maximum assist level of 3, 5, or 9 with the
and buttons. Short press the button to save your changes and
exit back to Settings.
7.2 Information
With the display powered on, press and hold and to enter into
the settings menu.
Short press or to select Information, then short press to
confirm.

Note: The information here can only be viewed, not edited.
7.2.1 Wheel Size
Short press or to select Wheel Size, then short press to
view the default wheel size.
Short press the button to exit back to Information.
7.2.2 Speed Limit
Short press or to select Speed Limit, then short press to
view the default speed limit.
Short press the button to exit back to Information.

7.2.3 Battery Info
Short press or to select Battery Info, short press to enter
the menu, and then short press or to view the battery data
(b01 → b04 → b06 → b07 → b08 → b09 → b10 → b11 → b12 → b13 →
d00 → d01 → d02 → … → dn → Hardware Ver → Software Ver).
Short press the button to exit back to Information.
Note: If the battery does not have communication functionality, you
won’t see any data.
Battery information menu
Hardware and software version menus

Table of contents
Other VANPOWERS Bicycle Accessories manuals