Egardia SMOKE-9 User manual

installation guide
Smoke detector
1
INSTALLATION GUIDE SMOKE DETECTOR
Congratulations on the purchase of your Egardia smoke detector.
Customer Service
Please visit www.egardia.com if you would like further information about the installation and use of
Egardia. The answers to a number of frequently asked questions can be found at
www.egardia.com/userquestions.
This package has been put together with care. Please contact our customer service if you would like
any help during installation or if something is missing from the package. Never return a package
without prior instruction from our customer service.
Smoke detector
The optical smoke detector uses a concentrated light beam to detect the presence of smoke
particles in the air. During the initialization process the smoke detector's sensor takes various
readings of the surrounding environment and memorizes the results. After initialization, the sensor
continually takes readings and any significant rise in the amount of particles will trigger an alarm.
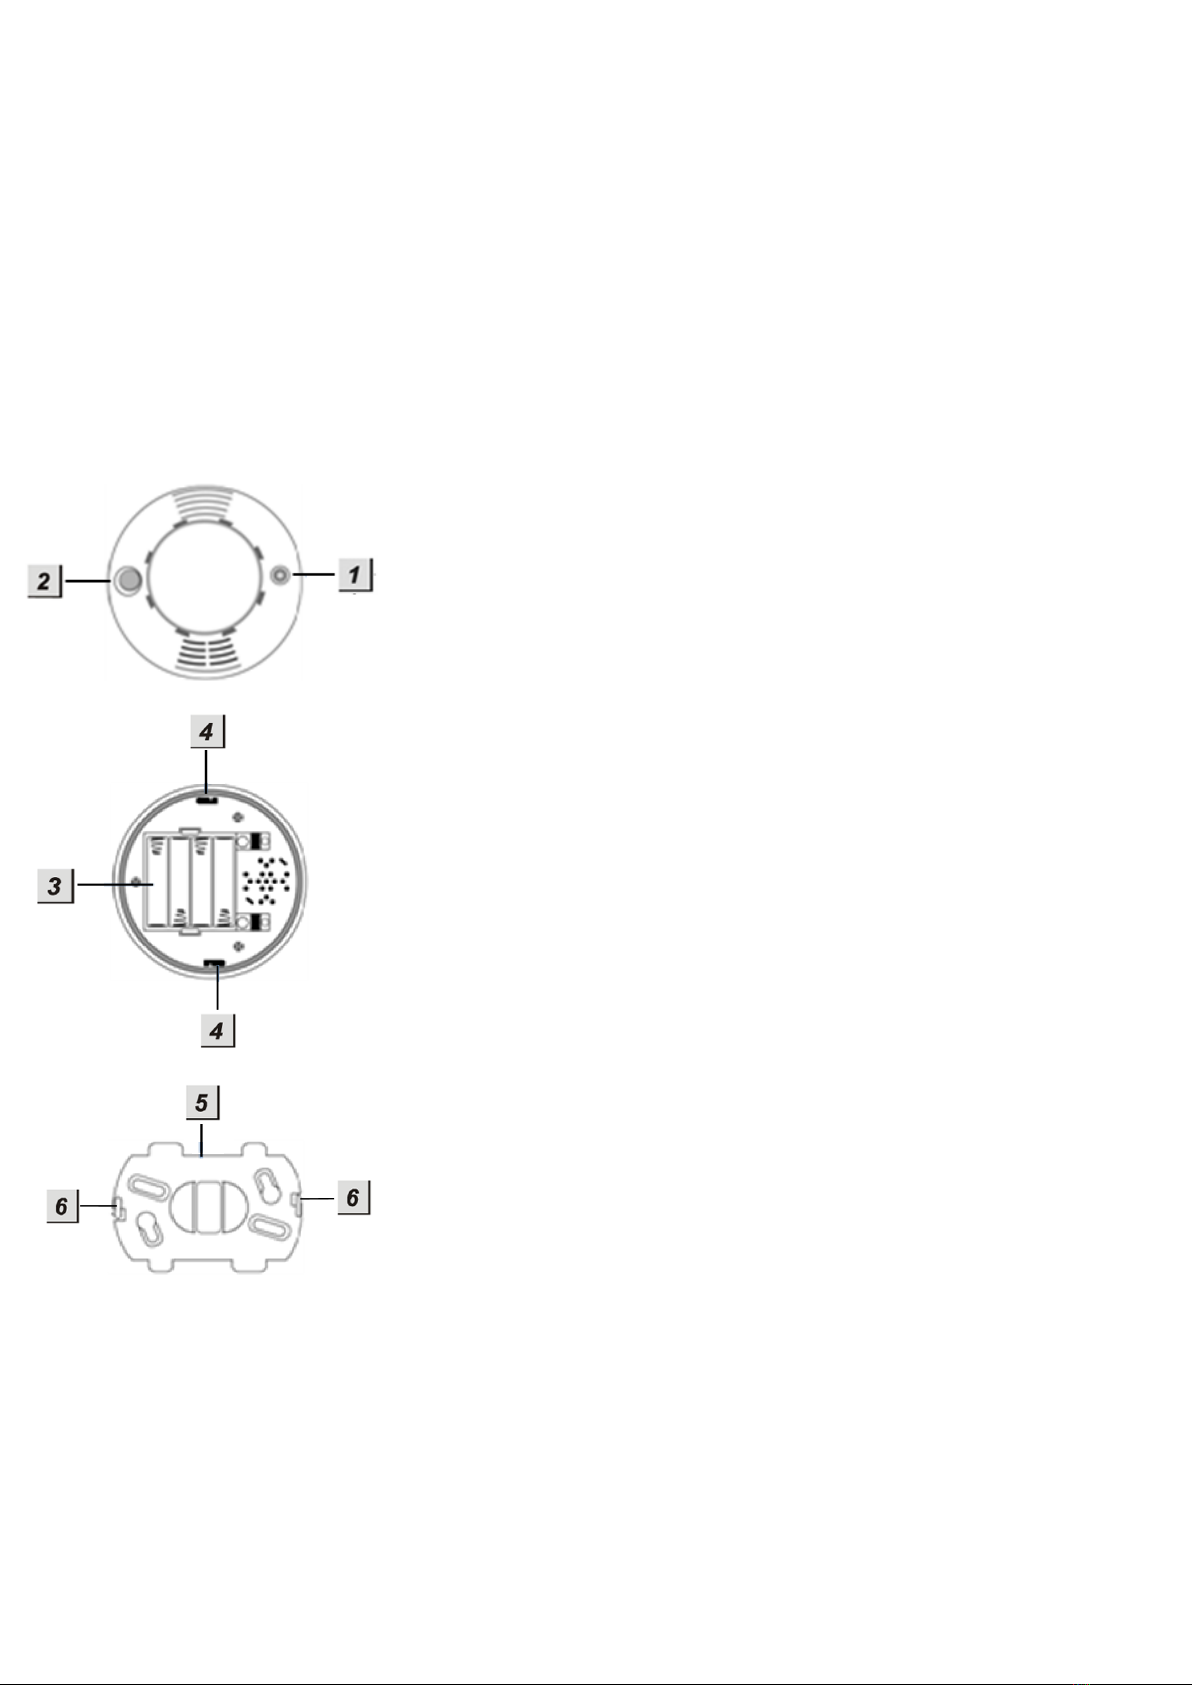
OVERVIEW SMOKE DETECTOR
1. Status indicator – Shows the status of the smoke detector.
2. Register button – The register button is used for the following:
a. To take readings of the surrounding environment.
b. To test the connection between the smoke detector and the gateway.
c. To test correct functioning of the smoke detector.
d. To silence the local alarm signal.
3. Battery compartment – Holds the batteries.
4. Mounting holes – Holes for the mounting plate.
5. Mounting plate – To mount the smoke detector using screws.
6. Mounting clips – Part of the mounting plate to secure the plate into the mounting holes.
In appendix 1 you will find a drilling template to determine hole positions.
Smoke detection
When the smoke detector detects smoke the status indicator will lit red to indicate that a smoke
alarm signal is being sent to the gateway. The gateway emits an interrupted sound:
3 beeps - pause - 3 beeps. The smoke detector also sounds a local alarm. The internal siren of the
smoke detector sounds and the status indicator will rapidly flash red for 10 seconds. After this local
alarm of 10 seconds the smoke detector will carry out another reading. When the smoke detector
still detects smoke it will trigger another local alarm. The smoke detector will repeat to signal until no
more smoke is detected. The local alarm of the smoke detector will automatically switch off.
Local silent alarm
In the case that the smoke detector is sounding a local alarm the internal siren of the smoke
detector may be switched off for 10 minutes. Press the register button of the smoke detector to
silence the alarm. During the 10-minute period the status indicator of the smoke detector will flash
once per second. After 10 minutes the smoke detector will beep twice to indicate returning to normal
operation. Should the smoke detector still detect smoke then the local alarm will sound again.
Website Egardia
www.egardia.com

2
INSTALLING THE SMOKE DETECTOR
The installation process of the Egardia smoke detector consists of four easy steps.
STEP 1.
CHECK CONTENTS
CHECK THE CONTENTS OF THE BOX
STEP 2.
ADD TO ALARM SYSTEM
REGISTER THE SMOKE DETECTOR
WITH YOUR EGARDIA ALARM SYSTEM
STEP 3.
MOUNT SMOKE
DETECTOR
DETERMINE THE LOCATION AND
MOUNT THE SMOKE DETECTOR
STEP 4.
CHECK AND TEST
CHECK AND TEST THE SMOKE
DETECTOR
STEP 1: CHECK CONTENTS
Check the contents of the packaging for the following parts:
1. Smoke detector with mounting plate
2. Bag containing screws and plugs
3. 3 x 1,5V AA alkaline batteries
STEP 2: ADD TO ALARM SYSTEM
You are now about to register the smoke detector with your Egardia alarm system.
1. Open the smoke detector by removing the two screws at the top and bottom Open the smoke
detector and insert the batteries into the battery compartment. Ensure that the battery
polarization is correct. When the batteries are installed correctly the smoke detector will beep
twice and the status indicator will start to flash.
2. Within 10 minutes the smoke detector will beep once to indicate that it has started the
initialization process. The sensor will take various readings of the surrounding environment and
memorizes the results. The initialization process can take a few minutes. Upon completion of
the initialization process, the smoke detector will beep twice and the status indicator will stop
flashing. The smoke detector has stored the environmental information and is ready for
installation. Please note! If the initialization process of the smoke detector is still not finished
after 20 minutes and the smoke detector has not beeped twice the initialization process has
failed. Remove the batteries of the smoke detector, wait for 1 minute and then replace the
batteries. The smoke detector will start the initialization process again.
3. Ensure at your gateway that the alarm is turned off. The top indicator light (Status) and the
bottom indicator light (Online) are lit green.
4. Press the "Reset" button at the side of the gateway for at least 5 seconds. The top indicator
light (Status) of your gateway flashes green to indicate it is searching for new accessories.
5. Press the register button of the smoke detector. The gateway beeps once and the smoke
detector beeps twice to indicate the smoke detector is successfully registered. The gateway
and the smoke detector beep twice to indicate the smoke detector has already been
successfully registered.
6. Press again the "Reset" button at the side of the gateway for at least 5 seconds if no more
accessories are being added. The gateway returns to normal operation.
7. Login to your Egardia account and go to the tab "Alarm system". The registered smoke
detector will appear after a few minutes.
8. Rename the smoke detector for easy recognition.

3
STEP 3: MOUNT SMOKE DETECTOR
Place the smoke detector in a room where the chance of fire is high. Before mounting use the key
fob to test the desired mounting place is within range of the gateway.
Important guidelines
• The optimal location for the smoke detector is on the ceiling in the middle of a room.
• Place the smoke detector at least 60 cm away from the walls.
• Smoke rises. Place per floor at least 1 smoke detector in the hallway or the stairwell. To rule
out all risk we recommend placing a smoke detector in each room.
• Do not place the smoke detector in the following locations:
o In the kitchen. Normal cooking fumes could accidentally trigger a false alarm.
o Close to vents, heating, fluorescent lighting or air-conditioning units as airflow could
influence the smoke detector's sensitivity.
o Close to ceiling beams or above cupboards because the air circulation could be
restricted on such places which could influence the smoke detector's sensitivity.
Testing the range
1. Ensure at your gateway that the alarm is turned off. The top indicator light (Status) and the
bottom indicator light (Online) are lit green.
2. Press the "Reset" button at the side of the gateway for at least 5 seconds. The top indicator
light (Status) of your gateway flashes green to indicate it is ready to test a registered smoke
detector.
3. Press the register button of the smoke detector. If the smoke detector is within range of the
gateway, the gateway and the smoke detector beep twice.
4. If you do not hear a confirmation signal from the gateway then your smoke detector is probably
out of range of the gateway. Move the smoke detector and test the range again.
5. Press again the "Reset" button at the side of the gateway for at least 5 seconds if you are done
testing. The gateway returns to normal operation.
If your smoke detector is within range of the gateway it may be mounted using the screws.
Instructions
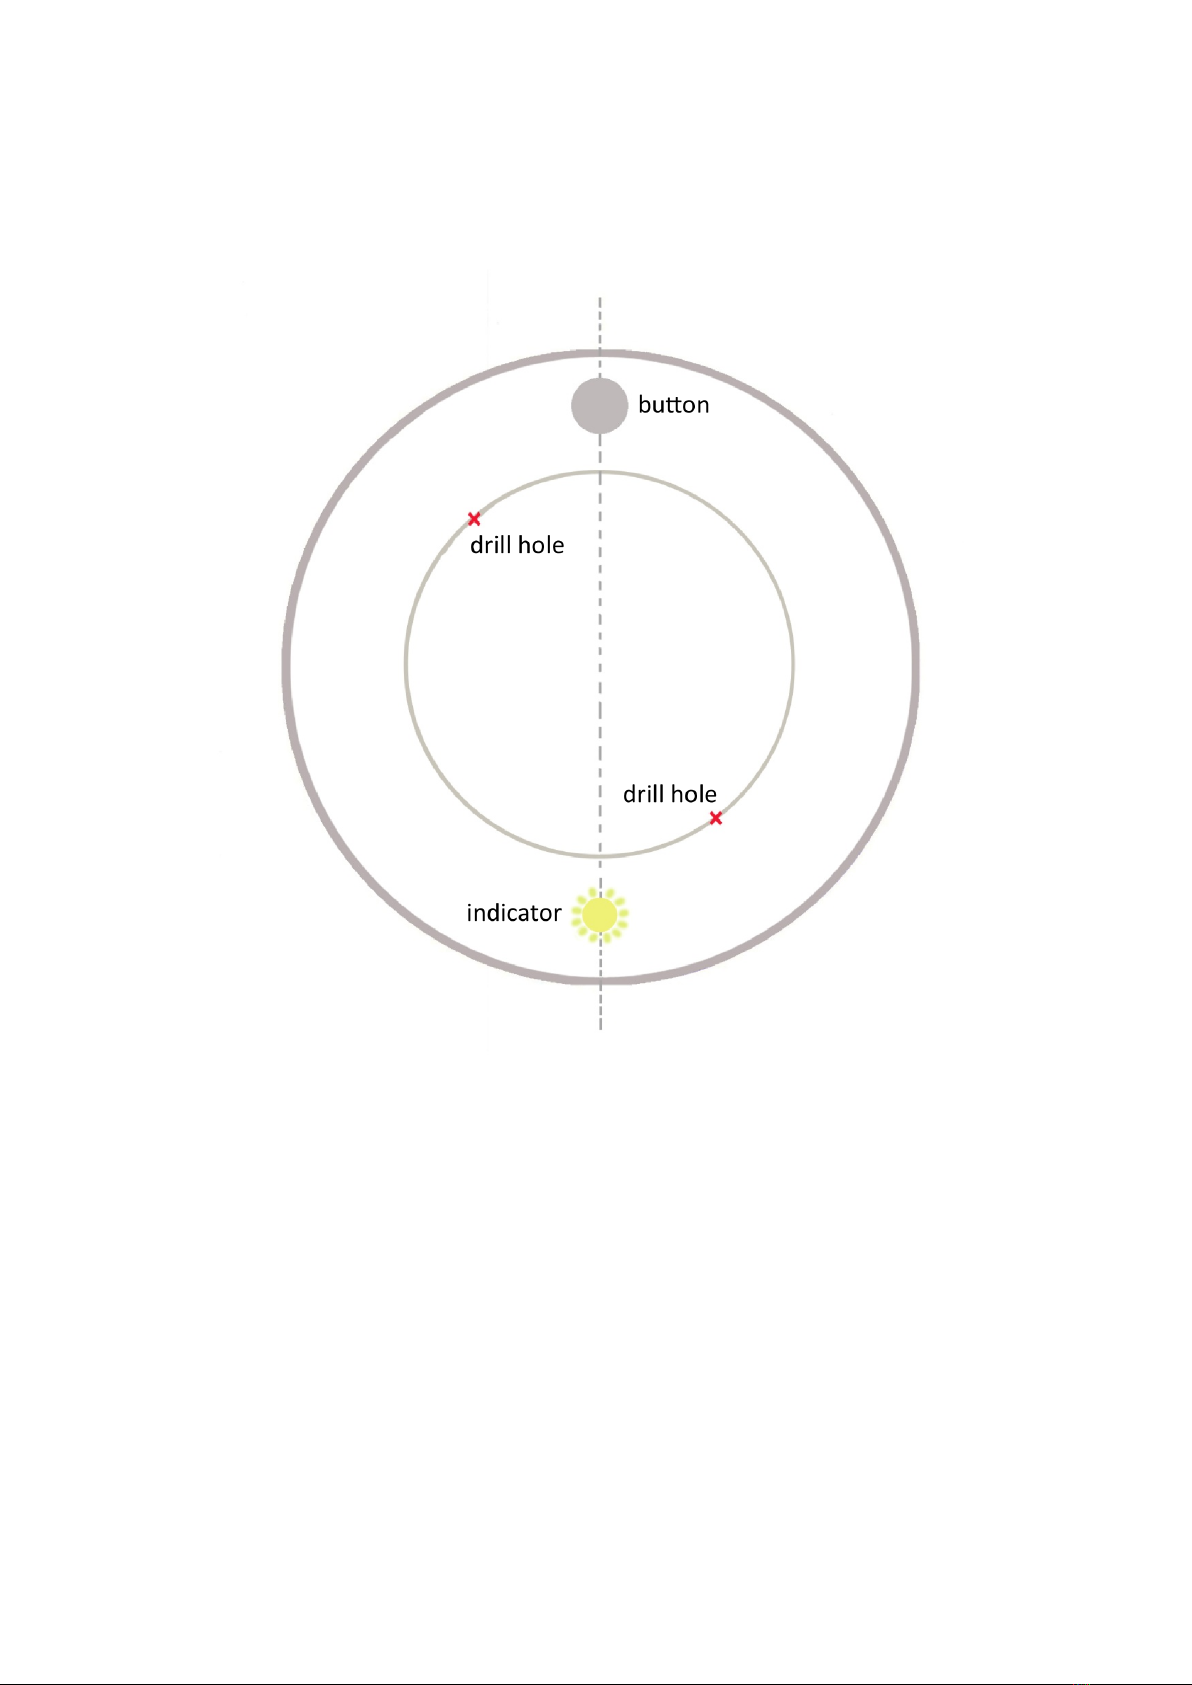
1. Use the drill holes of the template to mark the holes for drilling on the ceiling.
2. Drill the holes and use the plugs for stone or plaster ceiling.
3. Secure the mounting plate to the ceiling using the screws. The two mounting clips of the
mounting plate are pointing downward.
4. Place the smoke detector onto the mounting clips of the mounting plate and turn it clockwise to
secure the smoke detector to the mounting plate.
STEP 4: CHECK AND TEST
To make sure that the smoke detector functions correctly it is advisable to test the smoke detector.
Press the register button of the smoke detector. When the detector is functioning correctly the
status indicator glows for two seconds and two beeps will sound.
Congratulations! The installation is complete.
Please note! If the smoke detector beeps three times this means either the optical sensor of the
smoke detector is contaminated or not functioning correctly. Hold the register button for 10 seconds,
the sensor will start the initialization process. After completion of the initialization process the
smoke detector must be tested again.
If the smoke detector again beeps three times the optical sensor is defective. In such a case the
smoke detector should be replaced.
If during testing the status indicator remains extinguished and the smoke detector does not beep,
the batteries may need replacing. If the status indicator still remains extinguished and the smoke
detector still does not beep after replacing the batteries then the smoke detector is defective. In
such a case the smoke detector should be replaced.

4
MAINTENANCE
Batteries
The smoke detector is powered by three 1,5V AA alkaline batteries. Depending on use, the average
life of the batteries is 2-4 years. The smoke detector itself will indicate when the batteries are low.
When the batteries have power left for about one month you will receive the following warnings:
1. The smoke detector's status indicator will start to flash red and the smoke detector will emit a
low volume beep every 30 seconds.
2. In your Egardia account you will see the message "Battery low level" under the tab "Alarm
history".
3. You will receive a one-time message by telephone, SMS or email.
4. The central indicator light (Alarm) of your gateway is lit yellow. After the batteries have been
replaced the gateway will return to normal status.
Replacing the batteries
1. Ensure that the alarm is turned off.
2. Remove the smoke detector from the mounting plate by turning it anti-clockwise.
3. Remove the old batteries and replace by three new 1,5V AA alkaline batteries. Ensure that the
battery polarization is correct. When the batteries are installed you will hear two beeps and the
status indicator will flash for about 15 minutes.
4. Replace the smoke detector onto the mounting plate by turning it clockwise.
Please note! Every time the batteries are replaced the smoke detector will automatically go into
initialisation mode.
5
APPENDIX 1: DRILL TEMPLATE SMOKE DETECTOR

6
Safety information
1. Your product is suitable for use in semi-tropical and moderate climates
2. Use product only with the temperature between -20°C and 40°C and a relative humidity between 0-95%.
3. Only use your product in accordance with Egardia’s installation and product documentation.
4. The Egardia products are not intended for children and must not be used as a toy.
5. Do not attempt to dismantle this product as it contains no user-service parts and it could be hazardous.
6. Indoor use only.
Limited warranty: The Egardia warranty is valid if the product is used in accordance with the instructions and for its intended purpose. Claims will only be
accepted on submission of the original proof of purchase (invoice, sales slip) stating the purchase date, the name of the dealer and a description of the
product(type). You will find the full warranty information on www.egardia.com.
Batteries: if this product contains batteries, they shall not be treated as household waste. Instead, they shall be handed over to the appropriate collection point
for the recycling.
Electrical & Electronic Equipment: this product shall not be treated as household waste. Instead, they shall be handed on over to the appropriate collection
point for the recycling of electrical an electronic equipment.
Reclamations: Before submitting a warranty claim, please visit the support section on www.egardia.com. Valid warranty claims are generally processed
through the point of purchase. Warranty claims are generally processed through the point of purchase should be addressed directly to Egardia. The addresses
and customer service contact information can be found at www.egardia.com.
Cleaning & Maintenance: do not clean when product is connected to mains power. To avoid damage the product can only be cleaned with a soft dry cloth. Do
not use cleaning agents.
Client Services: Please check www.egardia.com for the contact details of the customer support.
Wireless specification
Frequency: 868 MHz
Maximum transmission power: <10 mW e.r.p. (<1%)
Technical details: see www.egardia.com
SIMPLIFIED EU DECLARATION OF CONFORMITY
Egardia BV hereby declares that this product is in accordance with essential requirements and other relevant terms of the European regulation: 2014/53/EU
(RED), 2014/30/EU (EMC directive), 2014/35/EU (LVD directive), 2002/96/EC (WEEE Directive), 2011/65/EU Annex II; recasting 2002/95/EC (RoHs Directive),
Contruction products regulation 305/2011.
The full text of the EU declaration of conformity is available online at www.egardia.com/doc
Egardia B.V.
Kleine Landtong 19
4201 HL Gorinchem
The Netherlands
www.egardia.com
Smoke detector
Type: SMOKE-9
EAN: 8718347930073
©2017 Egardia. All rights reserved. Egardia, the Egardia logo and other Egardia marks are owned by Egardia and may be registered. All other trademarks are
the property of their respective owners. Egardia assumes no responsibility for any errors that may appear in this manual. Information contained herein is subject
to change without notice.
Benelux registration No.: 0885727
International registration No.: 1074123
This manual suits for next models
1
Table of contents


