EggRider V2 User manual
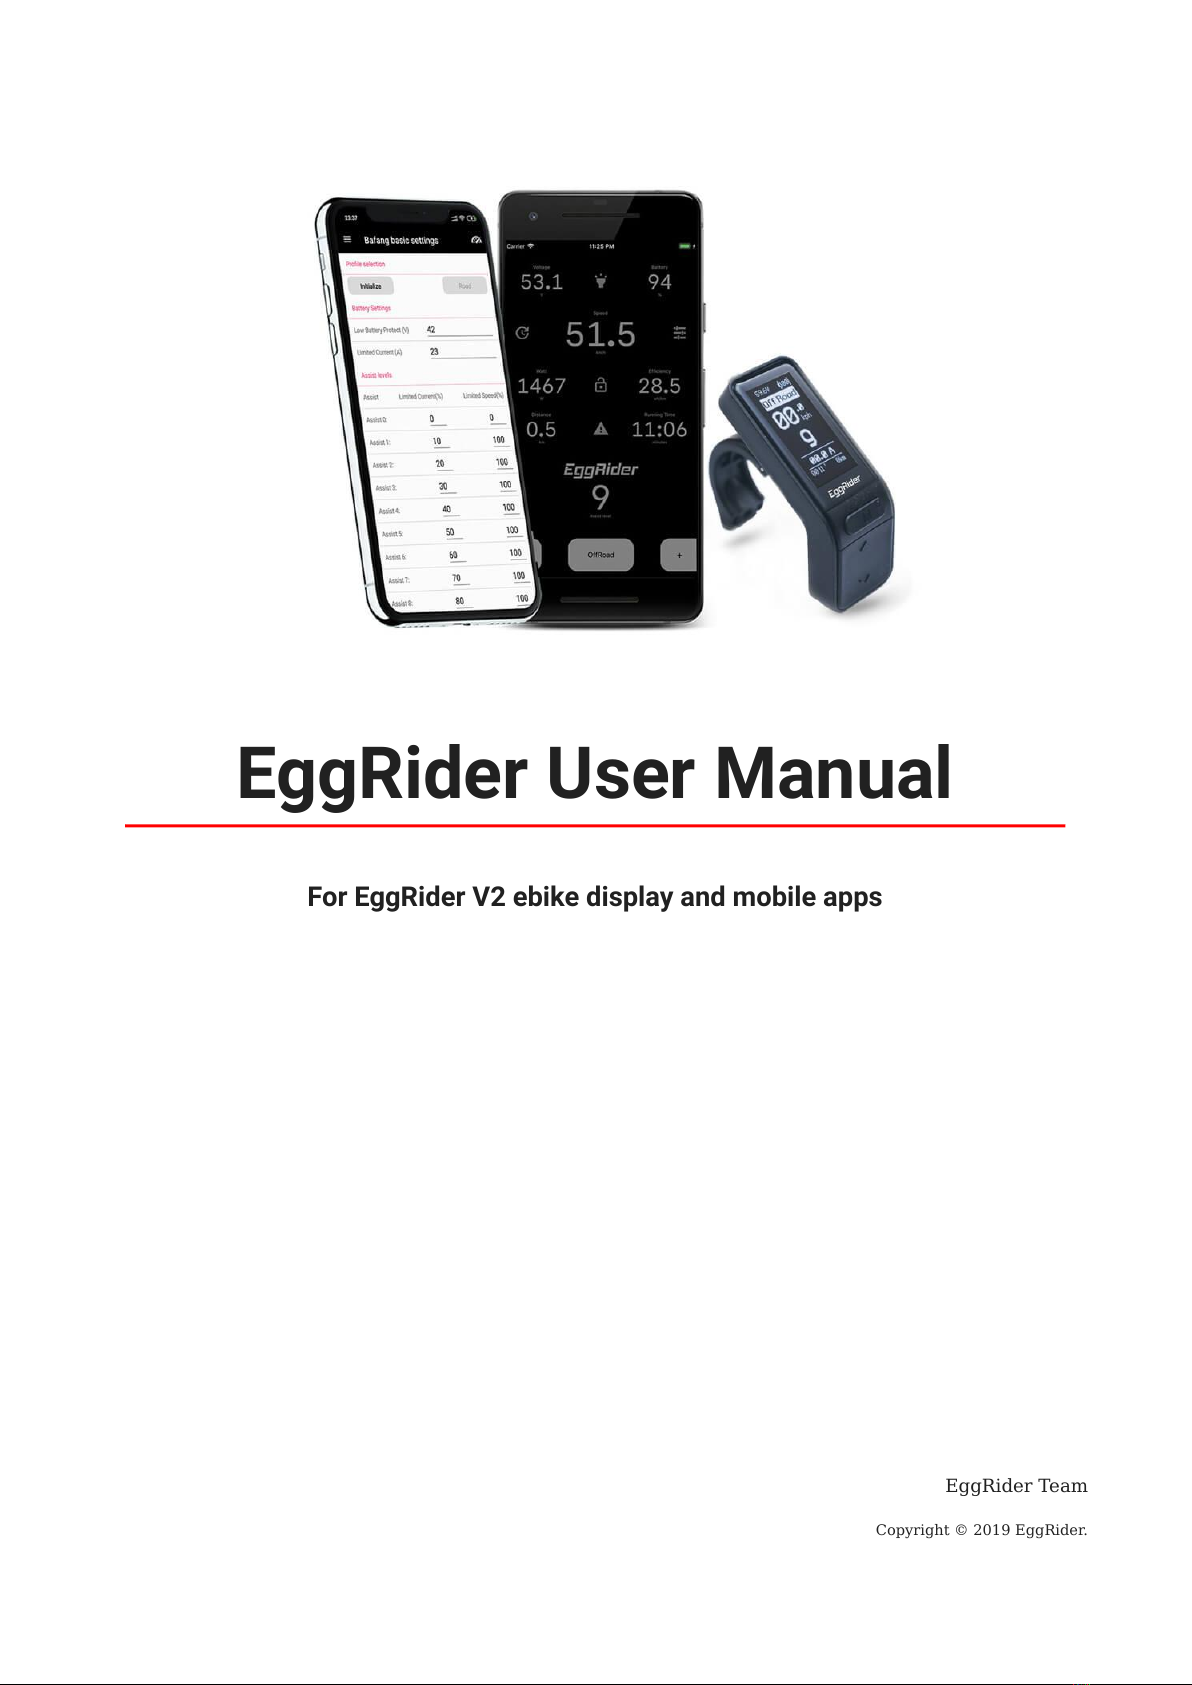
EggRider User Manual
For EggRider V2 ebike display and mobile apps
EggRider Team
Copyright © 2019 EggRider.

Table of contents
4
1. EggRider user manual
41.1 Personalize your ebike ride
41.2 Why EggRider
6
2. EggRider display setup
6
2.1 Install display on your handlebar
6
2.2 Connect with the mobile app
7
2.3 Activation
72.4 Important conguration
103. Display
103.1 EggRider Display
143.2 EggRider display specication
153.3 Pinout
163.4 EggRider display features
174. Firmware Update
174.1 EggRider Display Firmware Update
194.2 EggRider display rmware update from EggRider mobile app
215. Mobile App
215.1 EggRider mobile apps
235.2 Dashboard page
245.3 Search page
275.4 Rides
295.5 Display settings
355.6 Display advanced settings
385.7 App settings
405.8 Power levels
416. E-bike Settings
416.1 Ebike settings overview
426.2 Bafang
56
6.3 Lishui settings (LSW)
606.4 EggRider V2 Mate X settings
626.5 EggRider V2 Rad Power bikes settings
67
6.6 Kunteng settings (KT)
70
6.7 ASI - Accelerated Systems Inc settings
727. EggRider display compatibility
727.1 How to nd out controller brand?
Table of contents
- 2/89 - Copyright © 2019 EggRider.
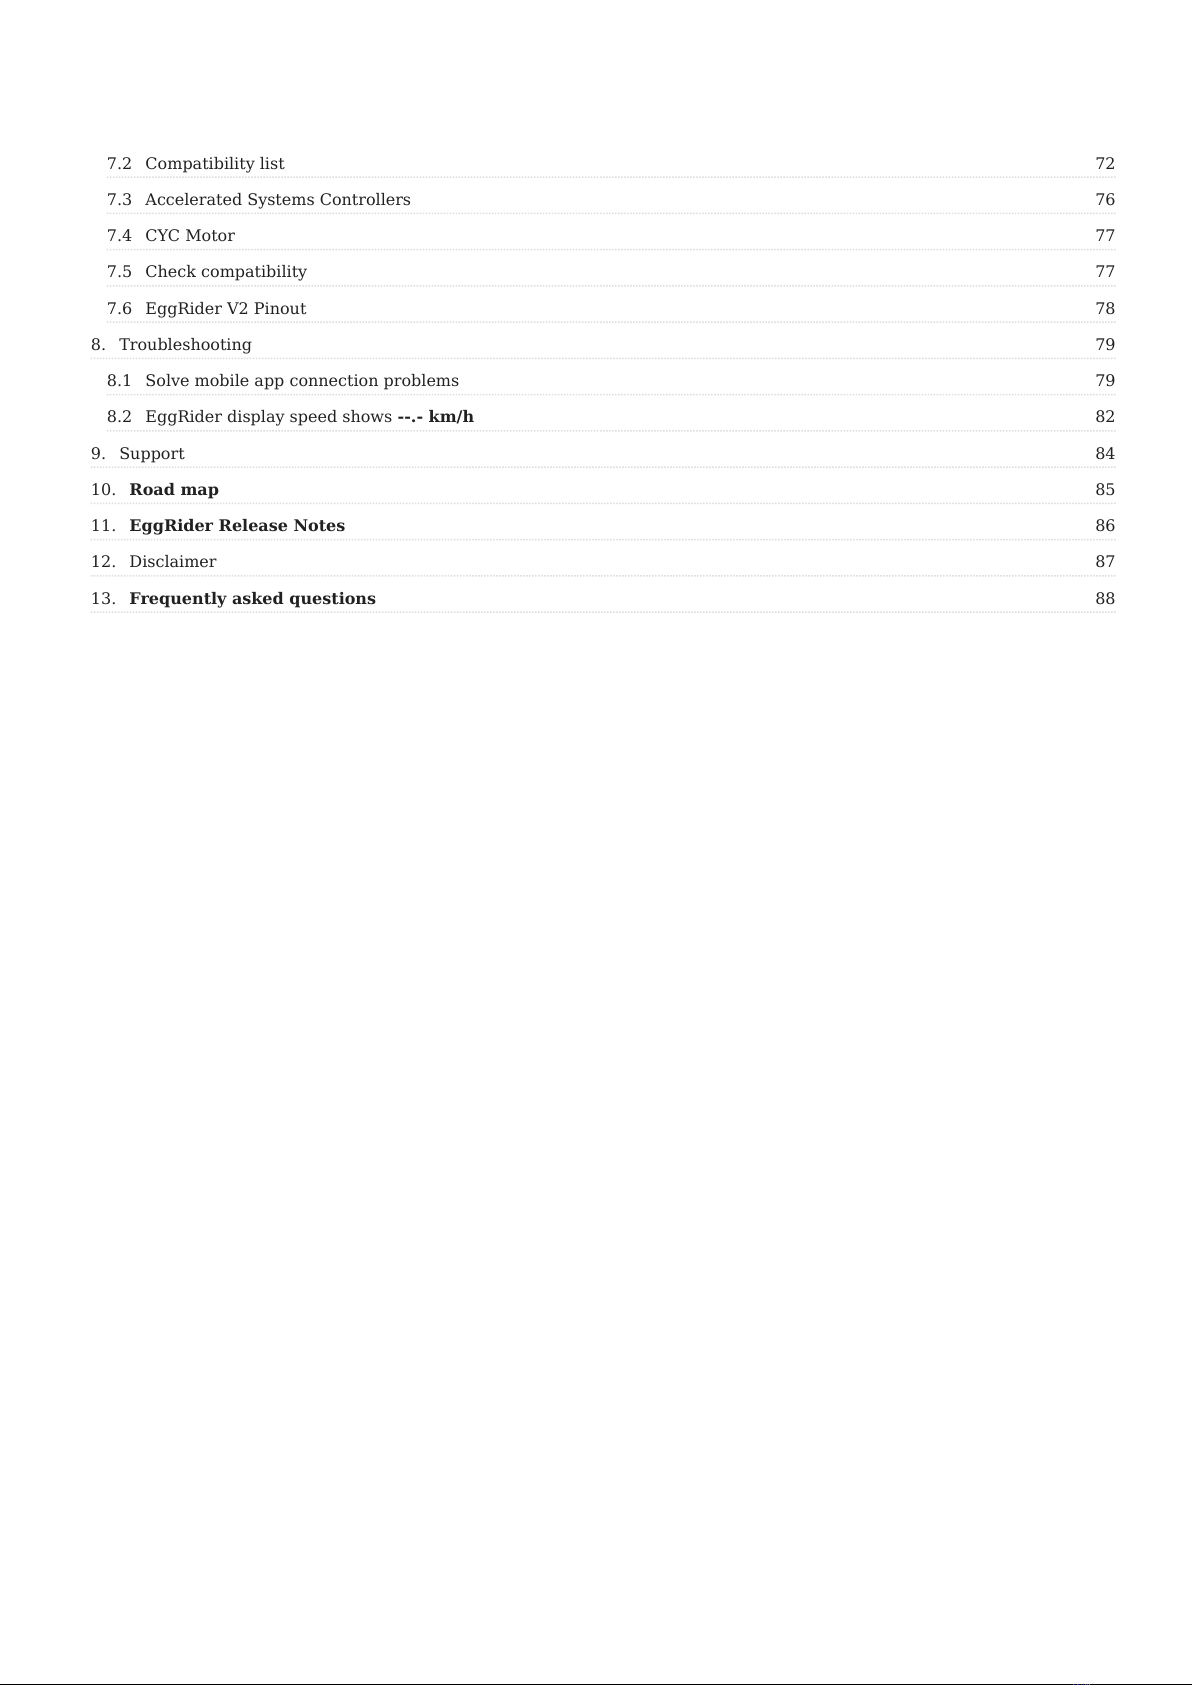
727.2 Compatibility list
767.3 Accelerated Systems Controllers
777.4 CYC Motor
777.5 Check compatibility
787.6 EggRider V2 Pinout
798. Troubleshooting
798.1 Solve mobile app connection problems
82
8.2 EggRider display speed shows --.- km/h
849. Support
85
10. Road map
86
11. EggRider Release Notes
8712. Disclaimer
88
13. Frequently asked questions
Table of contents
- 3/89 - Copyright © 2019 EggRider.
1. EggRider
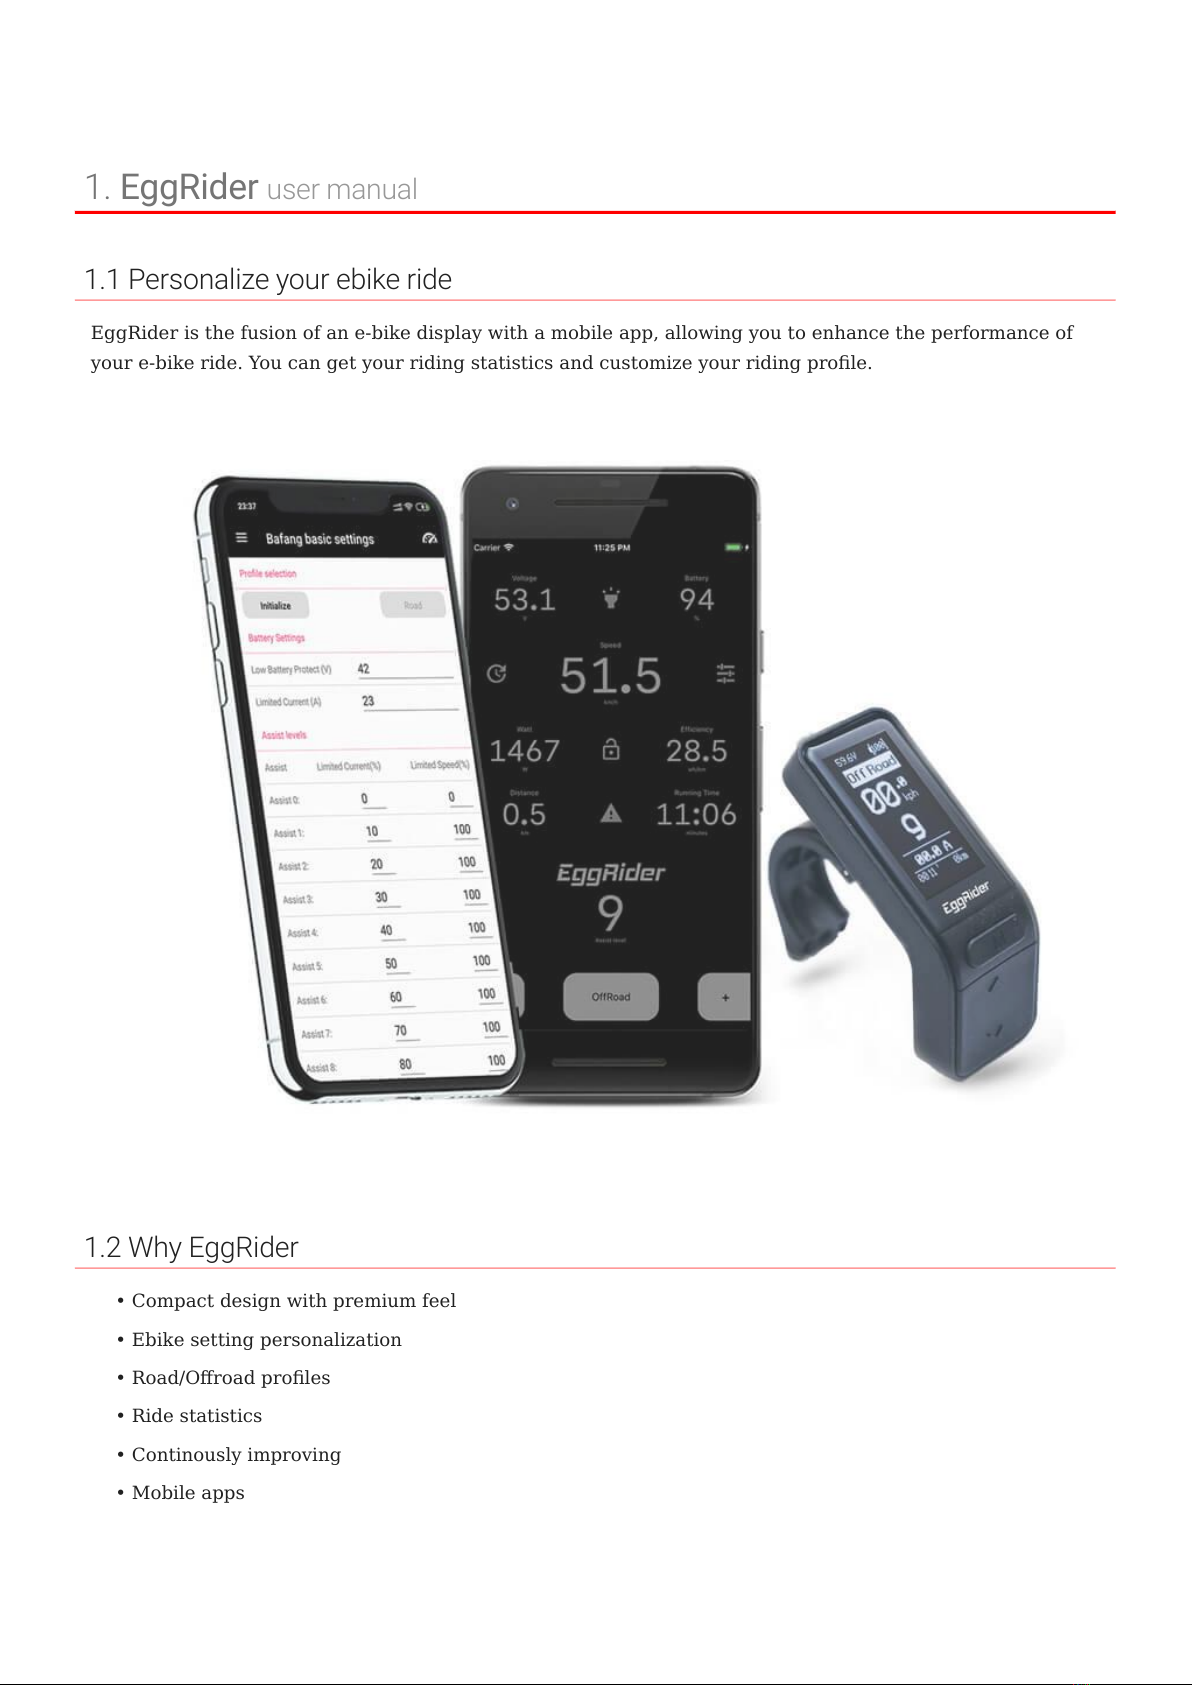
1.1 Personalize your ebike ride
EggRider is the fusion of an e-bike display with a mobile app, allowing you to enhance the performance of
your e-bike ride. You can get your riding statistics and customize your riding prole.
1.2 Why EggRider
Compact design with premium feel
Ebike setting personalization
Road/Oroad proles
Ride statistics
Continously improving
Mobile apps
user manual
•
•
•
•
•
•
1. EggRider user manual
- 4/89 - Copyright © 2019 EggRider.


2. EggRider display setup
2.1 Install display on your handlebar
Find the spot on the handlebar, open the hinge, make sure no other components stop the display from xing.
Plugin the connector to your ebike
2.2 Connect with the mobile app
Measure handlebar Tighten the screw Allow slight rotation Plug-in the connector
Please make sure the diameter of the handleber is 22.2 mm and is straight in the place where you want to install EggRider display.
Screws have to be driven to exactly the right depth. Too tight, and you might break the display. Please allow some movement for
display to rotate.
The rst time you power on the display it is recommended to reset the display to defaults by pressing M+Power until display turns
on. You should see Load default settings. (see Speed shows --.-km/h troubleshooting)
Attention
Android iPhone
2. EggRider display setup
- 6/89 - Copyright © 2019 EggRider.
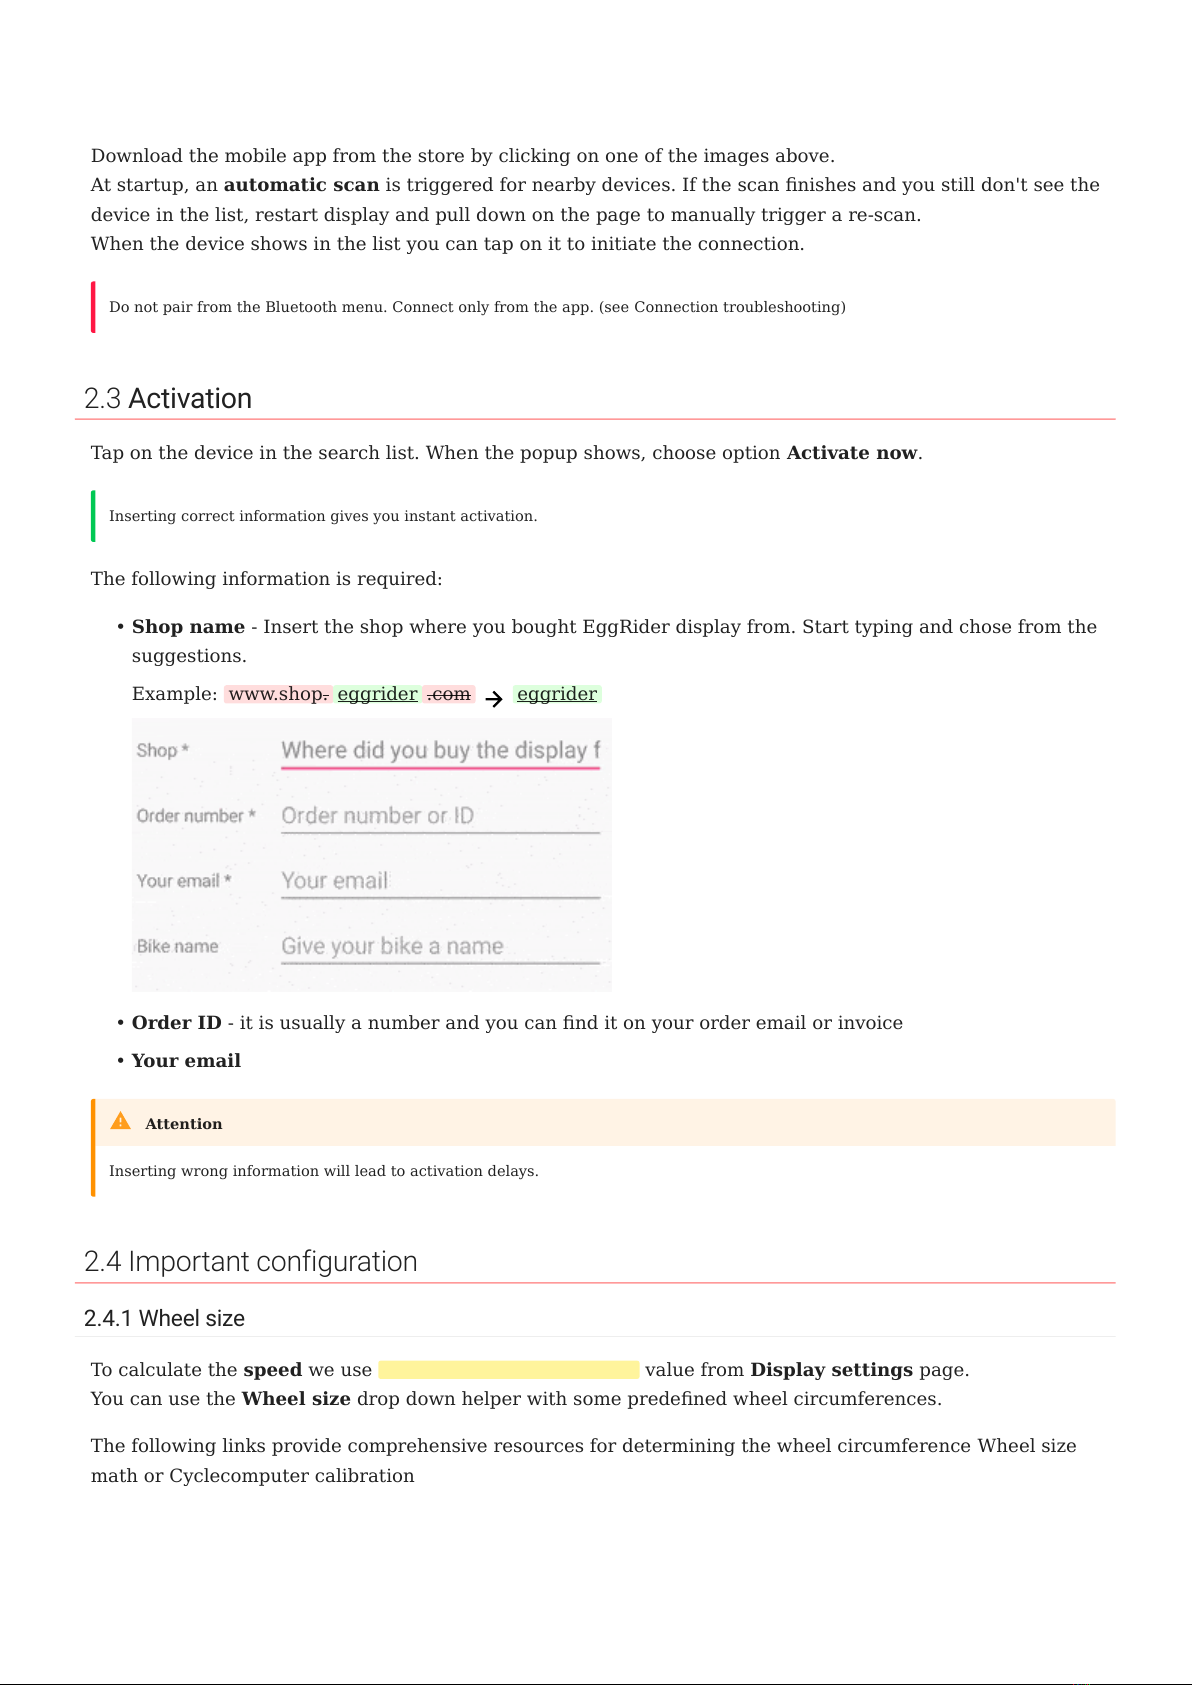
Download the mobile app from the store by clicking on one of the images above.
At startup, an automatic scan is triggered for nearby devices. If the scan nishes and you still don't see the
device in the list, restart display and pull down on the page to manually trigger a re-scan.
When the device shows in the list you can tap on it to initiate the connection.
2.3 Activation
Tap on the device in the search list. When the popup shows, choose option Activate now.
The following information is required:
Shop name - Insert the shop where you bought EggRider display from. Start typing and chose from the
suggestions.
Example: www.shop. eggrider .com eggrider
Order ID - it is usually a number and you can nd it on your order email or invoice
Your email
2.4 Important configuration
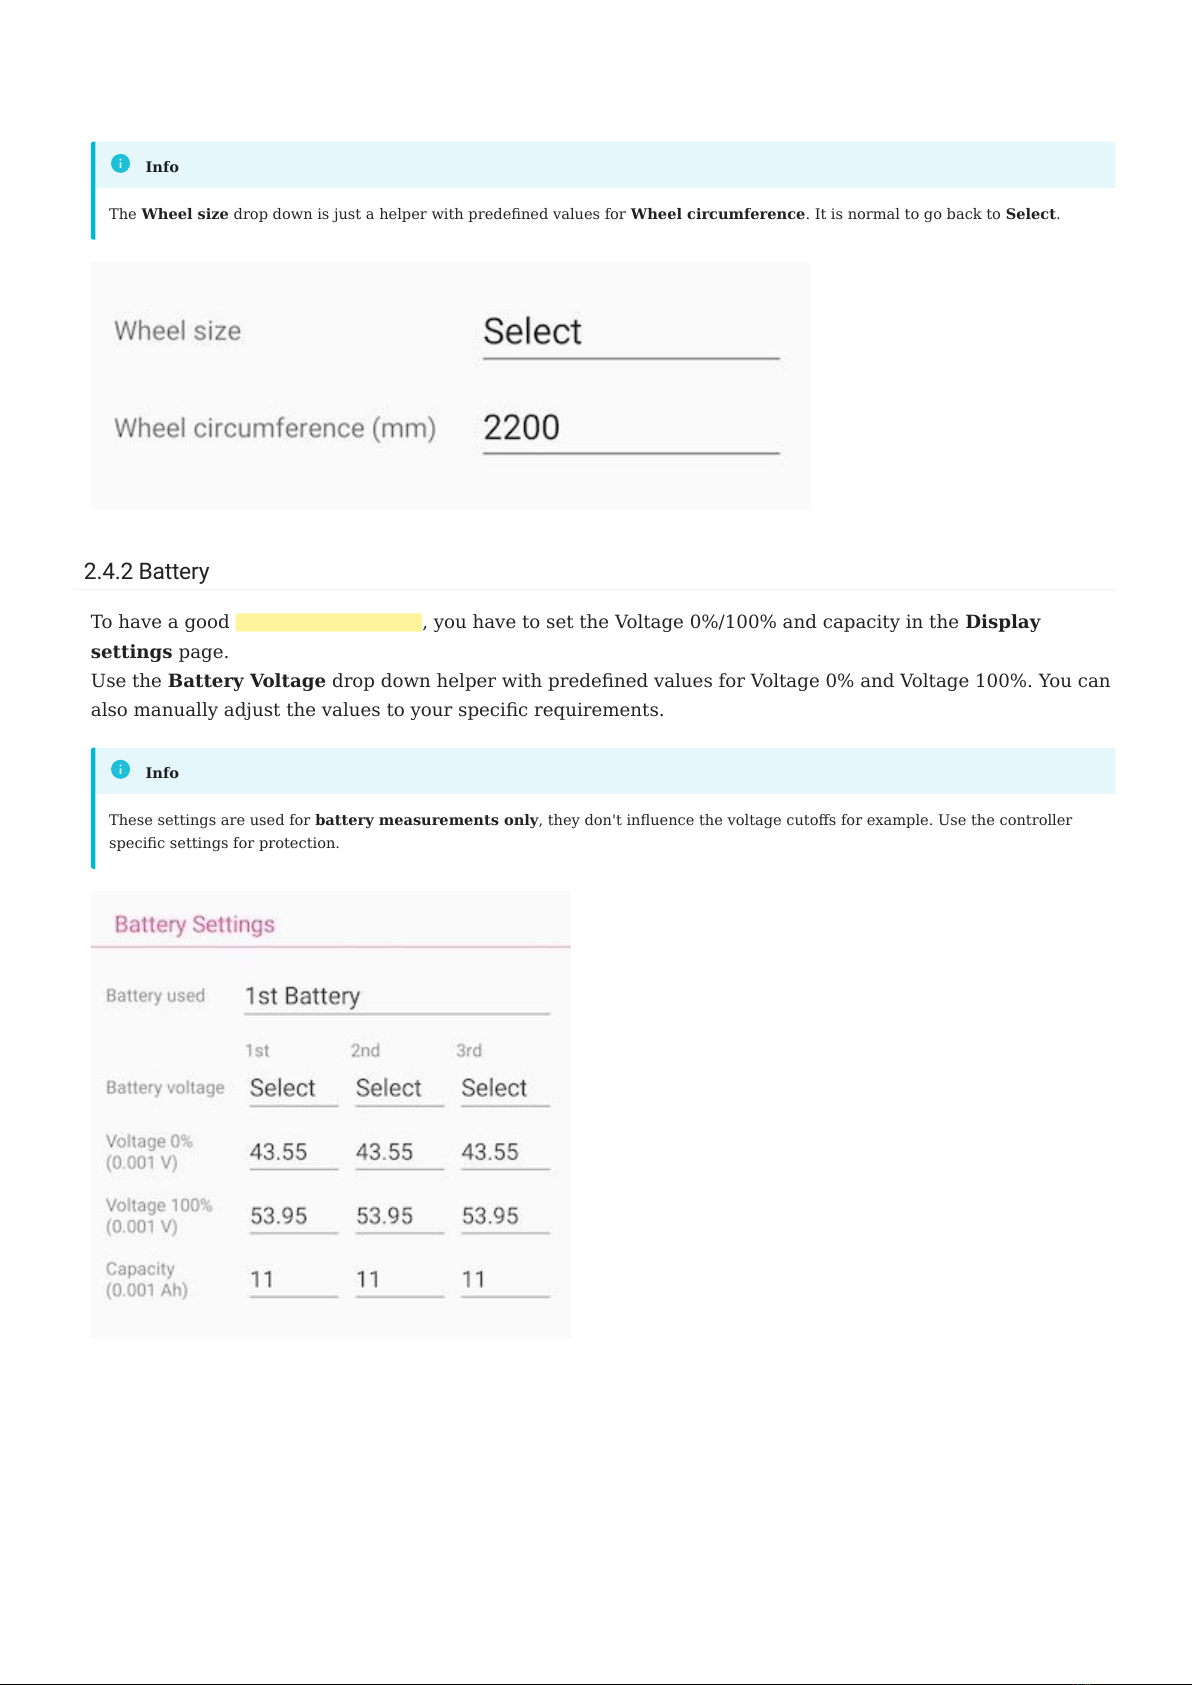
2.4.1 Wheel size
To calculate the speed we use Wheel circumference (mm) value from Display settings page.
You can use the Wheel size drop down helper with some predened wheel circumferences.
The following links provide comprehensive resources for determining the wheel circumference Wheel size
math or Cyclecomputer calibration
Do not pair from the Bluetooth menu. Connect only from the app. (see Connection troubleshooting)
Inserting correct information gives you instant activation.
•
•
•
Inserting wrong information will lead to activation delays.
Attention
2.3 Activation
- 7/89 - Copyright © 2019 EggRider.
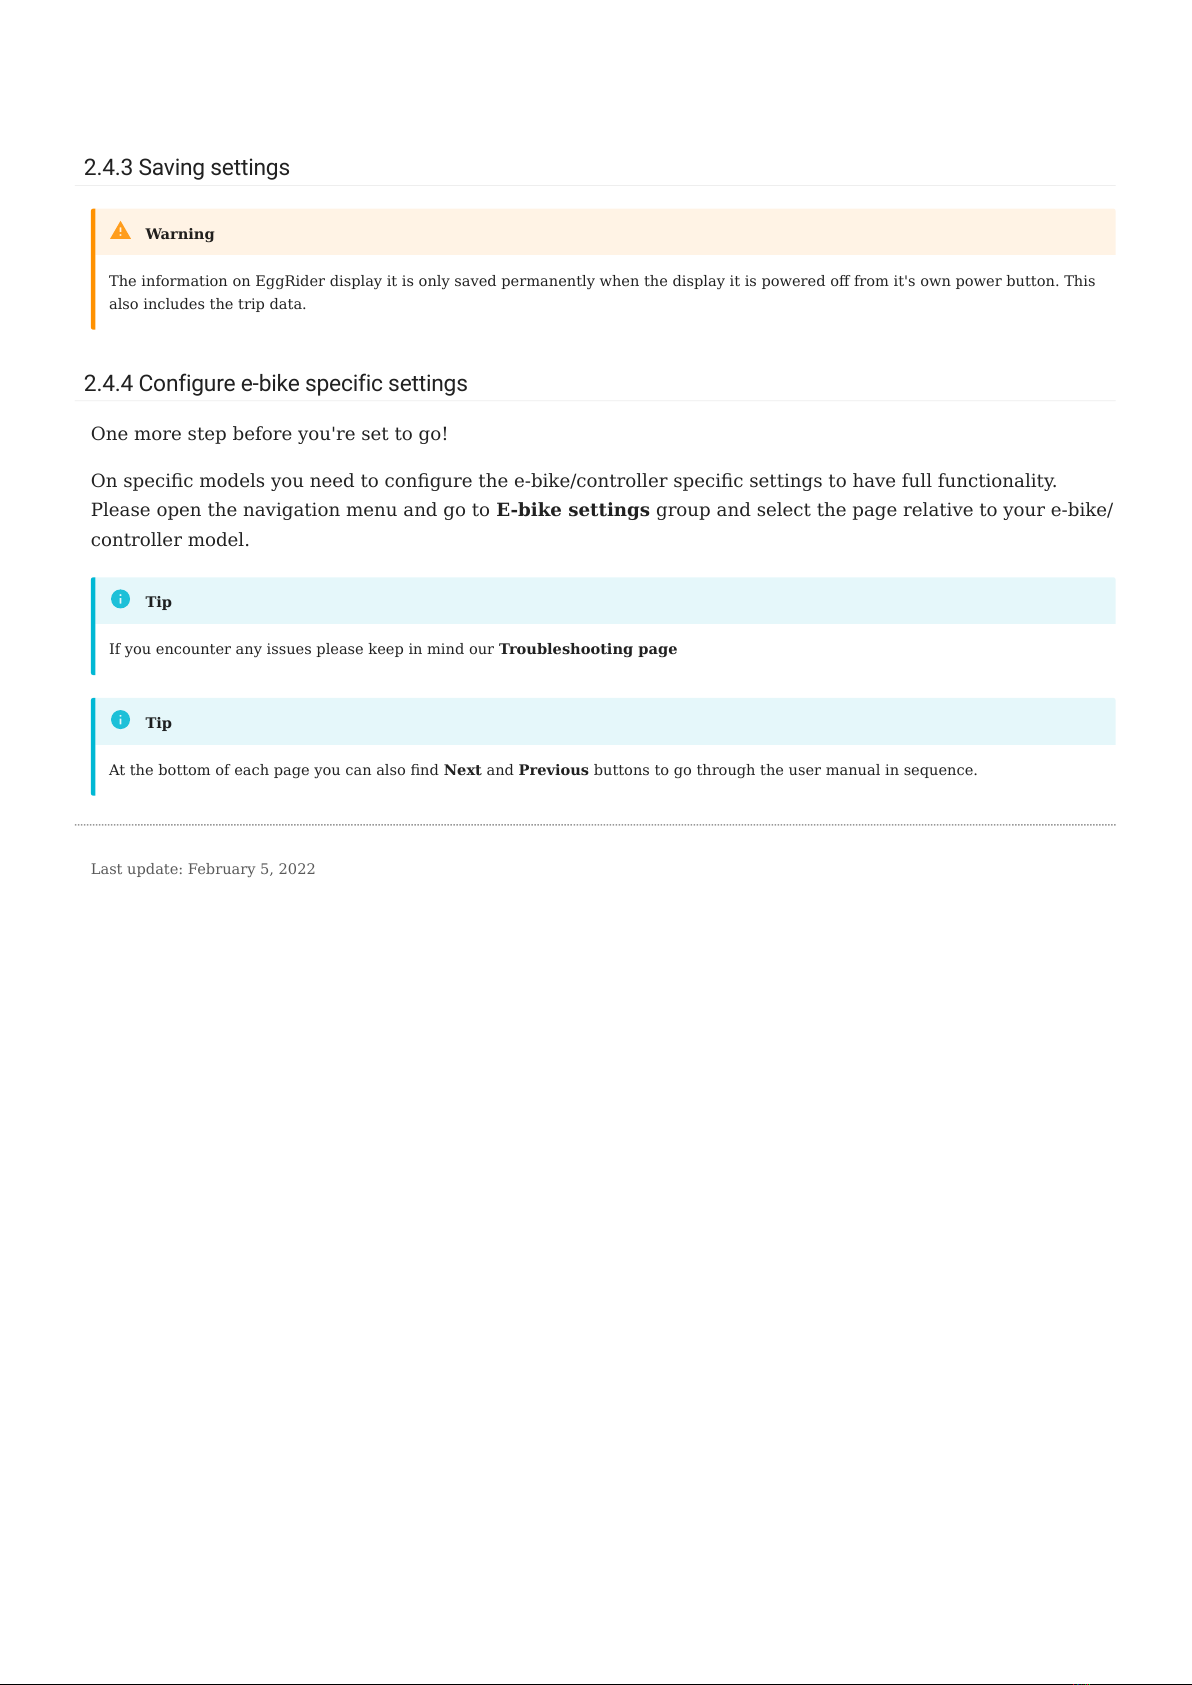
2.4.2 Battery
To have a good battery percentage , you have to set the Voltage 0%/100% and capacity in the Display
settings page.
Use the Battery Voltage drop down helper with predened values for Voltage 0% and Voltage 100%. You can
also manually adjust the values to your specic requirements.
The Wheel size drop down is just a helper with predened values for Wheel circumference. It is normal to go back to Select.
Info
These settings are used for battery measurements only, they don't inuence the voltage cutos for example. Use the controller
specic settings for protection.
Info
2.4.2 Battery
- 8/89 - Copyright © 2019 EggRider.
2.4.3 Saving settings
2.4.4 Configure e-bike specific settings
One more step before you're set to go!
On specic models you need to congure the e-bike/controller specic settings to have full functionality.
Please open the navigation menu and go to E-bike settings group and select the page relative to your e-bike/
controller model.
The information on EggRider display it is only saved permanently when the display it is powered o from it's own power button. This
also includes the trip data.
Warning
If you encounter any issues please keep in mind our Troubleshooting page
Tip
At the bottom of each page you can also nd Next and Previous buttons to go through the user manual in sequence.
Tip
Last update: February 5, 2022
2.4.3 Saving settings
- 9/89 - Copyright © 2019 EggRider.
3. Display
3.1 EggRider Display
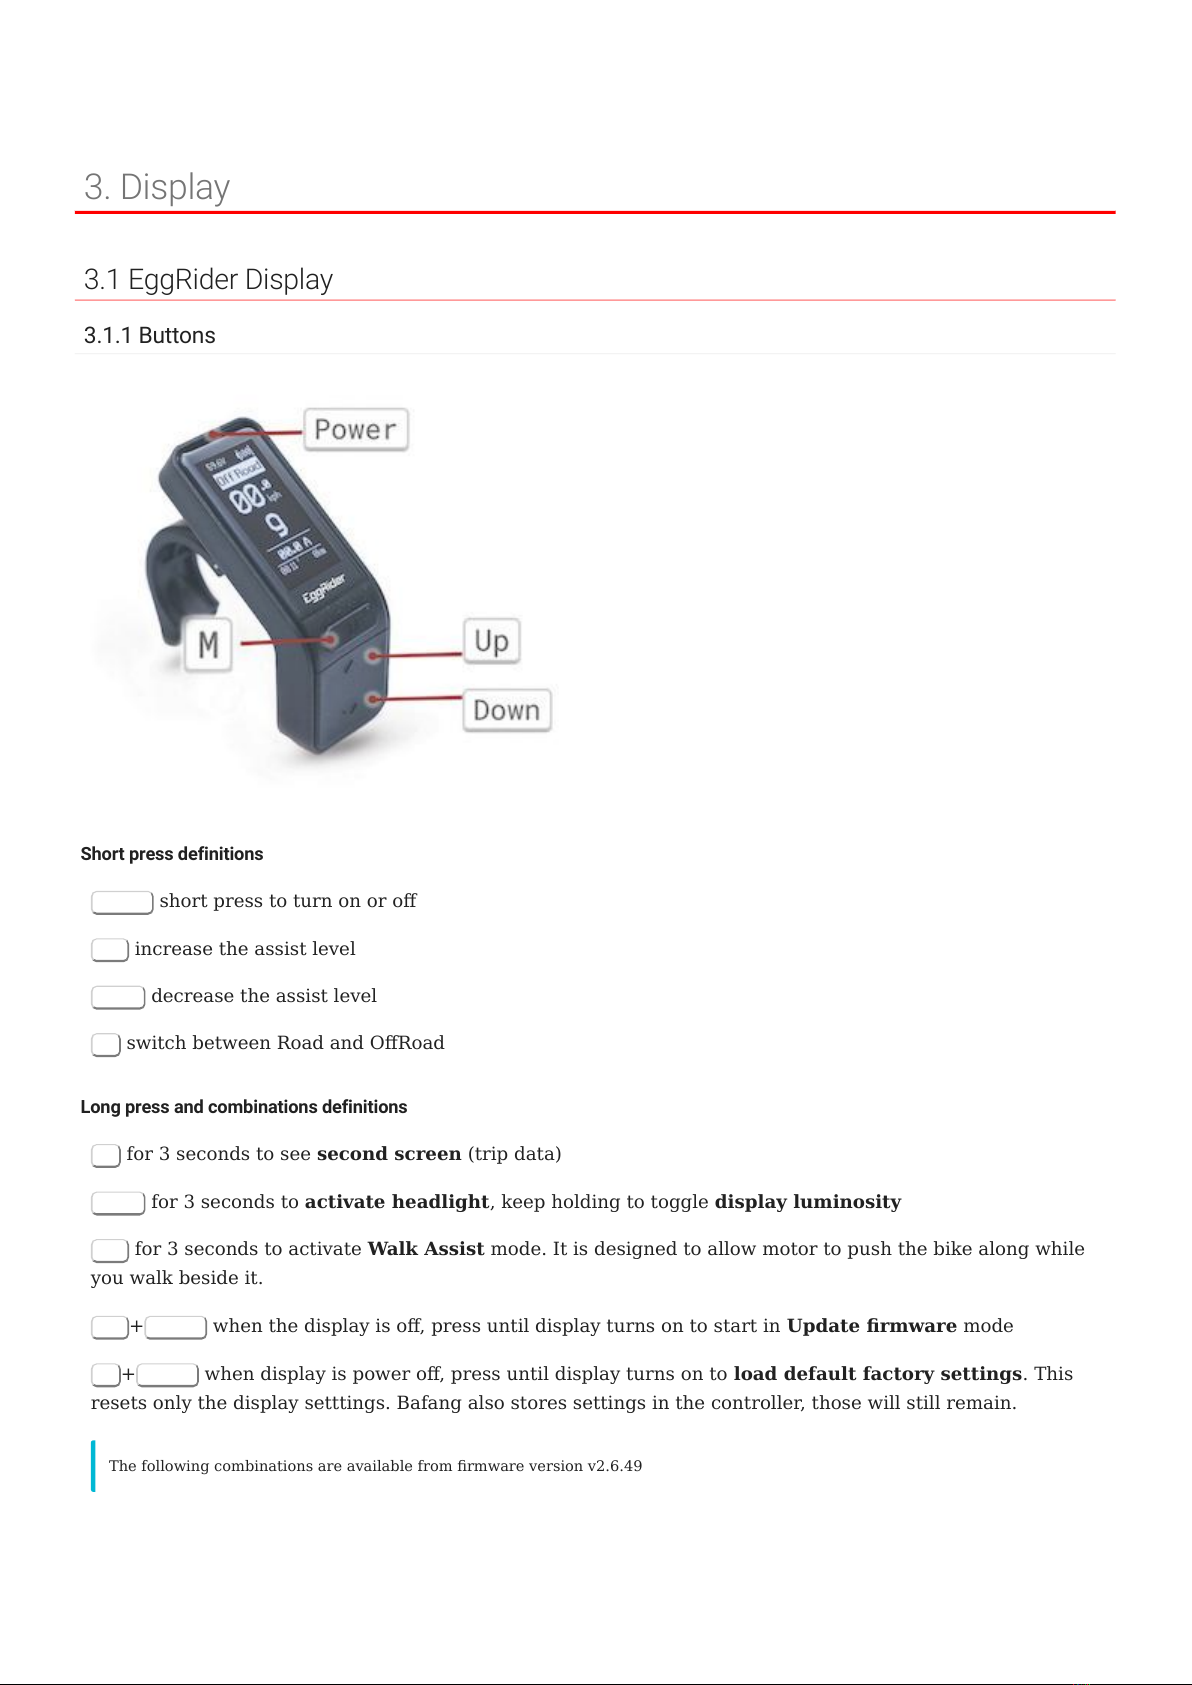
3.1.1 Buttons
Short press definitions
Power short press to turn on or o
Up increase the assist level
Down decrease the assist level
M switch between Road and ORoad
Long press and combinations definitions
M for 3 seconds to see second screen (trip data)
Down for 3 seconds to activate headlight, keep holding to toggle display luminosity
Up for 3 seconds to activate Walk Assist mode. It is designed to allow motor to push the bike along while
you walk beside it.
Up +Power when the display is o, press until display turns on to start in Update rmware mode
M+Power when display is power o, press until display turns on to load default factory settings. This
resets only the display setttings. Bafang also stores settings in the controller, those will still remain.
The following combinations are available from rmware version v2.6.49
3. Display
- 10/89 - Copyright © 2019 EggRider.
With second screen on, hold Down for 3 seconds to reset trip
With second screen on, hold Up for 3 seconds to change selected battery
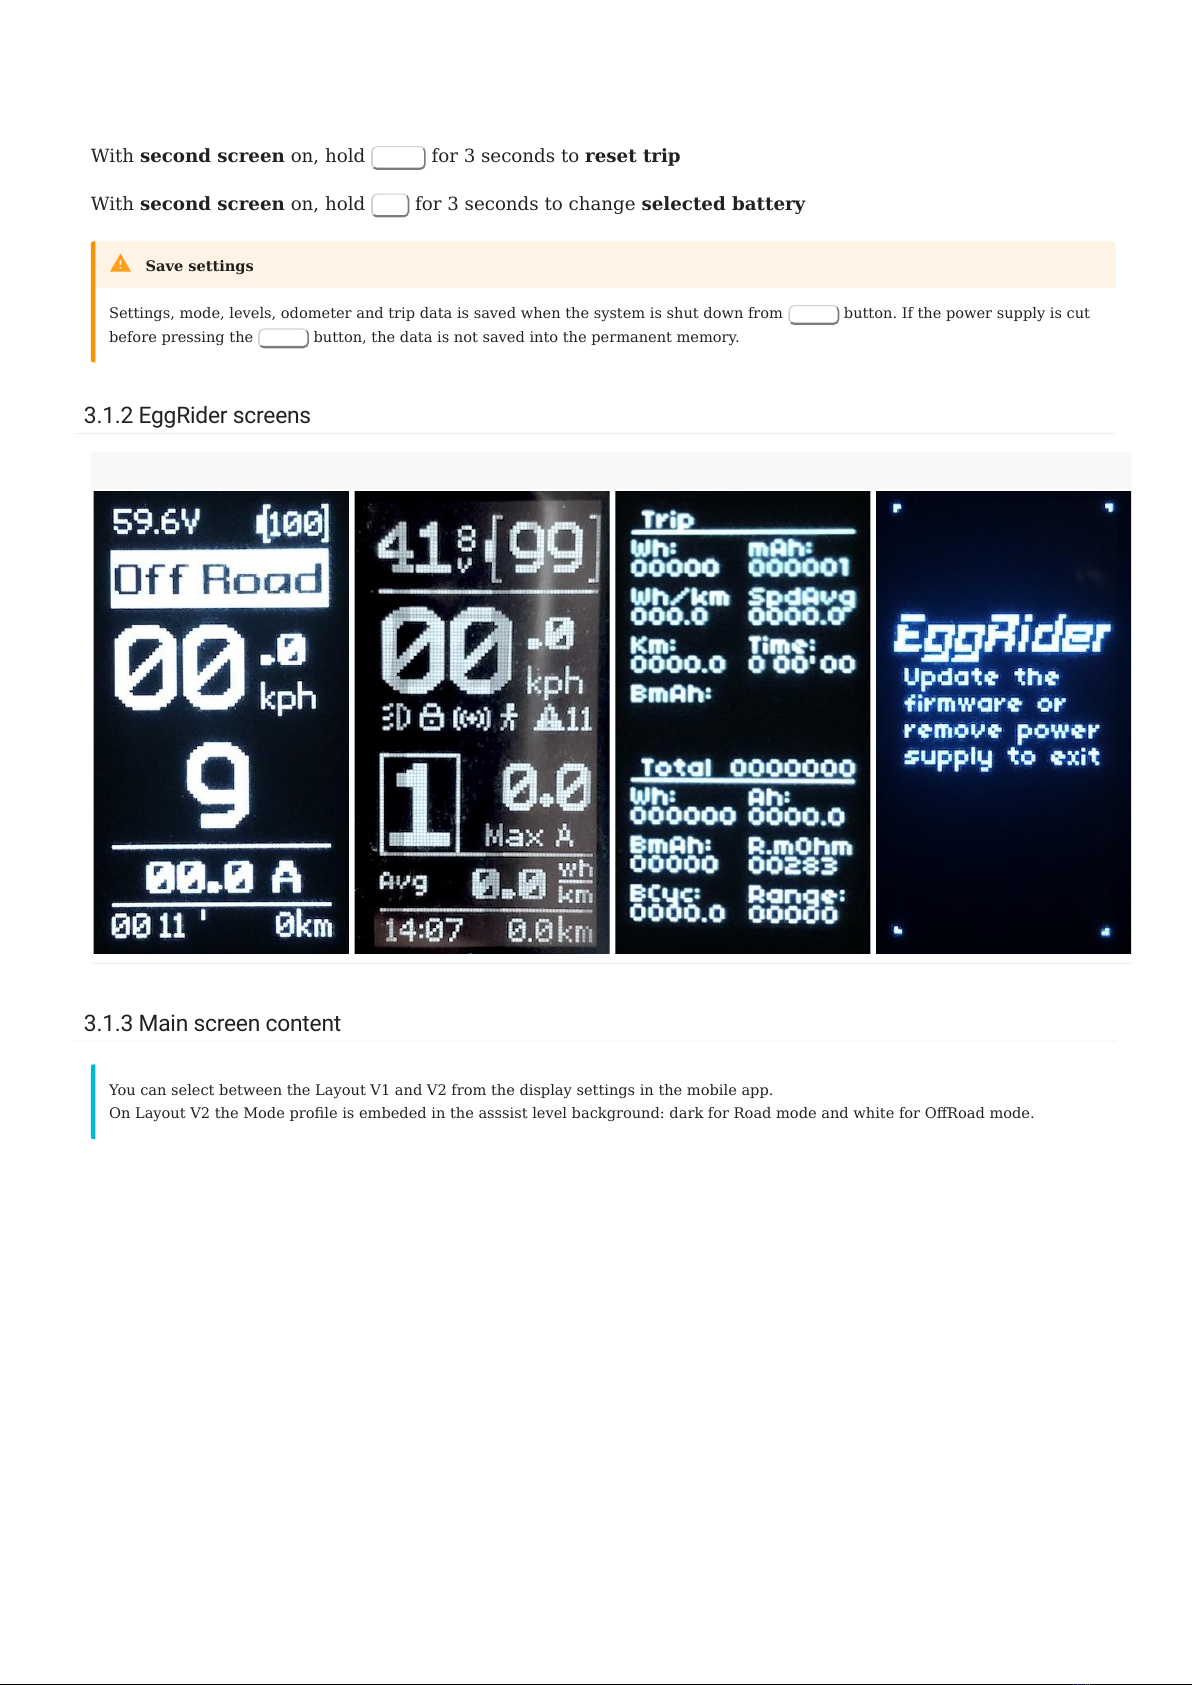
3.1.2 EggRider screens
3.1.3 Main screen content
Settings, mode, levels, odometer and trip data is saved when the system is shut down from Power button. If the power supply is cut
before pressing the Power button, the data is not saved into the permanent memory.
Save settings
Main screen layout V1 Main screen layout V2 Second screen Update screen
You can select between the Layout V1 and V2 from the display settings in the mobile app.
On Layout V2 the Mode prole is embeded in the asssist level background: dark for Road mode and white for ORoad mode.
3.1.2 EggRider screens
- 11/89 - Copyright © 2019 EggRider.
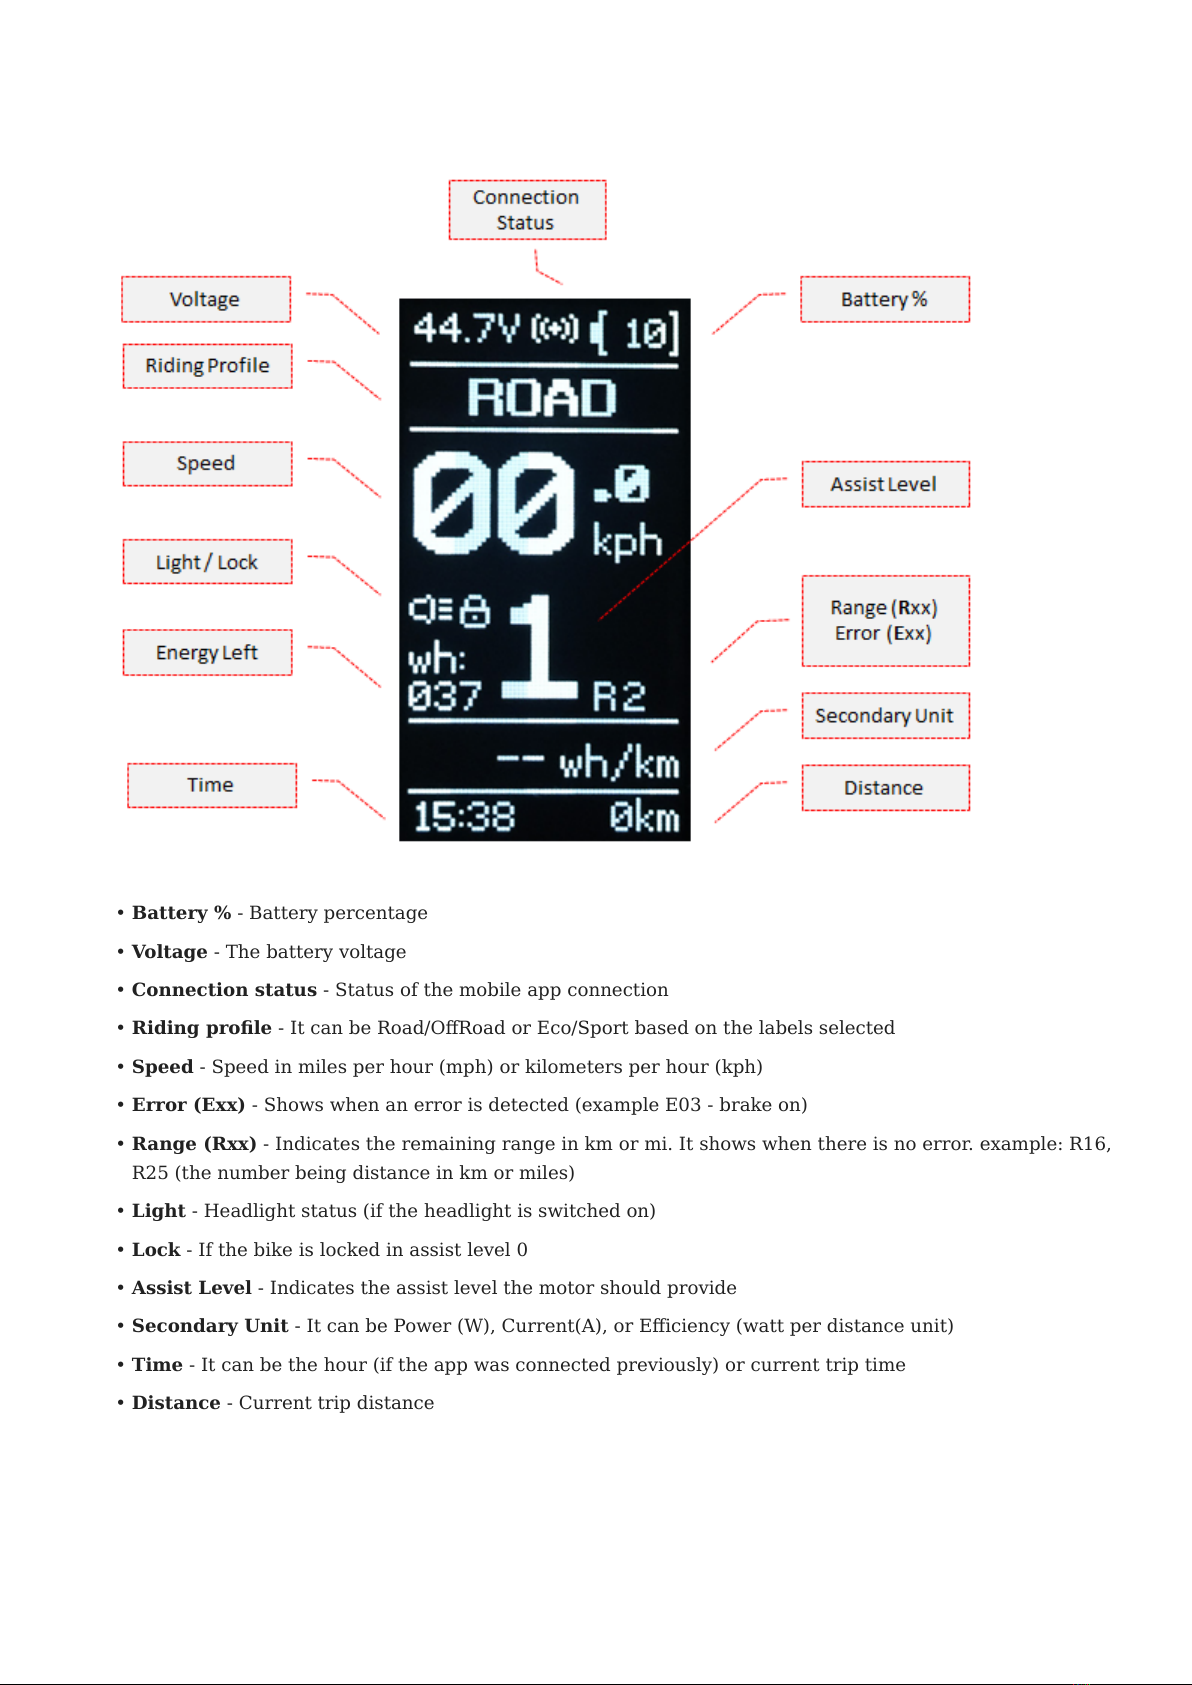
Battery % - Battery percentage
Voltage - The battery voltage
Connection status - Status of the mobile app connection
Riding prole - It can be Road/ORoad or Eco/Sport based on the labels selected
Speed - Speed in miles per hour (mph) or kilometers per hour (kph)
Error (Exx) - Shows when an error is detected (example E03 - brake on)
Range (Rxx) - Indicates the remaining range in km or mi. It shows when there is no error. example: R16,
R25 (the number being distance in km or miles)
Light - Headlight status (if the headlight is switched on)
Lock - If the bike is locked in assist level 0
Assist Level - Indicates the assist level the motor should provide
Secondary Unit - It can be Power (W), Current(A), or Eiciency (watt per distance unit)
Time - It can be the hour (if the app was connected previously) or current trip time
Distance - Current trip distance
•
•
•
•
•
•
•
•
•
•
•
•
•
3.1.3 Main screen content
- 12/89 - Copyright © 2019 EggRider.
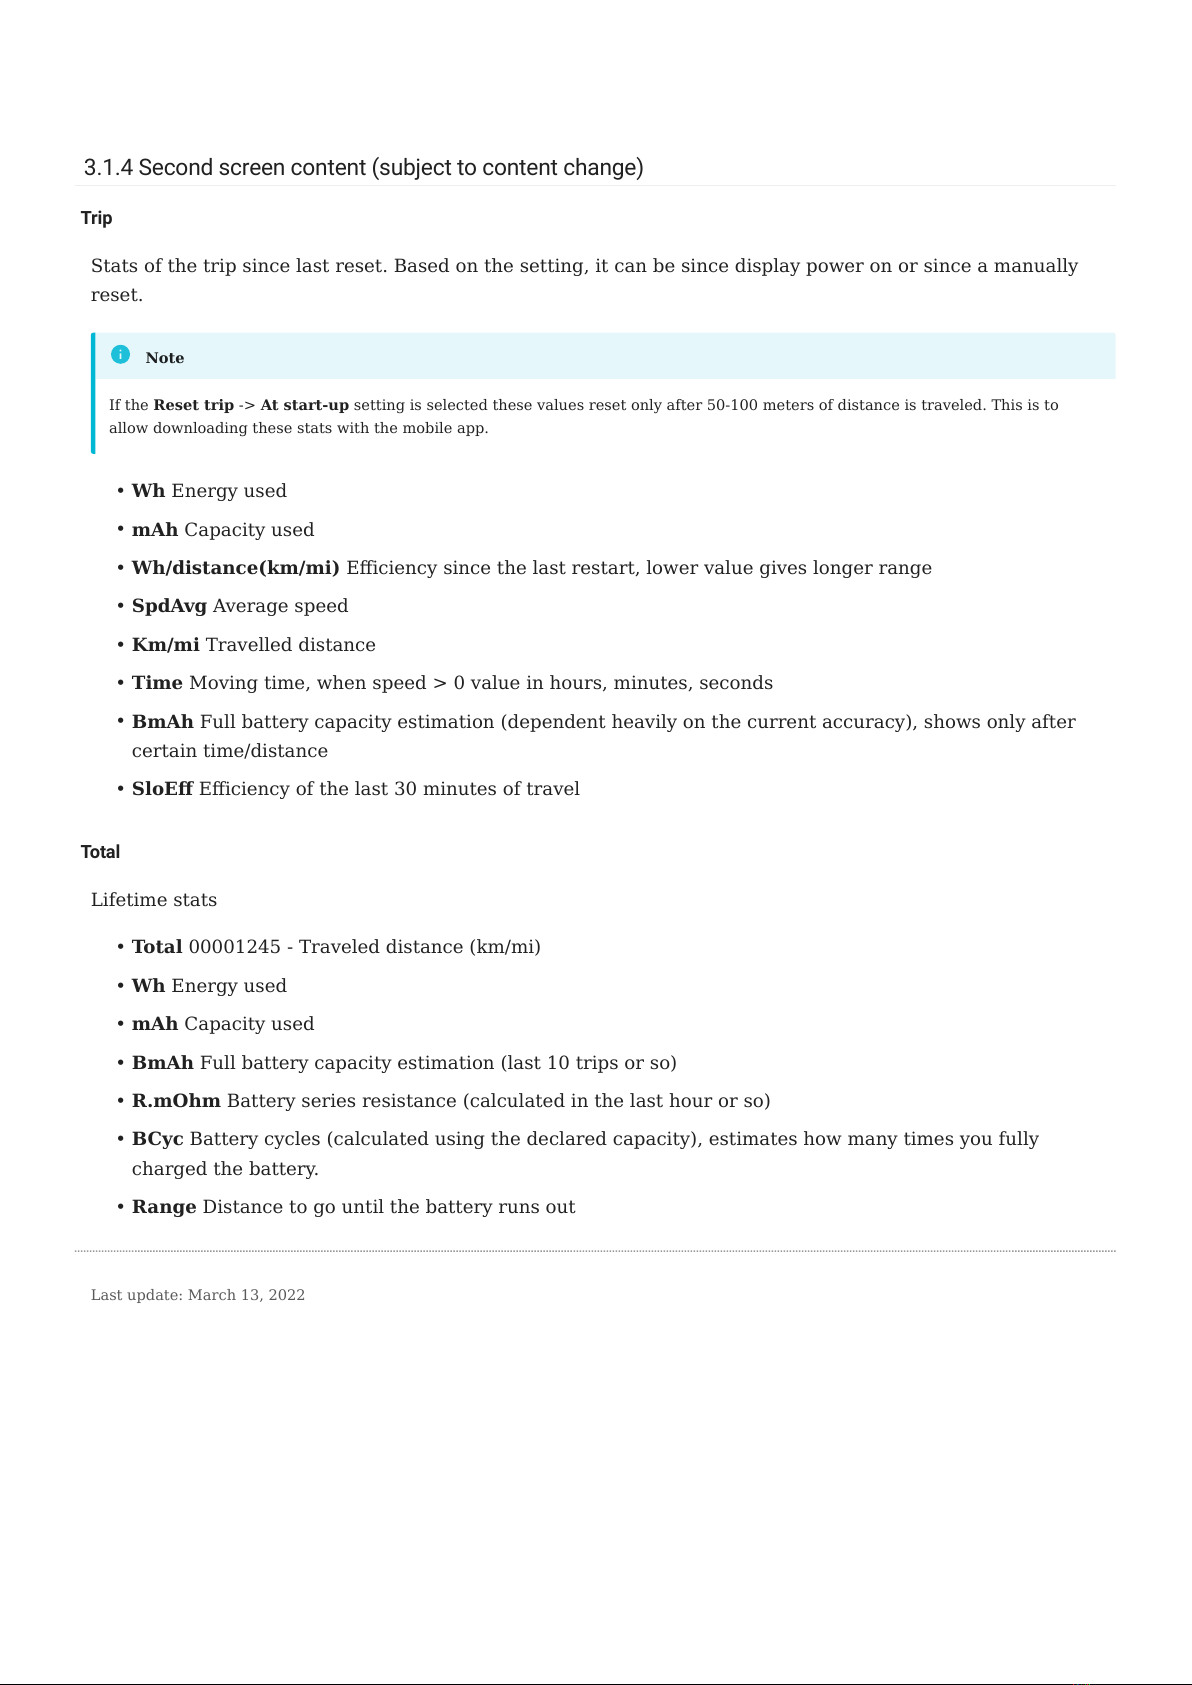
3.1.4 Second screen content (subject to content change)
Trip
Stats of the trip since last reset. Based on the setting, it can be since display power on or since a manually
reset.
Wh Energy used
mAh Capacity used
Wh/distance(km/mi) Eiciency since the last restart, lower value gives longer range
SpdAvg Average speed
Km/mi Travelled distance
Time Moving time, when speed > 0 value in hours, minutes, seconds
BmAh Full battery capacity estimation (dependent heavily on the current accuracy), shows only after
certain time/distance
SloE Eiciency of the last 30 minutes of travel
Total
Lifetime stats
Total 00001245 - Traveled distance (km/mi)
Wh Energy used
mAh Capacity used
BmAh Full battery capacity estimation (last 10 trips or so)
R.mOhm Battery series resistance (calculated in the last hour or so)
BCyc Battery cycles (calculated using the declared capacity), estimates how many times you fully
charged the battery.
Range Distance to go until the battery runs out
If the Reset trip -> At start-up setting is selected these values reset only after 50-100 meters of distance is traveled. This is to
allow downloading these stats with the mobile app.
Note
•
•
•
•
•
•
•
•
•
•
•
•
•
•
•
Last update: March 13, 2022
3.1.4 Second screen content (subject to content change)
- 13/89 - Copyright © 2019 EggRider.

3.2 EggRider display specification
SIZE
75mm x 47mm x 35mm
WEIGHT
31g
CABLE LENGTH
50cm
HANDLEBAR MOUNTING BRACKET
Standard 22.2mm diameter
CLAMP SCREW
Hex bolt M3x10mm
MOUNTING CLAMP PIN
2.0mm diameter and around 15mm length
PHYSICAL BUTTONS
Power On/O, Level Up/Down and popular Road/ORoad mode switch
CONNECTOR
Higo/Julet waterproof 5 pin male/female (see image)
CONNECTIVITY
Bluetooth low energy (BLE)
PROTECTION
Dust and water-resistant - IP65 protection
VOLTAGE
Supports direct voltage up to 60V (we can support higher voltages only with specic controllers by
connecting to 12V output)
Current consumption
Full brightness: <= 20 mA
Low brightness (dimmed) <= 12 mA
•
•
3.2 EggRider display specication
- 14/89 - Copyright © 2019 EggRider.
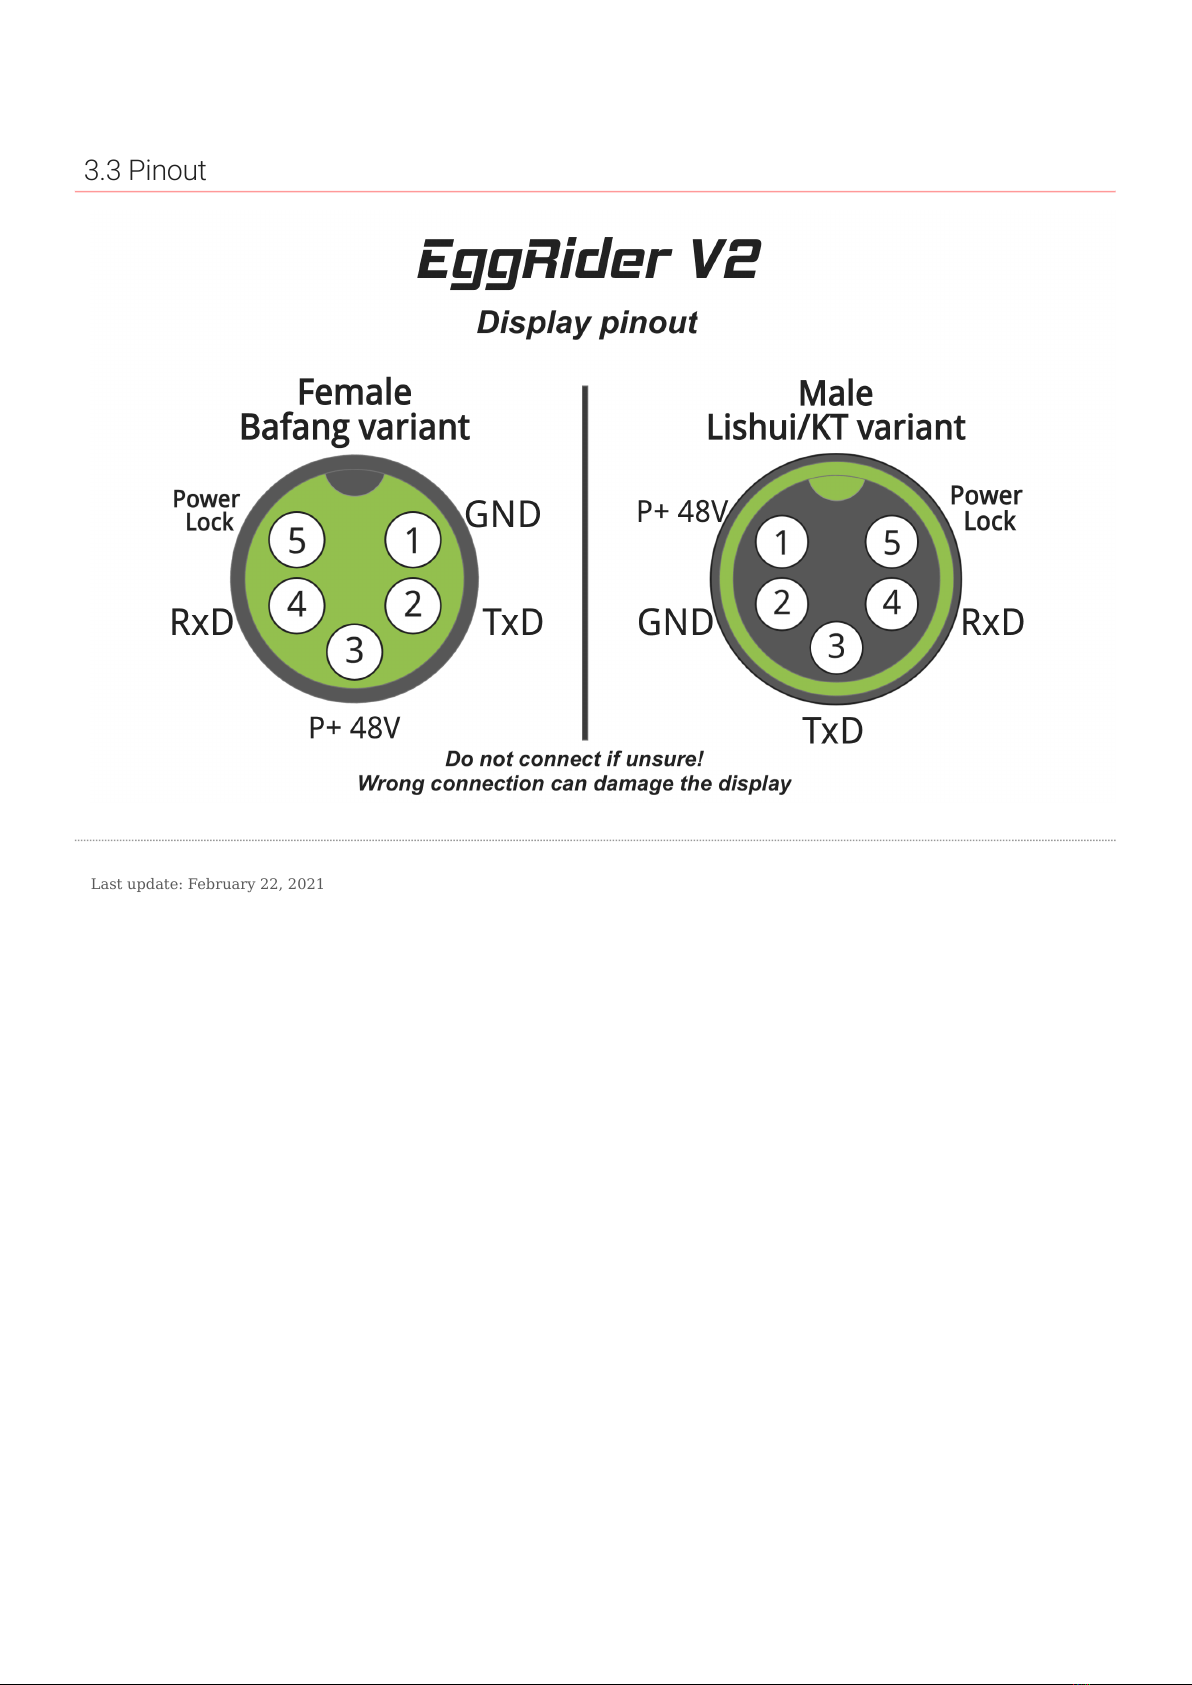
3.3 Pinout
Last update: February 22, 2021
3.3 Pinout
- 15/89 - Copyright © 2019 EggRider.
3.4 EggRider display features
Elegant design with premium feel.
Small enough to avoid unwanted attention.
Lightweight and compact design keeping your handlebar clean.
Voltage reading from 20V up to 60V.
OLED screen, displaying the most important information while riding without the need of your phone.
Android and iOS mobile apps for more statistics and congurations.
Essential and accurate information; battery percentage, speed, power and distance.
Advanced stats; energy eiciency, range estimation, voltage and battery cycles.
Detects real battery capacity and tracking stats of up to 3 batteries.
EggRider mobile app available for Android and iOS.
Easy conguration from the EggRider app.
Ability to use the EggRider app as a larger display.
In-depth charts capability for your rides.
One button switch between two proles
Throttle yes/no switching
Pedal assist yes/no
Power level
•
•
•
Last update: June 4, 2020
3.4 EggRider display features
- 16/89 - Copyright © 2019 EggRider.
4. Firmware Update
4.1 EggRider Display Firmware Update
It is highly recommended to ensure you update your rmware to the latest available when you receive your EggRider.
Attention
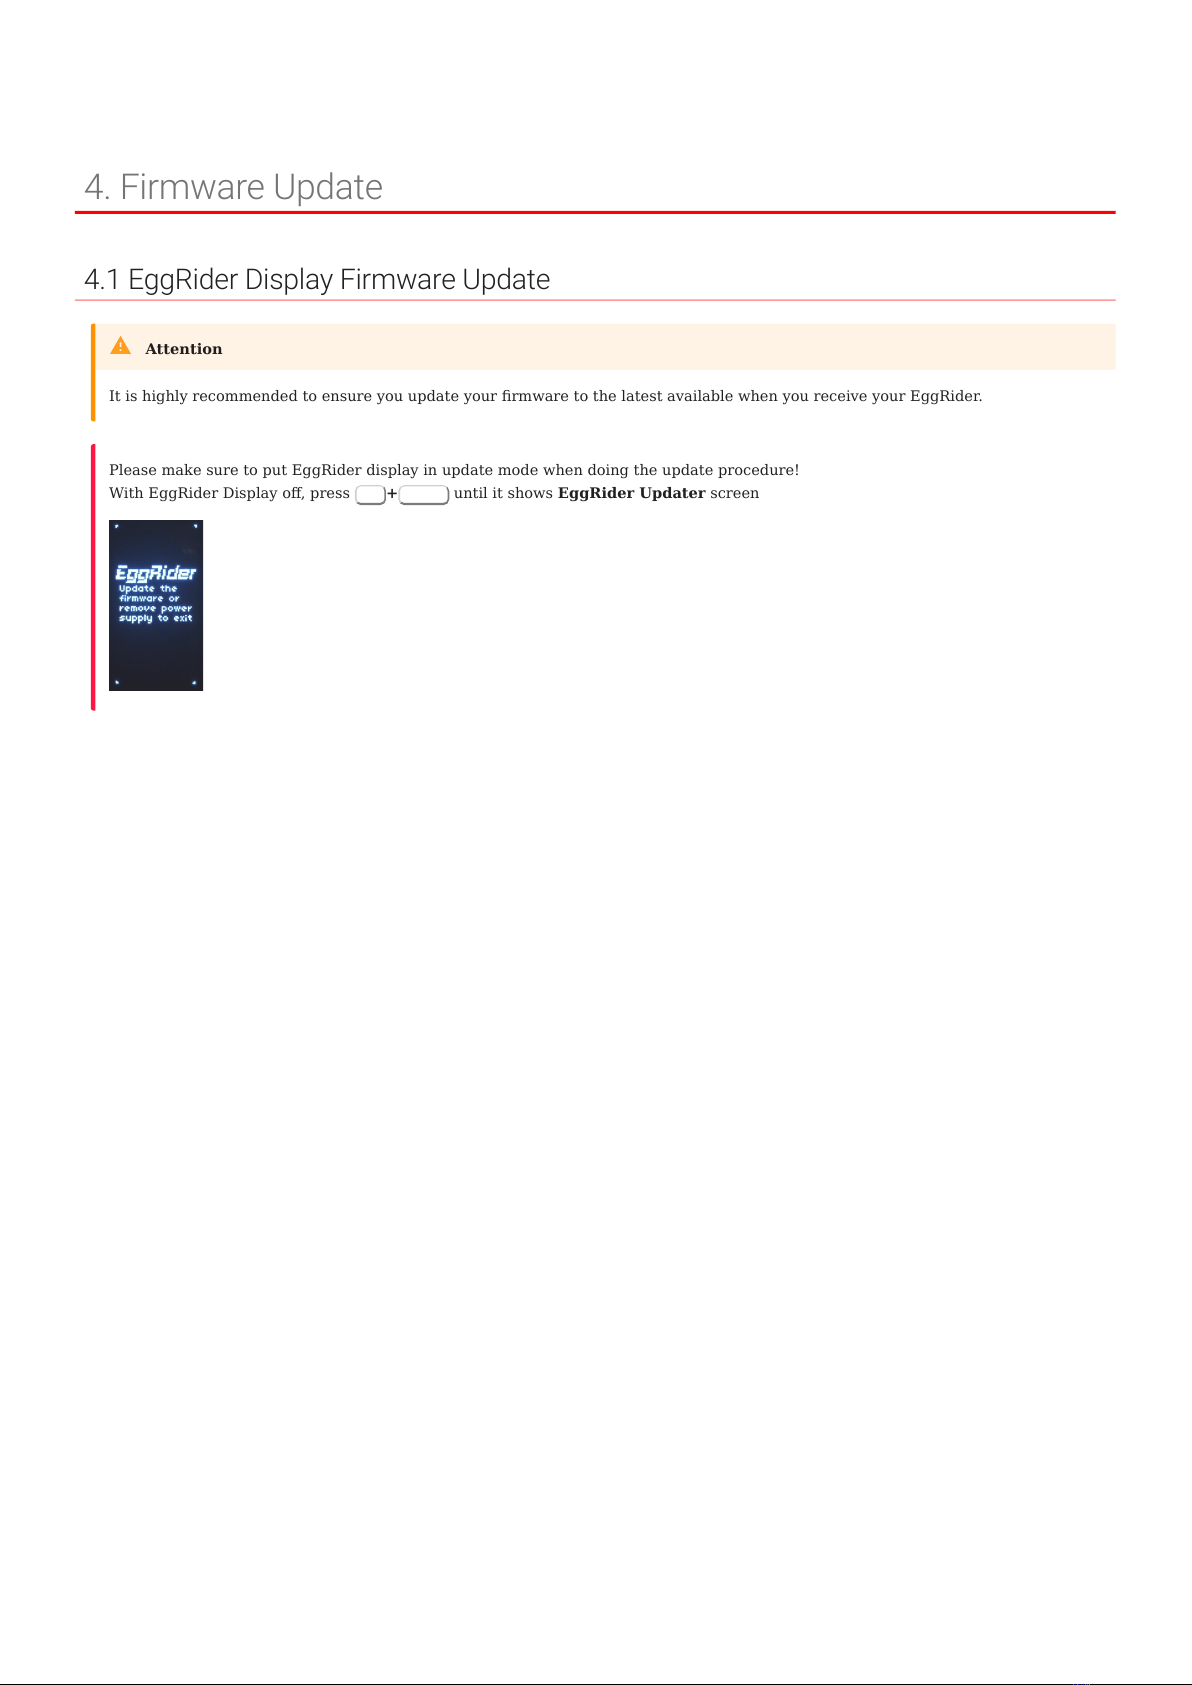
Please make sure to put EggRider display in update mode when doing the update procedure!
With EggRider Display o, press Up +Power until it shows EggRider Updater screen
4. Firmware Update
- 17/89 - Copyright © 2019 EggRider.

4.1.1 Update instructions for versions V2.5.xx +
Backup your settings and ODO stats (in rare cases they can be lost)
Check if any of the ODO Total KM, Wh or Ah are dierent than before, as highlighted in the picture
above. If so we recommend to reset ODO from Display Advanced settings
To use the new features like change Display Main screen layout (with app >= v2.5.03), after update
make sure to rescan for device (disconnect if already connected) and check that version shown is v2.5.23
as in picture bellow
If you had to reset the ODO you can use the ODO distance oset to input the old ODO distance
We recommend checking the battery specications. For Battery Voltage 100% in display settings we now
required the full battery voltage for a better battery estimation. For example, for a 48V battery it should
be 54.6V. You can use the helping predened selections if not sure. Also for Capacity (Ah) you might nd
that lower values than the manufactured declared capacity might work better. This --is-- because in time
the battery degrades but also because sometimes the voltage cuto is higher.
4.1.2 How to update EggRider display?
Using EggRider mobile app
Using Google Chrome browser (Deprecated)
Using iPhone or iPad (Deprecated)
Using Android or Tablet (Deprecated)
Because of the many changes in some of the core functionalities we recommend following the steps bellow for a smooth transition.
We tested the update from rmware version >= v2.4.11. It should also work from older rmware versions but we recommend doing
a reset to defaults afterwards.
To have access to all the features you need to use in conjunction with app >= v2.5.03
Attention
•
•
•
•
•
•
•
•
•
Last update: March 13, 2022
4.1.1 Update instructions for versions V2.5.xx +
- 18/89 - Copyright © 2019 EggRider.

4.2 EggRider display firmware update from EggRider mobile app
4.2.1 Steps to update
Backup your settings and ODO stats
Connect to EggRider display
Go to Search page and slide right on EggRider in the list
Tap Update
Display restarts in update mode showing the following screen
Display rmware page will open
Optional - slide left on one item in the list to see release notes
Optional - If you have a specic rmware code tap on unlock button in the right top corner to enter it
It is highly recommended to ensure you have the latest rmware available on your EggRider display.
Attention
Available starting from app version 2.6.03
Attention
1.
2.
If you are unable to connect: with display o, press Up +Power until display Update rmware screen. Skip to step 5
3.
Firmware update option in Search list by sliding right
4.
5.
6.
If not, go to Search page and slide down to scan for devices. Tap on EggRiderBL or DispUpdV2
a.
b.
4.2 EggRider display rmware update from EggRider mobile app
- 19/89 - Copyright © 2019 EggRider.
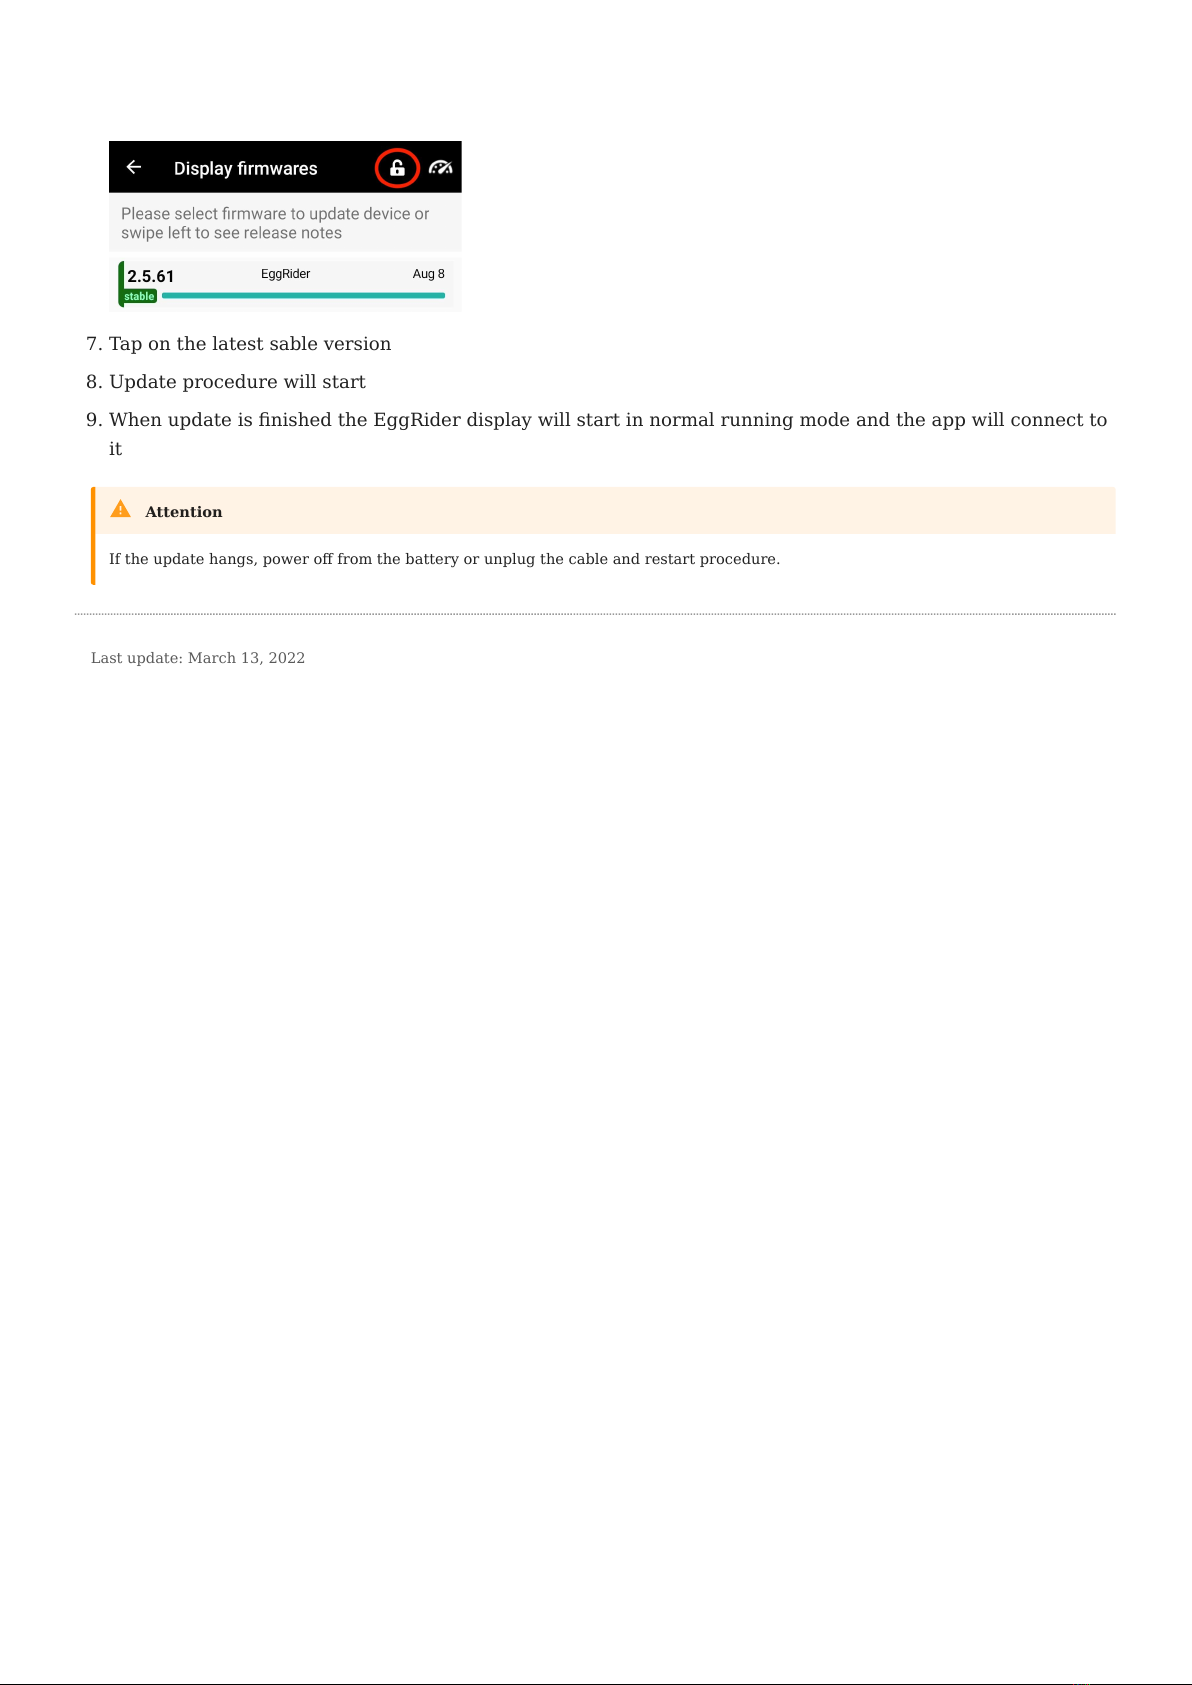
Tap on the latest sable version
Update procedure will start
When update is nished the EggRider display will start in normal running mode and the app will connect to
it
7.
8.
9.
If the update hangs, power o from the battery or unplug the cable and restart procedure.
Attention
Last update: March 13, 2022
4.2.1 Steps to update
- 20/89 - Copyright © 2019 EggRider.
Table of contents


