cycliq Fly12 User manual

QUICK START GUIDE

What’s in the box
Fly12 Sport 64GB micro SD
card (preinstalled) Handlebar
mount
Safety
tether
USB-A - USB-C
cable
M5 screw for
universal adapter
Universal
adapter
22.2mm handlebar
adapter

Fly12 Sport layout
microSD card slot
Charge port
Speaker Reset
button
Camera
Main LED

Fly12 Sport layout
Q button
Power button
Function button
Display screen
Status LED
Microphone
Tether hole

Before your first ride
Please follow these simple steps before your first ride
with your Fly12 Sport.
1. Ensure you fully charge the Fly12 Sport.
2. Ensure the Fly12 Sport port door is securely closed.
3. Ensure the safety tether is correctly attached.
4. Ensure the rotation of the display screen is correct.
5. Ensure the date and time stamps are correct.

Connecting to the Fly12 Sport
for the first time
All Fly12 Sport settings can be managed using the CycliqPlus
mobile app.
Connecting to your mobile device
The Fly12 Sport uses Bluetooth for connection to your mobile
device. The first time you connect you will need to follow the below
steps to enable Bluetooth.
Turn on the Fly12 Sport by pressing and holding the power button.
Open the CycliqPlus mobile app and ensure Bluetooth is enabled on
your mobile device.
Select your Fly12 Sport from the menu.
The Bluetooth icon will appear on the Fly12 Sport’s display screen
when a connection is established.
The Fly12 Sport will automatically sync with the time and date
settings from your mobile device when connecting to CycliqPlus.

Mounting the Fly12 Sport

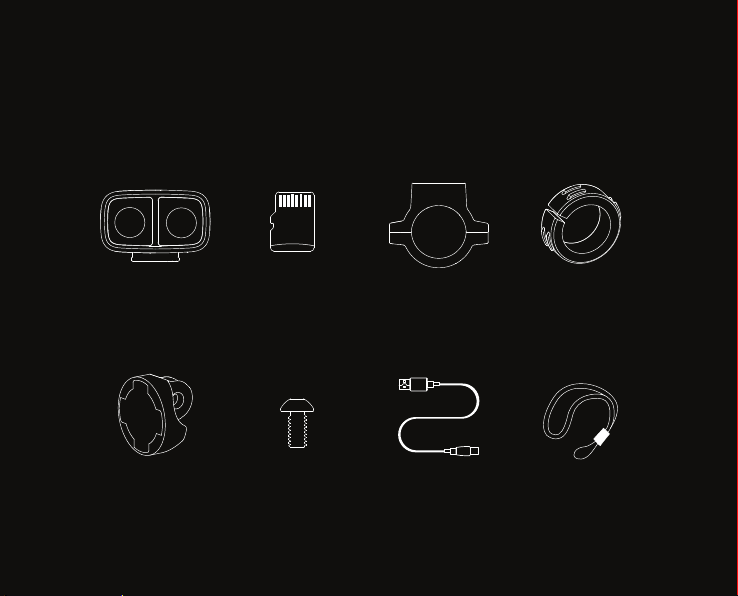
The Fly12 Sport comes with a handlebar mount and a universal
adapter that features the Cycliq quick release system.
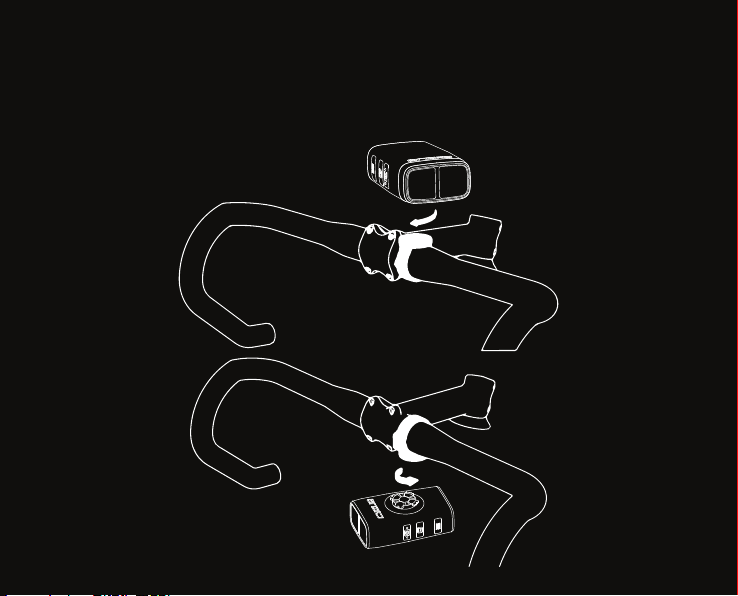
Attaching a handlebar mount:
1. Place the handlebar mount above or below the handlebar,
depending on available space. If mounting to a 22.2mm bar install
the appropriate rubber adapter then carefully torque the hex bolts
to a max of 2Nm.
2. With the Fly12 Sport facing forward and at a 45° angle to your
handlebar, line up the quick release male component on the Fly12
Sport with the female receptor on the handlebar mount. Place the
Fly12 Sport into the mount and make a 1/8th turn until the device
clicks into a forward-facing position.
Note
If installing the Fly12 Sport using the universal adapter and a
finned style mounting sytem, the process of operating the 1/8th.
Mounting the Fly12 Sport

Light modes
You can cycle through the available light modes using the power
button.
Camera Only (Main LED off)
Solid High (Main LED solid with high intensity)
Solid Low (Main LED solid with low intensity)
Flash High (Main LED flashing with high intensity
Flash Low (Main LED flashing with low intensity)
Pulse High (Main LED pulsing with high intensity)
Pulse Low (Main LED pulsing with low intensity)
Organic (Random generation of high and low intensity)
All light modes are available by default on the Fly12 Sport. You
can customise the available light modes on CycliqPlus so only
your preferred modes are available.
The light mode last used will be remembered when the Fly12
Sport is turned off.

Display screen - home
The display screen on the back of the Fly12 Sport allows you to
control many features and functions with ease. The display screen
can be toggled by pressing the function button.
The home screen is the default display on your Fly12 Sport.
The Bluetooth icon is
shown when a connection
is established.
Battery Status
4 bars = 75% to 100%
3 bars = 50% to <75%
2 bars = 25% to <50%
1 bar = 1% to <25%
The current active light
mode is displayed.
To toggle available light
modes press the power
button.

Display screen - rotation
The rotation screen shows the orientation the Fly12 Sport is set to
record in.
Changing rotation
To rotate the orientation of the Fly12 Sport, press and hold the
function button (for approximately 3 seconds).
Correct rotation
If the hold to rotate prompt is displayed upside down, hold the
function button to change orientation, so the screen reads right
way up.
Mounted above
your handlebars
Mounted below
your handlebars

Looping function
The Fly12 Sport was designed as a set and forget cycling safety
device. The footage is set to record on a continuous loop so you
don’t have to worry about running out of storage space on the
microSD card.
When there is no free space left to record on your microSD card,
the Fly12 Sport will start recording over the oldest video file first.
Any locked footage saved by the Fly12 Sport will not be
overwritten by the looping function.
Oldest file overwritten
Fly12 Sport continues recording microSD card full
Locked files will
not be overwritten

Incident Protection

Incident protection mode has been designed to save your footage
from major incidents without being recorded over.
Incident protection mode is activated when the Fly12 Sport is
tilted more than 60° from vertical (or 30° from the ground) for
more than five seconds. If this happens, the Fly12 Sport will lock
the current and immediately preceding video file then continue
recording as normal.
The incident screen is displayed to confirm your incident has been
saved and files locked.
Incident Protection

Manual footage capture
If you witness an event that you want to capture and
retain when riding, simply press the Q button. This
will lock the current and preceding video files.
A lock icon will be shown on the display screen to
confirm the manual footage capture.
Still image capture
The Fly12 Sport can take a still image while recording
video. You can do this by holding the Q button for
approximately 3 seconds.
The still image capture is confirmed by a ‘snapshot’
sound. A camera icon will be shown on the display
screen to confirm the still image capture.
Image capture

Accessing your footage
After your ride, you can access your footage in a number of ways:
1. Connect the Fly12 Sport to a PC or Mac using the USB cable.
2. Remove the microSD card and read data using your PC or Mac.
3. Using a Cycliq On The Go Card Reader.
Editing footage
You can edit your footage using the CycliqPlus desktop and mobile
app. From here you can also overlay Strava metrics and share
highlights from you ride.
Using your footage

Evidence makes a difference!
If you've had an incident on the roads, been subjected to a close
pass or capture any other dangerous activity, upload it to
www.UpRide.cc and use your footage to help make cycling safer.
Then share your UpRide with your community and help spread the
word. We are all in this together and we all have a role to play in
making the roads safer for all road users.
Record your ride. Make it count. UpRide it.
UpRide your ride

Specification
Feature
Recording
Lens angle
Video format
Image stabilisation
Lumens
Weight
Dimensions
Battery
Port
Bluetooth®BT 5.1
USB-C to charge & connect to PC & Mac
29.5mm (H) x 50.7mm (W) x 81.2mm (L)
3000mAh, 11.10Wh (up to 7 hours)
148g / 5.22oz
400lm max output
6-axis electronic image stabilisation
MP4
135° wide viewing angle
1280x720p @120fps
1920x1080p HDR @30fps
1920x1080p @60fps
2560x1440p @30fps
2880x2160p UHD @24fps
Tech specs

C Y CLIQ. C O M
Scan for more information
Other manuals for Fly12
3
Table of contents
Other cycliq Bicycle Accessories manuals