EGi play&sound 41513 User manual

41515
41513
41020
41518
41517
41018
41019
41514
en user's manual
HIGH QUALITY SOUND
41515
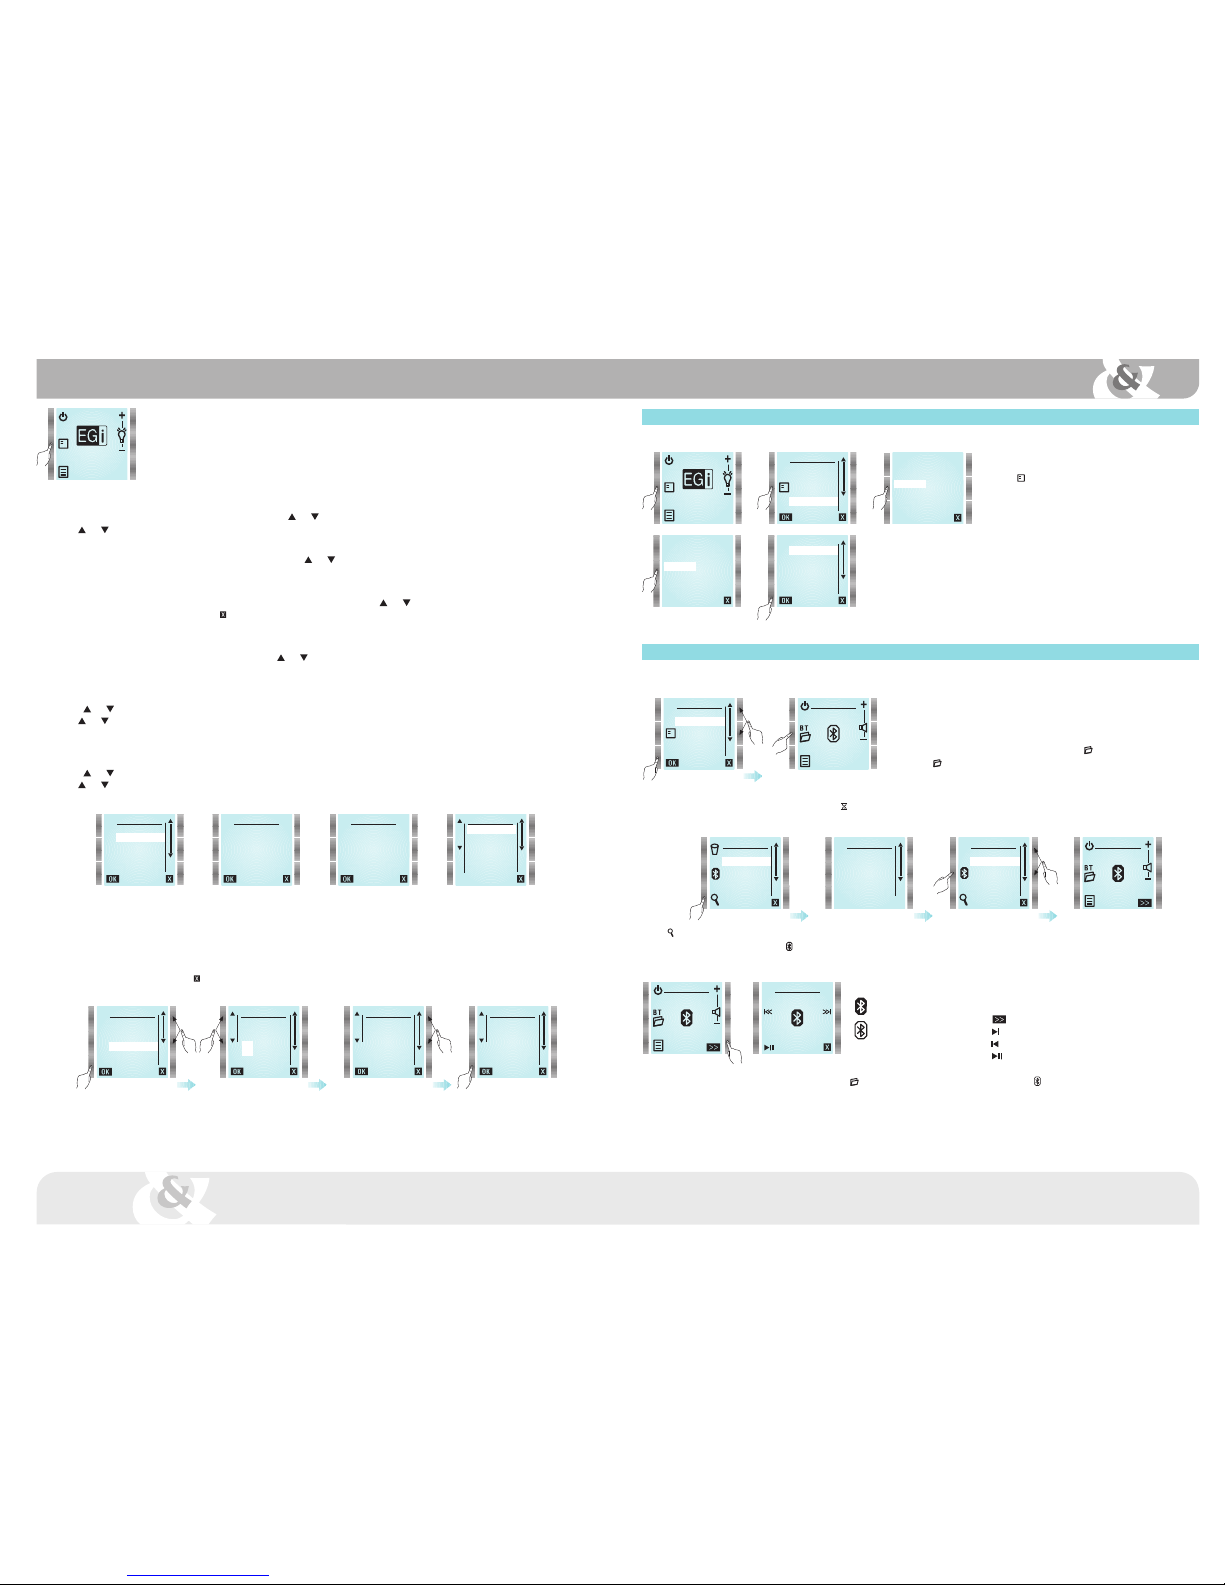
First connection
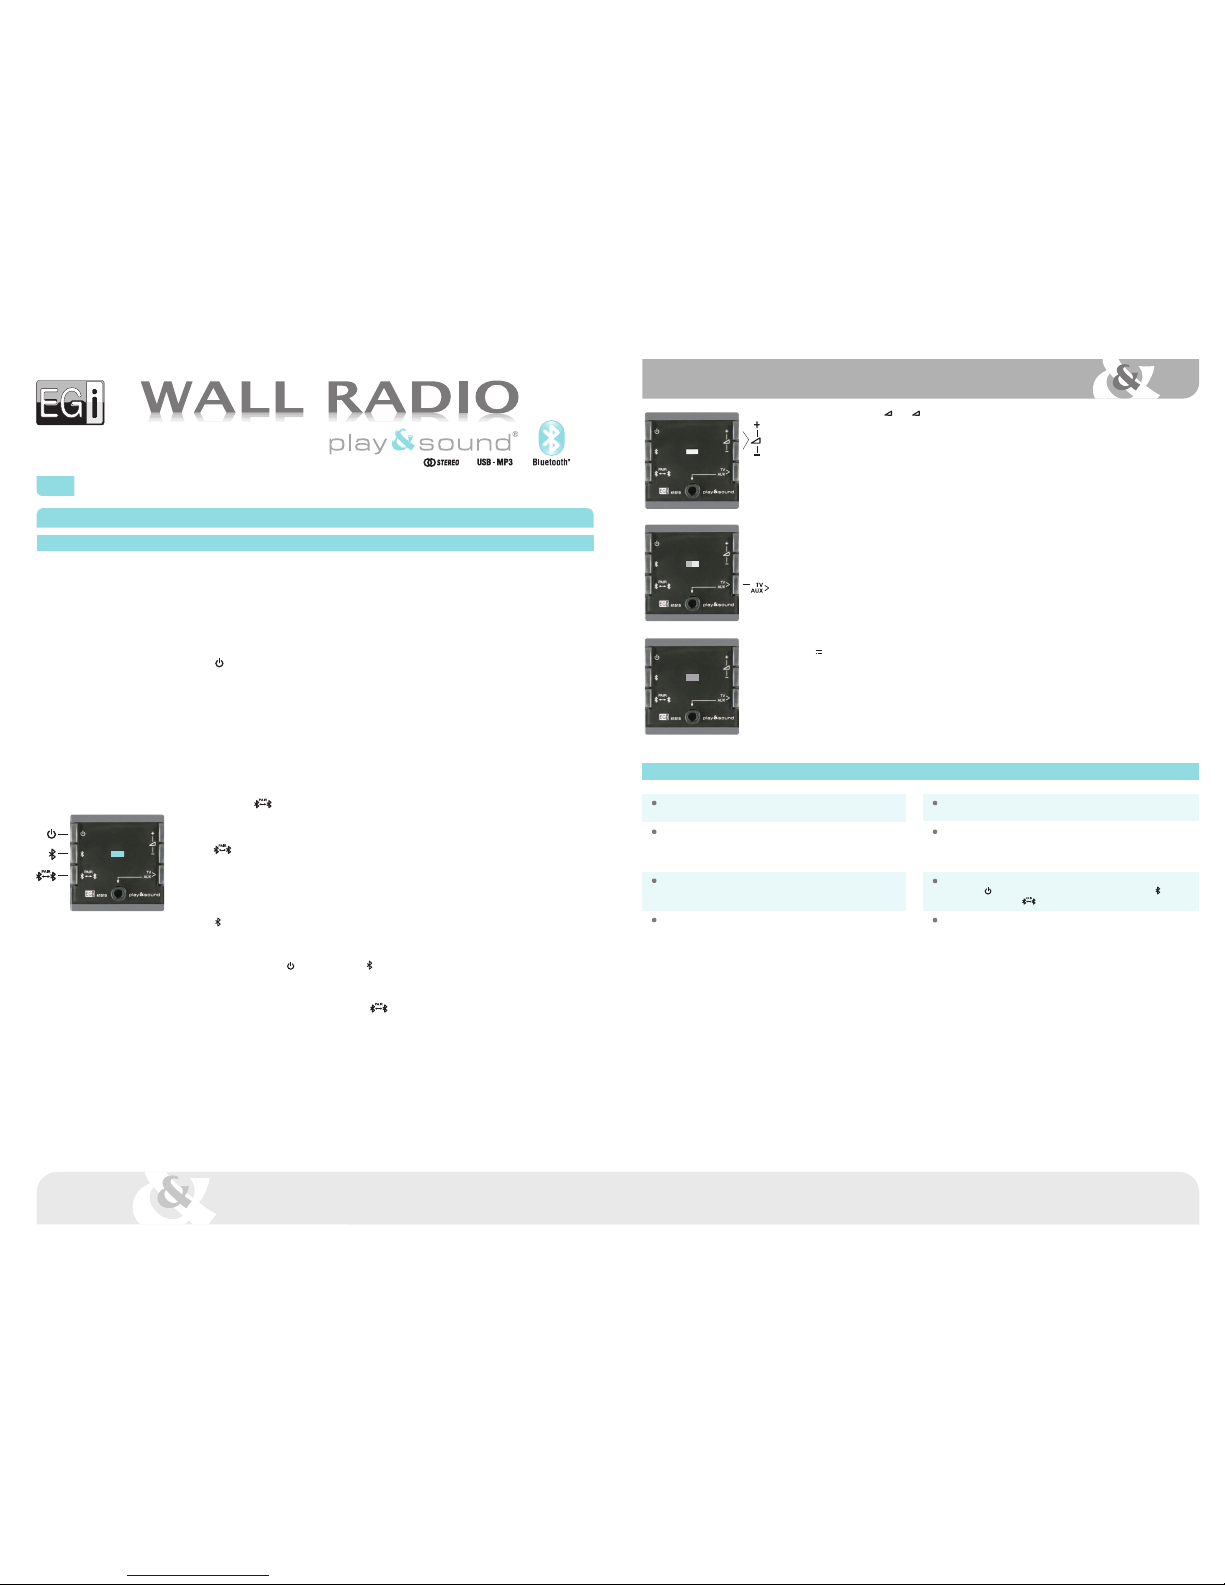
1. Press key to turn on the sound unit for the first time.
Bluetooth®mode will be selected and the blue led will start to blink quickly.
That means its ready to be paired with other device.
If the paired device list is empty, the sound unit will blink quickly.
If the sound unit has a previous link with other device (i.e. Paired Device List is not empty), it will blink slowly.
Audio source selection and volume level are stored when the device is turned off. In case of power failure, it will
return to Bluetooth mode when turned on.
NOTE: When the sound unit is at bluetooth®mode and visible/pairable, it´s displayed to other devices as
"EGi PS WR xxxx". Paired device list is empty when the sound unit comes from factory. The unit can store up
to 8 paired devices.
A short press on , key will make the sound unit visible/pairable, so that a new device can be paired with it.
When the Paired Device List is full, the oldest connection device (i.e. the least used) will be erased from it, and
replaced for the new one (see paragraph 2.).
2. If key is pressed, the blue LED will blink quickly. It shows that the sound unit is visible for other bluetooth®devices,
and therefore can be paired with any bluetooth®audio source..
Once paired with a new device, the audio unit stores its data in the paired device list. Then the blue led will light continuously
and the unit will be playing audio indefinitely until it is turned off, another audio source is selected, the user disconnects it
manually, or maximum distance between the unit and the device is exceeded.
3. When key is pressed, the sound unit will go to bluetooth®mode, regardless of its previous state.
Blue LED will blink slowly and the unit will try and reconnect to the last connected Bluetooth device.
If it fails, itll try to reconnect with the following device from the paired device list, and so on until it reaches the end of the list.
Press twice the ON/OFF key to force a new search .
If the device is disconnected by the user or by exceeding the maximum distance, the blue led will start to blink slowly.
That means that the unit can be connected to any device of the paired device list.
NOTE: To clear paired device list, please hold the key pressed for 6 seconds.
Normally it is not necessary, because every time a new device is paired, the unit erases the least used device from the list
to store the new one.
Function
The sound unit must be connected to a mains voltage between 115 and 230 V~ 50 / 60Hz, prior to being used.
The sound unit remains at OFF/Standby state when powered for the first time or after a power failure (even if it was ON before).
Even with the sound unit in ON position, if it suffers a blackout of power grid, at the return of the mains supply the sound unit mode, always stays on OFF or stand-by position.
To obtain the best sound quality, check speaker connections before turning on the device (no short-circuits, correct polarity and minimum impedance).
4. Volume is controlled by +and keys. It has 32 steps of 2dB each one.
Volume is set from factory to a medium level.
The unit memorizes the volume level selected by the user, so that it is restored when the unit is turned on.
However, after a power failure, the volume level is restored to its factory setting.
NOTE: Remember that bluetooth®devices have an independent volume control. Therefore, we recommend adjusting unit
volume near to its maximum and using device volume control. This way, maximum performance is achieved while the user
has a more comfortable volume control.
5. By pressing TV > AUX key, the unit switches from bluetooth®to TV mode. Audio from rear connection is selected and led
changes to green.
Then, if TV > AUX key is pressed again, the unit will switch to AUX mode. Audio from front 3.5mm jack will be selected
and led will change to yellow.
If TV > AUX key is pressed again, TV mode will be selected and so on.
6. Priority audio input (PIN) is activated ONLY by a Millennium signal. It consists of a +3 V~ audio level superimposed to a
+7 V level (referred to GND).
Regardless of the control unit state (ON, OFF, bluetooth®, TV or AUX), if PIN input is activated, audio from this input will
be selected, led will switch to red and volume control will go to maximum level. This unit will remain at this state until PIN
input is deactivated, returning to its previous state.
We recommend the use of MILLENNIUM equipment (1308.1, 1310.1 or 1304.1A) to utilize this function.
Troubleshooting
Problem
The sound unit doesnt turn on.
The sound unit turns on, but theres no sound.
The blue led blinks slowly, but the unit doesnt connect with a paired
device.
The unit is at TV or AUX mode, and theres no sound.
Possible solution
Check if the sound unit is powered. A voltage between 115 and 230 V~ 50/60Hz
must be applied to Land Nterminals.
Check that the speakers are properly connected to L+ / L and R+ / R
outputs. Verify the absence of short-circuits and check that line impedance
is above 11 ohms. Make sure that a bluetooth®device is connected, or a
signal is present at TV or AUX inputs. Set volume level to maximum.
Check that your device has Bluetooth connectivity enabled. Press twice the
ON/OFF key to force a new search through the paired device list . To force
a pairing process, press key.
Verify that an analog signal with a level around 250-500 mV is present at TV
(rear terminals) or AUX (front 3.5 mm jack) inputs.
41515 Bluetooth®control unit with AUX/TV and PIN
en user's manual
41513
41020
en user's manual
IDIOMA
ESPAÑOL
ENGLISH
DEUTSCH
FRANÇAIS
ITALIANO
PORTUGUES
Operation
First connection
Press ON key .
Language selection menu appears.
Use or keys to select your language and press OK.
Or press to exit.
Autoscan
Once language is chosen, autoscan process begins. It performs an automatic search for the FM* stations with
best reception and obtains RDS data (this operation can take up to 2 minutes approximately).
(*) Up to 30 stations + 6 in manual mode.
Autoscan process can be done at any time by entering MENU and selecting AUTOSCAN.
AUTOSCAN
RNE 3
89.3
03/30
Main screen
Turn on/off the device
Press key to turn on/off the device.
When the module is off, backlighting intensity can be adjusted by means of +and keys. It affects only to the backlighting when
the module is off.
It affects only to the backlighting when the module is off.
NOTE: In case of power failure, when the module is turned on again, RADIO mode will be selected.
Volume adjustment
When the module is on, volume level can be adjusted by means of +and keys.
A short press changes the volume step by step, whereas a long press changes it at an accelerated rate.
NOTE: This function is available when an audio source is activated and its main screen is displayed.
FM List
Press FM key to see all tuned stations.
Use and keys to select a station and press OK to listen to it. Normally, station name is displayed. If the station does not send RDS
information, station frequency is displayed instead.
Press key to add stations to FAVOURITES list.
Press key again to remove a station from FAVOURITES list.
To remove a station from FM LIST, select it and press (REMOVE). It will be erased permanently.
To recover an erased station, it must be tuned later by using MANUAL FM.
Press key (EXIT) to quit menu at any moment.
Favourites list
Up to 6 favourite stations can be selected.
Press at FM LIST to choose them. Selected station will be added to favourites list at the first free location. A station can be added at
FAVOURITES by using and keys to select a free location and then FM key. This way a list of available stations will appear, from
which the desired station can be added to FAVOURITES .
To remove a favourite station from the list, select it using and keys and press key (REMOVE).
FM LIST
RADIO 1
RADIO 2
RADIO 3
RADIO 4
RADIO 5
RADIO 6
FAVOURITES
NATIONAL RADIO
NEWS RADIO
TOP 40
EMPTY
EMPTY
EMPTY
RADIO 5
107,9 FM
41513 Wall Radio FM/RDS module (with optional bluetooth®, input & USB)
41020 Wall Radio FM/RDS Kit (with bluetooth®, line input IN,USB & headphones)
ALARM
NOTE: Take into account that present FM station and volume level will be stored for ALARM function.
To set the alarm, highlight ALARM from main menu by using and keys and press OK.
Use +and keys to modify hours value (HOURS is highlighted).
Then, press and keys to adjust minutes the same way as hours.
Press key (MORE) to select alarm type.
Alarm volume will be set at the same level that it was when configured.
By means of and keys, following options can be chosen: FM radio once , Buzzer once , FM radio every day or Buzzer
every day .
When all is correct, press OK key.
Activation time and alarm type will be shown on main screen.
When alarm is triggered, it can be turned off by pressing STOP (stop alarm) or SNOOZE (repeat every 9 minutes).
If not turned off, alarm will stop after 10 minutes.
To delete the alarm, select ALARM from the main menu and press key.
SLEEP (TIMER)
To set the timer, highlight SLEEP from main menu by using and keys and press OK.
Use or to select whether the timer will be activated once (NOW) or every time the module is turned on (ALWAYS).
Use +and keys to adjust turn off time.
Press OK to save the settings.
Select 0 minutes to deactivate SLEEP function.
LIGHTING CONTROL
Lighting when the module is on:
To adjust screen lighting level, highlight BACKLIGHT from main menu by using and keys and press OK.
Lighting level can be modified by using +and keys. Press (EXIT) to save the setting.
Lighting when the module is stand-by):
Lighting level can be modified by using +and keys.
When the module is off, the screen can be completely darkened.
EQUALIZER
To adjust bass and treble, highlight EQUALIZER from main menu by using and keys and press OK.
Use or to select bass or treble .
Once selected, press +or to increase or decrease bass or treble level.
When adjusted press OK to save and quit, or to quit without saving.
Main MENU (to enter it, press MENU key )
NOTE: INPUT and BLUETOOTH functions are only available when a 41518 module is connected.
TIME
Internal clock can be adjusted automatically (by synchronizing it to a station with RDS time information) or manually.
If AUTO mode is selected, time information will be restored automatically after a power failure.
Automatic setting:
From TIME menu select AUTO.
Press FM FM key and choose a station that offers RDS time information (usually state stations).
Wait 1 or 2 minutes for the clock to synchronize and press OK. If current time is not displayed, switch to other station.
Manual setting:
From TIME menu select MANUAL.
Use and keys to modify hours value (HOURS is highlighted).
Then, press key to adjust minutes the same way as hours. When all is correct, press OK key.
Once the clock is set, OK key will be replaced by key in TIME menu.
If key is pressed, time will not be displayed anymore.
12-24 hours mode:
To change time display mode, press key to highlight 12/24H.
Then press 12/24H to choose the desired option. Press OK to validate.
RADIO 5
107,9 FM
MENU
RADIO
TIME
ALARM
SLEEP
BACKLIGHT
EQUALIZER
TIME
AUTO
MANUAL
12/24H
TIME TIME
HOURS
MINUTES
00:34
ALARM
HOURS
MINUTES
00:00
ALARM TYPE
FM ONCE
00 : 00
SLEEP
NOW
ALWAYS
10
MINUTES
BACKLIGHT
EQUALIZER
TREBLE
BASS
0

1
2
1
2 2
1
1
2
1
1
MANUAL FM
To tune manually a station, highlight MANUAL FM from main menu by using and keys and press OK.
Tuning frequency can be increased or decreased in 100 KHz steps by pressing or .
To perform an automatic search, press or to find the next higher/lower frequency station (signal level must be over a certain threshold).
When a station is found (both in auto and manual mode), after some seconds RDS*information will appear.
Sometimes this information is changing, press OK when it is displayed the information you want to associate with the station. The station
will be added to FM list (if there is any memory available).
It can be stored up to 36 stations (30 from autoscan + 6 from manual tuning).
(*) Not all the stations transmit RDS information, If RDS text does not appear, press OK.
AUTOSCAN
To activate automatic station search, highlight AUTOSCAN from main menu by using and keys and press OK.
A new FM station list will be created. Favourites list can be kept or deleted.
Autoscan process can take several minutes.
Press to quit without doing autoscan.
LANGUAGE
To select menu language, highlight LANGUAGE from main menu by using and keys and press OK.
Use or to select the desired language and press OK.
VERSION
To know device firmware version, highlight VERSION from main menu by using and keys and press OK.
It will appear: software version, serial number and other service information. (SW stands for software version and HW stands for
hardware version).
RESET
To reset the system configuration to factory settings, highlight RESET from main menu by using and keys and press OK.
User will be prompted to confirm action (press OK) or to quit without executing reset (press ).
IMPORTANT: Personal configurations, FM list and Favourites list will be erased by resetting.
SETTINGS
To change the settings, highlight SETTINGS from main menu by using and keys and press OK.
Use and keys on the right to select the item to be modified.
Use and keys on the left to activate/deactivate the option.
EXT. ANTENNA:
Use and keys on the right to select EXT. ANTEN.
Use and keys on the left to select external antenna (YES) or internal antenna (NO).
Internal antenna is recommended.
Use an external antenna in case of mains interferences (caused by ballasts or switching power supplies).
STEREO:
Use and keys on the right to select STEREO.
Use and keys on the left to select stereo mode (YES) or mono mode (NO). Use mono mode when FM reception is poor.
RDS LIVE:
This function allows real time RDS information display.
Use and keys on the right to select RDS LIVE.
Use and keys on the left to activate RDS LIVE (YES) or to show only the station name (NO).
Connection to 41518 module (USB, bluetooth®and line input + phones output)
Some menu elements can be shown or not depending on configuration and connected modules.
41518 module is controlled from 41513 module and when it is connected, some features are added to menu.
USB, Bluetooth®and line input sources can be activated from main menu (PHONES is activated when a jack is plugged in).
USB
An USB memory with audio files (MP3 or WAV) should be inserted in 41518 module inlet prior to use this function.
BEATLES-HELP
01-Help!
02-The night
03-You've got
USB
BEATLES-Help
U2-Achtung
U2-October
MENU
USB
INPUT
BLUETOOTH
RADIO
TIME
ALARM
USB
01:48
MANUAL FM
RADIO 1
107.9
AUTOSCAN
NEW
FM LIST
KEEP
FAVOURITES?
YES NO
IDIOMA
ESPAÑOL
ENGLISH
DEUTSCH
FRANÇAIS
ITALIANO
PORTUGUES
VERSION
SW:1.0 HW:1.0
RESET
RESET
TO FACTORY
SETTINGS
SETTINGS
INPUT
EXT. ANTEN.
STEREO
PIN
NAME
YES
USBUSB
INPUT
USB PLAYER
02-The night BEATLES
00:30
USB
01:48
Once the desired song is being played, exit folders screen by pressing (EXIT). Press mp3 key to enter the player screen.
From this screen, audio tracks playing can be controlled.
A short press on or keys, jumps to the previous or next audio track.
If or keys are kept pressed, present audio track time is moved back or forward.
PLAY/REPEAT MODES (pressing key)
All the tracks in the present folder or directory are played indefinitely.
Present track is played indefinitely.
RND RANDOM o SHUFFLE - All the tracks in the USB memory (regardless their location in the folder tree) are played in a random order and indefinitely.
All the tracks in the USB memory (regardless their location in the folder tree) are played indefinitely.
NOTE: When the word SEARCHING appears, it means that the module is looking for a USB memory stick or that it is not inserted.
When the symbol appears, the module is searching for audio files "MP3" or "WAV".
BEATLES-HELP
02-The night BEATLES
Input
Prior to use this function, a device must be connected to 41518 module through the 3.5 mm jack input.
MENU
USB
INPUT
BLUETOOTH
RADIO
TIME
ALARM
INPUT
Phones
To enter headphones mode PHONES , it is necessary to connect a 3.5 mm stereo plug to PHONES jack.
Speaker outputs are automatically turned off. Volume level is switched to the last stored value at PHONES mode.
Press + / keys to control volume.
NOTE:
PHONES option can be activated from any audio source
(USB, Radio, Bluetooth®and Input).
Sample screen shows USB case.
To select the line input source, select INPUT from main menu .
To select the USB source, select USB from main menu .
Once USB is selected, press USB to search the desired song in the folders and subfolders tree. Press to play it.

2
1
1
2
1
2
BLUETOOTH iPHONE
1
2
1
2
BT DEVICES
NOKIA
iPHONE
BT SEARCH
SEARCHING
BT SEARCH
NOKIA
iPHONE
PC
Press to find new devices. They will be displayed after around one minute.
Select the device to be paired with, and press .
The paired device will ask for a PIN code. If it has not been changed, the value to be entered is printed on the module labels.
BLUETOOTH
Once the Bluetooth device is connected, user will be able to listen to the
music, to change volume or to control music playing. It can be done either
form the device or from the module.
When key is pressed, module enters remote player mode.
Press to jump to the next song.
Press to jump to the previous song.
Press to play/pause the music.
Bluetooth®connected.
Bluetooth®NOT connected.
To unpair a device (i.e. delete it form paired devices list), enter BT (BT DEVICES), select the device to unpair with and press key. The pairing can be also deleted from the device
(smartphone, PC, tablet, laptop).
Enter settings menu to change PIN.
Module Friendly Name is factory preset to "EGI 41518 _ _ _ _". "_ _ _ _" stands for a four digit unique identifier.
These codes are printed on a label on the back of the module and on another loose label.
Enter settings menu to change NAME.
MENU
VERSION
RESET
SETTINGS
SETTINGS
To change these 41518 module special settings, highlight SETTINGS from main menu by
using and keys and press OK.
Settings (only available when a 41518 is connected)
PIN
1003
PIN
1000
SETTINGS
INPUT
EXT. ANTEN.
STEREO
PIN
NAME
PIN
This option allows changing BLUETOOTH®PIN. It is factory preset to the value printed on the labels, but it can be changed to any desired 4 digit code.
Highlight PIN from SETTINGS menu and press OK.
Use the 2 top keys on the left to select the digit.
Use the 2 top keys on the right to change the digit.
Press OK to validate the new PIN, or press to quit without modifying it.
PIN
0000
SETTINGS
INPUT
EXT. ANTEN.
STEREO
PIN
NAME
NAME
EGI 41518
XXXX
NAME
BAÑO 1
NAME
IMPORTANT: It is recommended to perform this operation prior to activate Bluetooth®.
This option allows changing BLUETOOTH®Friendly Name. It is factory preset to "EGI 41518_ _ _ _", but it can be changed to any desired name (up to 14 characters).
Highlight NAME from SETTINGS menu and press OK.
It will appear a list with suggested names that can be assigned to the module. The module current name is at the top of the list.
Any name is editable by selecting it and pressing OK.
Use the 2 top keys on the left to select the character.
Use the 2 top keys on the right to change the character.
Press OK to validate the new NAME, or press to quit without modifying it.
NOTE: It is recommended to change Friendly Name and PIN before pairing the module with any Bluetooth®device, so they are displayed correctly.
If module Friendly Name is not updated in a Bluetooth®device, please delete the module from the device Bluetooth list and re-pair it.
BLUETOOTH
When BLUETOOTH option is highlighted and set by pressing OK, the module activates Bluetooth®
function and it becomes visible to other Bluetooth®devices.
Device search can be done in two ways:
- From the device that is going to transmit audio (smartphone, laptop, tablet)
- From the 41513 module by entering Bluetooth folder BT .
Press BT key to display paired devices list.
Bluetooth®
MENU
RADIO
BLUETOOTH
MASTER ON
TIME
ALARM
SLEEP
NOTE:
In case of power failure or if Bluetooth®mode is quit and re-entered quickly, it could take
14 seconds for the BLUETOOTH function to be available, In the meantime symbol will
be displayed.
IMPORTANT: It is recommended changing module Friendly Name and PIN prior to use Bluetooth®, in order to differentiate it from other nearby devices. Select SETTINGS from
main menu to do it
Troubleshooting
Problem
Module doesn't work. The screen is off.
The screen is on, but there is not any sound.
Band FM reception.
(41513 module uses mains cable as antenna. In case of interferences or weak
signal, please connect an external antenna and change antenna selection in
SETTINGS menu accordingly).
A bluetooth®device is not seen from the module.
Time is not recovered automatically after a power failure. It shows blinking
dashes instead of the time.
Time is not displayed on the screen.
Possible solution
Press any key to get a response.
Check mains connection.
Check that a valid audio source is selected and it is playing some music.
Check volume level is not at minimum.
Check that the speakers are properly connected to the connection block.
Connect an external FM antenna by using coaxial cable or check that it is properly
connected.
Check antenna settings to see if antenna selection is correct.
Ensure that the module is not close to electronic ballasts or similar equipment
(fluorescent lamps).
Check that the device has bluetooth®function enabled and it is configured as visible
to other devices.
Check that time is configured to AUTO mode and a valid FM station is selected (it
must transmit time information by using RDS).
Configure time settings to AUTO mode, so it can recover time information automatically
after a power failure.
Check that TIME is not disabled.
Set the clock in manual or auto mode.

HIGH QUALITY SOUND
41518
2
1
Smartphone,
tablet...
Advanced Audio
A2DP
PLAY
A
Bluetooth®
SEARCH
DEVICES
115 - 230 V~
50-60 Hz
R
R+
L
L+
R
L
EGI 41517 _ _ _ _
PIN: _ _ _ _
EGI 41517 _ _ _ _
0 0 0 8
1 0 2 8
0 0 0 8
HIGH QUALITY SOUND
41517
41018
41019
41518 Auxiliary module for Wall Radio 41513 with line IN, USB, headphone and bluetooth®.
en user's manual
Activation
By connecting 41513 module to a 41518 module, the following additional audio sources will become available in main menu : USB, INPUT and BLUETOOTH.
Operation
USB
USB socket is intended to connect memory devices whose consumption is below 100 mA. It can play MP3 and WAV files stored in the memory.
Enter MENU and select USB to activate this function.
INPUT
Enter MENU and select INPUT to activate audio input socket.
Any line level signal can be connected to it from MP3 players, walkman®, discman, PCs, tablets or smartphones.
BLUETOOTH
Enter MENU and select BLUETOOTH to activate bluetooth®connectivity.
To obtain the bluetooth®friendly name and the PIN code, read the back label, from the back side of the 41518 module.
HEADPHONES
Headphones output is automatically activated when a jack is plugged in PHONES socket.
Speaker outputs are switched off. Volume level goes to the last stored headphones volume level.
Unplug the jack to listen from the speakers again.
For more information about operation, please read the following chapter from 41513 user manual: Connection to 41518 module.
RADIO 5
107,9 FM
MENU
USB
INPUT
BLUETOOTH
RADIO
TIME
ALARM
41517
Amplified master module with bluetooth®connectivity, FM/RDS, audio input and multiroom
41018 XS Kit audio bluetooth®for rooms of 30 sq m
41019 XS Kit audio bluetooth®for rooms of 20 sq m
en user's manual
Note
Remember that in addition to operating only in Bluetooth mode, to get maximum performance with FM, multiroom, clock, alarm and INPUT; we recommend to acquire the
remote control 41514.
The sound unit must be connected to a mains voltage between 115 and 230 V~ 50/60Hz, prior to being used.
Because these devices communicate by radio frequency, depending on the environment interference and objects, communication can be altered.
There is not any LED indicator, so it is necessary to connect at least one speaker (better two) in order to check the unit is working properly.
External audio amplifiers (i.e. E17G/D, 40425 & 40430) can be attached to the audio output. To do so, connect 41517 terminals L+, R+ & 4(GND) to the audio amplifier
input terminals +L, +R & GND respectively.
First connection
41517 master module works in Bluetooth®mode only when powered for the first time or after a blackout. Initial state is stand-by: the module is visible to any Bluetooth®
device and can be paired with it.
Module Friendly Name is "EGi 41517 xxxx". This name will appear on the Bluetooth®device screen when searching. EGi is the brand, 41517 is the product reference
and "xxxx" stands for the last four digits of the serial number.
Every module has a unique Friendly Name, so the user can know which module is connecting to. Friendly Name is printed on two labels: one is attached to the enclosure,
and the other one is left loose into the packaging.
Pin code linking
A 4-digit random password / PIN code is printed on the labels. It must be keyed in during linking process.
Once linked and connected, the module will start to sound.
WARNING: Please dont lose the labels so that the Friendly Name and the PIN code are always available.
Turning ON
The module remains in stand-by state until it is connected to a Bluetooth®device.
When connected, it goes to ON state: audio output is activated, volume is adjusted to its preset value and equalizer is set to achieve optimum performance.
Since then, volume control and music selection will be controlled from the linked Bluetooth®device.
NOTE: Disconnection causes are: manual command from the device or lost of coverage.
When disconnected, module goes to stand-by state: audio output is disabled and the module is visible/connectable again. In other words, it can be linked to a new Bluetooth®
device or connected to a known device (one that has been linked previously).
Operation in Bluetooth®mode only without remote control
Access to LINK internal key on the back side of 41517.
Preset volume adjustment
Preset volume is factory-set at maximum level. However, it can be changed and limited by means of LINK key, which is located on the back side of 41517 module. Every
short press on LINK key reduces preset volume in -6 dB steps up to -68 dB, and then it goes to maximum level again.
Once adjusted, preset volume is stored and is value is kept even in case of power failure. It can be adjusted again or be reset to factory-set value (maximum) by pressing
LINK key for 6 seconds or more.
WARNING: Keep in mind that a RESET can modify other parameters.
NOTE: In Bluetooth®mode, the user can control volume level from the device. We suggest leaving the volume of 41517 module at maximum level. This way maximum
performance can be obtained and the control is more comfortable.
Volume / Link / Reset key
LINK key has three functions:
1. Every short press on LINK key reduces preset volume in -6 dB steps up to -68 dB, and then it goes to maximum level again.
2. Additionally, a short press on LINK key makes the module visible for Zigbee devices, so that it can be linked with a 41514 remote control.
3. A long press (more than 6s) produces a RESET of the module: preset volume is set to maximum, Friendly Name and PIN code return to the value printed on the labels.
41517
LINK
Troubleshooting
Problem
Module doesnt work at all.
The module can be linked to a Bluetooth®device, but there is no sound.
If the module is linked to a 41514 remote control, pressing the LINK key
switches off the sound.
Module is powered, but it is not visible for Bluetooth®devices and do not
responds to a 41514 remote control.
Possible solution
Check that the sound unit is powered. A voltage between 115 and 230 V~
50/60Hz must be applied to Land Nterminals
Check that the speakers are properly connected to L+ / L y R+ / R outputs.
Verify the absence of short-circuits and check that the speakers line impedance
is above 4 ohms. Make sure that a Bluetooth®device is connected, and set
volume level to maximum.
When LINK key is pressed in full-functionality mode, 41517 module goes to
stand-by state to allow a new link to a different remote control. That is the
reason for the music to switch off. After that, pressing any key on the 41514
regains control over the module.
It is probable that the module is being controlled by another 41514 remote
control (previously linked). Check all remote controls in the installation.
Operation in full-functionality mode: Bluetooth, FM/RDS, aux. input & multiroom
using EGi remote control
First connection
41517 master module works in Bluetooth®-only mode when powered.
It is necessary to link it to one or more 41514 remote controls to get full functionality: FM/RDS, multiroom, aux. INPUT, clock, alarm, sleep and equalizer.
Access to LINK internal key on the back side of 41517.
Linking to a 41514 remote control
Master module can be controlled by one or more 41514 remote controls, so that several
people can control it. A 41514 remote control can handle up to five 41517 modules. A 41517
module can be handled by up to fifteen 41514 remote controls.
Communication between 41517 modules and 41514 remote controls is performed by
Zigbee. It is a radiofrequency communications protocol.
To link the devices, please press LINK key on the back side of 41517 module (so it becomes visible for Zigbee devices). Next, press the two upper-right keys on the
41514 remote control at the same time (LINK TO A NEW RECEIVER). It will appear "LINKING" on the screen. When linking process ends, it will appear "LINKED TO A
NEW RECEIVER".
There is another way to link together 41514 and 41517; it uses the PIN code printed on the labels of 41517.
Press PIN on 41514. Then key in PIN code and press OK. It will appear "LINKING" on the screen. When linking process ends, it will appear "LINKED TO A NEW RECEIVER".
Once linked to a remote control (or more), Bluetooth® can only be activated from a 41514 remote control.
In case of power failure, the module will go to Bluetooth®-only mode, but it will change automatically to a full-functionality mode when any command from a linked 41514
remote control is received.
For detailed information about full-functionality mode (FM, multiroom, input, clock, alarm, sleep and Bluetooth®), please read the 41514
remote control user manual.
LINK
41517

HIGH QUALITY SOUND
41514
A
A
E
C
B G
G
H
F
F
D
41514 Remote control (bluetooth®, FM/RDS, input & multiroom)
en user's manual
Entering PIN code:
Press PIN key and enter PIN code by means of four upper keys.
Master module PIN code is printed on a label attached to the back housing. A loose label with PIN code is supplied as well for user convenience.
Once PIN code has been entered, press OK key. During the linking process, LINKING... will appear on the screen.
When linked, it will appear LINKED TO A NEW RECEIVER.
From that moment on, the remote control will be able to command the master module. The remote control can be linked to a maximum of four additional master modules by
entering LINKS menu.
In case of linking process fail, the remote control will show linking options again. Please check PIN code is entered correctly.
Linking and configuring 41514 & 41517 modules
The sound unit must be connected to a mains voltage between 115 and 230V ~ 50 / 60Hz, prior to being used.
A 41514 remote control can be linked with up to five 41517 master modules. On the other hand, a 41517 master module can be controlled by up to fifteen 41514 remote controls (it can be
controlled directly in Bluetooth mode as well).
NOTE: Every command issued on the remote control 41514 is performed effectively on the 41517 master module.
Main components
AKeys.
BDispaly.
CFront housing.
DRemote control holder (wall mounting).
EBack housing.
FTrim (white/black).
GSliding clip.
HBatteries compartment.
Access to LINK internal key on the back side of 41517.
PIN code
PRESS
Linking
Select preferred language for 41514 remote control. The screen will show options for
changing language and linking to a 41517 master module.
Linking process can be done in two ways: by entering master module PIN code or by
pressing LINK key on master module.
EGI 0008
Pressing LINK key:
By using a small screwdriver or a clip, press shortly once on LINK internal key of the master module to be linked.
Press at the same time the two keys for 0.5 s on the remote control. You have a minute to do that. During the linking process, LINKING... will appear on the screen. When linked, it
will appear LINKED TO A NEW RECEIVER.
From that moment on, the remote control will be able to command the master module. The remote control can be linked to a maximum of four additional master modules by
entering LINKS menu.
In case of linking process fail, the remote control will show linking options again. Please check LINK key is pressed, and press again the two keys at the same time on the remote control.
NOTE: If a remote control is linked to a master module, further linking attempts will be unsuccessful. If necessary, a link can be deleted by entering LINKS menu and selecting REMOVE.
IDIOMA
ESPAÑOL
ENGLISH
DEUTSCH
FRANÇAIS
ITALIANO
PORTUGUES
PIN
0 0 0 0
LANGUAGE
LINK TO
NEW
RECEIVER
PIN
LINKING...
LINKED TO
A NEW
RECEIVER
LANGUAGE
LINK TO
NEW
RECEIVER
PIN
LINKING...
IDIOMA
ESPAÑOL
ENGLISH
DEUTSCH
FRANÇAIS
ITALIANO
PORTUGUES
LINKED TO
A NEW
RECEIVER
NAME
EGI 0008
LIVING ROOM
KITCHEN
BEDROOM
BATHROOM
Configuration
After linking, it will appear a list with suggested names that can be assigned to the master module.
The master module current name is at the top of the list.
Any name is editable by selecting it and pressing OK. A number can be added (i.e. BEDROOM2), or it
can be changed as desired.
The master module chosen name will become its Bluetooth®Friendly Name too.
SETTINGS
INPUT
EXT. ANTEN.
STEREO
PIN
NAME
YES
AUTOSCAN
NEW
FM LIST
Operation
First connection
Press ON key .
Autoscan
AUTOSCAN option will appear. This process searches and memorizes FM radio stations.
Press OK to do the process or key (EXIT) to continue without scanning.
Autoscan process performs an automatic search for the FM*stations with best reception and obtains RDS data
(this operation can take up to 2 minutes approximately).
(*) Up to 30 stations + 6 in manual mode.
Autoscan process can be done at any time by entering MENU and selecting AUTOSCAN.
NAME
EGI
0 0 0 8
After choosing the name, it will appear the SETTINGS menu. The first item asks if an audio source is connected to INPUT terminals, select
YES or NO accordingly.
The module takes the FM signal from the mains cable by default. In case of bad reception, enter EXT. ANTEN. choose YES and connect an external
antenna to the respective terminals.
Stereo or mono sound can be selected by STEREO setting.
Press key (EXIT) when all the settings are done.
AUTOSCAN
RNE 3
89.3
03/30
Main MENU (to enter it, press MENU key)
TIME
Internal clock can be adjusted automatically (by synchronizing it to a station with RDS time information) or manually.
If AUTO mode is selected, time information will be restored automatically after a power failure.
Automatic setting:
From TIME menu select AUTO.
Press FM key and choose a station that offers RDS time information (usually state stations).
Wait 1 or 2 minutes for the clock to synchronize and press OK. If current time is not displayed, switch to other station.
Manual setting:
From TIME menu select MANUAL.
Use +and keys to modify hours value (HOURS is highlighted).
Then, press key to adjust minutes the same way as hours. When all is correct, press OK key.
Once the clock is set, OK key will be replaced by key in TIME menu.
If key is pressed, time will not be displayed anymore.
12-24 hours mode:
To change time display mode, press key to highlight 12/24H.
Then press 12/24H to choose the desired option. Press OK to validate.
Main screen
Turn on/off the device
Press key to turn on/off the device.
When the module is off, backlighting intensity can be adjusted by means of +& keys.
It affects only to the backlighting when the module is off.
NOTE: In case of power failure, when the module is turned on again, RADIO mode will be selected.
Volume adjustment
When the module is on, volume level can be adjusted by means of +and keys.
A short press changes the volume step by step, whereas a long press changes it at an accelerated rate.
NOTE: This function is available when an audio source is activated and the remote control is at the idle screen.
FM List
Press FM key to see all tuned stations.
Use and keys to select a station and press OK to listen to it. Normally, station name is displayed. If the station does not send RDS
information, station frequency is displayed instead.
Press key to add stations to FAVOURITES list.
Press key again to remove a station from FAVOURITES list.
To remove a station from FM LIST, select it and press (REMOVE).
It will be erased permanently.
To recover an erased station, it must be tuned later by using MANUAL FM.
Press key (EXIT) to quit menu at any moment.
Favourites list
It can be selected up to 6 favourite stations.
Press at FM LIST to choose them. Selected station will be added to favourites list at the first free location.
A station can be added at FAVOURITES by using and keys to select a free location and then FM key. This way a list of available
stations will appear, from which the desired station can be added to FAVOURITES .
To remove a favourite station from the list, select it using and keys and press key (REMOVE).
FM LIST
RADIO 1
RADIO 2
RADIO 3
RADIO 4
RADIO 5
RADIO 6
FAVOURITES
NATIONAL RADIO
NEWS RADIO
TOP 40
EMPTY
EMPTY
EMPTY
RADIO 5
107,9 FM
EGI 0008
RADIO 5
107,9 FM
MENU
RADIO
BLUETOOTH
INPUT
MASTER ON
TIME
ALARM
TIME
AUTO
MANUAL
12/24H
TIME TIME
HOURS
MINUTES
00:34
LINKS
REMOVE
ADD
ALARM
To set the alarm, highlight ALARM from main menu by using and keys and press OK.
Use +and keys to modify hours value (HOURS is highlighted).
Then, press and key to adjust minutes the same way as hours.
Press key (MORE) to select alarm type.
Alarm volume will be set at the same level that it was when configured.
By means of and keys, following options can be chosen: FM radio once , Buzzer once , FM radio every day or Buzzer
every day .
When all is correct, press OK key.
Activation time and alarm type will be shown on main screen.
When alarm is triggered, it can be turned off by pressing STOP (stop alarm) or SNOOZE (repeat every 9 minutes).
If not turned off, alarm will stop after 10 minutes.
To delete the alarm, select ALARM from the main menu and press key.
SLEEP (TIMER)
To set the timer, highlight SLEEP from main menu by using and keys and press OK.
Use or to select whether the timer will be activated once (NOW) or every time the module is turned on (ALWAYS).
Use +and keys to adjust turn off time.
Press OK to save the settings.
Select 0 minutes to deactivate SLEEP function.
LIGHTING CONTROL
Lighting when the module is on:
To adjust screen lighting level, highlight BACKLIGHT from main menu by using and keys and press OK.
Lighting level can be modified by using +and . Press (EXIT) to save the setting.
Lighting when the module is stand-by:
Lighting level can be modified by using +and keys.
When the module is off, the screen can be completely darkene.
EQUALIZER
To adjust bass and treble, highlight EQUALIZER from main menu by using and keys and press OK.
Use or to select basss or treble .
Once selected, press +or to increase or decrease bass or treble level.
When adjusted press OK to save and quit, or to quit without saving.
MANUAL FM
To tune manually a station, highlight MANUAL FM from main menu by using and keys and press OK.
Tuning frequency can be increased or decreased in 100 KHz steps by pressing or .
To perform an automatic search, press or to find the next higher/lower frequency station (signal level must be over a certain threshold).
When a station is found (both in auto and manual mode), after some seconds RDS*information will appear.
Sometimes this information is changing, press OK when it is displayed the information you want to associate with the station. The station
will be added to FM list (if there is any memory available).
It can be stored up to 36 stations (30 from autoscan + 6 from manual tuning).
(*) Not all the stations transmit RDS information, If RDS text does not appear, press OK.
AUTOSCAN
To activate automatic station search, highlight AUTOSCAN from main menu by using and keys and press OK.
A new FM station list will be created. Favourites list can be kept or deleted.
Autoscan process can take several minutes.
Press to quit without doing autoscan.
ALARM
HOURS
MINUTES
00:00
ALARM TYPE
FM ONCE
00 : 00
SLEEP
NOW
ALWAYS
10
MINUTES
BACKLIGHT
EQUALIZER
TREBLE
BASS
0
MANUAL FM
RADIO 1
107.9
AUTOSCAN
NEW
FM LIST
KEEP
FAVOURITES?
YES NO
LINKS
LINKS menu allows 41514 remote control to be linked to other 41517 master modules.
Up to 5 master modules can be linked. A remote control can manage 5 rooms and even change its name.
However, a 41517 master module can be linked with up to 15 remote controls.
Concretely, this menu allows deleting or adding links to 41517 master modules.
To do that, follow these instructions.
To enter LINKS menu, highlight LINKS from main menu by using and keys and press OK.
To add a new master module press ADD option. It will appear a new screen with two methods of linking:
PIN entering or pressing LINK key on master module (see LINKING section).
To change master module name, go to main menu, select SETTINGS and then select NAME.
To remove a link to a master module, press REMOVE.
Then a list of linked modules will be displayed.
Select the module to be removed.
Press key (EXIT) to quit without removing any link.
MENU
VERSION
LINKS
RESET
SETTINGS
EGI 0008
EGI 0030
LIVING ROOM
REMOVE
LINKS
REMOVE
ADD
1
2
1
2
2
1
HOW TO SELECT THE MASTER MODULE TO BE CONTROLLED:
If the remote control has been linked to more than one master module, it can be chosen which master module is commanded by the remote control.
See "How to change the master module to be controlled by 41514 remote control" below.
EGI 0008
IDIOMA
ESPAÑOL
ENGLISH
DEUTSCH
FRANÇAIS
ITALIANO
PORTUGUES
VERSION
SW:1.0 HW:1.0
RESET
EGI 0008
RESET
TO FACTORY
SETTINGS
SETTINGS
INPUT
EXT. ANTEN.
STEREO
PIN
NAME
YES
LANGUAGE
To select menu language, highlight LANGUAGE from main menu by using and keys and press OK.
Use and to select the desired language and press OK.
VERSION
To know device firmware version, highlight VERSION from main menu by using and keys and press OK.
It will appear: software version, serial number and other service information. (SW stands for software version and HW stands for hardware version).
RESET
To reset the master module configuration to factory settings, highlight RESET from main menu by using and keys and press OK. User will be prompted to confirm action
(press OK) or to quit without executing reset (press ).
IMPORTANT: Personal configurations, FM list and Favourites list will be erased by resetting.
SETTINGS
To change the settings, highlight SETTINGS from main menu by using and keys and press OK.
INPUT:
If an audio source is connected to INPUT terminals, select YES. Select NO otherwise (INPUT option will not appear in main menu in this case).
EXT. ANTENNA:
Press and keys on the right to select EXT. ANTEN.
Use and keys on the left to select external antenna (YES) or internal antenna (NO).
Internal antenna use (NO) is recommended.
In case of interferences from the mains (caused by other devices like electronic ballasts) or bad reception, use external antenna (YES).
STEREO:
Press and keys on the right to select STEREO.
Use and keys on the left to select stereo mode (YES) or mono mode (NO).
PIN
1003
PIN
1000
SETTINGS
INPUT
EXT. ANTEN.
STEREO
PIN
NAME
PIN
This option allows changing BLUETOOTH PIN. It is factory preset to the value printed on the labels, but it can be changed to any desired 4 digit code.
Highlight PIN from SETTINGS menu and press OK.
Use the 2 top keys on the left to select the digit.
Use the 2 top keys on the right to change the digit.
Press OK to validate the new PIN, or press to quit without modifying it.
PIN
0000
BT DEVICES
NOKIA
iPHONE
BT SEARCH
SEARCHING
BT SEARCH
NOKIA
iPHONE
PC
BLUETOOTH
When BLUETOOTH option is highlighted and set by pressing OK, the module activates Bluetooth®
function and it becomes visible to other Bluetooth devices.
Device search can be done in two ways:
- From the device that is going to transmit audio (smartphone, laptop, tablet).
- From the 41517 module by entering Bluetooth®folder BT .
Press BT key to display paired devices list.
Bluetooth®
MENU
RADIO
BLUETOOTH
MASTER ON
TIME
ALARM
SLEEP
NOTE:
In case of power failure or if Bluetooth®mode is quit and re-entered quickly, it could take
14 seconds for the BLUETOOTH function to be available, In the meantime symbol will
be displayed.
Press to find new devices. They will be displayed after around one minute.
Select the device to be paired with, and press .
The paired device will ask for a PIN code. If it has not been changed, the value to be entered is printed on the module labels.
BLUETOOTH
Press key to show the name of the master modules the remote
control is linked to.
Press the key next to the name of the module to be controlled.
How to change the master module to be controlled by 41514 remote control
EGI 0008
LINKS
REMOVE
ADD
EGI 0008
EGI 0030
LIVING ROOM
REMOVE
From that moment on, the remote control will command the selected master module, and its main screen
will be shown.
If communication with the selected master module is not possible (either by loss of coverage or because
the module is busy or unpowered), the remote control will return to the list of linked modules.
If no communication is possible, the remote control will offer the possibility of removing or adding master
modules.
NOTE: See "LINKS" section for details.
MENU
RADIO
BLUETOOTH
INPUT
MASTER ON
TIME
ALARM
BLUETOOTH
Once the Bluetooth device is connected, user will be able to listen to the
music, to change volume or to control music playing. It can be done either
form the device or from the remote control.
When key is pressed, module enters remote player mode.
Press to jump to the next song.
Press to jump to the previous song.
Press to play/pause the music.
iPHONE
Bluetooth®connected.
Bluetooth®NOT connected.
To unpair a device (i.e. delete it form paired devices list), enter BT (BT DEVICES), select the device to unpair with and press key. The pairing can be also deleted from the device
(smartphone, PC, tablet, laptop).
Enter SETTINGS menu to change PIN.
Module Friendly Name is factory preset to ("EGI 41517 _ _ _ _") stands for a four digit unique identifier.
These codes are printed on a label on the back of the module and on another loose label.
Enter SETTINGS menu to change NAME.
EGI 0008
EGI 0030
LIVING ROOM
41514 remote control can command several master modules. The master module to be controlled can be selected from both stand-by screen and main menu screen.
IMPORTANT: It is recommended changing module Friendly Name and PIN prior to use Bluetooth®, in order to differentiate it from other nearby devices. Select SETTINGS from
main menu to do it.

MASTER
1
2
1
2
1
2
MENU
RADIO
BLUETOOTH
INPUT
MASTER ON
TIME
ALARM
RADIO 5
107,9 FM
MULTIROOM
RADIO 5
107,9 FM
Select the module which will distribute the music to the others (and choose its desired audio
source).
Highlight MASTER ON from main menu by using and keys and press OK.
When a module is switched on, it automatically selects MULTIROOM audio source (i.e. the music from
MASTER module).
In case the module is turned on yet, go to main menu and select MULTIROOM source.
To exit MULTIROOM mode, choose another audio source form main menu or turn off the module.
To exit master mode, select MASTER OFF from main menu.
The module will no longer distribute music and all the modules in MULTIROOM mode in the installation
will turn off.
Multiroom
MENU
RADIO
BLUETOOTH
MASTER ON
TIME
ALARM
SLEEP
MENU
RADIO
BLUETOOTH
MULTIROOM
TIME
ALARM
SLEEP
MENU
RADIO
BLUETOOTH
MASTER OFF
TIME
ALARM
SLEEP
NOTE: It is necessary to wire multiroom BUS (connection blocks 4, 5 and 6) to all 41517 modules in the installation, in order to use MULTIROOM option.
This option allows the user to share the selected music on one module to the rest of the modules in the installation. To do that, follow the next steps:
Input
To select the audio INPUT source, select INPUT from main menu.
Once selected that source, its volume level can be controlled by +and keys.
Another audio source can be selected from main menu.
To turn off the module, press key.
Troubleshooting
Problem
Module doesn´t work. The screen is off.
The screen is on, but there is not any sound.
Bad FM reception.
(41517 master module uses mains cable as antenna. In case of interferences
or weak signal, please connect an external antenna and change antenna selection
in SETTINGS menu accordingly).
A bluetooth®device is not seen from the module.
Time is not recovered automatically after a power failure. It shows blinking
dashes instead of the time.
Time is not displayed on the screen.
41514 remote control losses communication with 41517 master module and
shows the following screen:
Possible solution
Press any key to get a response.
Check batteries status.
Check that a valid audio source is selected and it is playing some music.
Check volume level is not at minimum.
Check that the speakers are properly connected to the connection block.
Connect an external FM antenna by using coaxial cable or check that it is properly
connected.
Check antenna settings to see if antenna selection is correct.
Ensure that the module is not close to electronic ballasts or similar equipment
(fluorescent lamps).
Check that the device has bluetooth®function enabled and it is configured as visible
to other devices.
Check that time is configured to AUTO mode and a valid FM station is selected (it
must transmit time information by using RDS).
Configure time settings to AUTO mode, so it can recover time information automatically
after a power failure.
Check that TIME is not disabled.
Set the clock in manual or auto mode.
Verify that 41517 master module (placed on the ceiling) is properly powered
(115 V~ / 230 V~ ).
Press key (EXIT), so that the remote control can retry a communication.
Press REMOVE to delete previously linked master modules, or press ADD to memorize
a new master module.
INPUT
LINKS
REMOVE
ADD
Electroacústica
General
Ibérica, S. A.
008531 10/2015
Avda. Almozara, 79
50003 Zaragoza - ESPAÑA
Tel. 976 40 53 53
Fax 976 40 53 54
http://www.egiaudio.com
e-mail: info@egiaudio.com
Av. Almozara, 79
50003 Saragossa - SPAIN
Tel. +34 976 40 53 56
Fax +34 976 40 53 54
http://www.egiaudio.com
e-mail: export@egiaudio.com
exportnational
This manual suits for next models
7
Table of contents
Other EGi Radio manuals


