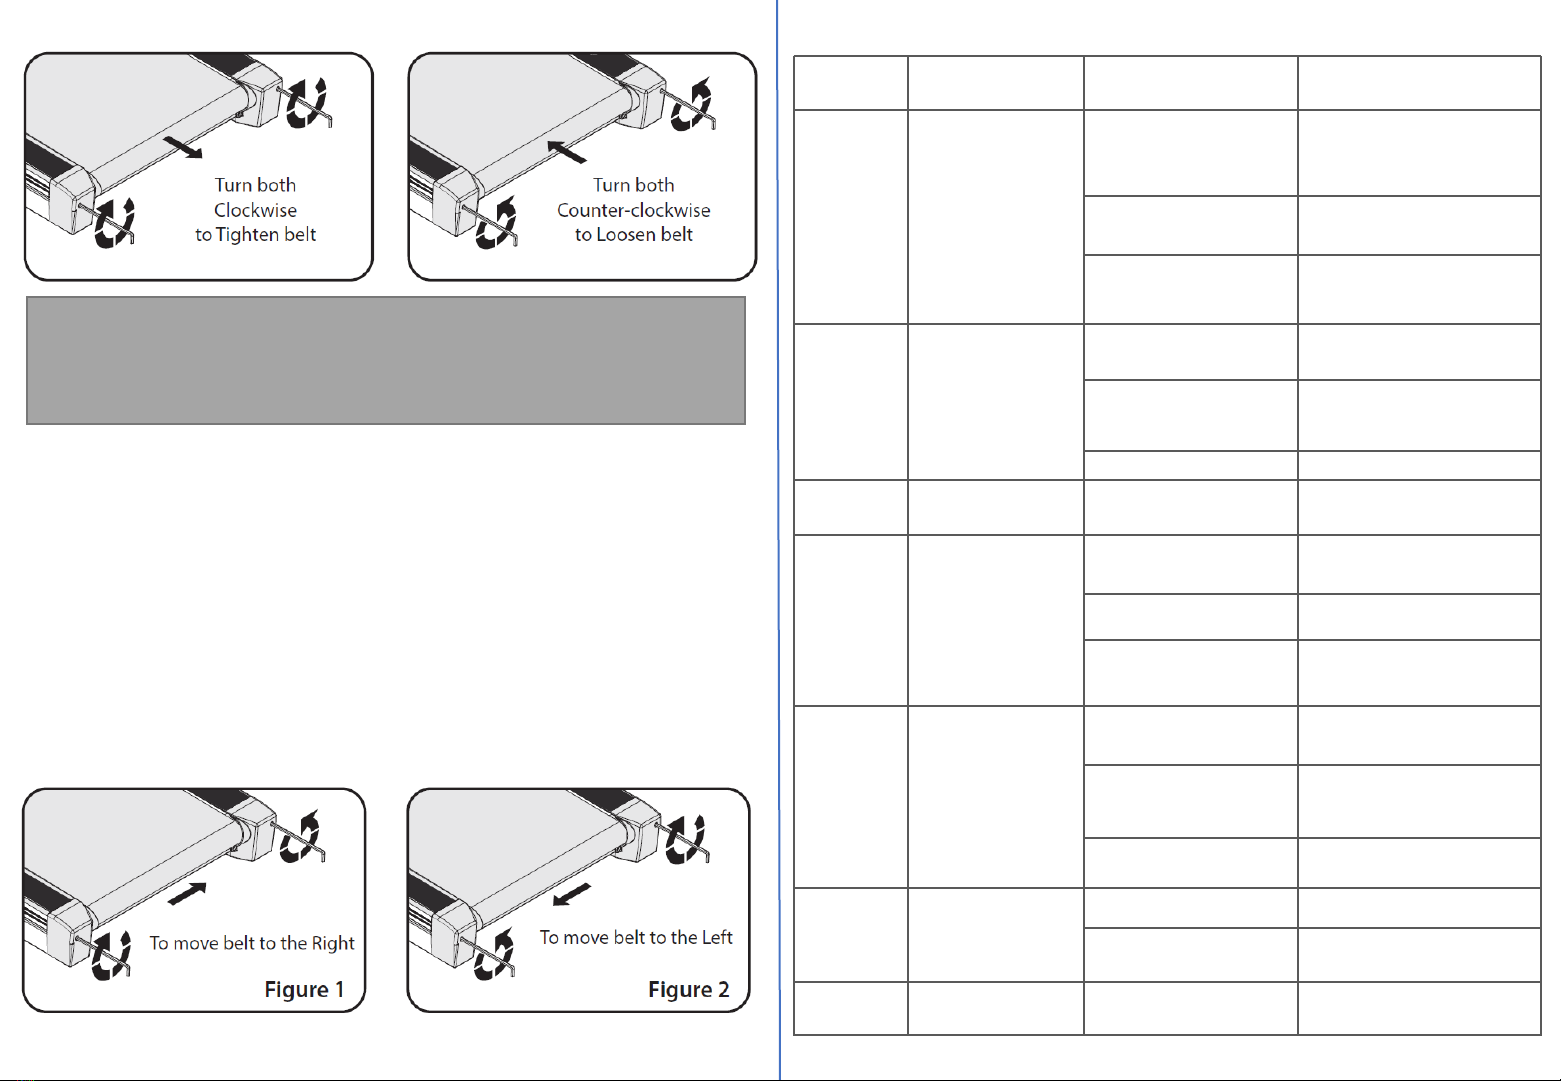
EGOFIT ComfortDeck M2 User manual

Welcome to Egofit,
Congratulations in taking a step forward to increase your level of
physical activity or add variety to your current exercise program. Physical
activity is now more than ever a necessity to keep your body healthy
and fit. Whether your motivation is to Lose Weight, manage a Chronic
Disease like diabetes, train for a sporting event or just live a Healthy
Lifestyle, Egofit products can help you achieve your health and fitness
goals.
We invite you to the Egofit website at www.egofitwalker.com where we
include additional information and tools to help you maintain your
exercise program and achieve your health and fitness goals.
The Egofit Home series of cardio equipment is designed for more than
60% consumers who say they prefer to exercise in the comfort and
privacy of their own homes. Each Home series product is designed and
manufactured to exceed your expectations for quality and durability,
simple assembly and ease of operation.
Please read this manual thoroughly before assembly and operation of
your new Egofit equipment. It includes information on proper operation,
safety precautions, product assembly and ongoing maintenance.
Remember that some types of services should only be performed by a
qualified service technician. In the instance that service is required,
please contact your authorized Egofit retailer or log on to our website
and select the Customer Support option. Complete the information
requested and we will respond to your inquiry within 1 business day.
Neither Egofit nor its representatives can accept responsibility for any
damages or injury incurred as a result of information presented in this
manual except under the terms of the product warranty.
Table of Content
Note: Please ensure that all the persons using the device have
read and understood the user manual and save for future use.
34
Welcome 3
Specification 5
Limited home use warranty 6
Important safety precautions 7-8
Accessories list 9
Buttons on Remote Control 10
Remote control match instructions 11
Starting an Exercise program 12
Assembly Steps 13-14
Operate Desktop console 15
Console power buttons 16
Starting the treadmill from Desktop console 17
Belt lubrication and Belt tensioning 18
Belt Alignment 19
Troubleshooting 20
FAQs 21-22
Note:
Warranty Registration:
You must register your Egofit product before a warranty claim can be
processed, To complete your registration online go to
www.egofitwalker.com and click on the foot menu Warranty
Registration, fill out the warranty registration form and submit,
Registration form must be received by Egofit within 30days of purchase
to activate the Product Warranty. Product Warranties are not valid
unless the registration is properly completed and received within 30
days.

56
Specifications
M2 M2T
Display
Readouts
Workout Time, Calories,
Distance, Speed, Steps
Workout Time, Calories,
Distance, Speed, Steps
Speed range 1~5.0 kmh/0.62~3.1mph 1~6.0 kmh/0.62~3.73mph
Inlcine levels 3% 3%
Running belt
Size
920*450mm /
36.2 *17.7 inch
920*450mm /
36.2 *17.7 inch
Deck Superior Glazed and
Silent Deck
Superior Glazed and Silent
Deck
Drive Motor 2.5 HP (peak) 2.5 HP (peak)
Maximum User
weight
110kgs / 245lbs 110kgs / 245lbs
Residential
Warranty
1 year 1 year
Limited Home Use Warranty
The Egofit M2 and M2T Treadmills come with the 1 year limited warranty,
which applies only for the use of the Treadmill in the home, for
residential, non-commercial purposes.
Egofit warrants that the equipment it manufactures is free from defects in
material workmanship under normal use and service. The periods above
are based on the date of purchase. During these periods, Egofit will repair
or replace any defective part, Free labor is included for the first year on all
parts that are not normally assembled or replaced by the customer
customer may be responsible to pay for Service Technician travel time
where travel in excess of 20 miles is required
if within the time frames specified above, any part fails to operate
properly, log on to our web site at www.egofitwalker.com, complete the
form to request assistance.
Egofit reserves the right to make changes and improvements to our
products without incurring any obligations to similarly alter any product
purchased. In order to insure our product warranty and to ensure the safe
and efficient operation of your Egofit product, only authorized parts can
be used The warranty is void if any parts other than those provided by
Egofit are used.
Exclusions and Limitations:
•· This warranty does not apply to any defects caused by negligence,
misuse, improper assembly or maintenance, accident, or an "act of god”.
•· This warranty does not apply to discoloration of paint or plastics.
•· Egofit shall not be responsible for incidental or consequential damages.
•· This warranty is nontransferable from the original owner.
•· Labor warranty does not cover replacement of Customer Assembled
Parts.
Warranty Registration:
You must register your Egofit product before a warranty claim can be
processed, To complete your registration online go to
www.egofitwalker.com and click on the foot menu Warranty Registration,
fill out the warranty registration form and submit, Registration form must
be received by Egofit within 30days of purchase to activate the Product
Warranty. Product Warranties are not valid unless the registration is
properly completed and received within 30 days.

78
Important Safety Precautions
When using exercise equipment, basic precautions should always be
followed, including.
•Never drop or insert any object into any opening.
•Never operate this treadmill if it has been damaged or even partially
submersed in water.
•To reduce the risk of electric shock, unplug the treadmill from the wall
outlet when not in use. before performing any maintenance, or before
moving the treadmill.
•Do not use outdoors.
•Do not lean against or climb on the treadmill. Doing so may result in the
treadmill tipping and falling and could result in serious personal injury.
•Do not hang or place items on the treadmill. Doing so could result in
shifting the weight balance of the treadmill causing it to tip over or fall
causing serious personal injury.
•Do not operate with the side rails removed.
•Keep the treadmill on a solid surface, with the side rails and front a
minimum of two feet from any walls or furniture. Make sure that the area
behind the treadmill remains completely clear during use. A minimum of 4
feet of clearance is required for safety reasons.
•Do not operate where aerosol spray products are being used or where
oxygen is being administered.
•Never place the power cord under carpeting or place any object on top of
the cord, this may pinch or damage the cord causing fire damage or
personal injury.
•Use this exercise product for its intended use as described in this Owner's
Manual. Do not use attachments that are not recommended by Egofit.
•Do not leave your treadmill running while not in use.
Children and Pets.
•Keep children off your treadmill at all times.
•When in use children and pets should be kept at least 10 feet away.
Grounding Instructions
•Never use extension cords between the treadmill and the wall outlet
•This product is for use on a nominal 120 volt (non GFl) circuit, and has a
grounding plug similar to the illustration below. Never remove or
otherwise bypass the electrical ground terminal.
Danger: Improper connection of the
equipment grounding conductor can
result in the risk of electric shock Check
with a qualified electrician or service
person if you are in doubt as to whether
the product is properly grounded. Do not
modify the plug provided with the
product. If it will not fit in the outlet,
have the proper outlet installed by a
qualified electrician.
Other Safety Tips
•Always consult a physician before beginning this or any exercise
program.
•lf you experience chest pains, nausea, dizziness or shortness of breath,
stop exercising immediately and consult your physician before
continuing.
•Do not wear clothing or jewelry that might catch on any part of the
treadmill.
•This treadmill is equipped with a safety key. lf the key is removed from
the display, the treadmill will immediately stop. Always clip the cord that
is attached to the safety key to a part of your clothing so the key will be
pulled from the display, stopping the treadmill, in case of an emergency.
Noted: Read all instructions and save for future use.

910
1 2 3
4 5 6
1. RF Remote Controller X 1
2. Allen Wrench 5mm X 1
3. Lubricant Oil X 2
4. Power Cord 1.8m X 1
5. User Manual X 1
6. Safety Key (For M2T Only) X 1
Installing the Battery for Remote Control
Buttons on Remote Control
Start: In standby or paused
status, press this button to
start the treadmill.
Stop: in the running status,
press this button to stop
the treadmill.
Speed Up
Speed Down
Accessories list

11 12
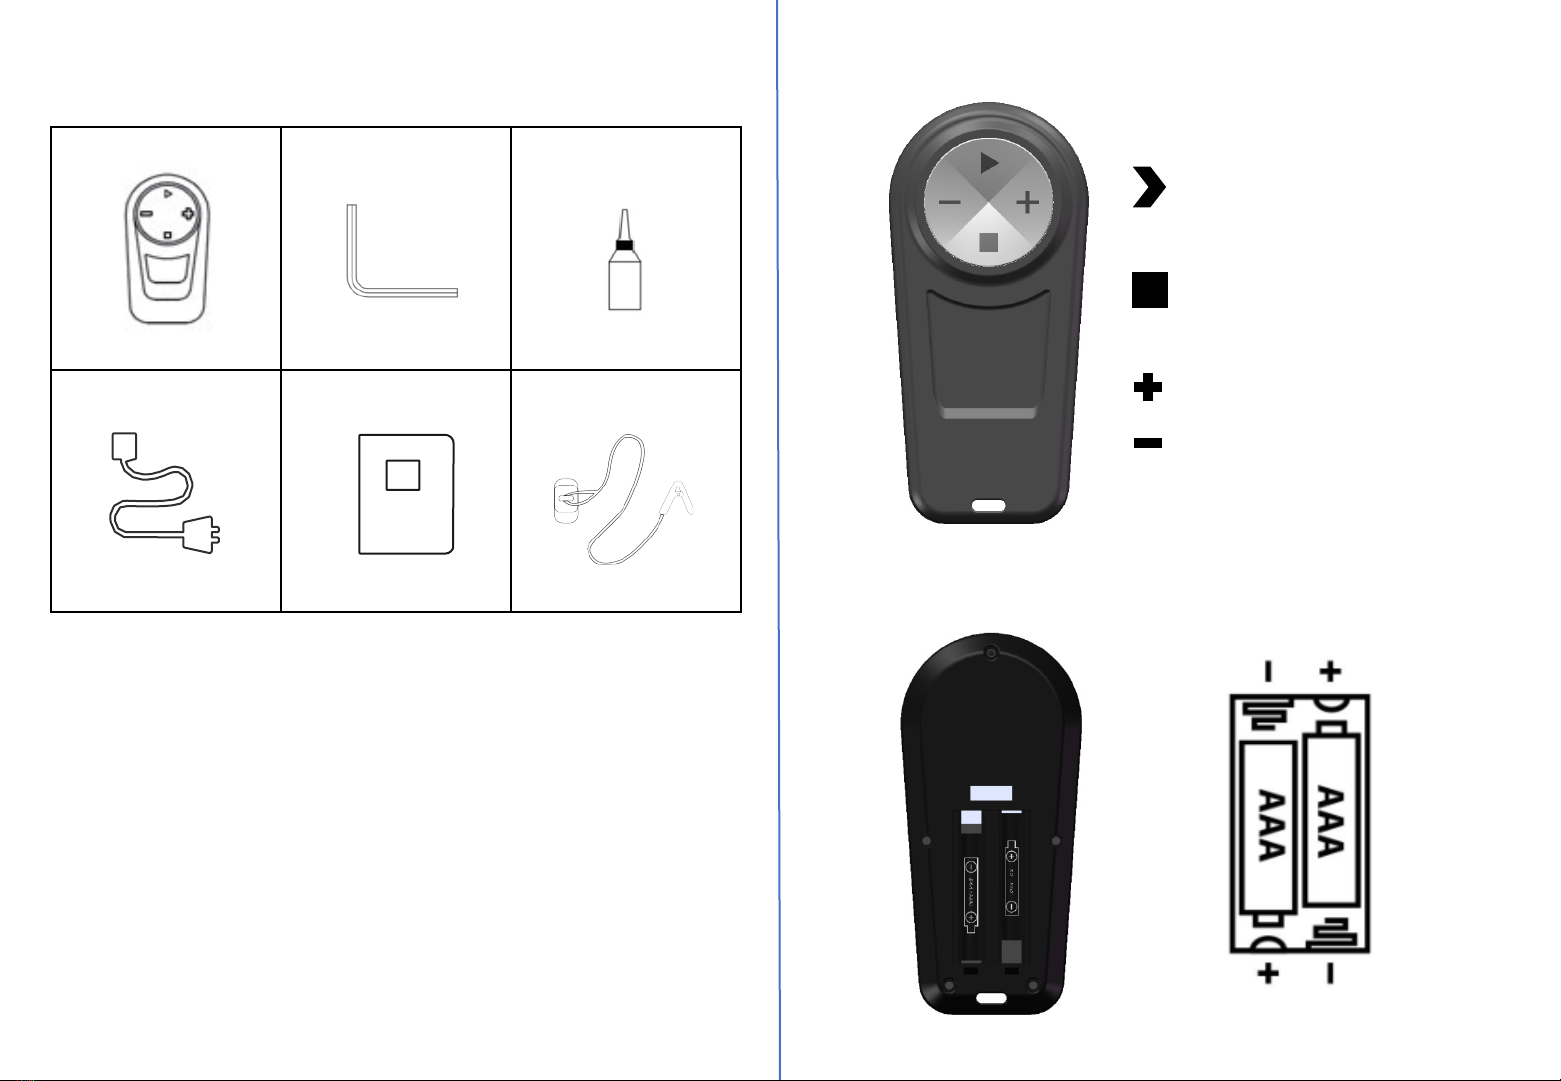
Remote Control Match Instructions
Noted:
The remote control comes pre-matched as a factory default, so you can
usually use it immediately after unboxing. However, if you find that the
treadmill is not responding to the remote, please follow the steps
below to match it with your treadmill.
To match the remote with treadmill, please follow these procedures:
Press and hold the "START" button on the remote control and
simultaneously switch on the treadmill. After 3 seconds, release the
remote button. The matching process will be completed, and the
remote control will now be able to operate the treadmill.
You may need to match the remote control with your treadmill under
the following circumstances:
•If your original remote control is lost or broken, and you have a new
replacement remote;
•If you have confused your remote control with those belonging to your
roommates or colleagues who use the same model of treadmill, you will
need to match the remote controls again.
Starting an Exercise Program
Before you begin an exercise program or substantially increase your level of
activity, be sure to consult your primary care physician, In preparation for a
visit you may also want to take the PAR-Q Assessment This Physical Activity
Readiness Questionnaire (PAR-O) will help you determine your suitability for
beginning an exercise program and prepare you for discussing your physical
activity program with your physician.
Has your doctor ever said that you have a heart condition or that you
should participate in physician activity only as recommended by a doctor?
Do you feel pain in your chest during physical activity?
In the past month, have you had chest pain when you were not doing
physical activity?
Do you lose your balance because of dizziness?
Do you ever lose consciousness?
Do you have a bone or joint problem that could be made worse by a change
in your physical activity
Is your doctor currently prescribing drugs for your blood pressure or a heart
condition?
Do you know of any reason you should not participate in physical activity?
if you answered yes to one or more of the questions, if you are over 40
years of age and have been inactive, or if you are concerned about your
health, consult a physician before beginning an exercise program or
substantially increasing your physical activity. If you answered no to each
question, then it's likely you can begin an exercise program.
Pre-Exercise Resting Heart Rate Check
Before beginning your exercise program it is recommended that you check
your resting heart rate, Your resting heart rate should be taken in a seated,
relaxed position. Find your resting pulse and begin your count with "zero“
on the first heart beat, Continue counting each time you feel your pulse
until you have counted for a full 30 seconds, Next, double the number that
you counted for 30 seconds and you now have your pre-exercise resting
heart rate, Remember this number as we also recommend taking a post.
exercise resting heart rate after you have completed your exercise program
and you will want to remember your pre-exercise heart rate so you can
compare the two heart rate measurements.

13 14
Assembly Steps
At Egofit we strive to make our equipment easy to assemble and start
using.
The M2 model treadmill come completely assembled in the box and are
ready to operate immediately.
The M2T model treadmill come completely assembled in the box and are
ready to operate in just minutes.
•Step 1: Remove Treadmill from Box
•Step 2: Remove Bag and Packaging Material from Treadmill.
•Step 3: Stand up the handlebar.
A. Rotate the black round cap on each side
at the bottom of the handlebar 1 or 2 full turn
counterclockwise to release any pressure on
the locking mechanism.
B. Raise the handlebar to the upright position.
C. Turn the black round cap clockwise to
tighten and secure the joint. Repeat on
the opposite side.
Caution: Injury to the user could occur if black cap
is not pushed into the locked position and cap
is not securely tightened. This could result in
handlebar falling.
Leveling the Treadmill
For optimum performance the treadmill should be level, making sure
that the treadmill sits stable and even on the floor.
Adequate Space
Make sure you have room to lay the treadmill down. There needs to be
at least 2 feet of clearance on both sides and in the front of the
treadmill. There should be at least 4 feet of clearance on the back side of
the treadmill for safety reasons. lf the user were to fall this would give
adequate clearance to get off the treadmill.
Moving
The treadmill is equipped with transport wheels located in front. To
move, lift up on the back end of the frame. Relocate the treadmill by
rolling the treadmill on these wheels.

15 16
Operate Desktop Console (Sold Separately)
After assembling the Treadmill, roll it to the desired location. Plug the
console connector into the connector coming from the front bottom of
the Treadmill.
Noted: Do not plug the power cord into the equipment until the
console is connected.
Desktop Console Overview & Specifications
①
②
③
④
⑤
⑥
Noted: Desktop Console is an option gadget not included in the
package, needs purchase separately.
Console Power Buttons
1. Start/Stop: In standby or paused status, press this button to start the
treadmill, In the running status, press this button to stop the treadmill.
2. Pause: In the running status, press this button to pause the treadmill.
The TIME window displays "PAU", the SPEED window displays "1.0KM/H"
or "0.6MPH", and the other windows display relevant workout data.
3. KMH/MPH Switch: In standby mode, press this button to switch the
display readouts for speed between metric and Imperial readouts
4. Mode: In standby mode, press this button to cycle through manual
mode, time countdown mode, distance countdown mode and calories
countdown mode..
5. “Ʌ”Speed Up: Increase speed, Each adjustment range is 0.1KM/H or
0.1MPH.
6. “V”Speed Down: Decrease speed, Each adjustment range is 0.1KM/H or
0.1MPH.
Console Treadmill Desk
Readouts Time, Steps, Calories, Distance,
Speed.
Display LED
Buttons Start/Stop, Pause, KMH/MPH
Switch, Mode, Speed Up/Down

17 18
Starting the Treadmill from Desktop Console
1. Turn the power switch on. It is located on the front right corner of the
treadmill.
2. Press the Start button to start the treadmill belt. The console will start
counting up from 0:00.
3. Press the speed buttons to adjust speed.
NOTE:
The steps are counted normally from 1 to 9,999 steps. After 9,999 steps,
the display format changes to accommodate more than four digits. Take
the number shown in the display and add a zero to the right for the
correct number of steps.
Below are examples of what the display will read and what those numbers
mean:
1001=10,010 steps 1005=10,050 steps 1100=11,000 steps
Belt Lubrication
Use only 100% silicone and avoid using aerosol silicone sprays which
include additives and petroleum distillates. One ounce of silicone should be
used for each application. Egofit offers 100% silicone lubricant that can be
ordered at www.egofitwalker.com.
The walking belt comes pre-lubricated from the factory. The M2 and M2T
should be lubricated every 3 months (regardless of use) or every 50 hours
of use.
To lubricate, unplug your treadmill. Slide your hand
under the belt and lift the belt away from the deck.
Apply about a dozen sprays toward the center of
the belt from each side. Rotate the belt 1/3 and
repeat this application. Rotate another 1/3 and
repeat once more. Plug the treadmill in and walk
for a few minutes to disperse lube evenly.
Note: Over tensioning the belt can cause unnecessary friction and
wear and tear on the belt, motor and electronics.
Belt Tensioning
If the belt begins to slip and needs to be tensioned, tension bolts are
accessible from the back of the treadmill. Before tensioning the belt, start
the treadmill and set the speed to 3 mph (5 kmh).
A. Using a 6 mm Allen wrench, included in your hardware bag, turn the
right and left tension bolts 1/2 turn clockwise.
B. Test to see if the slipping is eliminated. If the belt slips repeat step A
and test again
Note: Adjusting one side more than the other will cause the belt to
drift to the side of the treadmill and will require belt alignment. Check
to be sure the running belt is still aligned. If belt alignment is off as
shown below, refer to Belt Alignment section.

19 20
CAUTION: DO NOT tighten more than 2 full turns on each side. Over
tensioning the belt can cause unnecessary friction and wear and tear
on the belt, motor and electronics.
Belt Alignment
A. Press Start, then increase the treadmill speed to 3 mph (5 kph).
B. Stand behind the treadmill to see which way the belt is drifting.
C. If the belt drifts to the left, turn the left adjustment bolt 1/4 turn
clockwise and the right adjustment bolt 1/4 turn counter-clockwise.
(See FIG. 1)
D. If the belt drifts to the right, turn the left adjustment bolt 1/4 turn
counter-clockwise and the right adjustment bolt 1/4 turn clockwise.
(See FIG. 2)
E. Observe the alignment for two minutes. Repeat steps A-D as needed.
PROBLEM POSSIBLE CAUSE CHECKING CORRECTION
E01
Abnormal
communication
between the lower
controller and the
console after powering
on.
The console cables are not
connected well.
Connect the console cables
properly.
No signal output from the
console.
Change the console.
No signal output from the
lower controller.
Change the lower controller.
E02
Lower controller can’t
detect the voltage of
motor.
The motor cables are not
connected well.
Connect the motor cables
properly.
No voltage output or abnormal
voltage output from the lower
control to the motor.
Change the lower controller.
Motor is out of order. Change the motor.
E03 Lower control can’t
detect speed signal.
PWM drive circuit failure of
lower control Change the lower controller.
E04 Overvoltage protection.
The load of the treadmill
exceeds the rated working
voltage of the motor.
The load on the treadmill must be
within the rated operational
voltage.
The treadmill motor works
abnormally. Change the motor.
Detecting failure from the
lower controller to the motor
overvoltage.
Change the lower controller.
E05 Over current protection
The load of the treadmill
exceeds the rated working
current of the motor.
The load on the treadmill must be
within the rated operational
current.
Wrong assembly of the motor
causes the resistance or
blocking of the motor.
Check if the assembly of motor is
correct.
Failure of lower control limiting
current system. Change the lower controller.
E06 Driving power supply
voltage is too low.
Voltage output is too low. Check the power supply line is
normal.
The lower controller can not
detects the signal of the circuit. Change the lower controller.
E07 Without Safety key
attached or failure
Check safety key attached or
not Install the safety key
Troubleshooting

21 22
FAQs
Q: Just bought a new treadmill. Should I be concerned about the line on
the running belt?
A: This is Seal line, The process of joining the belt to itself leaves a visible
"seal line", indicating where the belt has been joined together. this line are
a perfectly normal part of treadmills, All treadmills have something similar
and are not a cause for concern, they will not impede the function of the
treadmill.
Q: when I turn it on, I get this read out on the screen “- - - -“ or “E07”. Do
you have any idea what I can do or is it broken?
A: This Screen error “- - - -“ or “E07” showing because of the safety key
not detected, check if the safety key attached on the handlebar correctly.
This manual suits for next models
1
Table of contents
Other EGOFIT Treadmill manuals