EHC 214C series User manual

IOAK-1703 / 8048622
(11.2010./1)
EHC*
214C*Tf*
(EN) INSTRUCTION MANUAL

2
DEAR CUSTOMER,
The cooker is exceptionally easy to use and extremely efcient. After reading the instruction
manual, operating the oven will be easy.
Before being packaged and leaving the manufacturer, the oven was thoroughly checked with
regard to safety and functionality.
Before using the appliance, please read the instruction manual carefully.
By following these instructions carefully you will be able to avoid any problems in using the
appliance.
It is important to keep the instruction manual and store it in a safe place so that it can be
consulted at any time.
It is necessary to follow the instructions in the manual carefully in order to avoid possible
accidents.
Caution!
Do not use the oven until you have read this instruction manual.
The oven is intended for household use only.
The manufacturer reserves the right to introduce changes which do not affect the
operation of the appliance.

3
TABLE OF CONTENTS
Safety instructions ............................................................................................................. 4
Description of the appliance ............................................................................................. 7
Installation........................................................................................................................... 9
Operation........................................................................................................................... 15
Baking in the oven – practical hints ............................................................................... 37
Cleaning and maintenance.............................................................................................. 38
Technical data................................................................................................................... 43

4
SAFETY INSTRUCTIONS
The appliance becomes hot during operation. Take care not to touch the hot parts
inside the oven.
Always keep children away from the cooker.
While in operation direct contact with the cooker may cause burns!
Ensure that small items of household equipment, including connection leads, do
not touch the hot oven or the hob as the insulation material of this equipment is
usually not resistant to high temperatures.
Donotleavethecookerunattendedwhenfrying.Oilsandfatsmaycatchredue
to overheating or boiling over.
Do not allow the hob to get soiled and prevent liquids from boiling over onto the
surface of the hob. This refers in particular to sugar which can react with the ce-
ramic hob and cause irreversible damage. Any spillages should be cleaned up as
they happen.
Do not place pans with a wet bottom on the warmed up heating zones as this can
cause irreversible changes to the hob (irremovable stains).
Usepansthatarespeciedbythemanufacturerasdesignedforusewithaceramic
hob.
If any defects, deep scratches, cracks or chips appear on the ceramic hob, stop
using the cooker immediately and contact the service centre.
Do not switch on the hob until a pan has been placed on it.
Do not use pans with sharp edges that may cause damage to the ceramic hob.
Do not look directly at the halogen heating zones (not covered by a pan) when
they are warming up.
Do not put pans weighing over 15 kg on the opened door of the oven and pans
over 25 kg on the hob.
Do not use harsh cleaning agents or sharp metal objects to clean the door as they
can scratch the surface, which could then result in the glass cracking.
Donotusethecookerintheeventofatechnicalfault.Anyfaultsmustbexedby
anappropriatelyqualiedandauthorisedperson.
In the event of any incident caused by a technical fault, disconnect the power and
report the fault to the service centre to be repaired.
This appliance is not intended for use by persons (including children) with reduced
physical,sensoryormentalcapabilities,orlackofexperienceandknowledge,
unless they have been given supervision or instruction concerning use of the ap-
pliance by a person responsible for their safety.
Children should be supervised to ensure that they do not play with the appli-
ance.
The cooker should not be cleaned using steam cleaning equipment.

5
HOW TO SAVE ENERGY
Using energy in a respon-
sible way not only saves
money but also helps the
environment. So let’s save
energy! And this is how you
can do it:
Use proper pans for cooking.
Panswiththick,atbasescansaveupto1/3
on electric energy. Remember to cover pans
if possible otherwise you will use four times
as much energy!
Match the size of the saucepan to the
surface of the heating zone.
A saucepan should never be smaller than a
heating zone.
Ensure heating zones and pan bases
are clean.
Soils can prevent heat transfer – and repeat-
edly burnt–on spillages can often only be
removed by products which cause damage
to the environment.
Do not uncover the pan too often
(a watched pot never boils!).
Do not open the oven door unnecessarily
often.
Switch off the oven in good time and make
use of residual heat.
For long cooking times, switch off heating
zones5to10minutesbeforenishingcook-
ing. This saves up to 20% on energy.
Only use the oven when cooking larger
dishes.
Meat of up to 1 kg can be prepared more
economically in a pan on the cooker hob.
Make use of residual heat from the
oven.
If the cooking time is greater than 40 minutes
switch off the oven 10 minutes before the
end time.
Important! When using the timer,
set appropriately shorter cooking
times according to the dish being
prepared.
Only grill with the ultrafan after closing
the oven door.
Make sure the oven door is properly
closed.
Heat can leak through spillages on the door
seals. Clean up any spillages immediately.
Do not install the cooker in the direct
vicinity of refrigerators/freezers.
Otherwise energy consumption increases
unnecessarily.

6
During transportation, protec-
tive packaging was used to
protect the appliance against
any damage. After unpack-
ing, please dispose of all
elements of packaging in a
way that will not cause dam-
age to the environment.
All materials used for packaging the appli-
ance are environmentally friendly; they are
100% recyclable and are marked with the
appropriate symbol.
Caution! During unpacking, the packag-
ing materials (polythene bags, polystyrene
pieces, etc.) should be kept out of reach of
children.
UNPACKING DISPOSAL OF THE APPLIANCE
Old appliances should not sim-
ply be disposed of with normal
household waste, but should
be delivered to a collection and
recycling centre for electric and
electronic equipment. A symbol
shown on the product, the
instruction manual or the packaging shows
that it is suitable for recycling.
Materials used inside the appliance are
recyclable and are labelled with information
concerning this. By recycling materials or
other parts from used devices you are making
asignicantcontributiontotheprotectionof
our environment.
Information on appropriate disposal centres
for used devices can be provided by your
local authority.
7
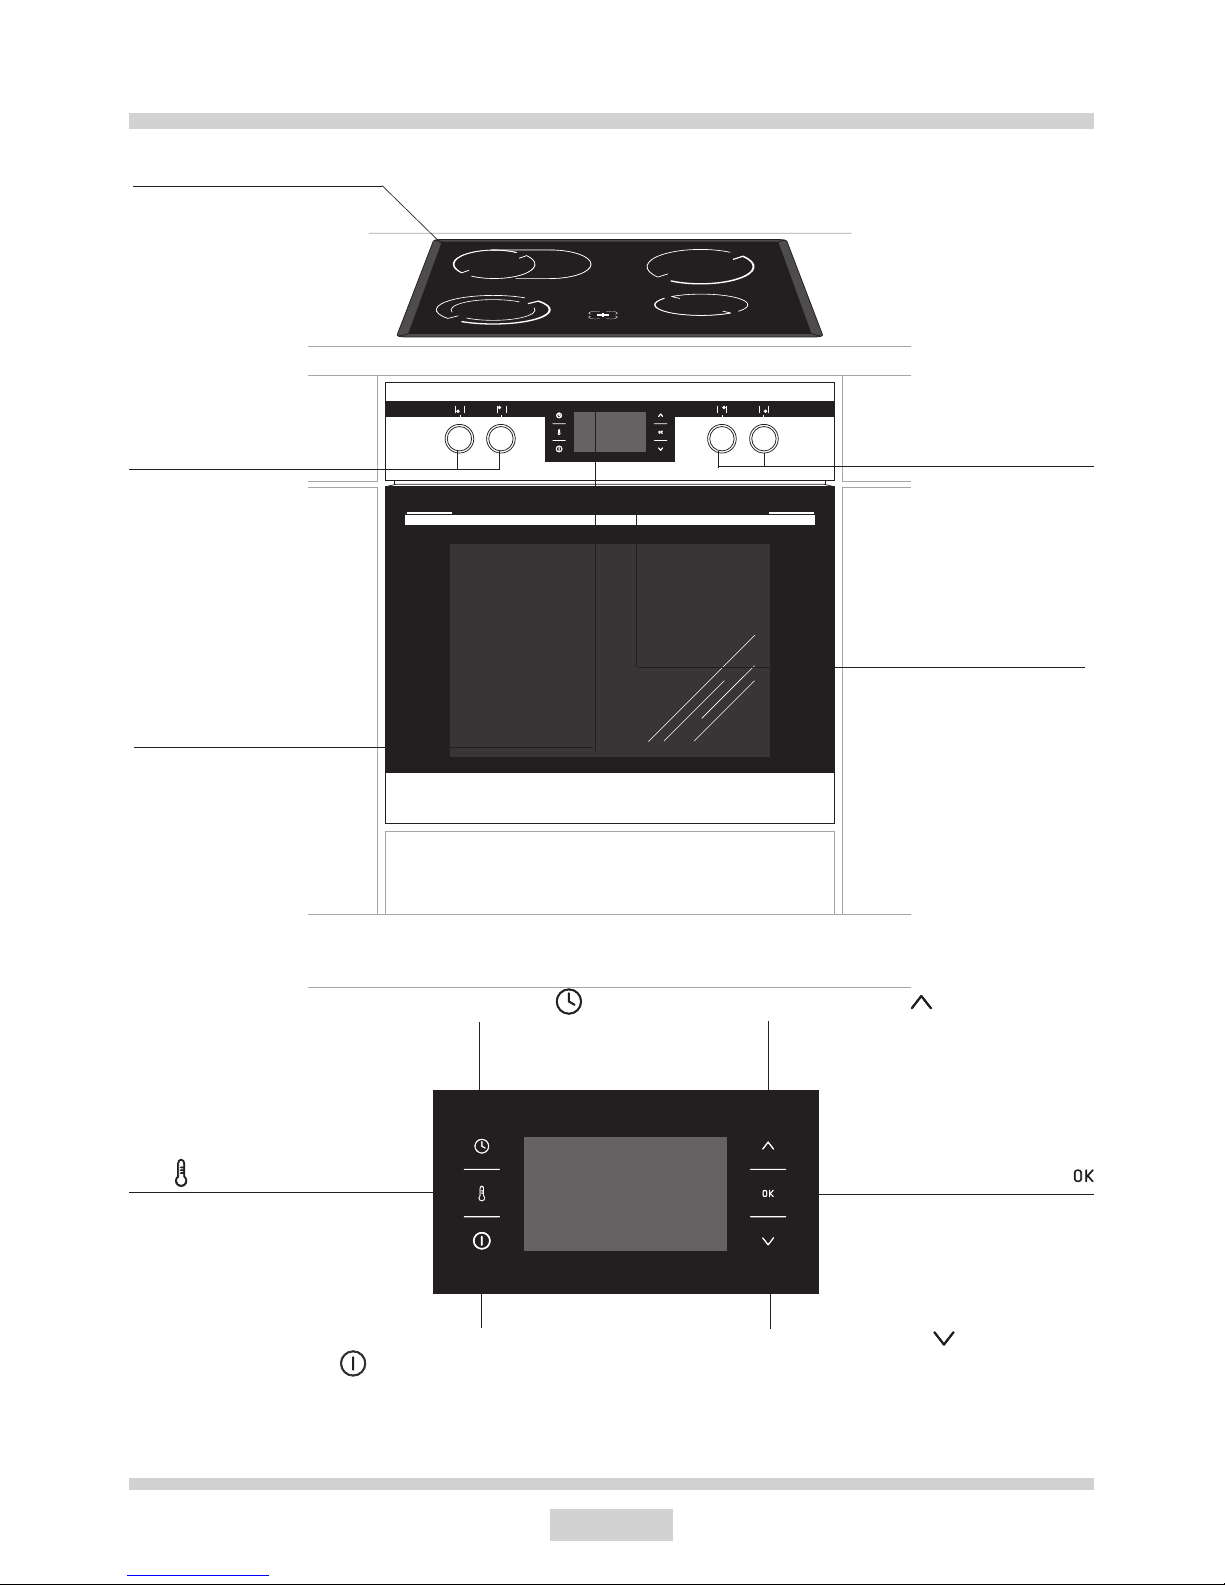
DESCRIPTION OF THE APPLIANCE
Oven door
handle
Ceramic hob
Electronic pro-
grammer
Setting selection sensor eld
Setting selection sensor eld
Conrmation sensor led
Time setting sensor eld
Stand by / menu sensor eld
Temperature selection sensor
eld
Heating zone
control knobs Heating zone
control knobs
8
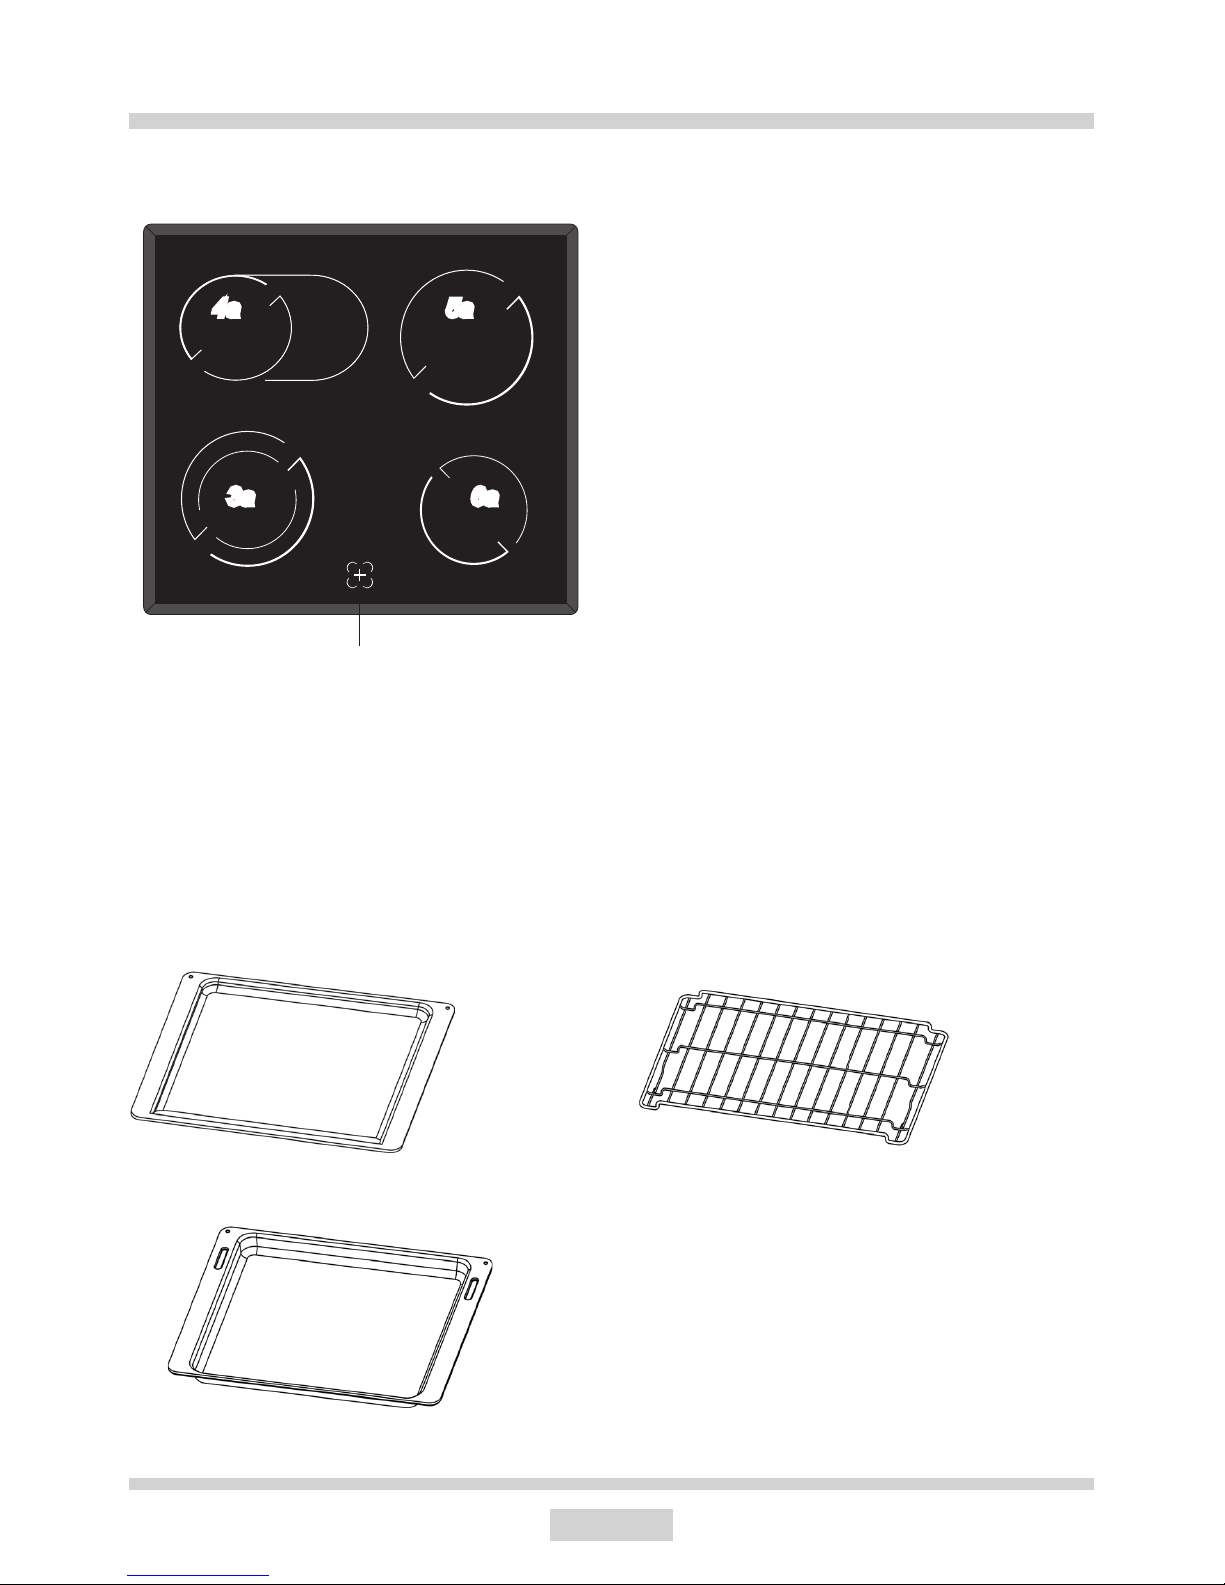
Ceramic hob
3a Ø 18 / Ø 12 cm
4a Ø 14 / Ø 25 cm
5a Ø 18 cm
6a Ø 14,5 cm
SPECIFICATIONS OF THE APPLIANCE
Baking tray* Grill grate
(drying rack)
Roasting tray
Cookerttings:
Zone heating indicator
3a
4a 5a
6a

9
INSTALLATION
Making the worktop recess
● Thekitchenareashouldbedryandairedandequippedwithefcientventillation.When
installing the cooker, easy access to all control elements should be ensured.
This is a Y–type design built–in cooker, which means that its back wall and one side wall
canbeplacednexttoahighpieceoffurnitureorawall.
●Worktop thickness should be 28 - 40 mm, while its width at least 600 mm. The worktop
mustbeatandlevel.Edgeoftheworktopnearthewallmustbesealedtopreventingress
of water or other liquids.
● Thereshouldbesufcientspacingaroundtheopening,inparticular, at least 50 mm
distance to the wall and 60 mm distance to the front edge of worktop.
●Worktop must be made of materials, including veneer and adhesives, resistant to a tem-
perature of 100°C. Otherwise, veneer could come off or surface of the worktop become
deformed.
●Edge of the opening should be sealed with suitable materials to prevent ingress of wa-
ter.
● Worktopopeningmustcuttodimensionsasshownongure
560
490
min
60
min
50
1

10
INSTALLATION
Installing the hob in worktop opening
●Use four “A” brackets for 38 mm thick worktops. Fit the hob into worktop opening as shown
ongure2and3.Toproperlysecurehobin28mmthickworktop,usefour15x15x50mm
wooden blocks in addition to “A” brackets. Fit the hob into worktop opening as shown on
gure4and5.
● Checkifadhesivesealisproperlyappliedtothehob'sange.
● Looselyattachxingbracketstothebottomofthehob
● Removedustfromtheworktop,inserthobintotheopeningandpressinrmly,
● Positionxingbracketsperpendicularlytothehob'sedgeandtightenrmly.
3
2
54
321
320
560
490
min
60
min
50
466
1 - worktop
2 - screw
3-xingbracket
4 - hob
5 - seal

11
INSTALLATION
Installing the hob in worktop opening
1 - worktop
2 - screw
3-xingbracket
4 - hob
5 - seal
6 - wooden block
4
5
54
321
15
15
6
560
416 50
490
min
60
min
50
270 50
12
INSTALLATION
Fig. B
Fig. A
Fig. C
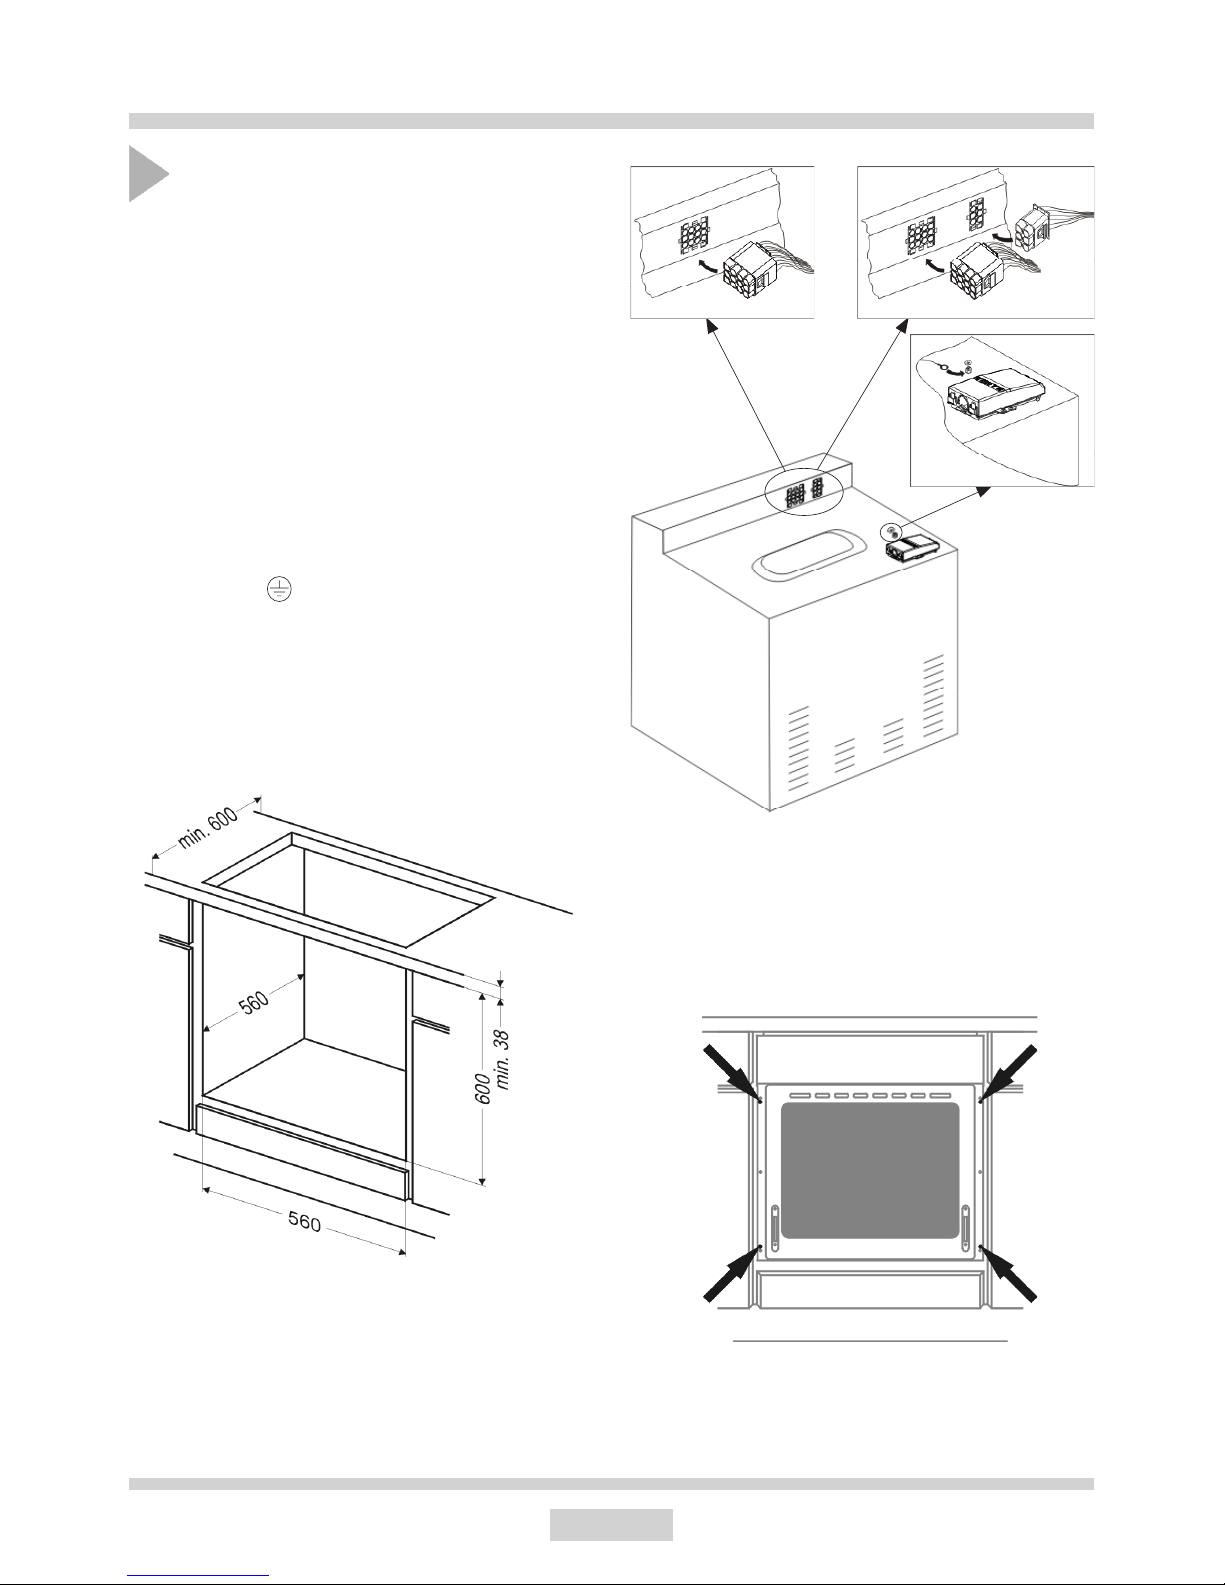
Assembly of the oven:
Make an opening with the dimensions
given in the diagram for the oven to be
tted.(Fig.A)
Make sure the mains plug is disconnected
and then connect the oven to the mains
supply.
Partially insert the oven into the prepared
opening and connect the oven to the hob.
(Fig.B)
The appliance must be earthed. Connect
the earth lead of the hob (yellow–green)
with the earth terminal of the oven
(marked ) which is located near the
connectionbox
Insert the oven completely into the open-
ing without allowing the four screws in the
places shown in the diagram to fall out.
(Fig.C)
13
INSTALLATION
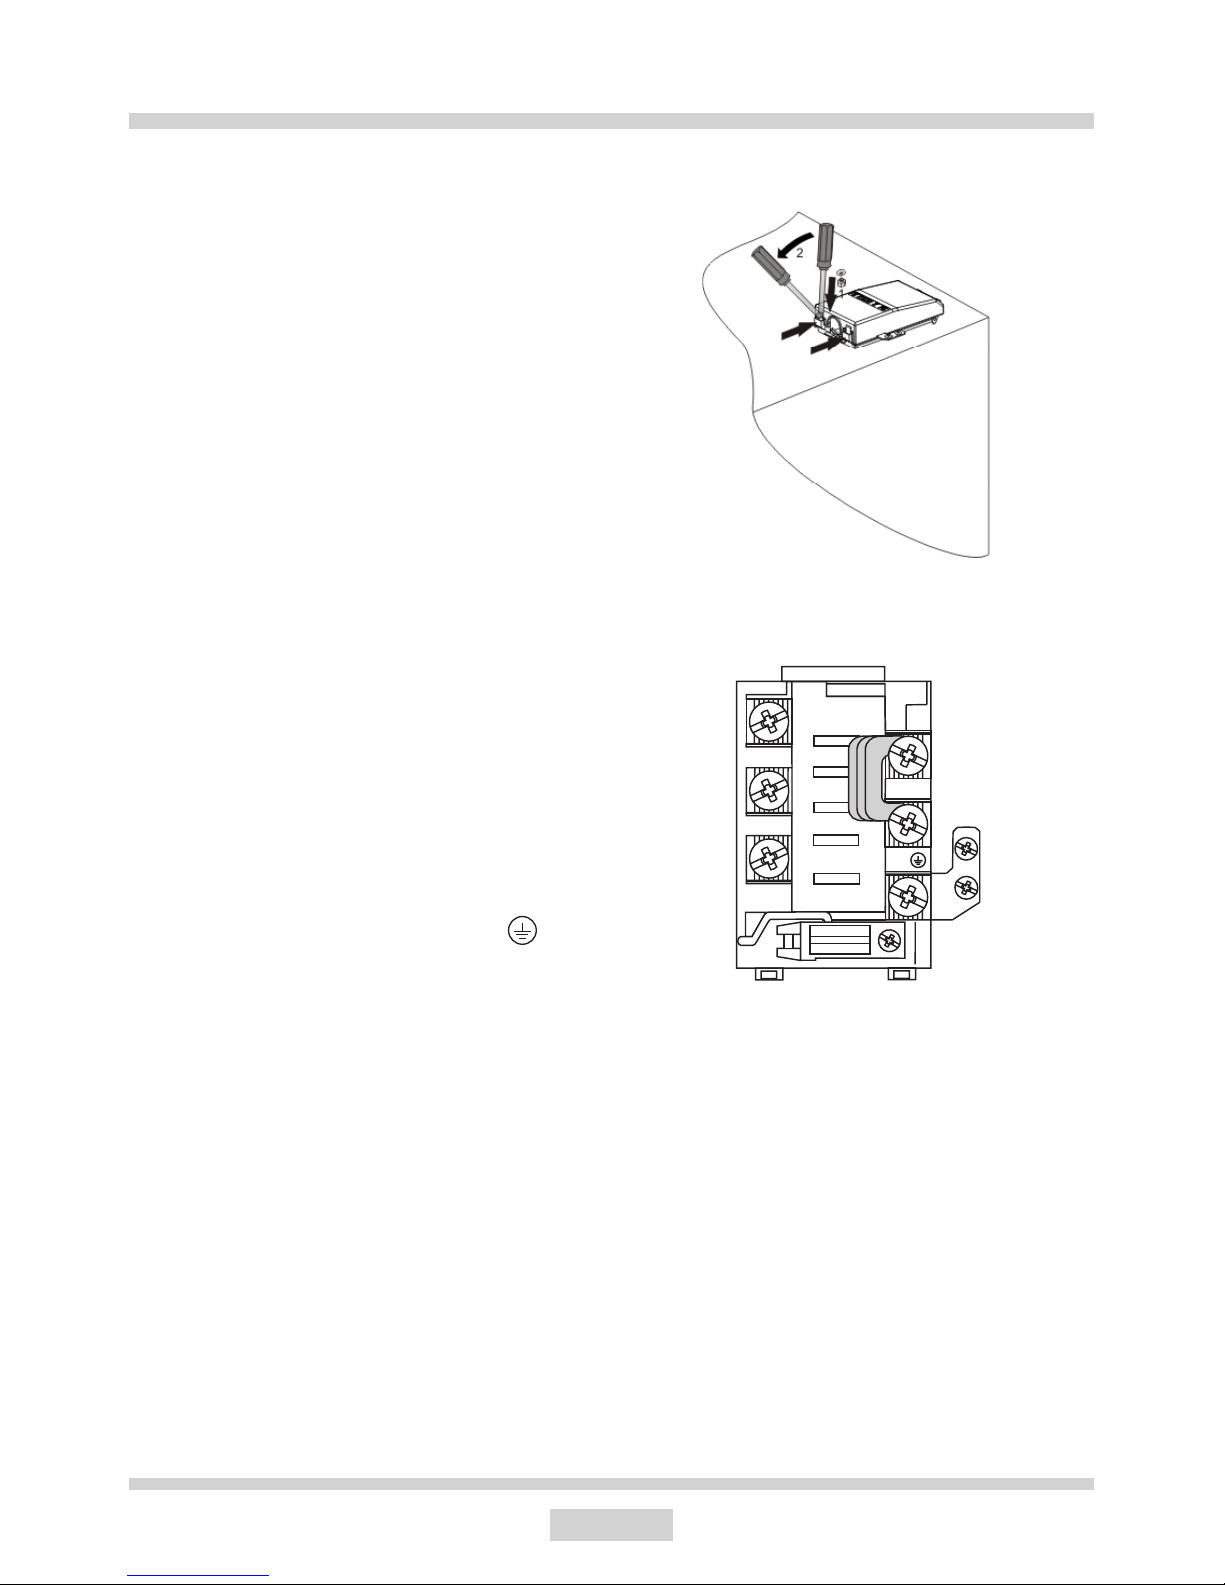
Electrical connection
Warning!
All electrical work should be carried out by a
suitablyqualiedandauthorisedelectrician.
No alterations or wilful changes in the electric-
ity supply should be carried out.
Fitting guidelines
The cooker is manufactured to work with
three–phase alternating current (400V
3N~50Hz). The voltage rating of the cooker
heating elements is 230V. Adapting the
cooker to operate with one-phase current is
possible by apropriate bridging in the connec-
tionboxaccordingtotheconnectiondiagram
below. The connection diagram is also found
onthecoveroftheconnectionbox.Remem-
ber that the connection wire should match
the connection type and the power rating of
the cooker.
The connection cable must be secured in a
strain–relief clamp.
Warning!
Remember to connect the safety circuit to the
connectionboxterminalmarkedwith . The
electricity supply for the cooker must have a
safety switch which enables the power to be
cut off in case of emergency. The distance
between the working contacts of the safety
switch must be at least 3 mm.
Before connecting the cooker to the power
supply it is important to read the informa-
tion on the data plate and the connection
diagram.
1
2
3
3
4
5
14
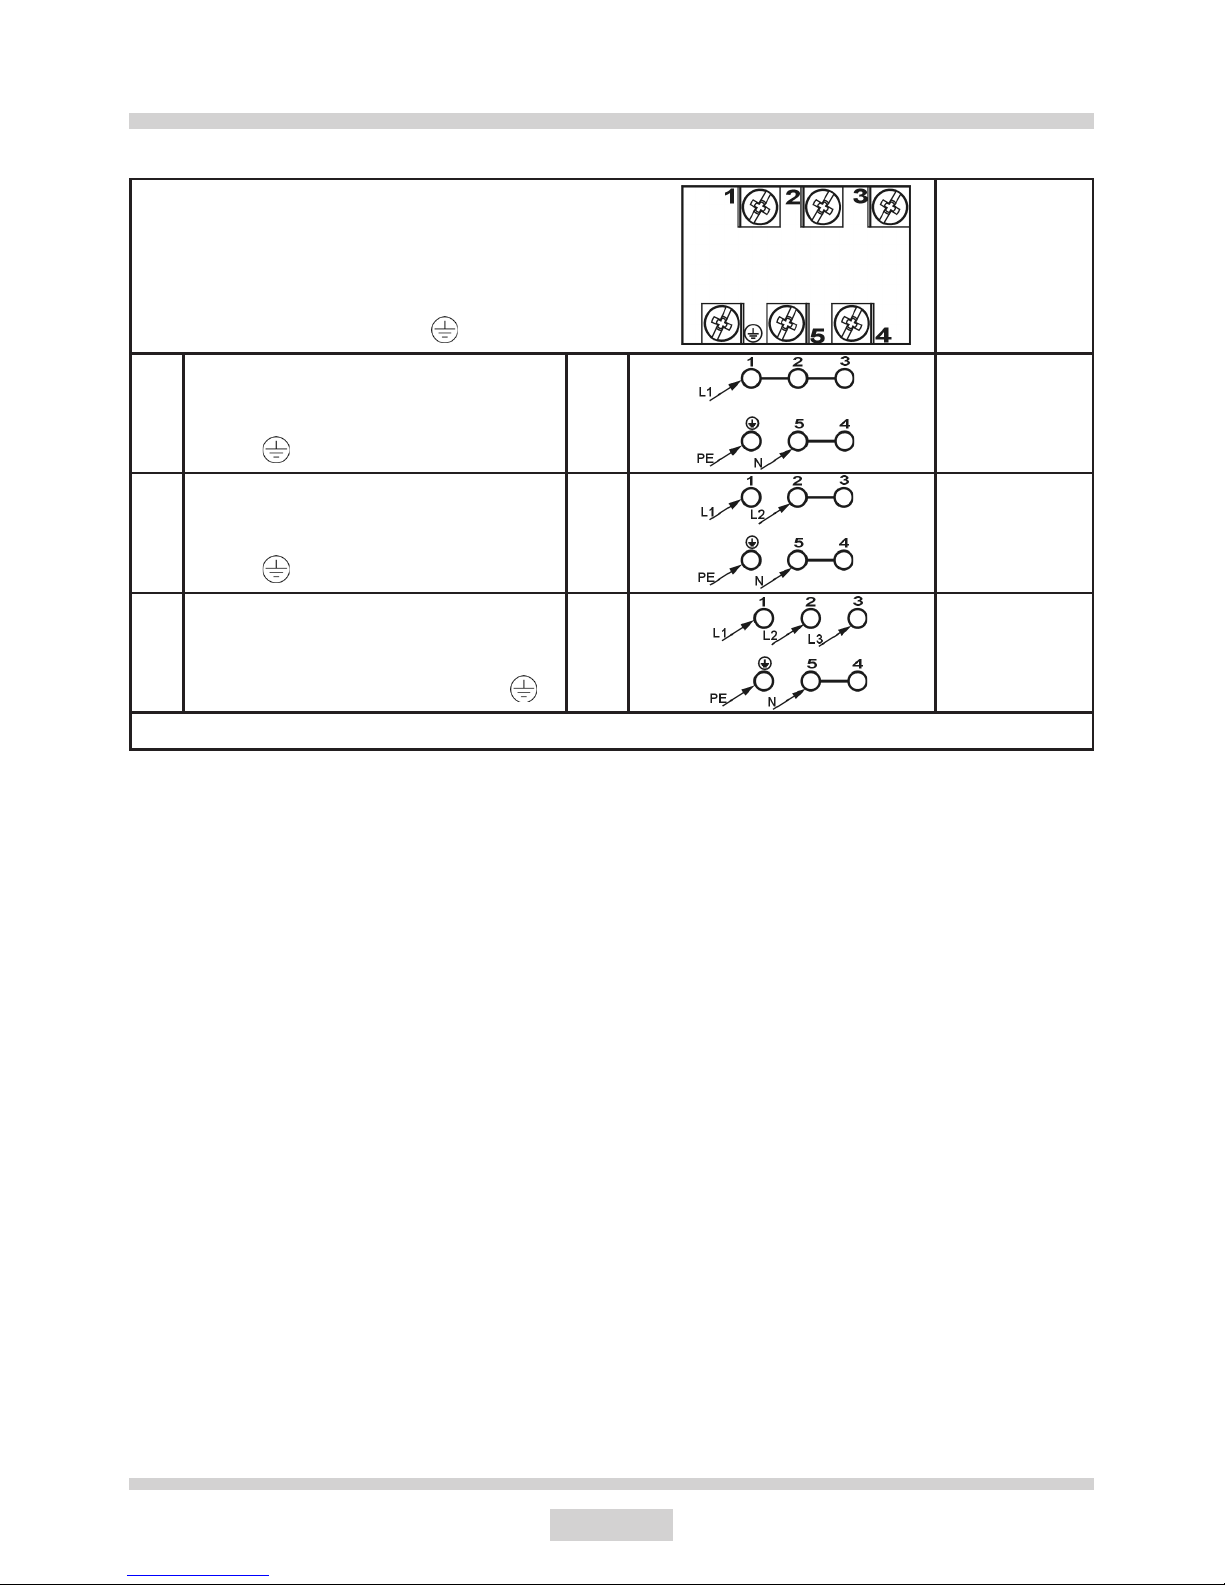
Caution! In the event of any connection the safety
wire must be connected to the PE terminal
Recommen-
ded
type
of connection
lead
1 For 230 V earthed one–phase
connection, bridges connect 1–2–3
terminals and 4–5 terminals, safety
wire to .
2 For 400/230 V earthed two–phase
connection, bridges connect 2–3 ter-
minals and 4–5 terminals, the safety
wire to .
3 For 400/230V earthed three–phase
connection, bridges connect 4–5 ter-
minals, phases in succession 1,2 and
3, earth to 4–5, the safety wire to .
L1=R, L2=S, L3=T, N=earth terminal, PE= safety wire terminal
INSTALLATION
H05VV-F3G4
H05VV-F4G2,5
H05VV-F5G1,5
CONNECTION DIAGRAM
Caution! Voltage of heating elements 230V
15
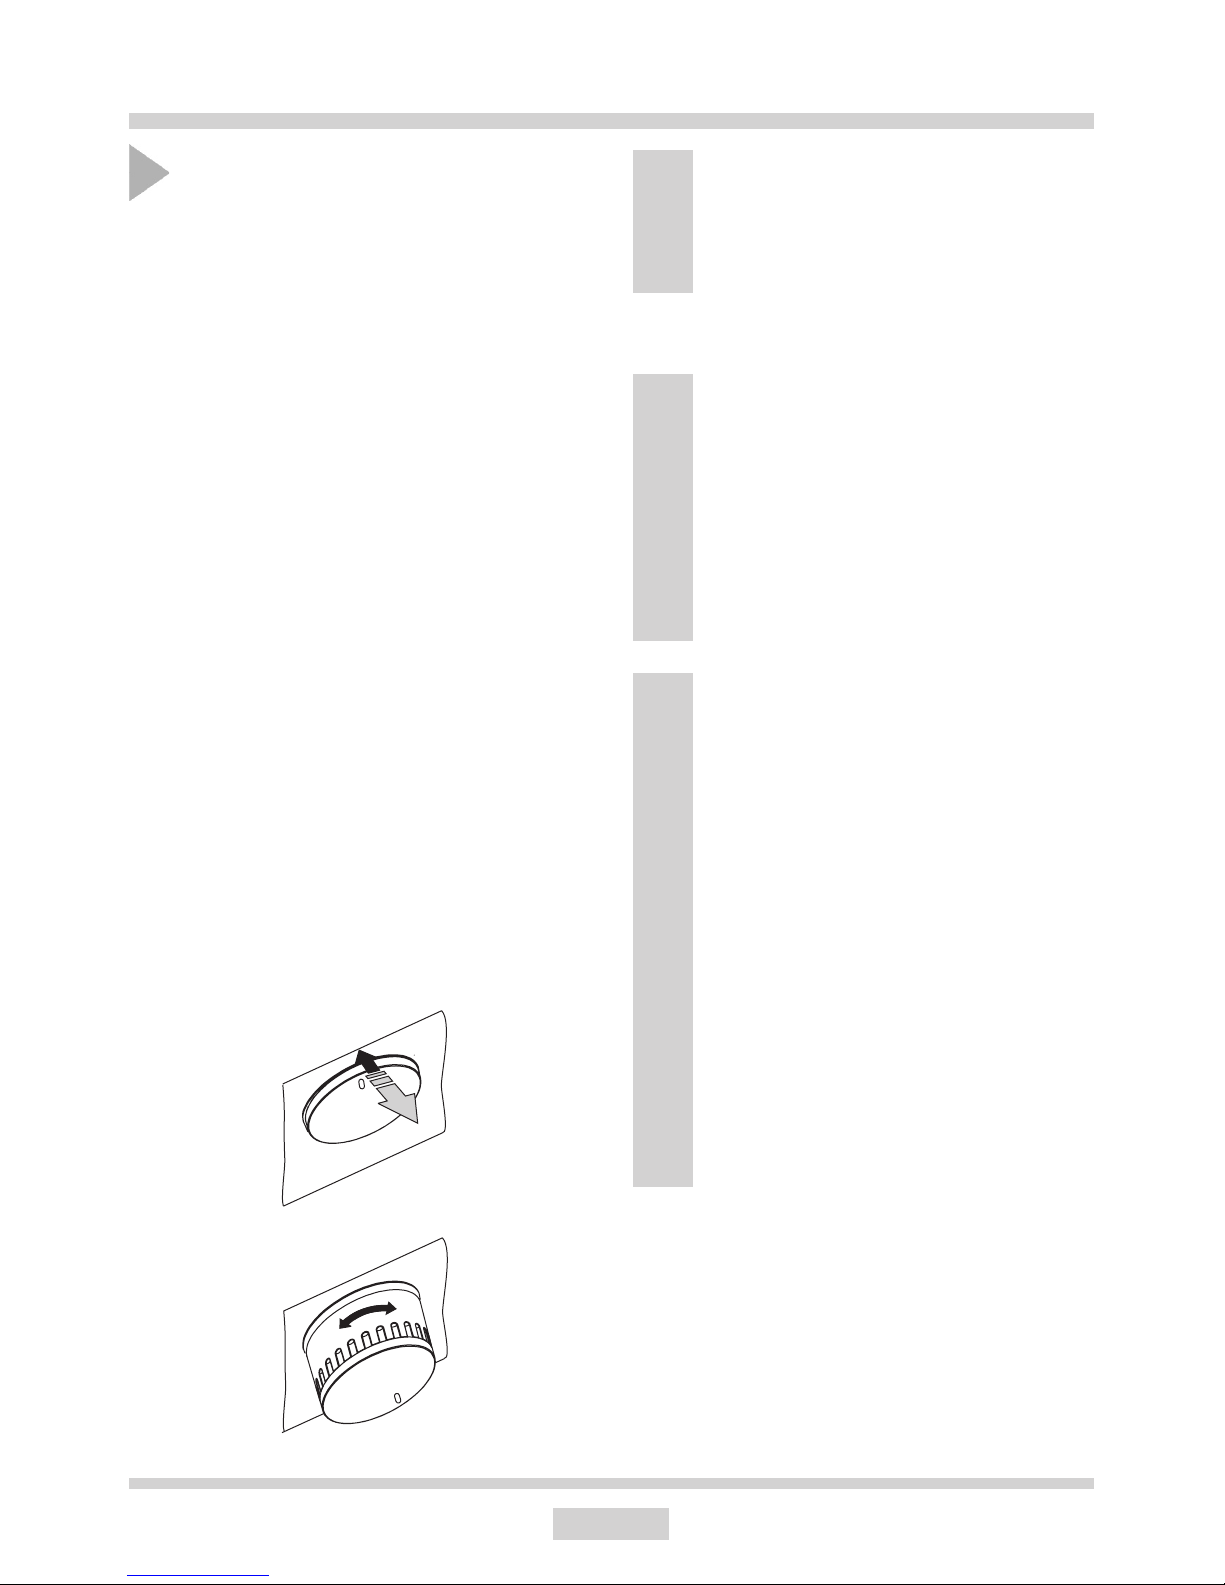
OPERATION
The oven is equipped with a retractable
knobs. In order to select a function do the
following:
1. Gently press and release a knob which
will pop out,
2. Turn the oven functions selection knob to
the desired function.
Symbols printed around the knob indicate
available oven functions.
1
2
Before using the appliance for
the rst time
Important!
To clean the oven, only use a cloth
well wrung out with warm water to
which a little washing-up liquid has
been added.
Note!
Before using an oven whose type
containstheletter„O”checkttingof
the heating element in the oven’s side
chamber walls. If the heating element
isnotcorrectlytted,liftitandinsert
into the grooves in the chamber’s
side walls.
●Remove packaging, clean the interior of
the oven,
● Takeoutandwashtheoventtingswith
warm water and a little washing-up liquid,
●Switch on the ventilation in the room or
open a window,
●Heat up the oven (to a temperature of
250°C for approximately 30 minutes),
remove any stains and wash the interior
carefully. (see section: Electronic pro-
grammer operation and oven control)
Important!
Oven is equipped with a programmer
withdisplaycontrolledbysixsensor
eldslocatedsymmetricallyonboth
sides of the display. To activate each
sensoreld,touchtheglassabovethe
sensor (indicated by a pictogram). An
acoustic signal will be heard, which
was selected in the menu. (See sec-
tion: Electronic programmer operation
and oven control.)
Sensor eld surfaces must be kept
clean.
16
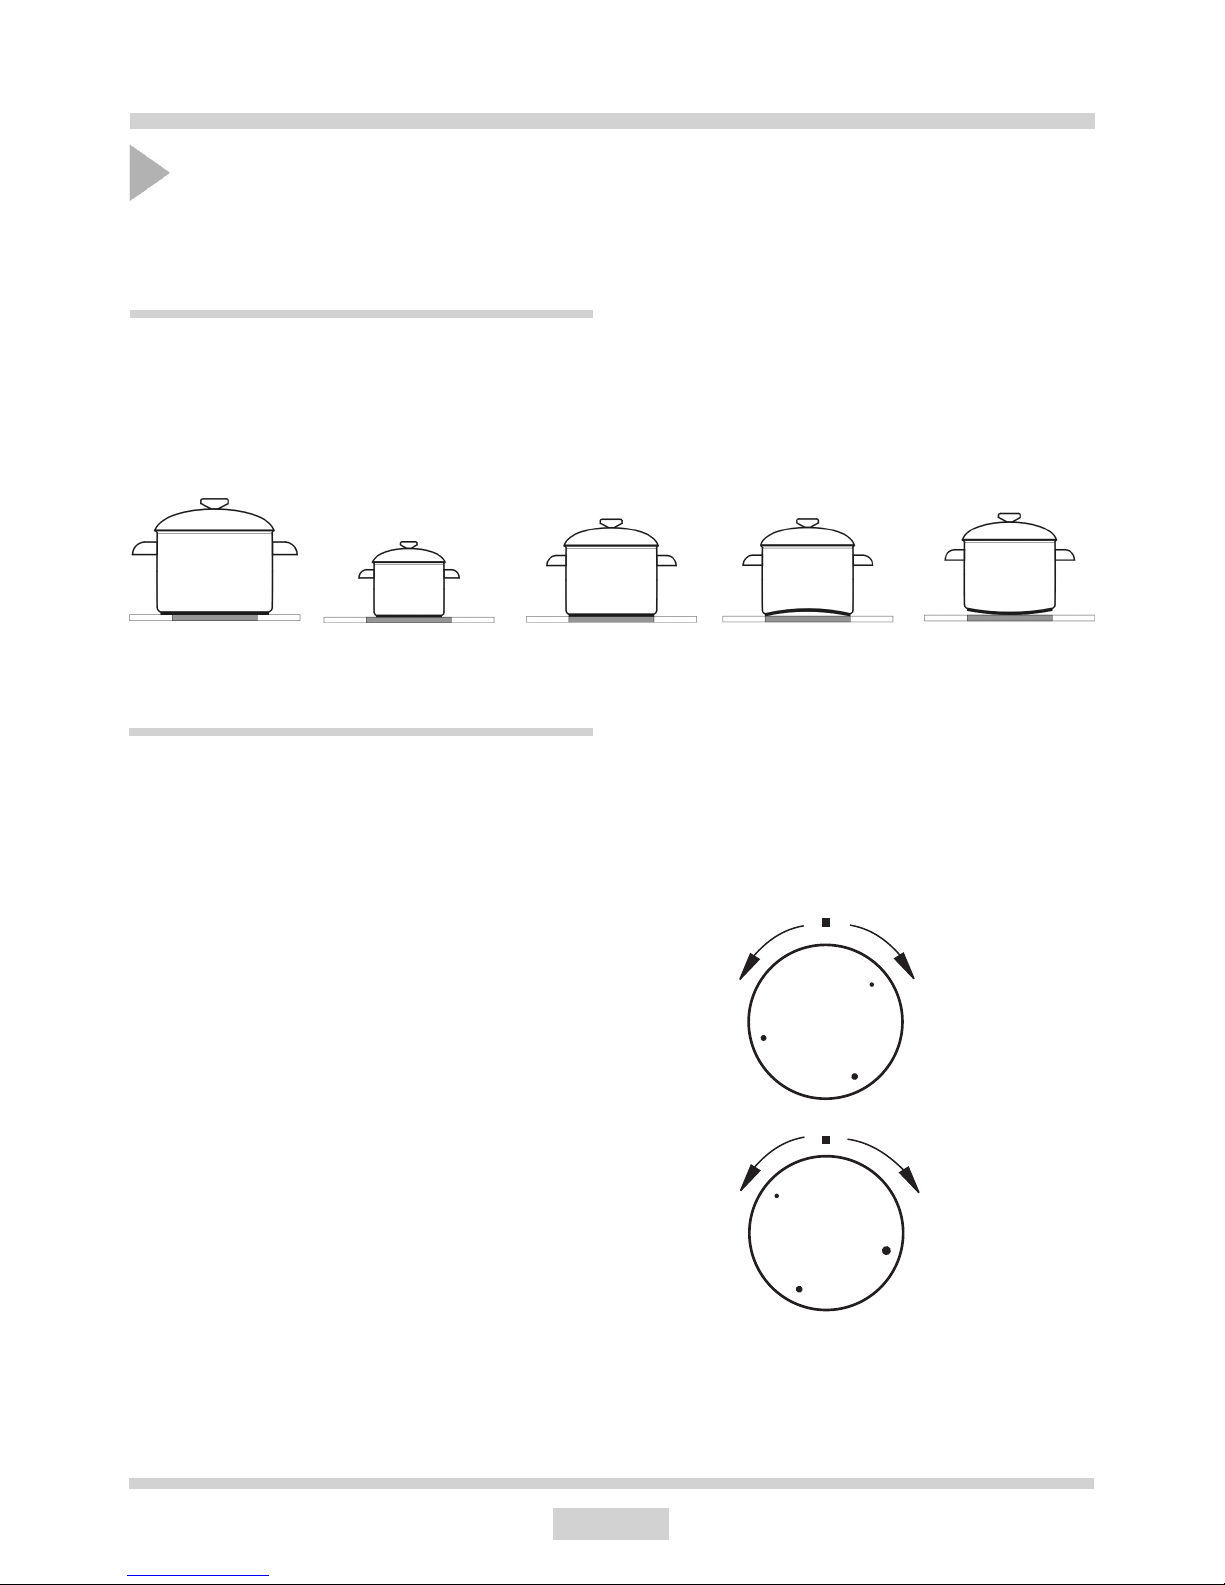
WRONG WRONG WRONG WRONG
RIGHT
OPERATION
Controlling the heating zones of the ceramic hob.
Choice of cookware
Choose a pan with a diameter that is at least as large as the heating zone. For roasting tins
thereisaspecialwidenedheatingzoneof140x250.Do not use pans with a concave or
convex base. Always remember to put a proper cover on the pan. We recommend the use
of pans with thick, even bases.
If the heating zones and pans are solied it is impossible to make full use of the heat.
Heat level selection
The heating zones have different levels of heat. The level of heat can be adjusted gradually
by turning the appropriate knob to the right or left.
0Switch off
MIN. Warming up
1Stewing vegetables, slow cooking
Cooking soups, larger dishes
2Slow frying
Grillingmeat,sh
3MAX. Fast heating up, fast cooking, frying
0
1
2
3
0
1
2
3

17
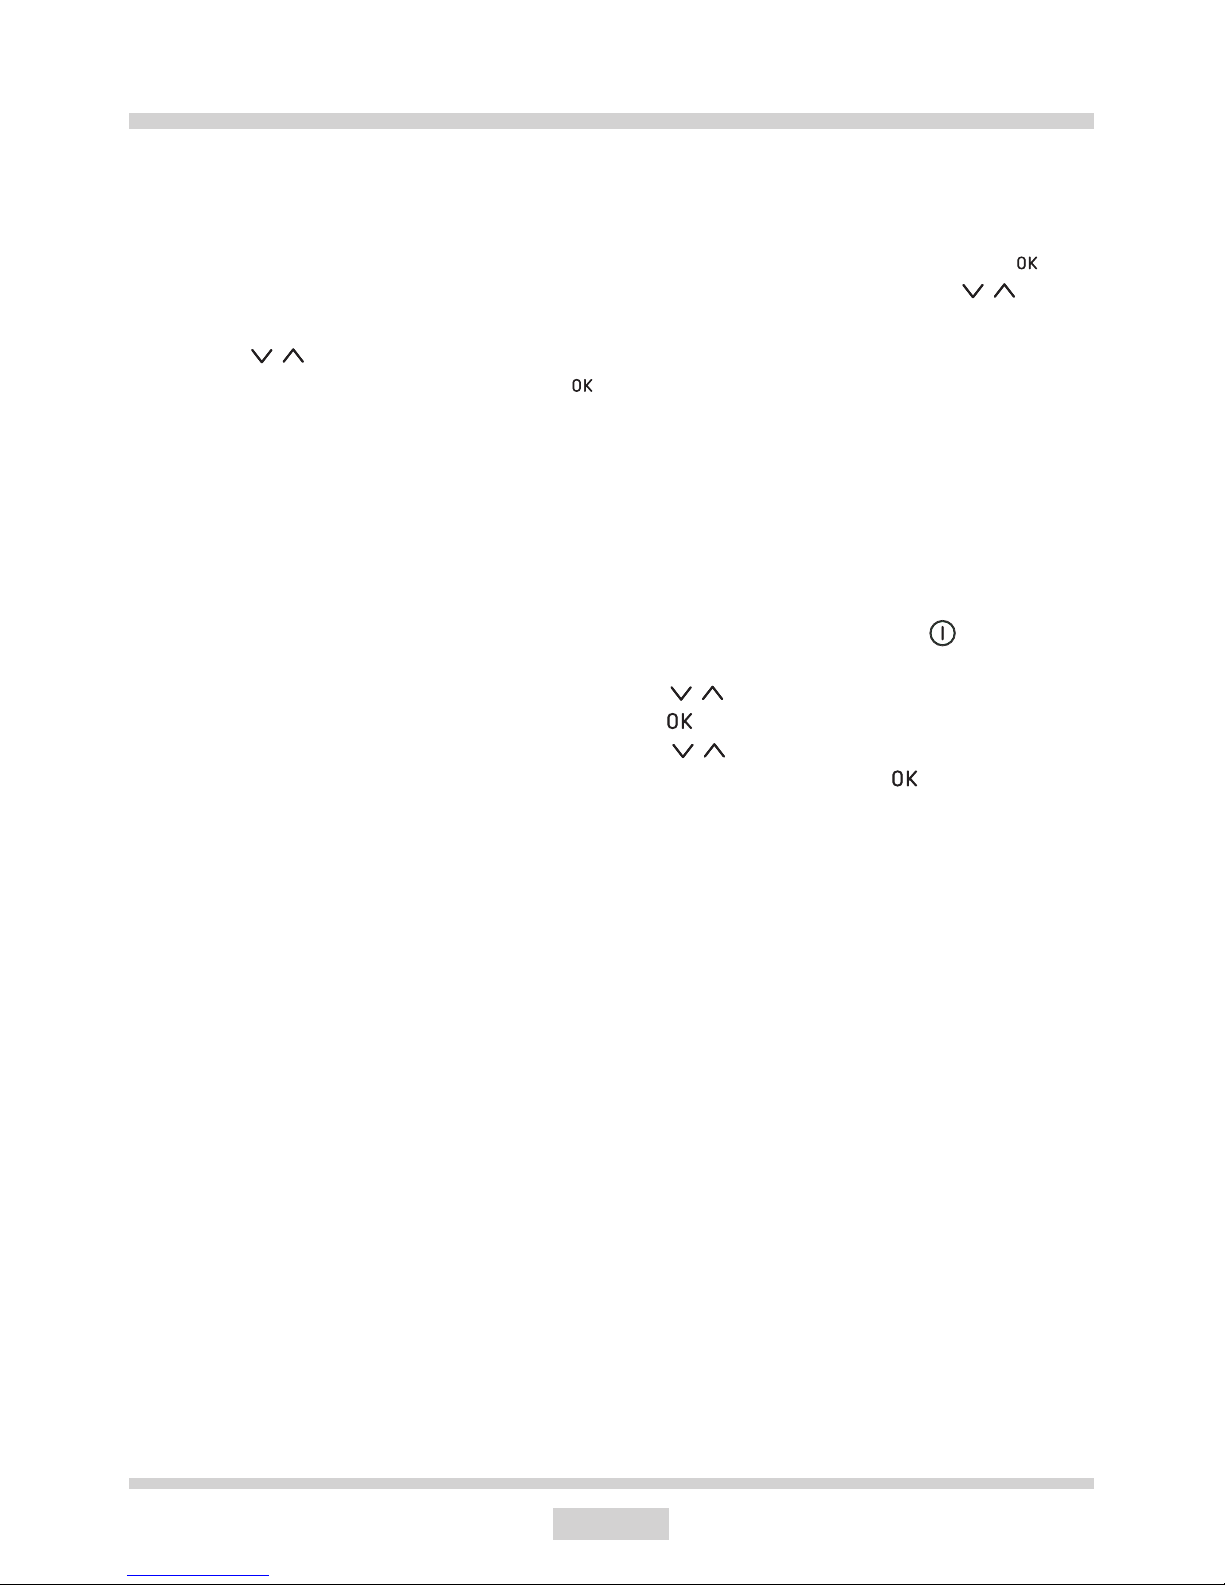
Switching on the wider heating zone
Important!
Only switch on a heating zone by
turning the knob clockwise. Turning
the knob in the opposite direction can
cause damage to the switch.
OPERATION
With the settings 0 1 2 3 the knob
operates the internal heating zone and it is
possible to smoothly control the amount of
heat transferred to a pan. Turning the knob
temporarily to the position marked causes
theexternalheatingzonetobeswitchedon.
From that point, you can smoothly control the
amount of heat trasferred to a pan by both
heatingzones(internalandexternal)asthe
internal switch will switch both zones off only
after the knob is set to position 0.
Zone heating indicator
Ifthetemperatureofaheatingzoneexceeds
50°C this is signalled by an indicator which
lights up for that zone.
When the heating indicator lights up it warns
the person using the cooker against touching
a hot heating zone.
For about 5 to 10 minutes after a heating
zone is switched off it will still have residual
heatthatcanbeused,forexampletowarm
up or keep dishes warm without switching on
another heating zone.
0
1
2
3

18
OPERATION
Function symbols
Electronic programmer operation and
oven control
- time setting sensor
-eld
- temperature
-selectionsensoreld
-standby/menusensoreld
-settingselectionsensoreld
- power cut-off
- temperature adjustment
- end time
- cook time
- Child Lock
Sensor eld functions
19
OPERATION
Switching on the appliance and selecting
language.
After connecting the appliance to the mains,
electronic programmer starts in menu: setup
/ language.
Using the sensor fields search the
contents of the language menu. Touch
sensoreldtoselectthehighlightedlangu-
age in which you want the messages to be
displayed.
When mains power is cut and restored (loss
of power), electronic programmer automa-
tically goes into standby and immediately
displays the current time.
Set current time.
Oncelanguageisselected,conrmthetime
displayed on the display using the sen-
soreldorchangeitusingthe sensor
elds.
Time can be set in the range from 0:00 to
23:59 for 24-hour clock system or from 0:00
to 12:00 for the 12-hour clock system.
When current time is set, electronic program-
mer goes into standby mode in which the
display shows the current time only.
To activate the appliance from standby and
set current time, touch the sensoreld.
When menu is displayed, select “setup” using
the sensoreldsandconrmbytouch-
ing . Upon accessing the “time” menu using
the sensorelds,select“currenttime”
andconrmbytouching .
20
OPERATION
Menu \ Setup
Touch sensoreldtoenterthemenu.Use
sensoreldstoselectthe“setup”menu
andconrmtheselectionbytouching .
The following setup menu items are avail-
able:
- language,
- time
- lighting,
- sound,
- themes,
- brightness,
- service,
- factory settings,
-exit.
Menu
Touch . to activate the appliance from
standby. Use sensoreldstonavigate
the menu.
The following main menu items are avail-
able:
- setup,
- heating functions,
- preset programmes,
- user programmes,
- cleaning,
-exit.
Touch sensor eld to select any menu
item.
If no changes are made within 60 seconds,
the appliance enters standby mode. To im-
mediatelyexitfromthemenuandswitchthe
appliancetostandby mode,selectthe exit
icon and touch .toconrm.Toimmediately
exitfromthemenuandswitchtheappliance
to standby mode simultaneously touch
sensoreldand .
Use .sensoreldstonavigatethemenu.
Touch to select the chosen item.
Toexitfromthesetupmenu,selectexitand
touch toconrm.Toimmediatelyexitfrom
the setup menu and switch the appliance to
standby mode simultaneously touch
sensoreldand .
Menu \ Setup \ Language
Select the required language using the
sensoreldsandconrmselectionbytouch-
ing .
The following language menu items are
available:
- Deutsch,
- English,
- Polski,
-Пopyccки,
-Česky,
- Srbski,
- Lietuviškai,
- Eesti,
- Latviski,
- Français,
- Español,
- Türkçe,
- Svenska,
- Norsk,
- Suomi,
- Dansk,
- Italiano,
-Exit,
Table of contents


