Ei Electronics Ei 225E User manual

Open unit by sliding cover up as shown in figure 1. Then
remove the terminal block cover screw.
What to do when the Alarm sounds:
(1) Open the doors and windows to ventilate.
(2) Turn off the appliance where possible and stop using
the appliance. (The alarm can be silenced immediately by
pushing the test/hush button if the level is below 150ppm CO).
(3) Evacuate the property leaving the doors and windows
open.
(4) Telephone your gas or other fuel supplier on their emer-
gency number; keep the number in a prominent place.
(5) Do not re-enter the property until the alarm has
stopped. (If the alarm has been silenced by pressing the
test/hush button, wait at least 5 minutes so the alarm can
check that the CO has cleared).
(6) Get medical help immediately for anyone suffering the
effects of carbon monoxide poisoning (headache, nau-
sea), and advise that carbon monoxide poisoning is sus-
pected.
(7) Do not use the appliance again until it has been
checked by an expert. In the case of gas appliances this
must be a CORGI registered installer.
When the CO Alarm detects abnormal levels of CO
(above 150ppm CO for 30 minutes) the horn sounds and
the red light starts to flash. At higher levels of CO the
alarm will turn on sooner (see table B).
The CO Alarm will automatically reset within about 4 min-
utes once the CO has cleared. Pressing the test /hush but-
ton resets the CO Alarm immediately if it has sensed
about 150ppm CO (the unit cannot be silenced if the level
is about 350ppm CO). If CO is still present the red alarm
light and horn will turn on again after 4 minutes.
WARNING: The CO Alarm is no substitute for keeping
chimneys and flues clear and in good condition, and all of
your appliances serviced regularly according to the manu-
facturer’s instructions.
Do not fit alarm until all building work is completed to avoid
contamination.
2.1 What is Carbon Monoxide ?
Congratulations on becoming the owner of an Ei Carbon Mon-
oxide Alarm. This will help protect you and your household from
the dangerous effects of carbon monoxide - the silent killer (CO
is the chemical symbol).
Many are killed each year, and many more suffer ill health from
carbon monoxide (CO) poisoning. CO is an invisible, odourless,
tasteless and extremely toxic gas. It is produced by appliances
or vehicles burning fuels, such as coal, oil, natural/bottled gas,
paraffin, wood, petrol, diesel, charcoal etc. CO is absorbed by
red blood cells in the lungs in preference to oxygen - this results
in rapid damage to the heart and brain from oxygen starvation.
High levels of CO in a house can be caused by:
lIncorrectly or poorly installed fuel-burning appliances.
lBlocked or cracked chimneys/flues.
lBlocked vents or draught-proofing which makes areas with
fuel burning appliances or fireplaces airtight.
lEngines of cars, lawnmowers etc. left running in confined
spaces.
lPortable paraffin or gas heaters in badly ventilated rooms.
2.2 Symptoms of Carbon Monoxide Poisoning
Most people know that high levels of CO are harmful, however
the period of exposure is also important.
The following symptoms are related to carbon monoxide poi-
soning and should be discussed with all members of the house-
hold.
Mild Exposure: Slight headache, nausea, vomiting, fatigue (of-
ten described as “flu-like” symptoms).
Medium Exposure: Severe throbbing headache, drowsiness,
confusion, fast heart rate.
Extreme Exposure: Unconsciousness, convulsions, car-
diorespiratory failure, death.
A high level of CO for a short period (e.g. 350 ppm CO for 30
minutes) will cause the same symptoms, a slight headache, as a
lower level for a longer time (e.g. 150 ppm for 90 minutes). Table
A shows how exposure to different concentrations of CO gener-
ally affects people.
Many cases of reported carbon monoxide poisoning indicate
that while victims are aware they are not well, they become so
disorientated they are unable to save themselves by either leav-
ing the building or calling for assistance. Young children and
household pets may be the first affected.
2.3 What happens when your CO Alarm detects Carbon
Monoxide ?
When the Alarm detects dangerous levels of CO, it sounds a
loud alarm and flashes the red alarm light.
4
23
READ THIS FIRST
Carbon Monoxide - The Silent Killer
1.
2.
?
!
?
?
8
35 The maximum allowable concentration for continuous
exposure in any 8-hour period according to OSHA *.
150 Slight headache after 1½ hours.
200 Slight headache, fatigue, dizziness, nausea after 2-3
hours.
400 Frontal headaches within 1-2 hours, life threatening
after 3 hours, also maximum parts per million in flue
gas (on an air free basis) according to US Environ-
mental Protection Agency.
800 Dizziness, nausea and convulsions within 45 minutes.
Unconsciousness within 2 hours. Death within 2-3
hours.
1,600 Headache, dizziness and nausea within 20 minutes.
Death within 1 hour.
3,200 Headache, dizziness and nausea within 5-10 minutes.
Death within 25-30 minutes.
6,400 Headache, dizziness and nausea within 1-2
minutes. Death within 10-15 minutes.
12,800 Death within 1-3 minutes.
ppm s
Inhalation Time (approx)
and Symptoms Developed
Concentration of
CO in Air
Table A: Effects of Cumulative CO Exposure
ppm = parts per million
s* OSHA Occupational Safety &
Health Association
4
TERMINAL
BLOCK
COVER
SCREW PRESS HERE
FIRST AND
SLIDE UP
GAS SENSOR
POSITION
Figure 1
(Cont.)

Table B shows how the built in microprocessor reacts to differ-
ent levels of CO gas and exposure time. At higher levels of
CO the alarm turns on sooner. The rate of flashing of the red
light indicates the level of CO.
If your CO Alarm sounds follow the instructions on page 2.
When ventilation is provided by leaving the windows and doors
open, the CO build up may have dissipated by the time help ar-
rives and the alarm may have stopped sounding. Although your
problem may appear temporarily solved it is crucial that the
source of the CO is determined and appropriate repairs made.
NEVER IGNORE THE ALARM.
Pre-Alarm: When the alarm detects over 50ppm CO the red
light flashes every 5 seconds. This helps locate CO leaks as the
unit gives an indication straight away. (Without this feature the
CO level would need to be at 150ppm CO for up to 30 minutes
for an indication to be given). Note the Pre-Alarm signal may be
triggered by CO coming for example, from cooking with gas,
from car engines or from nearby barbecues. This is usually not a
concern unless the Pre-Alarm signal persists for over an hour
and the CO source is unknown.
NOTE: The CO Alarm may sound if cigarette smoke is blown
into it or aerosols are released nearby.
CO Alarm Memory:
This tells you if the unit has detected CO in your absence and
helps to detect and locate leaks, monitor premises etc.
When the test button is pressed the horn sounds and the indica-
tor lights flash as follows:-
-Red Light is Off if no CO is detected since reset or power-up.
-Slow Flashing Red Light (every 2 seconds) if 150ppm CO
has been detected since power-up.
-Fast Flashing Red Light (every ½ second) if 350ppm CO has
been detected since power-up.
Reset Memory by holding down the test button for over 20 sec-
onds until the red light stops flashing. Cover the horn with a cloth
to muffle the alarm.
3.1 Suitable Locations
Ei Electronics recommends that the advice of the Health &
Safety Exectutive (HSE) UK is followed as this is based on re-
search done at the BRE subsequent to the issuing of the BS
7860 : 1996 standard.
The Health & Safety Executive (HSE) UK, give the following
recommendations for rooms where CO alarms should be lo-
cated - these are in order of priorty:
- In rooms with flueless or open flued appliances
- In rooms where the occupant spends most time
- In bedrooms
British Standard BS7860:1996 gives the following advice:
Ideally you should have a detector in or near every room that
contains a fuel-burning appliance.
However, if you have more than one appliance, but only one de-
tector, you should take the following into consideration when de-
ciding where best to put the detector.
(1) If there is an appliance in the room where you sleep, you
should put the detector in that room.
(2) If there is an appliance in a room that you use a lot, e.g. a sit-
ting room, you should put it in that room.
(3) If you live in a bedsit, put the detector as far away from the
cooking appliances as possible, but near to the place where you
sleep.
(4) If the appliance is in a room not normally used (e.g. a boiler
room), put the detector just outside the room so that you will be
able to hear the alarm more easily.
Ideally you should have a detector in or near every room that
contains a fuel-burning appliance.
3.2 Unsuitable Locations
Do not place the CO Alarm in any of the following areas.
(1) Within 1.85 metres (6 feet) of the appliance.
(2) Outside the building.
(3) In or below a cupboard.
(4) In a damp or humid area.
(5) Directly above a sink or cooker.
(6) Next to a door or window or anywhere that it would be af-
fected by draughts.
(7) Where it would be obstructed by curtains or furniture.
(8) In an area where the temperature could drop below -5 °Cor
rise above 40 °C.
(9) Where dirt or dust could block the sensor and stop it working.
(10) Where it could be easily knocked or damaged, or where it
could be accidently turned off or removed.
(11) In a bathroom or where the CO alarm may be exposed to
water splashes or condensation (e.g. above an electric kettle).
(12) Near paint, thinners, solvent fumes or air fresheners.
3.3 Installation
The HSE, UK gives more detailed recommendations as follows:
If locating the CO Alarm in a room with an appliance:
- the alarm should be located between 1m and 3m horizontally
from the appliance. (To comply with both BS & HSE advice lo-
cate between 1.85 and 3.0m from appliance).
- the alarm should be located preferably on the ceiling. Ceiling
mounted detectors should be at least 300mm from any wall.
- if placed on a wall the CO Alarm should be as high as possible
(higher than doors and windows) but not within 150mm of the
ceiling.
If locating the CO Alarm in a room remote from the appli-
ance:
7
56
Where to place CO Alarms3.
Figure 2
Bedroom*
Kitchen*
Sitting
Room*
*If they contain or are near a fuel-burning appliance
CO Level
ppm
Horn on
within
Red
Alarm Light Status
Stand-by
Off
0
150 Flashes every 2 sec
30 min Alarm
Alarm
6 min Flashes every ½ sec
350
Off
Table B: CO Alarm Response
Slight Headache
*
50 Flashes every 5 sec
Off Pre-Alarm

- the alarm should be located at a level similar to the breathing
zone of the occupant (typically in the living rooms at 1.5 to 2.0m
above floor level and in bedrooms at the height of the bed).
The BS 7860 : 1996 standard recommends that the CO Alarm
should be at least 1.5 metres (5 ft) above floor level. (see fig.3A)
and also the detector should be at least 1.85 metres (6 ft) from
the appliance.
Warnings:
(1) The CO alarm should be installed by a qualified electrican in
accordance with the IEE wiring regulations (BS 7671). Fail-
ure to install this alarm correctly may expose the user to
shock or fire hazards.
(2) Do not use the CO Alarm on an intermittent basis, or as a
portable detector for the spillage of combustion products
from fuel-burning appliances or chimneys.
Precaution: Do not install the actual alarm itself in new or reno-
vated buildings until all work is completed, including painting,
and the building has been fully cleaned. Wiring can be installed
when appropriate. (Excessive fumes from paints, solvents,
cleaning agents etc. may damage the sensor).
Procedure:
1. Select a location complying with the above advice.
2. Disconnect the AC mains supply from the circuit to be used.
3. Slide off the cover as shown in figure 1. Press gently in the
centre to release the catches before sliding upwards.
4. Remove the terminal cover screw and expose the connecting
terminals.
5. (a) If the wires are coming directly out from the ceiling/wall lo-
cate the wire entry slot over the wire and mark the two screw lo-
cations. Screw the unit to the ceiling/wall (ensure screws do not
penetrate buried wires. The unit can also be screwed on to a
standard recessed junction box if required. Seal the wire exit
holes to prevent air draughts preventing the carbon monoxide
from reaching the sensor.
(b) If surface wiring is being used bring the wiring in from either
of the vertical sides or the bottom as shown in figure 4. Note sur-
face wiring cannot be brought in from the top as it would be in the
way of the cover sliding off and also might allow water to pene-
trate. Screw the unit to the wall.
6. The Brown wire (terminal 3) must be connected to the house wir-
ing coloured red or brown or to a house terminal marked “L”.
The Blue wire (terminal 4) must be connected to the house wiring
coloured black or blue or to a house terminal marked “N”.
The alarm does not need to be earthed, however for convenience a
spare terminal (no. 5) is provided to hold an earth wire if present.
(1) Regularly check that the green mains power light is on - the
unit cannot detect CO if the mains power is not on (if it is off
check circuit breakers, fuses, wiring etc.).
(2) Test the unit weekly by pressing the test/hush button. Hold
the test button for 5 seconds until the horn sounds for over 5
seconds. This will help to familiarise you and your family with
the distinctive on-off sound of the CO Alarm. This test checks
that the electronics and the horn are working correctly.
(3) If the CO Alarm gives a short beep and the amber fault light
flashes every 45 seconds it means the self-checking circuitry
may have detected a fault. Press and hold the test / hush but-
ton until the horn sounds and it resets the unit. If the beeping
starts again the Alarm is defective.
(4) If the Alarm fails to operate when the test/hush button is
pressed, disconnect the mains supply at the distribution fuse
board for 3 minutes, re-connect the mains and try again.
(This procedure resets the microprocessor in the unit).
If the CO Alarm fails any of the above tests it must be replaced
immediately (see section 9“ Getting the CO Alarm Serviced”).
The CO Alarm is fully operational and will provide protection
against a build up of carbon monoxide gas after it is connected
to the mains supply for 2 minutes.
Testing with Carbon Monoxide
It is recommended that the alarm is tested with actual carbon
monoxide annually. Pressing the test button causes the unit to
check for CO 4 seconds later - this is the Fast CO Test Mode.
This eliminates the long waiting normally required e.g. up to 30
minutes at 150ppm CO and up to 6 minutes at 350ppm CO.
The unit can be tested with CO by using one of the kits that co-
mes with CO either in a glass phial or aerosol can. Follow the in-
structions on the kit but be sure to press the test button to speed
up the CO sampling directly after you expose the unit to the CO.
It is best if possible to inject the CO gas into the gas entry holes
next to the sensor (see figure 1). When it senses the CO it will
give 3 beeps and the red light will flash as per table B. It then re-
sets to normal mode. (If the unit fails to respond press test but-
ton again as gas can take some seconds to enter sensor).
The Fast CO Test Mode normally does not activate the memory
function. (This can be checked by pressing the test button. If the
red light flashes continuously indicating CO was detected, hold
the test button for 20 seconds until the red light stops flashing as
the memory resets).
10
8
4. Testing your CO Alarm
Locations for
Surface Wiring
Not Suitable Figure 4
Conduit
1.85m (min)
1.5m (min)
Figure 3A: BS 7860 : 1996 recommendation
A
s
h
ig
h
as possi
bl
e
but not closer
than 150mm
300mm
from walls
Ceiling
Mounting
Wall
Mounting
1to3m
HSE recommended locations for rooms with an appliance
Ceilin
g
mountin
g
preferable
1to3m
345
LIVE
BROW
N
NEUTRAL
BLUE
EARTH
(IF PRESENT)
9
Figure 5
Figure 3

How to distinguish between CO Alarm and Smoke
Alarm warnings
The CO Alarm has a distinctive on-off sound of 3 pulses, fol-
lowed by a pause as compared with a typical Smoke Alarm
which has a rapid pulsing sound.
In addition, when your CO Alarm is sounding the red alarm light
in the centre of the cover will be flashing.
Testing both your CO Alarms and Smoke Alarms weekly will
help you and your family to clearly distinguish between them in
an emergency.
Clean the outside case by occasionally wiping with a clean
damp cloth (disconnect the mains supply at the distribution /
fuse board first). Do not use any cleaning agents, bleaches, de-
tergents or polishes, including those in aerosol cans. Avoid
spraying air fresheners, hair spray, paint or other aerosols near
the CO Alarm. Do not place air fresheners near the unit.
Use the narrow nozzle of a vacuum cleaner to remove fluff and
other contamination from the cover slots to ensure CO gas can
reach the sensor.
Caution: Do not paint the CO Alarm.
Remove the CO Alarm when decorating. Do not allow water or
dust to contaminate the alarm (see below).
Warning: Do not open or tamper with the CO Alarm. There are
no user serviceable parts inside. This can damage the unit and
may expose the user to shock or fire hazards.
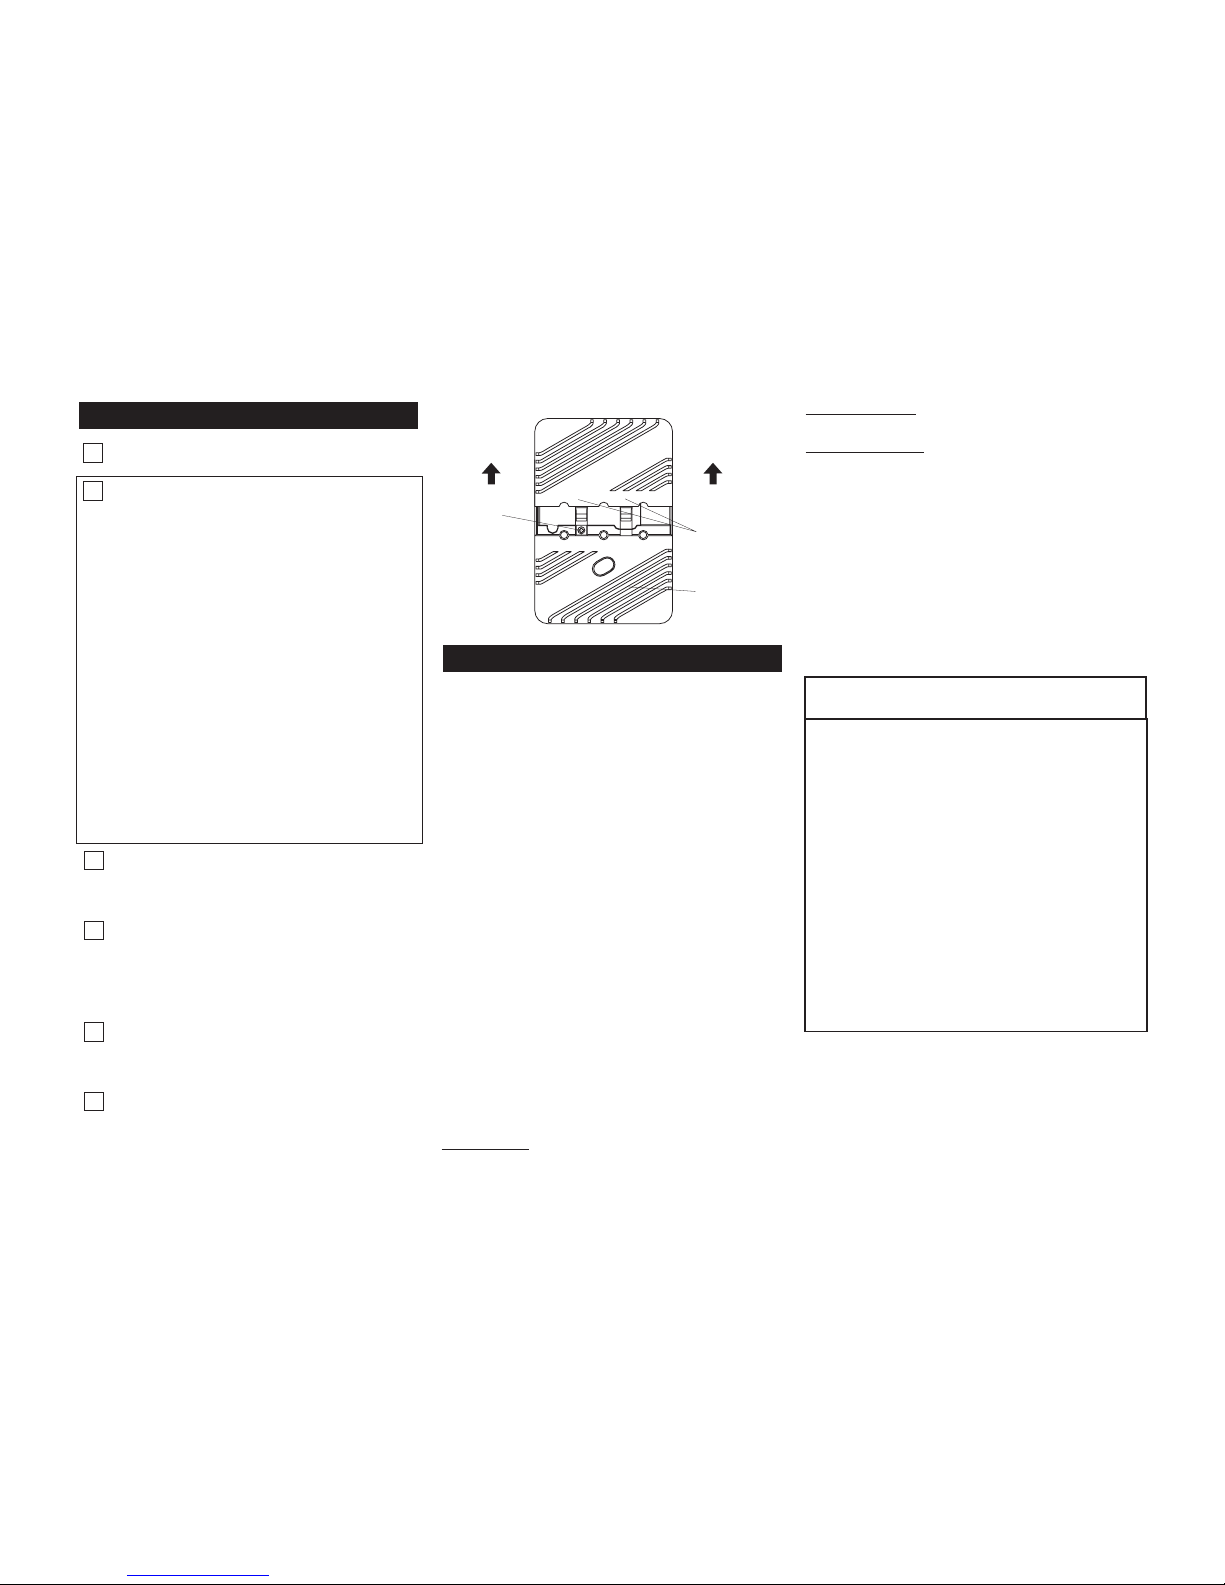
How to disconnect and remove the alarm:
1. First disconnect the mains supply to the CO Alarm circuit at
the distribution / fuse board.
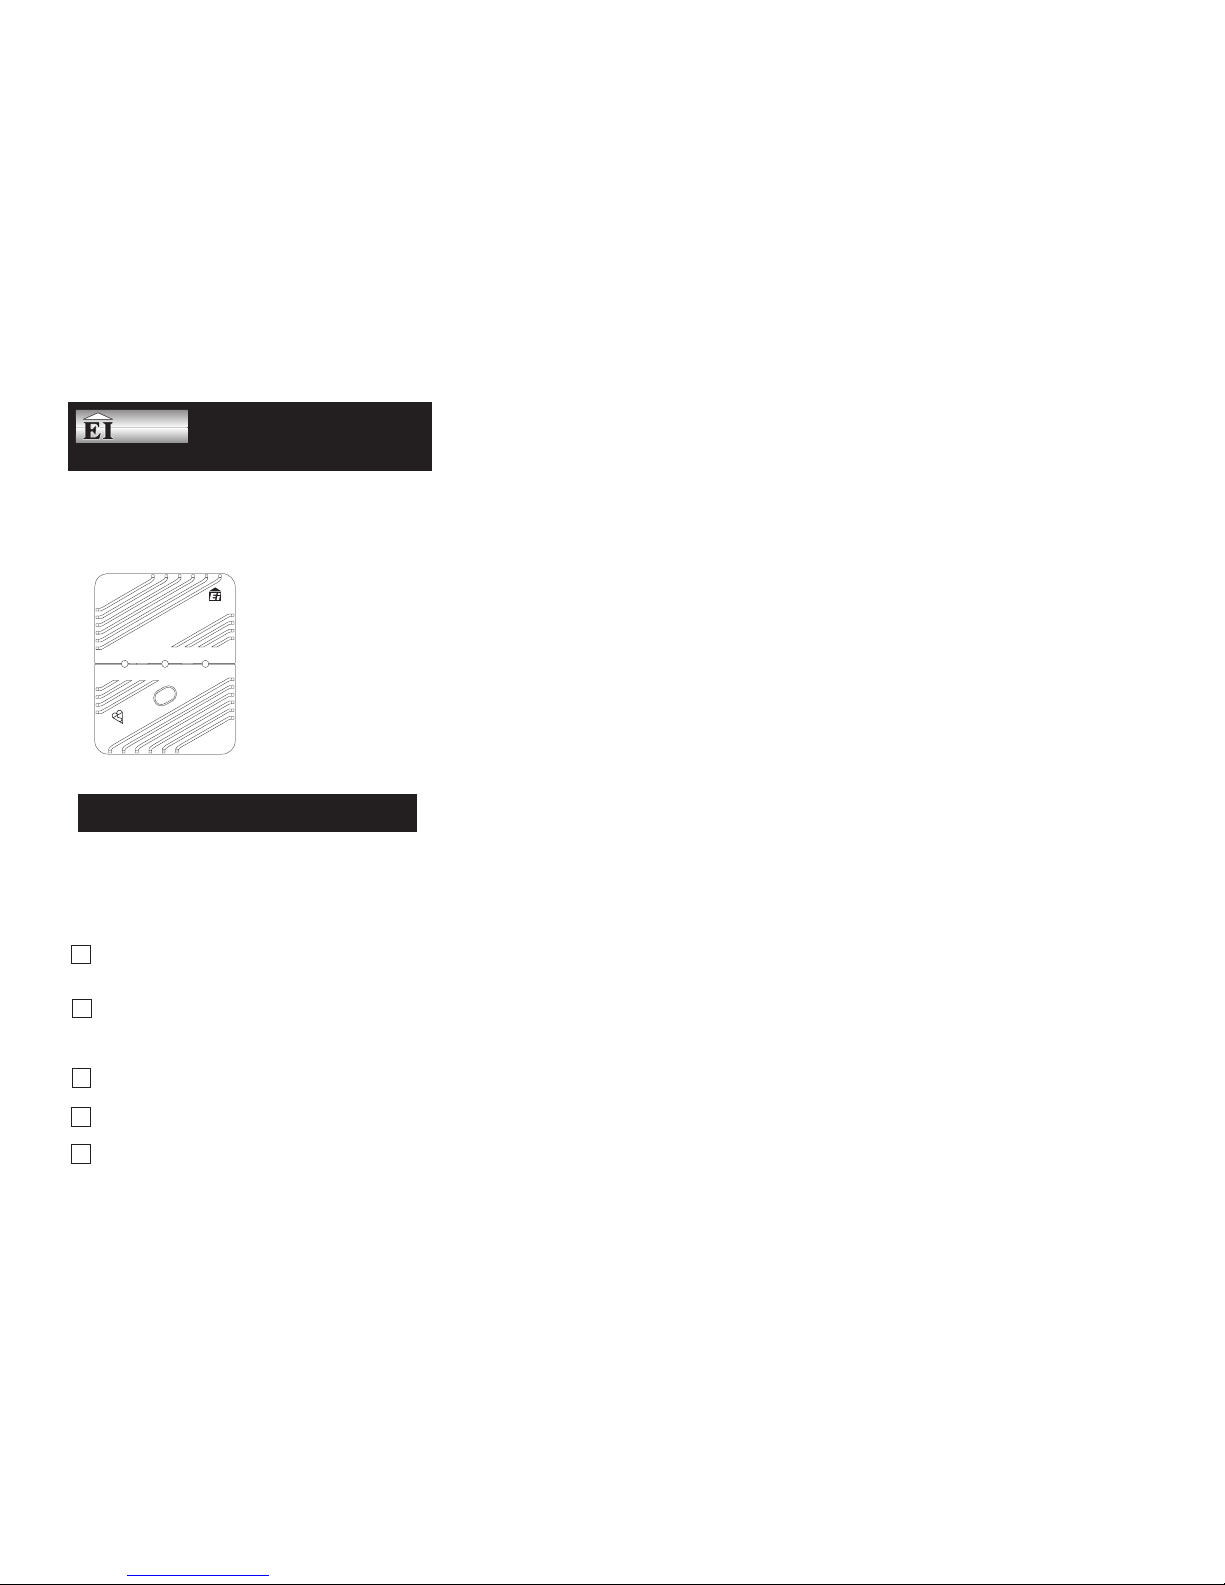
2. Slide cover up as shown in figure 1.
3. Unscrew the terminal cover screw.
4. Disconnect the wires from the terminal block and make safe,
particularly if the circuit is going to be turned on again after
the CO Alarm is removed.
5. Unscrew from the wall.
(1) The Ei 225E CO Alarm will not work without mains power -
the green power light must be on at all times.
(2) Carbon monoxide must enter the unit for it to be detected.
There may be carbon monoxide in other areas of the house
(e.g. downstairs, in a closed room etc.) but not in the vicinity
of the CO Alarm. Doors, air draughts and obstructions can
prevent the CO reaching the Alarm. For these reasons we
recommend CO Alarms are fitted both near and in bedrooms,
particularly if bedroom doors are closed at night. Additionally
in rooms where members of the household spend much of
their time, and in rooms with potential sources of CO gas.
(3) The CO Alarm may not be heard. The sound output is loud,
but it may not be heard behind a closed door or if it is too far
away. The Alarm may not wake up somebody who has taken
alcohol or drugs. The alarm sound may be masked by other
sounds such as a T.V., stereo, traffic noise etc. Fitting CO
Alarms on either side of closed doors will improve their
chance of being heard. This CO Alarm is not designed for
people with impaired hearing.
(4) CO Alarms don’t last indefinitely. CO Alarms are sophisti-
cated electronic devices with many parts. Although the
alarm and its component parts have undergone stringent
tests, and are designed to be very reliable, it is possible that
parts can fail. Therefore, you should test your CO Alarm
weekly. We recommend that the CO Alarm is replaced after
5 years operation. Check the “replace unit by date” on the
outside of the unit.
(5) CO Alarms are not a substitute for life insurance. House-
holders are responsible for their own insurance. The CO
Alarm warns of increasing CO levels, but we do not guaran-
tee that this will protect everyone from CO poisoning.
(6) CO Alarms are not suitable as early warning Smoke Alarms.
Fire produces carbon monoxide, but the response charac-
teristics of these CO Alarms are such that they would not
give sufficient warning of fire.
Smoke Alarms must be fitted to give early warning of fire.
(7) The CO Alarm does not detect the presence of natural gas
(methane), bottled gas (propane, butane) or other combus-
tible gases. Fit combustion gas alarms to detect these.
(8) WARNING: APPARATUS CONFORMING TO THE BS
7860 : 1996 STANDARD MAY NOT PROTECT PEOPLE
WHO ARE AT SPECIAL RISK FROM CARBON MONOX-
IDE EXPOSURE BY REASON OF AGE, PREGNANCY OR
MEDICAL CONDITION. IF IN DOUBT, CONSULT YOUR
MEDICAL PRACTITIONER.
A CARBON MONOXIDE DETECTOR IS NOT A SUBSTI-
TUTE FOR A SMOKE ALARM OR A COMBUSTIBLE GAS
DETECTOR.
Follow these guidelines to reduce the risk of carbon monoxide
poisoning.
(1) Know and look out for tell-tale signs that carbon monoxide
may be present. These include:
- The CO Alarm warning of abnormal levels.
- Staining, sooting or discolouration on or around appliances.
- A pilot light frequently going out.
- A strange smell when an appliance is working.
- A naked gas flame which is yellow or orange, instead of the
normal blue.
- Family members (including pets) exhibiting the “flu-like”
symptoms of CO poisoning described above.
If any of these signs are present get the appliance checked out
by an expert before further use. If family members are ill get
medical help.
(2) Choose all appliances and vehicles which burn fossil fuels
such as coal, oil, natural/bottled gas, paraffin, wood, petrol, die-
sel, charcoal etc. with care, and have them professionally in-
stalled and regularly maintained.
(3) These appliances must “breathe in” air to burn the fuel prop-
erly. Know where the air comes from, and ensure vents/air
bricks etc. remain unobstructed (particularly after building
work).
(4) The appliances must also “breathe out” the waste gases (in-
cluding the CO) - usually through a flue or chimney. Ensure
chimneys and flues are not blocked or leaking, and get them
checked every year. Check for excessive rust or cracks on ap-
pliances and pipework.
(5) Never leave your car, motor bike or lawnmower engine run-
ning in the garage with the garage door closed. Never leave the
door from the house to the garage open if the car is running.
(6) Never adjust your own gas pilot lights.
(7) Never use a gas cooker or a barbecue for home heating.
(8) Children should be warned of the dangers of CO poisoning
and instructed never to touch, or interfere with the CO Alarm. Do
not allow small children to press the test/hush button as they
could be subjected to excessive noise when the unit alarms.
(9) Leaving windows or doors slightly open (even a few inches)
will significantly reduce the risk of high levels of CO occurring.
The high levels of draught-proofing in modern houses reduces
ventilation and allows dangerous gases to build up.
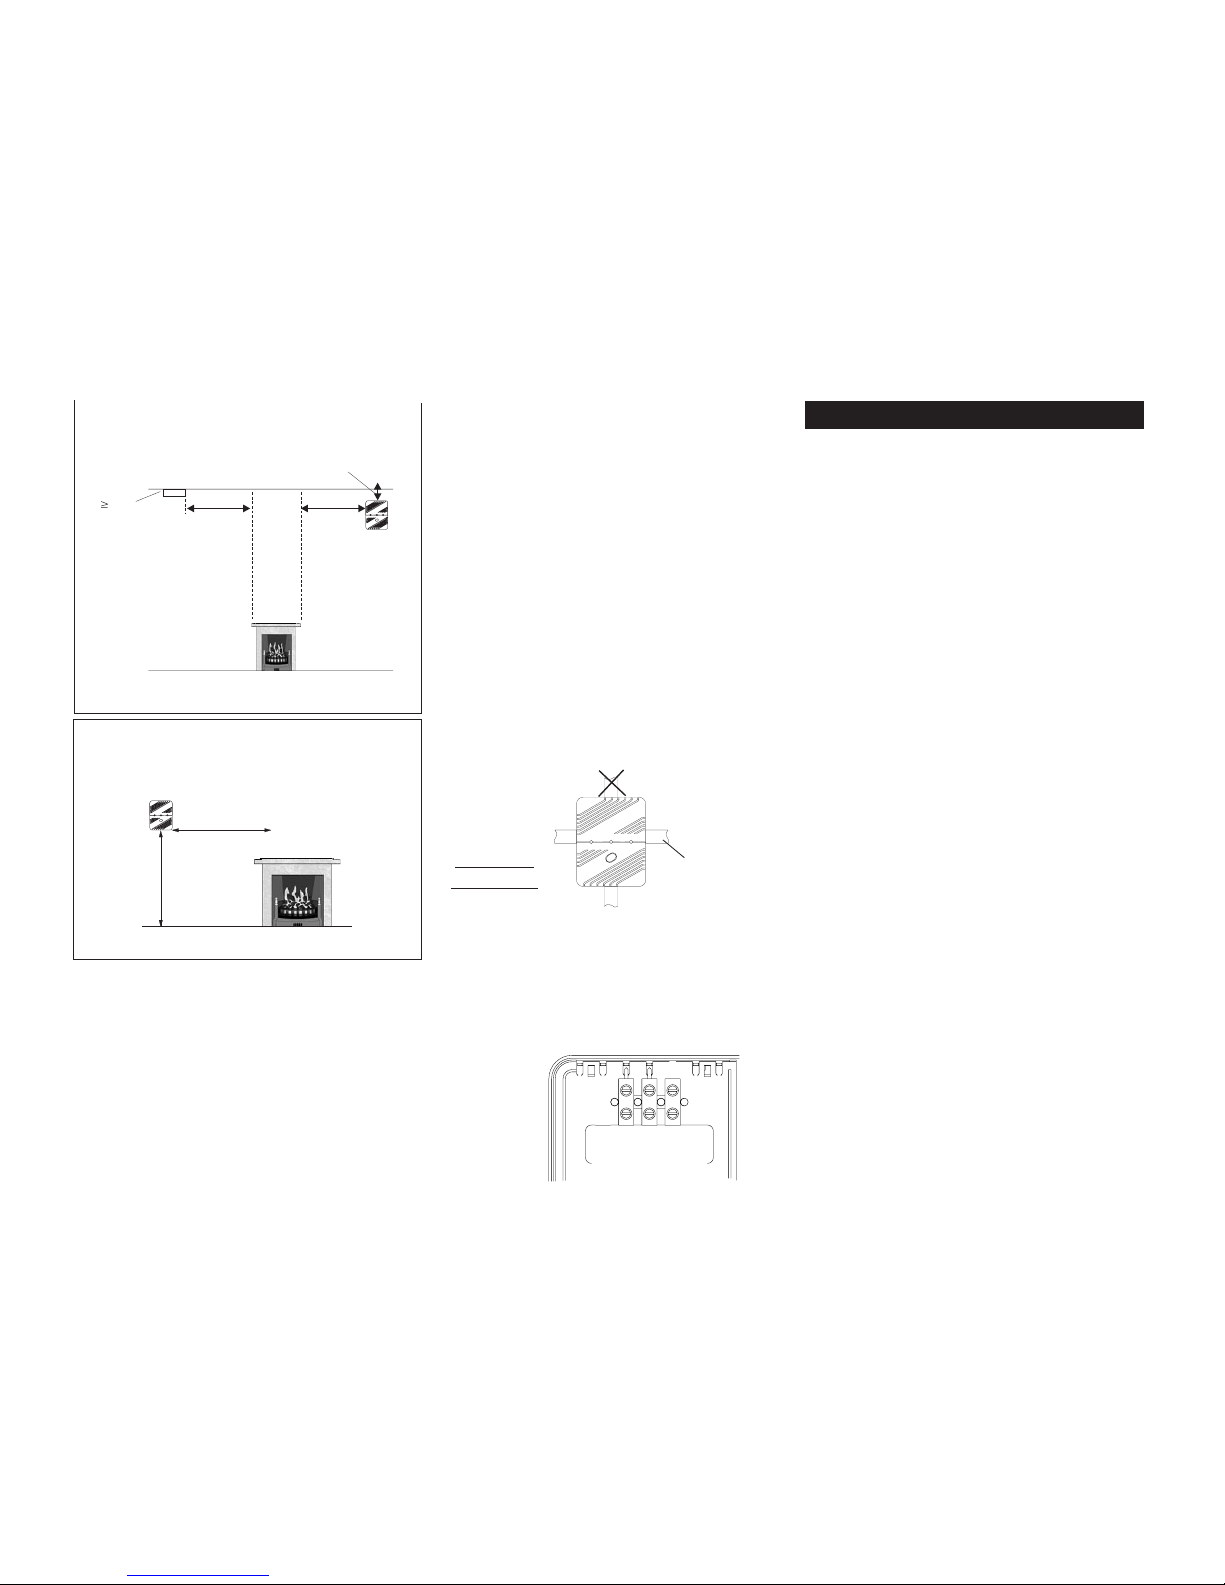
7. How to Protect your Family
11 12 13
6. Limitations of CO Alarms
Maintaining Your CO Alarm
5.

(10) Install CO Alarms in all areas recommended in this leaflet.
(11) Recognise that CO poisoning may be the cause when fam-
ily members suffer from “flu-like” symptoms when at home but
feel better when they are away for extended periods.
Operating Voltage : 230±10% V~, 50Hz
Power : 1 Watt (50mA)
Power on Indicator : Green light on.
Sensor : Electrochemical CO Sensor (Filter on sensor enhances selectivity)
CO Sensitivity : Meets or exceeds the CO sensitivity specifications in BS
7860:1996
At over 50ppm CO the red light flashes every 5 seconds (Pre-Alarm).
At 150 ppm CO, responds between 10 and 30 minutes, red light flashes every
2 seconds and horn sounds.
At 350 ppm CO, in less than 6 minutes red light flashes every 0.5 seconds and
horn sounds.
Electrical Safety : Complies with BS 7860 : 1996
Electromagnetic Compatibility : Complies with BS EN 50081-1 : 1992 and
BS EN 50082-1 : 1992.
Test/Hush Button: Checks electronics and horn. When the unit is alarming,
after sensing CO, pressing the test/hush button will immediately stop the horn
(the red light will continue to flash). If CO is still present the red light and the
horn will turn on again after about 4 minutes. The unit can only be silenced
once. At 350 ppm CO the unit cannot be silenced.
Fast CO Test Mode: Pressing the test button also causes the unit to check for
CO immediately. This facilitates testing with actual CO. If CO is sensed it
gives 3 beeps and the red light flashes, about 4 seconds later. It then resets.
Initialisation Time:20 seconds. On power up red and amber lights flash once
Operating Temperature :-5°Cto40°C (23°Fto104°F)
Humidity Range : 15% to 95% R.H. (non-condensing)
Audible Alarm : 85dB(A) at 3m (10ft) minimum
Self Diagnostics : Horn beep and amber fault light flashes every 45 seconds
if a fault is found.
Tamperproof : Screwdriver needed to unscrew mains cover over terminal
block, and to remove unit from wall.
Dimensions : 135mm X 105mm X 71mm (195 grams)
If your CO Alarm fails to work after you have carefully read all the
instructions, checked the unit has been installed correctly, and
is receiving AC power - see “How to disconnect and remove the
Alarm” in section 5, return it for repair or replacement. This
should be to where it was purchased, or alternatively return it in
a padded box to “Customer Assistance and Information” at the
nearest address given on the CO Alarm or in this leaflet. State
the nature of the fault, where the CO Alarm was purchased, and the
date of purchase.
Ei Electronics guarantees this Carbon Monoxide Alarm for five years from date of pur-
chase against any defects that are due to faulty materials or workmanship. This guarantee
only applies to normal conditions of use and service, and does not include damage result-
ing from accident, neglect, misuse, unauthorised dismantling, or contamination howsoever
caused. This guarantee excludes incidental and consequential damage. If this Carbon
Monoxide Alarm should become defective within the guarantee period, it must be returned
to where it was purchased or alternatively to Ei Electronics , carefully packaged, with the
problem clearly stated. (see section 9 “Getting the CO Alarm Serviced”) along with proof of
the date of purchase. We shall at our discretion repair or replace the faulty unit.
Do not interfere with the carbon monoxide Alarm or attempt to tamper with it. This will in-
validate the guarantee, but more importantly may expose the user to shock or fire hazards.
This guarantee is in addition to your statutory rights as a consumer.
Ei Electronics . Shannon, Co.Clare, Ireland.
Tel: (061) 471277 Fax: (061) 471053 - www.eielectronics.com
Aico Ltd. Mile End Business Park, Maesbury Rd, Oswestry, Shropshire
SY10 8NN, U.K. Tel: (01691) 657466 Fax: (01691) 662933
www.aico.co.uk
1. ALARM DOES NOT WORK WITH THE TEST BUTTON:
(1) Check that the green mains power light is on. If it is off check
the wiring, fuse, circuit breakers etc.
(2) Hold the test button down for at least 5 seconds.
2. ALARM BEEPS AND AMBER LIGHT FLASHES EVERY 45
SECONDS:
If the alarm beeps and the amber fault light flashes every 45 sec-
onds, the CO sensor is possibly defective. Press the test/hush
button to reset the unit. If the beeping and the amber light flash-
ing re-occurs after 5 minutes, the unit is defective.
3. ALARM SOUNDS FOR NO APPARENT REASON:
Follow the detailed instructions on the top of page 2. entitled
“What to do when the alarm sounds”.
(1) Ensure there are no fuel burning appliances in the vicinity
which could be leaking CO gas (e.g. even from next door).
(2) Ensure there are no fumes in the area (e.g. paint, thinners,
hair spray, chemical cleaners aerosol sprays etc).
(3) Ensure there is no outdoor source of CO in the vicinity (e.g. a
car with engine running, heavy traffic, heavy air pollution,
barbecue fumes etc).
(4) Press the test/hush button to silence the alarm.
If the unit continues to sound it is possibly defective and should
be replaced, follow the instructions in section 5 on “How to dis-
connect and remove your alarm” and then see section 9 “Get-
ting the CO Alarm Serviced”.
10. Five Year Guarantee
9. Getting the CO Alarm Serviced 11. TROUBLE SHOOTING
15 16
14
8. Technical Information

Professional ®
Read and retain carefully for as long as the product is being used. It contains
vital information on the operation and installation. The leaflet should be re-
garded as part of the product.
If you are just installing the unit, the leaflet must be given to the householder.
The leaflet is to be given to any subsequent user.
TEST &HUSH
BS7860 : 1996
MODEL: Ei225E
CARBON
MONOXIDE
ALARM
ALARM
FAULT
MAINS
POWER
MODEL Ei 225E
WARNINGS
The Alarm should be permanently wired to the mains by a qualified
electrician in accordance with IEE wiring regulations.
Do not locate the CO Alarm where it could be exposed to dripping,
splashing or condensation (e.g. bathroom, above an electric kettle
etc).
Install the Carbon Monoxide Alarm (CO Alarm) in or near every room
that contains a fuel burning appliance, particularly rooms where you
spend a lot of time e.g. bedrooms, kitchens, sitting rooms.
Install preferably on the ceiling (300mm from walls) in rooms with an
appliance. Install between 1.85m to 3m horizontally from appliance.
In rooms remote from the appliance install about 1½ to 2m above floor
level at breath level.
Regularly check that the green power light is on. Important: The CO
Alarm will not work if the mains supply is off.
Test the unit weekly by pressing the test/hush button. The horn will
sound.
Immediately the unit is powered the red & amber lights will flash once
to show they are operational.
4
?
4
4
4
READ THIS FIRST
1.
Ref No. B14689 Rev 0
(1)
(2)
(Cont.Ù
© Ei Electronics 2002
Instruction Leaflet
MAINS POWERED
CARBON MONOXIDE ALARMS
Table of contents
Other Ei Electronics Carbon Monoxide Alarm manuals

Ei Electronics
Ei Electronics Ei 261DEN User manual

Ei Electronics
Ei Electronics Carbon Monoxide Alarm Ei220EN User manual

Ei Electronics
Ei Electronics Carbon Monoxide Alarm Ei 225EN User manual

Ei Electronics
Ei Electronics Ei207/208 Series User manual

Ei Electronics
Ei Electronics Ei 261D Manual

Ei Electronics
Ei Electronics Ei207 Series User manual

Ei Electronics
Ei Electronics Carbon Monoxide Alarm Ei206D User manual

Ei Electronics
Ei Electronics Ei204 User manual

Ei Electronics
Ei Electronics Carbon Monoxide Alarm Ei220EN User manual

Ei Electronics
Ei Electronics Ei 220E User manual