Ei Electronics Ei208 Series User manual

Instructions
Read and retain carefully for as long as the product is being used. It contains vital information on the operation and installation
of your Alarm. The leaflet should be regarded as part of the product.
If you are just installing the Alarm, the leaflet must be given to the householder. The leaflet is to be given to any subsequent
user.
Ei207 / Ei208 Carbon Monoxide Alarm Series
Battery Powered
Carbon Monoxide Alarms
Ei207/208 Series

Model
Ei207
2xAAA Replaceable Batteries
Model Chart
Long Life Battery Built-in
Ei207D
No
No
RF
Capability
No
No
RF Module
Supplied
No
Yes
LCD
Display
Model
Ei208W
Ei208WRF
Yes
Yes
RF
Capability
No
Yes
RF Module
Supplied
No
No
Ei208DW
Ei208DWRF
Yes
Yes No
Yes
Yes
Yes
LCD
Display

3
2. Location & Positioning
1. Read This First ...................................................................
2. Carbon Monoxide Ð The Silent Killer ..................................
3. Where to Place CO Alarms ................................................
4. Installation ..........................................................................
5. Testing and Monitoring Your CO Alarm ...............................
6. What to do when the alarm sounds ....................................
7. Maintenance .......................................................................
8. Limitations of CO Alarms ....................................................
9. How to Protect your Family .................................................
10. Technical Specification ........................................................
11. Getting the CO Alarm Serviced ...........................................
12. Guarantees .........................................................................
13. Troubleshooting ..................................................................
14. LCD Display Symbols .........................................................
15. Indicators Summary ............................................................
16. Contact Us ..........................................................................
Table of Contents
4
5
10
15
17
19
20
21
23
25
27
27
28
29
30
31
page

1. Read This First
• Congratulations on becoming the owner of an Ei Carbon Monoxide Alarm. This
will help protect you and your household from the dangerous effects of Carbon
Monoxide- the silent killer.
• The Carbon Monoxide Alarm (CO Alarm) is powered up by carefully rotating it
onto the mounting plate which activates the on/off switch. The red, amber &
green lights will immediately flash in sequence to show they are working. (For the
Display models, the LCD screen will display all icons). Then wait 15 seconds after
connecting the power before button testing.
• Install a CO Alarm in every room that contains a fuel burning appliance,
particularly rooms where people spend a lot of time e.g. bedrooms, kitchens and
sitting rooms.
• In rooms with an appliance, install (preferably) on the ceiling, (300mm from walls)
and between 1m to 3m horizontally from appliance. In rooms remote from the
appliance install at Ô head heightÕ, where the light indicators can be seen.
• Test the Alarm weekly by pressing the test/hush button, the horn will sound (at
a diminished sound output level initially and then quickly reach maximum sound
output level).
• Replace Alarm after approx 6 years operation (see ‘Replace by’ date on side wall
label).
• Do not fit Alarm until all building work is completed to avoid contamination.
4

2. Carbon Monoxide Ð The Silent Killer
2.1 What is Carbon Monoxide ?
Many people are killed each year, and many more suffer ill health from
Carbon Monoxide (CO) poisoning. CO is an invisible, odourless, tasteless and
extremely toxic gas. It is produced by appliances and vehicles burning fuels,
such as coal, oil, natural/bottled gas, paraffin, wood, petrol, diesel, charcoal
etc. CO is absorbed by red blood cells in the lungs in preference to oxygen
- this results in rapid damage to the heart and brain from oxygen starvation.
High levels of CO in a house can be caused by:
• Incorrectly or poorly installed fuel-burning appliances.
• Blocked or cracked chimneys/flues.
• Blocked vents or draught-proofing which makes areas with fuel burning
appliances or fireplaces airtight.
• Engines of cars, lawnmowers etc. left running in confined spaces.
• Portable paraffin or gas heaters in badly ventilated rooms.
2.2 Symptoms of Carbon Monoxide Poisoning
Most people know that high levels of CO are harmful; however the period of
exposure is also important.
The following symptoms are related to Carbon Monoxide poisoning and
should be discussed with all members of the household.
5
Carbon Monoxide Ð The Silent Killer

Mild Exposure: Slight headache, nausea, vomiting, fatigue (often described as
“flu-like” symptoms).
Medium Exposure: Severe throbbing headache, drowsiness, confusion, fast heart
rate.
Extreme Exposure: Unconsciousness, convulsions, cardiorespiratory failure,
death.
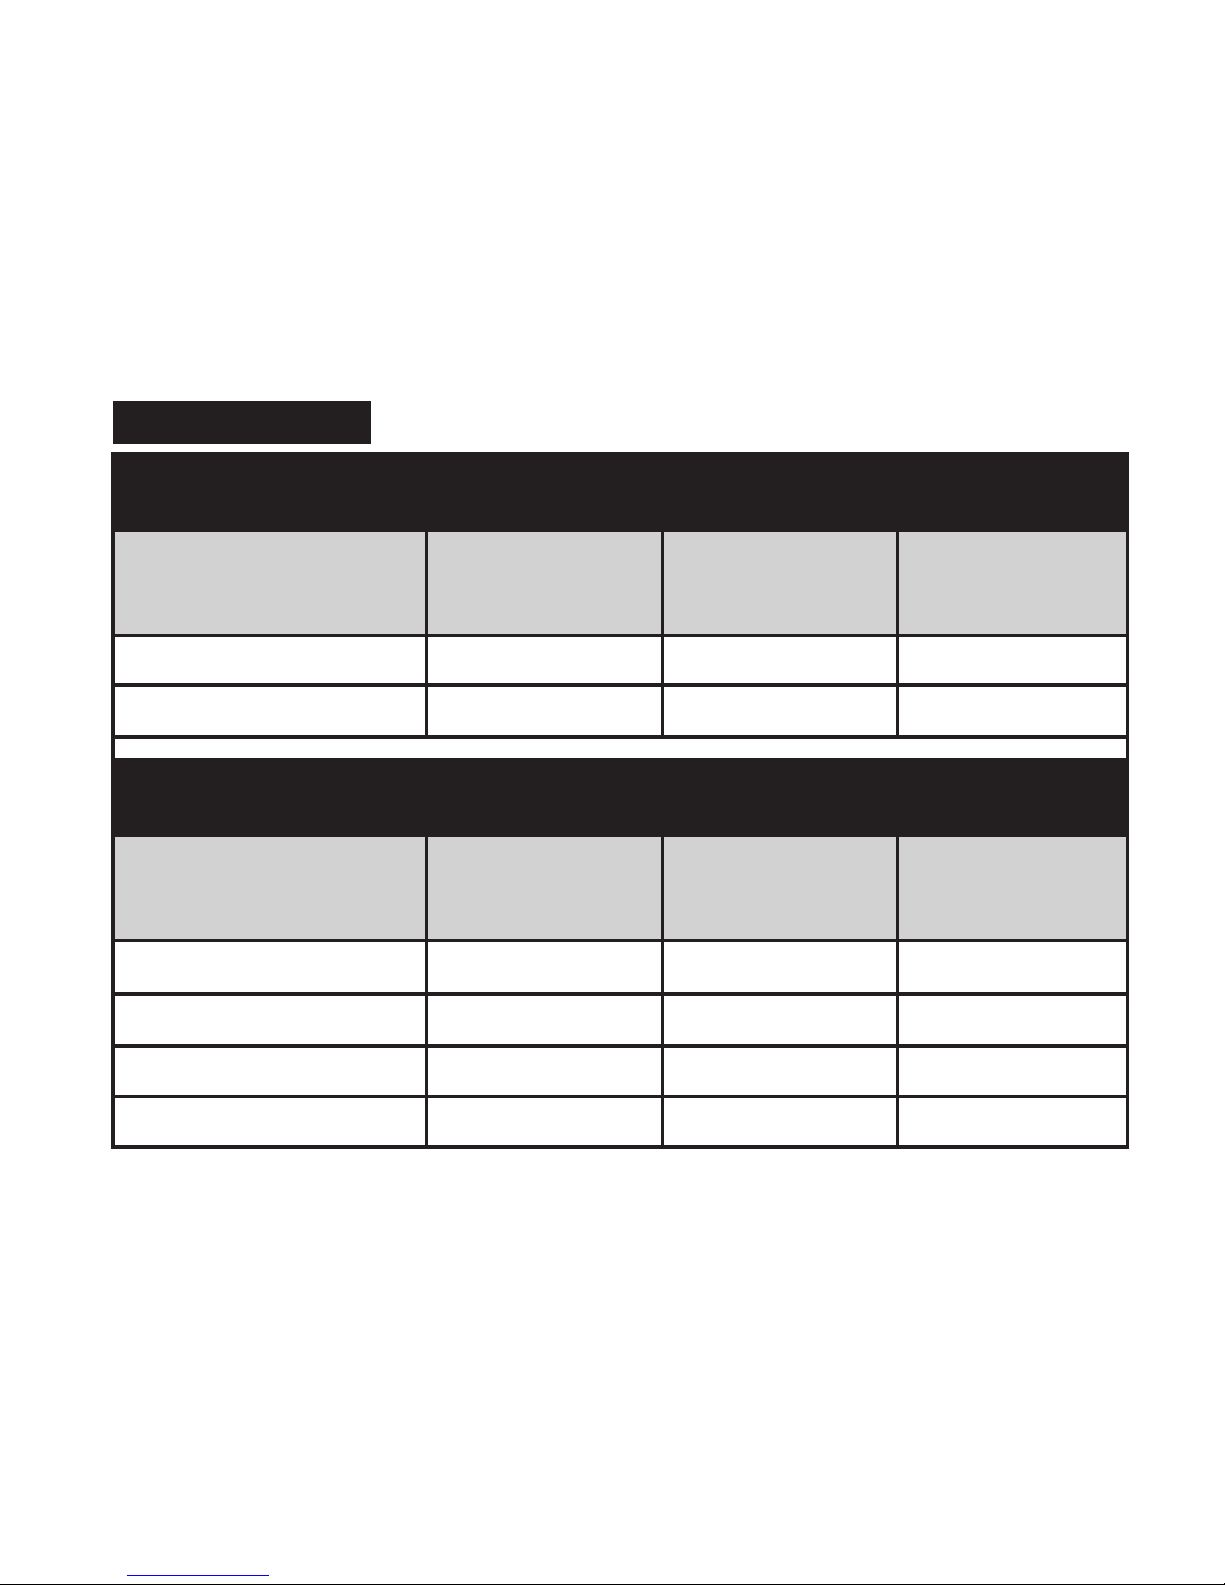
A high level of CO for a short period (e.g. 350 ppm CO for 30 minutes) will cause
the same symptoms, a slight headache, as a lower level for a longer time (e.g. 150
ppm for 90 minutes). Table A shows how exposure to different concentrations of
CO generally affects people. Many cases of reported Carbon Monoxide poisoning
indicate that while victims are aware they are not well, they become so disorientated
that they are unable to save themselves by either leaving the building or calling for
assistance. Young children and household pets may be the first affected.
2.3 What happens when your CO Alarm detects Carbon Monoxide ?
When the Alarm detects potentially dangerous levels of CO, it flashes the red alarm
light immediately and then sounds a loud alarm if the CO persists. Table B below
shows how the CO Alarm reacts to different levels of CO gas and exposure time.
At higher levels of CO the alarm turns on sooner. The rate of flashing of the red
light indicates the level of CO.
If your CO Alarm sounds follow the instructions on page 19.
When ventilation is provided by leaving the window and doors open, the CO build
up may have dissipated by the time help arrives and the alarm may have stopped
sounding. Although your problem may appear temporarily solved it is crucial that
the source of the CO is determined and appropriate repairs made.
6

7
Table A: Effects of Carbon Monoxide Poisoning
35 The maximum allowable concentration for continuous exposure in any
8 hour period according to OSHA *.
150 Slight headache after 1.5 hours.
200 Slight headache, fatigue, dizziness, nausea after 2-3 hours.
400 Frontal headaches within 1-2 hours, life threatening after 3 hours, also maximum
parts per million in flue gas (on an air free basis) according to US Environmental
Protection Agency.
800 Dizziness, nausea and convulsions within 45 minutes. Unconsciousness within
2 hours. Death within 2-3 hours.
1,600 Headache, dizziness and nausea within 20 minutes. Death within 1 hour.
3,200 Headache, dizziness and nausea within 5-10 minutes. Death within 25-30 minutes.
6,400 Headache, dizziness and nausea within 1-2 minutes. Death within 10-15 minutes.
12,800 Death within 1-3 minutes.
ppm
Concentration
of CO in Air Inhalation Time (approx) and Symptoms Developed
ppm = parts per million
*OSHA Occupational Safety & Health Association

8
058
102
150
058
102
150
Red Light Display Icon Horn /
Sounder
(before horn sounds)
Display Icon
(after horn sounds)
CO Gas Level
0 < ppm < 30 ppm
* unless it has alarmed previously (see CO Alarm Memory below)
ppm values shown in table are for example purposes only
Off* Off Off Off
Off
Off*
PPM level (steps of 5)PPM level (steps of 5)
on within 60-90 mins
(typ 72 mins)
on within 10-40 mins
(typ 18 mins)
1 flash
every sec
on within 2 mins
(typ 40 secs)
2 flashes
every sec
1 flash
every 2 secs
30 < ppm < 43 ppm
43 < ppm < 80 ppm
80 < ppm < 150 ppm
> 150 ppm
Table B: CO Alarm Response

NEVER IGNORE THE ALARM.
Pre-Alarm: When the Alarm detects over 43 ppm CO the red light flashes every 2
seconds. This helps locate CO leaks as the unit gives an indication straight away.
(Without this feature the CO level would need to be at 43 ppm CO for typically
72 minutes for an alarm sound to be given). Note the Pre-Alarm signal may be
triggered by CO coming for example, from cooking with gas, from car engines or
from nearby barbecues. This is usually not a concern, unless the Pre-Alarm signal
persists until the alarm sounds and the CO source is unknown.
The Display Models will display the level of CO gas above 30 ppm. This is also
an early warning indication that the CO gas level is building up and should be
investigated. Above 43 ppm CO, the red light will also flash.
NOTE: The CO Alarm may sound if cigarette smoke is blown into it, or aerosols
are released nearby.
CO ALARM MEMORY
The CO Alarm memory is an important feature of the CO Alarm where even if the
house is unoccupied during an alarm condition it warns the homeowner that the unit
has previously detected CO gas and been in alarm. The memory is displayed via
the flash rate of the red light. The red light will flash for a 24 hour period after an
alarm event has stopped. After this period, the memory can be viewed by pressing
and holding the test button (the flash rate will be as per Table B).
The memory flash rate: The RED light will flash at different rates every 50 seconds
depending on the level of CO detected as follows:
- Red light flashes twice every 50 seconds, meaning that a CO level above
43 ppm has been detected and that the unit was previously in alarm.
9

- Red light flashes four times every 50 seconds, meaning that a CO level above
80 ppm has been detected and that the unit was previously in alarm.
- Red light flashes eight times every 50 seconds, meaning that a CO level above
150 ppm has been detected and that the unit was previously in alarm.
Reset Memory by holding down the test button for over 12 seconds until the red
light stops flashing. Cover the horn with a cloth to muffle the alarm during this time.
Please note that the memory will also be reset when the unit is switched off.
3. Where to Place CO Alarms
3.1 Ideally a Carbon Monoxide Alarm should be installed in:
- Every room containing a fuel burning appliance, and
- Remote rooms where occupants spend a considerable amount of time
- Every bedroom.
However if the number of Carbon Monoxide Alarms to be fitted is limited, the
following points should be considered when deciding where best to fit the alarm(s)
- If there is an appliance in a room where people sleep, place a CO Alarm in this
room and
- Locate a CO alarm in a room containing a flueless or open-flued appliance, and
- Locate an alarm in a room where the occupant(s) spend most of their time (e.g.
sitting room) and
- In a bedsit, the CO alarm should be placed as far away from the cooking appliance
as possible, but near to where the person sleeps and
10

- If the appliance is in a room not normally used, such as a boiler room, the
CO alarm should be placed just outside the room so that the alarm will be
heard more easily.
3.2 Unsuitable Locations
Do not place the CO Alarm in any of the following areas.
(1) In the immediate vicinity of a cooking appliance (keep it at least 1 metre
horizontally from it).
(2) Outside the building.
(3) In an enclosed space (e.g. in or below a cupboard).
(4) In a damp or humid area.
(5) Directly above a sink or cooker.
(6) Next to a door, window, air vent or anywhere that it would be affected by
draughts.
(7) Next to an extractor fan.
(8) Over heat sources such as radiators or hot air vents.
(9) Where it would be obstructed, e.g. by curtains or furniture.
(10) In an area where the temperature could drop below –10°C or rise above
40°C.
(11) Where dirt or dust could block the sensor.
(12) Where it could be easily knocked or damaged, or where it could be
accidentally turned off or removed.
11
Where to Place CO Alarms

(13) In a bathroom or other areas where the CO alarm may be exposed to
water splashes, dripping or condensation (e.g. above an electric kettle).
(14) Near paint, thinners, solvent fumes or air fresheners.
3.31 If locating the CO alarm in a room with a fuel burning appliance
(see figure 1)
• If it is mounted on a wall, it should be located at a height greater than the height of
any door or window but still be at least 150mm from the ceiling.
• If it is mounted on the ceiling it should be at least 300mm from any wall or light
fitting.
• The CO alarm should be a horizontal distance of between 1m and 3m from the
potential CO source.
• If there is a partition in the room, the CO alarm should be located on the same side
of the partition as the potential source.
• In rooms with sloped ceilings, the CO alarm should be located at the high side of
the room (see fig 2).
3.32 If locating the CO alarm in a bedroom or in rooms remote from a fuel
burning appliance (see figure3)
• Mount the CO alarm relatively close to the breathing zone of the occupants.
Whatever position is chosen make sure it is possible to view the three light
indicators, when in the vicinity of the alarm.
WARNING: Do not use the CO Alarm on an intermittent basis, or as a portable
detector for the leakage of combustion products from fuel burning appliances or
chimneys. 12

13
300mm
150mm
1 to 3 m
1 to 3 m
DEAD AIR
DON'T LOCATE
HERE
CO Alarm
Figure 1
Location in room with a fuel burning appliance

14
CO Alarm
about
1 to 2m
Figure 3
Location in bedrooms & other
rooms remote from the appliance
(i.e. at breathing level)
300mm
CO Alarm
Figure 2
Location in rooms with sloped
ceilings, the CO alarm should be
located at the high side of the room

4. Installation
4.1 Installation Procedure
1. Select a location complying with the advice
in Section 3.
2. Remove the mounting plate from the
packaging/Alarm.
3. Place the mounting plate on the ceiling/wall
exactly where you want to mount the Alarm.
With a pencil, mark the location of the two
screw holes.
4. Taking care to avoid any electrical wiring in
the ceiling, drill holes using a 5.0mm drill bit
through the centre of the marked locations.
Push the plastic screw anchors provided into
the drilled holes. Screw the mounting plate to
the ceiling/wall.
5. Alternatively, if desired, the CO Alarm will also free stand on a flat surface
with the mounting plate attached.
6. If using the RadioLINK interconnection, ensure the RF module is fitted
correctly into the base of the Alarm. For further advice on the RadioLINK
installation, see booklet Ò RadioLINK Module for Battery Powered Carbon
Monoxide AlarmsÓ .
7. Carefully line up the Alarm on the base, gentle press home & twist on Ð
see figure 4. (This connects the batteries). The red, amber & green lights will
15
Figure 4
Installation

immediately flash in sequence to show they are
working. In addition, the icons on the LCD display
on the Display models will also light up.
8. Press the Test button (after 15 seconds) to
ensure that the Alarm works (see figure 5).
9. Install all the other Alarms similarly.
4.2 How to Tamperproof the Alarm
The Alarm can be made resistant to unauthorised
removal. Break off the small pillar on the base as
shown in figure 6a. To remove the Alarm from
the ceiling it is now necessary to use a small
screwdriver, to release the catch (push catch
towards the ceiling) and then twist off the Alarm
(see figure 6b).
16
Red
Light
Amber
Light
Green
Light
Test
Button
Figure 6a
Figure 5
Figure 6b Figure 7

If necessary it is possible to further secure or tamperproof the Alarm by using
a No.2 or No.4 (2 to 3mm diameter - not supplied) self tapping screw 6 to 8mm
long to firmly lock the Alarm and its mounting plate together (see figure 7).
5. Testing and Monitoring Your CO Alarm
Button Test
It is recommended that you test your CO Alarm after installation (wait 15
seconds after connecting the power) and then once a week to make sure the
Alarm is working. It will also help you and your family to become familiar with
the sound of the Alarm.
Press and hold the test button (see figure 5) until the Alarm sounds (it may take
up to 5 seconds) and the green light flashes. (For Display models, the LCD
will also display the “OK status” icon). The audible alarm will sound at a
diminished sound output level initially and then quickly reach maximum sound
output level. The Alarm will stop sounding shortly after the button is released.
Low Battery Indicator
If the Alarm beeps and the green and amber lights flash simultaneously every
50 seconds, then the batteries are depleted. (For Display models, the LCD will
also display the “Low Battery status” icon).
(For Ei207 Models Only)
Check the Ô Replace byÕ label on the side wall - if it has been exceeded replace
the entire unit. If the Replace byÕ label on the side wall has not been exceeded,
remove the Alarm from the mounting plate, remove the battery cover (see
figure 8) and replace the batteries. Use only the following Alkaline AAA size
batteries: Duracell, Panasonic, or Energizer.
17
Testing and Monitoring Your CO Alarm

Insert the new batteries with the orientation shown
on the base. Replace the battery cover and replace
the Alarm back on its mounting plate (this action
automatically switches on the batteries). Button test
the Alarm (after 15 seconds) to check the batteries
are installed correctly and that they are not depleted.
(For Ei208 Models Only)
These alarms use long-life lithium batteries and are
not replaceable. Check the Ô Replace byÕ label on
the side wall - if it has been exceeded replace the
entire unit. If the Ô Replace byÕ date has not been
exceeded, then the Alarm maybe faulty and needs
to be returned to the manufacturer Ð See Ò Getting
the CO Alarm Serviced Page 27)”.
Amber Fault Indicator with Beep
If the Alarm beeps and the amber light flashes simultaneously every 50 seconds the
self-checking circuitry may have detected a fault. This Alarm is probably defective
and must be replaced. See “Getting the CO Alarm Serviced Page 27)”.
End-of-life Indicator
When the unit has completed approx 6 years of operation the amber light will flash
twice every 50 seconds without a corresponding beep. This indicates that the
Alarm has reached its end-of-life. (For Display models, the LCD will also display
the Ò REPLACE UNIT”).
18
Figure 8

Check the Ô Replace byÕ label on the side wall - if it has been exceeded replace
the entire unit. If the Ô Replace byÕ date has not been exceeded, then the Alarm
may be faulty and needs to be returned to the manufacturer Ð See Ò Getting the
CO Alarm Serviced Page 27)”.
For environmentally sound disposal, remove the Alarm from its mounting
plate (for Ei207 models, open the battery door and remove the batteries) and
dispose in accordance with best practice and guidance on WEEE disposal
and recycling.
Testing with Carbon Monoxide
The Alarm can be tested with carbon
monoxide gas by using one of the kits that
comes with the gas either in a glass phial or
aerosol can. Follow the instructions on the kit.
It is best if possible to inject the CO gas into
the gas entry holes, see Figure 9. When it
senses the CO, it flashes the red light (as per
Table B) to confirm that its detecting CO gas.
6. What to do when the alarm sounds
(1) Open the doors and windows to ventilate the area.
(2) Turn off all fuel appliances where possible and stop using them. (The
Alarm can be silenced immediately by pushing the test/hush button).
(3) Evacuate the property leaving the doors and windows open.
19
Gas entry
holes
Figure 9
What to do when the alarm sounds

(4) Get medical help immediately for anyone suffering the effects of Carbon
Monoxide poisoning (headache, nausea), and advise that Carbon Monoxide
poisoning is suspected.
(5) Ring your gas or other fuel supplier on their emergency number. Keep the
number in a prominent place.
(6) Do not re-enter the property until the alarm has stopped. (If the alarm has
been silenced by pressing the test/hush button, wait at least 5 minutes so the
Alarm can check that the CO has cleared).
(7) Do not use the fuel appliances again until they have been checked by a
registered installer or equivalent expert.
7. Maintenance
Clean the outside case by occasionally wiping with a clean damp cloth. Do not
use any cleaning agents, bleaches, detergents or polishes, including those in
aerosol cans. Avoid spraying air fresheners, hair spray, paint or other aerosols
near the CO Alarm. Do not place air fresheners near the unit.
Use the narrow nozzle of a vacuum cleaner to remove fluff and other
contamination from the cover slots and gas entry holes.
Caution: Do not paint the CO Alarm.
Remove the CO Alarm when decorating. Do not allow water or dust to
contaminate the Alarm.
Warning: Do not open or tamper with the CO Alarm. There are no user
serviceable parts inside and this can damage the Alarm.
20
Maintenance
This manual suits for next models
6
Table of contents
Other Ei Electronics Carbon Monoxide Alarm manuals

Ei Electronics
Ei Electronics Carbon Monoxide Alarm Ei206D User manual

Ei Electronics
Ei Electronics Carbon Monoxide Alarm Ei220EN User manual

Ei Electronics
Ei Electronics Ei 220E User manual

Ei Electronics
Ei Electronics Ei207/208 Series User manual

Ei Electronics
Ei Electronics Ei261ENRC User manual

Ei Electronics
Ei Electronics Carbon Monoxide Alarm Ei206D User manual

Ei Electronics
Ei Electronics Ei207 Series User manual

Ei Electronics
Ei Electronics Ei204 User manual

Ei Electronics
Ei Electronics Ei 261D Manual

Ei Electronics
Ei Electronics Ei 225E User manual