EIC transfusio-therm 2000 User manual
transfusio-therm
®
2000
Quick Reference Guide
Status: June 2013 Page 1 of 5
The Quick Reference Guide must be kept directly on the transfusio-therm
®
2000 in a
clearly visible manner. Be certain to observe the following sequence of operations and
suggestions when putting the transfusio-therm
®
2000 into operation and when using it.
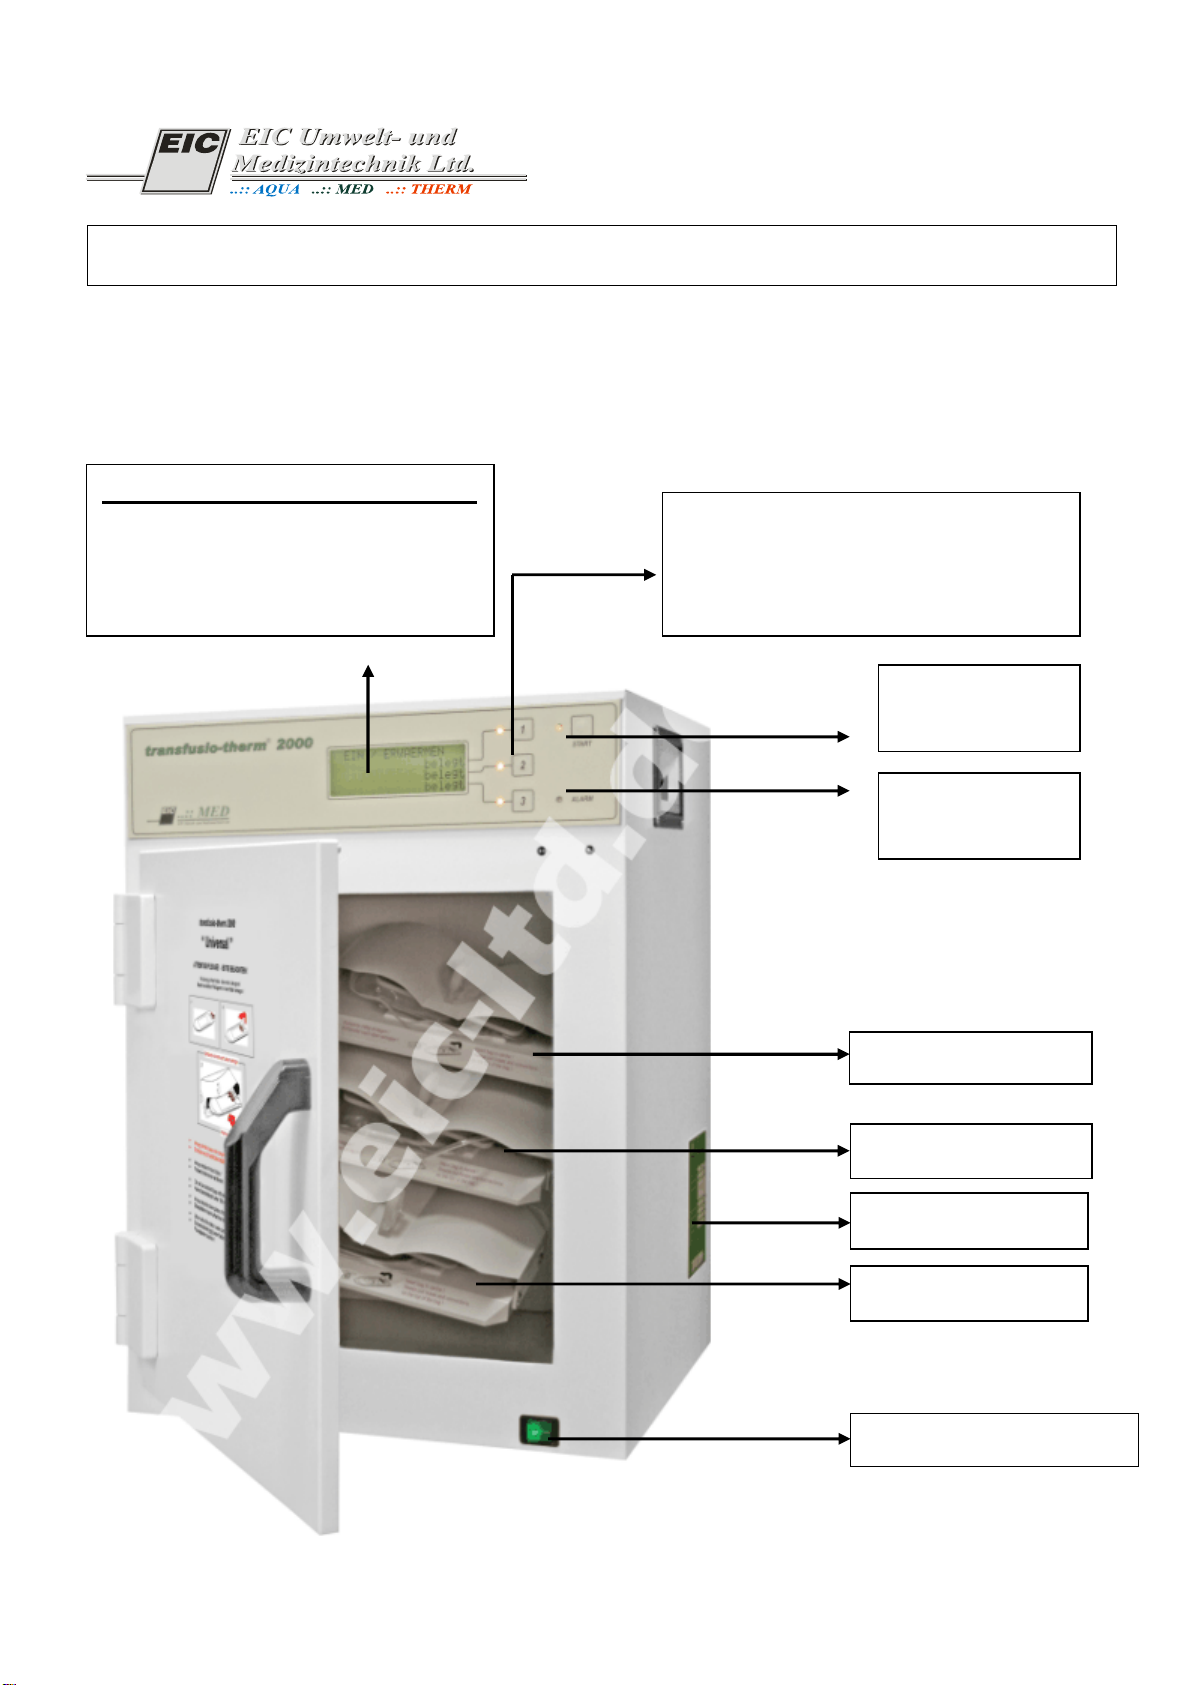
I. Overview
Compartment No. 1
Compartment No. 3
Compartment No. 2
ON / OFF Power Switch
Start Button
with LED
LED
Alarm Si nal
Confirmation Buttons with LED
Compartment No. 1
Compartment No. 2
Compartment No. 3
Operator-Prompting Display
Status Line
User Interface for Compartment No. 1
User Interface for Compartment No. 2
User Interface for Compartment No. 3
Nameplate

transfusio-therm
®
2000
Quick Reference Guide
Status: June 2013 Page 2 of 5
II. Start-up and Operation
Item
No.
Step
Activity
Display
Important:
Be Sure to Pay
Attention to the Comments Below.
01 Switching the
appliance on
Use the ON / OFF power switch to
switch the appliance on.
SELF-TEST; ON
VACANT Appliance carries out a self-test
(approx. 3 seconds).
02 Opening the door
Use the door handle to open the
door.
ON
03 Loading a
compartment
To load a blood bag into any vacant
compartment,
•prepare the bag, as shown in
the pictograms and described in
the instructions provided;
•raise the spring plate of the
compartment;
•place the bag in the middle of
the compartment;
•make sure that tube ends /
connectors are located on the
right-hand side and on top of
the bag;
•release the spring plate.
•IMPORTANT
Bag filling volume:
100 ml to 600 ml
ON
---------- Place the bag in the middle of the
compartment, with tube ends
located on the right-hand side and
on top of the bag.
Always make sure that tubes do
not protrude from the
compartment.
When it comes to bags containing
plasma / FFP, tube connectors
frozen in a bent position must be
located on the right-hand side and
on top of the bag. If the
connectors are frozen in a straight
position, the bag is to be inserted
with the connectors located on the
right-hand side.
It is possible to thaw a blood bags
inserted into protective bags,
provided the above instructions
are observed.
04 Closing the door
Use the door handle to close the
door.
ON
05 Confirming loading
When prompted by the yellow
flashing LED and the text appearing
in the display, press the confirmation
button of the compartment just
loaded.
ON
CONFIRM
LOADING
06 Start
When prompted by the yellow
flashing LED, press the start button.
ON / START
LOADED
07 Thawing /
heating
A star symbol will appear in the
Universal model and when fresh
frozen plasma (FFP) bags are
inserted. This star will be
extinguished when approximately
+20° C are reached, with an acoustic
signal indicating that the bag has
thawed and may be removed, as
required. If the bag is not removed,
heating will continue until the target
temperature is reached.
ON / HEATING
LOADED
Star symbol if the
bag contains
FFP
The appliance will automatically
recognize bags that are already
heated. If this is the case, the
appliance will shut down. An
intermittent alarm tone will be
sounded. A read flashing signal
will appear on the compartment
concerned, and the display will
show REMOVE / CHECK BAG.
Remove the bag. Check the
temperature of the bag and/or
reinsert the bag. Once the loading
of the bag has been confirmed
and the start button pressed, the
heating process will continue.

transfusio-therm
®
2000
Quick Reference Guide
Status: June 2013 Page 3 of 5
08 Target temperature
reached
Automatic acoustic signal and green
flashing LED on the compartment
concerned
ON
x °C / CONFIRM
DEFROSTED /
CONFIRM
The set target temperature will be
displayed.
09 Confirming the
removal
Press the confirmation button of the
compartment concerned.
ON
REMOVE BAG
10 Opening the door
Use the door handle to open the
door.
ON
LOADED
11 Removing the bag
Follow the steps below to remove
the bag:
•Raise the spring plate of the
compartment.
•Remove the bag.
•Release the spring plate.
ON
--------- Once the bag has been removed,
the compartment can be loaded
again. To do so, start with Item 03.
12 Closing the door
Use the door handle to close the
door.
ON
VACANT The appliance is ready for use. For
longer periods of non-use, turn
the appliance off, using the ON /
OFF power switch.
III. Safety Comments
Item
No.
Subject
Information
Display
Important:
Be Sure to Pay
Attention to the Comments Below.
13 Special operating
note If a bag has been inserted into
the compartment, with no
operating action taking place
(with the door open or closed),
although a relevant prompt has
appeared in the display, an
acoustic signal sounded after
approximately 5 minutes will
remind the operator to resume
work on the appliance.
Whenever an acoustic signal is
sounded, it is imperative that you
go to the appliance and act upon
the prompt.
14 Safety shutdown If the two-channel monitoring
system of the appliance detects
an error in any compartment
area, the compartment will be
blocked, as signaled by a steady
red light of the LED.
ON / SERVICE
BLOCKED Do not use the blocked
compartment.
Proceed as described in Item 16,
which addresses a protective
shutdown.
15 Inadvertent
loading of a
compartment
following a safety
shutdown (13)
If a shutdown compartment is
loaded inadvertently, the red
LED will change from a steady
light to a flashing one.
ON / SERVICE
REMOVE BAG After pressing the confirmation
button and removing the bag from
the blocked compartment, you can
continue using those
compartments of the appliance
which are not blocked.
16 Protective
shutdown All the compartments are shut
down whenever the two-channel
monitoring system of the
appliance detects a malfunction
in the overall system. The
compartment LEDs and the
alarm LED will show steady red
light.
OFF
PROTECTIVE
SHUTDOWN
NOTIFY SERVICE
In the event of a protective
shutdown, please be sure to turn
the appliance off, using the ON /
OFF power switch.
Open the door and check that all
the bags are inside the
compartments and that they are
not damaged. If necessary,
remove all the bags from the
compartments. Check the
temperature of the bags. Destroy
transfusio-therm
®
2000
Quick Reference Guide
Status: June 2013 Page 4 of 5
them if they are found to be
warmer than 41° C or show any
visible signs of external damage.
Clean the appliance whenever any
bag leakage has occurred.
Use the ON / OFF power switch to
turn the appliance on again.
If the self-test (1) is successful,
the appliance can continue to be
operated in the usual manner.
Notify the Service Department
immediately if the self-test
triggers a protective shutdown.
IV. Suggestions for Cleaning and Disinfection
Item
No.
Subject
Actions
Activities
Important:
Be Sure to Pay
Attention to the Comments Below.
17 Initial
cleaning
OUTSIDE SURFACES: Exclusively use a wet cloth and a mild
detergent.
SEALING SURFACES (the four sides of the front face of the
housing around the interior and on the inside of the door):
Exclusively use a wet cloth and a mild detergent. Do not turn
the appliance on when sealing surfaces or the door are
damaged.
INTERIOR: Exclusively use a wet cloth soaked with a
conventional disinfectant approved under applicable medical
regulations.
ROTATING UNIT: To facilitate cleaning, the rotating unit can
be taken out as a whole. To this end, remove the safety hook
and pull the rotating unit off frontwards. To remove the
spring plates, loosen the four screws with which they are
fastened.
To prevent damage, proceed with particular care when
cleaning temperature measuring points (silver plates). After
cleaning, wipe all parts dry and screw the spring plates on
again tightly. Push the complete rotating unit, from the front,
onto the drive shaft as far as it can go. Then, reinsert the
safety hook. Before putting the appliance into use again,
check that the rotating unit is properly fitted.
Be sure to clean the motor shaft and the plug-in device of the
rotating unit dry only.
Always pull the power plug
before cleaning the appliance.
Do not use any scouring agents
or scratching or pointed objects
for cleaning.
WARNING:
Never rinse the rotating unit with
running water or clean it with the
aid of washers or disinfectors.
Never operate the appliance
when the rotating unit is not
properly and securely positioned
and/or the safety hook is not
fully inserted.
When the message "Important:
Check Mounting of Rotating
Unit" appears on the display,
switch off the appliance and
recheck that the rotating unit is
properly fitted.
18 Bag
leakage Clean the affected surfaces and/or the rotating unit, as
described in Item 17. Be sure to heed the instructions
furnished in Item 17.
19 Regular
cleaning and
disinfection;
maintenance
Follow your in-house hygiene routines and regulations. Pay
particular attention to the cleanliness of the temperature
measuring points (silver plates).
Do not apply oil and other lubricants to the motor shaft and
plug-in device, as this may adversely affect electrical
conduction.
Be certain to heed the
instructions provided in Item 17.

transfusio-therm
®
2000
Quick Reference Guide
Status: June 2013 Page 5 of 5
20 Readout of
the error
code
Error
message
When switching the appliance on, keep button no. 3
depressed until the error code appears in the display. Button
no. 1 lets you browse through the errors all the way to error
no. 31. To get the number of bags heated, press button no. 2.
Record the read-out error code, together with the serial
number of the appliance (see nameplate attached on the
right-hand side of the appliance), in a fault report form and
fax or e-mail this form to EIC Ltd.
EIC Umwelt- und Medizintechnik Ltd., Rudolf-Diesel-Strasse 5, D-37308 Heilbad Heiligenstadt, Germany
Telephone: +49 3606 607925, Fax: +49 3606 5071353, E-mail: eic-ltd.mail@t-online.de

!"#$"%"&'(')
Meaning of the failure codes safety shutdown
„transfusio-therm 2000“ controller version 7 and 8
Code Error
0 Door switch, different signals Equipment protective cut-off
1 Error turning / blocked or protective
cut-off
2nd system
Equipment protective cut-off
2 Error turning / over-wound Equipment protective cut-off
3 Error magnetron / does not switch on or
protective switching
2nd system
Equipment protective cut-off
4 Error magnetron / does not switch off Equipment protective cut-off
5 Error antenna / turns too slowly Equipment protective cut-off
6 Deficient self-test Equipment protective cut-off
7 T1...T6 > 41
o
C Equipment protective cut-off
8 Full sensor 1 open,
Full sensor 2 closed
Equipment protective cut-off
Intake 1
9 Full sensor 2 open,
Full sensor 1 closed
Equipment protective cut-off
Intake 1
10 Temperature difference > 1
o
C Safety cut-off
Intake 1
11 Break in the temperature sensor cable Safety cut-off
Intake 1
12 T1 or T2 > 39
o
C Safety cut-off
Intake 1
13 Intake leaky (HF) Safety cut-off
Intake 1
14
15
16 Full sensor 1 open,
Full sensor 2 closed
Protective cut-off
Intake 2
17 Full sensor 2 open,
Full sensor 1 closed
Protective cut-off
Intake 2
18 Temperature difference > 1
o
C Safety cut-off
Intake 2
19 Break in the temperature sensor cable Safety cut-off
Intake 2
20 T1 or T2 > 39
o
C Safety cut-off
Intake 2
21 Intake leaky (HF) Safety cut-off
Intake 2
22
23
24 Full sensor 1 open,
Full sensor 2 closed
Protective cut-off
Intake 3
25 Full sensor 1 closed,
Full sensor 2 open
Protective cut-off
Intake 3
26 Temperature difference >
1
o
C
Safety cut-off
Intake 3
27 Break in the temperature sensor cable Safety cut-off
Intake 3
28 T1 or T2 > 39
o
C Safety cut-off
Intake 3
29 Intake leaky (HF) Safety cut-off
Intake 3
30
31
Table of contents
Popular Medical Equipment manuals by other brands


Droper
Droper Field 1000 operating instructions

ProMedTek
ProMedTek Replexa+ instruction manual

Weinmann
Weinmann LIFE-BASE light XS Instructions for use

Proactive Medical
Proactive Medical Protekt Aire 6500 Operation manual

mychway
mychway MS-7008CX user manual

Smeed Technologies
Smeed Technologies MERK-EVAC instruction manual


