ELAC IW 1130 User manual

Wand- / Regal-Lautsprecher
OnWall / Bookshelf Loudspeaker
Wir beglückwünschen Sie zum Kauf Ihres EL C Lautsprechers, der unter strengen Qualitäts- und
Umweltauflagen hergestellt wurde. Um die Leistung des Gerätes voll auszunutzen, lesen Sie bitte diese
Bedienungsanleitung gründlich durch. Wir raten Ihnen, diese nleitung für späteres Nachschlagen gut
aufzubewahren.
Bitte beachten Sie, die separaten Sicherheitshinweise, die der Verpackung Ihres neuen Lautsprechers
beigepackt sind. Bitte lesen, beachten und befolgen Sie alle diese Sicherheitshinweise. Bewahren Sie diese
Sicherheitshinweise auf. Beachten Sie bitte alle Warnungen, die auf dem Gerät und in der Bedienungsanleitung
aufgeführt sind.
Congratulations on the purchase of your ELAC loudspeaker which has been designed in accordance with strict
quality and environ ental require ents.
Please note the enclosed safety instructions. Please follow the instructions and keep the safety
instructions. Heed all warnings on the appliance and in the manual.
This anual will help you ake the ost of your ho e theatre syste . We reco end keeping this anual in a safe
place for future reference.
Bedienungsanleitung
Operating Instructions

- 2 -

- 3 -
Inhalt / Contents
Seite / page
Funktion
Lieferumfang
Voraussetzungen
Wahl des optimalen Installationsortes
5
Hochtonpegel Einstellung
6
Wandaufhängemöglichkeit
6
Auf-Wand Installation vertikal
7
Auf-Wand Installation horizontal
7
Function
8
What is included with the product
8
Require ents
8
Find the appropriate place for installation
9
Tweeter level adjust ent
10
OnWall installation facility
10
OnWall installation vertical
11
OnWall installation horizontal
11
Technische Daten / Specifications
12

- 4 -
Funktion
ELAC Wand- / Regal-Lautsprecher sind sowohl für die Auf-Wand Installation, als auch für die Verwendung als
Regallautsprecher geeignet. Sie lassen sich sowohl horizontal, als auch vertikal an die Wand hängen oder z.B. auf
einem Sideboard aufstellen.
Der ELAC Wand- / Regal-Lautsprecher bietet hervorragenden Klang für HiFi-Stereo- oder Heimkino-Surround-
Betrieb, bei gleichzeitig sehr kompakten Abmessungen.
Lieferumfang
Zum Lieferumfang gehören:
1 ELAC Wand- / Regal-Lautsprecher
1 Haken zum Entfernen des Schutzgitters
1 Schraube + 1 Dübel für Auf-Wand Installation
Klebefüße
1 Sicherheitshinweise
1 Bedienungsanleitung
Voraussetzungen
Für den Fall, dass Sie den Wand- / Regal-Lautsprecher auf der Wand installieren möchten, sind gewisse
handwerkliche Fähigkeiten erforderlich. Sie sollten hierzu gegebenenfalls Hilfe von einem Fachmann in Anspruch
nehmen.
Zusätzlich zu den mitgelieferten Zubehörteilen für die Wandinstallation benötigen Sie folgende Werkzeuge bzw.
Hilfsmittel:
1 Gliedermaßstab ("Zollstock"), 1 Bleistift, 1 Wasserwaage, ggf. 1 Kreuzschlitzschraubendreher

- 5 -
Wahl des optimalen Installationsortes
Ratschläge zur Wahl des "richtigen" Installationsortes:
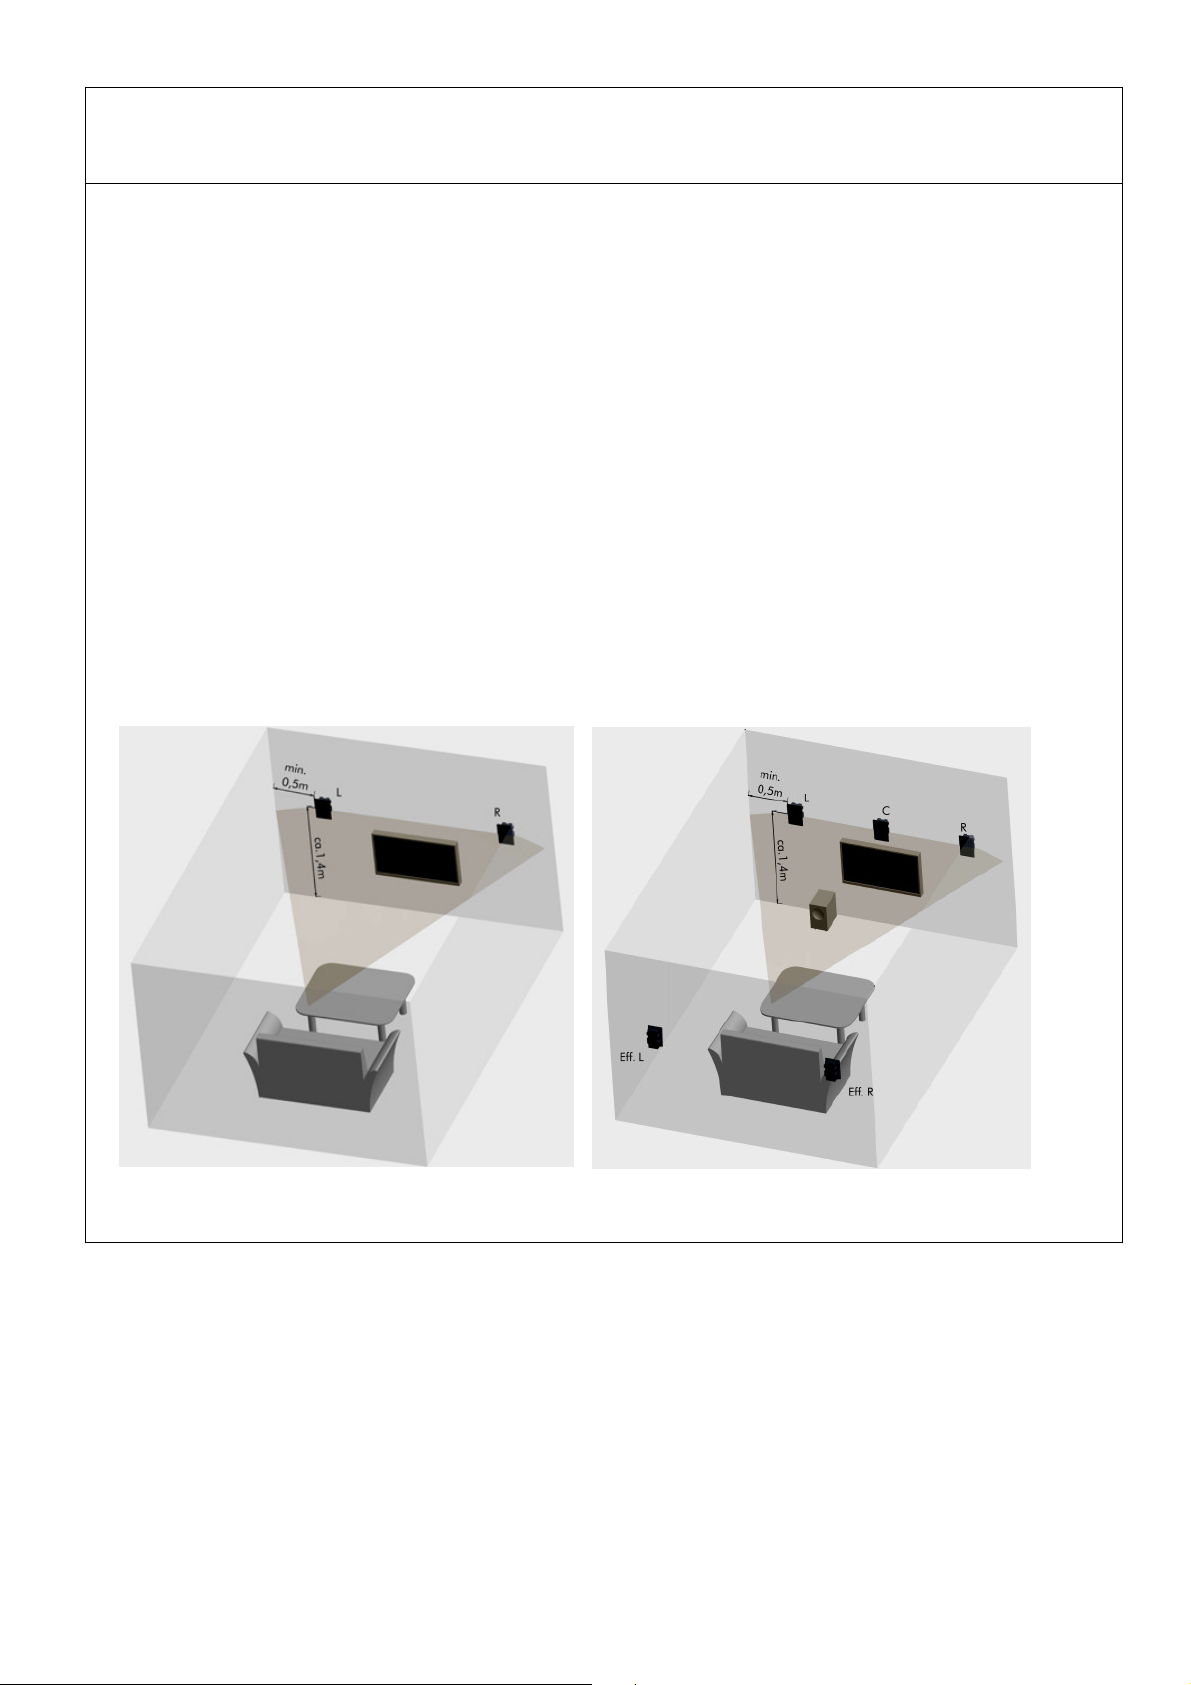
1) Generell sollten Sie zu jeder Wandecke, zur Decke und zum Fußboden einen Mindestabstand von 50 cm
einhalten (s. Bild unten), da eine Platzierung zu nah in einer Raumecke ungünstige akustische Wiedergabe-
Eigenschaften zur Folge haben würde.
2) Wir empfehlen Ihnen eine Platzierung der Lautsprecher etwas über Ohrhöhe, z.B. ca. 1, 0 m über dem
Fußboden.
3) Bei einer Stereo-Installation (hierfür sind zwei Lautsprecher erforderlich) sollten Sie die Einbauorte so
wählen, dass sich der von Ihnen bevorzugte Hörplatz im sog. Stereo-Dreieck befindet. D.h. Sie sitzen im
Idealfall an einer Spitze eines gedachten gleichseitigen Dreiecks. Die beiden anderen Spitzen werden von
den Lautsprechern gebildet.
) Werden Sie sich im Klaren darüber, ob Sie eine Surround-Installation oder eine reine Stereo-Installation
realisieren wollen. Bei einer Surround-Installation benötigen Sie min. 5 Lautsprecher (Hauptlautsprecher
links "L", Hauptlautsprecher rechts "R", Center-Lautsprecher "C", Effekt-Lautsprecher links "Eff. L" und
Effekt-Lautsprecher rechts "Eff. R"). Die folgenden zwei Bilder zeigen einerseits eine typische Stereo-
Installation, andererseits eine typische Surround-Installation. Halten Sie sich bitte in etwa an die in den
Bildern empfohlenen Maße.
Auf den folgenden Seiten wird detailliert beschrieben, wie Sie den Lautsprecher für die Installation vorbereiten,
installieren und montieren.
chtung: Stellen Sie bitte sicher, dass sich an den von Ihnen ausgewählten Orten in der Wand weder
elektrische Leitungen, noch Gas-, Wasser- oder Heizungsrohre befinden.

- 6 -
Hochtonpegel Einstellung
1) Der Wand- / Regal-Lautsprecher bietet eine
Einstellmöglichkeit für den Hochton-Pegel. Hiermit
können Sie die Wiedergabe des
Hochtonbereiches an die räumlichen
Gegebenheiten, sowie an den persönlichen
Geschmack anpassen.
Um an den Pegel Wahlschalter zu gelangen, ist
es erforderlich, das Abdeckgitter zu entfernen. Zu
diesem Zwecke verwenden Sie bitte den kleinen
Haken aus dem Beipack, der als Ausziehhilfe
vorgesehen ist (siehe Bild).
2) Die Stellung "0 dB" ist die Standardeinstellung
und für die meisten Anwendungsfälle richtig.
Sollten Sie auf Ihrem Hörplatz einen zu starken
Eindruck des Hochtonbereiches empfinden, so
schalten Sie den Wahlschalter bitte auf "-2 dB".
Möchten Sie den Hochton-Anteil auf Ihrem
Hörplatz erhöhen, so schalten Sie bitte auf "+2
dB".
Je nach Anwendungsfall kann es durchaus sinnvoll sein,
nur bei einem Lautsprecher diese Korrektur
vorzunehmen.
Wandaufhängemöglichkeit
Die Installation auf einer Wand gestaltet sich als denkbar
einfach, da der Lautsprecher auf der Rückseite mit
insgesamt Wandaufhängeösen ausgestattet ist. Sie
können ihn also in allen Orientierungen aufhängen.
Wann welche Orientierung sinnvoll ist, wird im nächsten
Abschnitt erläutert.

- 7 -
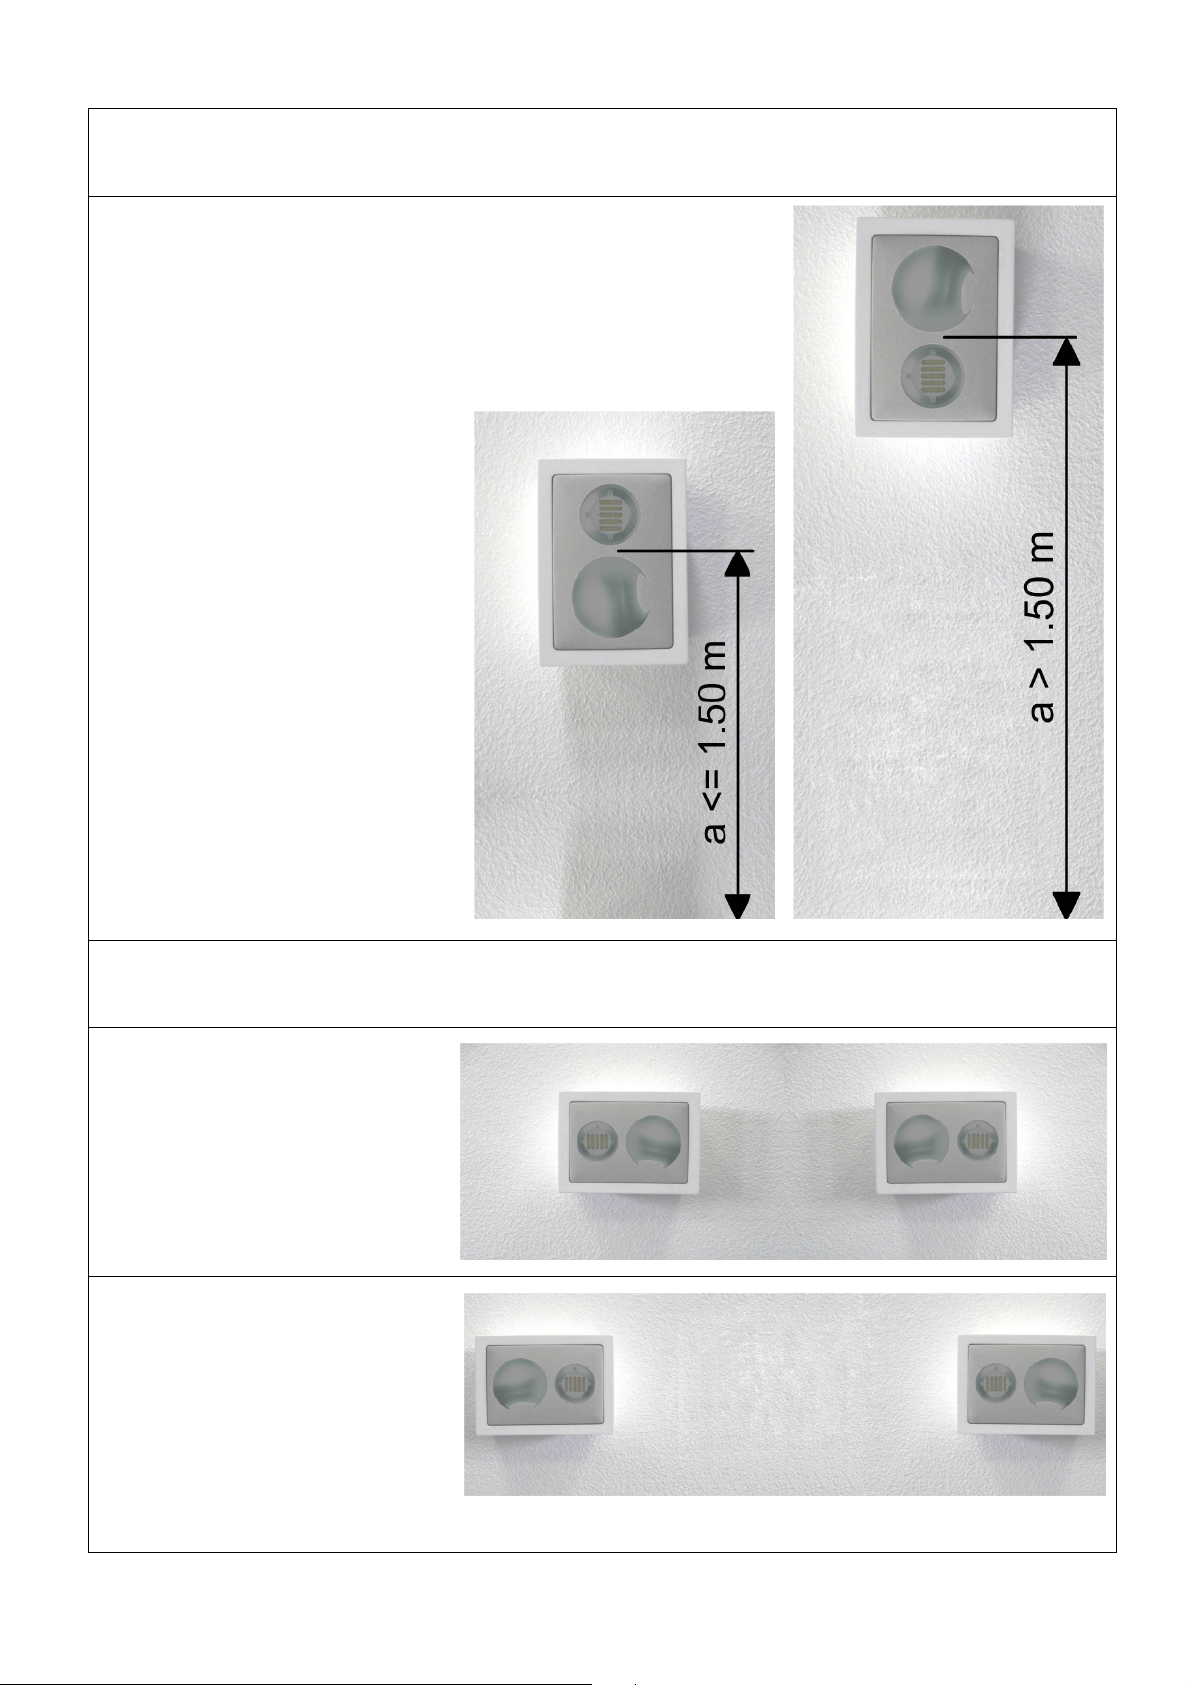
uf-Wand Installation vertikal
Wenn Sie die Lautsprecher vertikal aufhängen möchten, sollten Sie die
Orientierung (Hochtöner "oben" oder "unten") je nach Abstand zum
Fußboden wählen.
Bei einem Abstand von bis zu 1.50 m zum Fußboden, sollte der
Lautsprecher so angeordnet sein, dass der Hochtöner "oben" ist, bei
größerem Fußbodenabstand sollte der Hochtöner nach "unten" weisen.
uf-Wand Installation horizontal
Bei horizontaler Auf-Wand Installation
und vergleichsweise geringer
Basisbreite (geringem Abstand der
Lautsprecher zueinander), sollten die
Hochtöner der Lautsprecher nach
außen weisen.
Bei verhältnismäßig großer Basisbreite
und vergleichsweise geringem
Hörabstand kann es sinnvoll sein, die
Lautsprecher so anzuordnen, dass die
Hochtöner nach innen weisen.
Dies ist nur als Richtlinie zu verstehen.
Der Hörtest sollte letztendlich die
Entscheidung liefern.

- 8 -
Function
ELAC OnWall / bookshelf loudspeakers are ideal for either installing the on the wall or placing the on the
bookshelf or the sideboard.
ELAC OnWall / bookshelf loudspeakers offer unobtrusive design and perfect sound for all applications fro hi-fi to
stereo, ho e cine a to surround sound.
What is included with the product
As standard, this product includes:
1 ELAC OnWall / bookshelf loudspeaker
1 grille re oval tool
1 screw + 1 fastener for OnWall installation
4 rubber feet
1 safety instructions
1 anual
Requirements
The installation of the loudspeakers on the wall requires certain craft skills. Please refer to an expert if you require
any help.
The following tools shall be used for the installation:
1 yardstick, 1 pencil, 1 spirit level, 1
hand screw driver
- 9 -
Find the
appropriate place for installation
Tips for finding the best place for your loudspeaker:
1) As a general rule, please note, that there should be a distance of 50 c between the loudspeaker and the corner
of a roo , the ceiling and the floor (see picture below). If the loudspeaker is installed in a disadvantageous place of
a roo , the acoustic properties will be extre ely poor.
2) It is reco ended to install the loudspeaker approx. 1.40 above the ground floor.
3) If the loudspeaker is going to be used for stereo applications (this requires 2 loudspeakers), the opti u listening
position should be located in the iddle of a stereo triangle. This eans in other words, that your listening position
will be located at the top of an i aginary triangle, whereas the two loudspeakers ust be installed where you
i agine the other edges of this triangle.
4) You have to decide whether you prefer an installation for surround applications or for stereo applications. The
installation for a surround application requires 5 loudspeakers ( ini u ): ain speaker left "L", ain speaker right
"R", center loudspeaker "C", rear speaker left "Eff. L" and rear speaker right "Eff. R".
The figures below show the installation for a stereo application and for a surround application. Please refer to the
di ensions given in this figure.
Detailed infor ation regarding the installation of the loudspeaker and the re oval of the front grille and speaker unit
can be found on the following pages.
Note: Before you install the loudspeaker please make sure that there are no electrical lines gas pipes
water pipes or heating pipes.

- 10 -
I
Tweeter level adjustment
1.) The OnWall- / bookshelf speaker provides a level
selector switch for the tweeter. So, you can adapt the
tweeter level to the roo acoustics and to personal
listening preferences.
To get access to the level selector it is necessary to
re ove the grille fro the speaker. For this, please use
the grille re oval tool (see picture).
2.) The position "0 dB" is the standard position and
therefore, it can be used for ost applications. If you
perceive an unpleasant sound of trebles on your
listening position, turn the level selector switch to "-2
dB". If you would like to increase trebles, turn the switch
to "+2 dB".
It ay be useful to do this for only one loudspeaker. This
depends on the purpose and application. The best result
will be deter ined by listening.
OnWall installation facility
The OnWall installation is very si ple. As the speaker
provides 4 wall ounting key holes, you have the possibility
to ount the speaker in 4 orientations. Which orientation
fits best to your application will be discussed in the next
chapter.
- 11 -
OnWall installation vertical
If you want to place the speaker to the wall in vertical direction, you should
choose the orientation (tweeter "at the top" or tweeter "at the botto ")
depending on the distance to the ground floor. If the distance is less than
1.50 you should put the speaker to the wall with the tweeter at the top, if
the distance is ore than 1.50 you should choose the orientation with
tweeter at the botto .
OnWall installation horizontal
If you choose horizontal OnWall
installation and you have a quite s all
base-width (s all distance between
two stereo speakers), the orientation
should be chosen with tweeters
outward.
With quite large base-width and
co parable s all distance to the
listening position, it ight be useful to
choose the orientation with tweeters
inward.
Please only take this as a note as you
should co e to the final decision by the
obligatory listening test.

- 12 -
Technische Daten / Specifications
EL C ELECTRO CUSTIC GMBH
Rendsburger Landstraße 215
2 113 Kiel
02 1005 5195
360939
Table of contents
Languages:
Other ELAC Speakers manuals

ELAC
ELAC Carina Series User manual

ELAC
ELAC A4 User manual

ELAC
ELAC Vertex III Series User manual

ELAC
ELAC DCB41 User manual

ELAC
ELAC UB5 User manual

ELAC
ELAC Discovery Z3 User manual

ELAC
ELAC Vertex III Series User manual

ELAC
ELAC FS 249 User manual

ELAC
ELAC Navis AB-51 User manual

ELAC
ELAC Uni-Fi Reference UBR62 User manual


