ElectiQ EIQSOUPM User manual

Soup Maker
User Manual
Model: EIQSOUPM
Thank you for choosing electriQ.
Please read this user manual before using this soup maker and keep it safe for future
reference.
Visit our page www.electriQ.co.uk for our entire range of electricals
2
SAFETY PRECAUTIONS
Please be sure to abide by the following safety precautions, so as to guarantee your safety and avoid
any damage and property loss to you or others. Misuse of this product can lead to serious injuries or
damage to property, please observe all safety warnings in this manual.
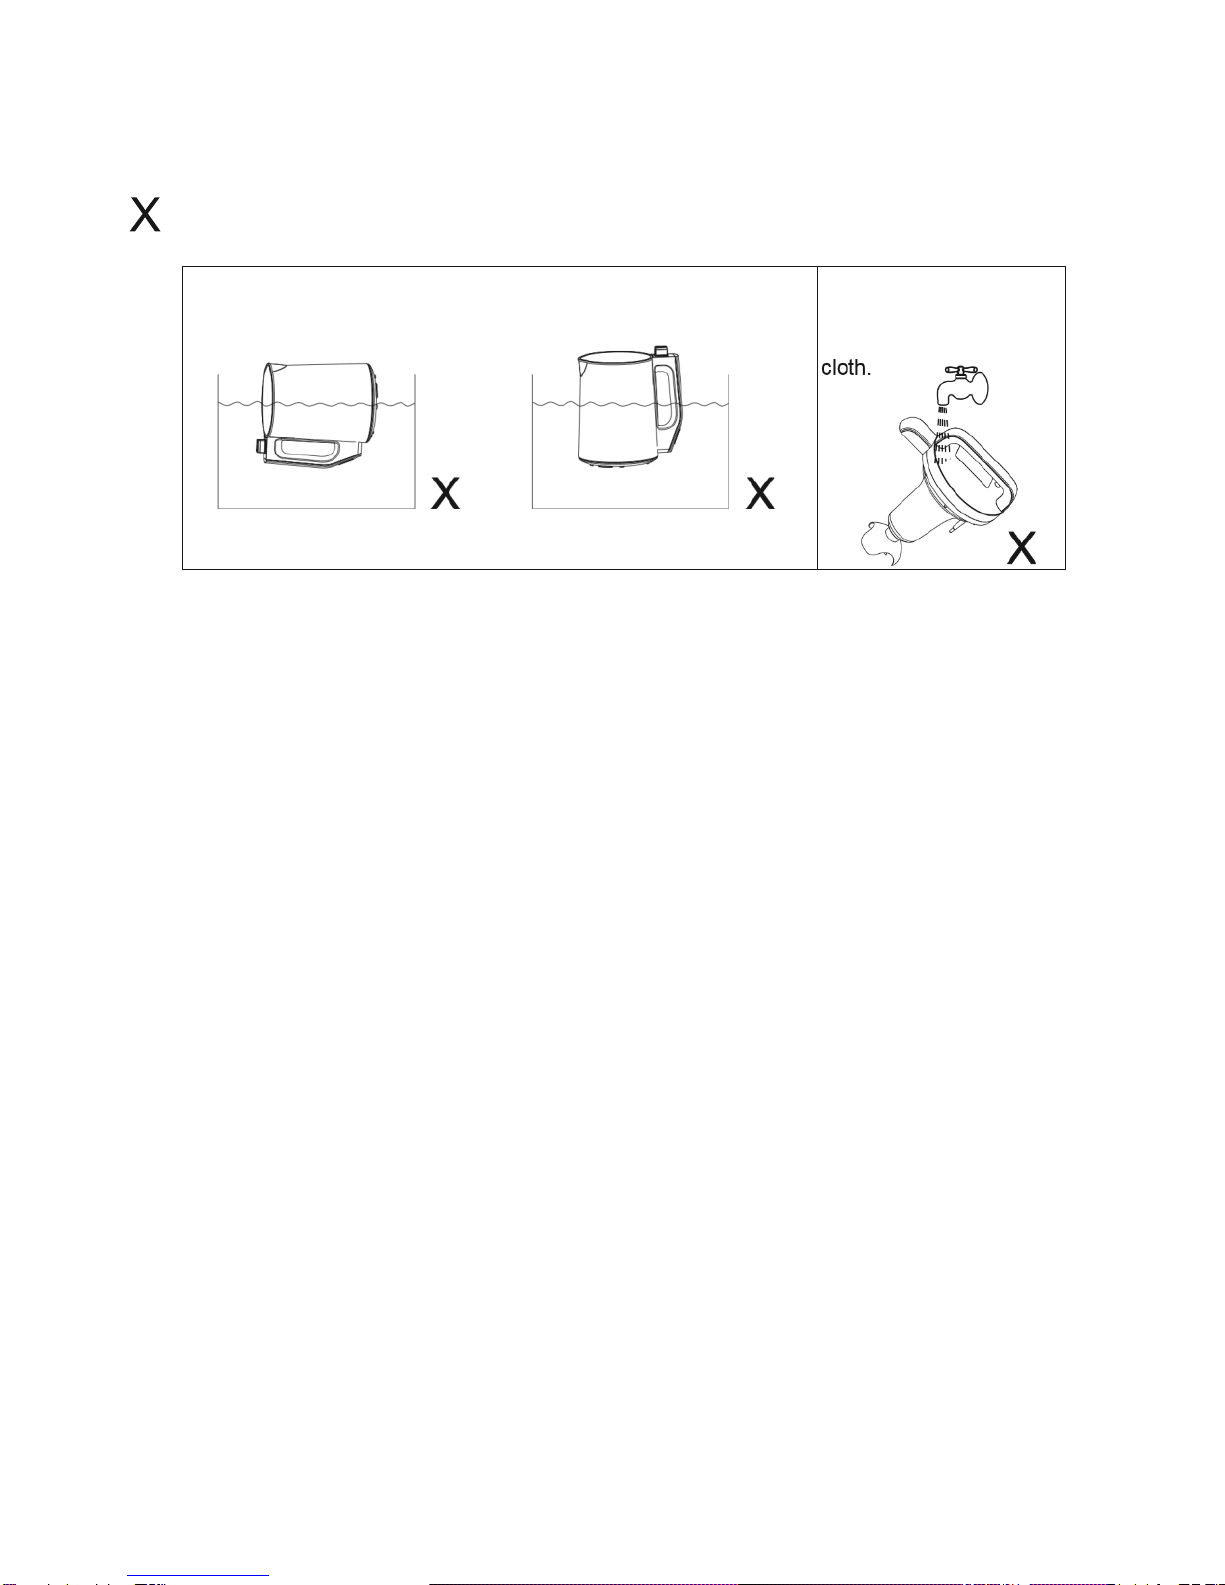
Indicates incorrect usage. Please pay special attention to this while using, to prevent personal
safety and property loss.
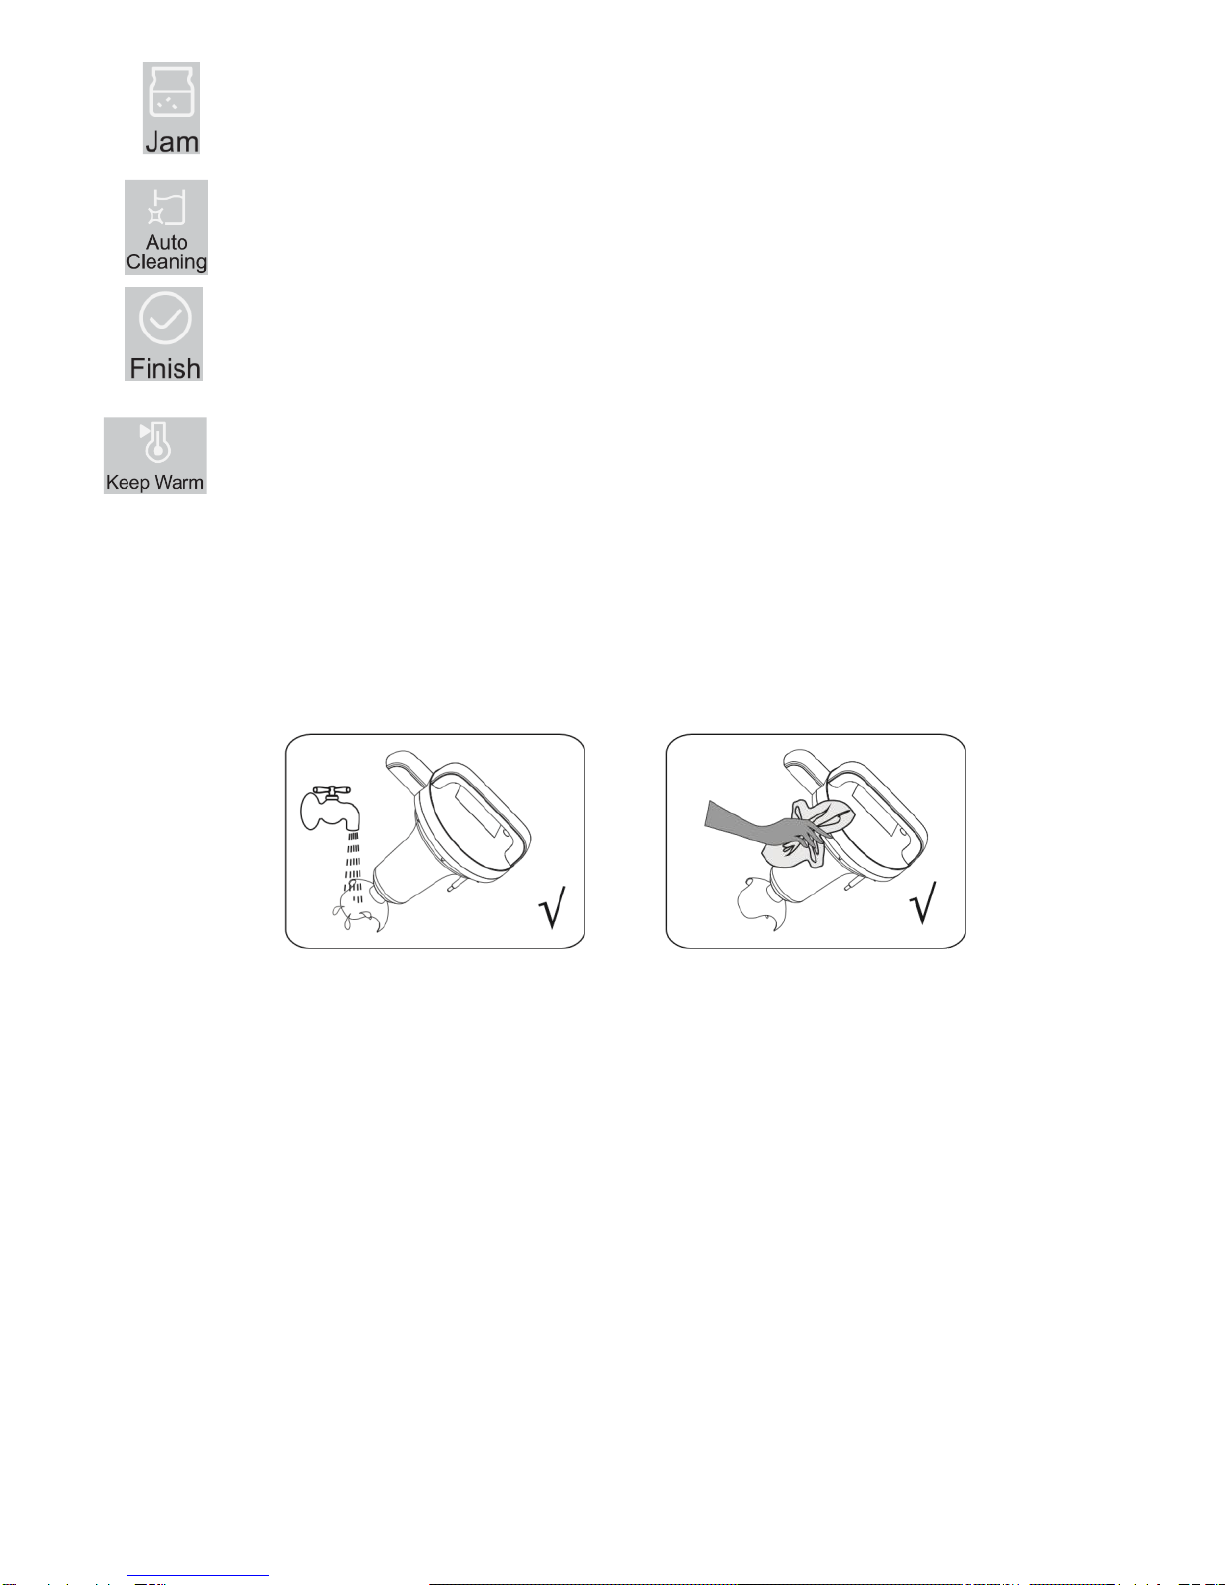
No immersing the whole soup maker into the water to clean.
No washing the machine
head directly.
Please wipe with the wet
•The product is for home use only, and shall not be used outdoors or near water.
•The product is for household use only. It is not intended for commercial use.
•Make sure the appliance is only used on a flat, stable surface.
•Do not leave the appliance running with no ingredients in.
•Do not move the appliance or touch any moving parts when the product is in use.
•This appliance can be used by persons with reduced physical, sensory or mental capabilities, or
lack of experience and knowledge, if they have been given supervision or instruction concerning
the use of the appliance in a safe way and understand the hazards involved.
•This appliance shall not be used by children.
•Children shall not play with the appliance.
•Keep the appliance and cord out of the reach of children.
•This appliance is not intended to be operated by means of an external timer or separate remove
control system.
•If the supply cable is damaged, it must be replaced with a special cable assembly available from
the manufacturer or its service agent.
•WARNING: The mixing blades are very sharp. Handle with care when using and cleaning.
•Always locate your appliance away from the edge of a worktop.
•The mains cable should reach from the socket to the base unit without straining the connections.
•Do not let the cable hang over the edge of a worktop where a child could reach it.
•Do not let the cable run across an open space e.g. between a low socket and table.
•Do not let the cable run across a cooker or toaster or other hot area which might damage the
cable.
•Extreme caution must be observed when moving an appliance with hot contents.
•Do not use product with wet or moist hands.
•Unplug the appliance from the outlet when not in use and before cleaning.
•Do not use the appliance if the mains lead is damaged.
•Do not place the appliance on or near heat sources such as gas or electric stove, ovens or
burners.
•Keep the appliance and the cable away from heat, direct sunlight, moisture, sharp edges and the
like.
•When using the unit, ensure the lid is in place before switching on.
•Do not remove the lid until the blade has stopped.
3
•Please confirm whether the voltage is consistent with the specification of this product before use
(220V~240V 50Hz).
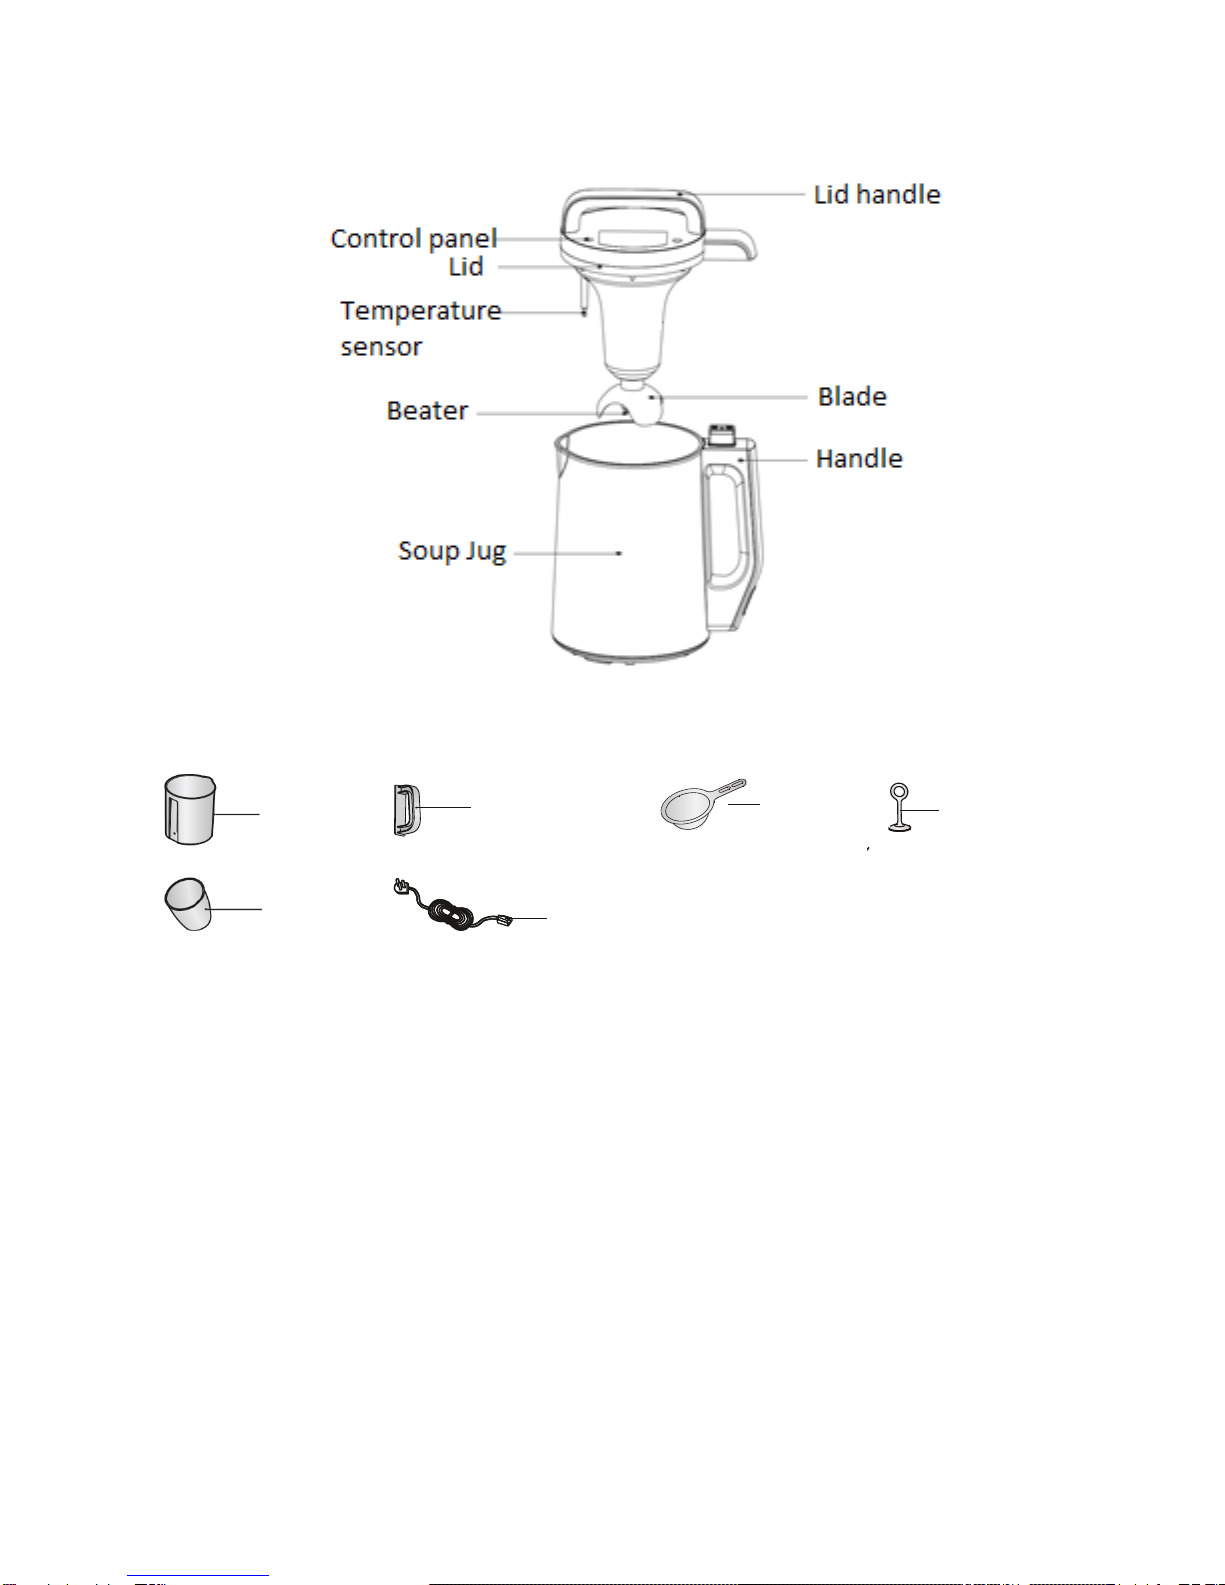
Name of Product Component
Accessories
Instructions for Use
Precautions for Use
•The optimum distance between the product and other kitchen appliance products is above 30cm.
•Make sure the lid is placed on the jug firmly and the power connection is firmly in place. If the lid is
not firmly in place the appliance may not run as the power will not be connected.
•Do not remove the lid whilst the appliance is running.
•Do not use this appliance to warm cold soup or other pre-prepared liquids.
•Make sure to use the correct setting for the desired food types or it may lead to burning of the food,
overflowing, not cooking or not blending.
•Be careful to measure ingredients out in accordance with the recipe so as to avoid burning,
undercooking or overflowing.
•Do not reheat food in this appliance.
Jug
Jug
Handle
Sieve
Mixer
Measuring
Jug
Power Cable
4
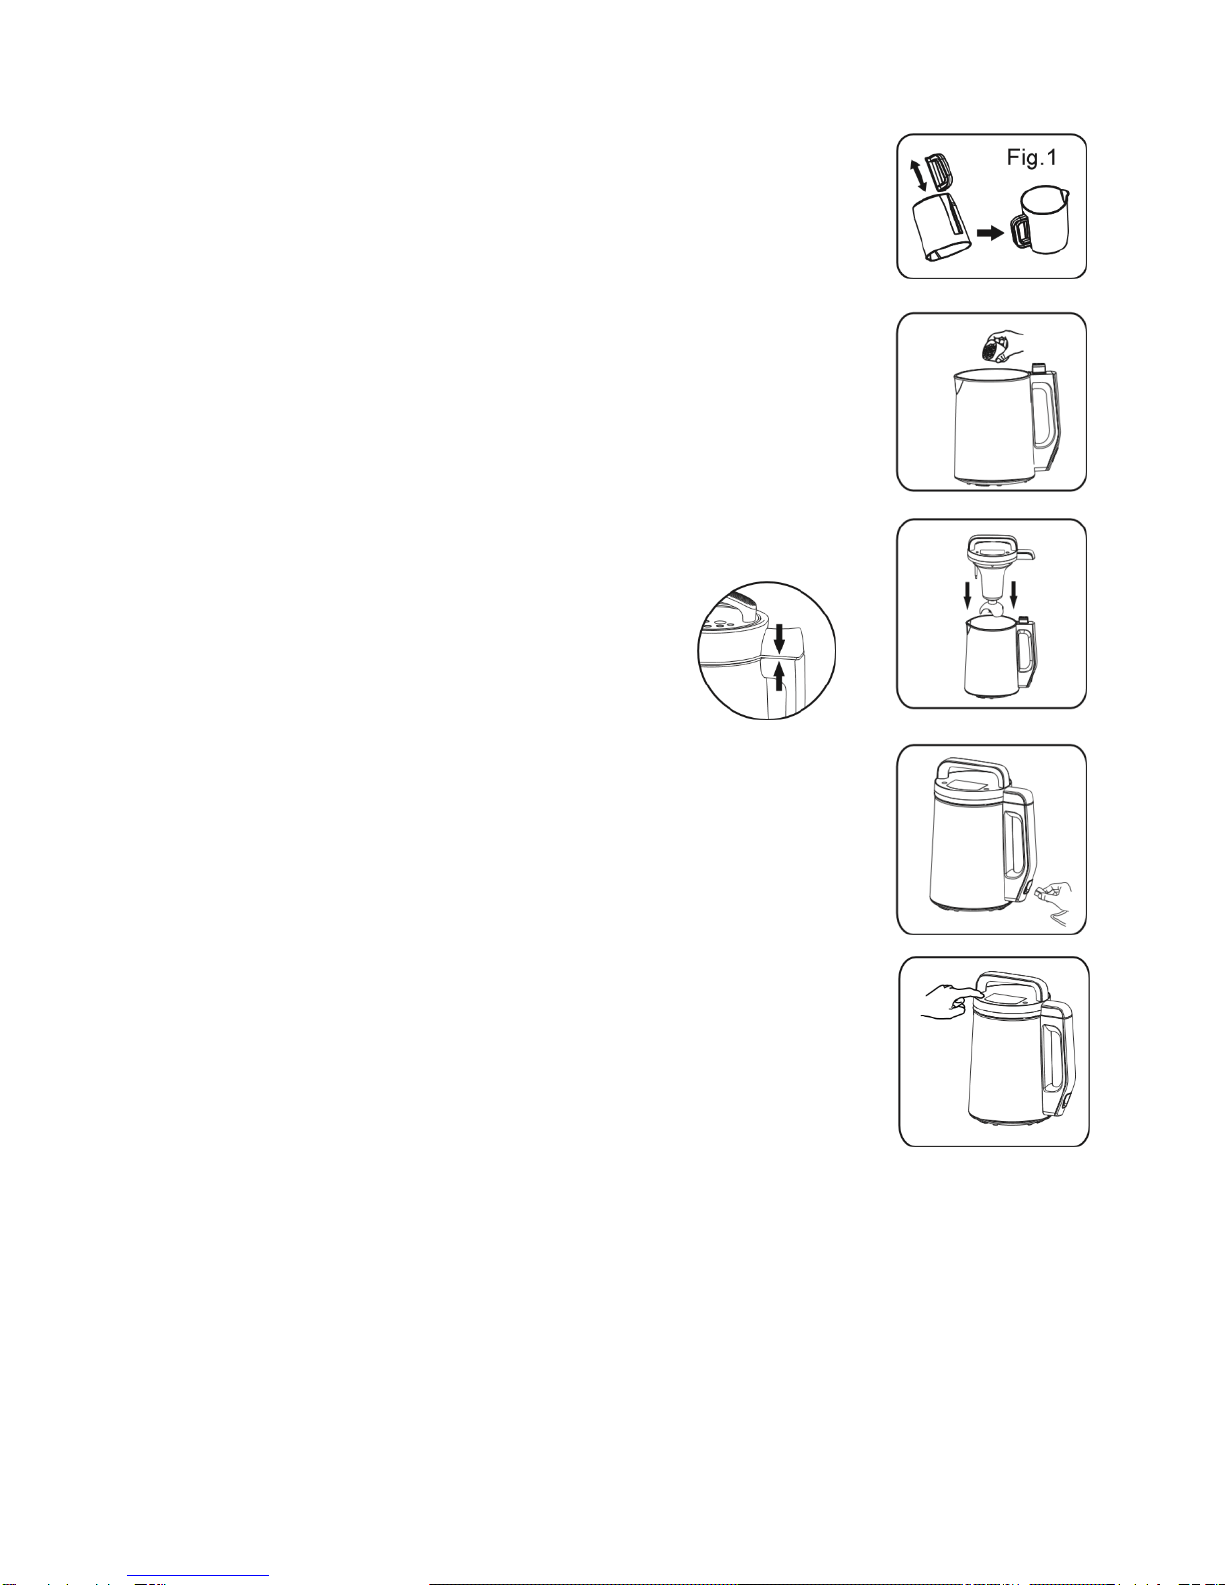
Operating instructions before use
1. Remove all packaging and contents from the main jug of the appliance
before use. Wash and clean the appliance and all accessories before first use
(see cleaning and maintenance instructions).
2. Fit the handle to the jug as in Fig. 1.
Instructions for Use
1. Fill out the materials with the measuring cup provided according to
the recipe and add into the main body of the appliance. Add clean, tepid water
between the lower water line and the upper water line (depending on the
volume you require).
(Note: the quality of the end product will be affected if the water level is too
low or too high).
2. Place the lid onto the soup jug base making sure that the connector
is seated correctly.
Note:
Please make sure the connection is firmly in place as
the appliance will not run if it is not.
3. Plug the power lead into the appliance and the power will come on,
the buzzer will "Beep". The control panel will show a light behind the “Smooth”
function.
4. Operation of function keys: Press the "Function" key to select the
corresponding function. Press "Start/Cancel" key to start the program.
(Note: When selecting "JUICE, BLEND" function, the machine only mixes,
without heating; and purified water should be added.)
5. When the program is complete the unit will repeatedly beep. Unplug
the power cable from the mains supply and the appliance. Either remove the
lid and pour out the contents for immediate consumption or leave the lid on
and the contents will remain warm thanks to the insulated double wall.
6. The appliance has a power-off memory function. In case of a sudden loss of power (power
failure or accidental removal of the lid) when the machine works normally, it shall power on again in 3
min or reset the head of the machine, so that the machine will continue working.
7. The insulation will keep the contents warm for 1h after the end of the cycle.
9. Error pulping: When the buzzer makes the sound and all display lamps flicker, an error has
occurred. This could be due to the water level being above the maximum level line. Remove some of
the water to below the maximum level line and try again.
5
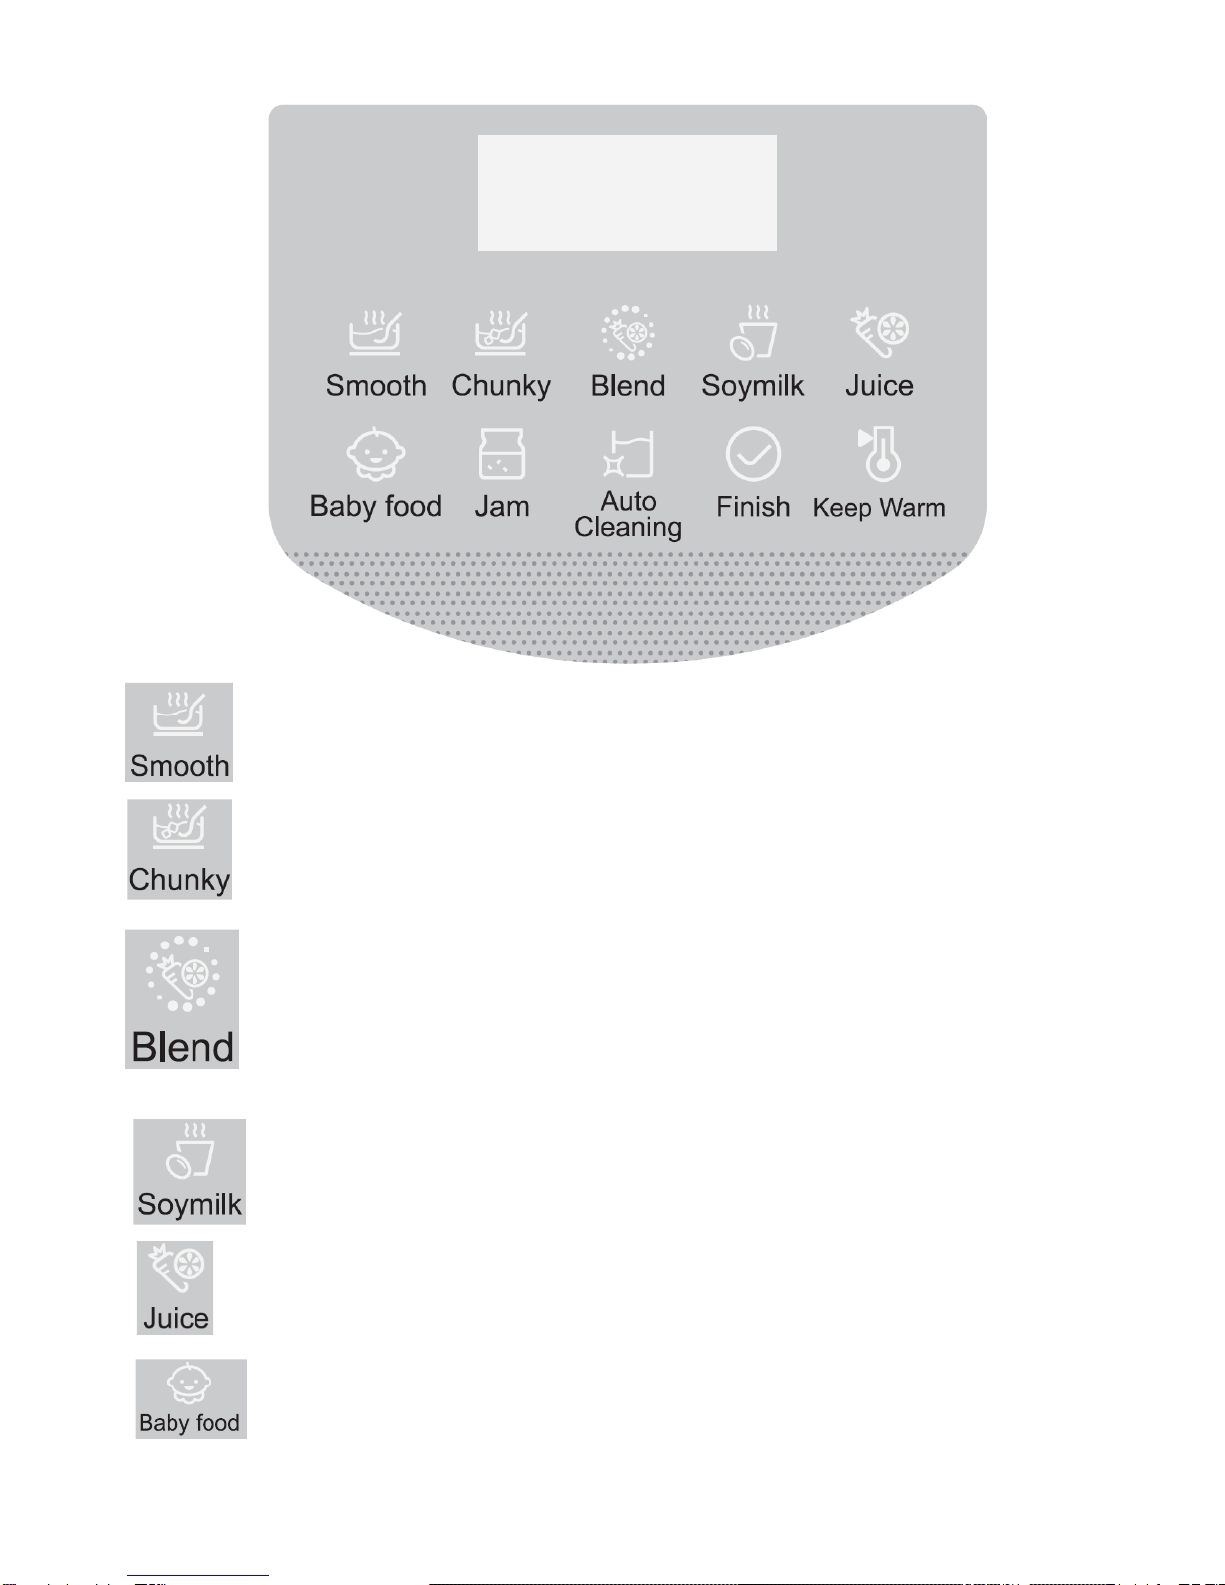
Control panel
Prepare the amount of foods according to the recipe, put them in the soup jug, switch on
the power, press “Function” button, select “SMOOTH” function, then press
“START/CANCEL” button again, and wait for about 21min to complete.
Prepare the amount of foods according to the recipe, put them in the soup jug, switch on
the power, press “Function” button, select “CHUNKY” function, then press
“START/CANCEL” button again, and wait for about 28min to complete.
Prepare the amount of foods according to the recipe, put them in the soup jug, switch on
the power, press “Function” button, select “BLEND” function, press “START/CANCEL”
button again, and then press and hold “START/CANCEL” button for agitating. ((The
maximum continuous agitating time is 20S;)The maximum agitating time of such
function cannot exceed 2min, and after use, the power will be shut off for 10min, so as
to cool the motor sufficiently before being used again.)
Prepare 125g soybean and 1.0-1.3L pure water and put them in the soup jug, switch on
the power, press “Function” button and select “SOYMILK” function, press
“START/CANCEL” button and wait for about 32min to complete.
Prepare the amount of foods according to the recipe, put them in the soup jug, switch
on the power, press “Function” button, select “JUICE” function, then press
“START/CANCEL” button again, and wait for about 3min to complete.
Prepare the amount of food according to the recipe and 1.0-1.3L pure water and put them
in the soup jug, switch on the power, press “Function” button and select “baby food”
function, press “START/CANCEL” button and wait for about 28min to complete.
6
Prepare the amount of foods according to the recipe, put them in the soup jug, switch on
the power, press “Function” button, select “JAM” function, then press “START/CANCEL”
button again, and wait for about 30min to complete.
Put in 1-1.3L clean water, select the clean function to wash automatically. The appliance will
heat up (taking about 8 minutes). The blender will start to run after about 5 minutes, cycling
on and off around 6 times. The timer will then set for 10 minutes and count down.
After foods are prepared completely, LED light is on.
After preparation is completed by using “SMOOTH/CHUNKY/SOYMILK/JAM” function,
the soup maker will be in keep warm status, and the insulation time is one hour. During
thermal insulation, Keep Warm indicator light is on.
Cleaning and Maintenance
Cleaning
1. Firstly unplug the power plug from the mains and the appliance. Take off the lid from the soup
maker; clean the part that the machine head is contacted with the food, including the spill-proof rod,
cutter shaft of motor. Clean the appliance in a timely manner after use to avoid staining of the parts.
2. Pour out the processed soup, and clean the internal part of the stainless steel barrel with tap
water. (Do not immerse the base of the soup jug in water.) Use a soft damp cloth to clean the external
body of the appliance.
3. After the soup maker is used, the food residue on the surface of the body should be cleaned in
a timely manner, otherwise, the residues will be attached to the surface of the body after drying, thus,
damaging the surface coating. Do not use any abrasive cleaning products.
5. Tips:
(1) Please pay attention to the safety when cleaning. The blade of the machine head is sharp.
(2) The lid, milk receiving cup and other accessories shall not be put into the dishwasher or microwave
oven for drying or cleaning.

7
Fault analysis and troubleshooting
Fault
Analysis
Troubleshooting
The indicating lamp is off
The plug or cable is not inserted well.
Inspect the plug and cable.
The machine head is not placed well on the
body.
Re-inspect and place correctly.
The machine has a fault.
Send to the after-sales service department
for maintenance.
The indicating lamp is on,
but the machine does not
work (no action)
Fail to press to start.
Repress to start
The machine has a fault.
Send to the after-sales service department
for maintenance
The machine is heating,
without mixing.
It is in the heating stage of the procedure.
Wait for several minutes.
The machine has a fault.
Send to the after-sales service department
for maintenance
The soup is not cooked,
and the food overflows
and is burnt to the
bottom.
The water volume is too little or too much.
Add the water between the upper and
lower water lines.
The dosage of the food is too little or too
much.
Add the food according to the provision in
operation.
Mismatch the selected function and food.
Select the correct functional for the
Instructions.
The machine has a fault.
Send to the after-sales service department
for maintenance.
The working time is
longer than that indicated
for the specified function.
The spill-proof rod is not cleaned up.
Wash the machine head and spill-proof
rod with water.
The water temperature is too low
Use warm temperature
The water volume is too much
Add the water between the upper and
lower water lines.
All LED indicating lamps
continue to flicker, and
the synchronous buzzer
beeps continuously.
The water volume is too much
Please correctly add the material and
water in accordance with the instructions,
and plug in again to confirm whether to be
normal or send to the after-sales service
department for maintenance.

8
APPROXIMATE COOKING TIMES
Tips:
The fruits and vegetables shall have their seeds removed and cut into the small blocks with the size of
10mm*10mm *10mm before making adding to the soup jug.
Setting
Menu
Ingredients
Method
Approximate
cooking time
(mins)
Smooth
Tomato Soup
350ml Tomato Passata
280g Tin Plum Tomatoes or chopped
Tomatoes
2 Chicken or Vegetable Stock Cubes
70ml Double Cream
Top up to your minimum level with
semi skimmed milk
1.Add all the ingredients into your soup
maker.
2.This soup is made by using the smooth
setting. If it isn't smooth enough for your
taste, use a stick blender to smooth it
even more.
21
Cabbage Soup
350g Cabbage, Shredded
70g Potatoes, Peeled and Chopped
70g Onions, Chopped Finely
1 Teaspoon Olive Oil
1 Clove of Garlic, Crushed
1 Vegetable Stock Cubes
560ml Boiling Water
1. Sauté your onions, herbs and garlic in
the olive oil until the onions are soft.
2. Add all the ingredients to the pot.
3. Choose the smooth setting.
21
Chunky
Chunky Vegetable
Soup
1 Tablespoon Olive Oil
70g Onions, Chopped
140g Carrots, Peeled, and Diced
70g Parsnip, Peeled and Diced
70g Leek, Trimmed and Sliced
70g Greens (Green Beans, Sugar
Snap Peas etc) Sliced
50g Red Lentil
420ml Vegetable Stock
140ml Semi Skimmed Milk
1. Sauté the onions and leek in the olive
oil for around three minutes, or until soft.
2. Add lentils, stock and vegetables to the
pot. Select the chunky setting if you
prefer to see your vegetables in a soup.
Stir the ingredients well in the pot.
3. Wait up to 28 minutes for your finished
soup, serve with fresh bread or
croutons.
28
Blend
Mixer
500g fruit, de-seeded and peeled,
(such as: banana and apple)
560mL milk or yoghourt
1. Wash the fruit cleanly with water, de-
seed and peel, and cut into
10mm*10mm size.
2. Add the fruit into the soup machine,
and select Blend procedure. Press and
hold the key to mix, (the continuous
mixing time is 20S at most). This gear can
be repeatedly operated, until to make the
food that you are satisfied. (The longest
continuous service time of this function
cannot be more than 2min, it shall power
off for 10min after use, this function, and
the function can continue to be used after
the motor is fully cooled, so as to avoid
burning out the motor.)
0.33
Soymilk
Rapid soybean milk
125g soybean 1L-
1.3L pure water
1. Wash the soybean with
water cleanly.
2. Add the soybean to the soup
machine, and select the Soymilk
procedure.
3. Wait up to 32 minutes for
your finished soup, serve with fresh
bread or croutons.
32

9
juice
Raspberry
Smoothie
640ml low fat raspberry yoghurt
210ml semi skimmed milk
210g raspberries (allow thawing if
frozen)
1. Place ingredients into the Soup Maker,
stir thoroughly.
2. Select the juice setting and simply wait
for 3 minutes until the Soup Maker has
finished.
3. Serve straight away.
2.3
juice
Strawberry and
Pineapple
Smoothie
210g fresh strawberries
180g fresh pineapple, peeled
430g low fat strawberry yoghurt
120ml semi skimmed milk
1scoop of vanilla ice cream
1. Prepare and hull the strawberries, cut
any large ones in half. Chop the
pineapple into chunks.
2. Place ingredients into the Soup Maker,
stir thoroughly.
3. Select the juice setting and simply wait
for 3 minutes until the Soup Maker has
finished.
4. Serve straight away.
3
Chocolate Banana
Smoothie
630g cartons low fat strawberry yoghurt
210-280ml semi skimmed milk (to taste)
2 bananas, peeled and sliced thinly
4tbsp caster sugar
70-120g dark chocolate
1. Melt the chocolate in either a
microwave or over a pan of hot water.
2. Add all ingredients to the Soup Maker,
stir thoroughly.
3. Select the juice setting and simply wait
for 3 minutes until the Soup Maker has
finished.
4. Serve straight away.
3
Baby food
Rice paste
100g rice
1L-1.3L pure water
1. Wash the rice with water cleanly.
2. Add the rice to the soup machine.
3. Wait up to 28minutes for your finished
soup.
28
Jam
Apple jam
700g apple, de-seeded and peeled.
140mLpure water 1/2
cup of Lemon juice
White sugar appropriate.
1. Wash the apple with water
cleanly, de-seeded and peel, and cut
into 10mm×10mm block.
2. Add the apple into the soup
machine, and select Jam procedure.
3. Wait up to 30 minutes for
your finished soup, serve with fresh
bread or croutons.
30
Note:
Recipes are for reference only.
Quantities can be varied according to ingredients and personal taste.
TECHNICAL SPECIFICATION
Rated voltage
Power consumption
Class rating
BS 1362 fuse
220 - 240V AC 50/60Hz
800-952W
1 (earthed)
3A

10
electriQ UK SUPPORT
www.electriQ.co.uk/support
Complete online support form on www.electriQ.co.uk/support
Service Line: 0871 620 1057
Office hours: 9AM - 5PM Monday to Friday
www.electriQ.co.uk Unit 2, The Nursery
Berristow Lane South Normanton
Derbyshire, DE55 2FX
Disposal: Do not dispose this product as unsorted municipal waste. Collection of such waste
must be handled separately as special treatment is necessary.
Recycling facilities are now available for all customers at which you can deposit your old
electrical products. Customers will be able to take any old electrical equipment to participating civic
amenity sites run by their local councils. Please remember that this equipment will be further handled
during the recycling process, so please be considerate when depositing your equipment. Please contact
the local council for details of your local household waste recycling centres.
Table of contents


