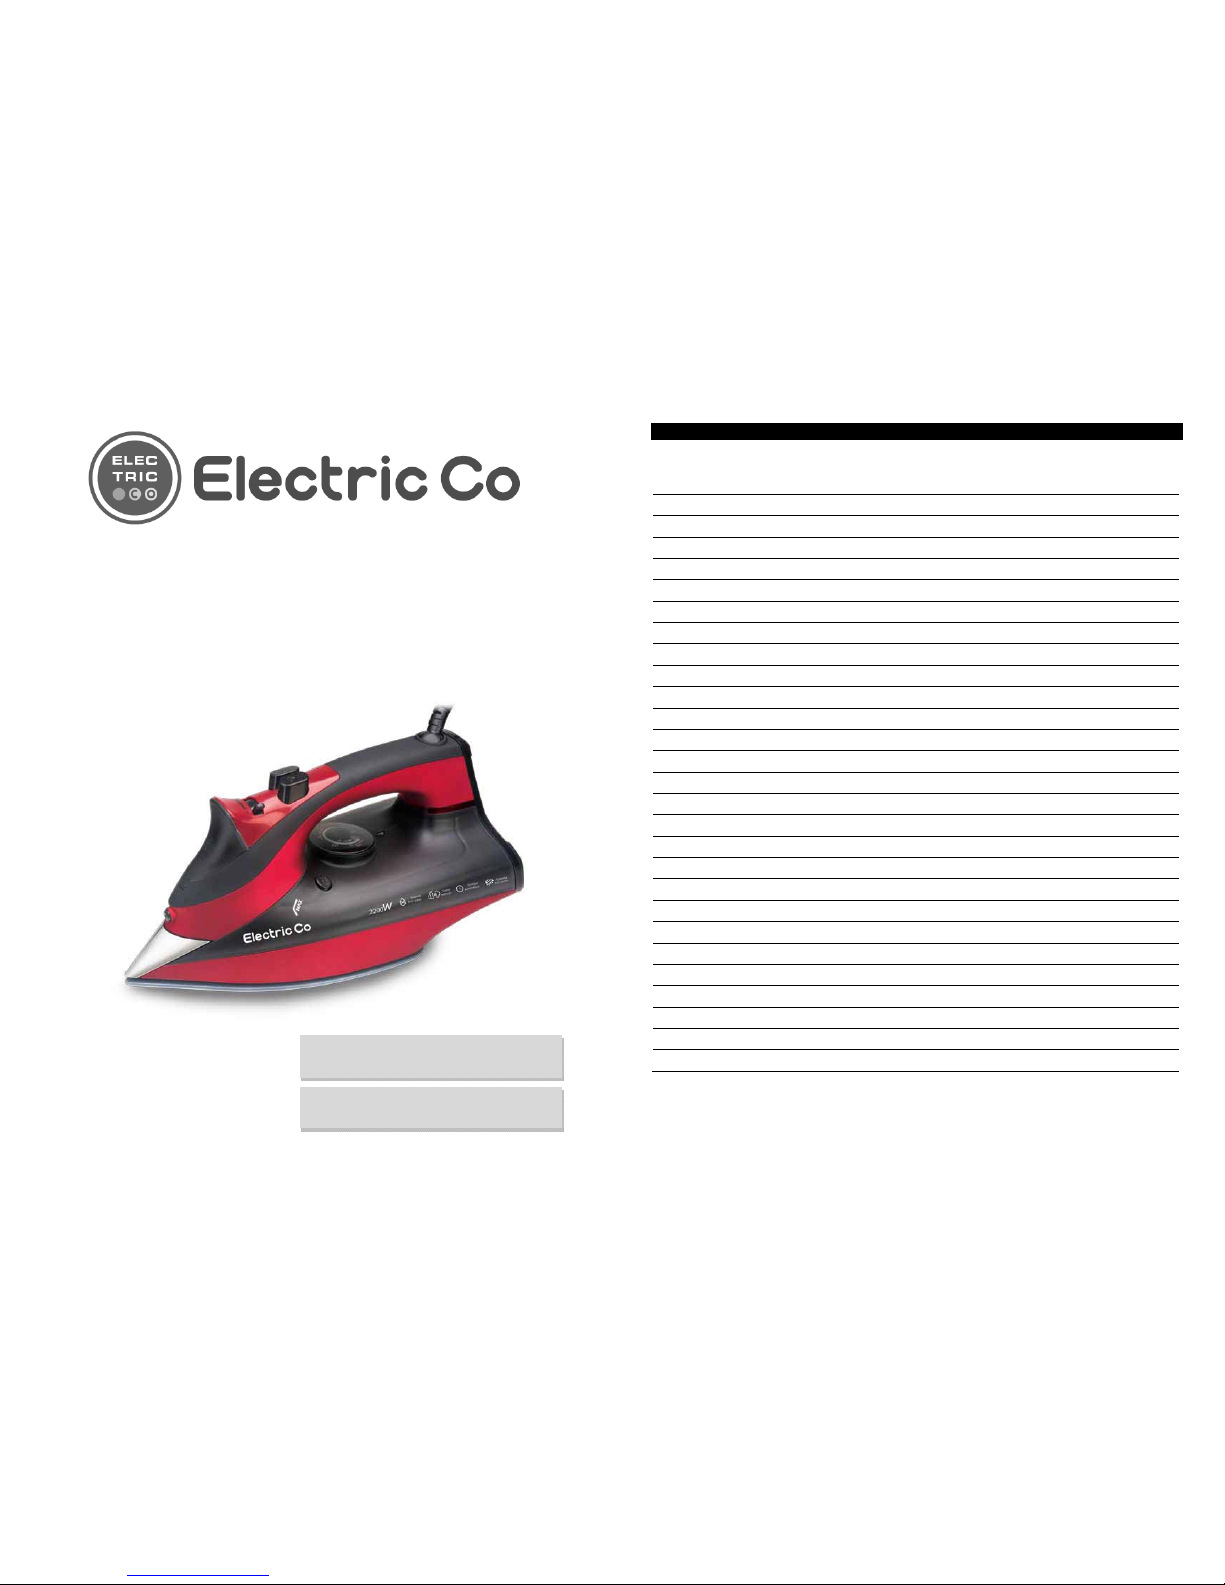
Electric Co SI2200W User manual
FERRO DE ENGOMAR A VAPOR REF. SI2200W
STEAM IRON REF. SI2200W
MANUAL DE INSTRUÇÕES
INSTRUCTION MANUAL
2
ÍNDICE
Pág.
INTRODUÇÃO 3
INSTRUÇÕES DE SEGURANÇA 3
DESCRIÇÃO DAS PARTES 9
DESCRIÇÃO GERAL 10
ESPECIFICAÇÕES TÉCNICAS 10
UTILIZAÇÃO DO APARELHO 10
ANTES DA UTILIZAÇÃO 10
ENCHIMENTO DO DEPÓSITO DE ÁGUA 10
FUNCIONAMENTO 11
SELECÇÃO DATEMPERATURA 11
SELECÇÃO DA TEMPERATURA PARA ENGOMAR A VAPOR 12
ENGOMAR SEM VAPOR 12
JACTO DE ÁGUA 12
JACTO DE VAPOR 12
ENGOMAR VERTICAMENTE 13
SISTEMAANTIGOTAS 13
SISTEMAANTICALCÁRIO INTEGRADO 13
FUNÇÃO AUTOLIMPEZA 13
SISTEMA DE DESLIGAR AUTOMÁTICO 14
ESVAZIAMENTO DO RESERVATÓRIO DE ÁGUA 14
DICAS 14
RESOLUÇÃO DE PROBLEMAS 15
LIMPEZA 17
PROTECÇÃO DO AMBIENTE – 2002/96/EC 18
GARANTIA E ASSISTÊNCIA 18
CONDIÇÕES DE GARANTIA 18
CERTIFICADO DE GARANTIA 35

3
INTRODUÇÃO
Agradecemos a sua escolha, este aparelho Electric Co irá certamente facilitar o seu dia-a-
dia. Leia atentamente este manual de instruções antes de colocar o aparelho em
funcionamento, para que possa tirar o máximo partido do mesmo, e guarde-o para
referência futura.
INSTRUÇÕES DE SEGURANÇA
ESTE APARELHO DESTINA-SE EXCLUSIVAMENTE A
UTILIZAÇÃO DOMÉSTICA!
Para reduzir o risco de acidentes pessoais, incêndio ou
danos quando utilizar aparelhos eléctricos, deve seguir
sempre as precauções de segurança básicas, incluindo as
seguintes:
-Antes de utilizar o aparelho, verifique na etiqueta de
especificações técnicas se a corrente eléctrica
corresponde à rede eléctrica da sua habitação. A etiqueta
está colocada no aparelho. Em caso de dúvida, recorra à
ajuda de um electricista qualificado.
-Este aparelho pode ser utilizado por crianças de 8 ou
mais anos e pessoas com capacidades físicas, sensoriais
ou mentais reduzidas ou sem experiência e conhecimento
para o seu manuseamento, se tiverem recebido
supervisão ou instruções relativas à utilização do aparelho
de forma segura e compreenderem os riscos envolvidos.
As crianças não devem brincar com o aparelho.Alimpeza
e manutenção não devem ser feitas por crianças sem
supervisão.
4
-Nunca deixe o aparelho sem supervisão durante a
utilização e enquanto estiver ligado à tomada. Caso tenha
de se ausentar, mesmo que seja por um breve período de
tempo, desligue o aparelho no termóstato, coloque-o na
sua posição de descanso e desligue-o da tomada.
-Desligue sempre o aparelho da tomada de alimentação
antes de proceder ao enchimento do reservatório de água.
-Utilize sempre o aparelho sobre uma superfície plana,
estável e resistente ao calor.
-Sempre que colocar o ferro na posição de descanso
certifique-se que a superfície onde este é colocado é
estável.
-O aparelho não deve ser utilizado se tiver sofrido uma
queda, se mostrar sinais visíveis de danos, se apresentar
perdas de água, se não estiver a funcionar correctamente
ou se detectar alguma anomalia no cabo de alimentação
ou na ficha. Sempre que detectar alguma avaria e/ou
anomalia dirija-se à loja onde o adquiriu ou a um técnico
qualificado, a fim de efectuar a reparação ou substituição
do aparelho ou do cabo de alimentação. Assegure-se que
somente são usadas peças novas e recomendadas.
-Mantenha o aparelho e o cabo de alimentação afastados
de crianças com idade inferior a 8 anos enquanto o
aparelho estiver ligado ou a arrefecer.
-Caso o cabo de alimentação apresente danos, este deve
ser substituído pelo fabricante, por um serviço de

5
assistência técnica ou por um técnico devidamente
qualificado de forma a evitar riscos.
-Após desembalar o aparelho, certifique-se que não está
danificado e que não falta nenhuma peça. Em caso de
dúvida contacte o Serviço de Informação ao Cliente. Todo
o conteúdo da embalagem, como por exemplo, sacos de
plástico, esferovite, fitas, etc., deve ser mantido fora do
alcance das crianças pois pode ser perigoso e causar
asfixia. Deve utilizar apenas os acessórios recomendados
pelo fabricante e contidos nesta embalagem, sob o risco
de acidente ou danos no aparelho.
-Este aparelho foi concebido apenas para uso doméstico.
Qualquer outro uso será considerado impróprio e
consequentemente perigoso. O fabricante não pode ser
responsabilizado por nenhuns ferimentos ou danos
resultantes do uso impróprio do aparelho.
-Nunca desmonte ou tente efectuar qualquer tipo de
reparação no aparelho. Caso não cumpra com esta norma
de segurança pode colocar em risco a sua própria
segurança e invalidar os termos da garantia. Somente
pessoal técnico, devidamente qualificado, pode efectuar
qualquer tipo de reparação neste aparelho.
-De forma a evitar riscos de incêndio ou choques
eléctricos, certifique-se que nenhum tipo de líquido entra
em contacto com as partes eléctricas do aparelho ou com
o cabo de alimentação. Não exponha o aparelho à
humidade, não o utilize no exterior e mantenha-o afastado
6
de fontes directas ou indirectas de água, como por
exemplo, lavatórios, jarras, vasos, etc. No caso de derrame
de qualquer líquido sobre as partes eléctricas, desligue o
aparelho imediatamente da fonte de alimentação e dirija-se
à loja onde o adquiriu ou a um técnico qualificado para
reparação.
-Na primeira utilização pode sentir um odor estranho
durante o aquecimento do aparelho. Isso é normal e
inofensivo, e desaparece após alguns instantes.
-Como este aparelho atinge altas temperaturas durante a
utilização, recomenda-se que não toque na sua base, no
jacto de água ou no jacto de vapor quente, para evitar
queimaduras e não aproxime o aparelho, enquanto
quente, de qualquer produto inflamável para evitar o risco
de acidente.
-Não coloque nenhum objecto por cima do cabo de
alimentação, nunca o dobre ou torça e certifique-se que o
mantém afastado de arestas cortantes, superfícies
quentes, nomeadamente da base do ferro, e de locais de
normal circulação de pessoas de forma a evitar quedas.
Não deixe que o cabo de alimentação fique pendurado de
forma que uma criança com menos de 8 anos de idade o
possa agarrar.
-Não enrole o cabo de alimentação à volta do aparelho
para o arrumar, sem que este tenha arrefecido
completamente.
-Segure sempre na ficha para desligar o aparelho da fonte

7
de alimentação. Nunca o faça puxando pelo cabo de
alimentação.
-Evite utilizar adaptadores e cabos de extensão. Se
necessário, utilize apenas os recomendados para este tipo
de aparelho.
-Depois de utilizar, antes de encher ou esvaziar o
reservatório e antes de proceder a qualquer operação
limpeza ou arrumação, certifique-se que o botão regulador
de saída de vapor está na posição de desligado, que o
aparelho está desligado da fonte de alimentação e
colocado na posição de descanso vertical, e que arrefeceu
por completo. Tenha especial cuidado quando virar o
aparelho ao contrário, pois a água do reservatório pode
ainda estar quente.
-Sempre que pretender pousar o aparelho durante a sua
utilização, coloque-o na posição de descanso vertical,
sobre o apoio existente na parte de trás e sobre uma
superfície estável.
-Nunca engome a roupa no corpo, nem a vista
imediatamente após engomar, para evitar queimaduras
graves.
-O vapor libertado é muito quente e pode ser perigoso.
Nunca direccione directamente o vapor a pessoas ou
animais.
-Autilização de água mineral ou com depósito pode gerar
calcário no aparelho e bloquear as saídas de vapor pelo
que é recomendada a utilização de água destilada. Nunca
8
utilize água descalcificada quimicamente.
-Não adicione produtos químicos, descalcificantes,
aromatizantes, perfumes ou outros produtos capazes de
danificar o aparelho, no reservatório de água. O não
cumprimento destas instruções implica a anulação dos
termos da garantia.
-De forma a evitar danos não permita o contacto da base
com objectos metálicos.
-Não mergulhe o aparelho em água ou quaisquer outros
líquidos.
-Este aparelho não se destina a funcionar através de
temporizadores externos ou de sistemas de controlo
remoto separados.
-Este aparelho é de Classe I e possui de origem um cabo
de alimentação e uma ficha com ligação terra, pelo que
deve ser sempre ligado a uma tomada com ligação terra
incorporada. Se a tomada eléctrica não tiver ligação terra,
é da responsabilidade pessoal do cliente substitui-la por
uma com ligação terra.
-Desligue o aparelho da fonte de alimentação antes de
proceder a qualquer operação de limpeza e aguarde que
arrefeça por completo.
9
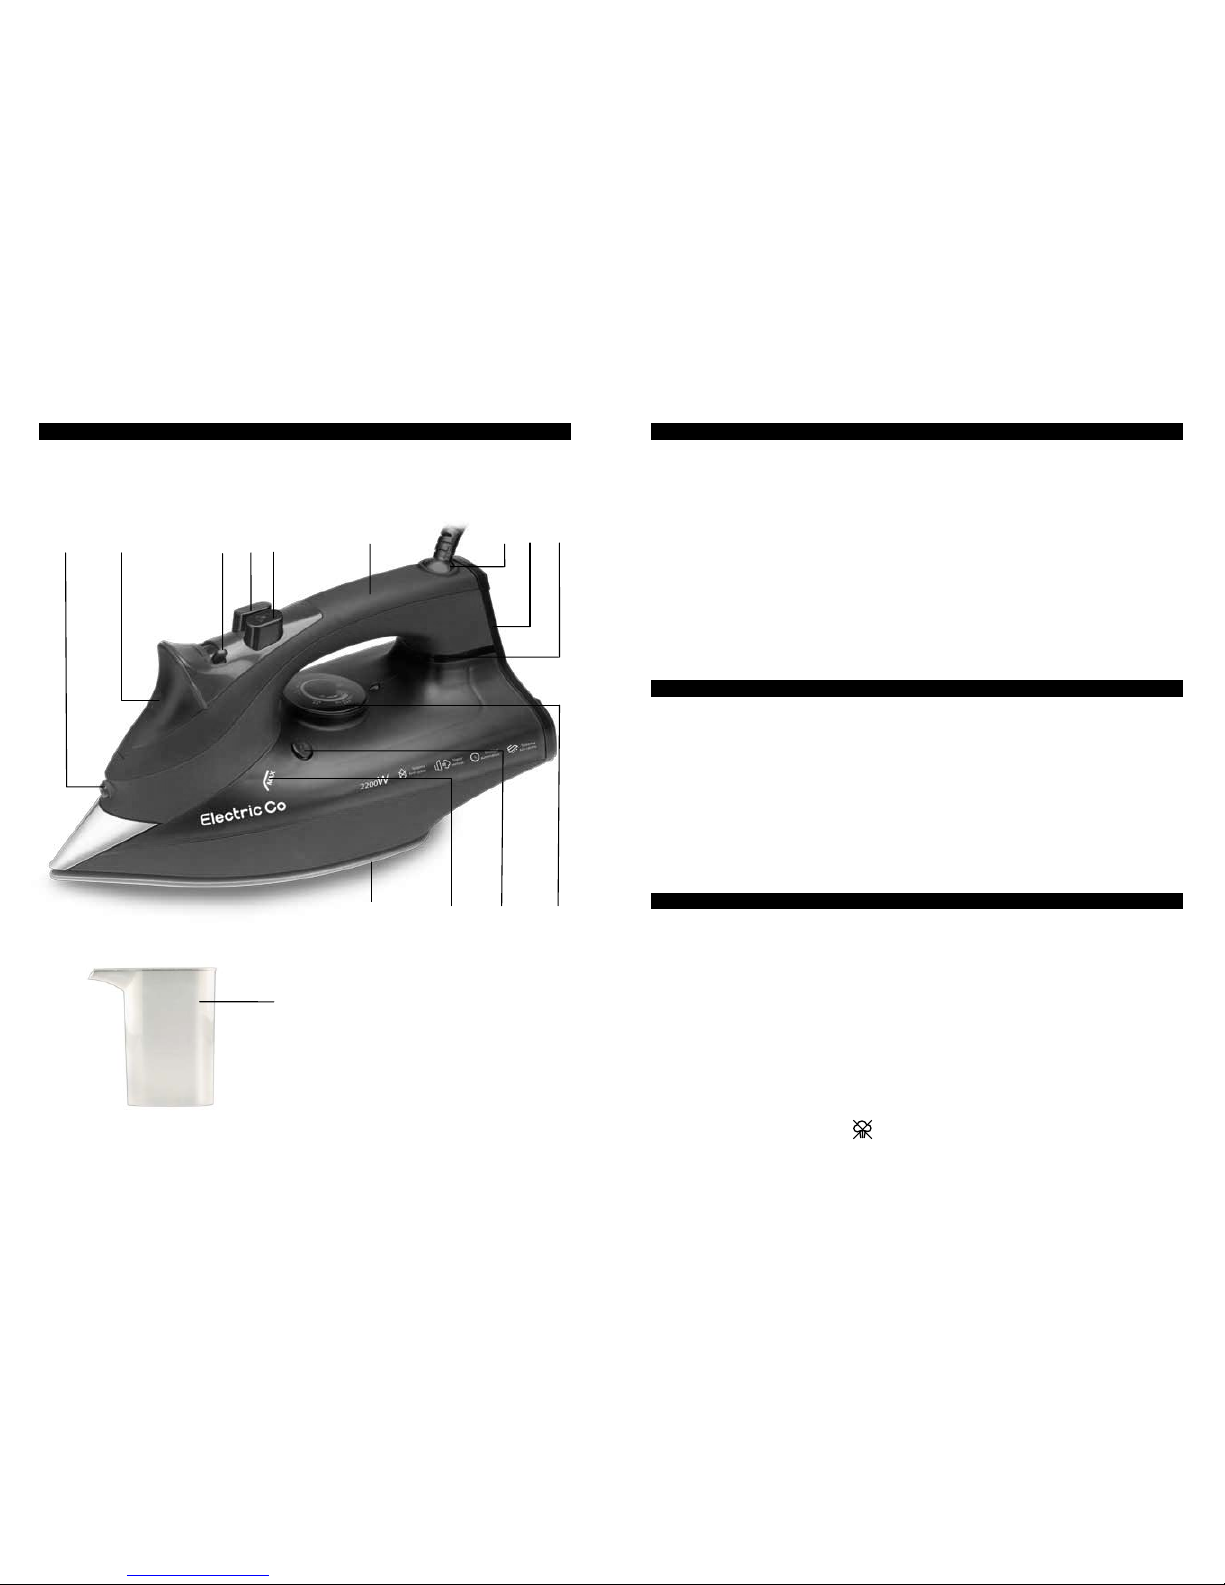
DESCRIÇÃO DAS PARTES
A B C D E F G H I
J
KL
M
N
10
DESCRIÇÃO GERAL
A. Saída do jacto de água
B. Tampa do depósito de água
C. Regulador de saída de vapor
D. Botão do jacto de água
E. Botão do jacto de vapor
F. Pega
G. Cabo de alimentação com extremidade rotativa de 360º
H. Base de descanso vertical
I. Luz indicadora de temperatura
J. Botão selector de temperatura
K. Botão autolimpeza
L. Nível máximo de água
M. Base cerâmica
N. Copo plástico
ESPECIFICAÇÕES TÉCNICAS
Tensão de alimentação: 230V ~ 50Hz
Potência: 2200W
Capacidade do reservatório de água: 350 ml
Débito de vapor contínuo: até 25g/min
Função jacto de água
Função jacto de vapor: 0,5-0,9g por utilização
Função jacto de vapor vertical
Sistema de desligar automático
Sistema anticalcário integrado
Sistema antigotas
Função de auto limpeza
UTILIZAÇÃO DO APARELHO
O Ferro de Engomar a Vapor SI2200W Electric Co tem uma saída de vapor regulável e a
temperatura ajustável a cada tipo de tecido. A base permite um óptimo deslizar com
resultados desde a primeira passagem.
Antes da utilização
-Retire todas as películas ou autocolantes de protecção da base do aparelho (M) ou do
corpo principal.
-Limpe a base do aparelho (M) com um pano macio para retirar quaisquer resíduos de
fabrico.
Enchimento do depósito de água
-Certifique-se que o aparelho está desligado da tomada, que o botão selector de
temperatura (J) está na posição de mínimo “MIN” e que o regulador de saída de vapor (C)
está também desligado - posição “ ”.

11
-Coloque o ferro na posição de descaso vertical, abra a tampa (B), incline o ferro para a
frente num ângulo de aproximadamente 45º e verta água para encher o depósito até
atingir a marca de nível máximo sinalizada com a inscrição “MAX” (L). Certifique-se que
não ultrapassa a marca “MAX“ (L) indicada no depósito. Para esse efeito, pode utilizar o
copo de enchimento (N) fornecido com o aparelho.
Nota: deve utilizar água destilada para encher o depósito.
-Depois de encher o depósito feche a tampa (B). O aparelho está agora pronto a ser
utilizado.
Funcionamento
-Coloque o aparelho na posição de descanso vertical numa superfície estável e plana e
ligue-o à tomada.
-Seleccione a temperatura adequada no botão (J), de acordo com os tecidos que
pretende engomar.
-A luz indicadora de temperatura (I) acende indicando que o aparelho está a aquecer e
apaga-se quando atingir a temperatura seleccionada.
-Regule a saída de vapor no botão (C) de acordo com os tecidos que pretende engomar.
-O aparelho está pronto a ser utilizado.
-Durante o funcionamento, a luz indicadora de temperatura (I) acende e apaga
repetidamente, indicando que o termóstato mantém a temperatura seleccionada.
-Após utilizar, desligue o aparelho colocando o regulador de saída de vapor (C) na
posição “ ” e o botão selector de temperatura (J) na posição “MIN”.
-Desligue o aparelho da fonte de alimentação quando terminar de engomar.
Selecção da temperatura
-Seleccione a temperatura de acordo com a simbologia internacional de tratamento dos
tecidos ou de acordo com o tipo de tecido:
ATENÇÃO - este símbolo marcado na etiqueta significa que o tecido
não pode ser engomado.
Instruções na etiqueta Tipo de tecido Selector de temperatura
(J)
Temperatura baixa (z)
Nylon
Seda
Temperatura média (zz) Lã
Temperatura alta (zzz)
Algodão
Linho
12
Nota: se desconhecer o tipo de tecido e qual a temperatura mais indicada para o engomar,
aconselha-se que experimente numa pequena parte do avesso da peça.
Nota: se estiver a engomar a uma temperatura alta e pretender engomar a uma
temperatura mais abaixa, posicione o botão selector de temperatura (J) num nível mais
baixo e aguarde que a luz indicadora de temperatura (I) se acenda.
Selecção da temperatura para engomar a vapor
-De forma a obter uma saída de vapor mais eficiente, rode o botão selector de
temperatura (J) para a zona indicada com os símbolos “ ” e “ ”.
-Assim que a luz indicadora de temperatura (I) se apagar o ferro está pronto a ser
utilizado, posicione então o botão regulador de saída de vapor (C) na posição pretendida,
sendo que o símbolo “0” significa “vapor desligado” e o símbolo “ ” significa “vapor
máximo”.
-No final da utilização, coloque o regulador de saída de vapor (C) na posição de
desligado “ ”.
Nota: caso não coloque o botão selector de temperatura (J) para a zona indicada com os
símbolos “ ” e “ ”, pode acontecer alguma fuga de água pela base (M), sinal de que o
aparelho não aqueceu o necessário para poder gerar vapor convenientemente.
Engomar sem vapor
-Certifique-se que o regulador de saída de vapor (C) está na posição de desligado “0”.
-Seleccione a temperatura pretendida de acordo com os tecidos a engomar no botão
selector de temperatura (J).
Jacto de água
-O jacto de água pode ser utilizado sempre que desejar e a qualquer temperatura, desde
que exista água no depósito. Permite humedecer os tecidos, tornando mais fácil a
eliminação de vincos.
Nota: quando utilizar o aparelho pela primeira vez e quando não o utilizar por um longo
período de tempo, poderá ser necessário carregar várias no botão “ ” (D) até sair água.
Jacto de vapor
-O jacto de vapor permite uma saída extra de vapor para remover ou fazer vincos,
engomar rendas, peças de roupa penduradas, cortinas, entre outros.
-Rode o botão selector de temperatura (J) para a posição “MAX”, pois só esta posição
permite a utilização do jacto de vapor.
-A luz indicadora de temperatura (I) acende indicando que o aparelho está a aquecer e
apaga-se quando atingir a temperatura seleccionada.
-Segure o aparelho alguns centímetros acima da peça de roupa e carregue no botão do
jacto de vapor (E) para libertar o jacto de vapor.
-Para um resultado óptimo aguarde cerca de 5 segundos entre cada accionamento do
botão (E). De forma a evitar a fuga de água pela base do aparelho (M) nunca pressione o
botão do jacto de vapor (E) continuamento por mais de 5 segundos e permita um intervalo
de pelo menos 1 minuto antes de pressionar o botão novamente.

13
Engomar verticalmente
-A saída de vapor vertical é especialmente útil para engomar roupa pendurada, cortinas,
fatos, entre outros.
-Rode o botão selector de temperatura (J) para a posição “MAX“.
-A luz indicadora de temperatura (I) acende indicando que o aparelho está a aquecer e
apaga-se quando atingir a temperatura seleccionada.
-Pendure a peça de roupa num cabide ou coloque-a num suporte vertical, aproxime o
aparelho do tecido e pressione no botão do jacto de vapor (E).
-Para um resultado óptimo aguarde cerca de 5 segundos entre cada accionamento do
botão (E). De forma a evitar a fuga de água pela base do aparelho (M) nunca pressione o
botão do jacto de vapor (E) continuamento por mais de 5 segundos e permita um intervalo
de pelo menos 1 minuto antes de pressionar o botão novamente.
Sistema antigotas
-Este aparelho está equipado com um sistema antigotas que interrompe imediatamente a
formação de vapor quando a temperatura seleccionada é demasiado baixa, evitando
manchas de água na roupa.
Sistema anticalcário integrado
-Este aparelho está equipado com um sistema especial no interior do depósito de água
que suaviza a água dura e evita a acumulação do calcário resultante das altas
temperaturas geradas.
Nota: este sistema é integrado e permanente, pelo que não necessita de substituição. A
existência deste sistema anticalcário não evita por completo a formação de calcário no
aparelho.
Função de autolimpeza
-O aparelho manter-se-á em melhores condições se esta função for realizada
regularmente, pelo menos uma vez a cada duas semanas. Dependendo da dureza da
água utilizada poderá ter ser utilizada com maior frequência, em especial se notar a saída
de resíduos pela base (M) do aparelho.
-Certifique-se que o aparelho está desligado da tomada.
-Coloque regulador de saída de vapor (C) na posição de desligado “0” e encha o
depósito de água conforme descrito anteriormente no ponto “Enchimento do depósito de
água” até ao seu nível máximo “MAX” (L).
Nota: não coloque vinagre nem nenhum tipo de descalcificante no depósito.
-Rode o botão selector de temperatura (J) para a posição “MAX”, coloque o aparelho na
posição de descanso vertical e ligue-o à fonte de alimentação.
-A luz indicadora de temperatura (I) acende indicando que o aparelho está a aquecer e
apaga-se quando atingir a temperatura seleccionada.
-Assim que a luz indicadora de temperatura (I) se apagar, desligue o aparelho da
tomada, segure-o na posição horizontal sobre o lava-loiça ou lavatório, pressione o botão
de autolimpeza (K) e abane o ferro para a frente e para trás. O calcário e minerais são
eliminados do aparelho com a saída do vapor e água, através dos orifícios existentes na
base.
-Incline o aparelho para a frente e para trás até esvaziar completamente o depósito de
água.
-Assim que a operação de autolimpeza terminar poderá libertar o botão (K).
14
Nota: caso continue a verificar a saída de resíduos através dos orifícios da base (M),
repita todo o processo de autolimpeza.
-Após a autolimpeza, ligue o aparelho a tomada e permita que aqueça para secar a base
(M). Após o aparelho atingir a temperatura para engomar, desligue-o da tomada e passe
suavemente a base (M) sobre um tecido limpo e macio de forma a limpar quaisquer
manchas que tenham surgido com o processo de autolimpeza.
-Coloque o ferro na posição de descanso vertical e aguarde que arrefeça completamente
antes de o armazenar.
Sistema de desligar automático
-O sistema de desligar automático desliga o aquecimento do aparelho sempre que o
aparelho ficar imóvel enquanto ligado à tomada, em duas situações específicas:
-Se o aparelho não for utilizado durante aproximadamente 30 segundos após ter sido
colocado horizontalmente;
-Se o aparelho não for utilizado durante aproximadamente 8 minutos após ter sido
colocado verticalmente.
-Após o tempo de inactividade (30 segundos após ter sido colocado horizontalmente ou
8 minutos após ter sido colocado verticalmente) a luz indicadora de temperatura (I)
começa a piscar indicando que o aquecimento do ferro foi desactivado.
-Para reactivar o aquecimento do ferro, levante-o ou mova-o ligeiramente. A luz
indicadora de temperatura (I) acende indicando que o aparelho está a aquecer e apaga-se
quando atingir a temperatura seleccionada.
-Assim que a luz indicadora de temperatura (I) se apagar, o ferro atingiu a temperatura
seleccionada está pronto a ser utilizado novamente.
-Para evitar a fuga de água pela base (M) quando o aparelho se encontra na posição
horizontal, coloque o regulador de saída de vapor (C) na posição de desligado “0”.
Esvaziamento do reservatório de água
-Desligue o aparelho da tomada.
-Coloque o regulador de saída de vapor (C) na posição de desligado “ ” e abra a tampa
do depósito (B).
-Vire o aparelho ao contrário para que a água contida no depósito saia através da
abertura da tampa (B).
DICAS
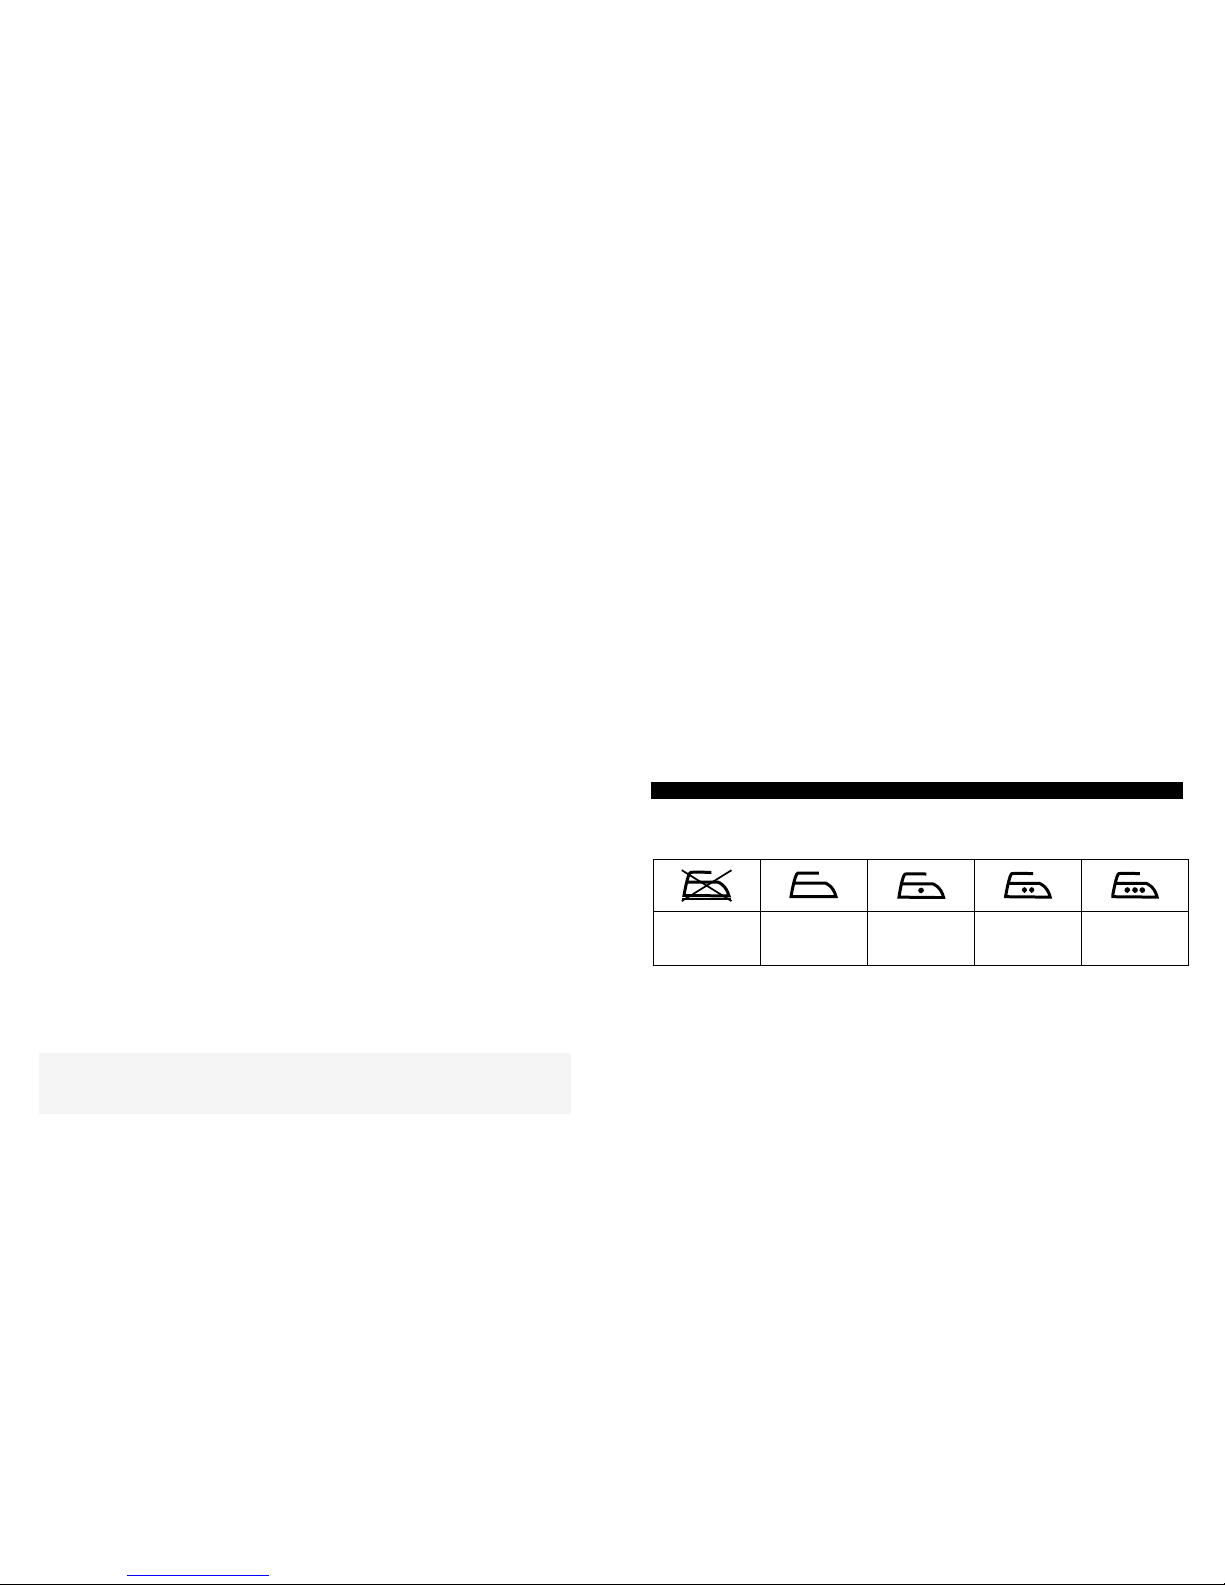
-Antes de engomar leia as etiquetas das peças de vestuário e siga as instruções dos
fabricantes, apresentadas normalmente através de símbolos, tais como:
Não passar a
ferro Passar a ferro Passar a ferro à
temperatura
máxima de 110º
Passar a ferro à
temperatura
máxima de 150º
Passar a ferro à
temperatura
máxima de 200º
-Separe as peças a engomar de acordo com o tipo de tecido. Desta forma, minimiza a
15
frequência de ajustes de temperatura para diferentes peças de vestuário.
-Se desconhecer o tipo de tecido e qual a temperatura mais indicada para o engomar,
aconselha-se que experimente numa pequena parte do avesso da peça. Comece com
uma temperatura baixa e vá aumentando gradualmente.
-Para tecidos delicados como seda, lã, veludo, etc. aconselha-se que engome o tecido
pelo avesso ou utilize um pano entre a peça a engomar e o ferro, para evitar o brilho.
-Recomendamos a utilização de temperaturas baixas em tecidos com acabamentos
pouco comuns (lantejoulas, bordados, pelúcia, etc.).
-Caso o tecido seja uma mistura de diferentes materiais (por exemplo: 40% algodão e
60% sintético), coloque o botão selector de temperatura (J) num nível mais baixo.
-Nunca passe a ferro tecidos com nódoas pois o calor do ferro fixa as nódoas no tecido,
tornando-as mais difíceis de remover.
-Aconselhamos que seleccione uma temperatura moderada quando aplicar goma nos
tecidos e quando engomar a seco. O excesso de calor queima a goma e pode formar
manchas amarelas.
-Para evitar deixar marcas brilhantes em peças de vestuário de veludo, passe-as a ferro
apenas numa direcção (na direcção da fibra).
-Muitos tecidos tornam-se mais fáceis de passar a ferro se não estiverem totalmente
secos. Por exemplo, a seda deverá ser sempre passada a ferro húmida.
RESOLUÇÃO DE PROBLEMAS
-Sempre que utilizar este aparelho e detectar alguma irregularidade no seu
funcionamento, consulte a tabela que se segue para perceber as causas e as soluções
para as resolver. Caso não seja possível, por favor contacte o Serviço de Informação ao
Cliente ou a loja onde adquiriu o aparelho.
Problema Causa possível Solução / Dica
O aparelho está
ligado mas não
aquece.
O botão selector de
temperatura (J) está no mínimo.
Regule o botão selector de
temperatura (J) para a
temperatura desejada.
Problemas na tomada.
Verifique se a tomada está
danificada e ligue o aparelho a
uma tomada que funcione
devidamente.
O aparelho
aquece demais.
O botão selector de
temperatura (J) foi regulado
para uma temperatura
demasiado elevada para o
tecido a engomar.
Regule o botão selector de
temperatura (J) para uma
temperatura mais baixa,
adequada ao tecido a engomar.
Não sai vapor
ou sai pouco
vapor.
O depósito de água está sem
água ou tem uma quantidade
insuficiente.
Encha o depósito de água.
Consulte as instruções
descritas em “Enchimento do
reservatório de água”.
16
O regulador de saída de vapor
(C) está na posição desligado.
Regule a saída de vapor no
botão (C) de acordo com os
tecidos que pretende engomar.
O aparelho não atingiu a
temperatura necessária.
Regule o botão selector de
temperatura (J) para a zona
indicada com os símbolos “ ”
e “ ”, e aguarde que o
aparelho aqueça.
Os buracos na base (M) para
saída de vapor estão
bloqueados com calcário.
Utilize água destilada e um
palito para desbloquear as
saídas de vapor na base (M).
Proceda à autolimpeza para
remover o calcário e minerais
acumulados. Consulte as
instruções descritas em
“Função de autolimpeza”.
Não sai jacto de
vapor vertical.
Não aguardou o tempo
recomendado entre cada
accionamento do botão (E).
Aguarde cerca de 1 minuto
entre cada accionamento do
botão (E) e volte a utilizar esta
função. Nunca repita este
procedimento mais de 3 vezes
consecutivas.
O jacto de vapor foi utilizado
vezes de mais num curto
período de tempo.
Aguarde cerca de 1 minuto
antes de voltar a utilizar esta
função novamente.
O jacto de água
não funciona.
Pouca pressão ou ar dentro do
depósito da água. Pressione repetidamente o
botão do jacto de água (D).
O depósito de água está sem
água ou tem uma quantidade
insuficiente.
Encha o depósito de água.
Consulte as instruções
descritas em “Enchimento do
reservatório de água”.
Saem resíduos
de calcário e
gotas de água
através dos
orifícios da base
(M).
Formação de resíduos de
calcário e minerais.
Proceda à autolimpeza para
remover o calcário e minerais
acumulados. Consulte as
instruções descritas em
“Função de autolimpeza”.
O aparelho não aqueceu o
suficiente.
Regule o botão selector de
temperatura (J) para a zona
indicada com os símbolos “ ”
e “ ”, e aguarde que o
aparelho aqueça.

17
Pingos de água
na roupa.
A função de vapor está a ser
utilizada sem o aparelho ter
atingido a temperatura
necessária.
Regule o botão selector de
temperatura (J) para a zona
indicada com os símbolos “ ”
e “ ”, e aguarde que o
aparelho aqueça.
Reduza a saída de vapor
quando engomar a baixa
temperatura.
A tampa da abertura para
enchimento do depósito (B) não
está fechada correctamente.
Feche a tampa (B)
correctamente.
Perdas de água
enquanto o
aparelho está
armazenado.
O depósito de água não foi
esvaziado após a utilização.
Após a utilização esvazie
sempre o depósito de água.
Consulte as instruções
descritas em “Esvaziamento do
reservatório de água”.
O peça
engomada fica
escura e/ou
cola-se à base
(M).
A temperatura seleccionada é
demasiado alta e está a causar
danos na peça de roupa.
Seleccione uma temperatura
mais adequada ao tipo de
tecido e limpe a base (M) com
um pano húmido.
LIMPEZA
-Desligue o aparelho da fonte de alimentação antes de proceder a qualquer operação de
limpeza e aguarde que arrefeça por completo.
-Para limpar depósito de água e o sistema interno do aparelho siga as instruções
descritas no ponto “Função de autolimpeza”.
-Para proceder à limpeza da superfície do aparelho, desligue-o da tomada, deixe que
arrefeça completamente, esvazie o reservatório de água conforme descrito anteriormente
no ponto “Esvaziamento do reservatório de água” e coloque o regulador de saída de vapor
(C) na posição de desligado “ ”.
-Limpe o exterior do aparelho com um pano húmido e suave, secando-o de seguida com
um pano seco e macio.
-Caso verifique a existência de resíduos de tecidos na base (M), limpe-a com um pano
húmido e vinagre.
Nota: nunca utilize objectos pontiagudos ou ásperos para retirar qualquer resíduo da base
(M), nem nunca a limpe utilizando produtos abrasivos ou qualquer outro tipo de
descalcificantes ácidos ou alcalinos.
-Se os orifícios de saída de vapor na base (M) estiverem bloqueados por resíduos de
calcário, pode retirá-los com a ajuda de um palito de dentes, que por ser em madeira não
irá danificar a superfície.
-Armazene o aparelho num local seco, ventilado e sempre na posição de descanso
vertical, de forma a preservar a base (M).
-Nunca mergulhe o aparelho em água ou qualquer outro líquido.
18
PROTECÇÃO DO AMBIENTE – DIRECTIVA 2002/96/EC
De forma a preservar o ambiente e a proteger a saúde humana, os equipamentos
eléctricos e electrónicos inutilizáveis devem ser eliminados de acordo com as leis
específicas do fabricante e do utilizador. Desta forma, e como indicado através do símbolo
na etiqueta de classificação ou na embalagem, este aparelho não deve ser eliminado
com o lixo indiferenciado. O utilizador tem o direito de o levar a um ponto específico de
recolha de desperdícios para reutilização, reciclagem ou utilização para outros fins, em
conformidade com a directiva.
GARANTIA E ASSISTÊNCIA
Os produtos Electric Co oferecem-lhe 2 anos de garantia.
A substituição do produto ou reembolso do seu valor em caso de avaria técnica, será
efectuada após verificação da cobertura e condições de garantia.
O Certificado de Garantia, emitido por Pingo Doce - Distribuição Alimentar, S.A., é válido
para o artigo “FERRO DE ENGOMAR A VAPOR – MODELO SI2200W” - denominado
“Artigo” e garante ao comprador, por um período de 24 meses, desde a data da sua
entrega, que este beneficia do serviço de assistência técnica da marca.
No caso de ser necessário o serviço de assistência técnica durante o tempo de vigência
desta garantia, o comprador deve contactar a loja onde adquiriu o artigo ou o posto de
assistência mais próximo.
Para obter o serviço de garantia, o cliente deve apresentar-se munido dos seguintes
documentos: Certificado de Garantia e Comprovativo de Compra (factura comercial), para
que possa ser confirmada a data de aquisição do artigo.
Condições da Garantia
Esta garantia aplica-se ao Artigo que tenha sido utilizado de acordo com as
recomendações do fabricante, sob condições normais de utilização, para fins domésticos
e cuidados razoáveis com o equipamento. Não cobre danos motivados por mau
funcionamento ou falhas técnicas resultantes de má utilização, designadamente utilização
para fins a que o Artigo não se destina ou para os quais não se encontra preparado, de
abuso ou de negligência;
Sempre que o Artigo necessitar de instalação técnica, esta terá de ser efectuada por um
agente autorizado pela marca Electric Co, caso contrário esta garantia não cobrirá
qualquer falta de conformidade resultante da instalação.
Esta garantia não cobre igualmente quaisquer alterações, reparações ou modificações
que não tenham sido executadas por um agente autorizado pela marca Electric Co e não
será aplicável para os casos em que o artigo tenha sido danificado por acidente.
Servi
ç
o de Informa
ç
ão ao Cliente 24 Horas: 808 20 45 45

19
INDEX
Pag.
INTRODUCTION 20
SAFETY INSTRUCTIONS 20
COMPONENTS DIAGRAM 25
GENERAL DESCRIPTION 26
TECHNICAL SPECIFICATIONS 26
PREPARING FOR USE 26
BEFORE USE 26
FILLING UP THE WATER TANK 27
OPERATION 27
TEMPERATURE SELECTION 27
TEMPERATURE SELECTION FOR STEAM IRONING 28
IRONING WITHOUT STEAM 28
WATER SPRAY 28
STEAM BOOST 28
VERTICAL IRONING 28
ANTI-DRIP SYSTEM 29
ANTI-SCALE SYSTEM 29
SELF-CLEANING FUNCTION 29
AUTO SHUT OFF SYSTEM 30
EMPTING THE WATER TANK 30
HINTS 30
TROUBLESHOOTING 31
CLEANING 33
PROTECTION OF THE ENVIRONMENT – 2002/96/EC 33
GUARANTEE AND TECHNICAL SUPPORT 34
GUARANTEE CONDITIONS 34
GUARANTEE CERTIFICATE 35
20
INTRODUCTION
Thank you for your preference, this Electric Co appliance will certainly make your daily
routine easier. Carefully read this instruction manual before using the appliance to get the
best results from it and keep this instruction manual for future reference.
SAFETY INSTRUCTIONS
THIS APPLIANCE IS EXCLUSIVELY FOR DOMESTIC
USE!
To reduce the risk of personal injury or property damage,
when using electrical appliances, basic safety precautions
should always be followed, including the following:
-Before using the appliance, check that the supply voltage
details marked on the appliance agree with those of the
electricity supply. The label is placed on the appliance. If in
doubt, apply to a skilled electrician for help.
-This appliance can be used by children aged from 8
years and above and persons with reduced physical,
sensory or mental capabilities or lack of experience and
knowledge if they have been given supervision or
instruction concerning use of the appliance in a safe way
and understand the hazards involved. Children shall not
play with the appliance. Cleaning and user maintenance
shall not be made by children without supervision.
-Never leave the appliance unattended during use and
while plugged to the supply mains. If you have to leave,
even for a brief period of time, set the thermostat to the off
position, place the appliance in its rest position and unplug it
from the wall socket.

21
-The plug must be removed from the socket-outlet before
the water reservoir is filled with water.
-Always use the appliance on a flat, firm and heat-resistant
surface.
-When placing the iron on its stand, ensure that the
surface on which the stand is placed is stable.
-The appliance must not be used if it has been dropped, if
it shows visible signs of damages, if it is leaking, if it is not
working properly or if detected any damaged on the supply
cord or plug. If any damage or any malfunction is detected,
you must contact the store where you bought the appliance
or a qualified technician in order to repair the appliance or
replace supply cord. Assure that only original parts or
components are used.
-Keep the iron and its cord out of reach of children less
than 8 years of age when it is energized or cooling down.
-If the supply cord is damaged, it must be replaced by
manufacturer, its service agent or similarly qualified persons
in order to avoid a hazard.
-After unpacking the appliance, check that it is undamaged
and that no parts are missing. If in doubt, contact the
Customer Support Line. All packaging ex. plastic bags,
styrofoam, tape, etc., should be kept out of reach of
children, as it can be dangerous and cause suffocation.
Only use accessories recommended by the manufacturer
and those provided with the appliance, otherwise they
could constitute a danger to the user and risk to damage
22
the appliance.
-This appliance is designed for domestic use. Any other
use must be considered improper and therefore
dangerous. The manufacturer cannot be held responsible
for any injuries or damage resulting from improper use of
the appliance.
-Do not open or undertake any repairs on the appliance.
By failing to observe this rule, you risk your safety and the
warranty may become invalid. Only qualified technicians
can repair the appliance.
-To avoid fire hazard or electrical shocks, make sure that
no fluids enter in contact with the electrical parts of the
appliance or in contact with the supply cord. Do not expose
the appliance to moisture, do not use it outdoors and keep
it away from any objects filled with fluids, such as
washbasins, vases, flowerpots, etc. If any fluid accidentally
spills on the appliance’s electrical parts, disconnect the
appliance from the wall socket immediately and go to the
store where the appliance was bought or get it repaired by
a qualified technician.
-When the appliance is used for the first time an odd smell
may be noticed during heating. This is normal and
harmless, and will disappear after a while.
-As this appliance reaches high temperatures during use, it
is recommended not to touch its soleplate, the water
sprinkler’s or hot steam shot to avoid burns, and do not
approach the appliance, while hot, from any flammable

23
products, to avoid the risk of accident.
-Do not place any objects over the supply cord, never
crease or crimp it, and make sure to keep it away from
cutting edges or hot surfaces, namely from the iron’s
soleplate, and away from places where a person can trip
over it, in order to avoid drops. Never leave the supply cord
hanging where children under 8 years old could grab it.
-Do not wind up the supply cord around the appliance for
storage until it has cooled down completely.
-Always hold the plug to disconnect the appliance from the
wall socket and not by the power cord.
-Avoid using any adaptors or extension leads. If they are
necessary, only use the ones recommended for this kind of
appliance.
-After use, before filling or emptying the water tank and
before carrying out any cleaning or storage operation,
make sure that the steam output control button is set to the
off position, the appliance is disconnected from the wall
socket, placed on the vertical resting position and has
cooled down completely. Take special care when turning
the appliance upside down, since the water from the water
tank may still be hot.
-Whenever you need to leave the appliance, place it
vertically on its vertical rest base and over a stable surface.
-Never iron the clothes on your body or dress clothes
immediately after ironing, in order to avoidsevere burns.
-The released steam is very hot and can be dangerous.
24
Never direct the steam towards persons or animals.
-The use of mineral water or with residues may generate
lime in the appliance and block the steam vents, is
therefore recommended to use distilled water. Never use
chemically descaled water.
-Do not add to the water tank any chemical additives, anti-
scale agents, fragrances, perfumes and other products
capable to damage the appliance. Failure to comply with
these instructions means the exclusion of the warranty
terms.
-To avoid damage do not allow contact of the soleplate
with metal objects.
-Do not immerse the appliance in water or any other liquid.
-This appliance is not intended to be operated by means
of an external timer or separate remote-control system.
-This appliance belongs to Class I and has a power cord
and plug with earth connection, that why it should always
be connected to a wall socket with earth connection. If the
plug does not have earth connection, is customer
responsibility to replace it by another with earth connection.
-Always unplug the appliance from the wall socket and
allow it to cool down completely before any cleaning
operation.

25
COMPONENTS DIAGRAM
A B C D E F G H I
J
KL
M
N
26
GENERAL DESCRIPTION
A. Spray nozzle
B. Water-fill cover
C. Steam control button
D. Spray button
E. Steam boost button
F. Handle
G. 360º degree swivel power cord
H. Vertical rest base
I. Temperature light
J. Temperature selector button
K. Self-cleaning button
L. Maximum level water mark
M. Ceramic soleplate
N. Filling cup
TECHNICAL SPECIFICATIONS
Rated voltage: 230V ~ 50Hz
Power: 2200W
Water tank capacity: 350 ml
Continuous steam output: until 25g/min
Water spray function
Steam boost output: 0,5-0,9g per press
Vertical steam boost function
Auto shut off system
Integrated anti-calc system
Anti-drip system
Self-cleaning function
PREPARING FOR USE
The Steam Iron SI2200W Electric Co has an adjustable steam output and allows the
temperature adjustment for each type of cloth. The soleplate with optimum slide allows
results since the first passage.
Before use
-Remove any protective films or stickers from the soleplate (M) and from the appliance’s
main body.
-Clean the soleplate (M) with a soft cloth to remove any manufacturing residues.
Filling up the water tank
-Make sure that the appliance is unplugged from the wall socket, that the temperature
selector button (J) it is at the minimum position – “MIN”, and that the steam control button
(C) is also at the off position “ “.

27
-Place the iron on the vertical position, open the water fill cover (B),tilt the iron forward at
an angle of approximately 45° and pour water to fill the tank until it reaches the maximum
level mark, marked with the inscription "MAX" (L). Make sure it does not exceed the "MAX"
mark (L) indicated the tank. For this purpose, you can use the filling cup (N) supplied with
the appliance.
Note: it should use distilled water to fill up the tank.
-After filling the water tank, close the cover (B). The iron is now ready to be used.
Operation
-Place the appliance on the vertical resting position over a stable and flat surface and
connect it to the wall socket.
-Select the right temperature in accordance with the fabric type on the temperature
selector button (J).
-The temperature light (I) turns on indicating that the appliance is warming up, and will
turn off when the select temperature is reached.
-Adjust the steam output on button (C) according to the fabrics type to be ironed.
-The appliance is ready to be used.
-During operation, the temperature light (I) turns on and off repeatedly, indicating that the
thermostat maintains the selected temperature.
-After use, turn off the appliance by sliding the steam control button (C) to the off position
““ and the temperature selector button (J) to the "MIN" position.
-Unplugged the appliance from the wall socket when finish ironing.
Temperature selection
- Select the temperature according with the international symbols for fabrics treatment or
according with the fabric type:
CAUTION – This symbol marked on the fabric label means that
the fabric may not be ironed.
Instructions on label Type of fabric Temperature selector
button (J)
Low temperature (z)
Nylon
Silk
Medium temperature (zz) Wool
Low temperature (zzz)
Cotton
Linen
Note: if the cloth material and the correct temperature to iron are unknown, it is
28
recommended to test ironing on a small part on the reverse side of the cloth.
Note: if it is being used a high temperature for ironing and it is necessary to change to a
lower temperature, place the temperature selector button (J) on a lower level and wait until
the temperature light (I) turns on.
Temperature selection for steam ironing
-In order to obtain an efficient steam output, turn the temperature selector button (J) to
the place indicated with the symbols “ ” and “ ”.
-Once the temperature light (I) turns off the iron is ready to be used, slide the steam
control button (C) to the desired position, knowing that the symbol “0” means “no steam”
and the symbol “ ” means “maximum steam”.
-After use, slide the steam control button (C) to the position the off position “ “.
Note: if the temperature selector button (J) is not positioned at the area indicated with the
symbols “ ” and “ ” it may happen leakage of water through soleplate (M), what means
that the appliance has not heated up sufficiently so it can generate steam conveniently.
Ironing without steam
-Make sure that the steam control button (C) is on position off position “0 “.
-Select the desired temperature according with the fabrics type on the temperature
selector button (J).
Water spray
-The water spray can be used whenever desired at any temperature, as long as there is
enough water in the water tank. It allows moistening the fabrics, making easier to eliminate
creases.
Note: the first time the appliance is used and when it is not used for a long period of time, it
may be needed to press several times the spray button “ ” (D), until water is released.
Steam boost
-The steam boost provides an extra amount of steam output to remove creases or make
folds, ironing lace, hanging clothes, curtains, among others.
-Turn the temperature selector button (J) to the "MAX" position because only this position
allows the perfect steam boost output.
-The temperature light (I) turns on indicating that the appliance is warming up, and will
turn off when the select temperature is reached.
-Raise the iron a few centimetres above the clothing and press the steam output button
(E) to release the steam boost.
-To achieve an optimum result wait about 5 seconds between each time the steam boost
button (E) is pressed. To avoid the any water leak from the appliance’s soleplate (M), never
press the steam boost button (E) continuously for more than 5 seconds and allows an
interval of at least one minute before pressing it again.
Vertical ironing
-The vertical steam output is particularly useful to iron hanging clothes, curtains, suits,
among others.
29
-Turn the temperature selector button (J) to the "MAX" position.
-The temperature light (I) turns on indicating that the appliance is warming up, and will
turn off when the select temperature is reached.
-Hang the cloth on a hanger or place it on vertical support, approach the appliance to the
cloth and press the steam boost button (E).
-To achieve an optimum result wait about 5 seconds between each time the steam boost
button (E) is pressed. To avoid the any water leak from the appliance’s soleplate (M), never
press the steam button (E) continuously for more than 5 seconds and allows an interval of
at least one minute before pressing it again.
Anti-drip system
-This appliance is equipped with an anti-drip system that immediately stops the steam’s
formation when the selected temperature is too low, avoiding water spots on clothing.
Anti-scale system
-This appliance is equipped with a special system inside the water tank that softens hard
water and prevents lime scale build up resulting from the high temperatures generated.
Note: the system is integrated and permanent, and does not require replacement. The
existence of this anti-scale system does not avoid completely the formation of the
limestone on the appliance.
Self-cleaning function
-The appliance will remain in best conditions if this function is performed regularly, at
least once every two weeks. Depending on the hardness of the water used it may be
necessary to perform this function more regularly, especially when flakes come out of the
soleplate (M) during ironing.
-Make sure the appliance is unplugged from the wall socket.
-Slide the steam output button (C) to the off position “0“ and fill the water tank as
previously described in “Filling up the water tank”, until its maximum level “MAX” (L).
Note: do not use vinegar neither any other kind of descaling agent in the deposit.
-Turn the temperature selector button (J) to the "MAX" position, place the appliance on
the vertical resting position and plug it to the wall socket.
-The temperature light (I) turns on indicating that the appliance is warming up, and will
turn off when the select temperature is reached.
-As soon as the temperature light (I) goes off, unplugged the appliance from the wall
socket, hold it horizontally over a sink or a washbasin, press the self-cleaning button (K)
and gently shake the iron forwards and backwards. The limestone and minerals will be
eliminated through the soleplate’s vents (M) with the expelled steam and water.
-Tilt the appliance forwards and backwards to completely empty the water tank.
-Release the button (K) as soon as the self-cleaning function stops.
Note: if any residues still come out through the steam vents of the base (M), repeat the
entire process of self-cleaning.
-After self-cleaning, plug the appliance to the wall socket to heat up and let the soleplate
(M) dry. After reaching the set temperature for ironing, unplug the appliance from the wall
socket and gently pass the base (M) on a clean and soft cloth, in order to clean up any
stains that have arisen with the process of self-cleaning.
-Place the appliance on the vertical resting position and allow it to cool down completely
before storing it.
30
Auto shut off system
-The auto shut off system shuts off the heating of the appliance when it’s left motionless
when plugged, in two specific situations:
-When the appliance is not used for approximately 30 seconds after being placed
horizontally;
- When the appliance is not used for approximately 8 minutes after being placed
vertically.
-After that motionless time (30 seconds after being placed horizontally or 8 minutes after
being placed vertically) the temperature light (I) starts flashing, giving the warning that the
heating of the iron has been disabled.
-To re-activate the heating of the iron, lift it or move it slightly. The temperature light (I)
lights up, indicating that the appliance is warming up and turns off when it reaches the set
temperature.
-As soon as the temperature light (I) turns off, the iron has reached the selected
temperature and it is ready to be used again.
-To prevent water leaking from soleplate (M) when the appliance is placed horizontally,
set the steam output button (C) to the off position "0".
Empting the water tank
-Unplug the appliance from the wall socket and open the water-fill cover (B).
-Slide the steam regulator button (C) to the off position “0 “.
-Turn the appliance upside down so that the water remaining in the water tank exits
trough the opening of the cover (B).
HINTS
-Before ironing, read all the fabric labels and follow the manufacturer’s instructions,
presented through symbols, such as:
Do not iron Iron
Iron at a
maximum
temperature of
110º
Iron at a
maximum
temperature of
150º
Iron at a
maximum
temperature of
200º
-Sort out the clothes to be ironed according with the fabric type. This will minimize the
frequency of temperature adjustment for the different fabrics.
-If the cloth material and the correct temperature to iron are unknown, it is recommended
to test ironing on a small part on the reverse side. Start with a low temperature and
increase gradually.
-For delicate fabrics such as silk, wool, velvet, etc. it is recommended to iron the cloth’s
reverse side or use a cloth between the fabric and the iron, to prevent shinny patches.
-It is recommend the use of low temperatures in clothes with unusual finishes (sequins,
embroidery, plush, etc.).
-If the fabric is a mixture of several fibres (for example 40% cotton and 60% synthetic),
place the temperature selector button (J) to a lower temperature level.

31
-Never iron fabrics with stains since the heat of the appliance marks the stains on the
fabric, making them difficult to remove.
-It is recommended the selection of a lower temperature when use starch on the fabrics
and when iron without steam. The excessive heat burns the starches and forms yellow
stains.
-To avoid shinny patches on velvet fabrics, iron them only in one direction (the direction of
fibre).
-Many fabrics become easier to iron if they are not completely dry. For example, the silk
should be iron when still moist.
TROUBLESHOOTING
-During use, if any irregularities are detected on the appliance’s operation, check the
below table to understand the causes and solutions to resolve them. If not possible, please
contact the Customer Support Line or the store where the appliance was bought.
Problem Possible Cause Solution / Hint
The appliance is
turned on but
does not heat
up.
The temperature selector button
(J) is set to minimum.
Set the temperature selector
button (J) to the intended
temperature.
Problems with the wall socket.
Check if the wall socket is
damage and connect the
appliance to a wall socket in
good conditions.
The appliance
heats too much.
The temperature selector button
(J) was set to a too high
temperature for the fabric to be
ironed.
Set the temperature selector
button (J) to a lower
temperature, more suitable for
the fabric to be ironed.
The appliance
does not
produce enough
or any steam at
all.
The water tank is empty or does
not have enough water.
Fill the water tank. See the
instructions "Filling up the water
tank”.
The steam control button (C) is
turned off.
Set the steam output on button
(C) according with the fabrics to
iron.
The appliance has not reached
the required temperature.
Set the temperature selector
button (J) to the position marked
with the symbols “ ” and “ ”
and wait until the appliance
warms up.
32
The steam vents at the
soleplate (M) are clogged with
limestone.
Use distilled water and a wood
toothpick to unclog the steam
vents in the soleplate (M).
Proceed to the self-cleaning to
remove limescale and minerals
accumulated. See the
instructions in "Self-cleaning
function."
No vertical
steam boost
output.
You did not wait the
recommended period of time
between each pressing of the
button (E).
Wait 1 minute between each
pressing of the button (E) and
then use this function again.
Never repeat this procedure
more than 3 consecutive times.
The steam boost has been used
too often in a small period of
time.
Wait about 1 minute before
using this function again.
The water spray
does not work.
Not enough pressure or air
inside the water tank. Press repeatedly the spray
button (D).
The water tank has no water or
has an insufficient amount of it. Fill the water tank. See the
instructions in "Filling the water."
Limestone
residues and
water drips
come out
through the
soleplate’s vents
(M).
Limestone formation and
minerals residues.
Proceed with the self-cleaning
function to remove lime scale
and minerals accumulated. See
the instructions in "Self-cleaning
function."
The appliance has not warmed
up enough.
Set the temperature selector
button () to the position marked
with the symbols “ ” and “ ”,
and wait until the appliance
warm up.
Water droplets
on garments.
The steam function is being
used and the appliance has not
reached the necessary
temperature.
Set the temperature selector
button (J) to the position marked
with the symbols “ ” and “ ”,
and wait until the appliance
warms up.
Reduce the steam output when
ironing at a low temperature.

33
The water fill-cover (B) is not
properly closed. Close the water fill-cover (B)
properly.
Water loss while
the appliance is
stored.
The water tank was not emptied
after use.
After use, always empty the
water tank. See the instructions
“Empting the water tank”.
The ironed piece
of cloth turns
dark and/or
sticks to the
soleplate (M).
The selected temperature is
too high and is damaging the
piece of cloth.
Select a more suitable
temperature for the fabric type
and clean the soleplate (M)
with a damp cloth.
CLEANING
-Always unplug the appliance from the wall socket and allow it to cool down completely
before any cleaning operation.
-To clean the water tank and the internal system of the appliance, follow the instructions
described in “Auto-cleaning function”.
-To clean the appliance’s surface, unplug it from the wall socket, allow it to cool down
completely and empty the water tank as previously described in “Empting the water tank”.
-Clean the appliance’s surface with a damp and soft cloth, drying it after with a soft and
dry cloth.
-If any residues of clothes are noticed at the soleplate (M), wipe it with a damp cloth and
vinegar.
Note: never use metallic rough or pointed objects to remove any deposit on the ceramic
soleplate (M), never clean it using abrasive products or with any other type of anti-scale
agents.
-If the steam vents at the soleplate (M) are clogged by lime residues, you can remove
them with the help of a wood toothpick that will not damage the soleplate surface.
-Store the appliance in a dry and ventilated place and always in the vertical resting
position in order to preserve the soleplate (M).
-Never immerse the appliance in water or other liquid.
PROTECTION OF THE ENVIRONMENT– DIRECTIVE 2002/96/EC
In order to preserve our environment and protect human health, the waste of electrical and
electronic equipment should be disposed of in accordance with specific rules with the
implication of both suppliers and users. For this reason, as indicated by the symbol on
the rating label or on the packaging, your appliance should not be disposed of as unsorted
municipal waste. The user has the right to bring it to a municipal collection point performing
waste recovery by means of reuse, recycling or use for other applications in accordance
with the directive.
34
GUARANTEE
A
ND TECHNICAL SUPPORT
Electric Co products have a 2 year guarantee.
In the event of technical malfunction, the product will only be replaced or a refund made
after verification that the product is covered by the guarantee.
The guarantee certificate issued by Pingo Doce - Distribuição Alimentar, S.A., is valid for
the product “STEAM IRON – MODEL SI2200W” – referred to as “product” and it
guarantees to the buyer, technical assistance service by the brand within 24 months since
the product is delivered.
If the technical assistance service is required during the guarantee period, the buyer must
contact the seller or the nearest technical assistance service
In order to benefit the product’s guarantee, the buyer must present the following
documents: Guarantee Certificate and Purchase Receipt (commercial invoice), to confirm
the purchase date.
Guarantee Conditions
This guarantee applies to products which have been used according to the manufacturer’s
recommendations under normal conditions of domestic use and when reasonable care has
been taken of the equipment. This guarantee does not cover damage as a result of
malfunctions or technical defects from misuse, namely when the product has been used for
other purposes or in any circumstances other than those for which it was intended, neither
does the guarantee cover negligence or abuse.
Whenever the product requires technical installation, this must be performed by an
authorized agent from Electric Co brand, otherwise this guarantee does not cover any
unconformity that could be as a result of improper installation.
This guarantee does not cover any changes, repairs or alterations that were not
prosecuted or done by an authorised agent by the Electric Co brand and does not cover
cases in which the product has been accidentally damaged.
24 Hou
r
Customer Su
pp
ort Line: 808 20 45 45

35
CERTIFICADO DE GARANTIA / GUARANTEE CERTIFICATER
VISITE O SITE: www.pingodoce.pt
VISIT: www.pingodoce.pt
Este certificado de garantia deve ser mantido pelo cliente durante todo o tempo
de vigência da mesma.
This guarantee certificate must be kept during the whole guarantee time.
A fim de poder recorrer aos serviços de assistência técnica, deve guardar a
factura e este formulário, devidamente preenchido.
In order to apply for the after sales service, you must keep the invoice purchase and this
form duly filled.
Artigo (Product): FERRO DE ENGOMARA VAPOR / STEAM IRON
Loja (Store): ___________________________________________________________
Morada (Address): ______________________________________________________
Data de compra (Date of purchase): _______________________________________
Modelo nr. (Model nr.): SI2200W
Número de série (Serial number) – se aplicável (if applicable): _________________
36
Table of contents
Languages:


