Electricwingman FlightClub PROton User manual
www.electricwingman.com
Builders guide –FlightClub PROton (Witchcraft)
Safety First
Please build, fly and configure your drone safely. Moving propellers and mishandled
lithium batteries can cause serious damage to person and property. It is your
responsibility to operate safely when flying and handling your ‘drone’!
Some related external resources (by no means exhaustive!): -
•The Home of British FPV Racing
•Dronesafe

www.electricwingman.com
Why build this quad?
FPV FlightClub is a US store who also design frames (and sponsor racing Pilots).
The attention to detail FlightClub invest in their frames is spectacular, their Tokio was
the first frame I was aware of to use chamfered edges on the carbon, they tried
many different types of carbon (a lot of manufacturers say this but in FlightClubs
case I was involved in some of the testing) and the “Buttermount” is just brilliant.
The Proton is the latest frame from FlightClub and is a light frame which can be
configured a number of ways, the version we are building here is the Skeleton, the
lightest one and I have to say, having built it if flies spectacularly well.
The frame has all the usual features from FlightClub such as Buttermount for the
flight controller, countersunk screws so you have a flat bottom –no screw head
damage to the LiPo, mounts for a micro cam, VTX antenna and RX antennae, a
mount point for the VTX and an innovative aluminium plate which removes the
requirement for lock nuts.
Quite honestly this is the cleanest build I have, nothing is held in place with zip ties,
nothing is attached to the top plate, it just fits. On top of this it flies superbly, my first
flight I referred to it as “Witchcraft” and honestly, I stick by it.
Don’t be deceived by the description as being “Racing Quad”, this thing makes an
excellent acro quad, there are arms options that can be used to make it more suited
to that. It is simply the best frame I have
Parts list
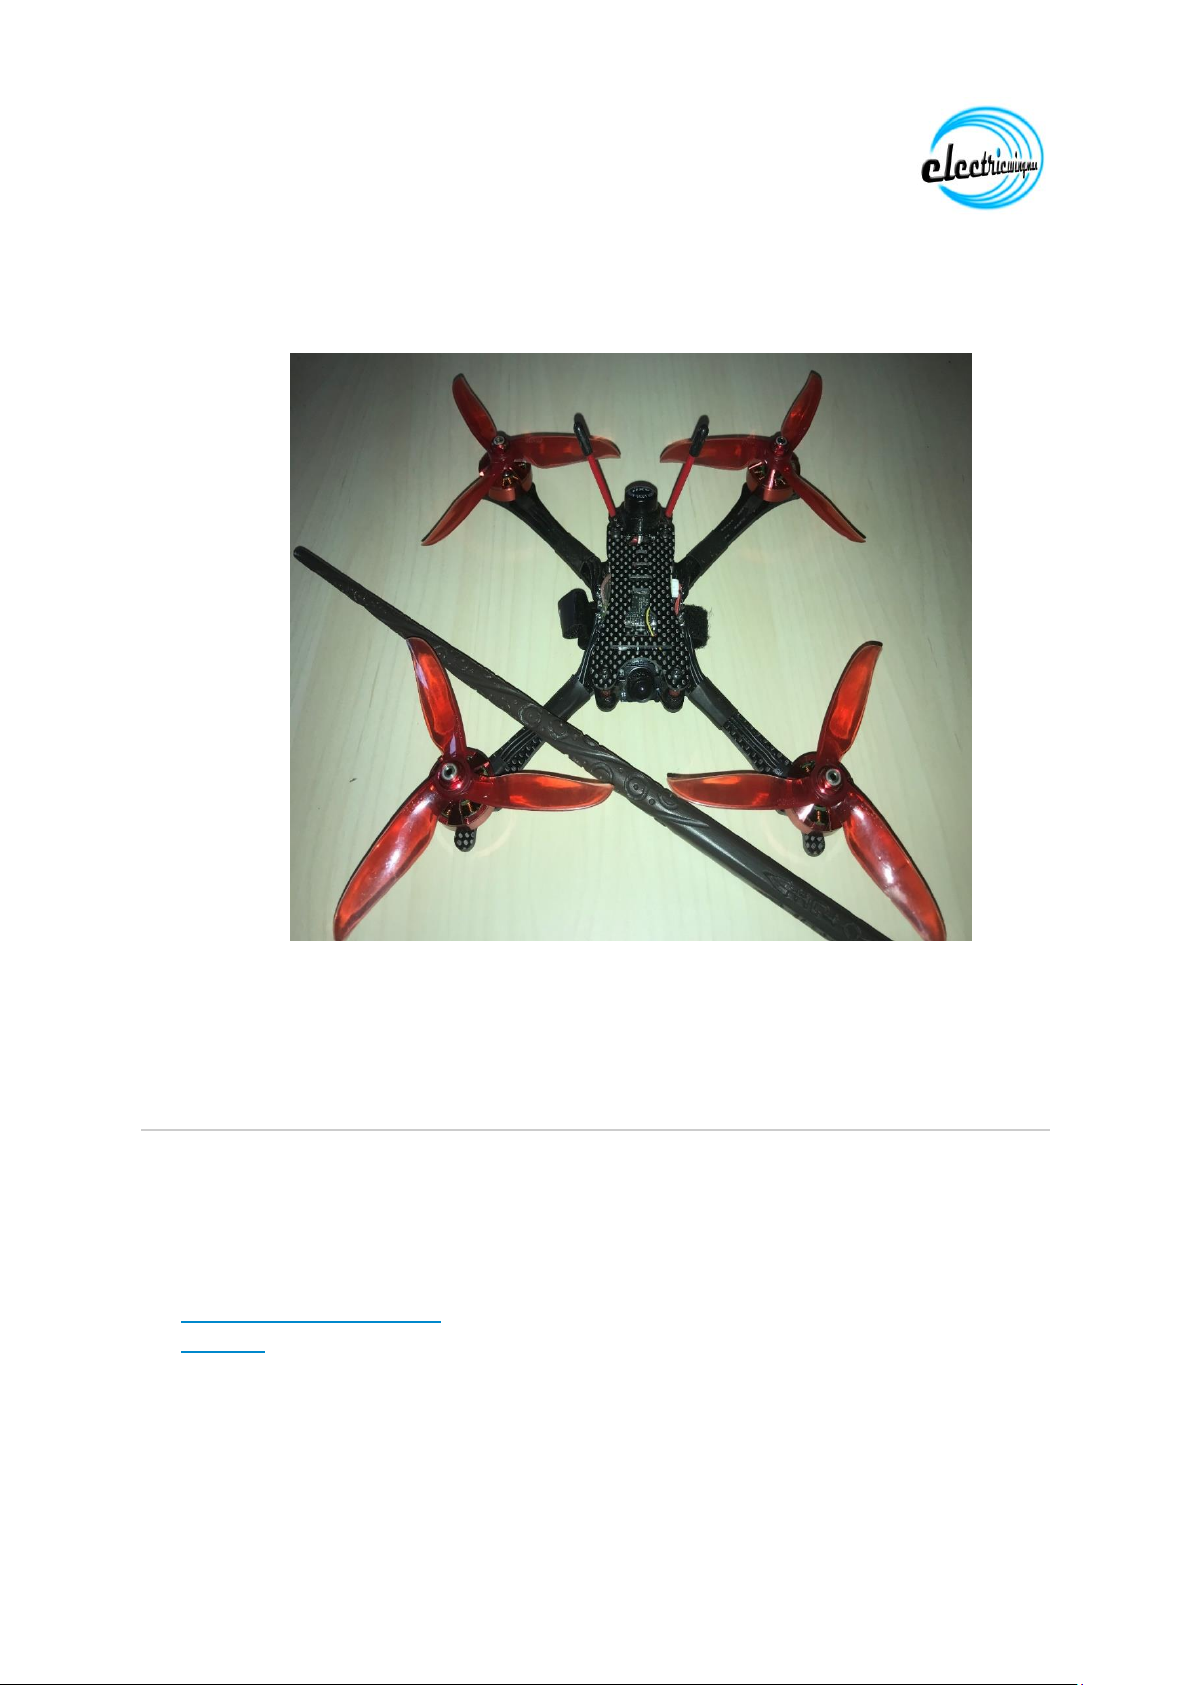
Frame: FlightClub PROton Ultralight Racing Quad
Flight Stack: Sunrise Siskin 4 in 1 30A ESC, F4 FC and OSD (2-4S)
Motors: BrotherHobby Returner R5 2306 2450kv (Deadpool are always popular but I
prefer the RedHulks, the photos never do them justice, they are not flat scarlet but
bright metallic red, see the photo at the front
VTX: TBS Unify Pro HV Race
Camera: Foxeer Arrow Micro (Runcam Swift Micro will fir just as well, but I prefer the
Foxeer, it has proved more robust)
Receiver: FrSky XM+
VTX antenna: Lumenier Axii ufl
Ancillary Parts: XT60 connector, shorter standoffs (20mm) can be used
Tools: Soldering iron and solder, side trimmers, craft knife, hot glue gun, hex drivers,
blue threadlock
Other useful stuff: files and wet-and-dry paper, hot air gun, tweezers.
www.electricwingman.com
Preparation and Dry Build
There is no prep work required on this quad, FlightClub are pretty good at making
sure everything is right. Dry building the frame is always recommended to work out
where everything fits. FlightClub have done a nice video that shows how to
assemble the quad an in the interest of not reinventing the wheel it can be found
here:
https://www.youtube.com/watch?v=XuWfn1731PA&t=29s
The xm+ sits below the flight controller with the bind button visible through the
bottom of the frame (although the battery strap may need to be moved to access it).
There is a carbon plate which sits above the flight controller and the VTX comes with
double sided tape which can be used to stick it to the plate.
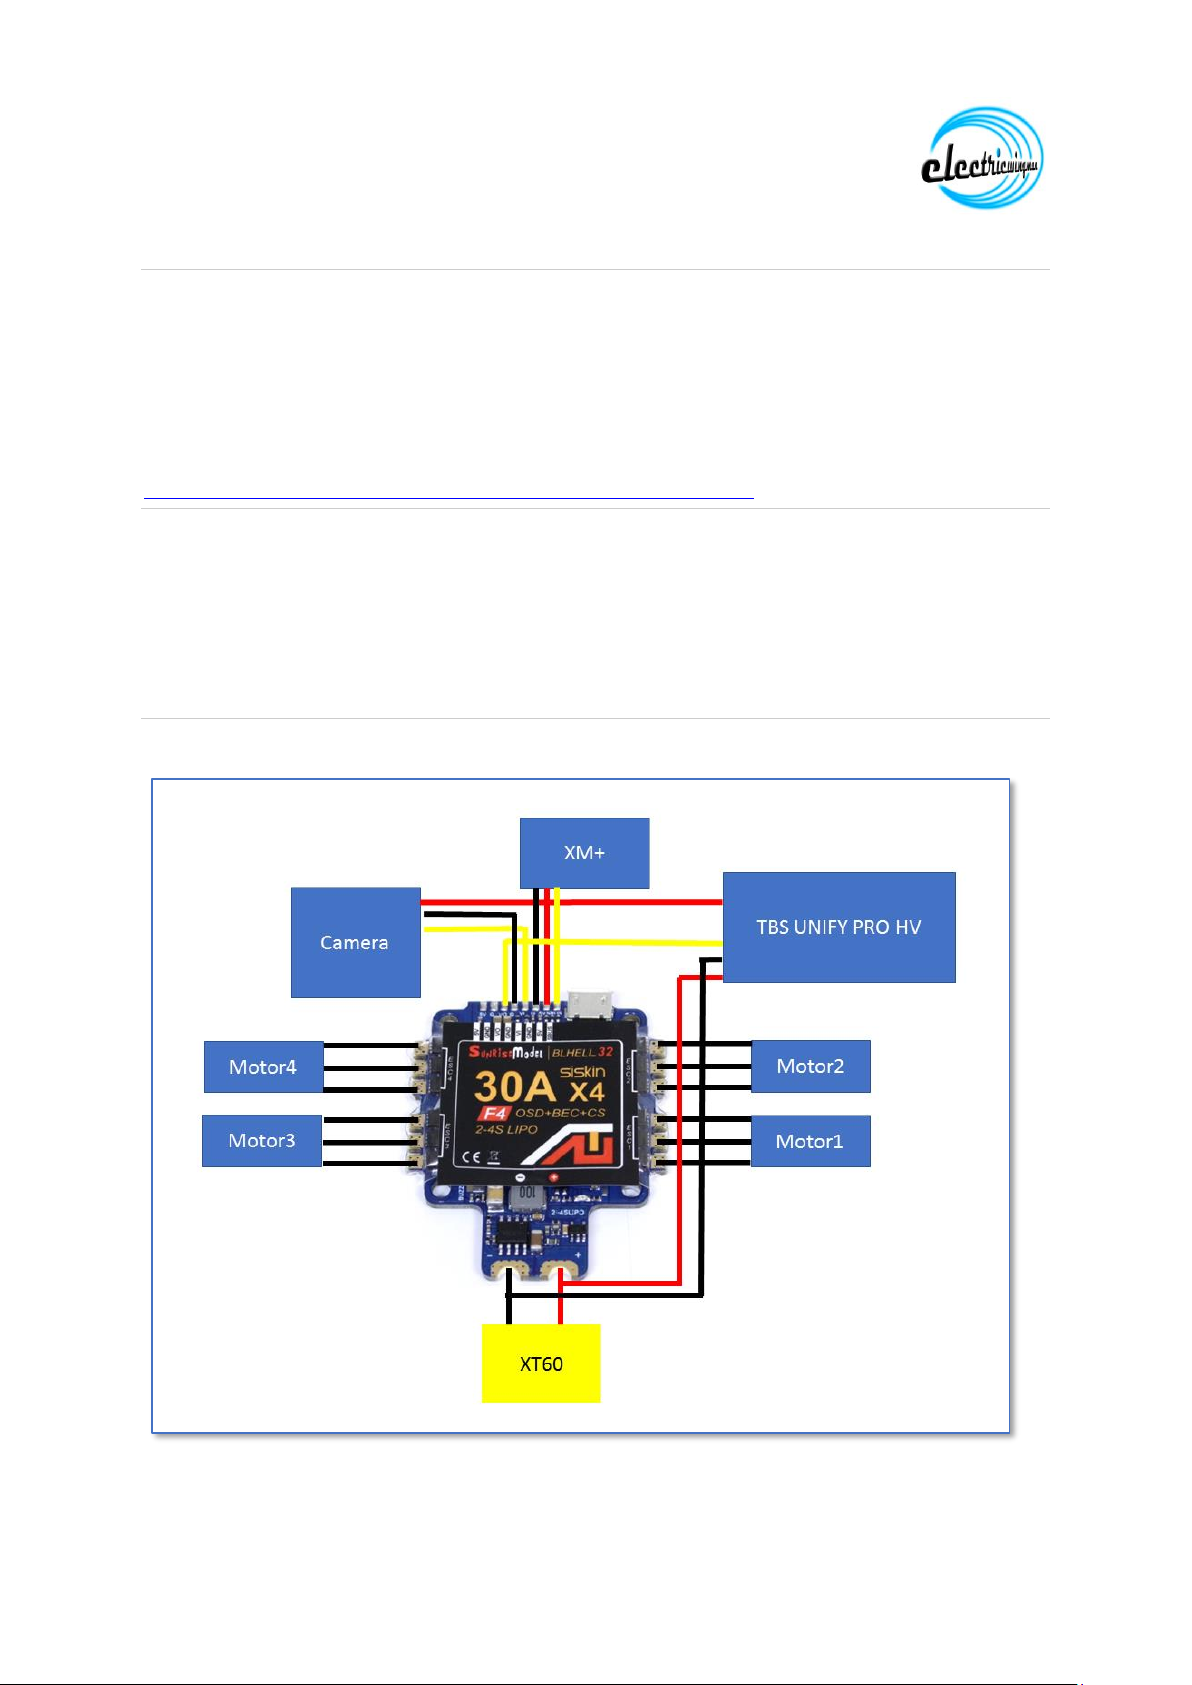
Wiring Diagram
Below is the wiring diagram for the Quad:

www.electricwingman.com
The Build
It is important to check the flight controller can connect to Betaflight and the gyro is
working correctly before soldering anything, once something is soldered to the board
it will void any warranty.
Use of a flux pen and a small tip on the soldering iron is recommended as the pads
on the flight controller are quite small.
I found it easiest to mount the flight controller and motors and then cut wires and
solder. The order which is easiest is:
•XT60 connector
•Motors
•The rest
This approach means you will not be applying a lot of heat to the board to connect
something like an XT60 ground when something has a much smaller connection and
could get de-soldered by heat wicked from the XT60
It is generally good practice to use the following approaches:
•Use a smoke stopper during testing
•Use a multimeter to check the continuity (or lack of) before testing anything
•Do one component at a time and test before moving on to the next one
Configuration
There are three things to configure; the Flight controller, the ESCs and the FPV
components, a couple of general rules:
1. PROPS -never ever ever plug the LiPo in with props on when you are working
on your quad. Quite aside from any damage to your equipment, this is likely to
cause a very angry, sharp and fast moving set of blades to make contact with
your face or hands and result in very serious injury. Always remove the props
when working on the quad, it is a pain in the bum but you do not want to learn
the lesson the hard way. Make it a habit.
2. It is assumed the radio has been bound to the receiver, there are many guides
available on how to do this as well as instructions that come with the receiver
Configuring the Flight controller –Butterflight?
First we are going to use Butterflight here. I have set the quad up using Betaflight
and it worked fantastically. However there are builders guides already which explain
how to flash and configure Betaflight and the can be used for this quad just fine.
Butterflight is the new kid on the block so it is being used as an example.
To install Butterflight you need to download the Butterflight configurator from here
and install it

www.electricwingman.com
http://butterflight.co/
Go to the “get Butterflight Configurator” button and click it then click on the version
of configurator for your operating system and it will download, then run the install
program in the download and the configurator will install.
When you open the configurator it will look very familiar:
Notice the white panel on the left side entitled “Starter settings for Butter”, it is worth
taking a copy of these, although we are going to adjust them slightly.
Plug the flight controller into the PC go to the “Flash Firmware” tab.
From the top drop down select OMNIBUS F4
From the second drop down select the latest stable version, then click on Load
Firmware (online) at the bottom and once the firmware has loaded click on Flash
Firmware

www.electricwingman.com
The firmware should flash but if it is the first time Butterflight has been flashed the
board may not go into DFU mode (because it does not match the existing firmware),
this can be fixed by either using the boot button when you plug the USB in or by
using Betaflight configurator and using the DFU command then switching to the
Butterflight configurator.
The latest version of Butterflight will then flash to the board.
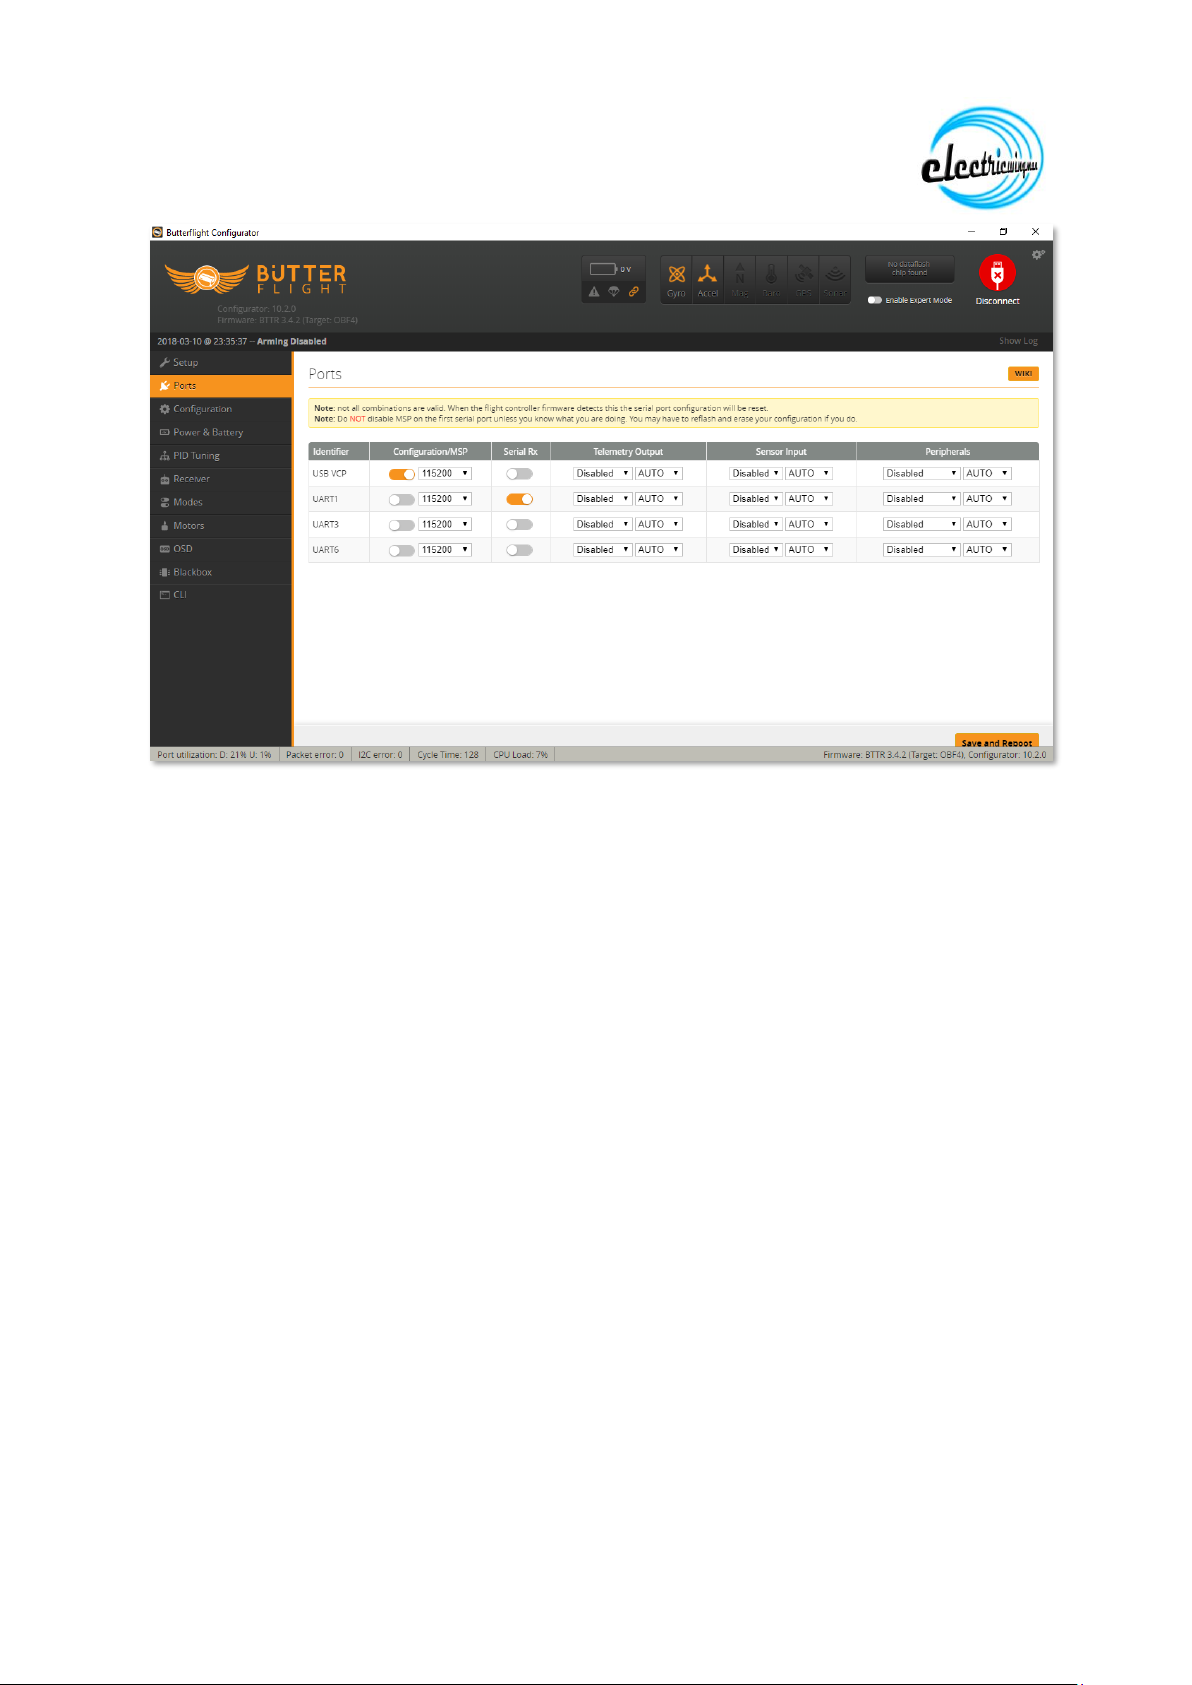
Make use the com port is shown at the top and then click on Connect
Go to the ports tab and set UART1 to Serial rx and click Save and Reboot
www.electricwingman.com
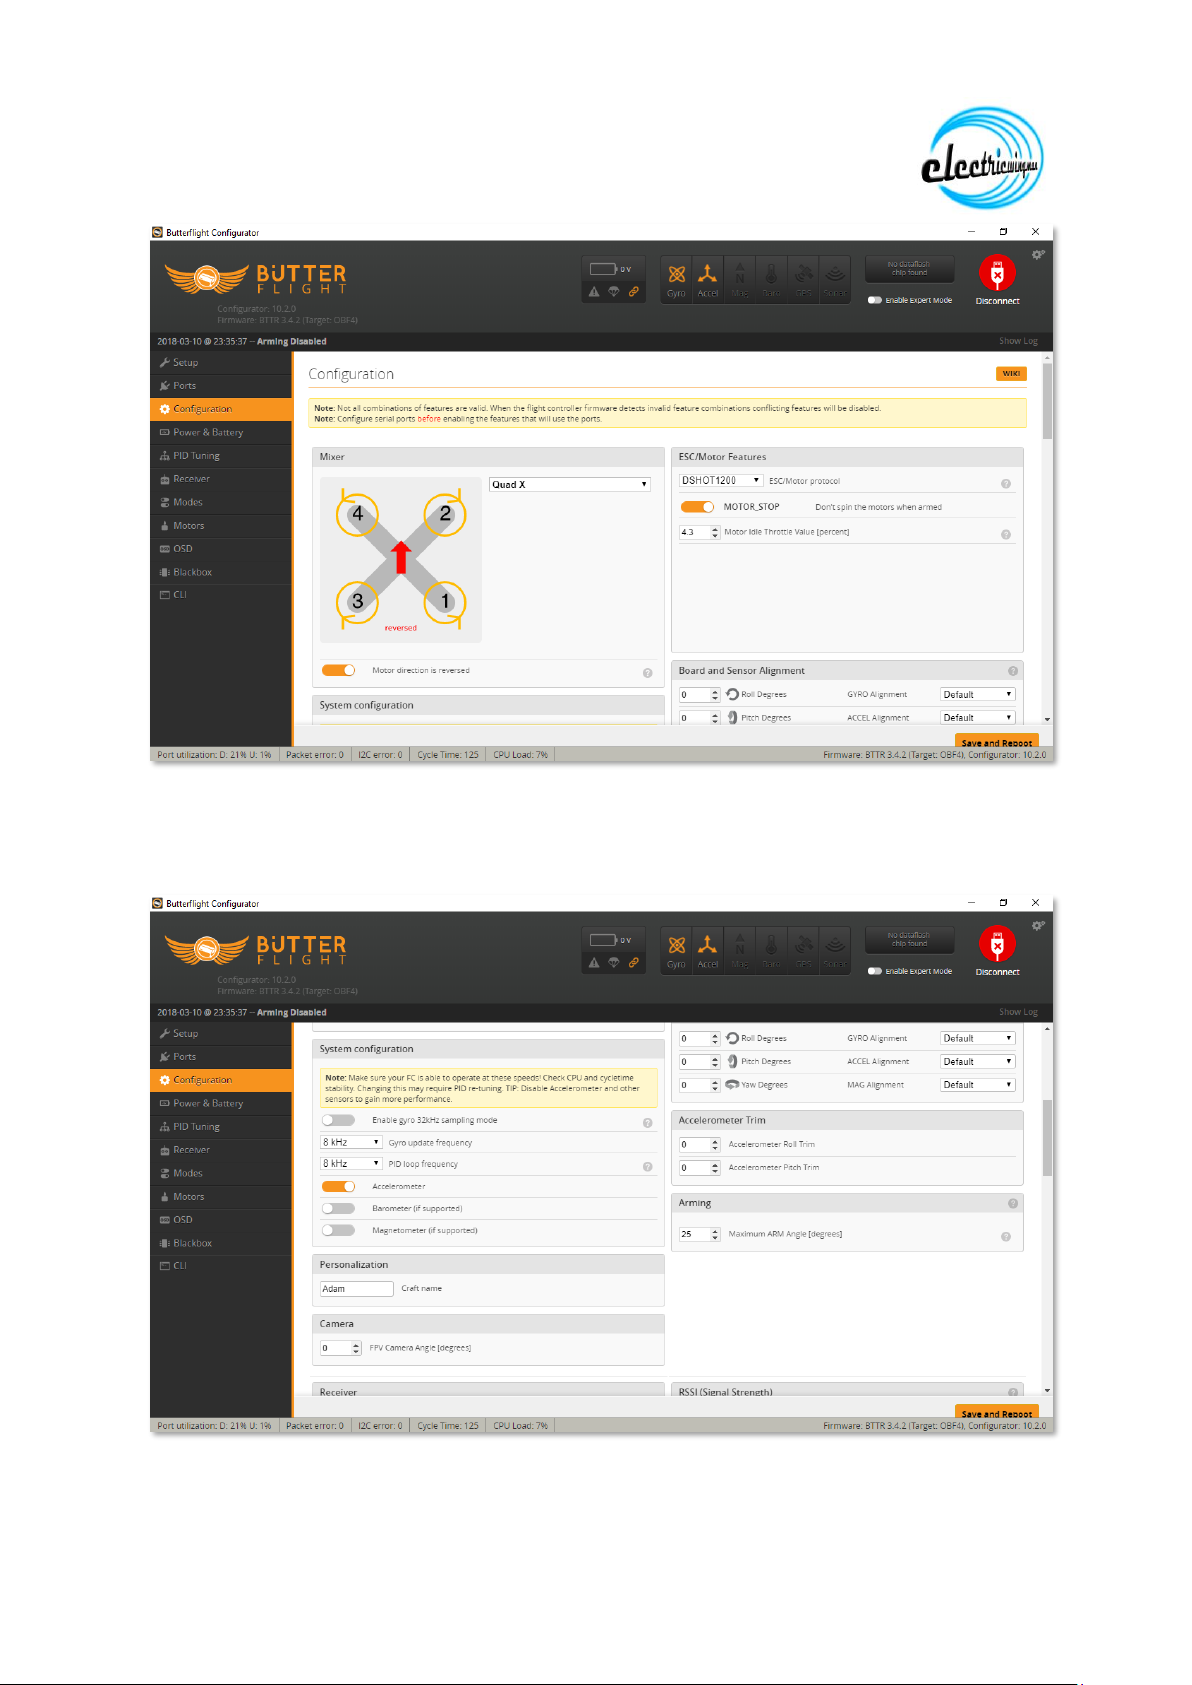
Once the board has rebooted, reconnect and go to the Configuration tab
In the mixer pane, enable “Motor Direction is Reversed”
In the ESX/Motor Features select DShot1200 from the drop down.
I also enable motor stop because I prefer to use Air Mode on a switch so I can
disable it for landing, this stops the infamous Air Mode bounce landings and allows
me to stop the motors by dropping the throttle when I land.
www.electricwingman.com
Scroll down, in the System Configuration panel set the PID loop Frequency to 8Khz
and disable the Barometer and Magnetometer
In the personalisation Panel enter the Quad or Pilot name
Scroll down, in the Receiver Panel set the Serial Receiver Provider to SBus

www.electricwingman.com
Scroll down and in the Other Features Panel, ensure the follow are the features that
are enabled:
OSD
Anti_Gravity
Dynamic_Filter
I also disable all beeper settings (because there isn’t a beeper on the quad)
Then click on Save and Reboot

www.electricwingman.com
When the Flight Controller has rebooted, reconnect.
Go to the PID tuning tab, the PIDS show below are ballpark, it will vary depending on
what props you are using as well as if you use different arms, different lipos, etc:
The rates are what I use for general flying, you should put your own rates in

www.electricwingman.com
Then go to the Filter Settings section and ensure it is set up as shown below and
click on Save
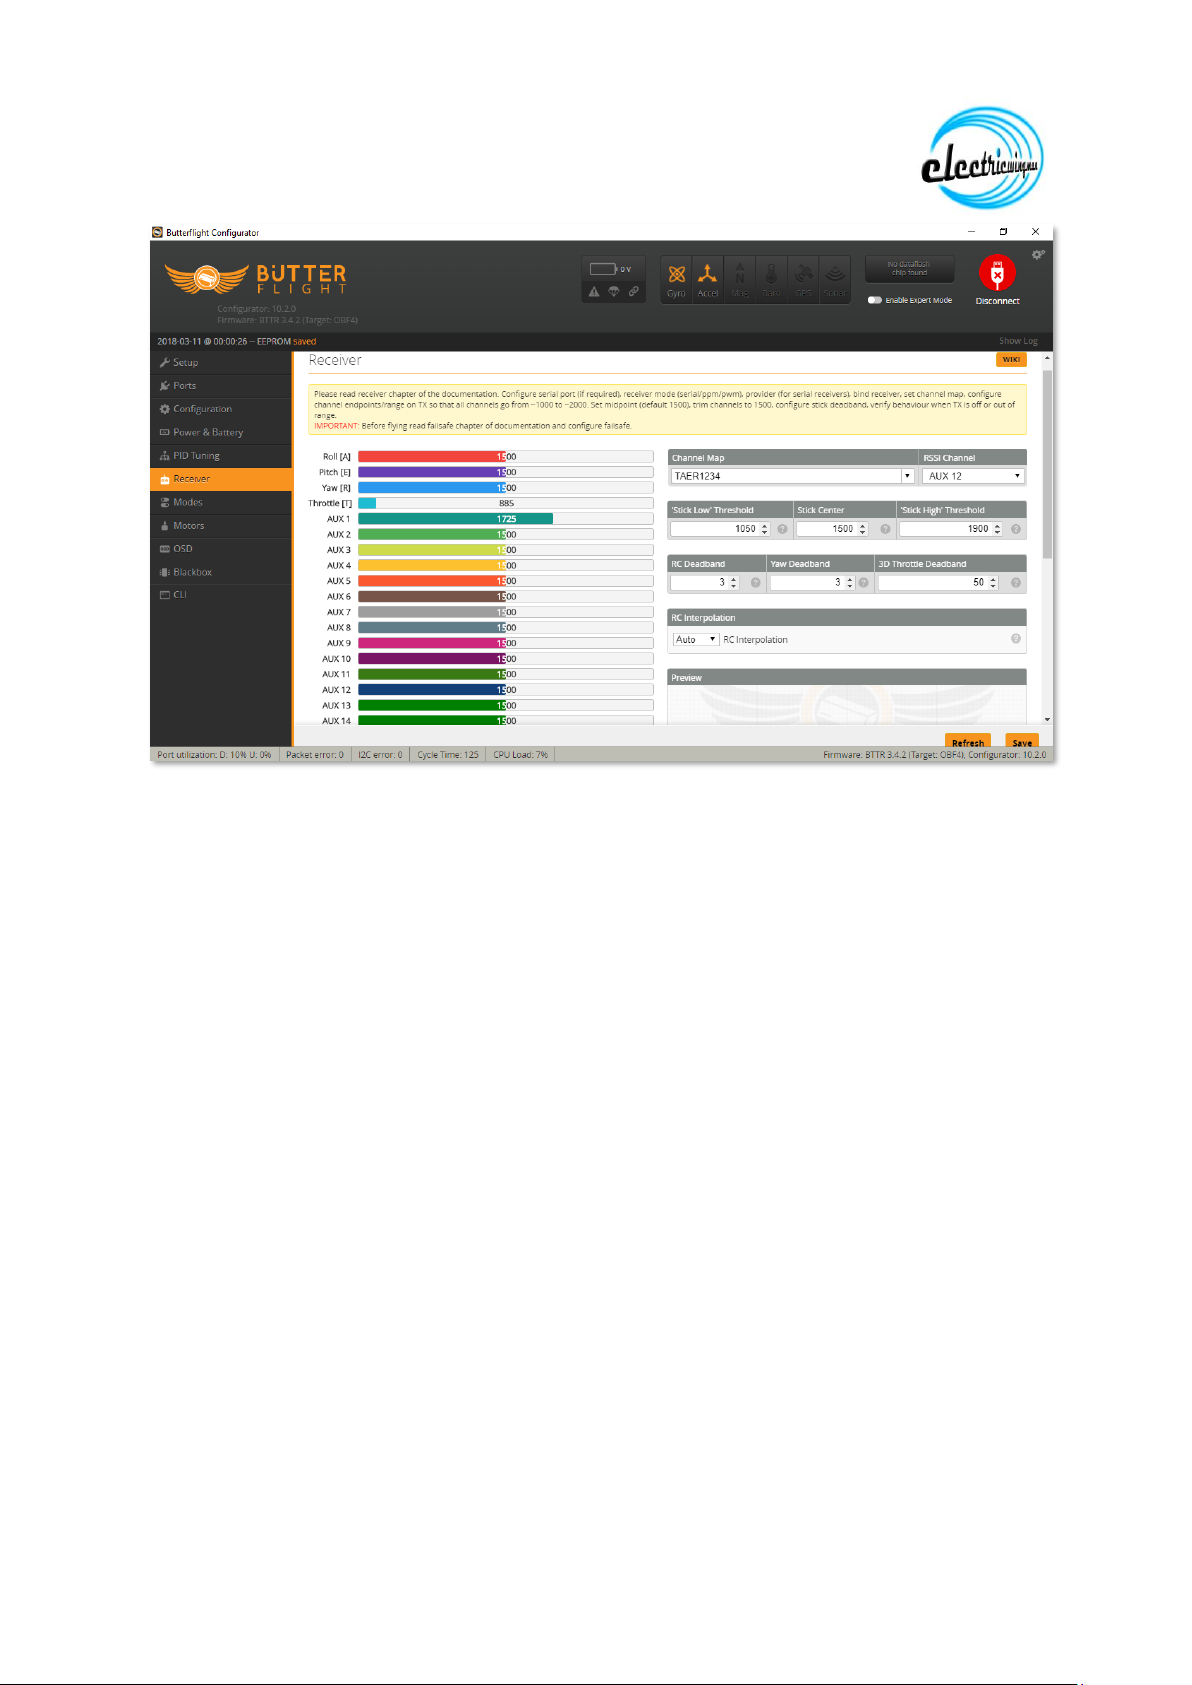
Go to the Receiver Tab
From the Channel map drop down select Spktrum / Graupner / JR
From the RSSI channel drop down select Aux 12
Click on Save
www.electricwingman.com
Go to the Modes Tab
Set up the modes as required, in the screen shot below I am using:
A three position switch on Aux 1 to give Disarmed / Armed / Armed and Air Mode
A three position switch on Aux 2 to give Rate mode / Horizon Mode / Angle mode
A momentary switch on Aux 3 to give Pre Arm
Click Save when done

www.electricwingman.com

www.electricwingman.com
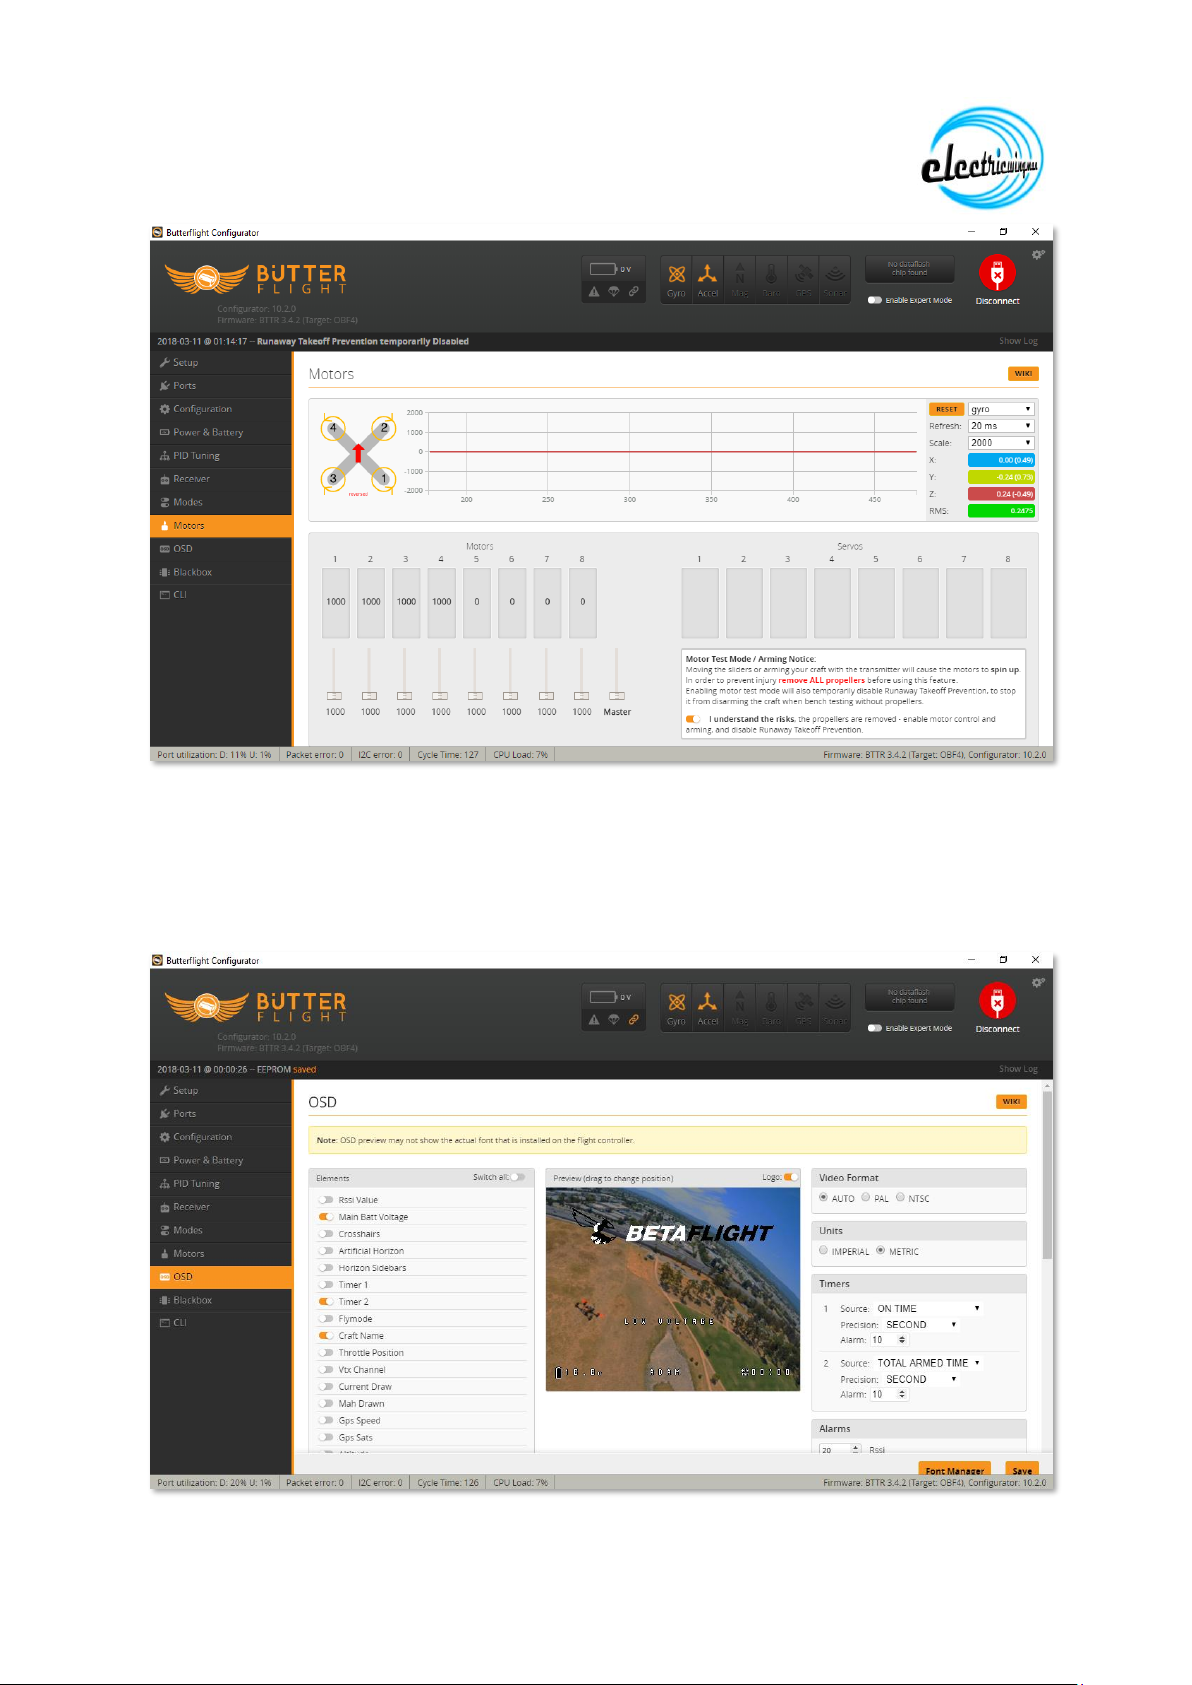
Go to the Motor Tab
Here we are going to check the direction of rotation of the motors
Make sure you have removed your props
Click the I understand the risks switch in the bottom right quarter of the window,
Plug the lipo in.
One motor at a time, slowly raise the slider, until the motor starts to turn smoothly
Compare the direction the motor turns in to the corresponding arrow in the diagram
at the top left,
Take a note of any motors that are spinning in the wrong direction
Stop that motor and go on to the next one
When all four motors are done disconnect the lipo
www.electricwingman.com
Go to the OSD tab and set up the OSD as required (features are enabled on the left
and then can be drag and dropped on the screen).
Click Save when done

www.electricwingman.com
Go to the CLI tab.
It is possible to copy and paste the recommended settings from the front screen
before connecting here, however we are going to change a little:
This is the current recommended settings:
Set dterm_lowpass_type = PT1 We have already set this on the filter tab, but by all
means do it again if you want
Feature AIRMODE This sets AirMode to be always on, as discussed above, this
makes landing very difficult, instead we have set it up on a switch
Feature ANTI We have set this up already
Feature DYNAMIC Again we have already set this up
Set gyro__stage2_filter_type = FAST_KALMAN type this in and press return
Set gyro_filter_q = 400
Set gyro_filter_r = 88 these are the recommended filter settings, however I have
had quads where these produce heat in the motors, I strongly recommend q = 300
and r=80, type the two lines in and hit return after each.
(note you can choose to use the recommended settings from butter flight, in the
majority of quads these have been fine, but do keep an eye on motor temp)
Type Save and hit return
Configuring ESCs –BLHeli32
To configure the ESCS we are going to use BLHeliSuite32. This is not the same
software as BLHeliSuite used for BLHeli or BLHeli_S. It can be downloaded from
here:
https://www.mediafire.com/folder/dx6kfaasyo24l/BLHeliSuite
Download it, unzip it and run the BLHeliSuite32.exe.

www.electricwingman.com
Click on Select BLHeli_32 Interface and from the drop down select BLHeli32
Bootloader (Cleanflight/Betaflight)
MAKE SURE THE PROPS ARE REMOVED
Plug in the lipo
Click on Connect
Click on Read Setup
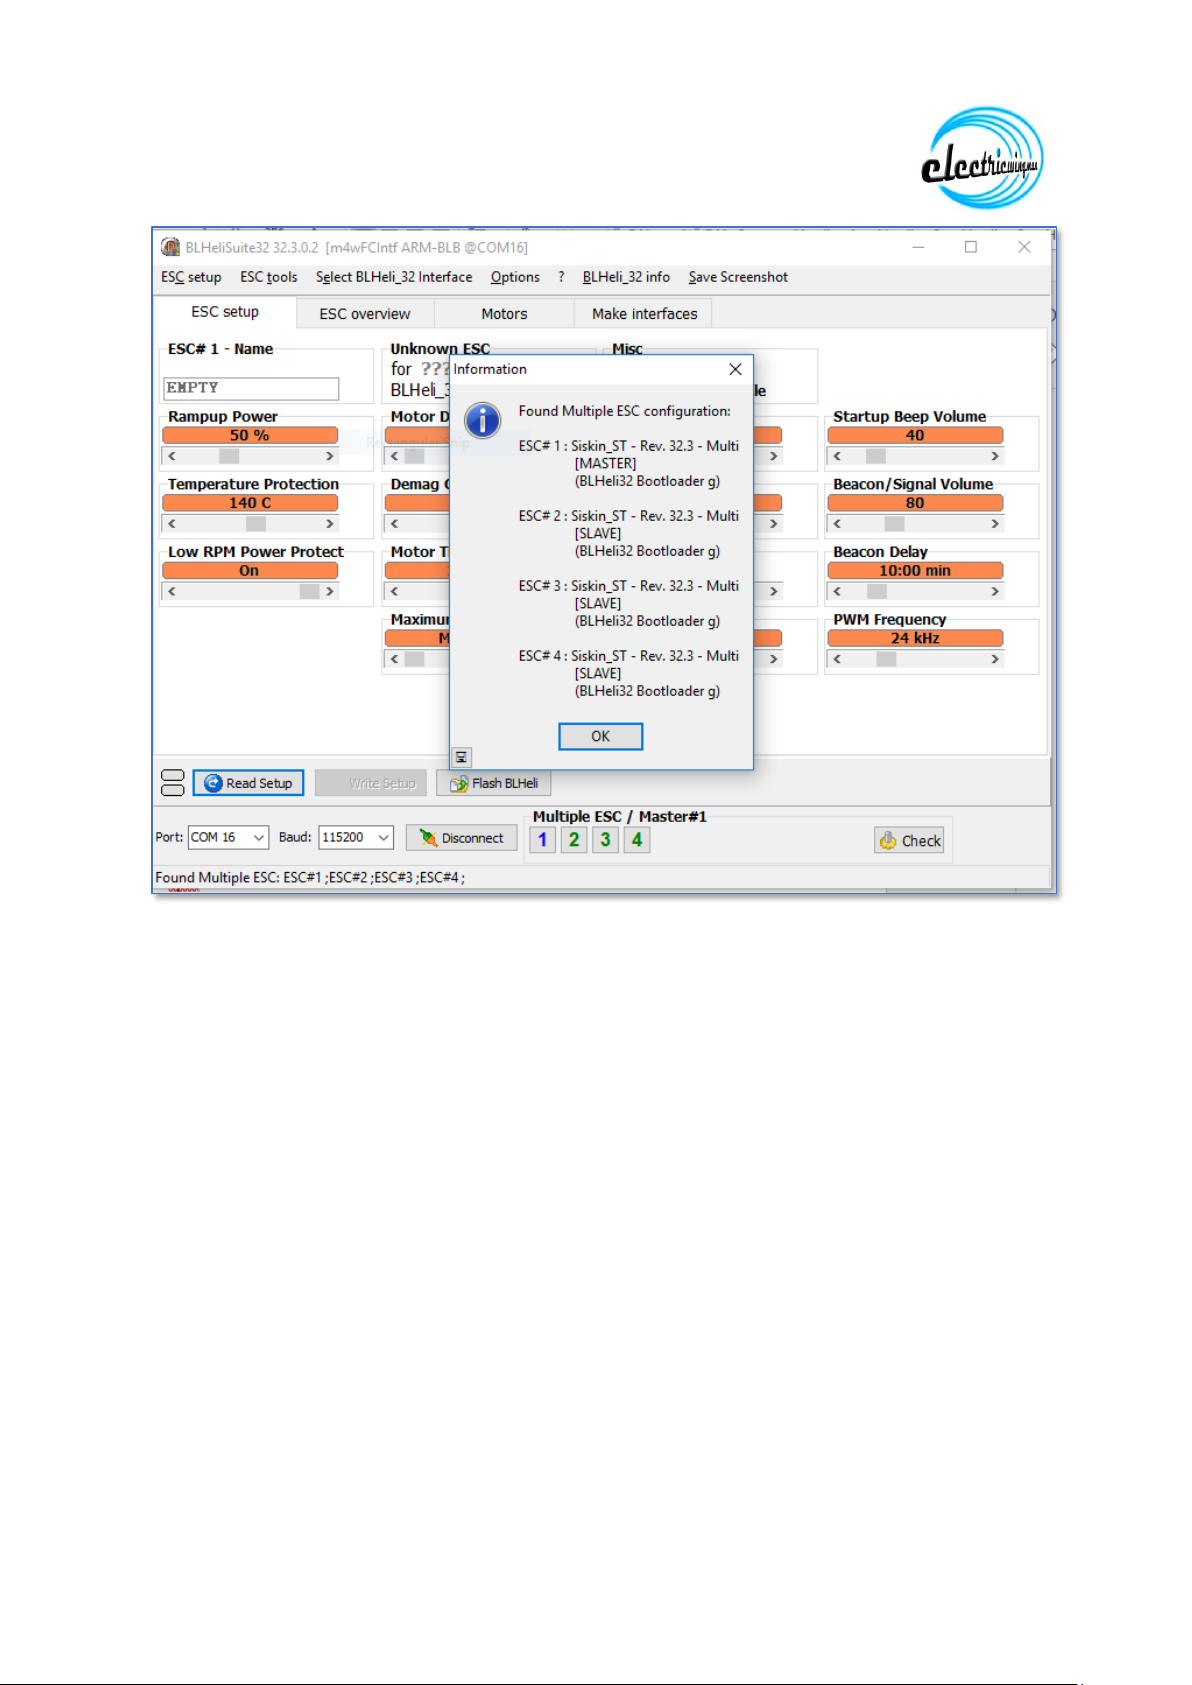
www.electricwingman.com
Click on OK on the popup.
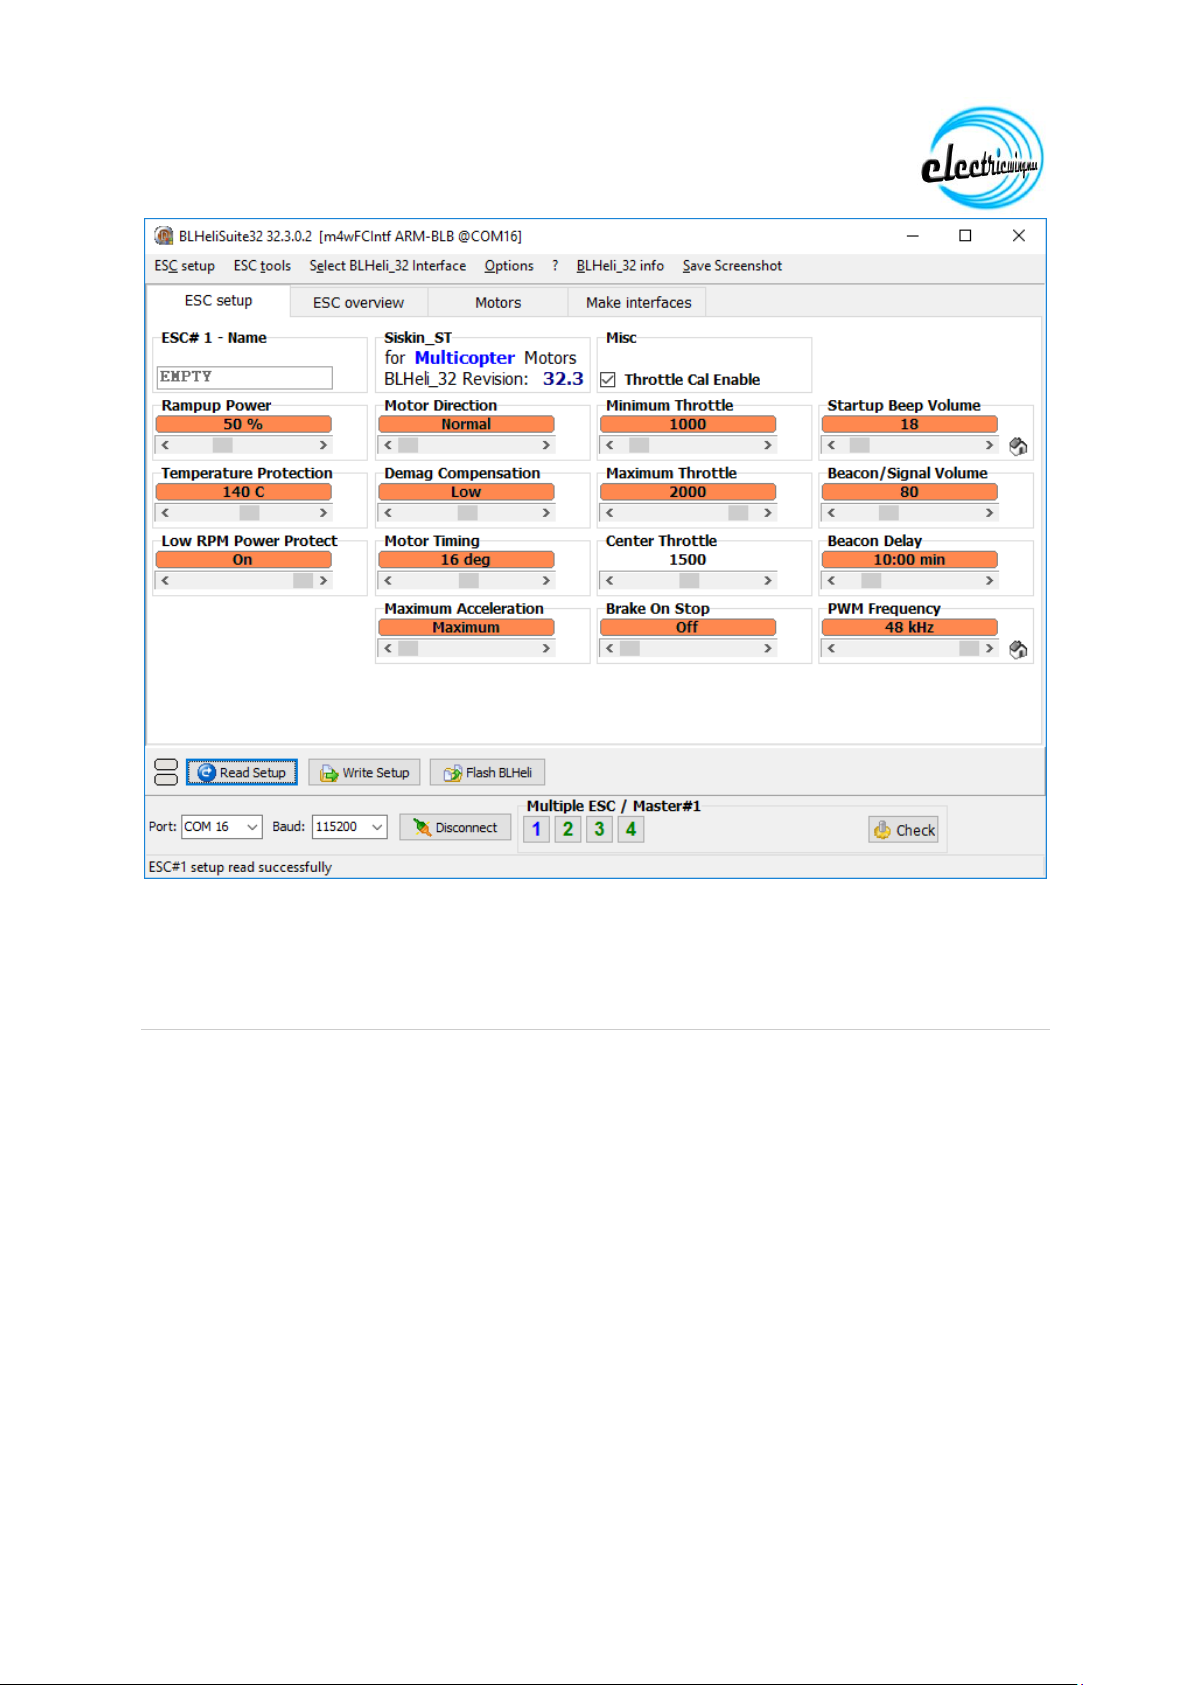
The latest Version of BLHELI32 can be installed by using the Flash BLHeli button
However, what we really want to change here is the PWM Frequency on the bottom
right which by default is 24khz, move the slider to the right so it is increased to 48khz
Click Write setup
IF any of your motors were spinning in the wrong direction this is the time to correct
that. The four boxes at the bottom numbered 1 to 4 represent the four motors, by
clicking on them you can deselect motors. Deselect all the motors apart from the
one you want to change, use reverse motor direction to set the direction to
reversed and click write setup then move on to the next motor
www.electricwingman.com
When done click Disconnect and unplug the LiPo. If you changed any motor
directions pop back into ButterFlight and retest them.
Configuring the FPV components
NOTE: Never power a video transmitter without an antenna attached, it will burn out
the transmitter.
Set up your goggles and receiver on the channel and band you want to use.
Following the instructions that came with the VTX, WITHOUT PROPS ON, plug the
LiPo in and use the button on the the VTX to set the band and channel on the
transmitter, the image will appear in the goggles when correct. (note that the image
may appear when you are on the wrong band and channel because the frequency is
close, this will be fine on the bench but will have dramatically less range. Use the
LED on the VTX and whatever mechanism is on your goggles to confirm they are on
the same band and channel with the image in the goggles as confirmation.
On the camera connect the OSD cable, and switch off the OSD components (you
don’t want two OSDs and the Flight controller OSD is more useful)

www.electricwingman.com
Final things
Before flying for the first time (and regularly thereafter) test your failsafe (if you don’t
you will have what is termed a “Flyaway” at some point where your quad departs like
some homesick Mary Poppins and is never seen again.
To do this, WITH PROPS OFF, turn on your radio, power up the quad, arm it and
give it a little throttle so the motors start spinning, then turn the radio off. Within a
second or so the motors should stop dead.
Test Hover your quad somewhere safe. Do it Line of Sight, I usually do it in Angle
mode and from a safe distance before taking it to the field to fly for the first time.
Once you have tested failsafe and test hovered. Make sure everything is screwed
down tightly, use blue threadlock on the motor mount screws and the four screws
holding the standoffs to the bottom plate.
You are now good to fly, please do it safely and legally and ensure you have
appropriate insurance such as that provided by BMFA membership.


