SNAIGE CD48DM-S300BD User manual
BEVERAGE REFRIGERATOR
Instruction for Use
CD48DM-S300BD
CD48DM-S300AD

1
CAREFULLY READ THE INSTRUCTION MANUAL. If instructions are not followed,
there is a risk of injury, damage of the appliance and loss of the right to free
warranty service.
The Manufacturer shall not be held liable for damage arising from the failure to
observe the instructions contained in this manual.
We recommend to keep the Instruction manual the whole time you have the
appliance. When you sell the appliance pass the Instruction manual to the new
owner of the appliance.
General information:
The appliance is a vertical beverage cooler is designed for chilling of drinks, for
storage of foodstuffs and for a short-term storage of them. This appliance is
intended for commercial use!
THE MANUFACTURER GUARANTEES RELIABLE OPERATION OF THE
REFRIGERATOR WHEN THE AMBIENT TEMPERATURE IS +16 TO +32 DEGREES
CELSIUS AND THE RELATIVE AIR HUMIDITY NOT GREATER THAN 65 PER CENT.
SAFETY INSTRUCTIONS
General safety requirements:
–WARNING: Do not cover the ventilation holes at the top and on the sides of the
appliance.
–WARNING: Do not use any mechanical means or electrical devices to hasten the
thawing process when cleaning the freezer compartment.
–WARNING: Do not use electrical appliances inside the food storage
compartments of the appliance, unless they are of the type recommended by the
manufacturer.
–WARNING: When positioning the appliance, ensure the supply cord is not
trapped or damaged.
–WARNING: Do not locate multiple portable socket-outlets or portable power
supplies at the rear of the appliance.
WARNING: Disposal of the appliance should be according to national rules.
2
WARNING: risk of fire / flammable materials. Do not damage the
appliance refrigeration system. It contains the refrigerant gas R600a. If
the refrigeration system is damaged:
•Do not use any open flame.
•Avoid sparks ― do not turn on any electrical appliances or lighting fixtures.
•Immediately ventilate the room.
•Air the room in which the appliance is placed for a few minutes (the size of the
room for a product containing isobuthane / R600a must be at least 4 m3) to avoid
damage to the cooling system.
C-Pentane is used as blowing agent in theinsulation foam and it is a
flammable gas.
–This appliance is not designed for the storage of explosive substances such as
aerosol cans with a flammable propellant.
–It is prohibited to store petrol and other flammable liquids near the appliance.
–The appliance should be used only for storing foodstuffs
–Once the appliance is unpacked, make sure that it is complete, that the body
and the electrical cord aren’t damaged. It is forbidden to use a technically
damaged appliance.
–The appliance should only be connected to an earthed socket installed in
accordance with the regulations. Make sure that the supply voltage corresponds
with the voltage marked on the rating label. This product complies with all
binding CE labelling directives. The earthed electrical socket by which the
appliance is connected to the mains should be in an accessible place. It is a
legal requirement that the appliance is properly earthed. The manufacturer will
not be held liable for any damage or injury which may result from the failure to
fulfil this requirement.
–To avoid the exposure to danger, always have faulty cable be replaced only by
the manufacturer, by our customer service or by qualified person and with a
cable of the same type.
–Do not use adapters, multiple sockets and two-wire extension leads. If it is
necessary to use the extension lead, it must be equipped with a protection ring
and a single socket and must have a VDE/GS safety certificate.
–The frequency and power of the electricity supply must conform to the general
data parameters of the appliance as it is shown in the product label.
–When positioning the appliance, be careful that the electrical cord isn’t
squeezed in order to avoid its damage. Do not store heavy objects such as
cooling devices, furniture or other devices next the appliance in such a way that
3
they could squeeze and damage the electrical cord. This can cause a short
circuit and a fire.
–Make sure that the plug of the electrical cord is not squeezed by the back wall
of the appliance or otherwise damaged. A damaged plug can be the cause of a
fire!
–CAUTION! If the installed interior lighting diode (LED) lamp for the cooling
device is not functioning, contact the maintenance and repair representative for
replacements. LAMPS CAN BE REPLACED ONLY BY THE MAINTENANCE
AND REPAIR REPRESENTATIVE.
If the appliance is out of order and it is not possible to repair it by means of
given recommendations, unplug it, open the doors and call the service
expert. Only a service representative can remedy all technical or
construction faults
–If the appliance is unplugged (for cleaning, moving to another place, etc.), it
may be repeatedly switched on after 15 min.
–Pull the plug out from the mains socket before each maintenance activity. Do
not pull on the cord, but hold the body of the plug instead.
–The appliance should be used only for storing foodstuffs.
–This appliance is not designed for the storage of explosive substances such as
aerosol cans with a flammable propellant.
–It is prohibited to store petrol and other flammable liquids near the appliance.
–The appliance can’t be disposed of by burning.
–Do not place any switched on electrical devices on top of the appliance because
this may cause ignition of plastic parts.
–Do not place any dishes with liquids on top of the appliance and do not keep
flowers in vases or other liquid-filled vessels on the appliance. Do not lean on or
hang on the appliance doors and do not allow children to do this.
The appliance should be transported only in the vertical position.
THE MANUFACTURER WILL NOT BE RESPONSIBLE FOR ANY DAMAGE OF
THE APPLIANCE THAT RESULTS FROM NON-COMPLIANCE WITH THE
INSTRUCTIONS FOR TRANSPORTATION.
4
INSTALLATION AND OPERATING CONDITIONS
Positioning:
•This appliance can be installed in a dry, well ventilated indoor where the ambient
temperature corresponds to the climate class indicated on the rating plate of the
appliance
WARNING! The appliance should not be operated in an unheated room or
porch. Place the appliance away from heat sources such as kitchen
stove/oven, radiators, or direct sunlight.
The rear wall of the appliance, in particular, the condenser and other
elements of the cooling system must not contact other elements, which may
damage them, (e.g. central heating pipes and the water supply pipes).
•Do not cover the ventilation holes at the top of the appliance –it must be a good air
circulation around the appliance. There should be a gap of at least 10 cm between the
top of the appliance body and any furniture that may be above it. If this requirement is
not followed, the appliance consumes more electrical energy and its compressor may
overheat.
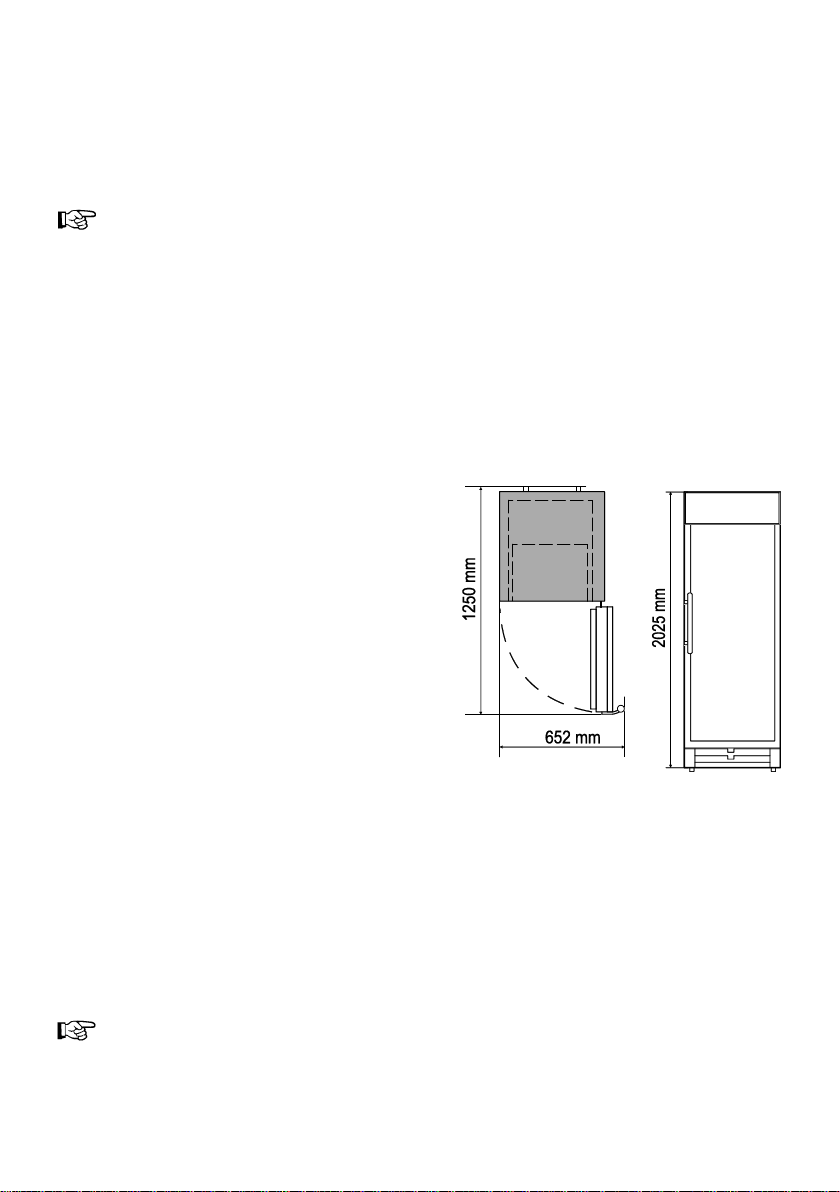
•If the appliance is placed in a corner, a gap
of at least 3 cm must be left between the
appliance body and the wall. Overall space
required for use of the refrigerator.
Overall dimensions for installation of
the refrigerator (see fig.).
•The appliance must stand on a level surface
and must not touch the wall. If necessary,
regulate the height of the appliance by
adjusting the levelling feet: by turning them
clockwise –the front of the appliance rises,
by turning them counter clockwise –it
comes down. If the appliance is tilted
slightly backward –the doors will close by
themselves.
Preparing the appliance for operation:
It is recommended to prepare the appliance for operation with a helper.
•The device must only be transported in its vertical position; do not tilt any more than
30°.
•Remove boards of foamed polystyrene from the top and the bottom of the appliance.
They are intended for transportation only. Remove adhesive tapes and open the door. In
case of moving the appliance to another place, lift its front in such a way that its
supports couldn’t touch the floor.
Take out the plug with the supply cord 10 from the water tray 11 (see page 6, fig.
1) which is placed under a compressor (this is intended for transportation only.
When the appliance is running, the cord can’t be in the tray. The appliance
should not be connected to the mains until all packing and transport materials
aren’t removed.
This manual suits for next models
1
Table of contents
Other SNAIGE Refrigerator manuals

SNAIGE
SNAIGE RF62FB-TNCBNE0 User manual

SNAIGE
SNAIGE CD40DM User manual

SNAIGE
SNAIGE MD40DD User manual

SNAIGE
SNAIGE RF31SM User manual

SNAIGE
SNAIGE FR240 User manual

SNAIGE
SNAIGE R 130 User manual

SNAIGE
SNAIGE RF27SM User manual

SNAIGE
SNAIGE MD40DC User manual

SNAIGE
SNAIGE SGM020P2AA Series Manual

SNAIGE
SNAIGE Fresh INN RF53SM User manual

SNAIGE
SNAIGE C 14SM User manual

SNAIGE
SNAIGE CD29DM User manual

SNAIGE
SNAIGE R 13SM User manual

SNAIGE
SNAIGE C 31SM User manual

SNAIGE
SNAIGE FR27SM User manual

SNAIGE
SNAIGE C 29SM User manual

SNAIGE
SNAIGE CC70MF User manual

SNAIGE
SNAIGE RF53SG User manual

SNAIGE
SNAIGE R 13SM User manual

SNAIGE
SNAIGE MD14DC User manual


