Electro Scan ES-38 User manual

ES-38TM for
Sewer Laterals
User Guide
Copyright 2012 Electro Scan, Inc. All Rights Reserved.

Electro Scan Inc.
ES-38TM User Guide
ES-38 for
Sewer Laterals
ES-38 Air Push Rod
Zebra RW420
Printer
Smartphone
Distance
Module
Probe
Module
Probe
Plug
Reel
Accessories
Diffuser
Salt Solution
Ground &
Calibration Reel
50 ft. Flat
Hose
Metal Stake
Ground
Connection

Electro Scan Inc.
ES-38TM User Guide
Table of Contents
1. Before Leaving the Office
A. Checking Bluetooth Pairings……..………………..1
B. Assigning Bluetooth Devices to Smartphone...........2
C. Checking Batteries for Distance & Probe Modules. 4
D. Confirming GPS Capability………………..............4
E. Checking Printer…………………………………...5
2. Arriving at a Customer’s Site
A. Entering Your Customer Information……………...6
B. Testing Your ES-38TM Air Push Rod…….……….. 7
C. System Calibration Check……..………………….. 7
3. Preparing the Sewer Lateral
A. Plugging the Sewer Lateral………………………...9
B. Filling the Sewer Lateral with Water ……………...9
C. Positioning and Connecting Ground Stake……….10
4. Electro Scanning the Sewer Lateral
A. Starting an Electro Scan…………………………. 10
B. Checking the Ground Stake Connection………… 10
C. Positioning the Probe for Scanning……………….11
B. Recording an Electro Scan………..………………11
C. Printing, Storing, and Exporting………………….13
5. Cleaning-Up and Securing the Job Site
A. Deflating the Plug……….….…………………….15
B. Removing Equipment…..………………………...15
C. Replacing Clean-Out Cover………………………15
Copyright
2012 Electro Scan Inc. All Rights Reserved.
ES-38TM for Sewer Laterals, User Guide, Version 1.1
Released April 2012
This document is confidential and is owned by Electro Scan Inc.
Use, examination, reproduction (even partial) in any format,
transfer and/or disclosure to others is strictly prohibited except
by express written agreement of Electro Scan Inc.
All Inquiries should be addressed to:
Electro Scan Inc.
1745 Markston Road
Sacramento, CA 95825-4026
Written by: Electro Scan Inc.
Layout, design and editing: James H. Dewey
Photography by: Whitney Lofrano
Printed in Sacramento, CA
Help Desk: Call Toll Free 800-975-6149
M-F 8AM-4PM Pacific Time
Electro Scan Inc.
ES-38TM User Guide
Preface
Introduction
The ES-38TM for Sewer Laterals represents
the next generation in sewer leak detection.
Measuring the variation of electric current
flowing through the walls of a sewer pipe, the
ES-38TM represents the state-of-the-art in
locating defects that cause infiltration and
exfiltration.
Electro scanning, in contrast to visual
inspection techniques commonly used by
closed-circuit television equipment, locates
all potential cracks and fractures that
represent pathways where water can either
leak into or out of a sewer pipe. If a pipe
leaks electricity, it will leak water.
Most sewer pipe materials such as clay,
plastic, concrete, reinforced concrete, and
brick have high resistance to electrical
current, while defects have low resistance.
As a result, the ES-38TM is your new tool of
choice to help you cost-effectively find pipe
defects and confidently recommend fixes to
your Customer.
Operating Conditions & Safety
The use of the ES-38TM requires access to
sanitary sewer laterals, involves filling
sewers with water, and sometimes operating
along the side of roads, easements, and other
hazardous locations that represent safety
hazards. This User Guide DOES NOT
describe the hazards likely to be encountered,
nor required safety procedures and
requirements that must be carried out when
operating in these hazardous environments or
conditions.
Therefore, operation of the ES-38TM is at the
sole responsibility and risk of the Operator,
who bears full responsibility to ensure that
the required safety procedures for work is
known and carried out.
Electro Scan Inc.
ES-38TM User Guide
Using the ES-38TM for
Sewer Laterals
Electro Scan Inc. has designed the ES-38™ for
Sewer Laterals and its Smartphone App to be as
straightforward, as possible. Before you begin using
the ES-38™, please verify the following conditions:
•The ES-38 Application is installed in a
Smartphone running the operating system
Android Version 2.3 (or later).
•There is enough memory available on the
Smartphone to store scans.
•ES-38™ field unit has sufficient battery
power.
Note: The Help screens in the ES-38™ application
contains a copy of this Field Guide and is routinely
updated to reflect enhancements to the Smartphone
App.
1. Before Leaving The Office
Before you leave your office please ensure that the
following devices are Paired to your Smartphone:
•ES-38 Distance Module
•ES-38 Probe Module
•RW420 Zebra Printer
Once all devices have been paired, each device’s
corresponding MAC Address must be entered into
the Smartphone App,
with its related MAC
Address for Distance
and Probe Modules,
provided separately.
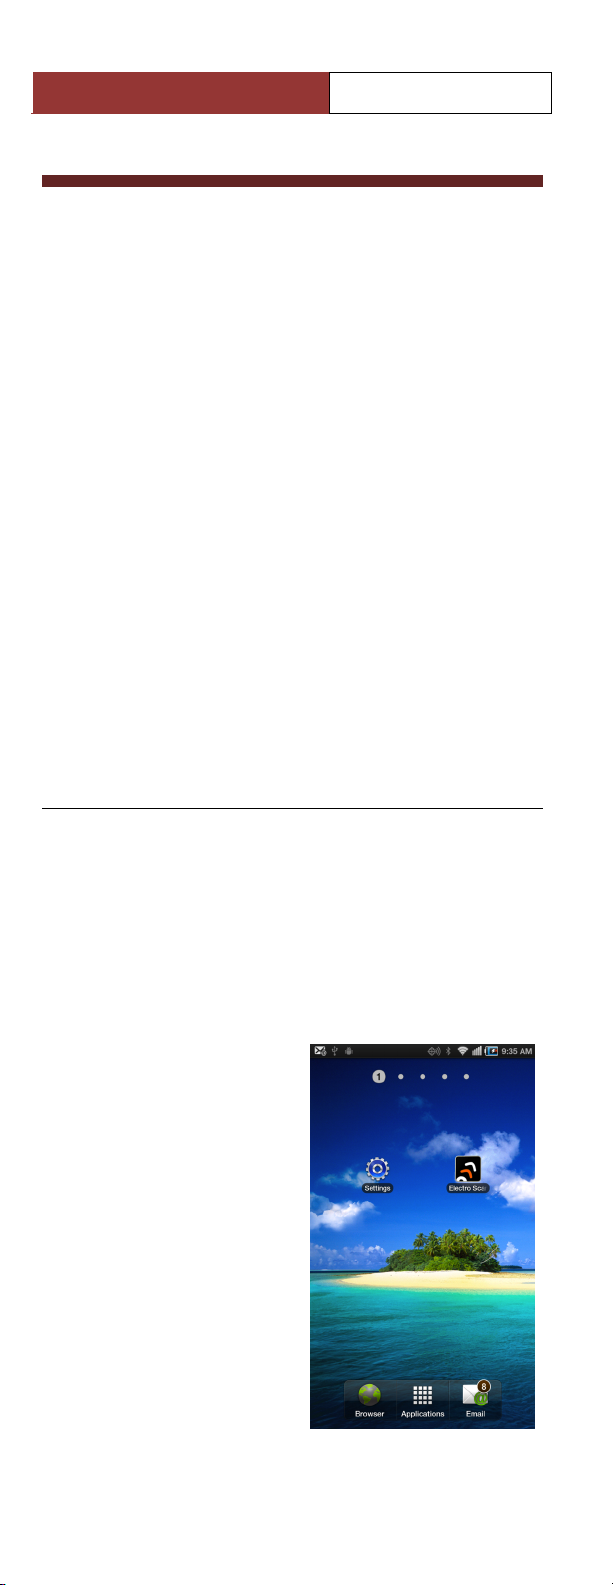
A. Checking
Bluetooth Parings
1. Turn ON the above
devices.
2. On the Smartphone
Home Screen, Go To
Your SETTINGS
icon and click.
1
Electro Scan Inc.
ES-38TM User Guide
3. Go to Bluetooth settings.
Make sure that Bluetooth
is Turned ON so that ALL
discoverable devices
appear.
4. If not Paired, pair your
Smartphone with the ES-
38 Distance Module, ES-
38 Probe Module, and
Zebra RW420 Printer.
5. The Pass Code for connecting the Distance and
Probe Bluetooth is “1234,” while the Pass Code
for connecting the Zebra RW420 Printer
Bluetooth is “0000.”
B. Assigning Bluetooth Devices to
Smartphone
After pairing your Smartphone to Electro Scan’s three
devices, you still must ensure that the Electro Scan
Smartphone App recognizes each Bluetooth device with
the application. This is a one-time set-up, but it’s
always recommended to check before starting your
scans.
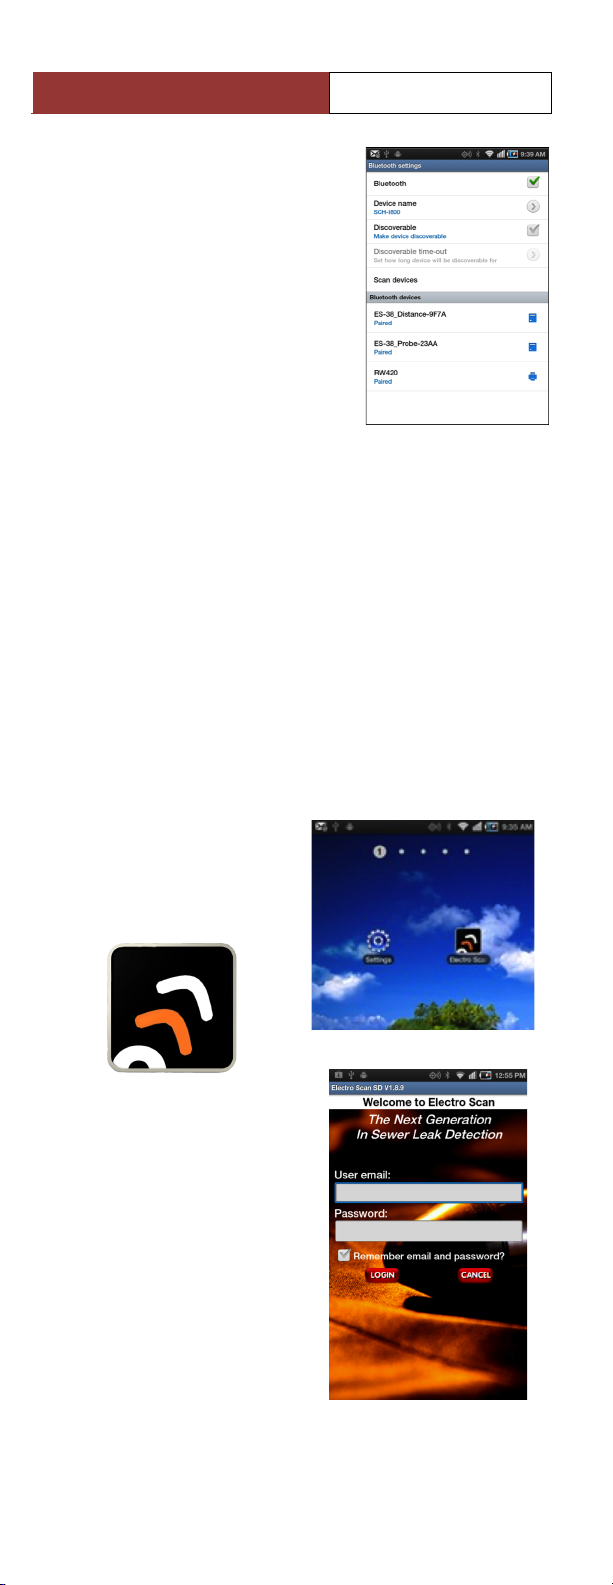
1. Access the Electro
Scan Smartphone App
by clicking on the
Electro Scan icon.
2. Enter your User email
and Password, as
provided during your
initial delivery, and
Click LOGIN.
Electro Scan Icon
2
Electro Scan Inc.
ES-38TM User Guide
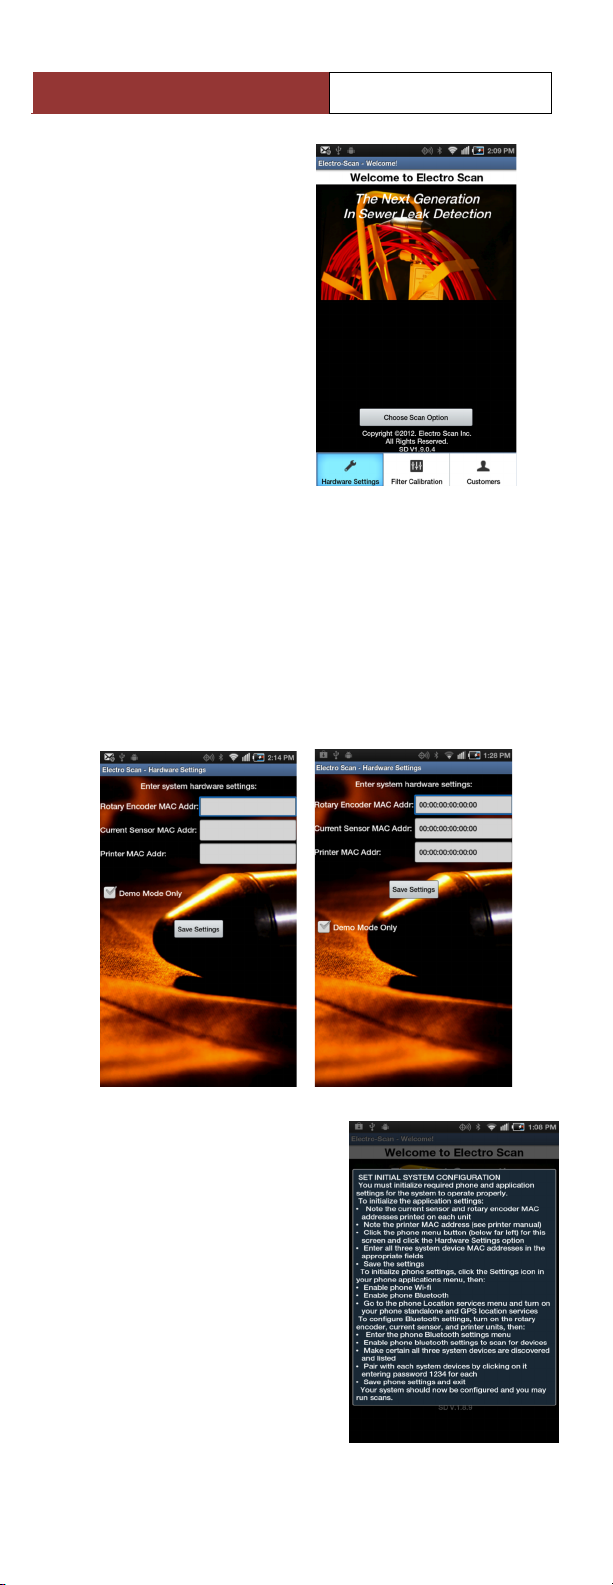
3. Touch the MENU
button of your
Smartphone, i.e. not
on the screen of the
Smartphone App, to
display a pop-up
menu.
4. Touch the
HARDWARE
SETTINGS button
on your Smartphone
app.
5. Enter the
corresponding MAC Address for each device,
Rotary Encoder Mac Addr (same as Distance),
Current Sensor Addr (Same as Probe), and
Printer Mac Addr (Same as Zebra RW420
Printer). Zeros are displayed on the screen below
to show proper format, as your numbers will be
unique to each device, for instance,
00:06:66:07:9F:7B.
5. Press SAVE
SETTINGS.
6. Touch CHOOSE SCAN
OPTION to begin
scanning.
7. If the screen to the Right
appears, it means that
you have not filled in all
required fields or did not
save your Your MAC
Addresses. Repeat Steps
1-5 (above).
3
Electro Scan Inc.
ES-38TM User Guide
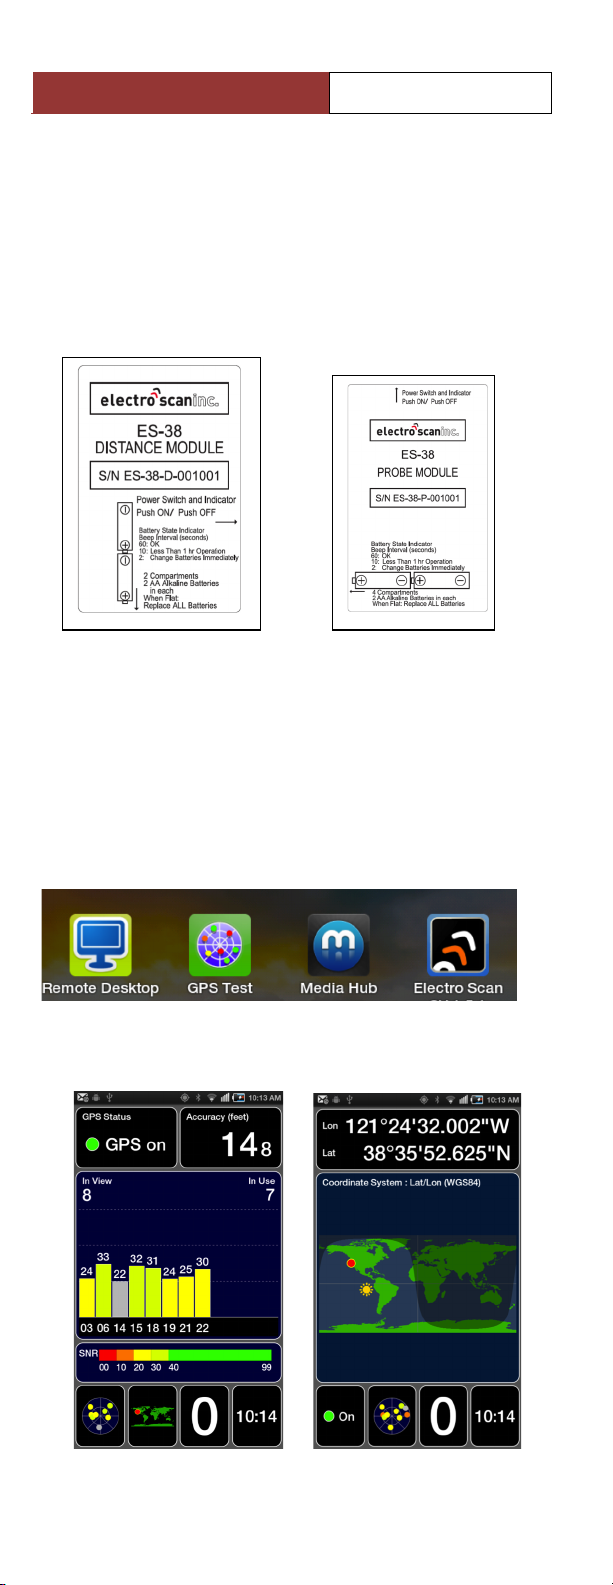
C. Checking Batteries for Distance & Probe
Modules
Your Distance Module takes four (4) AA batteries,
while Probe Module takes eight (8) AA batteries,
both containing a Battery State Indicator (Green)
light. Follow the instructions on each module label,
and change batteries immediately, if flat.
D. Confirming GPS Capability
Your Smartphone App has a Map Sketch feature to
assist office staff in seeing job site conditions, first
hand. However, you must have a connection to
global positioning satellites (GPS) to provide
acceptable levels of accuracy. As results, we
recommend GPS Test by Chartcross Limited, be
added to your Smartphone.
GPS Test will help the Smartphone App locate
addresses, find GPS locations, and drawing lines.
4

Electro Scan Inc.
ES-38TM User Guide
E. Checking Printer
There are three (3) key aspects to check on your
Zebra RW420 Printer, including (a) sufficient battery
power, (b) paper supply, and (c) assigned Bluetooth
Mac address.
1. Battery Power.
Make sure your
battery has been
properly charged.
An AC/Auto
Adaptor is
recommended.
Check the Control
Panel to confirm
battery life.
2. Rolled Paper Stock
Make sure you have enough paper for printing
Customer Reports. See below.
3. Bluetooth Mac Address
To find the Bluetooth Mac ID:
a. Turn the printer off.
b. Press and hold the Feed Button.
c. Press and release the Power button. When
printing starts, release the Feed button. The
output report will indicate model number,
ROM version, serial number, baud rate,
Bluetooth Mac Address, etc.!
5

Electro Scan Inc.
ES-38TM User Guide
2. Arriving at a Customer’s Site
A. Entering Your
Customer
Information
We recommend
entering Customer
Data before you get
out of your vehicle.
This ensures more
face time with your
Customer and fewer
mistakes. You can
always update and
add key information,
later.
1. Go to New
Customer screen
to enter data.
2. Enter Customer Info, including, Customer Name,
Company (optional), Address, City/State/Zip, etc.
Note: Try pressing GET ADDRESS FROM
GOOGLE MAPS to automatically seed in an
address from Google Maps.
Information about the job site, such as Start
Location and End Location, Comments,
Measurements, etc., can also be entered with
Keyboard and Calculator input.
6
Electro Scan Inc.
ES-38TM User Guide
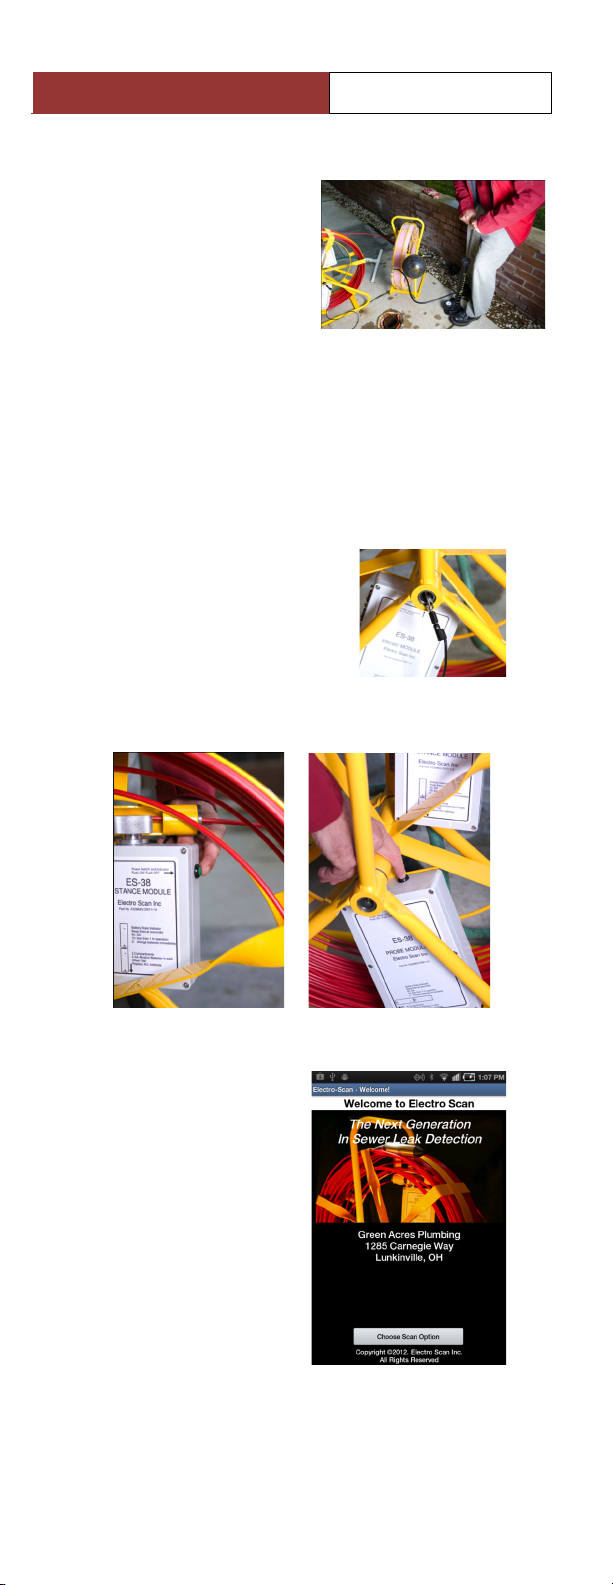
B. Testing Your ES-38TM Air Push Rod
1. Check the ES-38TM
Air Push Rod for
leaks, by pumping up
the inflatable plug to
15 psi and ensure that
it holds air.
2. If OK, deflate the inflatable plug. You are ready
to insert & push to the end of your service lateral.
C. System Calibration Check
It is important that you check that the Probe is
providing adequate current, prior to beginning a scan.
1. Connect the Alligator Clip
to the pin, located inside
the reel axle.
2. Turn ON BOTH Distance
and Probe Modules,
located on the ES-38 reel, by pressing the Green
Button.
3. From the
Smartphone App’s
Main Screen, touch
CHOOSE SCAN
OPTION.
7

Electro Scan Inc.
ES-38TM User Guide
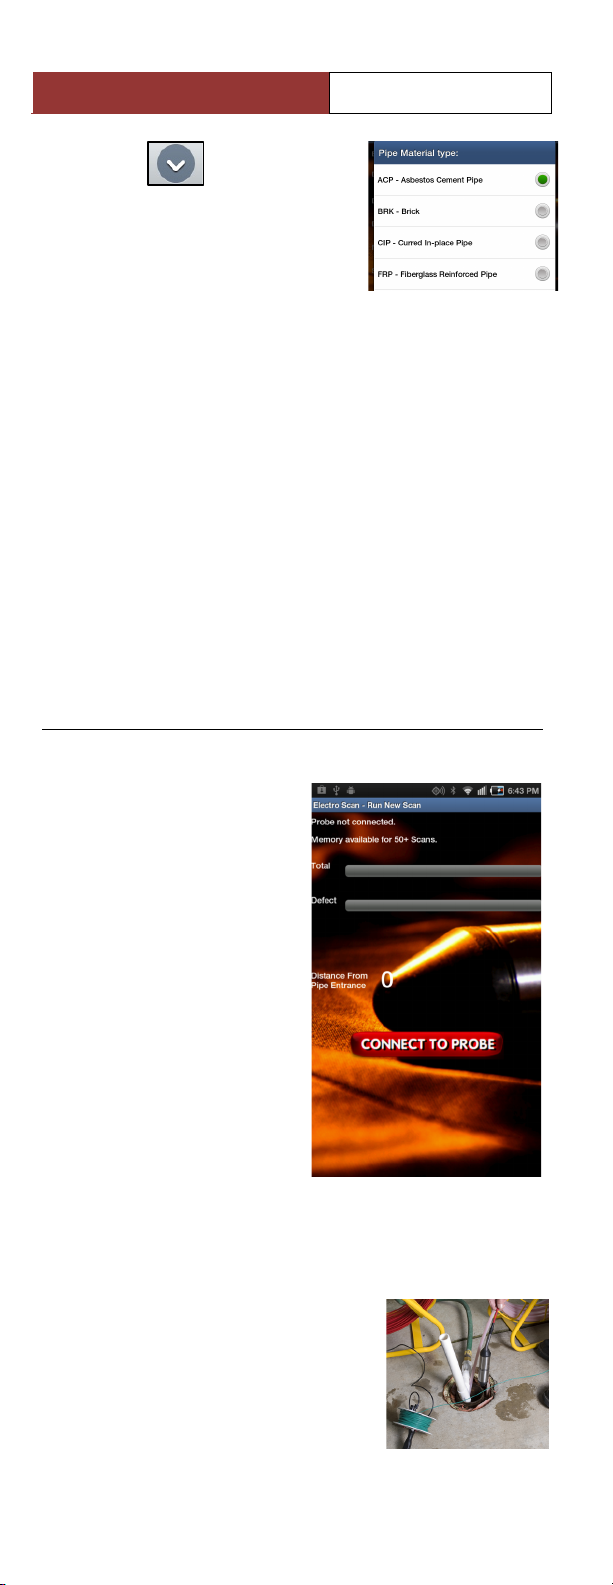
4. Touch NEW SCAN.
5. Connect the black
wire to the Red
socket marked “Center.”
6. Touch the Ground Reel
Alligator Clip, between
the Center Lines of the
Main ES-38 Probe.
7. Ensure a Yellow
indicator displays
approximately
75% of the
Defect bar (See
Left).
8. To check the ‘Total’
electrodes, touch the
Alligator Clip to the
End of the electrode
and ensure the Green
indicator displays
approximately 75%
of the Total Current
bar (Right). Check
both ends.
9. Turn OFF both Distance and Probe Modules.
8

Electro Scan Inc.
ES-38TM User Guide
3. Preparing the Sewer Lateral
A. Plugging the Sewer Lateral
1. Open the clean out.
2. Push the inflatable plug from the ES-38TM Air
Push Rod, into the sewer lateral getting as close
to the lateral’s sewer main connection as
possible.
3. Slightly inflate the plug to 15 psi.
4. Pull the plug back as far as possible (without
forcing) and mark the push rod position at the
cleanout. The plug should be positioned in the
main line, up against the lateral-to-main
connection.
5. Deflate the plug.
6. Pull the plug about one (1) foot (0.3m) into the
lateral.
7. Inflate the plug to the recommended pressure (25
psi) to seal the lateral so that the lateral can be
flooded. Check that the plug is secure by pulling
firmly on the push rod.
B. Filling the Sewer Lateral with Water
1. Attach the Electro
Scan-provided
Diffuser to a garden
hose and place into
the clean out.
2. As water is filling
the sewer lateral, add
salt solution.
3. While filling the
lateral, update the
Smartphone App to
include Direction of
Flow, Diameter,
Depth, Length, Pipe Material, Surface Cover,
Soil Type, Ground Condition, Service type, and
Pipe Shape.
9
Electro Scan Inc.
ES-38TM User Guide
4. Touch to access pop-
up windows throughout the
Smartphone App.
5. Estimate the distance from clean out to sewer
main in order to approximate how much air plug
hose you will be using.
The difference in the water level before and
after the scan should be noted.
C. Positioning and Connecting Ground Stake
1. Place the Ground Stake in the ground, preferably
in moist soil.
2. Connect the Ground Reel to Ground Stake.
3. Connect Ground Reel to Probe Reel Ground
connection.
4. Electro Scanning the Sewer Lateral
A. Starting an Electro
Scan
1. Turn on BOTH
Distance and Probe
Module units of the
ES-38TM.
2. Using your ES-38TM
Smartphone App,
touch CONNECT
TO PROBE button to
begin receiving
Current Values.
B. Checking the
Ground Stake
Connection
The area between the two center lines of the Probe,
represents the electrode that locates the defects.
1. Place the probe in the pipe so
that the 2 foot mark is just
visible in the cleanout.
2. Zero the Distance Counter by
touching RESET.
10

Electro Scan Inc.
ES-38TM User Guide
3. SELECT 2.0 ft. if using the mark, and Zero if
the end of the Probe is touching the bottom pipe.
4. When the pipe cleanout connection is covered
with water, check the total current value that is
displayed on the Total bar graph.
•VCP and Concrete Pipe should be between
15% and 25% of the total height,
•Plastic pipe, 5% of the total height,
•If the total current is less than recommended,
check the Earth Connection.
If possible and without risk of flooding any
upstream connection, it is recommended that the
sewer lateral be filled to the top of the clean out.
This will enable an “electrical” connection
between the cleanout, pipe, and the cleanout
riser.
C. Positioning the Probe for Scanning
1. Push the probe into the pipe until it reaches the
plug.
oAs the probe is pushed through the sewer
lateral, the Distance From Pipe Entrance,
will increase.
oThe total current on the bar graph should
remain fairly constant and above the levels
specified.
oThe defect value on the bar graph (Yellow)
will increase in height when the probe
passes a pipe defect.
oA cable locator (982 HZ) can be used to
establish the surface location and depth of
the probe rod.
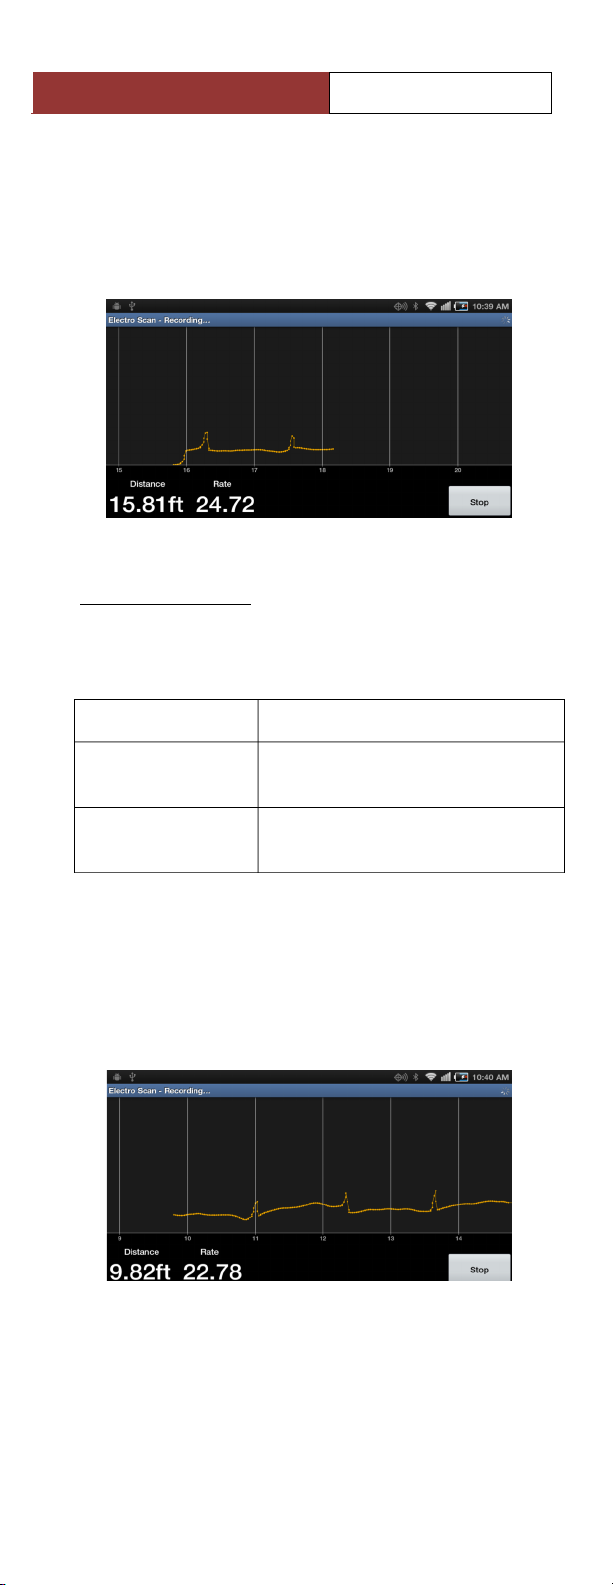
D. Recording an Electro
Scan
1. Touch RECORD button.
The defect current trace will
be displayed.
11
Electro Scan Inc.
ES-38TM User Guide
Velocity of Pull
Rate of Measurement
30 ft/min
(1ft per 2 sec)
60 current measurements per
ft.
10 m/sec
(1m per 6 sec)
100 current measurements per
meter.
2. Pull the probe back along the pipe at the speed
(i.e. Velocity of Pull) shown in the Chart below:
The Rate displayed on the graph represents the
speed the Probe is pulled through the pipe.
SPECIAL NOTE:
The text color of the Rate display will change to
RED if rate is too high, i.e. the probe is being
pulled too fast.
3. Pull the probe all the way along the sewer lateral
and out of the clean out. This ensures that any
fault at the clean out connection is detected. The
graph will always be shown in landscape view.
12

Electro Scan Inc.
ES-38TM User Guide
4. Touch STOP and follow the steps shown on the
ES-38™ Smartphone App to Save the scan data.
The scan information may be entered/edited at
this time by using the Scan List screen.
5. Turn OFF the Distance and Probe Modules.
6. Adjust the Start Offset Value, if required.
E. Printing, Storing, and Exporting
1. To print a Customer Copy of your scan, Touch
the PRINT button. The Smartphone App will
invert the screen’s colors to prepare a print
version to be sent via Bluetooth to your Zebra
RW420 Printer. Touch PRINT SCAN to start a
hardcopy print.
Sample Hardcopy Customer Report.
13

Electro Scan Inc.
ES-38TM User Guide
2. Record a Map Sketch
of the Customer’s Job
Site. Touch the Menu
and display selections.
3. Touch the screen
showing the
approximate location
for the Start and End
Location of the
sewer lateral. This
feature helps to
document the type of
conditions at the
Customer’s Job Site,
in addition to
helping to sell
additional pipe
lining, repair, and
replacement
services.
4. Save and Send your Electro Scan information.
14

Electro Scan Inc.
ES-38TM User Guide
Become the Leader in Certifying
Pipe Lining Projects & Finding
Leaks in Sewer Mains 6” to 60”!
Convert Your CCTV Truck to
Utilize Electro Scan, Today!
5. Cleaning Up and Securing the Job Site
A. Deflating the Plug
1. Releases the water from the pipe.
2. Ensure that the plug for the ES-38TM Air Push
Rod is secure, as the water will tend to wash it
down the pipe.
3. Remove the plug and push rod.
B. Removing Equipment
1. Disconnect and retrieve the ground stake.
2. Pack-up all equipment
C. Replacing Clean-Out Cover
15
Copyright
2012 Electro Scan Inc. All Rights Reserved.
ES-38TM for Sewer Laterals, User Guide, Version 1.1
Released April 2012
This document is confidential and is owned by Electro Scan Inc.
Use, examination, reproduction (even partial) in any format,
transfer and/or disclosure to others is strictly prohibited except by
express written agreement of Electro Scan Inc.
All Inquiries should be addressed to:
Electro Scan Inc.
1745 Markston Road
Sacramento, CA 95825-4026
Written by: Electro Scan Inc.
Layout, design and editing: James H. Dewey
Photography by: Whitney Lofrano
Printed in Sacramento, CA
Help Desk: Call Toll Free 800-975-6149
M-F 8AM-4PM Pacific Time
Table of contents


