ELECTROCOMPANIET EC LivingTANA SL-1 User manual

QUICK START GUIDE
TANA SL-1
EN
NO

INTRODUCTION
Welcome to the world of Electrocompaniet! Through more than 40 years of ceaseless practice,
we learned how to combine timeless Scandinavian design and innovative thinking to give you
the purest possible experience of music and sound. EC Living, not only combines all of that into
one small package, it also embeds in itself the technologies of tomorrow, granting you access
to all your favourite Music Streaming Services at your fingertips.
PACKAGE CONTENT:
• 1pc. EC Living speaker
• 1pc. Power cable ( 220V)
• 1pc. Quick Start Guide
UNPACKING
Immediately after receiving the EC Living speaker, inspect the carton for possible damage dur-
ing shipment. The carton and packaging have been designed to provide the safest possible
protection for transport of your EC Living speaker. Unpack the unit carefully. Save all packag-
ing materials for possible future shipments.
Manuals and documents in other languages
Electrocompaniet has a green profile and as part of that we reduce the volume of
documentation included in the box. You can find manuals, more
documents and other material on our web page.
ENGLISH

EN
English
FIRST TIME SETUP
The first time you set up a wireless system without a screen and keyboard, may present quite
a challenge, reminding of a classic “chicken or the egg” problem. We need to be connected
to the system in order to input the Wi-Fi password, but without a wi-fi connection this is not
possible. So until the Wi-Fi password is set in the system, we can not communicate via Wi-Fi.
The system supports multiple ways of doing this first time setup, but in this guide we will only
describe the initial setup based on a LAN cable connection.
WiFi link
Audio link
LAN Cable
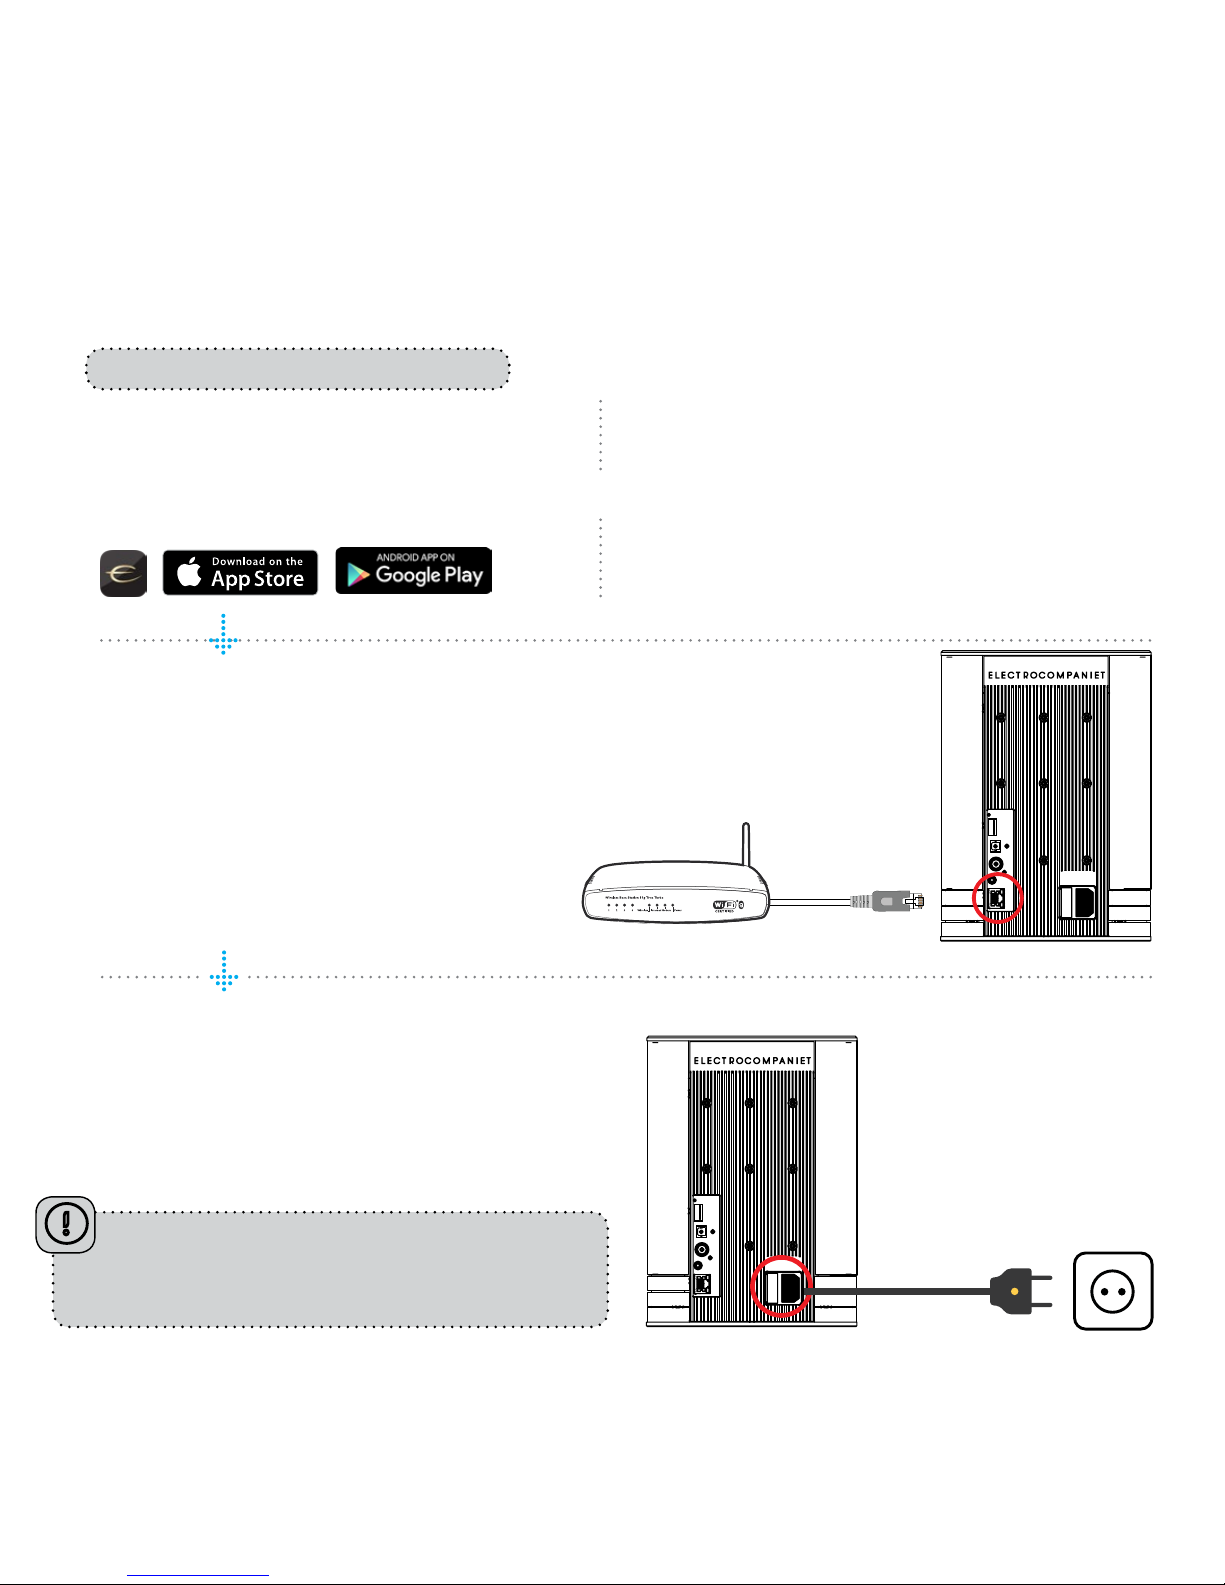
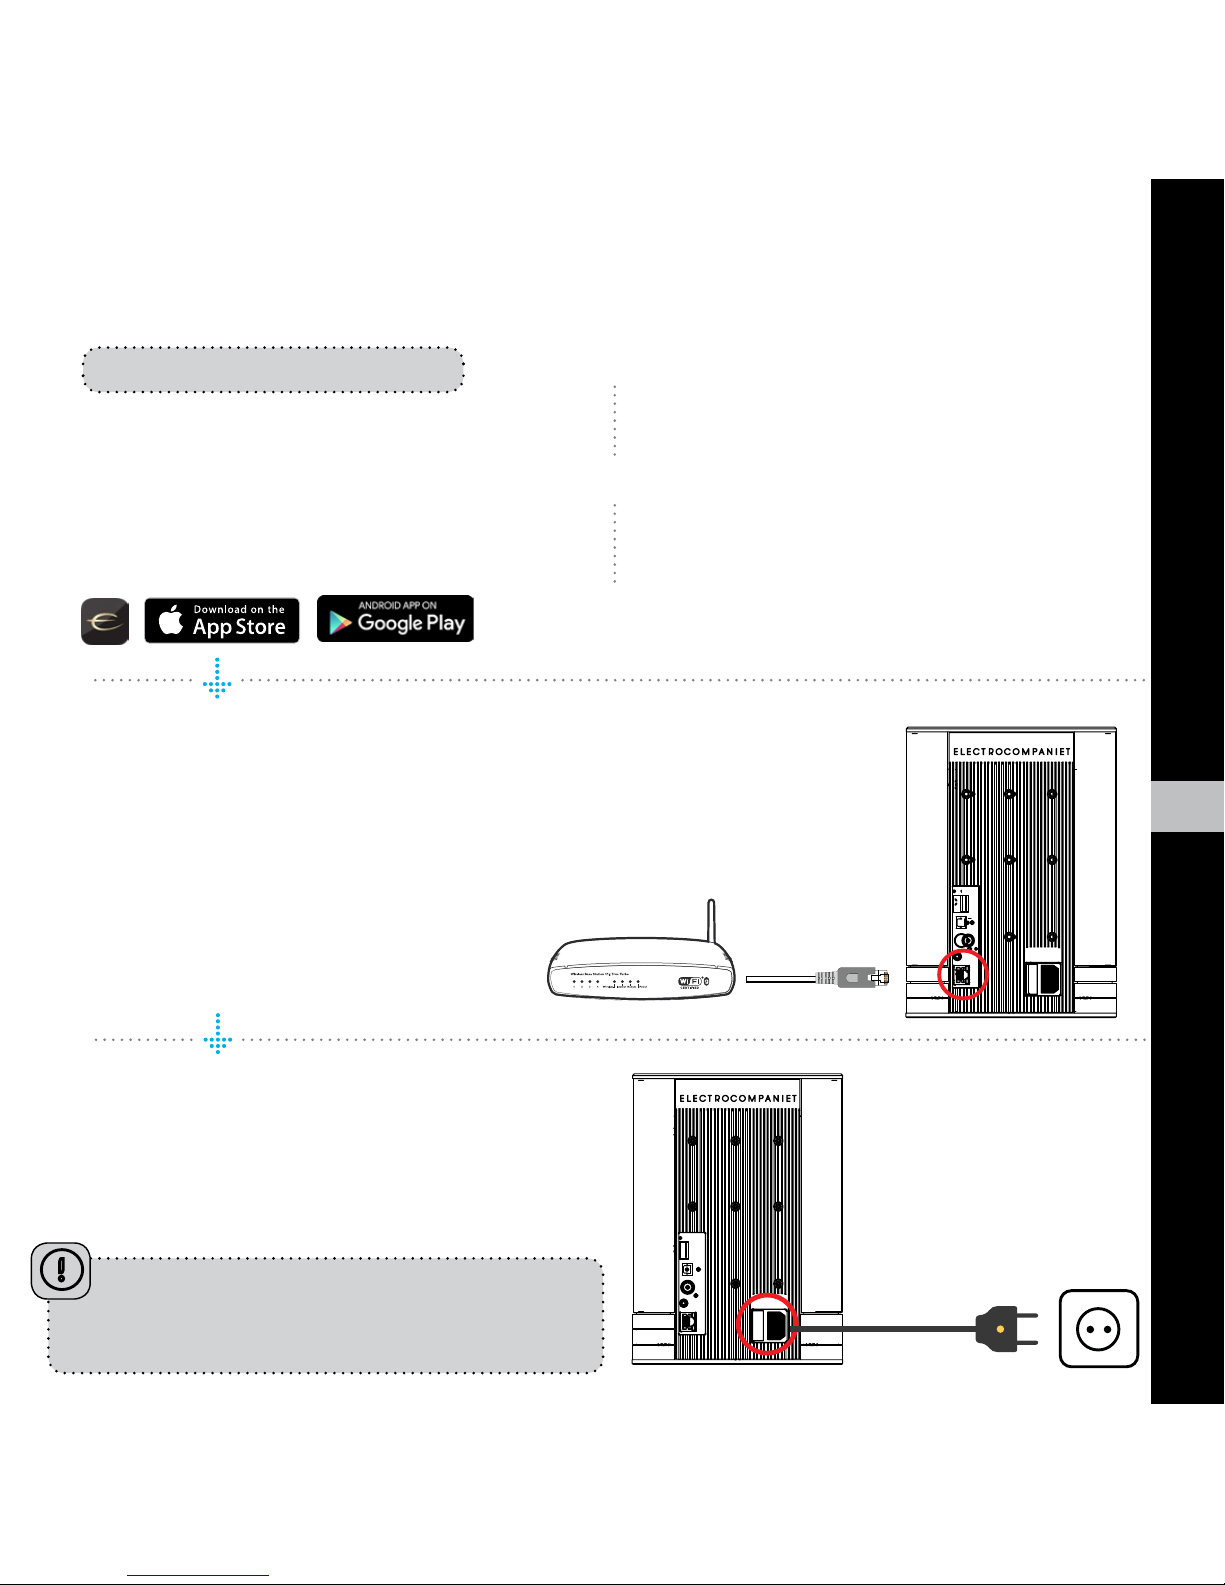
Download the “EC Remote” App
The free App is available at Apple store or
Google Play. Search for: “EC remote” or
“Electrocompaniet”
Connect to your router
In order to establish a Wi-Fi connection
you have to use a LAN cable which con-
nects to you local network, or directly to
your router.
*LAN cable is not included. Please use any
standard RJ45 cable.
Connect the power cable
Power up the TANA SL-1 by connecting the
power cable included in the box. Before
continuing, check that you have a glowing
“E” logo, on top of the unit.
Use your PC, Mac or Linux
machine with a web browser
PREPARATION FOR SET UP PROCEDURE
The first time you set up your EC LIVING TANA SL-1 Speaker & Streamer.
OR
RECOMMENDED
After connecting the power and network cable, it
is a good idea to wait about 20 minutes for any
software updates to be installed.

EN
English
Start your “EC Remote” App
As long as you have downloaded the App
following the previous instructions, you will
find the App where you normally find other
Apps on your device. The first thing to do is
to select your new TANA SL-1.
Tap ZONE BUTTON
Now select your TANA SL-1. For example the
unit name can be “EC Living 6”. If no name
is listed, tap the refresh icon at the top bar to
rescan for your TANA SL-1. When you find
your unit, tap on the name to start the setup.
Use a web browser
Enter the address of your EC Living system in
the web browser.
If you are using a Mac or Linux machine, this
will be “ECLiving-<number>.local”. Where
<number> are the last 4 digits of the serial
number, excluding leading zeros
(e.g. “ECLiving-565.local”).
On a PC, please enter the system’s IP address.
You may find this address in your router, by
referencing the EC Livings MAC address.
Please follow your router manufacturer’s
instructions for finding an IP address given a
MAC address.
Begin the Initial Setup
Simply tap START to begin the setup of the new EC Living system.
Select your language
Just select your language. It will send you automatically to the next screen.
Name your EC Living unit (Give your unit a zone name if you plan to expand )
You can give your TANA SL-1 any name you want. Examples of name is Livingroom, Kitchen, Bedroom,
Bathroom. Tap ENTER or Return on the keyboard when you have entered your unit name. Tap Next (upper
right corner) when you are done.
A Zone is the name we use for the area this
device is planned to cover. Typical Zones
could be livingroom, bedroom, kitchen etc.
FOLLOW THE ON-SCREEN INSTRUCTIONS
OR
RECOMMENDED
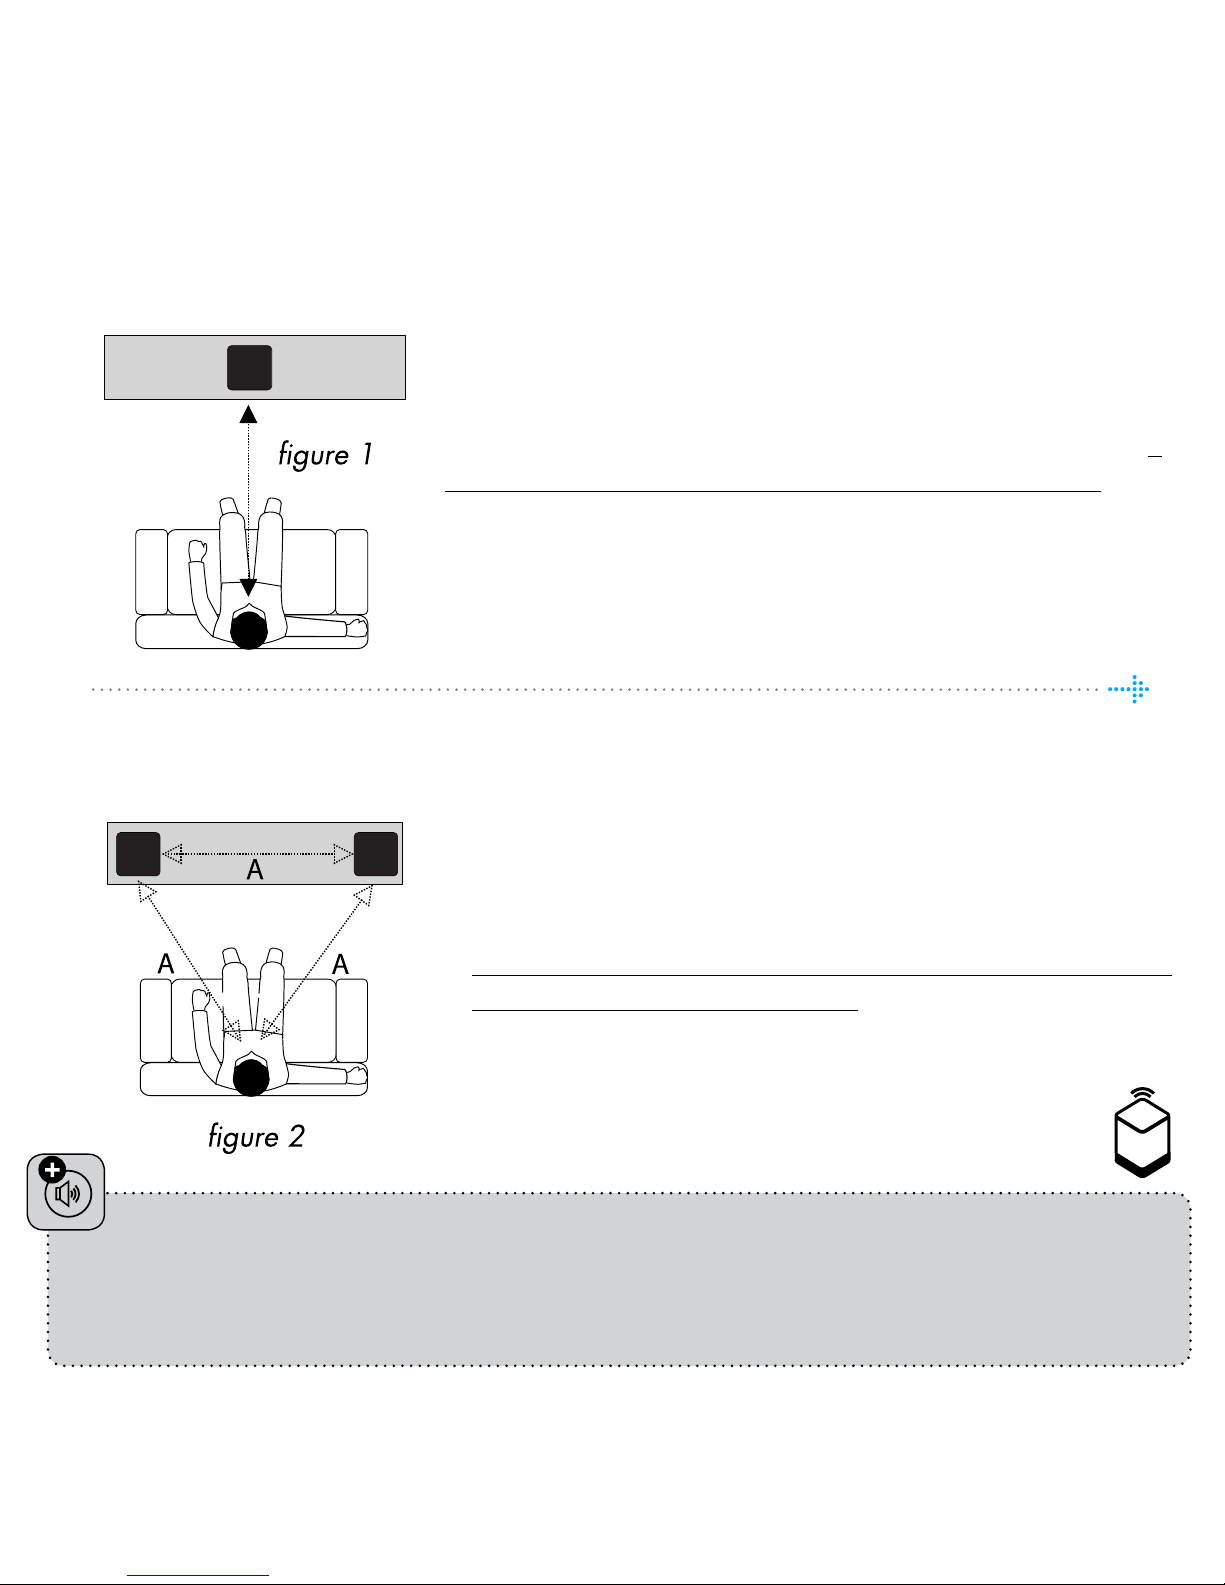
SETUP 2 : STEREO SETUP CONFIGURATION
Position your speakers for a STEREO setup (figure 2).
If you are using a tablet once the speaker is detected,
drag the speaker from the bottom line to the correct posi-
tion (Right - Left).
If you are using a smartphone select the position from
the pop-up menu. (Tap on a speaker to play a test tone.)
If speakers icons are missing, tap on SCAN to search, then
repeat SETUP 2 from beginning.
Tap Next (upper right corner) when you are done.
* On the tablet App, the TANA SL -1 speaker
symbol has a small “wireless icon“ at the top corner.
PAIRING ADD-ON SPEAKER TANA L-1 FROM THE SETTINGS MENU
( if you buy an add-on speaker later)
Go to SETTINGS -> OUTPUT SETTING -> SPEAKER CONFIGURATION.
Follow instructions from SETUP 2.
SETUP 1: STANDALONE SPEAKER CONFIGURATION
Position your speaker for a STANDALONE setup (figure 1).
Next step is to identify your TANA SL-1 for a standalone
setup. If you are using a tablet, you will see a speaker icon
placed at the middle, tap on a speaker to play a test tone. If
the speaker icon is missing, tap on SCAN to search for it. Drag
the speaker into the correct position when it’s detected, ( if
you are using a tablet), or select the position from the pop-up
menu ( if you are using a smartphone).
Tap Next (upper right corner) when you are done.

EN
English
Test of audio output
Tap the button START TEST. A standard “white noise” sound should be played on all
paired speakers. Wait until the test sound stops.
Tap Next (upper right corner) when you are done.
Check the Internet access
The system will now check the internet connectivity. If the system finds a stable
internet connection the spinning circle will be replaced with a green mark.
Press Next (upper right corner) when you are done.
Include your music files
“Add libraries” let’s you access your music stored on other devices through
ECLiving.Ifyourmusiclibraryisbig, werecommend youto dothis afterthe initialsetup .
You can do this later under the SETTINGS menu from the main menu.
Music services login
Choose your streaming service and fill in your Wimp, Tidal and/or Qobuz account
details. You can also do this later at any time in the SETTINGS menu from the main
menu. Tap Next (upper right corner) when you are done.
You are done, tap FINISH to complete
You have now completed the setup of your system. For test, please select Internet
radio from the main screen. Swipe left to select Top100 stations and pick a station
to test the system.
ENABLING WIRELESS CONNECTION
This step is only necessary if you want the system connected to your wireless network.
If you want to continue using wired connection (LAN cable), simply skip this page.
(We recommend using wired connection if possible to reduce Wi-Fi traffic and
achieve best possible stability for the system.)
Wireless network setup:
1. Tap SETTINGS at the main menu.
2. Tap NETWORK
3. Scroll down and tap CONNECT TO NETWORK
4. Select your wireless network. (Mobile/tablet must be on the same network)
5. Enter your password, tap “Join” or “OK”
6. Remove the LAN cable and wait until the ZONE button appear. Tap
ZONE and reselect your EC Living system.
If you loose connection with the system, reconnect the network cable and
check your network password carefully.

EN
English
System state Led state Colour
Start-up Flashing fast, then on only for 10s Green
Scanning library Flashing slow. Will turn off when
the scanning is completed Green
No network Solid Orange
Updating DSP firmware Heartbeat blink pattern Orange
Connecting to paired speakers Flashing slow Orange
Overtemperature Flashing fast Red
Recovery Solid Red
Recovering USB Solid Green/Red
Audio clipping Flashing fast (rhytm of clipping) Red
Volume
UP
Volume
DOWN Standby
Power indicator TANA SL-1 STATUS INDICATORS
There are three status LEDs indicating the
status of your system.

1.
REAR PANEL OVERVIEW
1. Reset button
2. USB Port (HDD, Memory stick)
3. TOSLINK S/PDIF digital Input ( TV, PC connection)
4. COAX S/PDIF digital Input
5. LINK Port (for future use)
6. Ethernet port (RJ45)
7. Power Socket (115 - 230V AC)
2.
3.
4.
5.
7.
6.
SUPPORTED PROTOCOLS
All audio streamers are fully wireless including the connection to add-on speakers and/or subwoofers.
They all support the protocols below:
Cloud
• Tidal
• Spotify
• Qobuz
• WiMP
• Internet Radio
Supported audio formats: All popular formats including: WAV/WAVE, MP3, AAC+, Vorbis, ALAC, FLAC,
APE, WMA, up to 192kHZ /24bit, DSD, up to DSD 128 (5.6 MHz)
Local/ Network:
• SMB
• NFS
• USB storage
• UPnP, as renderer
This list is continually expanding. This guide contains information that is subject to change
without notice. Please refer to our website for the latest updates.

EN
English
TIPS AND TROUBLESHOOTING
Streaming from Apple devices
On Apple devices, it is possible to stream all audio from your iPhone/iPad to the
EC Living via a system called “Airplay”. This is represented by this symbol
We recommend to not use this system when playing from Spotify, Wimp, and Tidal.
Instead, use our EC Remote App to control playback.
For Spotify, use Spotify connect, as represented in the Spotify App by the speaker
icon . This will allow EC Living to stream directly from the internet, which opti-
mizes the bandwidth, and saves battery life on your iPhone/iPad.
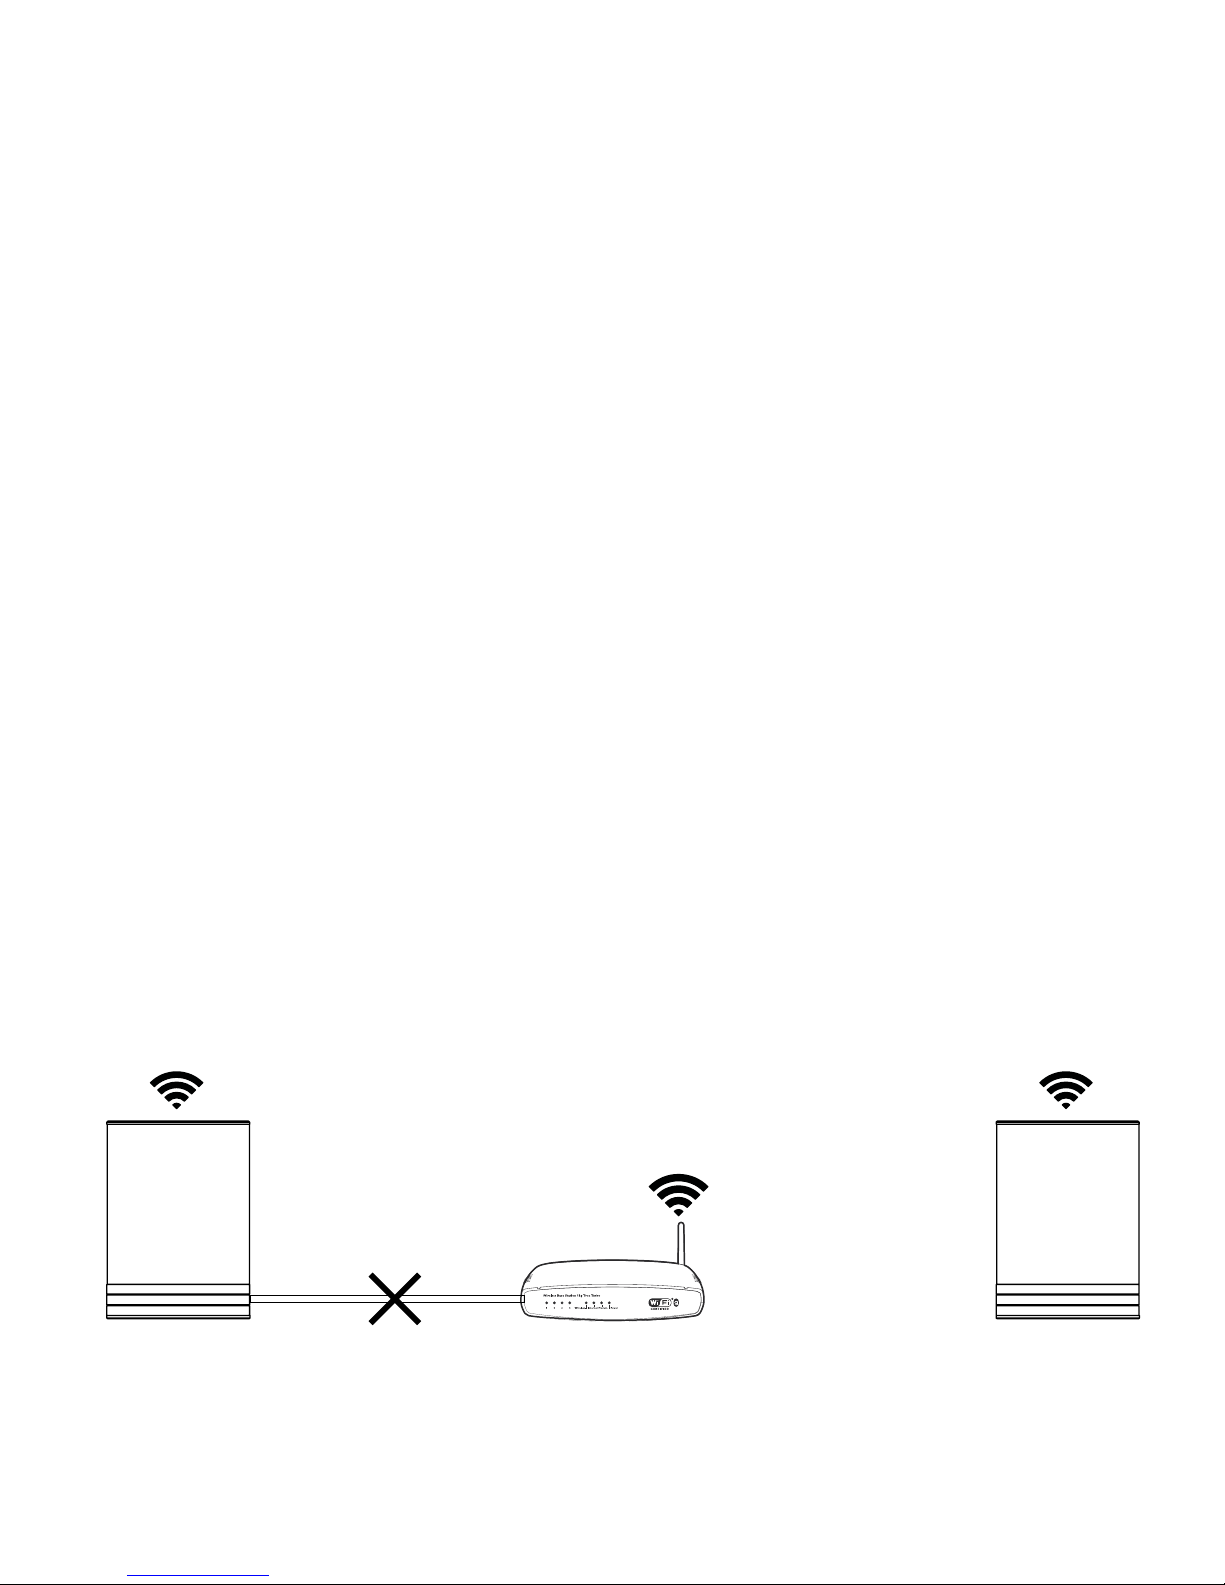
Connecting to WiFi
We recommend that the EC Living has a link quality of minimum 70%, and bet-
ter than 40 Mb/s link speed. This can be verified in our App, in the Settings ->
Network menu. Higher link quality and speed is recommended for a better user
experience. We recommend a wireless AC router with MIMO technology for maxi-
mum performance.
Resetting your system
If your system acts strangely, it can be reset to its default settings by using a paper-
clip to press the RESET button on the back ( see illustration “rear panel overview”)
The yellow led will blink a few times, after which the green led on top of the
speaker will start to blink. The unit will have restarted into the initial setup and you
can then follow the steps in this quick start guide.
To fully reset the software of the system, please go to support chapter of our electro-
companiet.no/ecliving website and follow the instructions for software download.

Warning!
To avoid risk of fire or electric shock, do not expose this appliance to rain or moisture.
Verify line voltage before use.
Do not remove cover. No user serviceable parts inside.
Refer servicing to qualified service personal.
The warranty is void if the product is tampered with by non-authorised personnel.
Use only authorized Electrocompaniet service center.
SERVICE AND SUPPORT
Your dealer will have all relevant information regarding the service centers in your area, and will ensure
that your unit is serviced with minimum delay. It is our general policy to have your unit returned to you
within five working days. This is an average time, and can vary locally, depending on the workload at
that particular service station. If, for some reason, there are no service facilities available in your coun-
try, please ship the unit to the following address:
Electrocompaniet as,
Breivikveien 7,
N-4120 Tau,
Norway
Web: www.electrocompaniet.no
Service and support department: www.ecliving.no/support
The end user is responsible for all shipping charges, insurance, re-importation and duty charges.
When shipping a product to the factory for service, always include the following:
1. A sales slip or other proof of purchase if repair is claimed under warranty.
2. A proforma invoice with value of goods, stating that the TANA SL-1 is returned to Norway for repair.
3. An accompanying letter describing faults, symptoms, or problems with the unit.
4. Always ship the unit in its original carton and packaging material to prevent damage in transit.
Electrocompaniet will not cover damages incurred in transit. If you require further information concern-
ing the operation of the unit, or if you have any questions related to service, please do not hesitate to
contact your dealer or your national distributor.

INNLEDNING
Takk for at du har valgt EC Living fra Electrocompaniet. I mer enn 40 år har vi jobbet med å utvikle
produkter med store krav til lyd og designkvalitet for et globalt high-end marked.
Vi har brukt vår kunnskap og kombinert denne med et tidløst skandinavisk design og nytenkning slik
at vi kan gi deg den best mulige opplevelsen av musikk og lyd. EC Living gir deg tilgang til alle dine
mest brukte musikkstreamingtjenester på en enkel måte, med et lydbilde som imponerer.
INNHOLD:
• 1stk.EC Living høyttaler
• 1stk Nettledning ( 220V)
• 1stk. Hurtigstartveiledning
UTPAKKING
Umiddelbart etter å ha mottatt din EC Living høyttaler, må du inspisere esken for eventuelle
skader under transport. Pakk ut enheten og sjekk nøye for transportskader. Ta vare på all
emballasje for mulige fremtidige forsendelser og service.
Håndbøker og dokumenter på andre språk
Electrocompaniet har en grønn profil og har oppnådd å få “green business” -
stempel i utlandet grunnet at vår produksjon foregår i Norge, og at vi har svært
lang levetid på våre produkter. Et bidrag til dette er at vi har redusert mengden
dokumentasjon som følger med i esken. Du kan finne mer dokumentasjon og
annet materiale på vår nettside som vil hjelpe deg å bruke systemet.
NORSK

FØRSTEGANGSINSTALLASJON
Førstegangsinstallasjon av et trådløst system uten skjerm og tastatur minner litt om det klassiske
“høna eller egget”- problemet. Før systemet kan brukes på et trådløst nettverk, må innstillinger
for trådløs tilkobling legges inn. Først når wi-fi passordet er lagt inn vil trådløs kommunikasjon
virke.
Systemet støtter flere måter å løse dette på under oppstart, men i denne guiden vil vi bare
beskrive løsningen basert på en nettverkskabel. (Alternative løsninger finnes forklart på vår
hjemmeside)
WiFi link
Audio link
LAN KABEL
NO
Norsk
OPPKOBLING
Last ned “EC Remote” App
En gratis App er tilgjengelig på Apple
Store eller Google Play.
Søk etter: “EC remote” eller
“Electrocompaniet” og installer denne på
din mobil/nettbrett.
Koble til nettverksruteren
For å etablere første gangs kontakt med
EC Living må du bruke en nettverkskabel
som kobles til det lokale nettverket ditt via
et vegguttak, eller direkte til ruteren. Det er
viktig at du kobler systemet til samme nett-
verk som din mobil/nettbrett er tilkoblet.
* Nettverkskabel er ikke inkludert. Bruk en
standard RJ45-kabel.
Koble til nettspenning
Slå på din TANA SL-1 ved å koble til
strømkabelen som følger med i esken. Før
du fortsetter, må du kontrollere at du har
lys i “E” logoen eller en av LEDene på
toppen av enheten.
Etter tilkobling av strøm og nettverkskabel er det
en god ide å vente ca 20 minutt for at eventuelle
programvareoppdateringer skal bli installert.
Bruk din PC, MAC eller Linux
datamaskin med en internettleser
eller
ANBEFALT

Start “Initial Setup”
Trykk START for å begynne konfigureringen av ditt nye system.
Velg ditt språk
Velg ditt språk og trykk på knappen”neste” oppe til høyre. Det vil sende deg til neste skjermbilde.
Gi navn til din EC Living sone
Du kan gi din TANA SL-1 det sonenavnet du ønsker. Eksempler på navn er stue, kjøkken, soverom, bad.
Trykk Enter eller Retur på tastaturet når du har angitt sonenavnet. Trykk Next (øverst til høyre) når du er
ferdig.
En sone er navnet vi bruker for området
denne enheten er planlagt å dekke. Typiske
soner kan være stue, soverom, kjøkken etc.
Bruk av internettleser
Skriv inn adressen til ditt EC Living-system i adresse-
feltet til internettleseren. Bruker du MAC eller Linux er
adressen “ECLiving<nummer>.local”, der <nummer>
er de fire siste siffrene i serienummeret (uten ledende
null). Eksempel: “ECLiving-565.local”.
Bruker du Windows må du skrive inn IP-adressen til
ditt EC Living-system i adressefeltet til internettleseren.
IP-adressen kan finnes i hjemmeruterens DHCP-tabell
ved å bruke MAC-adressen som finnes på undersiden
av esken som utgangspunkt. Vennligst følg ruterfabri-
kantens instruksjoner for å gjøre dette.
eller
Start din “EC Remote” App
Om du har lastet ned appen som beskrevet
på forrige side, finn frem denne og start
appen. Det første du må gjøre er å velge
din nye TANA SL-1.
Trykk på SONEKNAPPEN
Nå velger du din nye TANA SL-1 fra listen.
Hvis du ikke finner noe på listen, trykker
du på refresh-ikonet øverst til høyre for å
søke på nytt etter din TANA SL-1. Når du
finner din enhet, trykker du på navnet for å
starte installasjonen.
OPPSTART
Følg alle trinnene nedenfor for å sette opp din TANA SL -1 Speaker & Streamer
ANBEFALT

NO
Norsk
OPPSETT 2 : STEREO
Plasser høyttalerne for avspilling i stereo (figur 2).
Hvis du bruker et nettbrett drar du høyttaleren fra bunnlinjen til
riktig posisjon, eller bytt om høyre - venstre posisjon ved å dra
høyttalerne til bunnlinjen og så bytte posisjon på disse. Hvis
du bruker en smarttelefon velger du posisjonen fra hurtigme-
nyen. (Trykk på symbol av høyttaleren for å spille en testtone.)
Hvis høyttalersymbolet mangler trykker du på SCAN for å søke etter
dette, og gjenta så OPPSETT 2 fra begynnelsen.
Trykk Next (øverst til høyre) når du er ferdig.
* TANA SL -1 høyttaler vises med et lite “trådløst“ symbol
i øvre hjørne om du bruker et nettbrett.
Paring med TANA L-1 (om du har kjøpt en tilleggshøyttaler på et senere tidspunkt)
Gå til SETTINGS -> OUTPUT SETTING -> SPEAKER CONFIGURATION.
Følg instruksjonene fra OPPSETT 2 ovenfor.
OPPSETT 1: MONO
Plasser høyttaleren for avspilling i mono (figur 1).
Neste trinn er å gi TANA SL-1 beskjed om at den skal spille i
mono. Hvis du bruker et nettbrett, vil du se et høyttalersymbol
plassert midt i bildet. Trykk på bildet av høyttaleren for å spille en
testtone. Hvis høyttalersymbolet mangler, trykker du på SCAN for å
søke. Dra høyttaleren i riktig posisjon når den oppdages, (hvis du
bruker et nettbrett), eller velg posisjonen fra hurtigmenyen (hvis du
bruker en smarttelefon).
Trykk Next (øvre høyre hjørne) når du er ferdig.

Test av lydsignal
Trykk knappen START TEST.
“Hvit støy” skal spilles på alle parede høyttalere. Vent til testlyden stopper. Trykk
Next (øverst til høyre) når du er ferdig.
Kontroller Internett-tilgang
Systemet vil nå sjekke din internett-tilkobling. Hvis systemet finner en stabil
internett-tilkobling vil den spinnende sirkelen bli erstattet med dette symbolet.
Trykk Next (øverst til høyre) når du er ferdig.
Inkluder musikkfilene dine
“Legg til biblioteker” lar deg få tilgang til musikk du har lagret på andre enheter,
Hvis musikkbiblioteket ditt er stort, anbefaler vi deg å gjøre dette etter at du er
ferdig med oppsettet.
Du kan legge til din egen musikk når du ønsker under INNSTILLINGER fra hoved-
menyen .
Musikktjenester
Velg din streamingtjeneste og fyll inn dine Wimp, Tidal eller Qobuz kontoopplys-
ninger. Du kan også gjøre dette senere under innstillinger fra hovedmenyen. Trykk
Next (øverst til høyre) når du er ferdig.
Du er ferdig, trykk “FINISH”
Du har nå fullført konfigureringen av systemet. Som første test kan du velge Inter-
nett-radio fra hovedmenyen. Sveip til venstre for å velge “Top 100” radiostasjoner
og velg en stasjon for å teste systemet.

NO
Norsk
TILKOBLING TIL TRÅDLØST NETTVERK
Dette trinnet er bare nødvendig hvis du vil at systemet skal brukes på et
trådløst nettverk. Hvis du ønsker å fortsette å bruke kablet løsning (nett-
verkskabel) kan du hoppe over denne siden.
(Vi anbefaler at du bruker kablet løsning dersom det er mulig for å re-
dusere wifi-trafikk, og oppnå beste stabilitet.)
Oppsett trådløst nettverk:
1. Trykk SETTINGS på hovedmenyen
2. Trykk på NETWORK
3. Skroll ned og trykk CONNECT TO NETWORK
4. Velg ditt wifi-nett (må være det samme som på din mobil/nettbrett)
5. Skriv inn passord og trykk “Join” eller “OK”.
6. Fjern nettverkskabelen og vent til ZONE vises i Appen.
(Det kan ta litt tid, vennligst ikke berør skjermen i løpet av denne prosessen.)
7. Velg din sone på nytt og begynn å bruke systemet.
Hvis du mister forbindelsen med systemet, koble til nettverkskabelen og
sjekk nettverkspassordet nøye.

Systemstatus Led indikatorer Farge
Oppstart Blinker raskt, deretter på for 10s Grønn
Skanner musikkbibliotek Blinker sakte. Vil slå seg av når
skanningen er fullført Grønn
Ingen nettverk Lyser fast Oransje
Oppdatering DSP program Hjertebankmønster Oransje
Kobler til parede høyttalere Blinker sakte Oransje
Temperaturalarm Blinker raskt Rød
Gjenoppretting programvare Lyser fast Rød
Gjenoppretting USB Lyser fast Grønn/rød
Klipping Blinker synkront med musikken Rød
Volum
OPP
Volum
NED Standby
Power indikator TANA SL-1 STATUSINDIKATORER
Det er flere lysdioder som brukes for å indikere
statusen på systemet.
Statuslys
Table of contents
Languages:
Other ELECTROCOMPANIET Speakers manuals


