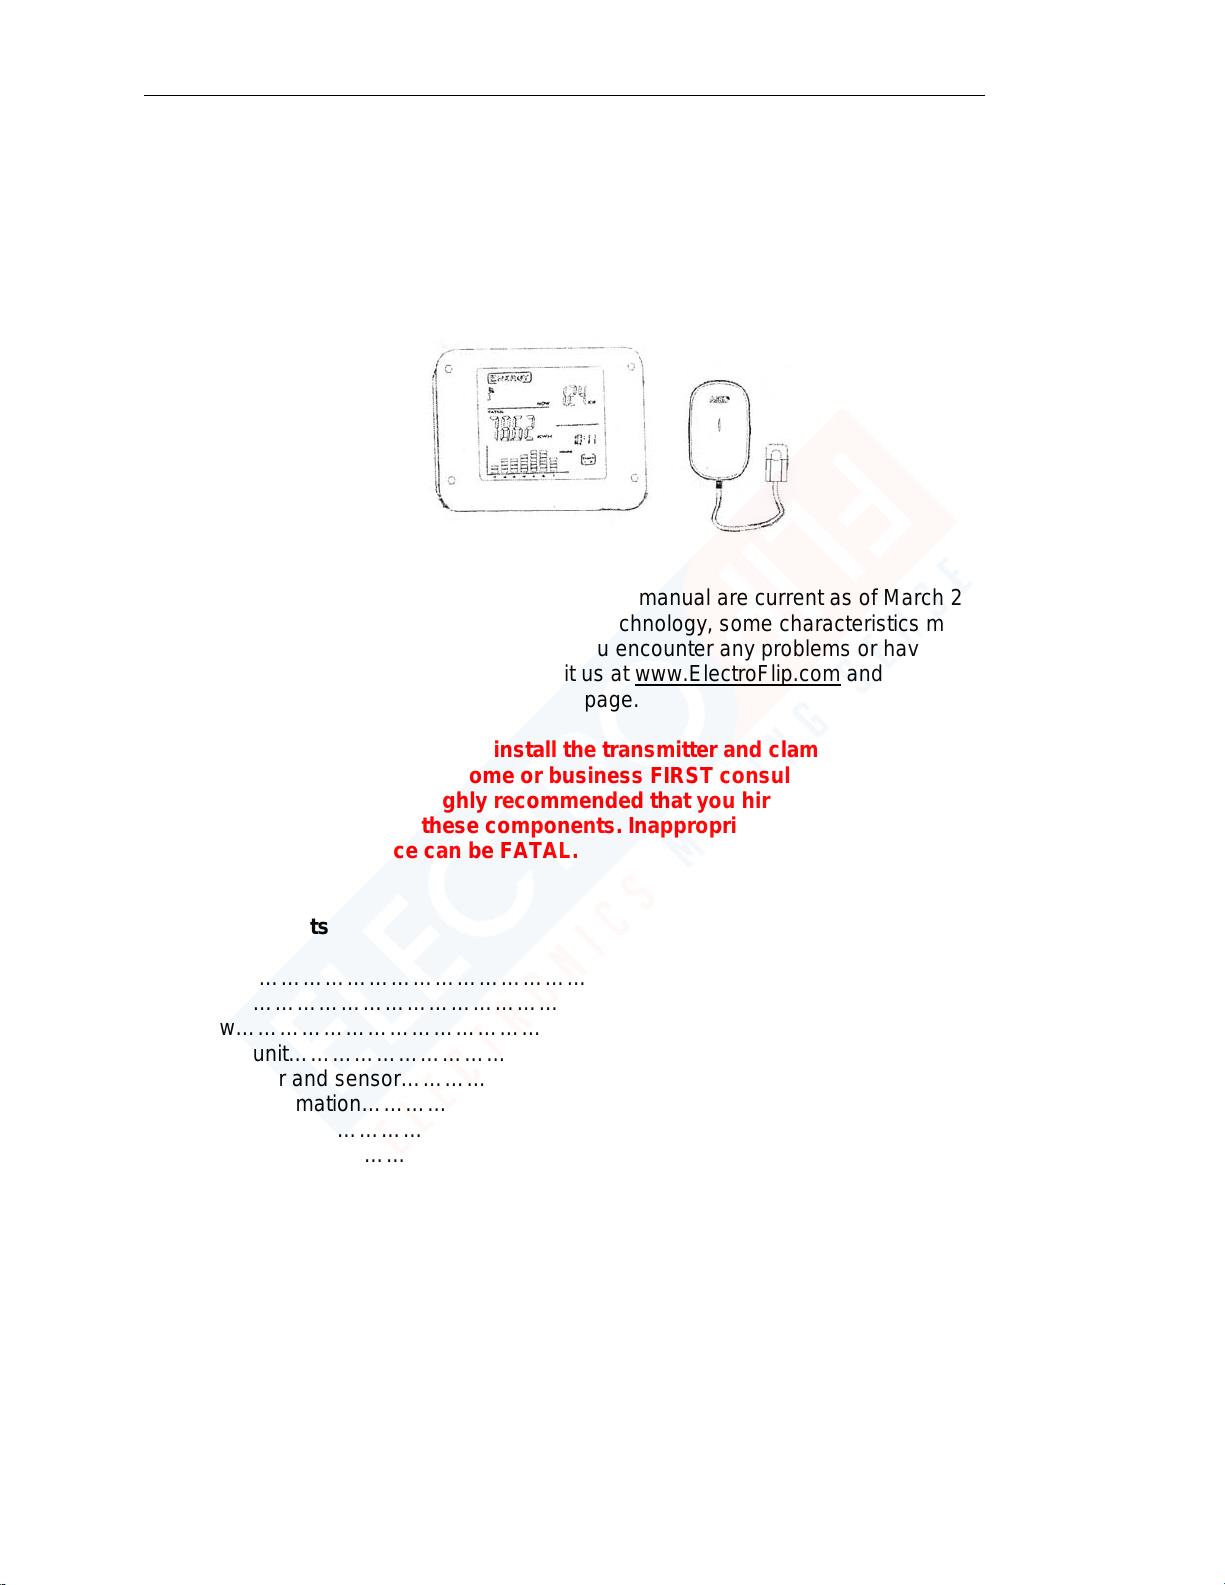
ElectroFlip iConserve User manual
iConserve User Guide___________________________________________________
1
iConserve
User Guide
All information and instructions included in this manual are current as of March 22, 2014.
However, due to the fluid nature of advancing technology, some characteristics may change or
need modifications in the future. Should you encounter any problems or have any further
questions about your purchase, please visit us at www.ElectroFlip.com and visit the contact us
page.
WARNING!: Before attempting to install the transmitter and clamp sensor in your breaker
box or power source for your home or business FIRST consult with a local Certified
Electrician. In addition it’s highly recommended that you hire this Certified Electrician to
safely and properly install these components. Inappropriate contact with your breaker
box or main power source can be FATAL.
Table of Contents
Introduction………………………………………………………………………………………
2
Features………………………………………………………………………………………….
2
Overview………………………………………………………………………………………….
2
Display unit…………………………………………………………………………………...
2
Transmitter and sensor……………………………………………………………………..
2
Display information………………………………………………………………………….
3
Installation………………………………………………………………………………………..
3
Find power cable…………………………………………………………………………….
4
Replacing batteries………………………………………………………………………...
4
Link transmitter and display unit………………………………………………………….
4
Operating Guide……………………………………………………………………..................
4
Setting time and date……………………………………………………………………...
4
Advanced settings……………………………………………………………………...........
5
View instant and accumulative energy, cost, Co2……………………………………….
6
How to view historical data and charts…………………………………………………….
7
Switch alarm on or off…………………………………………………………………........
8
Must Read Warnings……..……………………….…………………………………………......
9

iConserve User Guide___________________________________________________
2
FAQ………………………………………………………………………....................................
9
Specifications…………………………………………………………………….........................
13
Introduction
Thank you for purchasing the iConserve. When using the iConserve in the home or in a small
office, it is possible to get straightforward information about the amount of electricity used in real
time or in the past.
You can get real time information on electrical consumption and track your spending. With this
guide, we hope you will learn how to use iConserve, so that you can cut down on the amount of
electricity you use in the home or office. When you save energy you save money, and you will
also help the planet. A cost saving of up to 15 percent is possible with iConserve.
Features
•Display instant and total energy, cost and CO2emissions.
•View hourly, daily, weekly and monthly electricity data.
•Historical graphical chart of electricity usage.
•Time view: clock, day, week, month and year.
•High amount of electricity warning alarms automatically.
•Data storage capacity: 2 years.
•Display currencies: ₤ € ¥ $.
•Valid for single and dual tariff.
•Single, two or three phase system compatibility.
•Low battery indicator and backlit display.
•Transmitter battery life: 2 years.
•DC adapter input (optional).
Overview
Display unit
TIME/ALARM: Setting time and alarm.
SEARCH: Searching signals.
HISTORY/ENTER: Inquiry of history data and entering confirmation.
FWD/+: Check next data/number (plus).
iConserve User Guide___________________________________________________
3
BWD/-: Check last data/number (minus).
MODE/SET: Setting modes and parameters.
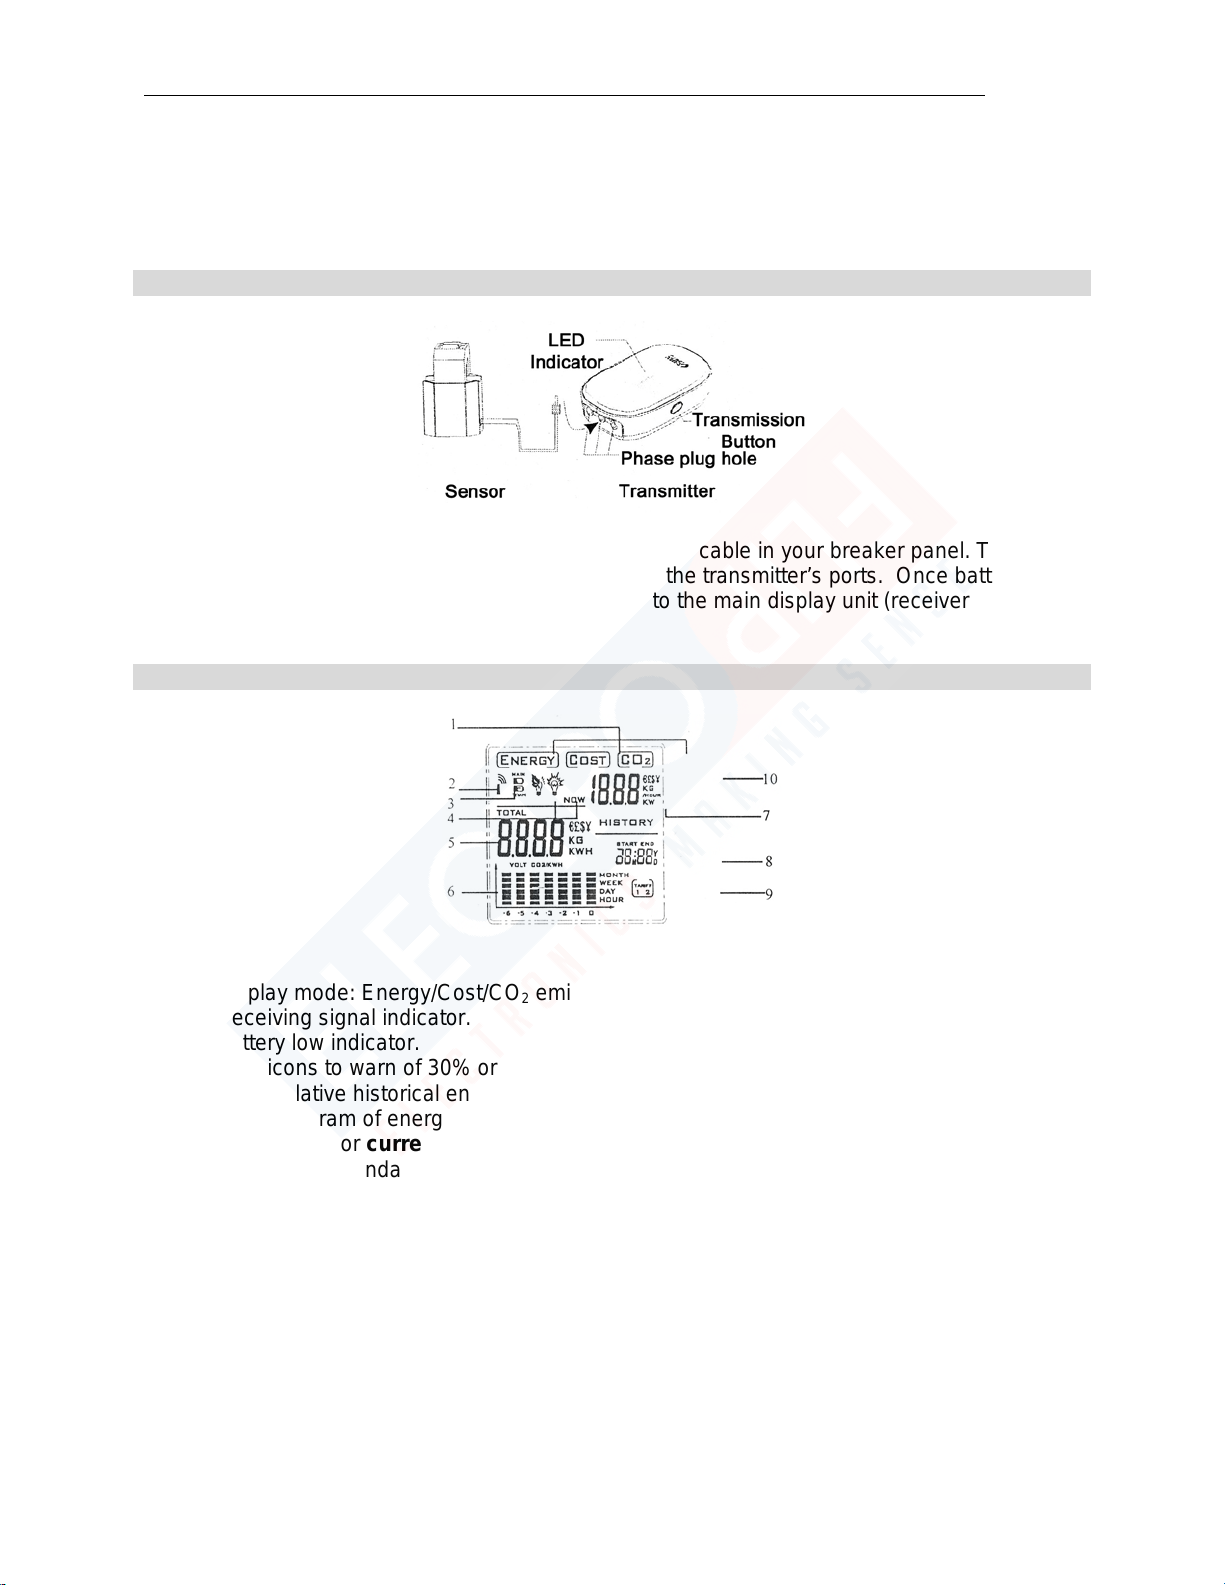
Transmitter and sensor
The sensor coupler clips around the incoming live power cable in your breaker panel. The
sensor’s adapter plug is then inserted into any one of the transmitter’s ports. Once batteries are
installed information will begin to transmit wirelessly to the main display unit (receiver).
LCD
1. Display mode: Energy/Cost/CO2emission.
2. Receiving signal indicator.
3. Battery low indicator.
4. Alert icons to warn of 30% or higher of usual daily consumption level of electricity.
5. Accumulative historical energy/cost/CO2emission data.
6. The histogram of energy/cost/CO2emissions for last seven months, weeks, days, hours.
7. The display for current real-time energy/cost/CO2emission readings.
8. Clock and Calendar.
9. Cost tariff rate.
10. Money currencies.
Installation
Locate your home or businesses breaker box (panel). Then remove the panel carefully, you’ll
find 1, 2, or 3 thick (16mm or 10mm) red or black cables. These cables are live main cables. To
record your entire home or business energy consumption you will need to install the iConserve
iConserve User Guide___________________________________________________
4
Transmitter Coupler onto each main wire. There may be a ground wire that’s gray or white;
you’ll want to skip this wire. Just attach each sensor around the live wires only. If you’re
interested in just monitoring one appliance such as you’re a/c or water heater, just install a
coupler to that particular devices power feed in the breaker box. Most household electricity
breaker panel’s use single-phase, however some larger homes or townhomes can use three-
phase. Most standalone business buildings will use three-phase. Note for three-phase the
iConserve unit is required to have a sensor connected to each of the three-phase live main
power cables. We offer two sensor sizes 10mm and 16mm. You will only use one size and at
most use three sensors (called 3 Phase) at one time. If you’re not sure how many you need to
use or what size please consult your electric company or a local certified electrician.
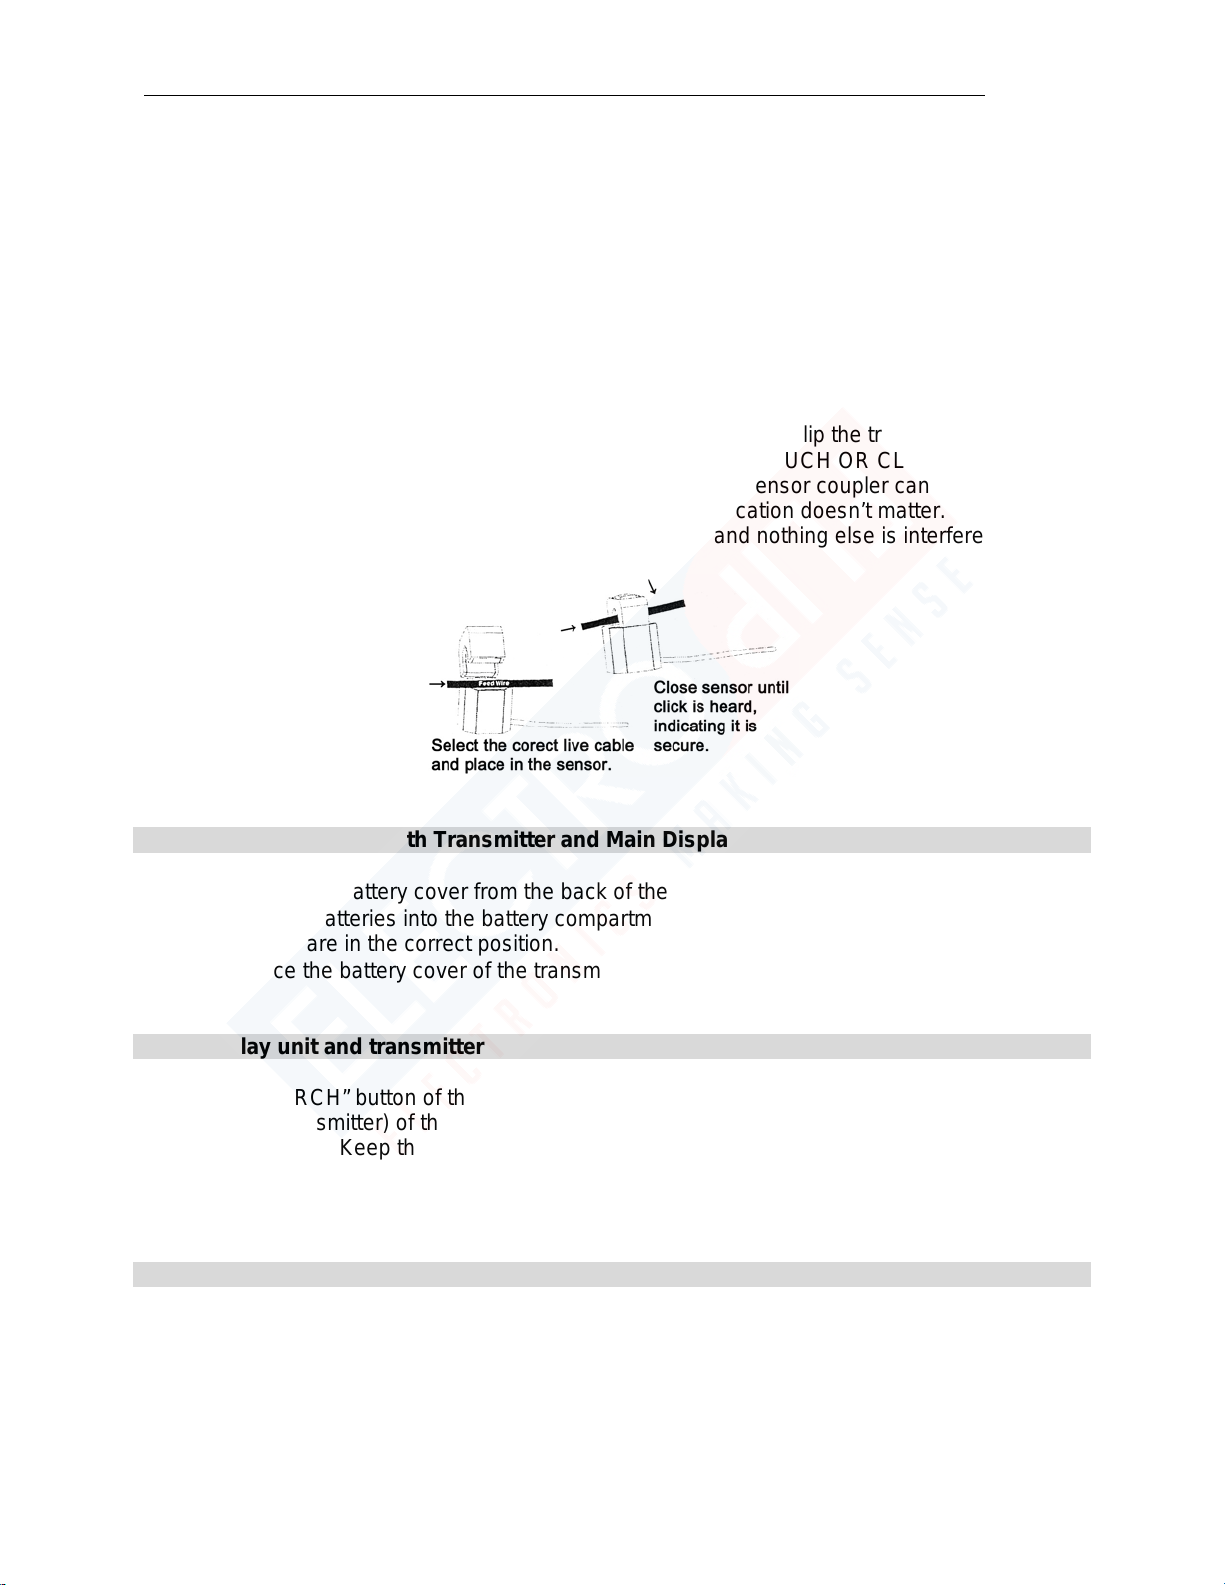
As shown in the example, once the live main power cable is found clip the transmitter’s coupler
sensor around the insulated live main power cable. **DO NOT TOUCH OR CLIP THE SENSOR
AROUND RAW METAL OR UNINSULATED WIRING. ** The sensor coupler can be clipped
anywhere along the insulated live main power cable, exact location doesn’t matter. Just try and
clip it on a bend in the cable so it simply rests on the bend and nothing else is interfered with.
Installing batteries for both Transmitter and Main Display Unit
•Remove the battery cover from the back of the transmitter or display unit.
•Insert AA batteries into the battery compartment ensuring that the polarities of the
batteries are in the correct position.
•Replace the battery cover of the transmitter or display unit.
Link display unit and transmitter
Press the “SEARCH” button of the display unit and then the “TRANSMIT” button (the only
button on the transmitter) of the transmitter to link the communications between the display unit
and the transmitter. Keep the units at arm’s length in distance for initial connection.
Operating Guide
Setting time and date
Press the “TIME” button and hold for 2 seconds to enter the year setting. The last two numbers
of the year digits will flash. Press the “FWD/BWD” button to increase or reduce the number.
Press and hold the “FWD/BWD” button for the number to increase and reduce quickly.

iConserve User Guide___________________________________________________
5
Press the “TIME” button again to enter the month setting. The digits of the month will flash.
Press the “FWD/BWD” button to set the month.
Press the “TIME” button again to enter the day setting. The digits of the day will flash. Press the
“FWD/BWD” button to set the day.
Press the “TIME” button again to enter the hour setting. The digits of the hour will flash. Press
the “FWD/BWD” button to set the hour in the 24-hour Military Time Format.
Press the “TIME” button again to activate the minute setting. The digits of the minutes will flash.
Press the FWD/BWD button to set the minutes.
Press the “TIME” button to save the settings and then to return to the normal display.
Throughout the set-up process, press the “ENTER” button at any time to save settings instantly
and to return to the normal display.
If there is no action made after pressing the “TIME” button, the settings will save automatically
and will return back to the normal display in 20 seconds.
Configuration Settings (voltage, currency, tariff, CO2emission)

iConserve User Guide___________________________________________________
6
Press the “MODE” button and hold down for 2 seconds to set the “voltage” and until the number
“220” starts flashing. Press the “FWD/BWD” buttons to adjust the voltage. For common
households in the United States this setting is 110 (for 110 volts), for Europe it’s 220 (for 220
volts). Consult your Power Company or local electrician to confirm.
Press the “MODE” button again to set the “currency unit” until the symbol “€” starts flashing.
Press the “FWD/BWD” buttons to change the currency symbol in this order: € → ₤ → $ → ¥
Some power companies will set a higher cost per kilo watt per hour after a specific time of day
or night. For example before 6PM its $0.045 per kilo watt hour (KWH) and after its $0.09 per kilo
watt hour (KWH) until 1AM. To enable this function press the “MODE” button again to set the
“current tariff” (also known as Tier). “TARIFF1” (or Tier1) will start flashing. Press the
“FWD/BWD” buttons to set the use of two tariff standards. (Again your power company may call
these Tier1 and Tier2)
If you choose “TARIFF2”, press the “MODE” button again to set the start time for “TARIFF2”.
Use the “FWD/BWD” buttons to set the hours and press the “MODE” button to save settings.
Use the “BWD/FWD” button and press the “MODE” button to confirm. Repeat the process for
setting the end time as well.
Press the “MODE” button to set the “tariff2” standard until the number “0.125” starts flashing.
Then use the “FWD/BWD” button to set. Press and hold down the “FWD/BWD” button to set the
number quickly.

iConserve User Guide___________________________________________________
7
If you do not choose “TARIFF2”, the above step will automatically be skipped.
Press the “MODE” button again to set the “tariff1” standard until the number “0.125” starts
flashing. Press the “FWD/BWD” button for the number to increase or reduce.
Press the “MODE” button again to set the CO2emission. This will cause the number “0.45”
(kg/kwh) to start flashing. Press the “FWD/BWD” button to set the desired number. In the United
States the average CO2emission is 0.600 KG per KWH. Consult your Power Company or local
electrician to confirm.
View instant and accumulative energy, cost, CO2
In normal display mode, you can view current power (kW) on the right screen and the
accumulated energy (kWh).
Press the “MODE” button to see the “COST” display. You can view the current cost of electricity
per hour on the right screen and accumulated cost since you last reset it on the right screen.
Press the “MODE” button again to see the “CO2” display and view the current emission of CO2
per hour on the right screen, as well as accumulated emissions.
The date and time will display alternately every 10 seconds at the lower right screen. The
histogram on the lowest screen will show the usage of energy in the last 7 hours.
Press the “MODE” button once again to return to the current “ENERGY” display.

iConserve User Guide___________________________________________________
8
How to view historical data
Press the “HISTORY” button to see the historical data shown by “per hour” mode and use the
“BWD/FWD” button to look up the usage of energy for the last 7 hours. The corresponding block
in the chart will start to flash.
Press the “HISTORY” button again to see the historical data shown by “per day” mode, and use
the “BWD/FWD” button to look up the usage of energy for the last 7 days. The corresponding
block in histogram will start to flash.
Press the “HISTORY” button again to see the historical data shown by the “per week” mode.
Use the “BWD/FWD” button to look up the usage of energy for the last 7 weeks. The
corresponding block in the histogram will start to flash.
Press the “HISTORY” button again to see the historical data shown by “per month” mode. Use
the “BWD/FWD” button to look up the usage of energy for the last 24 months. The histogram will
show the data of the current use and use for the last six months. The corresponding block in the
histogram will start to flash.
Press the “MODE” button to switch amongst the energy/cost/CO2modes. You can also view
historical data of cost and CO2emissions.
Press the “HISTORY” button once again to return to the normal display. To clarify what normal
is, it’s when the blocks are no longer blinking.
iConserve User Guide___________________________________________________
9
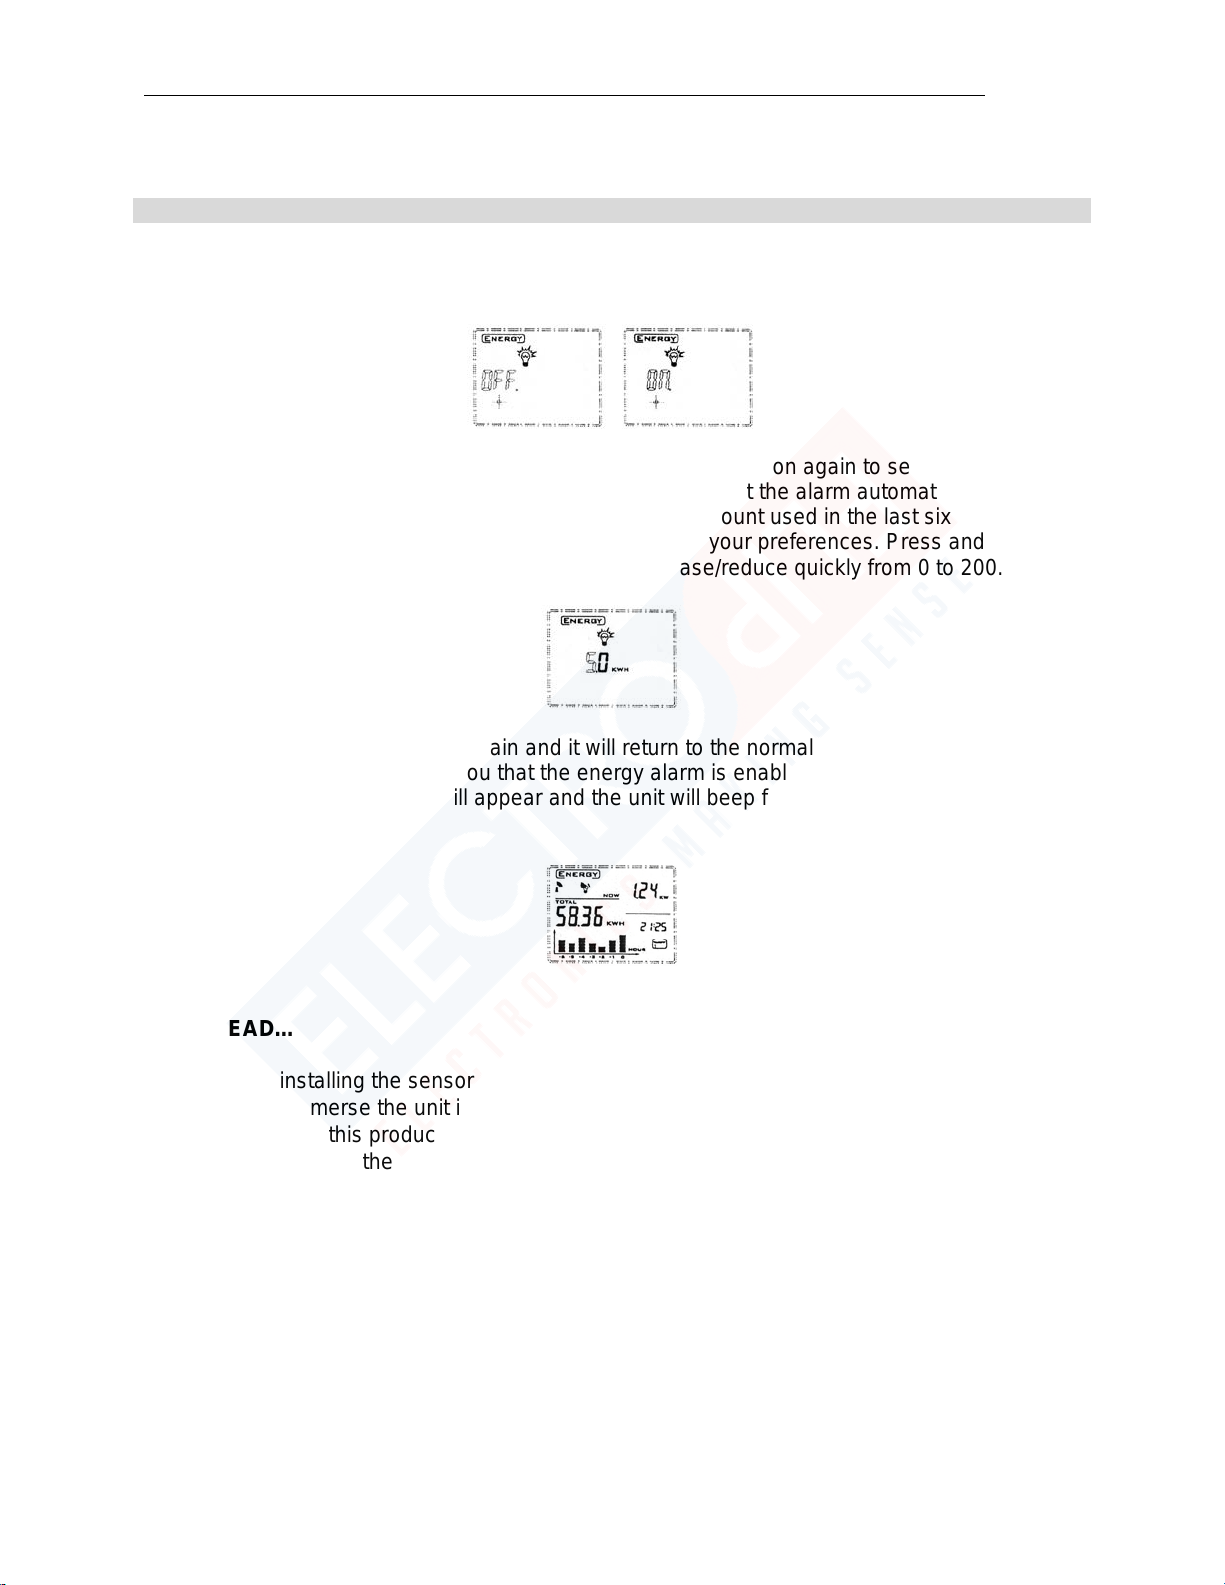
Switch alarm on or off
Press the “TIME/ALARM” button to set the alarm “OFF” flashing which indicated that the alarm
function is off. Press the “FWD/BWD” button to switch on the alarm.
If you have switched the alarm on, press the “TIME/ALARM” button again to set the maximum
daily usage. The number “0.0” will start flashing, indicating that the alarm automatically goes off
when the current usage is 30% higher than the average amount used in the last six days. Use
the “FWD/BWD” button to adjust the number according to your preferences. Press and hold
down the “FWD/BWD” button and the number will increase/reduce quickly from 0 to 200.
Press the “TIME/ALARM” button again and it will return to the normal display with a leaf symbol
on the screen which is notifying you that the energy alarm is enabled and active. When the
alarm is triggered, a new icon will appear and the unit will beep for 2 minutes, and display will
continuously blink.
MUST READ…
•When installing the sensor and when in doubt, always consult a certified electrician.
•Do not immerse the unit in water or other liquids.
•Do not use this product where radio frequencies can cause malfunctioning.
•Do not subject the unit to excessive force, shock, dust, temperature or humidity.
•The LCD panel is made of glass and may break if the unit is dropped, impacted, or
subjected to shock.
•Keep the product away from heat sources like radiators, stoves, heaters, etc.
•Do not use the product near water or in humid areas.
•Do not attempt to repair the product yourself. Contact customer service for assistance.
FAQ (for a more advanced understanding of the iConserve, continue reading…)

iConserve User Guide___________________________________________________
10
How do I know the tariff rate of my electricity and how many tariff rates do I have?
It is the price per kWh of electricity, as shown on your electric bill. You may have just one
tariff/tier rate or you may have two. Some electric companies charges more during specific
hours of the day. Our unit supports this. Some electric companies charge by meeting a specific
kWh during the month. For example after 500 kWh the tariff rate goes from $0.046 to
$0.090(see figure below). Our unit does not support this specific tariff rating system yet.
However we recommend taking the tariff rate you’re more likely to be charged at over the other
to provide the best estimated historical costs. It won’t be exact but it will be near enough to
ensure you’re still able to accurately manage your costs per hour, day, week, or month. In this
figure we would use tariff/tier 2 as our rate for tariff 1/tier 1 in our iConserve’s configuration and
tariff 2/tier 2 would be left blank or not enabled at all.
My Cost reading doesn’t match my monthly electric bills actual cost?
The iConserve provides an estimated cost based data you provide it. Some power companies
have various charges that cannot be figured out by the iConserve because they are additional
fees such as Electrical Commodity Adjustments, Demand Side Management Cost, Purch Cap
Cost Adjustments, Service Facility Costs, and much more unfortunately. Many of these fees are
based on your total monthly kilowatt hours used (kWh). So to help get a better accurate total
monthly expense we suggest adding up all major expenses that are based on your kWh usage.
For example see the figure below:
We first selected the most used Tier rate, which is “Summer Tier 2” at $0.09 per kWh. Then we
added the following to it “Elec Commodity Adj” (just the one charging against the bulk of the
kWh usage) $0.032370, “Demand Side Mgmt Cost” (again just the one charging against the
larger part of kWh used) $0.000800, and “Purch Cap Cost Adj” $0.012130.
Our total came to: $0.1353

iConserve User Guide___________________________________________________
11
This total number we’ll use as our tariff 1 / tier 1 rate on our main display unit in the
configuration setup mode. We will enter 0.135 (since you’re limited to a total of 3 decimal
numbers passed the decimal point)
With these settings and similar electric bill, your total energy expenses will be to your iConseve
when compared to your actual bill.
My KWH usage per month doesn’t match my actual monthly energy bill’s KWH usage per
month?
Depending on your specific power companies measurements and states legal regulatory
measurements there may be an offset. For example your home may be a 2 phase (also known
as 3 phase) which will more than likely bring in 220v into your home or business. You may need
to set the iConserve to 150v or 185v or other. We recommend to first resetting your display units
energy data the night before the first billing day of your electric bill. Then setting the display unit
to 110v(most homes) or 220v(most businesses) then allowing it to record exactly the number of
billing days for that month 28-31 calendar days (depending on the month you’re in). When this
month ends, now check your electric bill online or wait for it in the mail. If your bill records 1200
KWH used for that specific month, then adjust the voltage on the iConserve to match the KWH
of your energy bill. Keep setting the unit plus or minus to various voltage settings until it’s close
to your bill. It will now provide a reasonably accurate reading.
A more difficult yet quicker alternative to locating your homes exact voltage:
First reset your main display unit’s memory by holding down buttons “History” and “Mode” for 10
seconds. Then configure your unit to 110V voltage. Let the unit sit for 7 days recording energy
usage. On the seventh day select the Day historic chart. Ignore day “0” and day “-6” and write
down the numbers for day -1,-2,-3,-4,-5. Use a calculator to add these figures you wrote down
together then divide them by 5. This figure is the average usage in your home for a period of 5
days. Multiply this number by the number of days billed on your electric bill for your last month’s
bill. This might be called “Days in Bill Period” or “Days in Billing Cycle” or similar. This figure will
give you your total estimated usage according to the iConserve. It will be off plus of minus. If it’s
above your bills usage reading, then lower the units 110 voltage by increments of 5 and keep
doing the same math above until near your bills usage reading. If it’s below your energy bill,
then do the same thing as above only increase the voltage on your iConserve from 110 to 115
and do the math again. Keep doing this in increments of 5 and you’ll eventually come to a very
close reading to that of your energy bills.
Which sensor coupler size should I use?
That depends on your breakers live main power wire’s size. Some are 10mm and some are
16mm. It’s ok for the sensor coupler to be loose over the wire; it’s not ok for the sensor coupler
to be too small for the cable. The coupler needs to be clipped (closed) completely around the
wire.
Why is the display blank?
This may be due to the batteries. Ensure that the batteries are inserted correctly and that they
are not exhausted.
Why is there a “0.00” reading on the display?
This means that the sensor is not able to measure anything. There could be a couple of
reasons. Check if the sensor coupler is properly secured around the cable. Check if the sensor
is plugged into the transmitter. Another possibility is if the sensor was dropped the ferrite core of

iConserve User Guide___________________________________________________
12
the sensor may be cracked or damaged in some way. Check with customer service or your local
certified electrician.
Why is there a lower reading than what I expected?
If the cable is a very tight fit for the sensor, it is likely that the sensor is unable to close properly.
This may affect the readings.
If I remove the batteries, will I lose the information on the display?
No, if you need to change or remove the batteries, the display has internal memory, so
information stored will not be lost.
How do I reset the display (clear the data and start again)?
Press the mode and history buttons simultaneously and hold down for ten seconds.
I have three dashes (---) showing on the display. What does this mean?
Move the display unit closer to the transmitter and press the link button on the transmitter and
the search button on the main display unit. If the dashes remain on the display, this indicates
that the transmitter and receiver are not communicating. Please contact customer service to
help locate the problem.
How do I identify if the main display unit and transmitter working normally?
A. being the main display unit.
B. being the transmitter unit.
Normal Status will look like:
A. LCD display, with functional beeping buttons when pressed.
B. LED flashes (1 blink up to 64 seconds) on transmitter. Quick press on Check/Link button.
(On the side of the transmitter unit). Every 64 seconds the LED’s should blink.
Potential Problems:
Problem for A: No display, or displaying garbled characters (the value of abnormally large,
digital missing segment, multi-segment, etc.), or the keys give no reaction.
Problem for B: No LED flashes on transmitter.
Solutions:
Solution for A: Check if the battery is installed properly - Remove the battery, wait 10 seconds,
re-load a new battery according to polarity.
Solution for B: Check if the work environment is in line with product requirements - Avoid using
in harsh environments, such as extremely low temperature, high temperatures, or areas with
strong electromagnetic interference. (EMI)
Cost shows "----" and it seems the transmitter is not transmitting anything to the main
display unit?
Solutions:
Solution A: Re-load batteries of receiver and transmitter.
Solution B: Reset transmitters ID code:
Step1: Remove the batteries from transmitter. Two minutes later reinstall the batteries in the
transmitter.
Step 2: Remove the batteries from the receiver.

iConserve User Guide___________________________________________________
13
Step 3: Push and hold buttons "MODE" and "SEARCH". Simultaneously load the batteries in the
receiver.
Step 4: Release the two buttons after hearing 2 beeps. The receiver will continue to search for
the signal from the transmitter and make a connection.
The main display unit is receiving signals from the transmitter, but often looses data (for
example, A/C unit turned on and energy reading have not changed. Sometimes the
antenna symbol disappears; energy and cost will also display "-- - " from time to time?
Potential Problems:
A. The receiver and transmitter are too far from each other and beyond the effective reception
range.
B. Check whether there is interference with the wireless frequency signal. A doorbell, wireless
alarm system, powerful wireless internet router, etc. or other strong electromagnetic interference
signal can cause this problem.
C. The receiver and transmitter may be operating under low battery power levels (low battery
icon should identify this for either the main display unit and or the transmitter).
Solutions:
Solution for A: Move the main display unit as close to the transmitter as you possibly can within
arm’s length. Avoid presenting too many obstacles between them.
Solution for B: Reduce the electromagnetic signal interference as much as possible. Or turn off
the interfering signal source if possible.
Solution for C: Replace batteries if power is low.
I’m using two iConserve units, and I’m confused as to which display unit belongs to
which transmitter?
Exercise process of elimination:
Place the receiver close to the transmitter, and then pull out the sensor plug from the transmitter
for some time to view the receiver power data. If the power data is anything other than “0”, it
means the main display unit is receiving from a different transmitter.
Resetting ID Code for Transmitter and Main Display Unit:
In order to receive correct data from the transmitter, the receiver (main display unit) should have
the same ID codes of the corresponding transmitter. The possibility of two transmitters have
same ID codes is 1 / 65536. If there are two transmitters which have same ID code, you can
reset the ID code on the transmitter and receiver manually to solve this problem.
First, to change ID Code on transmitter:
Step 1: Remove the batteries from transmitter.
Step 2: Push and hold down the CHECK button. At the same time, reload batteries on the
transmitter. LED is on.
Step 3: When LED is off and then on again, release the CHECK button. (This process
takes about 30 seconds).
Step 4: LED will blink 10 times which means the ID code is updated on the transmitter.
Step 5: Two seconds after, push the CHECK button down again once. Wait for the LED to
blink at least once.
Second, to change the ID Code on receiver:
Step 1: Remove batteries from the receiver.

iConserve User Guide___________________________________________________
14
Step 2: Push and hold down SEARCH and MODE button together while reloading
batteries.
Step 3: Release the two buttons and you will hear 2 beeps. It means the ID code on the
receiver is updated. The receiver is searching for a signal from the transmitter.
What if my unit is not able to properly update data? But the electric power consumption
on the receiver shows “0” or shows a big difference between real consumption and
displayed data?
Potential Problems:
A. Check whether the sensor plug has fallen from the transmitter.
B. Check if the sensor is normal and clamped onto a live line (single sensor stuck in a
single-phase line and mouth is completely locked).
C. Check if the voltage setting is correct on the main display unit.
Solutions:
Solution A: Turn on a household electrical appliance to ensure that the current electric
power is not 0. Plug the sensor properly into the transmitter socket, and then clamp on a live
power cable and lock the mouth. Reload batteries in the transmitter. Two seconds after,
push (no need hold) CHECK button once and wait for the transmitter LED to flash
continuously. Immediately push and hold the SEARCH button on the receiver for about 2
seconds. Release the SEARCH button after hearing one beep. View the power value on
receiver and check if it is normal.
Solution B: Check the voltage and if other parameters are correct on the main display unit.
What’s a quick step by step process oh how to setup / operate the iConserve for
advanced users?
1. If you are using this product for the first time, we suggest you do the following steps:
Step 1: Load batteries into the receiver and set the current time.
Step 2: Set the local voltage, electricity rates and other parameters.
Step 3: Load the batteries into the transmitter. The receiver will start an open searching
function to receive data from the transmitter.
(Note: During this step, power data exists already, so do the following to clear the existing
data)
Step 4: Make sure the sensor and transmitter are connected.
Step 5: Clamp the sensor onto an electricity live cable.
Step 6: Place the receiver where it can receive data from the transmitter reliably.
Step 7: If necessary, set the alarm value of household electricity consumption.
2. Quick manual energy reading check:
Step 1: Press the SEARCH button for 2 seconds on the receiver.
Step 2: Release the SEACH button till you hear one beep.
Step 3: Push the CHECK button once on the transmitter. One minute later, the receiver data
should be update every 2 seconds.
Step 4: Turn home appliances on and off to view the power change on the receiver.
Special Note: 30 seconds later the transmitter will automatically update the receiver every 8
seconds. If you need to view data quickly, press the CHECK button again and repeat the cycle.
3. To reset both your main display unit’s memory and wipe all historical data:
First, remove the data preserved in the transmitter:
First, to wipe the history memory on the transmitter

iConserve User Guide___________________________________________________
15
Step 1: Remove the batteries from the transmitter.
Step 2: Push and hold the CHECK button and at same time, reload the batteries into the
transmitter. LED should be on.
Step 3: When the LED is off, release the CHECK button. Memory will start cleaning (This
process should take about 8 seconds)
Step 4: The LED will blink 5 times, which means the history data is deleted on the transmitter.
Start working from 0.
Second, to wipe the history memory on the receiver
Step 1: Load the batteries into receiver. The LCD should display data.
Step 2: Push and hold down the HISTORY and MODE button together for 2 seconds. “CLR”
should display on the LCD meaning the memory is going to be deleted.
Step 3: Continue to hold the two buttons down for 8 more seconds to confirm the deleting.
Memory will reset to 0.
Step 4: It will go back to normal working status automatically. LCD display “----”.
Step 5: Release the two buttons.
Step 6: Push and hold the SEARCH button down for 2 seconds.
Step 7: Release the SEARCH button once you hear once beep. The receiver should start to
receive new data from the transmitter.
Device Specifications
Specifications for the main display unit / receiver
1. Displays for current total electricity, cost and CO2.
2. Historical graphical chart view for most recent 7 hours, 7 days, 7 weeks and 24 months.
3. Setting for the daily capacity alarm value and on/off alarm function manually.
4. Voltage Setting: 100V to 250V (According to local standards, users can set it by
manual).
5. Maximum record capacity: four digits 9999KWH (over will show “HI”)
6. Automatically calculates the CO2 excretion (Greenhouse gas): CO2 = 0.45kg/kWH *
nkWH (factory default is 0.45kg for each 1kWh power consumption. According to local
standards, users can set it manually).
7. Automatically calculates electricity charges: COST = tariff × nkWh (tariff electricity rates,
factory default is 0.125). The currency unit of the factory default is £. The user can set
the parameters according to local standards manually. User may also set two different
rates (tariff1 and tariff2) a day. Four different currencies are possible €, £, $, ¥.
8. Wireless Transmission Cycle: 2s/8s/64s (The reception cycle of receiver can be adjusted
automatically according to the transmitter’s frequency).
9. Digital clock and calendar: Clock and date display alternately every 10 seconds
10. Low battery indicator on the receiver and the transmitter
11. LED backlight will be on once you push on any button.
12. External DC5V power jack (USB Port or D3.5 two-pin socket). When there is available
external power supply, the internal battery power will not be consumed.
Specifications for the transmitter
1. Minimum measuring current: 100mA (Virtual value).
2. Maximum measuring current: 70A (Virtual value) (over will issue an error HI).
3. Current measurement frequency: 2s/8s/64s.
4. Maximum record capacity: 9999KWH (base on 100V calculation, over it will issue an
error of Overflow Err).
iConserve User Guide___________________________________________________
16
5. Current measurement accuracy: <5%.
6. Wireless transmitting cycle: 2s/8s/64s (2 seconds after pushing CHECK button. It will
issue 15 consecutive cycles to verify the emission intensity of your environment. Within
one hour, after power is on or reset operation, transmitting cycle will be 8 seconds. After
one hour, transmitting cycle will be adjusted to 64 seconds automatically).
7. Low power detection.
8. Memory of total electricity consumption for up to two years.
9. Single-phase, two-phase, three-phase power measurement systems are compatible.
WARNING!: Before attempting to install the transmitter and clamp sensor in your breaker
box or power source for your home or business FIRST consult with a local Certified
Electrician. In addition it’s highly recommended that you hire this Certified Electrician to
safely and properly install these components. Inappropriate contact with your breaker
box or main power source can be FATAL.
All information and instructions included in this manual are current as of March 22, 2014.
However, due to the fluid nature of advancing technology, some characteristics may change or
need modifications in the future. Should you encounter any problems or have any further
questions about your purchase, please visit us at www.ElectroFlip.com and visit the contact us
page.
This document is property of ElectroFlip LLC. No unauthorized reproductions allowed.
Table of contents


