Electrolux Professional thermaline 588440 User manual

Electric multi-function
cooker
EN-US Installation and Operating manual
599A0UH01 - 82.8030.11- 2022.06

2
Foreword
Read the following instructions, including the warranty terms before installing and using the appliance.
Visit our website www.electroluxprofessional.com and open the Support section to:
Register your product
Get hints & tips of your product, service and repair information
The installation, use and maintenance manual (hereinafter Manual) provides the user with information necessary for correct and
safe use of the appliance.
The following must not be considered a long and exacting list of warnings, but rather a set of instructions suitable for improving ap-
pliance performance in every respect and, above all, preventing injury to persons and animals and damage to property due to im-
proper operating procedures.
All persons involved in appliance transport, installation, commissioning, use and maintenance, repair and disassembly must con-
sult and carefully read this manual before carrying out the various operations, in order to avoid wrong and improper actions that
could compromise the appliance's integrity or endanger people. Make sure to periodically inform the user regarding the safety reg-
ulations. It is also important to instruct and update personnel authorised to operate on the appliance, regarding its use and
maintenance.
The manual must be available to operators and carefully kept in the place where the appliance is used, so that it is always at hand
for consultation in case of doubts or whenever required.
If, after reading this manual, there are still doubts regarding appliance use, do not hesitate to contact the Manufacturer or the au-
thorised Service Centre to receive prompt and precise assistance for better operation and maximum efficiency of the appliance.
During all stages of appliance use, always respect the current regulations on safety, work hygiene and environmental protection. It
is the user's responsibility to make sure the appliance is started and operated only in optimum conditions of safety for people, ani-
mals and property.
IMPORTANT
• The manufacturer declines any liability for operations carried out on the appliance without respecting the instructions
given in this manual.
• The manufacturer reserves the right to modify the appliances presented in this publication without notice.
• No part of this manual may be reproduced.
• This manual is available in digital format by:
– contacting the dealer or reference customer care;
– downloading the latest and up to date manual on the web site www.electroluxprofessional.com;
• The manual must always be kept in an easily accessed place near the appliance. Appliance operators and mainte-
nance personnel must be able to easily find and consult it at any time.

3
Contents
A WARNING AND SAFETY INFORMATION................................................................................................... 5
A.1 General information ......................................................................................................................5
A.2 Personal protection equipment ........................................................................................................ 6
A.3 General safety .............................................................................................................................6
A.4 Protection devices installed on the appliance ...................................................................................... 7
A.5 Safety signs to be placed on the appliance or near its area ....................................................................8
A.6 Reasonably foreseeable improper use .............................................................................................. 8
A.7 Additional safety information ........................................................................................................... 8
A.8 Residual risks ..............................................................................................................................8
A.9 Transport, handling and storage ...................................................................................................... 9
A.10 Installation and assembly ............................................................................................................. 10
A.11 Electrical connection ................................................................................................................... 10
A.12 Water connection........................................................................................................................ 10
A.13 Positioning ................................................................................................................................ 10
A.14 Appliance space limits ................................................................................................................. 11
A.15 Appliance cleaning...................................................................................................................... 11
A.16 Preventive Maintenance............................................................................................................... 11
A.17 Parts and accessories ................................................................................................................. 11
A.18 Precautions for use and maintenance ............................................................................................. 11
A.19 Appliance maintenance................................................................................................................ 12
A.20 Appliance disposal...................................................................................................................... 12
B WARRANTY TERMS AND EXCLUSIONS................................................................................................. 12
C TECHNICAL DATA............................................................................................................................... 12
C.1 Data plate position...................................................................................................................... 12
C.2 Appliance and manufacturer's identification data ............................................................................... 13
C.3 How to interpret the factory description............................................................................................ 13
C.4 Technical data............................................................................................................................ 13
D GENERAL INFORMATION .................................................................................................................... 13
D.1 Introduction............................................................................................................................... 13
D.2 Intended use and restrictions ........................................................................................................ 13
D.3 Testing and inspection ................................................................................................................. 14
D.4 Copyright.................................................................................................................................. 14
D.5 Keeping the manual .................................................................................................................... 14
D.6 Recipients of the manual .............................................................................................................. 14
D.7 Definitions................................................................................................................................. 14
D.8 Responsibility ............................................................................................................................ 14
D.9 Customer packaging checks ......................................................................................................... 14
D.10 Storage .................................................................................................................................... 14
E INSTALLATION DIAGRAMS................................................................................................................... 15
E.1 Appliance type ........................................................................................................................... 15
E.2 Dimension drawings for floor installations ........................................................................................ 15
E.3 Installation and connection diagram................................................................................................ 16
E.4 Accessing the appliance’s internal components................................................................................. 18
F INSTALLATION AND ASSEMBLY ........................................................................................................... 18
F.1 Introduction............................................................................................................................... 18
F.2 Customer's responsibilities ........................................................................................................... 18
F.3 Before installation....................................................................................................................... 18
F.4 Installing on concrete plinth........................................................................................................... 18
F.5 Installing on steel plinth or adjustable feet ........................................................................................ 19
F.6 Disposal of packing..................................................................................................................... 19
F.7 Securing or adjusting to the floor (optional)....................................................................................... 19
F.8 Wall installation.......................................................................................................................... 20
F.8.1 Preparing the brackets ....................................................................................................... 20
F.8.2 Positioning....................................................................................................................... 20
F.8.3 Securing and set up........................................................................................................... 20
F.9 Fastening multiple appliances together............................................................................................ 20
F.10 Side panels and base models........................................................................................................ 21
F.11 Fixing the side panels with a 12,5 mm / 0,49″ overhang....................................................................... 21
F.12 Fixing the side cover without overhang ............................................................................................ 22
F.13 Sealing..................................................................................................................................... 23
G ELECTRICAL INSTALLATION................................................................................................................ 23
G.1 Mains connection ....................................................................................................................... 23
G.2 Power cable .............................................................................................................................. 23
G.3 Potential equalisation .................................................................................................................. 23
H CONNECTING THE WATER SUPPLY...................................................................................................... 24
H.1 Water connection........................................................................................................................ 24
H.2 Drinking water supply .................................................................................................................. 24
I NORMAL APPLIANCE USE................................................................................................................... 24
I.1 Characteristics of personnel enabled to operate on the appliance ......................................................... 24
I.2 Basic requirements for appliance use.............................................................................................. 24

4
J PRODUCT DESCRIPTION .................................................................................................................... 25
J.1 Appliance overview..................................................................................................................... 25
J.2 Use ......................................................................................................................................... 25
J.3 Glass display............................................................................................................................. 25
J.4 Steel dashboard......................................................................................................................... 25
J.5 Temperature control .................................................................................................................... 26
J.6 Capacity control ......................................................................................................................... 26
K OPERATING....................................................................................................................................... 26
K.1 First use ................................................................................................................................... 26
K.2 Filling up the tank ....................................................................................................................... 26
K.3 Switching on-off ......................................................................................................................... 26
K.4 The cooking process - pasta cooker................................................................................................ 26
K.5 The cooking process - bain marie................................................................................................... 27
K.6 The cooking process - sous-vide.................................................................................................... 27
K.7 Stand-by mode .......................................................................................................................... 27
K.8 Empting the tank ........................................................................................................................ 27
K.9 Main switch (optional).................................................................................................................. 27
K.10 Handrail (optional) ...................................................................................................................... 27
L APPLIANCE CLEANING AND MAINTENANCE.......................................................................................... 27
L.1 Care information......................................................................................................................... 27
L.2 Cleaning introduction................................................................................................................... 27
L.3 Stainless steel surfaces ............................................................................................................... 28
L.4 Colored surfaces ........................................................................................................................ 28
L.5 Surfaces blackened by heat .......................................................................................................... 28
L.6 Descaling ................................................................................................................................. 28
L.7 Drain and overflow openings ......................................................................................................... 28
L.8 Gaps and Joints ......................................................................................................................... 28
L.9 Air filter (optional) ....................................................................................................................... 29
L.10 Informations for maintenance ........................................................................................................ 29
L.11 Maintenance intervals.................................................................................................................. 29
L.12 Periods of non-use...................................................................................................................... 29
M TROUBLESHOOTING.......................................................................................................................... 30
M.1 Introduction............................................................................................................................... 30
M.2 Troubleshooting ......................................................................................................................... 30
N APPLIANCE DISPOSAL........................................................................................................................ 30
N.1 Procedure regarding appliance disposal .......................................................................................... 30
5
A WARNING AND SAFETY INFORMATION
A.1 General information
To ensure safe use of the appliance and a proper understanding of the manual it is
necessary to be familiar with the terms and typographical conventions used in the
documentation. The following symbols are used in the manual to indicate and identify the
various types of hazards:
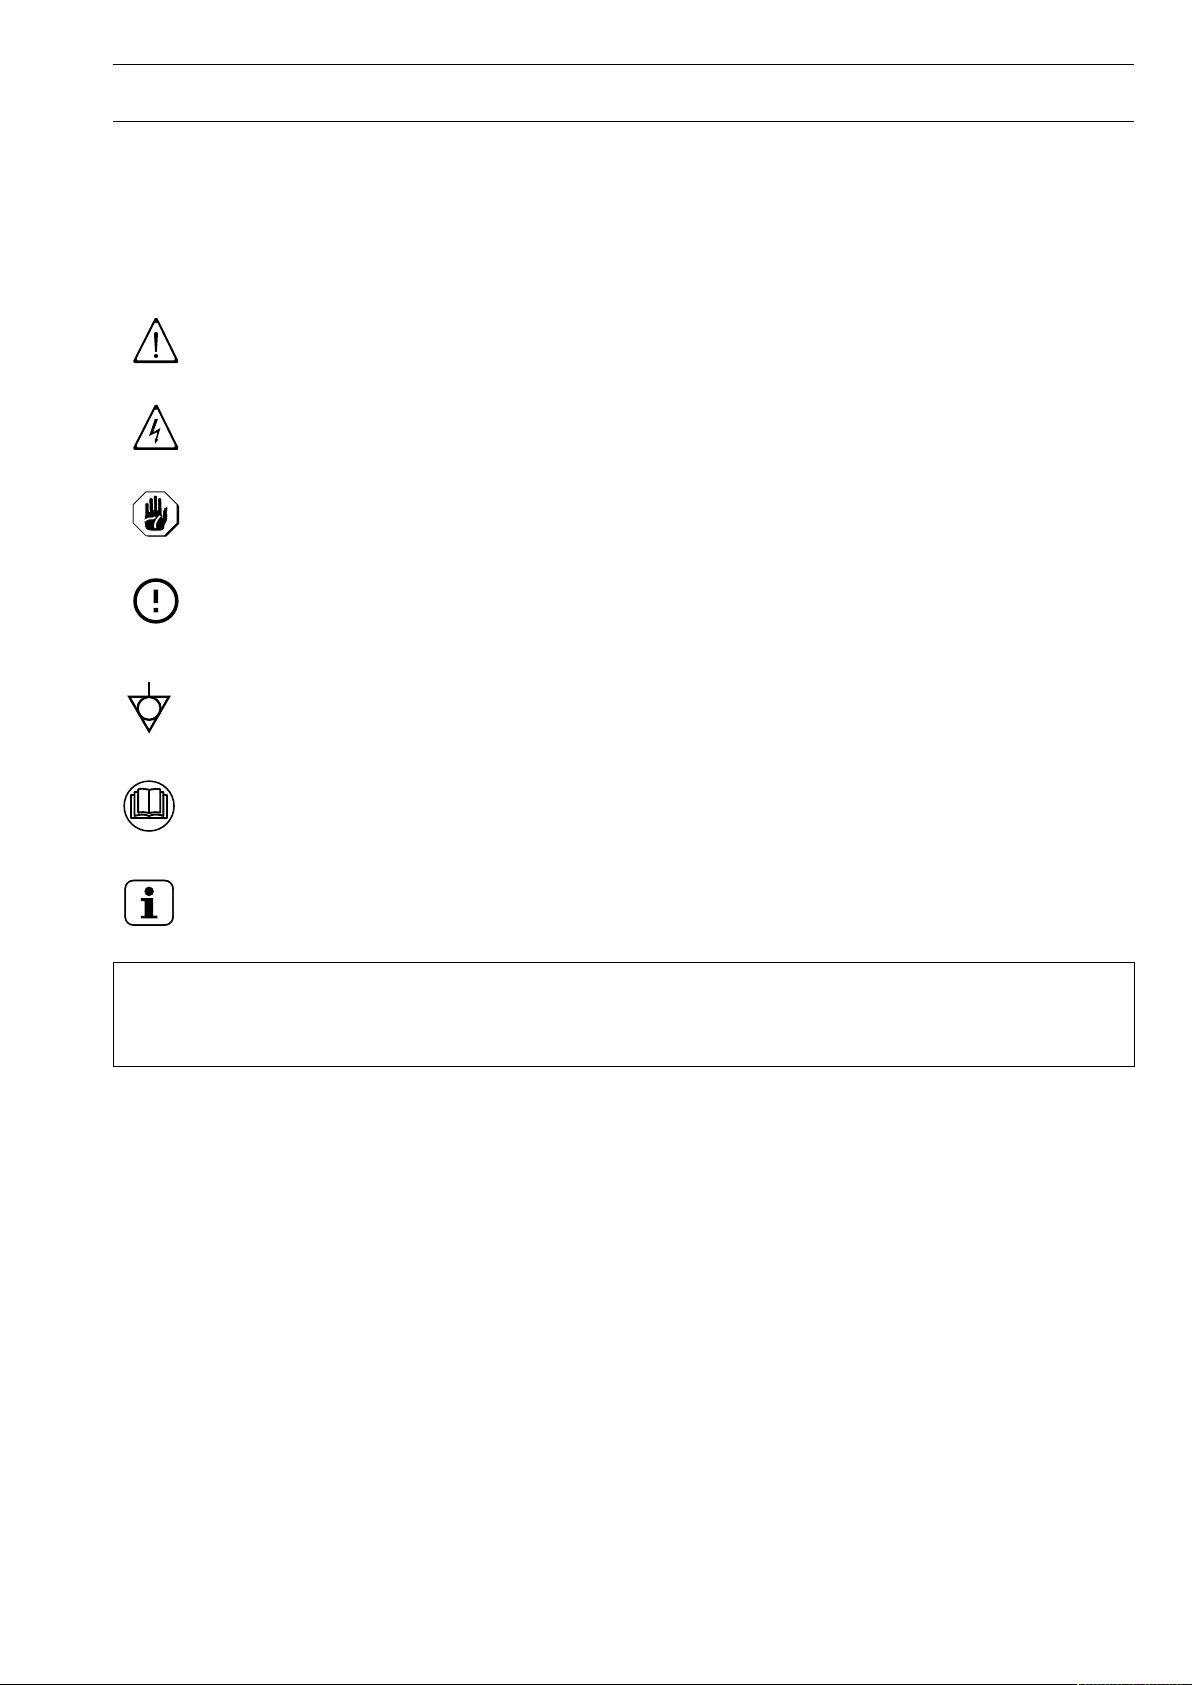
WARNING
Danger for the health and safety of operators.
WARNING
Danger of electrocution - dangerous voltage.
CAUTION
Risk of damage to the appliance or the product.
IMPORTANT
Important instructions or information on the product
Equipotentiality
Read the instructions before using the appliance
Clarifications and explanations
FOR YOUR SAFETY
Do not store or use gasoline or other flammable materials, vapours and liquids in
the vicinity of this or any other appliance.
• Only specialised personnel are authorised to operate on the appliance.
• This appliance is to be intended for commercial and collective use, for example in
kitchens of restaurants, canteens, hospitals and in commercial enterprises such as
bakeries, butcheries, etc., not for continuous mass production of food. Any other use is
deemed improper.
• This appliance must not be used by minors and adults with limited physical, sensory or
mental abilities or without adequate experience and knowledge regarding its use.
• Do not let children play with the appliance.
• Keep all packaging and detergents away from children.
• Do not store explosive substances, such as pressurized containers with flammable
propellant, in this appliance.
• Refer to the data given on the appliance’s data plate for relations with the Manufacturer
(e.g. when ordering spare parts, etc.).
• When scrapping the appliance, the marking must be destroyed.
• Save these instructions carefully for further consultation by the various operators.
6
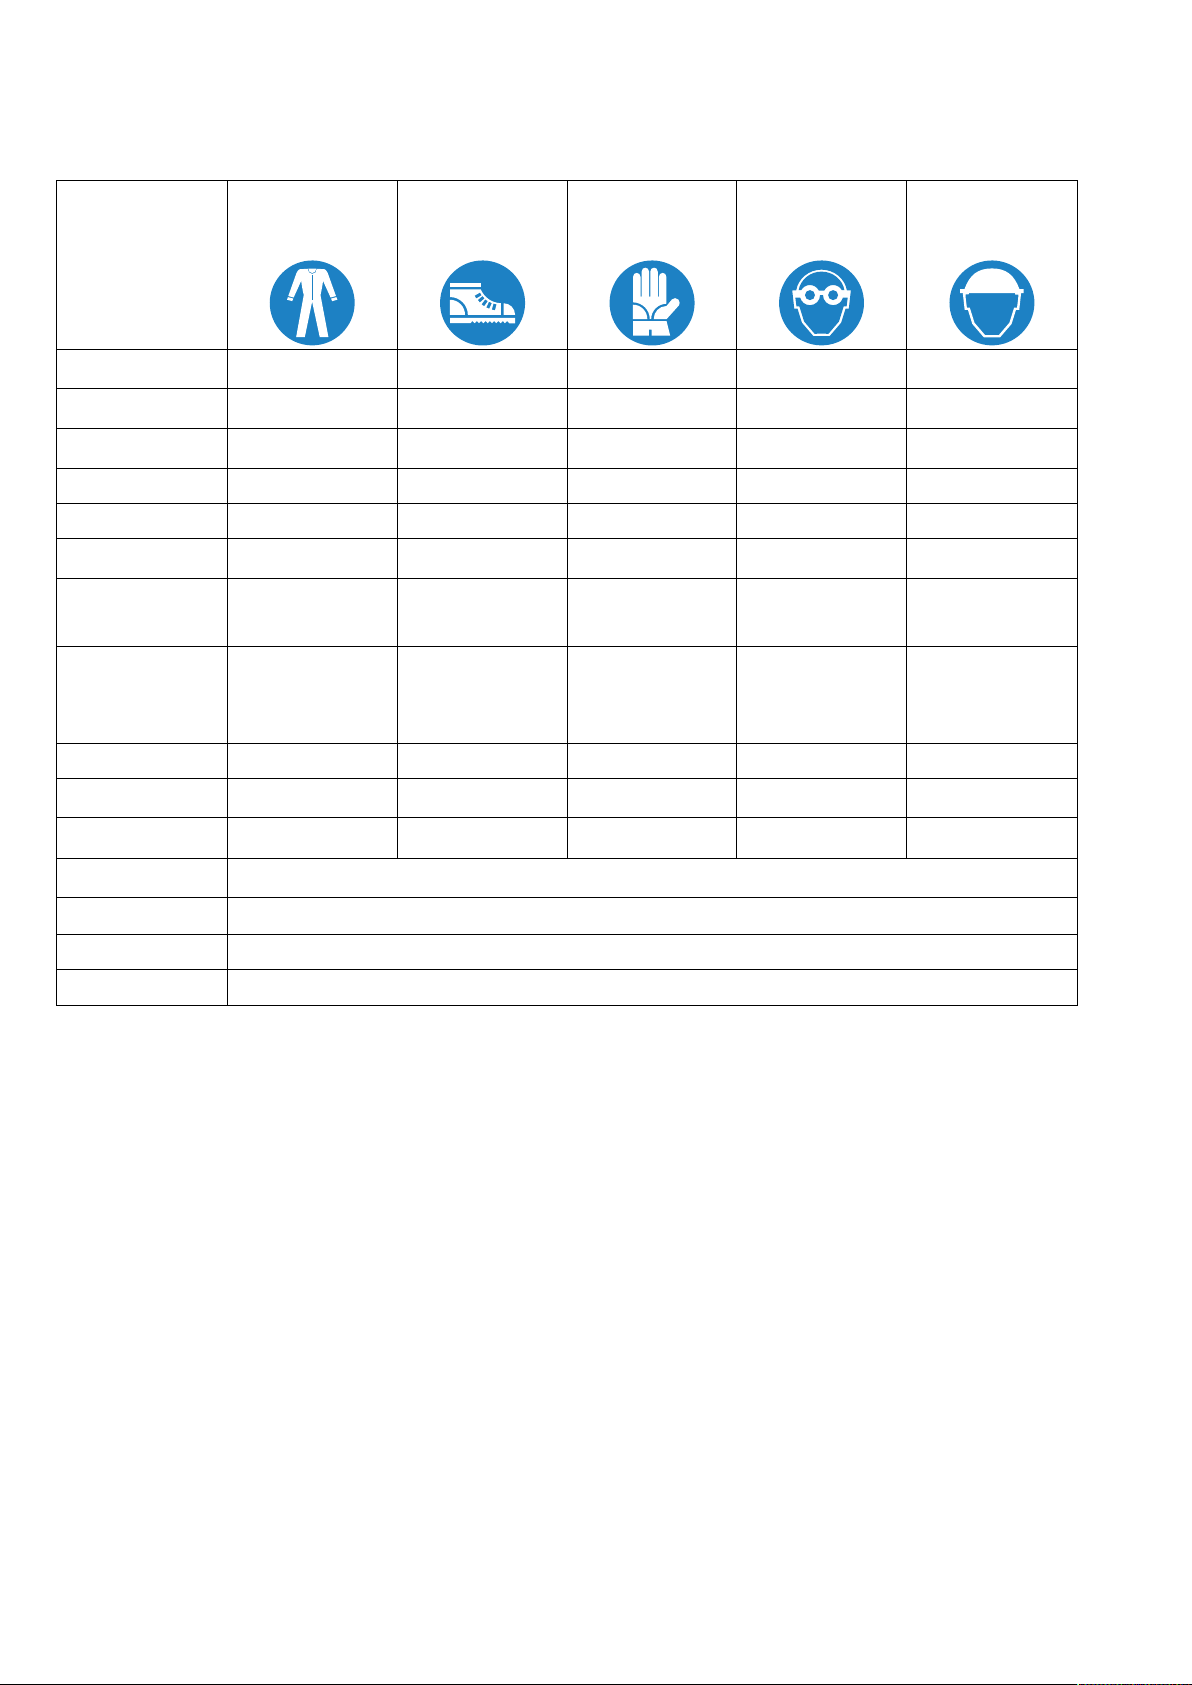
A.2 Personal protection equipment
Summary table of the Personal Protection Equipment (PPE) to be used during the various
stages of the appliance's service life.
Stage Protective
garments
Safety
footwear
Gloves Glasses Safety
helmet
Transport ● ○ —○
Handling —● ● — —
Unpacking ○ ● ● — —
Installation —● ●1— —
Normal use ○ ○ ○2○—
Adjustments —○— — —
Routine
cleaning
○ ● ●1ˉ3○—
Extraordi-
nary
cleaning
○ ● ●1ˉ3○—
Maintenance ○ ● ● — —
Dismantling ○ ● ● — —
Scrapping ○ ● ● — —
Key:
●PPE REQUIRED
○PPE AVAILABLE OR TO BE USED IF NECESSARY
—PPE NOT REQUIRED
1. During these operations, gloves must be cut-resistant. Failure to use the personal protection equipment by
operators, specialized personnel or users can involve exposure to damage to health (depending on the model).
2. During these operations, gloves must be heatproof to protect hands from contact with hot food or hot parts of
the appliance and/or when removing hot items from it. Failure to use the personal protection equipment by
operators, specialised personnel or users can involve exposure to chemical risk and cause possible damage to
health (depending on the model).
3. During these operations, gloves must be suitable for contact with chemical substances used (refer to the
safety data sheet of the substances used for information regarding the required PPE). Failure to use the
personal protection equipment by operators, specialized personnel or users can involve exposure to chemical
risk and cause possible damage to health (depending on the model).
A.3 General safety
• The appliances are provided with electric and/or mechanical safety devices for
protecting workers and the appliance itself.
• Never operate the appliance, removing, modifying or tampering with the guards,
protection or safety devices.
• Do not make any modifications to the parts supplied with the appliance.
• Several illustrations in the manual show the appliance, or parts of it, without guards or
with guards removed. This is purely for explanatory purposes. Do not use the appliance
without the guards or with the protection devices deactivated.

7
Disconnect the appliance from the power
supply before carrying out any installation,
assembly, cleaning or maintenance
procedure.
• Do not remove, tamper with or make illegible the marking and safety, danger and
instruction signs and labels on the appliance.
• Before servicing, disconnect the electrical service and place a red tag at the disconnect
switch to indicate work is being done on that circuit.
• The A-weighted emission sound pressure level does not exceed 70 dB(A).
• Turn the appliance off in case of fault or poor operation.
• Do not use products (even if diluted) containing chlorine (sodium hypochlorite,
hydrochloric or muriatic acid, etc.) to clean the appliance or the floor under it.
• Carefully avoid exposure of the equipment to ozone - do not use ozonizers in the rooms
where the equipment is installed.
• Do not spray aerosols in the vicinity of this appliance while it is in operation.
• The following operations have to be carried out by specialised authorised personnel or
Customer Care Service provided with all the appropriate personal protection equipment
(A.2 Personal protection equipment), tools, utensils and ancillary means, who can ask
the manufacturer to supply a servicing manual:
– Installation and assembly;
– Positioning;
– Electrical connection;
– Appliance cleaning, repair and extraordinary maintenance;
– Appliance disposal;
– Work on electrical equipment;
A.4 Protection devices installed on the appliance
Guards
The appliance has:
• fixed guards (e.g. casings, covers, side panels, etc.), fixed to the appliance and/or frame
with screws or quick-release connectors that can only be removed or opened with tools;
therefore the user must not remove or tamper with such devices. The Manufacturer
declines any liability for damage due to tampering or their non-use;
• interlocked movable guards (door) for access inside the appliance;
• appliance electrical equipment access panels or doors, made from hinged panels
openable with tools. The panel or the door must not be opened when the appliance is
connected to the power supply.
ON
OFF

8
A.5 Safety signs to be placed on the appliance or near its area
Prohibition Meaning
do not remove the safety devices
do not use water to extinguish fires (placed on electrical
parts)
Keep the area around the appliance clear and free from
combustible materials. Do not keep flammable materials in
the vicinity of the appliance
Danger Meaning
caution hot surface
danger of electrocution (shown on electrical parts with
indication of voltage)
A.6 Reasonably foreseeable improper use
Improper use is any use different from that specified in this manual. During appliance
operation, other types of work or activities deemed improper and that in general can involve
risks for the safety of operators and damage to the appliance are not allowed. Reasonably
foreseeable improper use includes:
• lack of appliance maintenance, cleaning and periodical checks;
• structural changes or modifications to the operating logic;
• tampering with the guards or safety devices;
• failure to use personal protection equipment by operators, specialised personnel and
maintenance personnel;
• failure to use suitable accessories (e.g. use of unsuitable equipment or ladders);
• keeping combustible or flammable materials, or in any case materials not compatible
with or pertinent to the work, near the appliance;
• wrong appliance installation;
• placing in the appliance any objects or things not compatible with its use, or that can
damage the appliance, cause injury or pollute the environment;
• climbing on the appliance;
• non-compliance with the requirements for correct appliance use;
• other actions that give rise to risks not eliminable by the Manufacturer.
A.7 Additional safety information
CAUTION
Never use this appliance for frying.
A.8 Residual risks
The appliance has several risks that were not completely eliminated from a design
standpoint or with the installation of adequate protection devices. Nevertheless, through

9
this manual the Manufacturer has taken steps to inform operators of such risks, carefully
indicating the personal protection equipment to be used by them. In order to reduce the
risks, provide for sufficient spaces while installing the unit.
To preserve these conditions, the areas around the appliance must always be:
• kept free of obstacles (e.g. ladders, tools, containers, boxes, etc.);
• clean and dry;
• well lit.
For the Customer's complete information, the residual risks remaining on the appliance are
indicated below: such actions are deemed improper and therefore strictly forbidden.
Residual risk Description of hazardous situation
Slipping or falling The operator can slip due to water, any liquid or dirt
on the floor
Burns/abrasions (e.g. heating
elements, cold pan, cooling
circuit plates and pipes)
The operator deliberately or unintentionally touches
some components inside the appliance without
using protective gloves.
Electrocution Contact with live parts during maintenance
operations carried out with the electrical panel
powered
Tipping of loads When handling the appliance or the packing
containing it, using unsuitable lifting systems or
accessories or with the unbalanced load
Chemical Contact with chemical substances (e.g. detergent,
rinse aid, scale remover, etc.) without taking
adequate safety precautions. Therefore always refer
to the safety cards and labels on the products used.
Sudden closing of the door/
drawers (if present, depending on
the appliance type)
The operator for normal appliance use could
suddenly and deliberately close (if present,
depending on the appliance type):
• door/s
• drawers
A.9 Transport, handling and storage
• Transport (i. e. transfer of the appliance from one place to another) and handling (i. e.
transfer inside workplaces) must occur with the use of special and adequate means.
• Please refer to indications on packaging for stackability during transport, handling and
storage.
• Do not stand under suspended loads during loading or unloading operations.
Unauthorized personnel must not enter the work area.
• The weight of the appliance alone is not sufficient to keep it steady.
• For appliance handling, do not lift and anchor it to movable or weak parts such as:
casings, electrical raceways, pneumatic parts, etc.
• Do not push or pull the appliance to move it, as it may tip over. Use proper tool to lift the
appliance.
• Arrange a suitable area with flat floor for appliance unloading and storage operations.
• Appliance transport, handling, shifting and storage personnel must be adequately
instructed and trained regarding the safely use of lifting systems and personal protection
equipment suitable for the type of operation carried out.

10
• When removing the anchoring systems, make sure the stability of the appliance parts
does not depend on the anchoring and, therefore, that this operation does not cause the
load to fall off the vehicle. Before unloading the appliance components, make sure all
the anchoring systems are removed.
A.10 Installation and assembly
• The operations described must be carried out in compliance with the current safety
regulations and provisions in force in the country of use.
• The plug, if present, must be accessible after positioning the appliance in the place of
installation.
• The appliance is not suitable for installation outdoors and/or in places exposed to
atmospheric agents (rain, direct sunlight, etc.).
A.11 Electrical connection
• The electric supply connection must meet all national and local electrical code
requirements.
• The power supply system must be suitable for the rated current of the connected
appliance.
• The information regarding the appliance power supply voltage and frequency is given on
the data plate.
• Install between the power cable and the electric line a differential thermal-magnetic
switch suitable for the absorption specified on the data plate, with contact gap enabling
complete disconnection in category III overvoltage conditions and complying with the
regulations in force.
For the correct sizing of the switch or plug, refer to the absorbed current specified on the
appliance data plate.
• If the power cable is damaged or too short, it must be replaced by the Customer Care
Service or in any case by specialised personnel, in order to prevent any risk.
• The manufacturer declines any liability for damage or injury resulting from breach of the
above rules or non-compliance with the electrical safety regulations in force in the
country where the appliance is used.
• Verify that a safety circuit breaker is installed between the power cable of the appliance
and the mains electric line. The contact opening max. distance and leakage current
must comply with the local safety regulations.
• In case of electrical permanent connection: the device must be lockable in the open
position and accessible even after the appliance is installed in its place.
A.12 Water connection
Water connection must be carried out in compliance with the regulations and
provisions in force with the country.
• The appliance must be supplied with drinking water at a pressure of 1,5 – 3 bar (150 –
300 kPa).
WARNING
The manufacturer declines any liability if the safety regulations are not
respected.
A.13 Positioning
• Install the appliances, taking all the safety precautions required for this type of operation,
also respecting the relevant fire-prevention measures.

11
• Prevent the areas where the appliance is installed to be polluted with corrosive
substances (chlorine, etc.). The manufacturer declines any liability for corrosive effects
due to external causes.
• The appliance can be installed separately or combined only with other appliances of the
same range.
A.14 Appliance space limits
• Do not install the appliance on flammable walls. If an appliance is set up next to or
against temperature-sensitive walls, maintain a distance of at least 50 mm / 1,97″
between the appliance and any combustible walls or in any case an adequate space to
enable subsequent servicing or maintenance operations.
• A suitable space must be left around the appliance (for operations, maintenance, etc.).
• This space must be increased in case of use and/or transfer of other equipment and/or
means or if exit routes are necessary inside the workplace.
A.15 Appliance cleaning
• Do not touch the appliance with wet hands or feet or when barefoot.
• Put the appliance in safe conditions before starting any cleaning operation.
• Do not allow oil or grease to come into contact with plastic parts. Do not allow dirt, fat,
food or other residuals to form deposits on the appliance.
• Respect the requirements for the various routine and extraordinary maintenance
operations. Non-compliance with the instructions can create risks for personnel.
• Do not spray water or use water jets, steam cleaner or high pressure cleaner.
A.16 Preventive Maintenance
In order to ensure the safety and performance of your equipment, it is recommended that
service is undertaken by Electrolux Professional authorised engineers every 12 months, in
accordance with Electrolux Professional Service Manuals. Please contact your local
Electrolux Professional Service Centre for further details.
A.17 Parts and accessories
Use only original accessories and/or spare parts. Failure to use original accessories and/or
spare parts will invalidate the original manufacturer warranty and may render the appliance
not compliant with the safety standard.
A.18 Precautions for use and maintenance
• Risks mainly of a mechanical, thermal and electrical nature exist in the appliance.
Where possible the risks have been neutralised:
– directly, by means of adequate design solutions.
– indirectly by using guards, protection and safety devices.
• During maintenance several risks remain, as these could not be eliminated, and must be
neutralised by adopting specific measures and precautions.
• Do not carry out any checking, cleaning, repair or maintenance operations on moving
parts. Workers must be informed of this prohibition by means of clearly visible signs.
• Make sure to periodically check correct operation of all the safety devices and the
insulation of electrical cables, which must be replaced if damaged.

12
In case of a significant anomaly (e.g. short circuits, wires coming out of the terminal block,
motor breakdowns, worn electrical cable sheathing, etc.) the operator for normal appliance
use must:
• immediately deactivate the appliance and disconnect all the supplies (electricity, gas,
water).
Before carrying out any operation on the appliance, always consult the manual which gives
the correct procedures and contains important information on safety.
A.19 Appliance maintenance
• The inspection and maintenance intervals depend on the actual appliance operating
conditions and ambient conditions (presence of dust, damp, etc.), therefore precise time
intervals cannot be given. In any case, careful and periodical appliance maintenance is
advisable in order to minimise service interruptions.
• It is advisable to stipulate a preventive and scheduled maintenance contract with the
Customer Care Service.
• Put the appliance in safe conditions before starting any maintenance operation.
A.20 Appliance disposal
• Make the appliance unusable by removing the power cable and any compartment
closing devices, to prevent the possibility of someone becoming trapped inside.
B WARRANTY TERMS AND EXCLUSIONS
If the purchase of this product includes warranty coverage,
warranty is provided in line with local regulations and subject to
the product being installed and used for the purposes as
designed, and as described within the appropriate equipment
documentation.
Warranty will be applicable where the customer has used only
genuine spare parts and has performed maintenance in
accordance with Electrolux Professional user and mainte-
nance documentation made available in paper or electronic
format.
Electrolux Professional strongly recommends using Electrolux
Professional approved cleaning, rinse and descaling agents to
obtain optimal results and maintain product efficiency over
time.
The Electrolux Professional warranty does not cover:
• service trips cost to deliver and pick up the product;
• installation;
• training on how to use/operate;
• replacement (and/or supply) of wear and tear parts unless
resulting from defects in materials or workmanship reported
within one (1) week from the failure;
• correction of external wiring;
• correction of unauthorized repairs as well as any damages,
failures and inefficiencies caused by and/or resulting from;
– insufficient and/or abnormal capacity of the electrical
systems (current/voltage/frequency, including spikes and/or
outages);
– inadequate or interrupted water supply, steam, air, gas
(including impurities and/or other that does not comply with
the technical requirements for each appliance);
– plumbing parts, components or consumable cleaning
products that are not approved by the manufacturer;
– customer’s negligence, misuse, abuse and/or non-com-
pliance with the use and care instructions detailed within the
appropriate equipment documentation;
– improper or poor: installation, repair, maintenance
(including tampering, modifications and repairs carried out
by third parties not authorized) and modification of safety
systems;
– Use of non-original components (e. g.: consumables,
wear and tear, or spare parts);
– environment conditions provoking thermal (e. g. over-
heating/freezing) or chemical (e. g. corrosion/oxidation)
stress;
– foreign objects placed in- or connected to- the product;
– accidents or force majeure;
– transportation and handling, including scratches, dents,
chips, and/or other damage to the finish of the product,
unless such damage results from defects in materials or
workmanship and is reported within one (1) week of delivery
unless otherwise agreed;
• product with original serial numbers that have been
removed, altered or cannot be readily determined;
• replacement of light bulbs, filters or any consumable parts;
• any accessories and software not approved or specified by
Electrolux Professional.
Warranty does not include scheduled maintenance activities
(including the parts required for it) or the supply of cleaning
agents unless specifically covered within any local agreement,
subject to local terms and conditions.
Check on Electrolux Professional website the list of authorized
customer care.
C TECHNICAL DATA
C.1 Data plate position
The data plate is located in the lower right corner (see fig.
below).

13
C.2 Appliance and manufacturer's
identification data
The data plate gives the product identification and technical
data.
An example of the marking or data plate on the appliance is
given below:
The meaning of the various information given on it is listed
below:
PNC production number code
Serial number serial number
Type factory model
Construction type of appliance
Voltage power supply voltage
El. Power max. power input
Current current rating
C.3 How to interpret the factory description
The factory description on the data plate has the following
meaning:
1 - Product line
M Modular
2 - Family (depth)
A 800 mm / 31,50″
B 850 mm / 33,46″
C 900 mm / 35,43″
3 - Machine type
B Multi-function cooker
4 - Size / Zones / Details
D Multi-function cooker, 1/1 GN
5 - Module type (height)
E 700 mm / 27,56″, glass front panel
F 800 mm / 31,50″, glass front panel
G 700 mm / 27,56″, steel front panel
6 - User operating
A one side
B one side with splashback
7 - Width
D 400 mm / 15,75″
8 - Base combination
D drain with door compartment
9 - Power supply
A 400 V / 3N ~ 50-60 Hz (standard)
F 208 V / 2 ~ 50-60 Hz (USA)
10 - Option
O No options
C.4 Technical data
M * B D * * D D * O
Electrical power kW 7,5
Voltage / Phases V / Nr 208 V / 2
Frequency Hz 50 - 60
Power supply cable
section AWG 10
Amperage A 20.8
Water protection class: IPX5.
D GENERAL INFORMATION
D.1 Introduction
This manual contains information relevant to various applian-
ces. The product images in this guide are only an example.
The drawings and diagrams given in the manual are not in
scale. They supplement the written information with an outline,
but are not intended to be a detailed representation of the
appliance supplied.
The numerical values given on the appliance installation
diagrams refer to measurements in millimeters and/or inches.
D.2 Intended use and restrictions
This appliance is designed for cooking food. It is intended for
collective use.
Any other use is deemed improper.
NOTE!
The manufacturer declines any liability for
improper use of the product.
Hs
ABCDEFGHIJ

14
D.3 Testing and inspection
Our appliances have been designed and optimized, with
laboratory testing, in order to obtain high performance and
efficiency.
The appliance is shipped ready for use.
Passing of the tests (visual inspection - gas/electrical test -
functional test) is guaranteed and certified by the specific
enclosures.
To ensure protection class compliance, all seals must remain
in perfect condition and all components must be properly
assembled after installation, repairs and maintenance work.
D.4 Copyright
This manual is intended solely for consultation by the operator
and can only be given to third parties with the permission of
Electrolux Professional company.
D.5 Keeping the manual
The manual must be carefully kept for the entire life of the
appliance, until scrapping. The manual must stay with the
appliance in case of transfer, sale, hire, granting of use or
leasing.
D.6 Recipients of the manual
This manual is intended for:
• the carrier and handling personnel;
• installation and commissioning personnel;
• the employer of appliance users and the workplace
manager;
• operators for normal appliance use;
• specialised personnel - Customer Care service (see service
manual).
D.7 Definitions
Listed below are the definitions of the main terms used in the
manual. It is advisable to read them carefully before use.
Operator appliance installation, adjustment, use,
maintenance, cleaning, repair and trans-
port personnel.
Manufacturer Electrolux Professional SpA or any other
service centre authorised by Electrolux
Professional SpA.
Operator for
normal appli-
ance use
an operator who has been informed and
trained regarding the tasks and hazards
involved in normal appliance use.
Customer
Care service
or specialised
personnel
an operator instructed/trained by the
Manufacturer and who, based on his
professional and specific training, experi-
ence and knowledge of the accident-
prevention regulations, is able to appraise
the operations to be carried out on the
appliance and recognise and prevent any
risks. His professionalism covers the
mechanical, electrotechnical and elec-
tronics fields etc.
Danger source of possible injury or harm to health.
Hazardous
situation
any situation where an operator is
exposed to one or more hazards.
Risk a combination of probabilities and risks of
injury or harm to health in a hazardous
situation.
Protection
devices
safety measures consisting of the use of
specific technical means (guards and
safety devices) for protecting operators
against risks.
Guard an element of a appliance used in a
specific way to provide protection by
means of a physical barrier.
Safety device a device (other than a guard) that elimi-
nates or reduces the risk; it can be used
alone or in combination with a guard.
Customer the person who purchased the appliance
and/or who manages and uses it (e. g.
company, entrepreneur, firm).
Electrocution an accidental discharge of electric current
on a human body.
D.8 Responsibility
The Manufacturer declines any liability for damage and
malfunctioning caused by:
• non-compliance with the instructions contained in this
manual;
• repairs not carried out in a workmanlike fashion, and
replacements with parts different from those specified in
the spare parts catalogue (the fitting and use of non-original
spare parts and accessories can negatively affect appliance
operation and invalidates the original manufacturer
warranty);
• operations carried out by non-specialised personnel;
• unauthorized modifications or operations;
• missing, lack or inadequate maintenance;
• improper appliance use;
• unforeseeable extraordinary events;
• use of the appliance by uninformed and / or untrained
personnel;
• non-application of the current provisions in the country of
use, concerning safety, hygiene and health in the workplace.
The Manufacturer declines any liability for damage caused by
arbitrary modifications and conversions carried out by the user
or the Customer.
The employer, workplace manager or service technician are
responsible for identifying and choosing adequate and suitable
personal protection equipment to be worn by operators, in
compliance with regulations in force in the country of use.
The Manufacturer declines any liability for inaccuracies con-
tained in the manual, if due to printing or translation errors.
Any supplements to the installation, use and maintenance
manual the Customer receives from the Manufacturer will form
an integral part of the manual and therefore must be kept
together with it.
D.9 Customer packaging checks
• The forwarder is responsible for the goods during transport
and delivery.
• Make a complaint to the forwarder in case of visible or
hidden damage.
• Specify any damage or shortages on the dispatch note.
• The driver must sign the dispatch note: the forwarder can
reject the claim if the dispatch note is not signed (the
forwarder can provide the necessary form).
• For hidden damage or shortages becoming apparent only
after unpacking, request the forwarder for inspection of the
goods within and no later than 15 days after delivery.
After packaging checks
1. Remove the packaging.
Take care when unpacking and handling of the appliance
to not cause any shocks on itself.
2. Keep all the documentation contained in the packaging.
D.10 Storage
The appliance and/or its parts must be stored and protected
from damp, in a non-aggressive place, free of vibrations and
with room temperatures between 5℃/ 41℉and 50℃/ 122℉.
The place where the appliance is stored must:
• can take the appliance load,
• have a flat support surface to avoid deforming the appliance
or damage to the support feet.
15
E INSTALLATION DIAGRAMS
E.1 Appliance type
When describing our appliances, we distinguish between top
modules A, base modules Band factory-assembled units C.
Top and base modules can be set up together or as individual
units.
The appliance must always be installed in its intended location
according to the relevant installation and connection diagrams
(E Installation DIAGRAMS). The appliance should be con-
nected to fixed cables.
Installation options:
1. Wall mounted (not available for all appliances)
2. Standing against the wall
• on adjustable feet
• on steel plinth
• on concrete plinth
3. Free standing
• on adjustable feet
• on steel plinth
• on concrete plinth
The appliances are suitable for setting up as single appliances
or as a group of appliances.
They can be positioned freely in the space provided, side by
side, against a wall or back-to-back. When installing side by
side, appliances are connected to a rail.
Different wall frames are used when setting up against a wall.
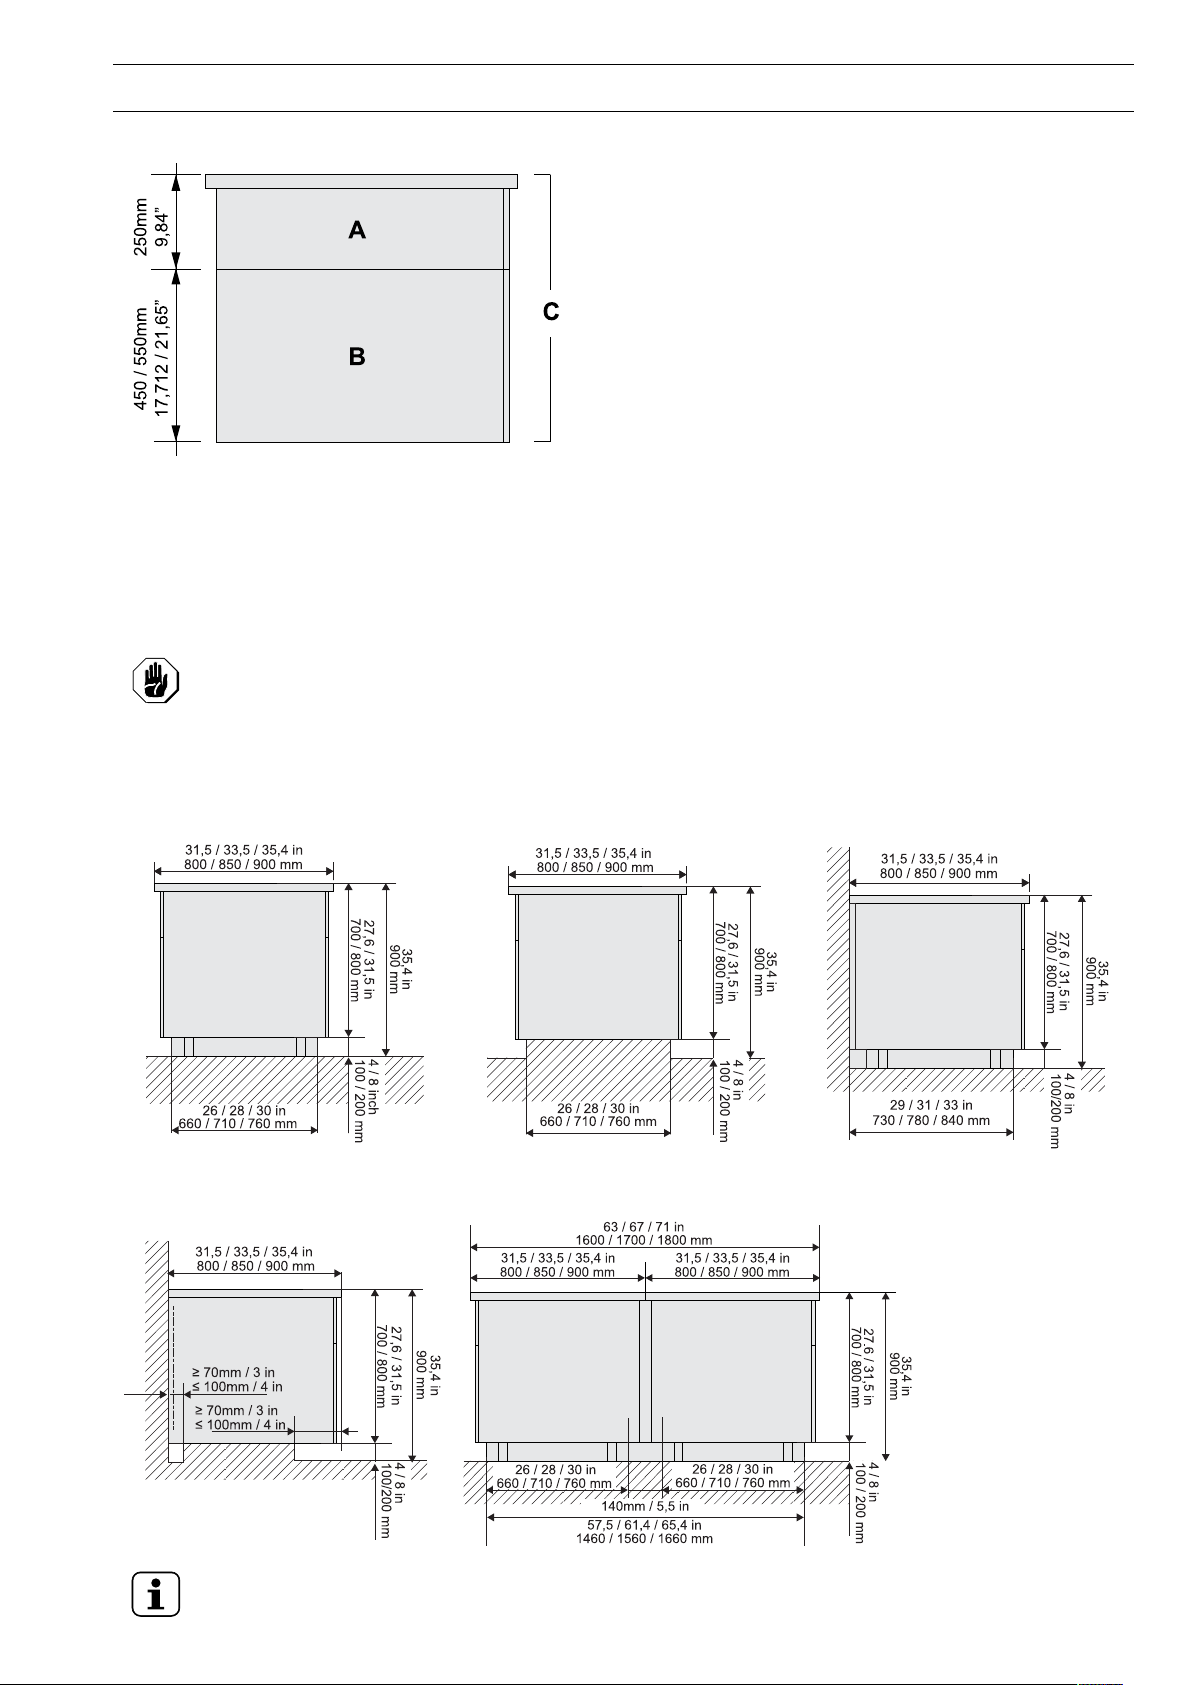
E.2 Dimension drawings for floor installations
CAUTION
When installing with concrete plinth, the wall niche must be at least 70 mm [2,76″] deep but must
not exceed 100 mm [3,94″] to ensure the appliance has a solid base and sufficient ventilation
inside it.
Floor installation options:
1. On steel plinth or adjustable feet 2. On concrete plinth 3. Against the wall on steel plinth or
adjustable feet
4. Against the wall on concrete plinth 5. Back to back
NOTE!
Please note that not all models are available in the depths shown on the diagram.
250mm
9,84”450 / 550mm
17,712 / 21,65”
A
B
C
800 / 850 / 900 mm
31,5 / 33,5 / 35,4 in
700 / 800 mm
27,6 / 31,5 in
900 mm
35,4 in
100 / 200 mm
4 / 8 inch
660 / 710 / 760 mm
26 / 28 / 30 in
31,5 / 33,5 / 35,4 in
800 / 850 / 900 mm
700 / 800 mm
27,6 / 31,5 in
900 mm
35,4 in
100 / 200 mm
4 / 8 in
660 / 710 / 760 mm
26 / 28 / 30 in
800 / 850 / 900 mm
730 / 780 / 840 mm
31,5 / 33,5 / 35,4 in
29 / 31 / 33 in
700 / 800 mm
27,6 / 31,5 in
900 mm
35,4 in
100/200 mm
4 / 8 in
≥ 70mm / 3 in
≤ 100mm / 4 in
31,5 / 33,5 / 35,4 in
800 / 850 / 900 mm
700 / 800 mm
27,6 / 31,5 in
900 mm
35,4 in
100/200 mm
4 / 8 in
≥ 70mm / 3 in
≤ 100mm / 4 in
1460 / 1560 / 1660 mm
700 / 800 mm
27.6 / 31,5 in
900 mm
35,4 in
100 / 200 mm
4 / 8 in
800 / 850 / 900 mm
31,5 / 33,5 / 35,4 in
800 / 850 / 900 mm
31,5 / 33,5 / 35,4 in
1600 / 1700 / 1800 mm
63 / 67 / 71 in
660 / 710 / 760 mm
26 / 28 / 30 in
660 / 710 / 760 mm
26 / 28 / 30 in
140mm / 5,5 in
57,5 / 61,4 / 65,4 in
16
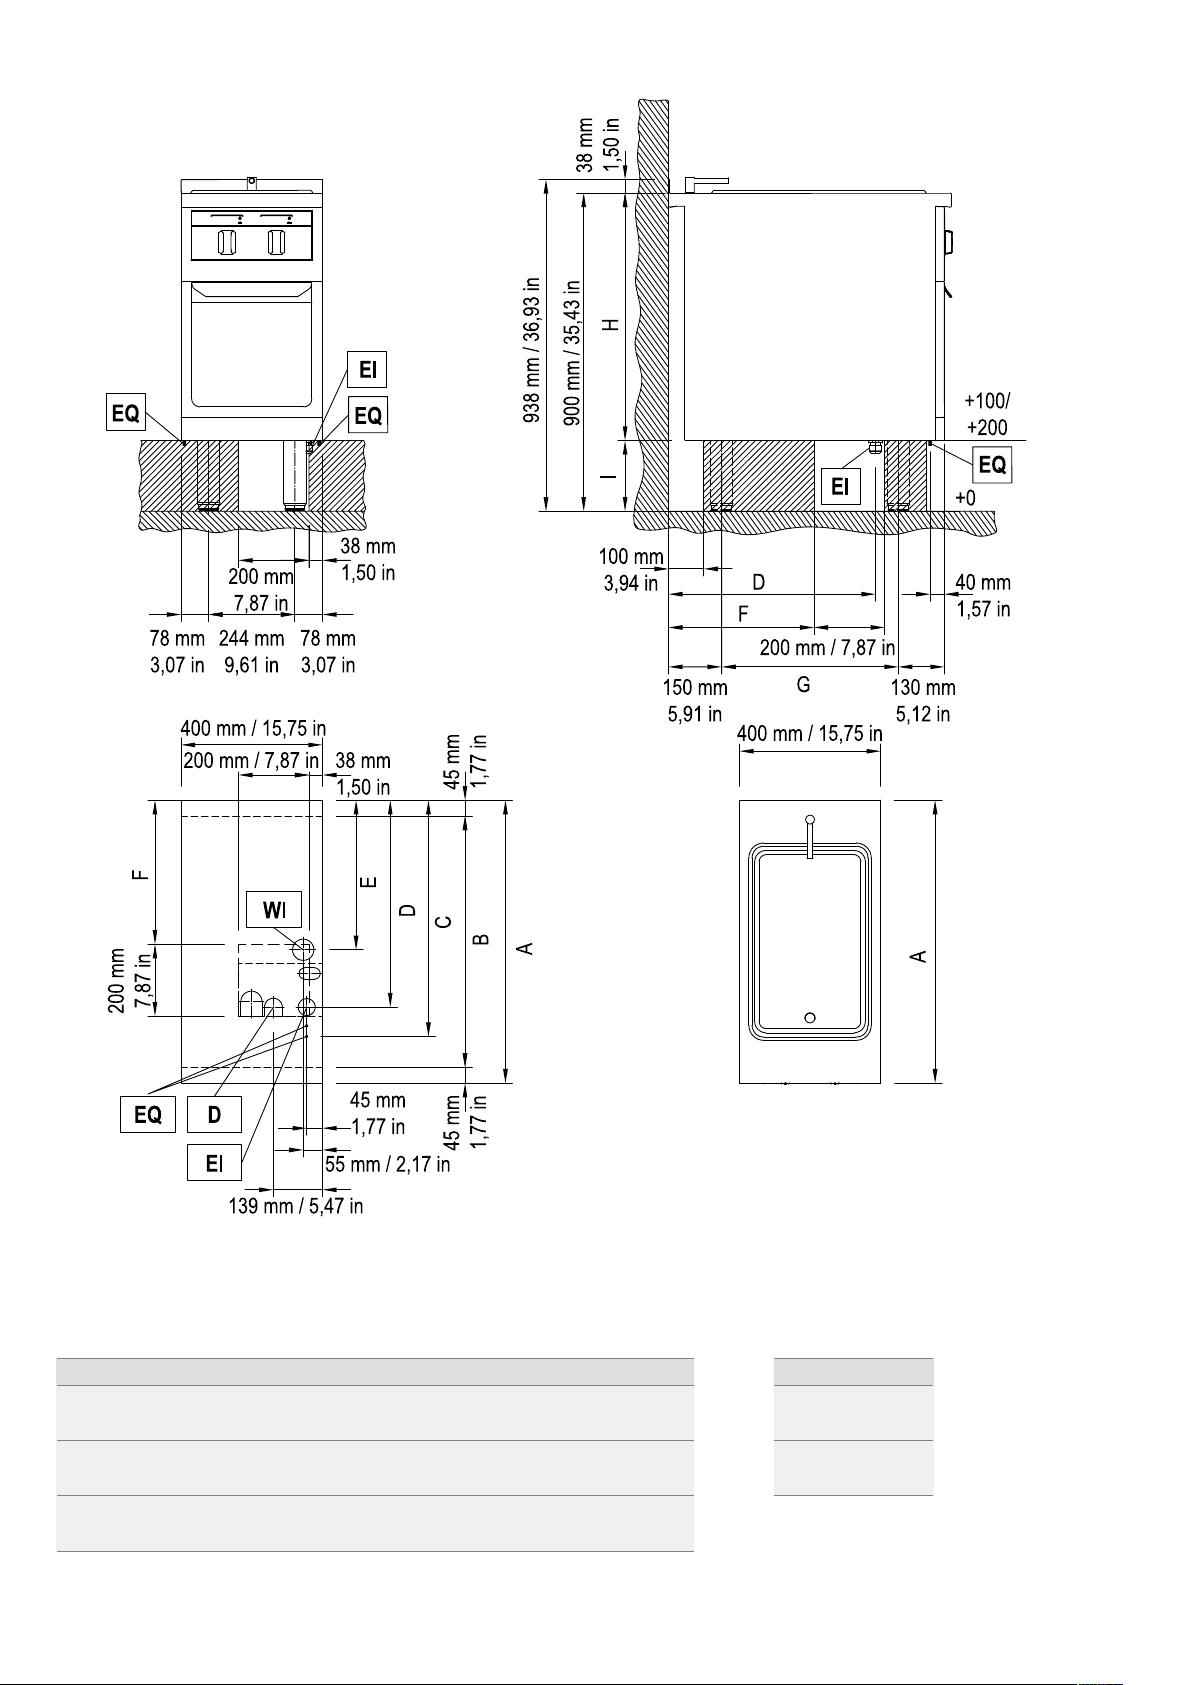
E.3 Installation and connection diagram
EI = Electrical connection
EQ = Potential equalisation
(x)* = Protective panel
WI = Water inlet
D = Drain
A B C D E F G I J
mm 800 710 668 585 423 411 500 700 200
in 31,50 27,95 26,30 23,03 16,65 16,18 19,69 27,56 7,87
mm 850 760 718 635 473 461 550 800 100
in 33,46 29,92 28,27 25,00 18,62 18,15 21,65 31,50 3,94
mm 900 810 768 685 526 511 600
in 35,43 31,89 30,24 26,97 20,71 20,12 23,62
A
A
45 mm
1,77 in45 mm
1,77 in
45 mm
1,77 in
H
900 mm / 35,43 in
38 mm
1,50 in
38 mm
1,50 in
938 mm / 36,93 in
I
B
C
D
E
F200 mm
7,87 in
200 mm / 7,87 in
D
F
G
130 mm
5,12 in
40 mm
1,57 in
+100/
+200
+0
100 mm
3,94 in
EQ
EQ
EQ
EI
EQ
EI
D
WI
EI
78 mm
3,07 in78 mm
3,07 in
244 mm
9,61 in
400 mm / 15,75 in
400 mm / 15,75 in200 mm / 7,87 in
38 mm
1,50 in
55 mm / 2,17 in
139 mm / 5,47 in
200 mm
7,87 in
150 mm
5,91 in

17
EI = Electrical connection
EQ = Potential equalisation
(x)* = Protective panel
WI = Water inlet
D = Drain
ABCD
mm 850 635 473 140
in 33,46 25,00 18,62 5,51
mm 900 685 523 150
in 35,43 26,97 20,59 5,91
400 mm / 15,75 in
55 mm / 2,17 in
139 mm / 5,47 in
200 mm / 7,87 in
400 mm / 15,75 in
50 mm
1,97 in300 mm
11,81 in
106 mm
4,17 in106 mm
4,17 in
50 mm
1,97 in
200 mm / 7,87 in
695 mm / 27,36 in
695 mm / 27,36 in
900 mm / 35,43 in
700 mm / 27,56 in
250 mm / 9,84 in
170 mm / 6,69 in
580 mm / 22,83 in
38 mm
1,50 in
50mm/1,97in
B
A
CD
D
EQ
WI
EQ
EI
A

18
E.4 Accessing the appliance’s internal
components
F INSTALLATION AND ASSEMBLY
F.1 Introduction
WARNING
Refer to “WARNING and Safety
Information“.
To ensure correct operation of the appliance and maintain safe
conditions during use, carefully follow the instructions given in
this chapter.
Check and, if necessary, level the appliance after positioning.
Incorrect levelling can cause appliance malfunctioning.
F.2 Customer's responsibilities
The tasks and works required of the Customer are:
• check the floor planarity on which the appliance is placed;
• arrange an earthed power socket of suitable capacity for the
input specified on the data plate;
• prearrange a high-sensitivity manual-reset magneto-ther-
mal circuit-breaker;
• prearrange a device lockable in the open position for the
connection to the power supply.
• Do not install the unit in environments where temperatures
may fall below 0℃[32℉] or rise above 40℃[104℉].
NOTE!
For information regarding the electrical connection,
refer to “A.11 Electrical connection“.
F.3 Before installation
Depending on your model, prepare the following before the
appliance is installed and positioned correctly:
• Fastening elements, i.e. drill holes and insert dowels. You
can find accompanying notes in the relevant sections on F.8
Wall installation.
• Prepare water, gas and electrical connections and install a
shut-off valve, if necessary.
F.4 Installing on concrete plinth
Packaging should only be removed immediately before the
unit is installed.
Keep the unit on the transport pallet until it is at its final location.
1. Transport the appliance on its transport pallet directly in
front of the point of installation.
2. Remove the pre-cut plate at the bottom of the appliance.
(for access, see E Installation DIAGRAMS).
1
1
2
2
4
3
2
34
4
44
6
5
5
1
1
1

19
3. Lift the unit on one side so that all installation connections
are inside the appliance.
4. Carefully lower the appliance and then move it into the
correct position. Finally, remove the transport palette.
5. Remove the outer protective film and the edge covers,
taking care not to scratch the surface of the appliance.
Very slowly pull off the protective film on the stainless steel
surfaces, without ripping, to prevent any adhesive residue.
Remove any adhesive residue with a non-corrosive
solvent. Then rinse and dry the spot thoroughly.
F.5 Installing on steel plinth or adjustable
feet
NOTE!
If installing on a steel plinth or adjustable feet,
always make sure these are attached to the
appliance beforehand. There are no tools for
taking the unit down from the transport pallet and
putting it in place; all you need is manpower, with
two to four men required depending on the size of
the unit.
1. Transport the appliance on its transport pallet directly in
front of the point of installation.
The installation connections that are sticking out of the
floor should be as close as possible to the side of the
transport pallet.
2. Remove the pre-cut plate at the bottom of the appliance.
(for access, see E Installation DIAGRAMS).
3. Shift the appliance onto the transport pallet such that all of
the installation connections lie within the appliance.
4. Tip the appliance until it is standing on the floor. Then lift at
the front and remove the transport pallet.
5. Carefully lower the appliance and then move it into the
correct position.
6. Remove the outer protective film and the edge covers,
taking care not to scratch the surface of the appliance.
Very slowly pull off the protective film on the stainless steel
surfaces, without ripping, to prevent any adhesive residue.
Remove any adhesive residue with a non-corrosive
solvent. Then rinse and dry the spot thoroughly.
F.6 Disposal of packing
The packing must be disposed of in compliance with the
current regulations in the country where the appliance is used.
All the packing materials are environmentally friendly.
They can be safely kept, recycled, or burned in an appropriate
waste incineration plant. Recyclable plastic parts are marked
as follows:
Polyethylene
• Outer wrapping
• Instructions bag
Polypropylene
• Straps
• Top packaging panels
Polystyrene foam
• Corner protectors
The parts in wood and cardboard can be disposed of,
respecting the current regulations in the country where the
appliance is used.
F.7 Securing or adjusting to the floor
(optional)
If you need to secure it to the floor, the appliance comes with
compatible adjustable feet.
We recommend you adjust the feet so you end up with a
working height of 900 mm / 35,43″. Level the unit with a spirit
level.
A. Attaching the unit with screws
The feet have metal plates which may be secured to the
floor using screws .
B. Attaching the unit by welding
The metal plate underneath the feet must be welded to the
floor with a continuous weld around the outer edge.
100 - 200 mm
3,94 - 7,87“
1

20
F.8 Wall installation
F.8.1 Preparing the brackets
Before you start, prepare the mounting holes in the wall
according to the specifications in the mounting diagram.
1. Use the supplied wall anchors 1with the threaded rods 2.
The holes must have a diameter of 18 mm [0,71″] and a
minimum depth of 145 mm [5,71″].
2. Clean the hole after drilling.
3. Mount the supporting profile 3with the nuts 4and the
spring washers 5.
4. Adjust the supporting profile 3in height and alignment
using a spirit level.
F.8.2 Positioning
We recommend using a lifting truck with a stable shelf to take
the unit down from the transport pallet and position it into place.
Lifting the unit onto the hand truck has to be done by hand, with
two or more men required depending on the unit size.
1. Transport the appliance on its transport pallet directly in
front of the point of installation.
Bring the lifting cart as close as possible to the appliance.
2. Carefully lift the unit on shelf Aof the truck.
3. Remove the transport pallet.
4. Carry the appliance on the lifting cart to the prepared
position on the wall and lift it to the correct height.
5. Remove the outer protective film and the edge covers,
taking care not to scratch the surface of the appliance.
Very slowly pull off the protective film on the stainless steel
surfaces, without ripping, to prevent any adhesive residue.
Remove any adhesive residue with a non-corrosive
solvent.
Then rinse and dry the spot thoroughly.
F.8.3 Securing and set up
Lift the unit on the prepared support profile and level it using a
spirit level. Check the height in relation to other devices.
Use the adjusting screws 6to adjust the device vertically.
Finally, tighten wall anchor nuts 4to a torque of 80 Nm.
F.9 Fastening multiple appliances together
1. Remove lower panel Aby undoing the screws.
100 - 200 mm
3,94 - 7,87“
2
145
1
2
3
4
5
A
A
A
4
6
A
A
This manual suits for next models
7
Table of contents
Other Electrolux Professional Cooker manuals


Popular Cooker manuals by other brands

Esse
Esse WN operating instructions

DALKYO
DALKYO MB-42 instruction manual

Bertazzoni
Bertazzoni MT Installation, maintenance and use instructions

Falcon
Falcon Professional+ FX 90 Induction G5 User's guide & installation instructions

Gorenje
Gorenje E617E17WKA Detailed instructions

Fisher & Paykel
Fisher & Paykel OR90SCG2 user guide

Parkinson Cowan
Parkinson Cowan SG 553 Operating and installation instructions

Pelgrim
Pelgrim NF970RVS manual

Koncar
Koncar SE 5040/BH0 Operating and installation instructions

Caso
Caso Master P3 Original operating manual

BorMann
BorMann HOME BLG4400 owner's manual

Parmco
Parmco VH-1-6S-4E Installation and operating instructions


