Electrorad HPH01-05E User manual

1"
Panel convector heater
Always read this instruction manual before installing or using your
appliance and keep them safe for future reference
Model# HPH01-05E/10E/15E/20E

2"
SAFETY ADVICE
READ THIS NOTICE CAREFULLY BEFORE
OPERATING THE APPLIANCE.
! This appliance can be used by children aged from 8
years with parental supervision only.
! CAUTION — Some parts of this product can become
very hot and cause burns. Particular attention has to
be given where children and vulnerable people are
present.
! Make sure that the voltage indicated on the nameplate
of the appliance corresponds to that of your electrical
installation. If this is not the case, contact your installer
and do not connect.
! Regularly check the condition of the power cable. Do
not use if the power cord, plug or appliance is damaged.
! The device should not be placed underneath a power
outlet.
! The power cable should never be in contact with hot
parts of the device.
! CAUTION: To prevent overheating, do not cover the
heater.
! Keep a minimum distance of one meter from flammable
objects such as curtains, textile ...
! Do not clean the unit with abrasive chemicals.
! Do not place sharp metal objects or your fingers into the
unit to prevent damage and reduce the risk of electric
shock.
! Do not use accessories other than those supplied or

3"
recommended by the manufacturer. This can be
dangerous and may damage the heater.
! Never repair the unit yourself. Otherwise you will lose
the benefit of the guarantee. Like any electrical
appliance, it must be repaired by a qualified person. If
the power cable is damaged, it must be replaced by the
manufacturer, the service agent or similarly qualified
person in order to avoid danger.
! A repair involving the opening of the radiator can be
made by the manufacturer.
! Do not use this heater with a programmer, timer,
separate remote-control system or any other device that
switches the heater on automatically, since a fire risk
exist if the heater is covered or positioned incorrectly.
! Disconnect from mains when not in use or cleaning. The
timer will need re-setting.
! It is not recommended to use an extension cord.
! The heater is hot when in use. To avoid burns, do not let
bare skin touch the hot surface.
! Do not immerse cord, plug or any part of the appliance
in water or any other liquid.
! Do not use the heater in dusty environments or where
flammable vapours are present (e.g. in a workshop or
garage).
! Do not place the heater on or near any other source of
heat.
! Do not use this heater in the immediate surroundings of
a bath, a shower or a swimming pool.
! Do not let the mains lead hang over the edge of the
table or work surface or touch hot surfaces.
4"
! Do not use outdoors.
! Do not use the appliance for other than its intended use.
This appliance is intended for household use only.
! Do not misuse the cord or pull the cable to disconnect it
from the outlet. Instead, grasp the plug and pull it to
disconnect.
! Do not insert or allow foreign objects to enter the
ventilation or exhaust openings as this may cause an
electric shock , fire or damage to the appliance.
! When the heater is turned on for the first time, it may
release a slight, harmless odor. This odor is a normal
occurrence caused by the initial heating of the internal
heating elements and should not occur again.
! In order to avoid any accident, please turn off the unit
when people leave.
! Please do not use the product when there are no people
to take care of children, animals or disabled people.
! Do not handle the power cord and plug by wet hands.
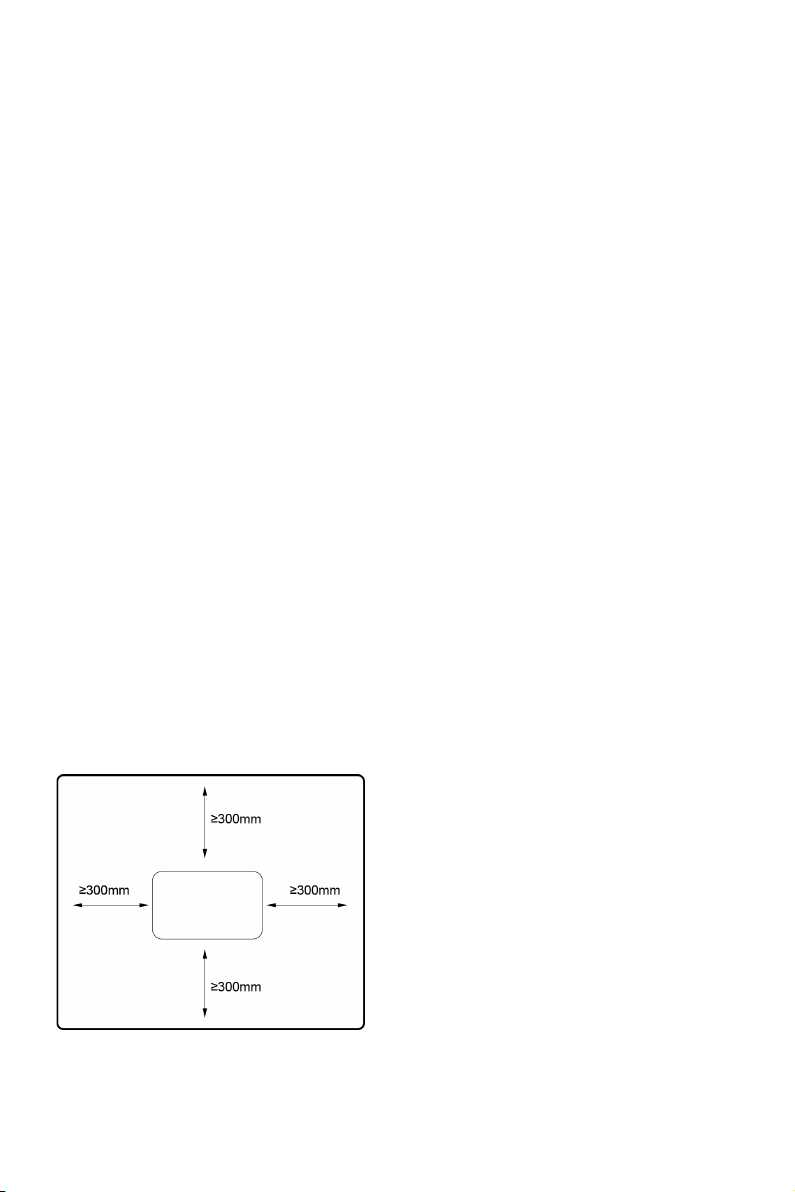
INSTALLATION
Make sure that the distance from walls and objects is
respected.

5"
A. Put the brackets on the wall as a guide (please make
sure the holes at parallel level) use a pen to mark the
hole position
B. Drill holes on the wall with ɸ 8mm drill bit and insert
the plastic wall plug
A
B
C
D

6"
C. Fasten the brackets on the wall with the screws,
making sure the brackets are in the correct direction
D. Gently insert the heater body to the bottom of the
brackets first and then push the heater body on to the
top of the brackets
Warning: Be sure to keep the distance between the
heater and floor, wall and so on at least 30cm.
Warning! When drilling holes, always check to ensure
there is no wiring, pipework, etc. in the area to be
drilled.
Warning: Before plugging in the unit make sure the
radiator is properly attached to the wall. Otherwise
problems can occur.
HOW TO USE:
Control panel
① Standby: on/off
② Heating condition
③ Open window function
④ Comfort mode
⑤ ECO mode
⑥ Timer
Standby
Mode selection
Open window
function
Increase function
Decrease function
Timer

7"
- Plug the appliance in to AC 220-240V 50-60Hz socket, you will hear a
beep sound. The blue indicator light will come on.
- Press to turn the heater on, which is in state of factory default when
used for the first time.
Factory default:
Heating mode: comfort mode
Target temperature setting: 22 ºC
Date: 1(Monday); Time: 00:00 (Off)
Window open function: Off
Timer: Off
(If the default settings are different, it will simply be because
the unit has been quality tested after production).
- To stop the heater working, press to turn off the heater,
- Unplug the product when it’s not in use for long periods of time.
Clock and day of week setting:
- Press down 3 secs to enter clock and day of week setting
- The screen displays “d”, press and to choose day from 1-7.
1
Monday
4
Thursday
7
Sunday
2
Tuesday
5
Friday
3
Wednesday
6
Saturday
- Press to confirm day setting and enter the clock hour setting, with
the screen display: .
- Press and to set the current hour
- Press to confirm hour setting and enter the minute setting, with the
screen display: .
- Press and to set the current minute
- Press to confirm all settings
Note: The clock and calendar will be reset to factory default if the heater is
turned off at the mains.
8"
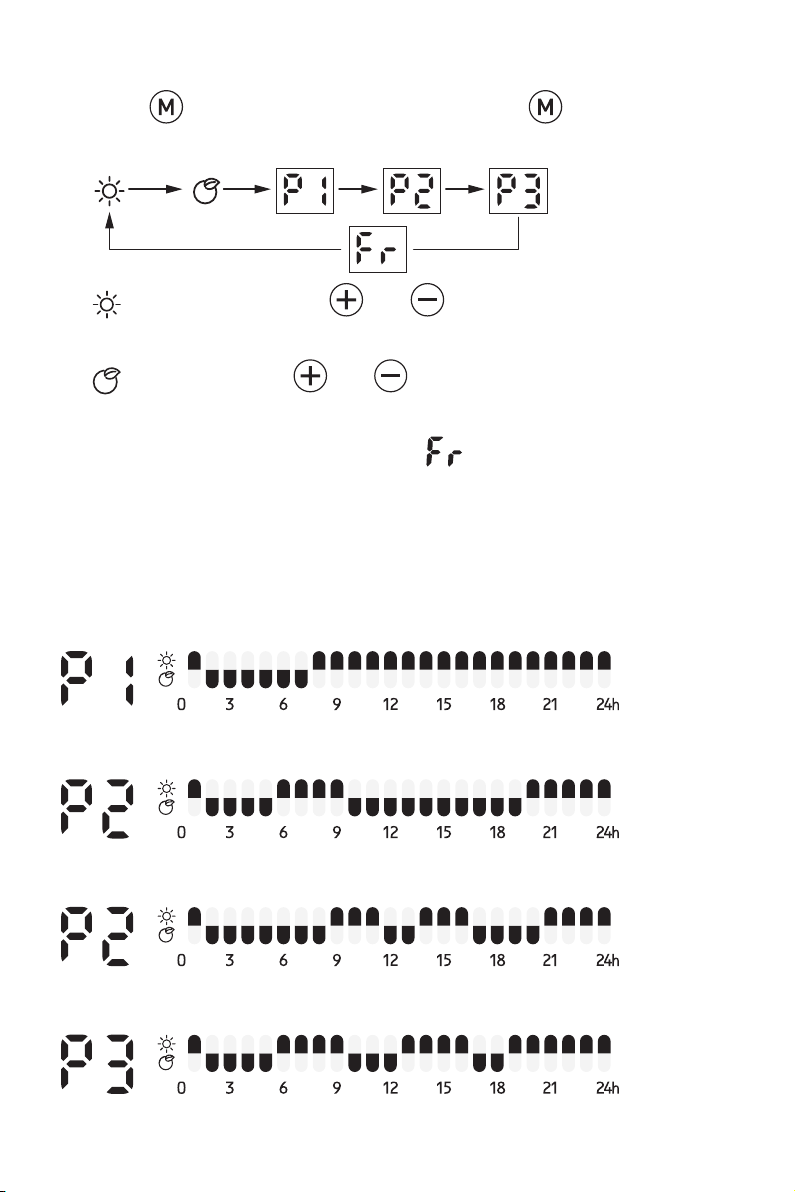
HEATING MODE:
- Press to enter mode selection. By pressing , the heating mode
runs in a continuous cycle as below:
-
- Comfort mode: Press and to set the temperature from 5-
35℃.
- ECO mode: Press and to set the temperature from 1-31ºC.
Note: ECO mode=Comfort mode - 4ºC
- Anti-frost mode: the screen displays . The set temperature is 7ºC.
The temperature can’t be adjusted.
- P1/P2/P3: Pre-set heating programs.
Note: You must make sure the time and day are set first.
P1: (Monday-Sunday) non adjustable program
P2:(Monday-Friday) non adjustable program
P2:(Saturday-Sunday) non adjustable program
P3:(Monday-Friday) Adjustable program

9"
P3:(Saturday-Sunday) Adjustable program
- P3 adjustable program setting
1. When under P3 mode, press over 3 secs to enter day setting.
2. The screen displays , press and to set from
(Monday-Sunday). Press to confirm and enter hour setting
3. The screen displays , press and to set from 00-24).
Press to choose heating mode for every hour (Comfort mode or
ECO mode )
4. Repeat the operation until you have completed the schedule of every
hour and every day.
Note: After setting heating mode for hour 23, press to come back to
day setting.
Note: when screen displays , press finish all setting with display
of .
TIMER OFF FUNCTION
- Press once, the indicator light is on. And the screen display
“OH” and keeps flashing. press and to set timer from 0-24
hours. Press again to confirm setting. The heater will then turn off
after the set amount of time has passed.
-
OPEN WINDOW FUNCTION
- Press once and the indicator light will come on. If the radiator
detects a window is open, the open window function is activated and the
indicator light keeps flashing, the radiator will stop heating.
10"
- Press again to deactivate the open window function.
Model
HPH01-05E
HPH01-10E
HPH01-15E
HPH01-20E
Power
500W
1000W
1500W
2000W
CLEANING & MAINTENANCE
- Switch off and unplug from the power supply before cleaning.
- Using a soft, moist cloth, with or without a mild soap solution,
carefully clean the exterior surface of the product.
- CAUTION: Allow the product to completely cool before
handling or cleaning it.
- Do not allow water or other liquids to run into the interior of the
product, as this could create a fire and/or electrical hazard.
- We also recommend the periodic cleaning of this appliance by
lightly running a vacuum cleaner nozzle over the guards to
remove any dust or dirt that may have accumulated inside or on
the unit.
- CAUTION: Do not use harsh detergents, chemical cleaners or
solvents as they may damage the surface finish of the plastic
components.
Waste electrical products should not be disposed
of with household waste.
Please recycle where facilities exist. Check with
your local authority or retailer for recycling advice.
11"
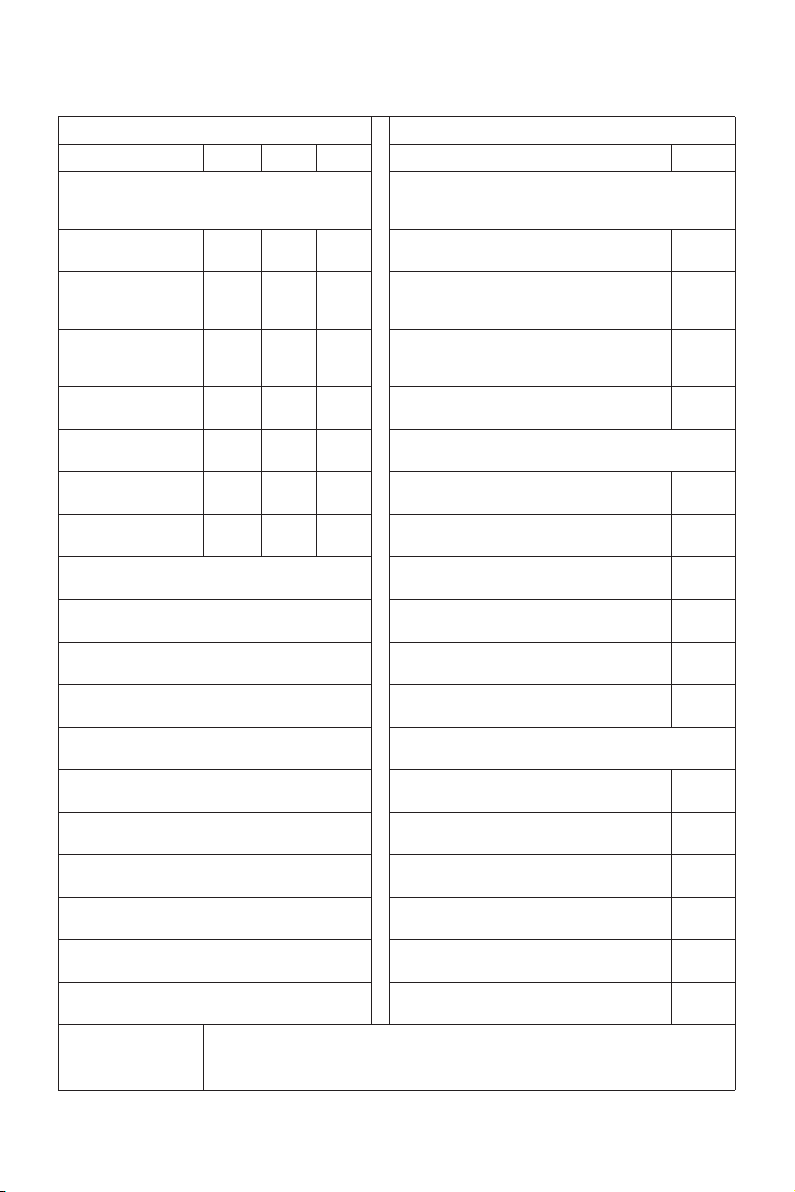
Model identifier(s): HPH01-05E
PManual heat charge control, with integrated
thermostat
Manual heat charge control with room
and/or outdoor temperature feedback
Electronic heat charge control with room
and/or outdoor temperature feedback
Fan assisted heat output
Two or more manual stages, no room
temperature control
With mechanic thermostat room temperature
control
With electronic room temperature control
Electronic room temperature control plus
day timer
Electronic room temperature control plus
week timer
Room temperature control, with presence
detection
Room temperature control, with open
window detection
With distance control option
Minimum heat output
(indicative)
Maximum continuous
heat output
At nominal heat
output
At minimum heat
output
In standby mode
Item Item UnitSymbol Value
Heat output Type of heat input, for electric storage local space
heaters only (select one)
Auxiliary electricity
consumption
Other control options (multiple selections
possible)
0,5
With adaptive start control
With working time limitation
Information requirements for electric local space heaters
nom kW
Pmin
Pmax,c
elmax
elmin
elsb
0,5
0,00024
[no]
[no]
0,00024
[no]
[no]
[no]
[no]
Unit
Nominal heat output
kW
kW
kW
kW
kW
With black bulb sensor
[no]
[no]
[no]
[no]
[no]
[no]
[no]
[yes]
[yes]
[no]
[no]
[no]
Contact details Electrorad U.K. Ltd
Unit 1 Clayton Park
Leeds. LS16 6RF
Type of heat output/room temperature control
(select one)
Single stage heat output and no room
temperature control

12"
Model identifier(s): HPH01-10E
PManual heat charge control, with integrated
thermostat
Manual heat charge control with room
and/or outdoor temperature feedback
Electronic heat charge control with room
and/or outdoor temperature feedback
Fan assisted heat output
Two or more manual stages, no room
temperature control
With mechanic thermostat room temperature
control
With electronic room temperature control
Electronic room temperature control plus
day timer
Electronic room temperature control plus
week timer
Room temperature control, with presence
detection
Room temperature control, with open
window detection
With distance control option
Minimum heat output
(indicative)
Maximum continuous
heat output
At nominal heat
output
At minimum heat
output
In standby mode
Item Item UnitSymbol Value
Heat output Type of heat input, for electric storage local space
heaters only (select one)
Auxiliary electricity
consumption
Other control options (multiple selections
possible)
1,0
With adaptive start control
With working time limitation
Information requirements for electric local space heaters
nom
kW
P
min
P
max,c
el
max
el
min
el
sb
1,0
0,00024
[no]
[no]
0,00024
[no]
[no]
[no]
[no]
Unit
Nominal heat output
kW
kW
kW
kW
kW
With black bulb sensor
[no]
[no]
[no]
[no]
[no]
[no]
[no]
[yes]
[yes]
[no]
[no]
[no]
Contact details Electrorad U.K. Ltd
Unit 1 Clayton Park
Leeds. LS16 6RF
Type of heat output/room temperature control
(select one)
Single stage heat output and no room
temperature control

13"
Model identifier(s): HPH01-15E
PManual heat charge control, with integrated
thermostat
Manual heat charge control with room
and/or outdoor temperature feedback
Electronic heat charge control with room
and/or outdoor temperature feedback
Fan assisted heat output
Two or more manual stages, no room
temperature control
With mechanic thermostat room temperature
control
With electronic room temperature control
Electronic room temperature control plus
day timer
Electronic room temperature control plus
week timer
Room temperature control, with presence
detection
Room temperature control, with open
window detection
With distance control option
Minimum heat output
(indicative)
Maximum continuous
heat output
At nominal heat
output
At minimum heat
output
In standby mode
Item Item UnitSymbol Value
Heat output Type of heat input, for electric storage local space
heaters only (select one)
Auxiliary electricity
consumption
Other control options (multiple selections
possible)
1,5
With adaptive start control
With working time limitation
Information requirements for electric local space heaters
nom
kW
P
min
P
max,c
el
max
el
min
el
sb
1,5
0,00024
[no]
[no]
0,00024
[no]
[no]
[no]
[no]
Unit
Nominal heat output
kW
kW
kW
kW
kW
With black bulb sensor
[no]
[no]
[no]
[no]
[no]
[no]
[no]
[yes]
[yes]
[no]
[no]
[no]
Contact details Electrorad U.K. Ltd
Unit 1 Clayton Park
Leeds. LS16 6RF
Type of heat output/room temperature control
(select one)
Single stage heat output and no room
temperature control

14"
Model identifier(s): HPH01-20E
PManual heat charge control, with integrated
thermostat
Manual heat charge control with room
and/or outdoor temperature feedback
Electronic heat charge control with room
and/or outdoor temperature feedback
Fan assisted heat output
Two or more manual stages, no room
temperature control
With mechanic thermostat room temperature
control
With electronic room temperature control
Electronic room temperature control plus
day timer
Electronic room temperature control plus
week timer
Room temperature control, with presence
detection
Room temperature control, with open
window detection
With distance control option
Minimum heat output
(indicative)
Maximum continuous
heat output
At nominal heat
output
At minimum heat
output
In standby mode
Item Item UnitSymbol Value
Heat output Type of heat input, for electric storage local space
heaters only (select one)
Auxiliary electricity
consumption
Other control options (multiple selections
possible)
2,0
With adaptive start control
With working time limitation
Information requirements for electric local space heaters
nom
kW
P
min
P
max,c
el
max
el
min
el
sb
2,0
0,00024
[no]
[no]
0,00024
[no]
[no]
[no]
[no]
Unit
Nominal heat output
kW
kW
kW
kW
kW
With black bulb sensor
[no]
[no]
[no]
[no]
[no]
[no]
[no]
[yes]
[yes]
[no]
[no]
[no]
Contact details Electrorad U.K. Ltd
Unit 1 Clayton Park
Leeds. LS16 6RF
Type of heat output/room temperature control
(select one)
Single stage heat output and no room
temperature control

15"

16"
Electrorad U.K. Ltd
Unit 1 Clayton Park
Leeds. LS16 6RF
www.electrorad.co.uk T: 0113 2746799 E: sales@electrorad.co.uk
This manual suits for next models
3
Table of contents
Other Electrorad Heater manuals


