Electrorad Vanguard User manual


Vanguard by Electrorad
•Vanguard Aluminium energy efficient electric radiators are constructed in
aluminium for lightness and rapid heat up times. Vanguard radiators are
finished with powder coating.
•The aluminium bodies have been manufactured with the convection air
vents at the top to increase the looks and desirability of this product. The
digital controls are also at the top to not affect the aesthetic appeal and to
make for easier use. Each Vanguard electric radiator has a built in digital
thermostat and weekly programming control.
•Energy saving features include open window sensing, adaptive start
learning function, surface temperature control and energy use monitor.
European legislation Lot 20 compliant. Wall brackets are provided.
Vanguard radiators can be plugged in or connected to a fused spur.
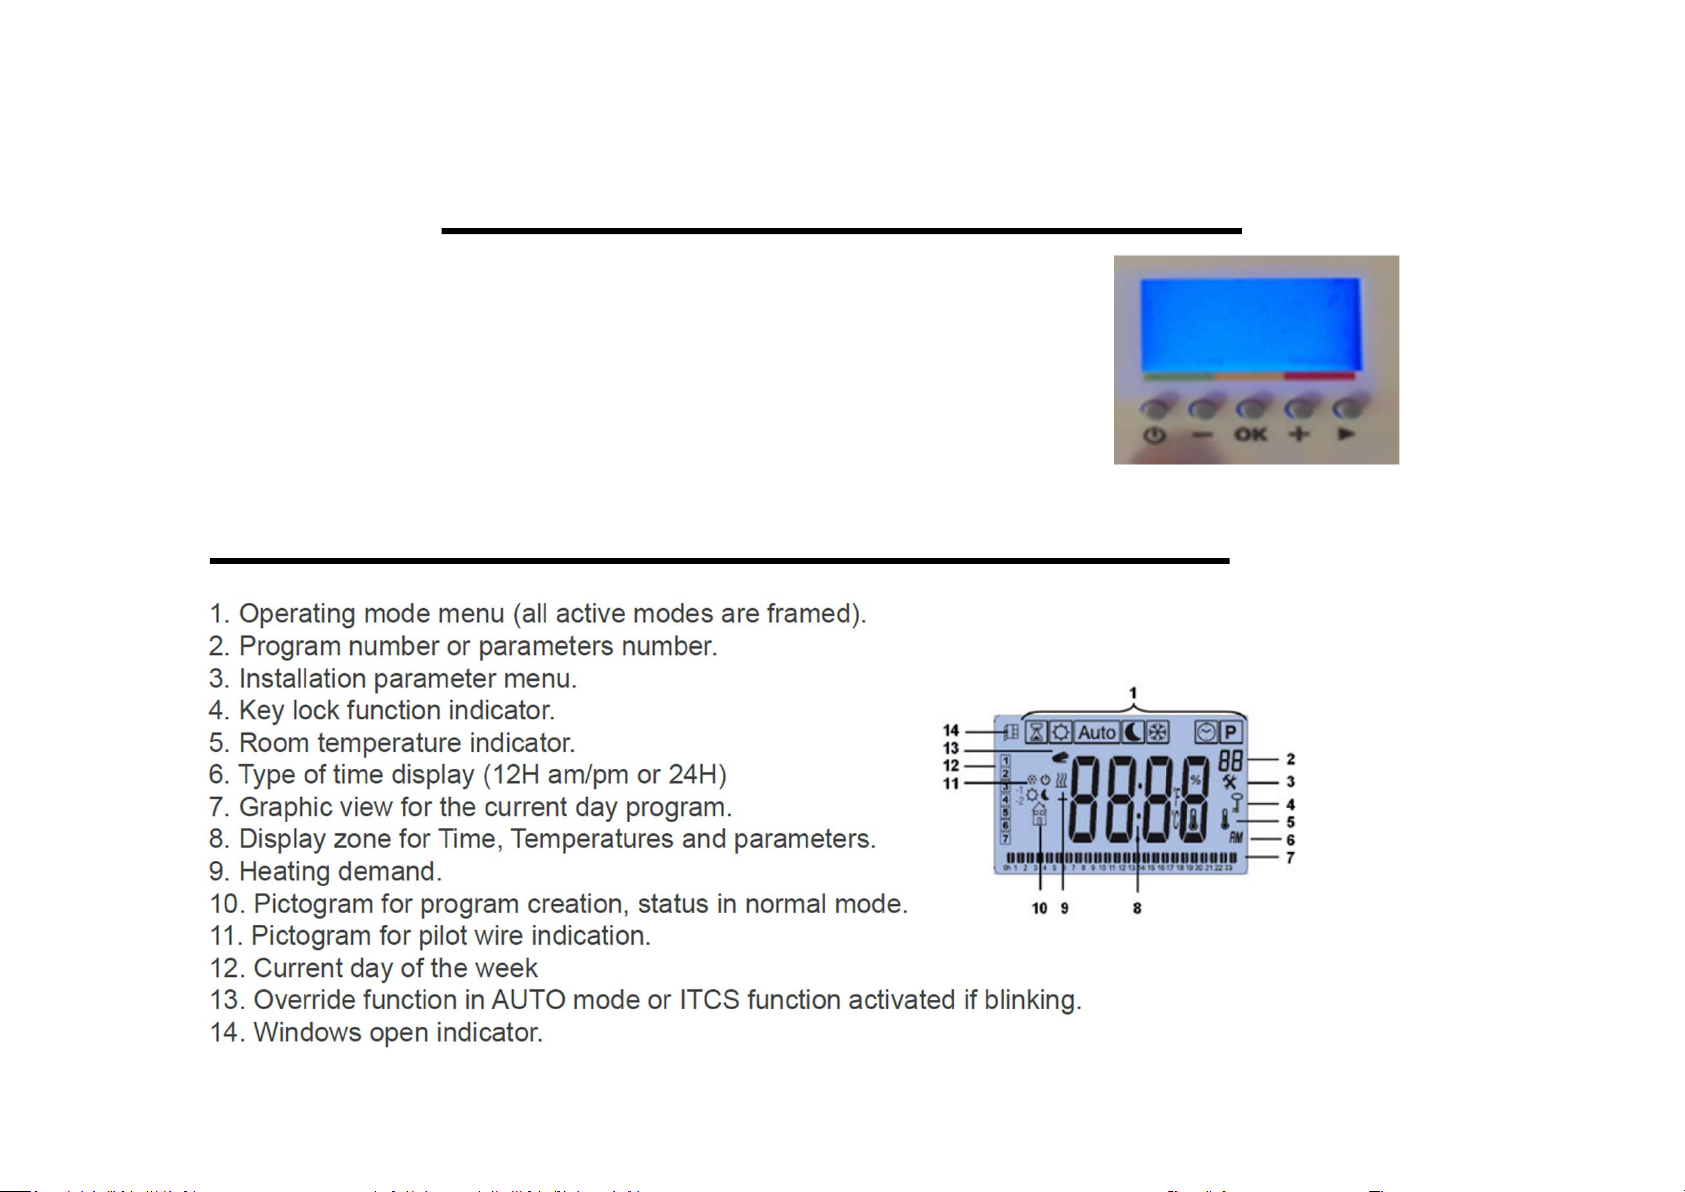
Vanguard Instructions
Please read these through before attempting to set your radiator.
The buttons on the screen look like this, we call them button 1 2 3 4 5 from left to right.
Understanding your display.

Setting the date and time.
•Use button 5 to scroll along the icons at the top of the screen until your square
surrounds the clock icon.
•Press OK, you will then be presented with a clock.
•Press button number 4 and the hours will begin to flash. You can then use button 2 to
decrease the hours and button 4 to increase the hour. One you have reached the correct
hour, press ok and the minutes will start to flash. Again use buttons 2 or 4 to select the
current minutes passed the hour and press ok once this shows the correct time.
•Once you have set the time and pressed OK, you invited to select the day of the week
which is represented by numbers 1 – 7 down the left hand side. I think it’s a good idea to
imagine day 1 is Monday, day 2 is Tuesday, day 3 is Wednesday, day 4 is Thursday, day 5
is Friday, day 6 is Saturday and day 7 is Sunday. Use button 2 or 4 to move the cursor to
the correct day of the week, then press OK
•You are then given the date in the same manner as the time, so you can set the date and
month in the same way as the time. Then press OK.
•Finally you need to set the year, use button 2 or 4 to select the correct year and press
OK.
•The final part of this is to save the information, you will be presented with a screen
asking if you want to save, Press OK and the information will be saved.

Setting your comfort and Economy
temperatures.
•Your comfort temperature is decided by you and symbolised by the
sunshine icon, this is for when you are home and want to be warm. Your
economy setting is also decided by you and is symbolised by the moon
icon, most often used through the night when you are in bed or when you
are out during the day.
•To set your comfort temperature, use button 5 to scroll along to the
sunshine icon. Simply press button 2 to decrease your comfort
temperature, or button 4 to increase it. Pressing OK on this screen moves
you from the current room temperature to your set temperature.
•Repeat this process for your economy setting, use button 5 again to scroll
across to the moon icon, then use button 2 to decrease or button 4 to
increase the temperature as desired. Again, pressing the OK button send
you to and fro from your current room temperature to the set point.
•You can now select which temperature you want your room to be
throughout 30 minute intervals, 24 hours a day for the whole week long to
suit your lifestyle.

Using the radiator in manual mode
•If you don’t want to set your timing and just want to use your radiator manually in what we call easy
mode, we can remove all the icons along the top of your screen apart from the sunshine and moon.
You can then simple swap from your comfort to your economy setting as you wish manually. To set
your radiator to easy mode:
•Press and hold button 3 which says OK for 5 seconds, you will then be presented with a screen that
says ‘prog’
•Press button 4 to select no, and then press button 3 for OK.
•You will then need to press button 5 12 times until you see the word end in the middle of the screen.
•Press button 3 again to get back to the home screen.
•Now when you press button 5 you will notice that all of the icons have disappeared apart from the
sunshine and moon symbol which represent your comfort and economy settings.
•Now when you want your comfort temperature, press button 5 until your square is around the
sunshine icon, then press OK. Then when you want your economy temperature, you press button 5
then OK once your square surrounds the moon icon.
•If you then want to set timings, press and hold button 3 for 5 seconds again to be presented with the
‘prog’ parameter 01. This time, you press button 4 until it says yes, then press ok to accept you want
the full range of icons back.
•You will then need to press button 5 12 times until you see the word end in the middle of the screen.
•Press button 3 again to get back to the home screen.
•If you press button 5, you will now notice that all the icons have re-appeared along the top of the
screen and proceed to set your timings as instructed in the ‘set timings’ section of these instructions.

To set your own timings.
•You need to move fast with these actions before the radiator will go back to the home screen so please have an idea of what times you
want your radiator to come on comfort and set back settings before you begin
•Use button 5 to scroll across the icons along the top of your screen until your square surrounds the ‘P’ icon as shown in the picture above.
Press OK
•Press button 4, 10 times, until the small p1 on the right hand side of the screen reaches ‘U1’ there are 9 pre-set programmes so it will go
through all these first before you reach ‘U1’ Press OK when you reach ‘U1’ You will be presented with this screen.
•The screen above has numbers one to 7 down the left hand side; these are the days of the week. I would advise setting day 1 as Monday
with days 6 and 7 being Saturday and Sunday. (This is selected when you set the date and time) The numbers 1 – 24 along the bottom are
the hours of each day.
•The timing periods are set at 30 minute intervals which begin at 00:00 for midnight. Most people have their radiators on economy at
midnight so you can press button 2 to select the setback temperature, you will notice the time in the middle of the screen has now
changed to 00:30. Press button 2 again for each 30 minute period you want to select your set back temperature. The time on the screen
moves along at 30 minute intervals so you know what time of the day you are about to set. When you want your radiator to come on at
your comfort temperature, you then press button number 4. You will notice that a small bar has appeared along the bottom of the screen.
Press button number 4 for each 30 minute interval you want to select your comfort setting. When you want to go back to your economy
setting press button 2 again, then when you want your comfort press button 4 again. For each interval you have selected economy, there
won’t be any bars along the bottom and when you have selected comfort, you will see bars along the bottom so you can see what you
have selected at a glance. The picture above shows that we have a comfort period through the whole middle of the day and economy
setting in the evening and early hours of the morning.
•Once you have completed a full cycle for the day, you will notice that the triangle on the left has now moved down to day 2. Repeat the
above process until you have selected a set point temperature for each half hour interval for every day of the week.
•Once you have completed the process, you will automatically be directed back to the home screen with your square around the ‘auto’
icon.
•Your radiator is now set. Just check that the ‘u1’ is on the right
Table of contents
Other Electrorad Heater manuals


Popular Heater manuals by other brands


Vornado
Vornado iControl Digital Vortex Heat owner's guide

Pinnacle
Pinnacle MASTER MH-80-OFR User's manual & operating instructions

Sealey
Sealey ir20.v2 instructions

Waters
Waters ACQUITY CH-A Overview and maintenance guide

Ouellet
Ouellet OHY Series installation instructions

MasterCraft
MasterCraft EH-4604BY instruction manual