Electrorad Aeroflow Series User manual

User friendly guide

Aeroflow Radiators
Aeroflow German made electric radiators are extremely high quality electric radiators
with the longest warranty available of 30 years. Internally, the electrical elements are
encased within non porous fireclay heat plates. When the element heats, it transfer the
heat to the fireclay and then in turn to the radiant surface of the radiator. Once the core
is hot, cold air is drawn from the floor and up through the flutes to create convection
heat.
Aeroflow German heating Radiators continuously generate and conserve heat within the
core of the heater. The heat retention is achieved by a series of fireclay heat plates in
the centre of the radiator. Each heat plate has a coiled heating element totally buried
within it, forming an integral part of the plate. Each heat plate has a typical power rating
of 100 –200 watts. When the electric heating system is switched on, the element gets
hot, heating the storage plate within a matter of minutes. Once heated the heat plate
will retain heat for well over 30 minutes, transferring heat to the metal casing and flutes
of the Radiator.
Each Aeroflow German radiator has a built in digital electronic room thermostat and 7
day programming system. Optionally they can be controlled remotely by radio
frequency and by App from any smart device. The electronic thermostat is accurate to
+/- 0.2 deg C and the timing system allows you to pre-set required room temperatures
at specific times. As the temperature drops in a room the thermostat senses the change
and switches the heater on, perhaps for only a minute to re-heat the internal plates. This
continual dynamic re-heat process continues thereby maintaining the room
temperature. The ability to sense temperature changes and react immediately is one of
the great benefits of this type of heating. Because of the ability to heat up quickly the
use of electricity is limited and the cost of using the Aeroflow radiators may be very little
if you’re house insulation is good. These German radiators heat the room to a
comfortable even temperature and also keep the floor temperature within a few
degrees of the ambient room temperature.

Understanding your radiator
The inside of your radiator has fireclay plates that are heated up by the electrical
element. The hot plates transmit the heat to the metal body, making the room warm
by radiant heat. Radiant heat is like the sun shining on you, it makes you feel lovely
and warm. The hollow flutes on the front and back of the radiator create convection
heat by touching the cool air that’s lower in the room which then warms naturally as
it rises through the flutes. As the air rises through the flutes it heats more and more
and quickly heats all of the air in the room.
Your radiator has a built in thermostat which means that it will heat your room to
whatever temperature you want it to be. Once the radiator has heated your room to
its set point, it will click off. It then comes back on to compensate for any heat loss, so
when it falls below your set point. This keeps your room at an accurate temperature.
The better the insulation is in your room, the less often the radiator will come on.
Normally, if your room is cool, such as first thing in the morning or when it has been
off all day, your radiator will have to work really hard and will get quite warm when it
is trying to achieve your set point, but once its got there, it will just click on and off at
a luke warm temperature to maintain the temperature, so don’t worry if its only
warm and not hot, it is just doing its job.
Symbols on your radiator
Manual Mode
Timer mode
The radiator is calling for heat
Open window feature has been activated
Holiday Mode
Keylock is on

Getting started
Firstly you need to think about how you want to operate your radiators. There are 3 ways to use them.
Manual mode.
In this mode, you can simply use the
arrow keys to turn your set point up
and down. Your set point is the
temperature that you want your
room to be. You just need to
remember to turn it off so that your
not paying more to run it than you
need to. Nice and easy.
App Control.
Download the app so that you can control
your heating from your phone or tablet
anywhere in the world. This is a good idea
if you don’t always know when your
coming home or going out.
Timed mode.
In timed mode, you can set your radiator to
come on and off at whatever time you
want, each day of the week. This means
that when you get up in a morning or home
from work, its already nice and warm for
you. This is a good idea if you live a
structured lifestyle. In theory, you will
never have to touch your radiator again,
Nice and easy again right!
Set the time first.
Which ever option you choose, you need to set the time first. To do this, press the OK
button once to illuminate the screen, then press ok again to see the ‘configuration’ screen.
If you see ‘programs’ just press the arrow down button once to see configuration. Press
OK when you see ‘configuration’ then press the arrow down button 3 times to see ‘set the
time’. Now use the arrow up or down keys to select the current day, then press ok. You
will now see a 24 hour clock and the hours will be underlined. Use the arrow up and down
keys to scroll through to the correct hour and press ok. Now the minutes will be
underlined so that you can use the arrow up and down keys to select the current minute
of the day. You will now be taken back to the ‘set the time’ parameter of the configuration
menu. Now press the arrow up button 3 or 4 times until you see back, then press ok, then
press the arrow up button until you see ‘back’ and press ok again and you will now be back
on the home screen.

Manual Mode
Using the Aeroflow radiator in manual mode is very easy. The big numbers on the screen show your
current room temperature and the little numbers show your set point, which is the temperature you
want your room to be. The Radiator will heat up until your set point is achieved and then it will click off.
When the temperature in the room drops, the radiator will click back on again to compensate for the
heat lost. The more insulated your room is, the less heat loss you will suffer so the less often your
radiator will come on, in turn costing you less to run. All you need to do is use the arrow up and down
buttons to adjust your set point accordingly.
To use your radiator in manual mode, make sure you have a silhouette of a person underneath the time.
If you have, you are already in manual mode. If you have a clock symbol, you need to press OK once to
illuminate the screen. You will now see the word ‘programs’ on the screen, now press the arrow down
button and you will see ‘configuration’ and the picture of a spanner, press OK here. You will now see
‘programs on’ press ok and this will change to ‘programs off’ Now press the arrow up button and you
will see ‘back’ press ok and this will take you back to see ‘configuration. Now press the up button again
to see ‘back’ again and press ok again. You are now back on the working screen and will see the
silhouette of the person.
When you see 3 wavy lines in the bottom left corner, this means that your radiator is calling for heat and
you should feel the radiator getting warm. Remember this will only happen when your current room
temperature is lower than your set point.
If the room temperature is already warmer than your set point, your radiator will not come on.
We would never recommend letting your room drop below 5 degrees so on a night time or when you
are going out, you want to look to set your radiator at 5 degrees as a minimum.
Using your radiator on timed settings
Using your radiator in timed mode, means that
you should never in theory, have to touch the
radiator again. You can set the radiator 24 hours a
day, 7 days a week to exactly what temperature
you want it to be. This means when you get up in
the morning or when you get home from work,
the house will be warm but has not been left on
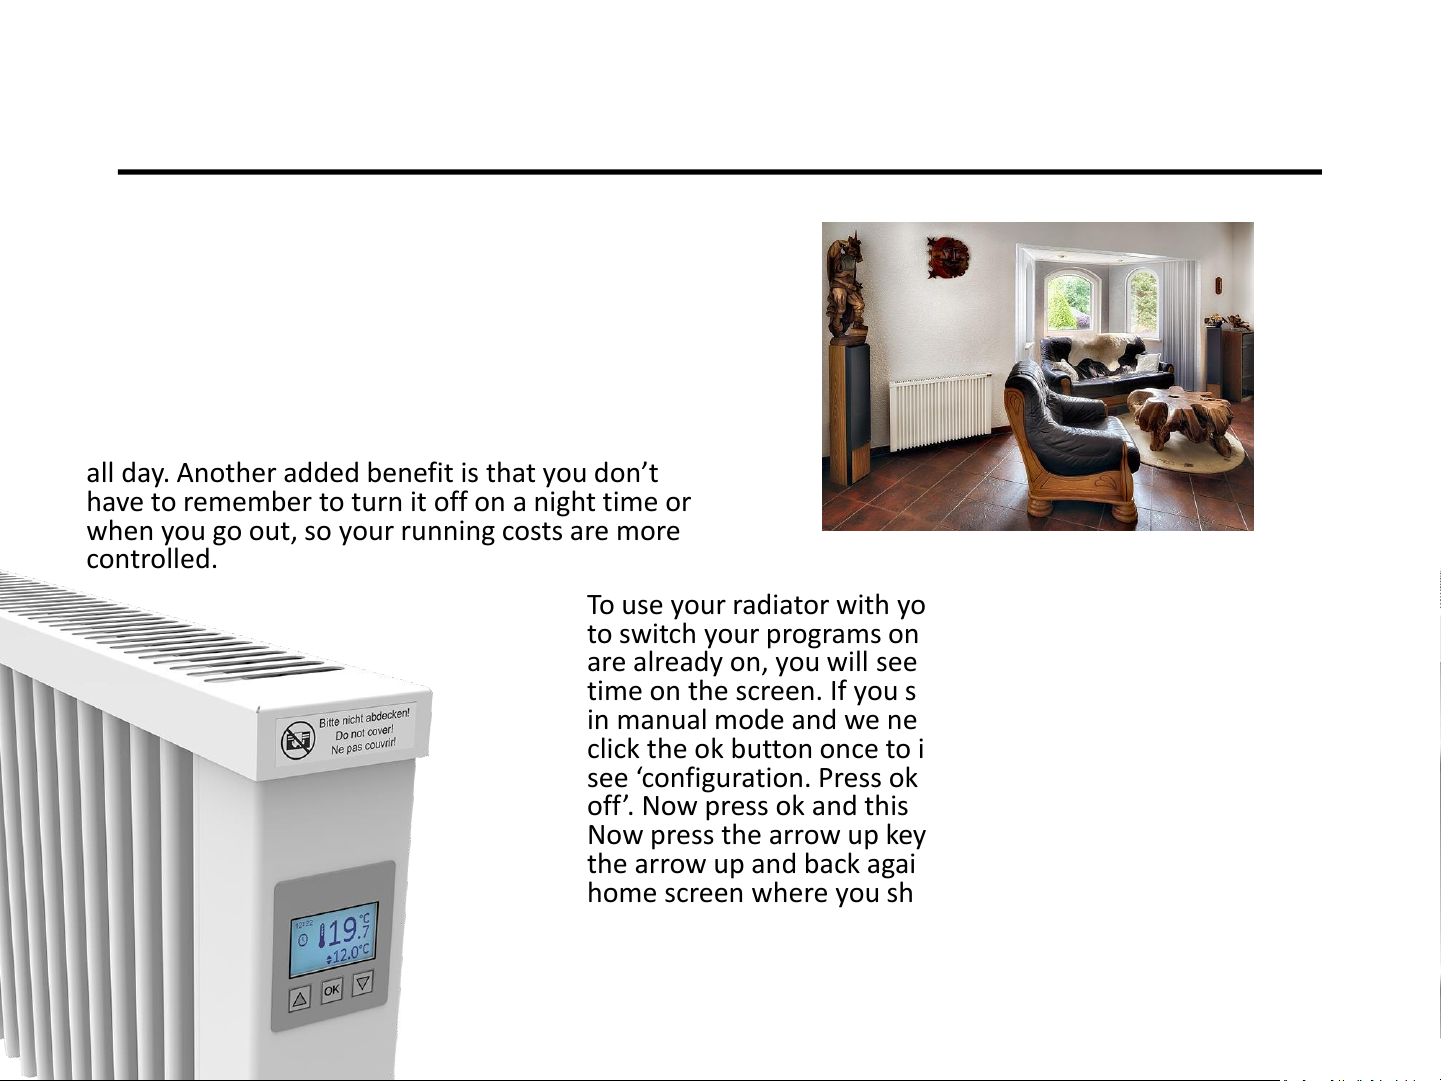
all day. Another added benefit is that you don’t
have to remember to turn it off on a night time or
when you go out, so your running costs are more
controlled.
To use your radiator with your own bespoke timings, you need
to switch your programs on first, then we can set them. If they
are already on, you will see a clock symbol underneath the
time on the screen. If you see a silhouette of a person, you are
in manual mode and we need to change this. To change this,
click the ok button once to illuminate the screen, then again to
see ‘configuration. Press ok gain and you will see ‘programs
off’. Now press ok and this will change to say programs on.
Now press the arrow up key to see ‘back and press ok, then
the arrow up and back again. This will take you back to your
home screen where you should now see the clock symbol.
Programing your timings
Before you begin, it is a good idea to think about what temperatures you want your room be at what times. You have 6 different time
periods but your first one must start at 00:00 and your last one must finish at 00:00 in order for the radiator to understand the full
sequence of each day. Remember each room can be set differently if you want it to be, to suit you, your family and your lifestyle.
Press ok here and you will be prompted to select your first time frame, which as mentioned earlier, must begin at
00:00. This time appears as default, so you can just press ok for the hour then ok again for the minute. You will now
see a very similar screen but this time it will say ‘end time’ above the time. This will be when you next want the
temperature to change, so if the radiator is in your bedroom, you may want it to heat at 7am when you get up in the
morning, so you would select this as your end time.
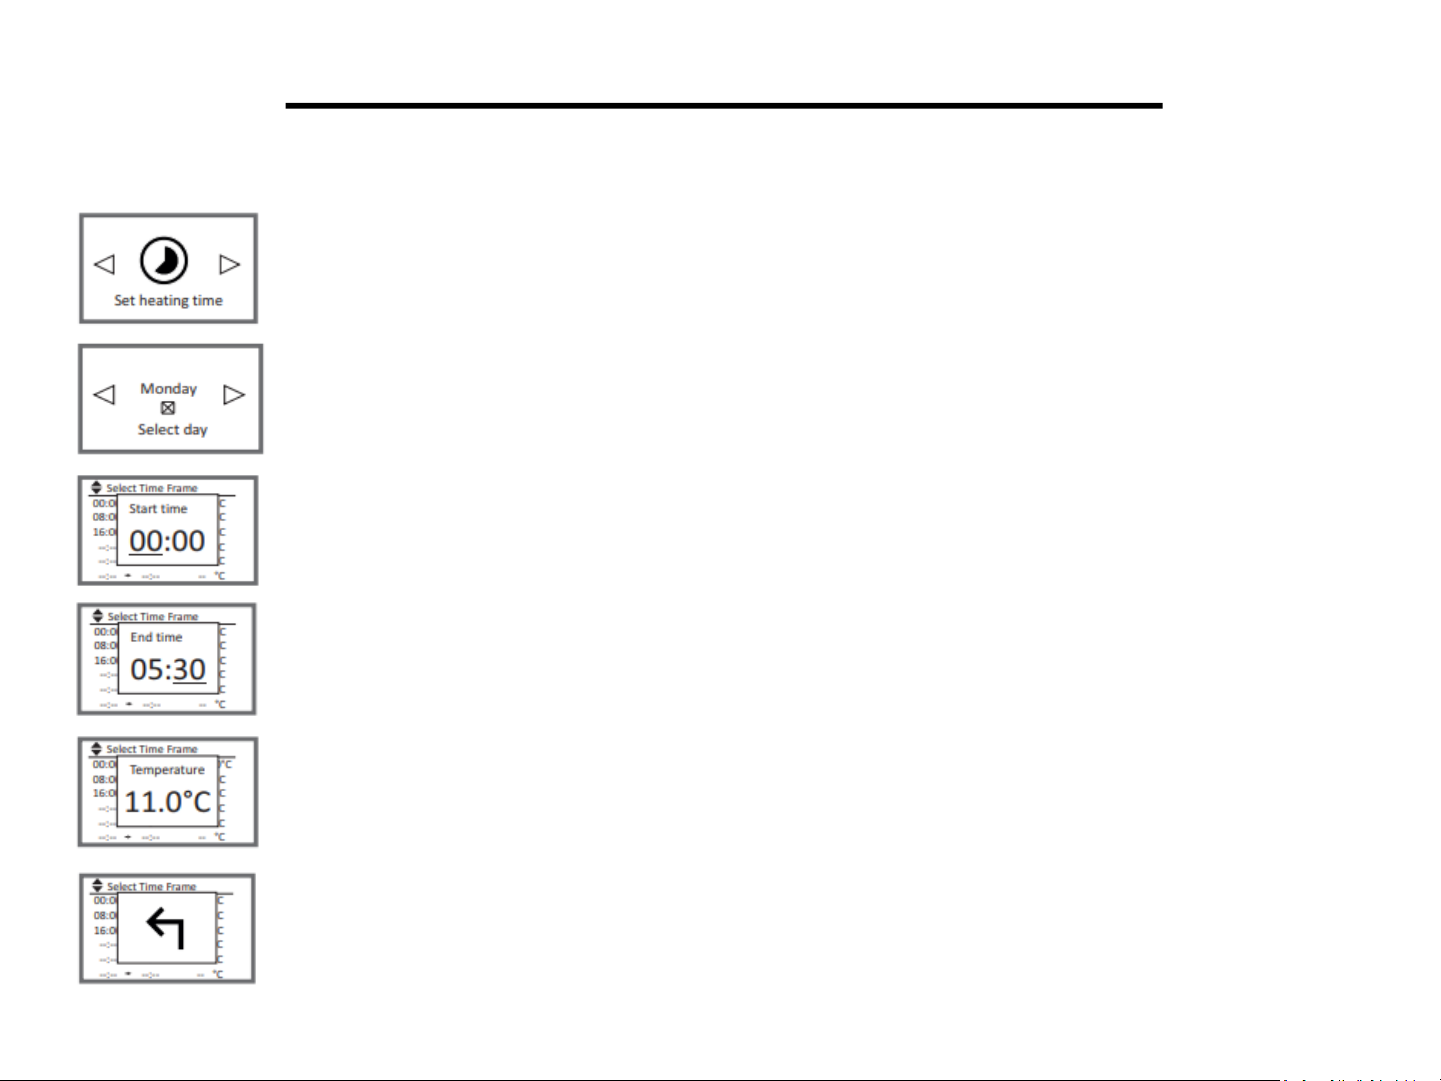
To program your radiator, press OK once to illuminate the screen, then ok again to access the parameters menu.
You should now see ‘programs’. Press ‘OK here and you will see ‘see’ Press the arrow down button to see ‘set
heating times and press OK.
You will now be prompted to select the days of the week that you want to program, so if you want Monday –
Friday all set the same you press OK on that day to put a cross in the box, then the arrow down key to move on
to the next day. So if we are programming Monday –Friday all the same, you will have an x on Monday,
Tuesday, Wednesday, Thursday and Friday, but you will have just pressed the arrow down key on Saturday and
Sunday without pressing ok, so there is no ‘X’ in the box on these days. Once you have gone through each day
of the week, you will see ‘set frames. Press OK here.
You will see a grid which will be a lot of dashes if it’s the first time you are setting this up. The days of the week
that you are programing will flash along the top of the screen.
You will now be asked to set your temperature for this time frame. Most people are in bed early hours in the morning so
you are likely to set a low temperature for this first time frame. Again if this is in your bedroom, you might want to set
the temperature somewhere between 10 and 15 degrees as a starting point, depending on how warm or cool you like it
to be, it’s a personal preference for everybody. The next time frame you set may be when your are getting up and ready
for work, so you might want this at about 18 degrees, again this is personal preference.
Complete the time frames to suit your daily shcedule, making sure that your last time frame ends at 00:00 hours to
complete the loop for the full day. If you have completed all 6 time frames, you will be presented with the back arrow.
If you have completed fewer time frames for your day, just press the down arrow until you see the back arrow. Make
sure you have completed the time frames for every day of the week. Now press the arrow up twice to see the back
button and press OK, then the arrow up once to see back and OK again to take you to the home screen and your timings
and temperatures are now set.
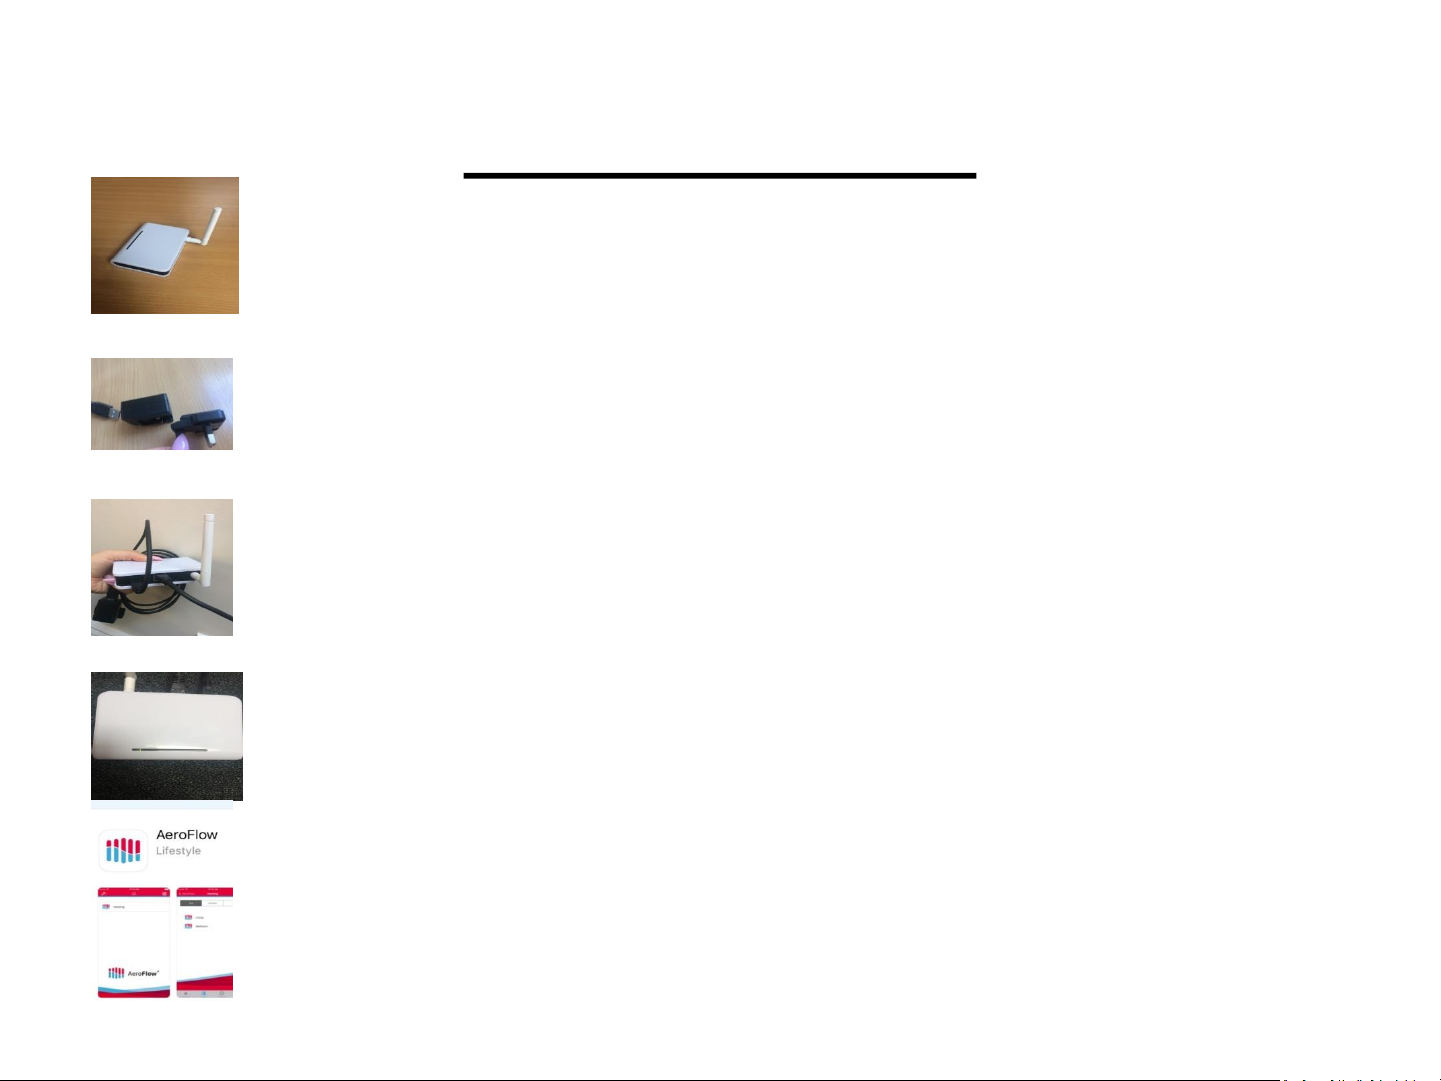
Using the App
Open the box that contains the Aeroflow gateway hub. Thread the antenna into the back of the gateway
hub. Plug the other end of the Ethernet cable into your internet router.
You will see a red light appear on you’re the gateway hub at first but after a few seconds this
should turn to green light to symbolise there is an internet connection to the gateway hub.
Download the app from Google play or iTunes on to your chosen device. The App is called Aeroflow and
looks like this:
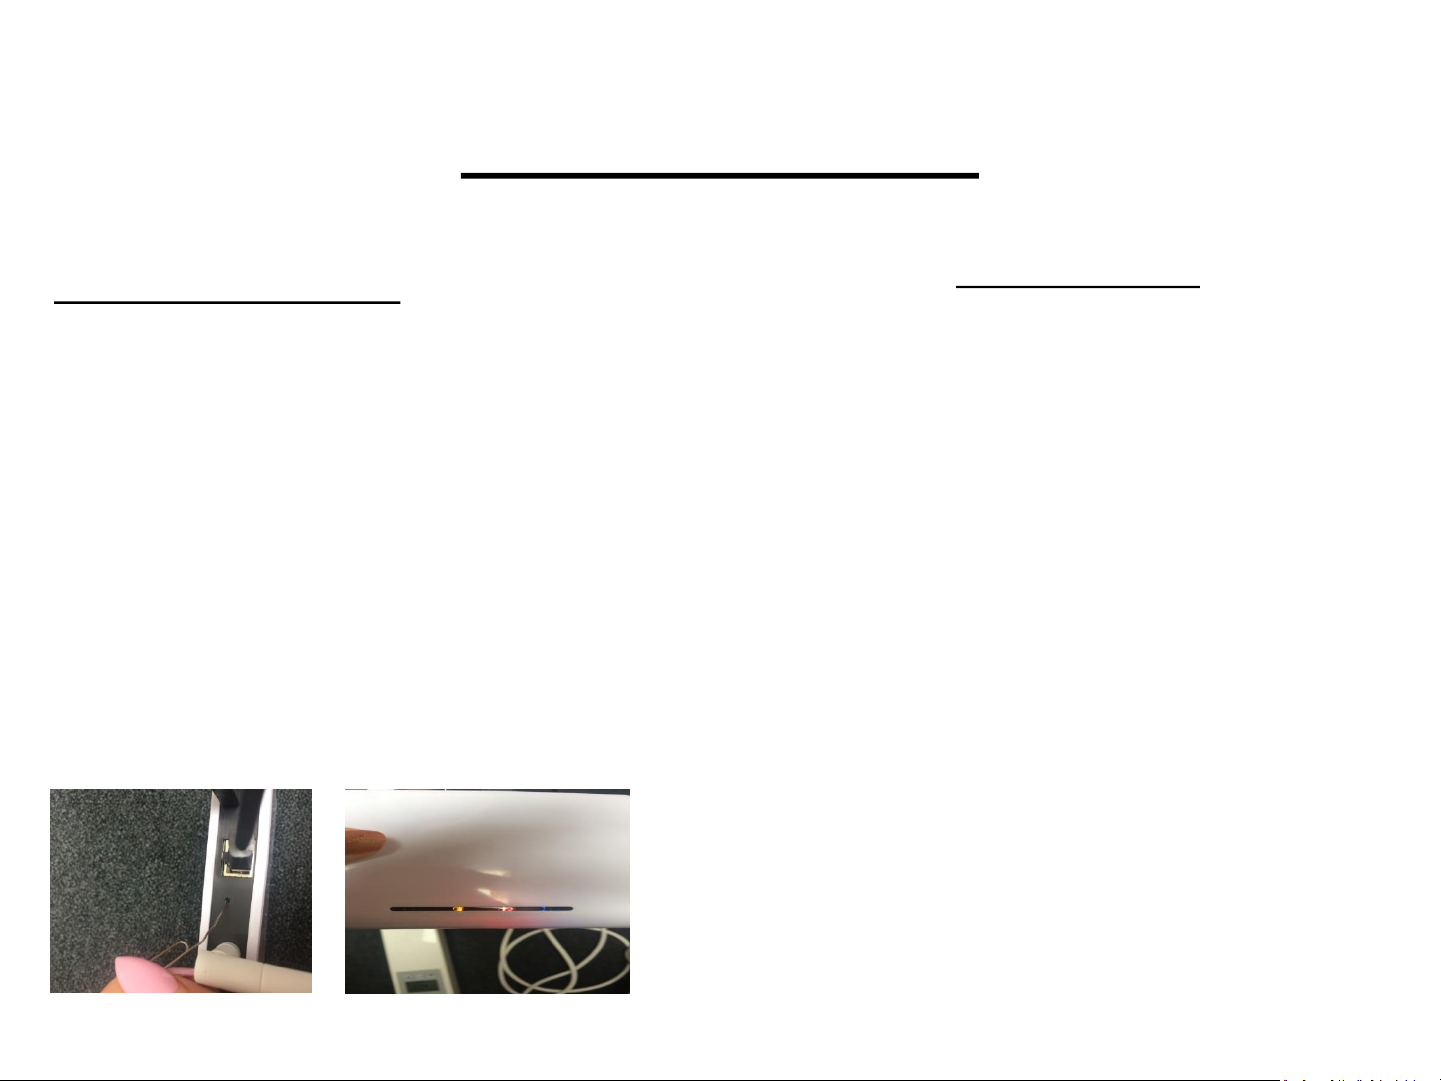
Connect the uk plug connection to the power box and insert the usb cable, connecting the other end to
the Gateway Hub
The back of your gateway hub looks like this.

Make sure that your device is connected to the same router that you have plugged the gateway hub into, make sure
your 4g is off and you have the Wi-Fi connection symbol on your phone. Open the app and you will be presented with
the following screen:
Now press the inset button on the back of the router using a paperclip or such like to put the gateway hub into pairing
mode. This is just one short press.
You should then see your phone begin to synchronise, once this has happened, it should go to your heating screen.
The synchronise may be instant and take you straight to the heating page
You should then be able to press the heating button at the top of your screen, and
then press configure at the bottom right of the screen.
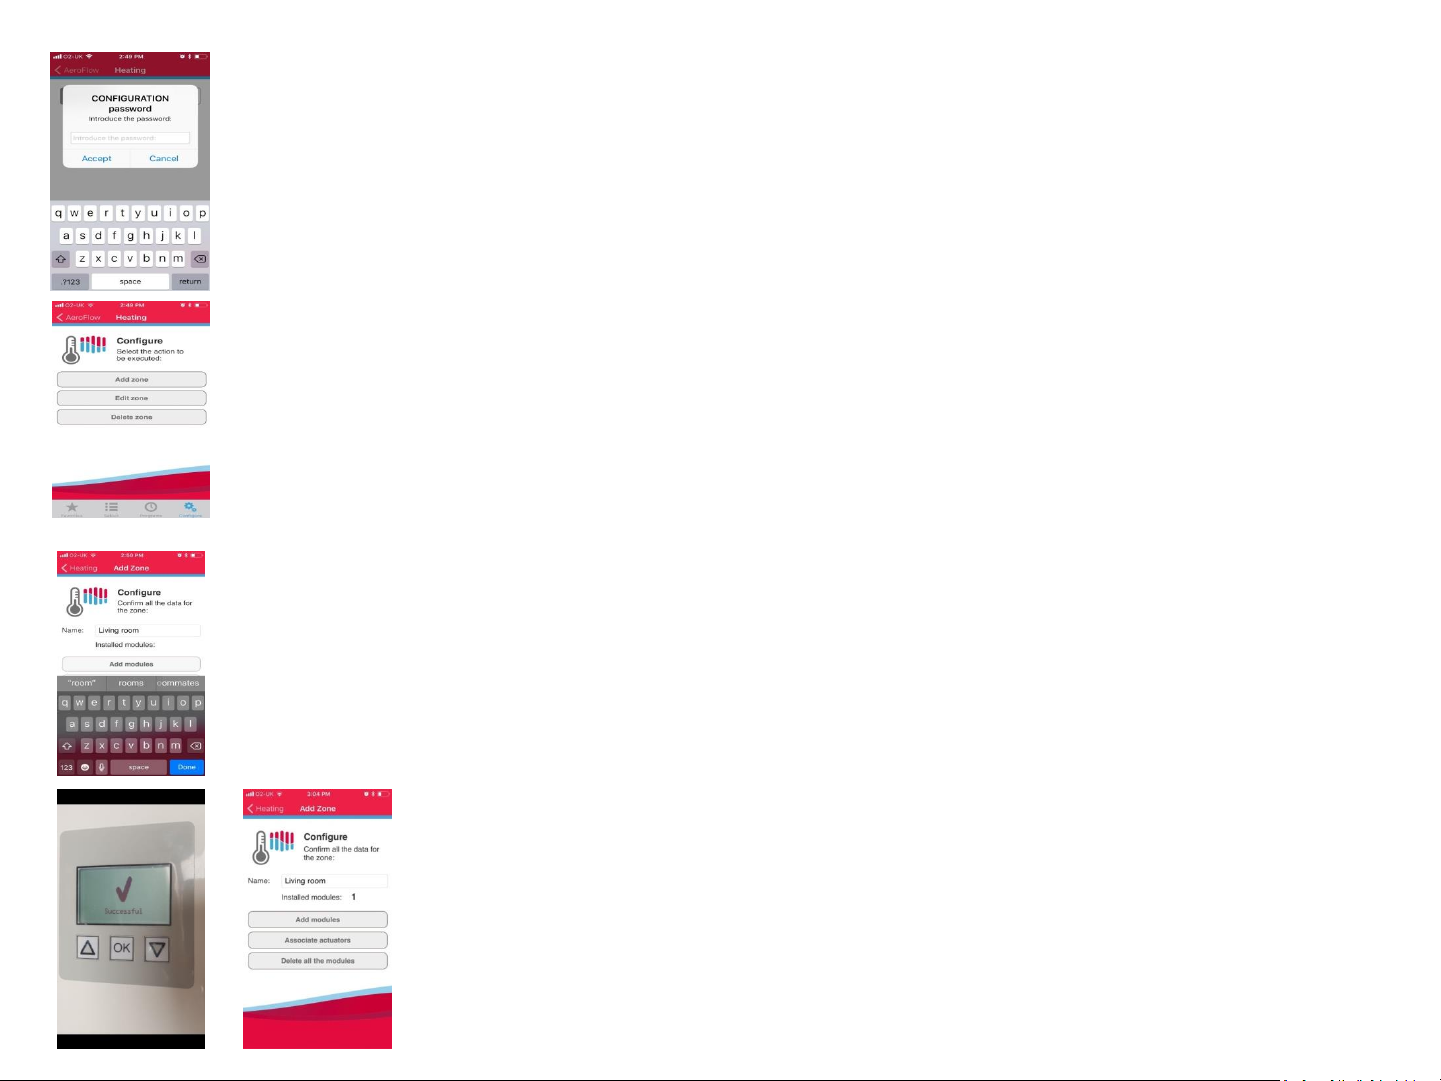
You will be asked for a password, the password is ’aeroflow’ all lower case, then press accept.
Now click add zone and call this whatever you like, living room, kitchen, ‘Melanie’s bedroom’,
depending on what room the radiator you are about to pair up will be in, by clicking into the empty
name box. You may notice under this box it says ‘installed modules:’ and there is nothing next to it.
Now click add module
On the radiator that you are pairing up, press ok once to bring the screen to life if it needs it, then
once more to see ‘programmes’, press ok, press the arrow down button once to see ‘configuration’
(Spanner icon), press the arrow down button 7 times to get to ‘Install’ then press ok. (Make sure that
your phone is still looking for the module, if it has given up after taking too long on this step, you
may have to repeat steps 7 to 9 again. ALWAYS ASK THE RADIATOR TO ADD MODULE BEFORE
ASKING THE RADIATOR TO INSTALL.
You should then see ‘successful’ and a big tick to show that the radiator is paired to the device.
Now when you look at the ‘installed modules:’ it should have a number 1 next to it. If you see a ‘X’
and error 1, then go to trouble shooting.

Your phone may or may not then present you with the following message; press accept to fully synchronise your
devise and the radiator. This is just to make sure your device and the radiator are on the same time as to not cause
confusion when trying to set programes.
You should now see that your named room is listed when you click back into the
heating section at the top left of the screen.
You can now turn the set point of the radiator up and down using your phone. If you click on the
room on your phone, you can see the room temperature at the top right and the set point
centrally in the white box. To adjust the temperature, use the red plus key or the blue minus key
to adjust accordingly, then you must press modify to send the instruction to the radiator.
Repeat steps 9 to 16 to pair up all the radiators that you have to your device.

To set a program.
You can set each individual radiator on its own programmed time settings, multiple radiators together, or all on the same programme by
using the tabs along the top of the screen when you are on the heating page of the app. You can have 6 different time changes per radiator
per day and you must always start from midnight and end at midnight to complete the days cycle.
To set an independent set of timings on one radiator:
Open the Aeroflow app, click ‘heating’, click ‘programs’ at the bottom of the screen, make sure that
the ‘one’ tab is highlighted in grey and click on your chosen radiator from the list of radiators you have
paired up on your devise, eg living room. (It will say ‘not programmed’ if no program has currently
been set for this radiator)
You will now be presented with the ‘Zones to be programmed’ page. Click edit program to change or create a program.
You can now either select one day at a time, multiple days or all. Lets imagine you work 9am –5pm
Monday to Friday. Lets start by programming Mon –Fri. Click on the ‘multiple’ tab at the top middle of the
screen and then click on the circles on the right for mon –fri, you will notice a tock will appear in the
circles. Then click proceed.
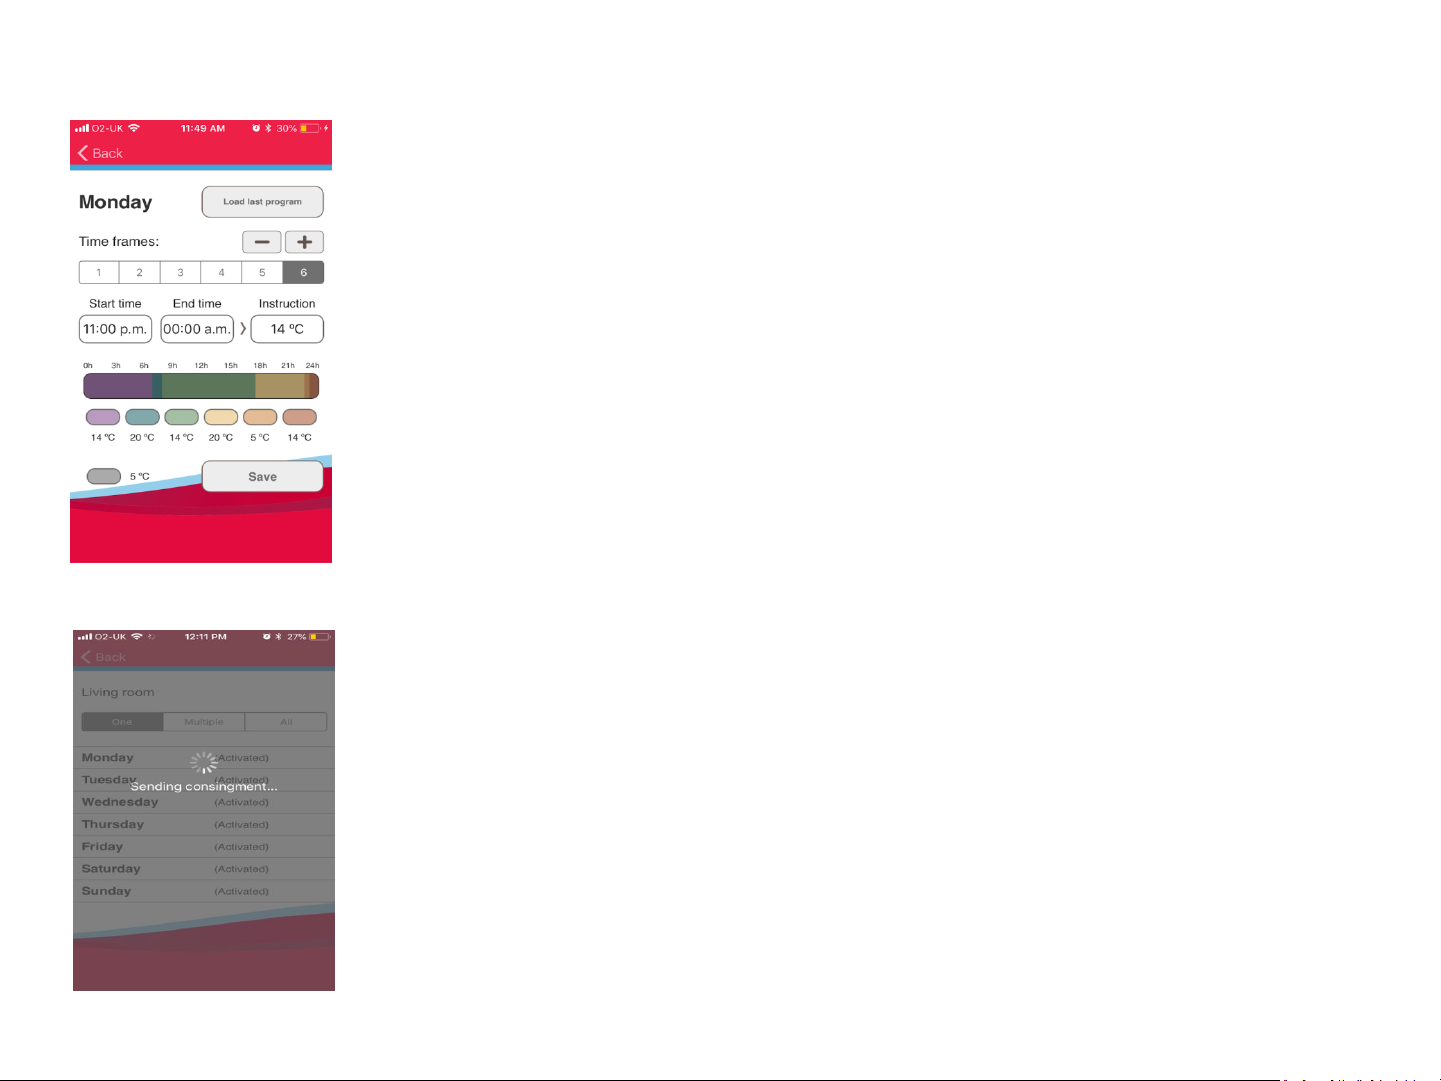
You will now be presented with ‘Time Frames’ You can have 6 different time changes per radiator, per day and you
must always start from midnight and end at midnight to complete the days cycle. Lets start at time frame 1.

You now need to select time frame 2, to do this, click the + button in the top right hand corner, you should notice that the
time frame 2 is highlighted in dark grey to show this is what we are setting, and zone 1 will become white to show that this
has been set.
Now click in the ‘instruction’ box to select the desired temperature for this time frame. Again, most people don’t want to
heat the temperature too high during the evening, so we can select a relatively low temperature, for example 14 degrees.
This means that the radiator will only come on if the room temperature falls to less than 14 degrees, and keep the room at
this set point. Now press done.
The start time should now default to the time that zone 1 ended in, so in this example, it starts at 7am. You may want the
heating to come on for 1 hour while you get ready for the day. Click in the ‘end time’ box again and change the time to
8am, then press accept. You then need to click on instruction and select your desired set point temperature for this time
frame, this may be around 20 degrees, then press done.
Now lets move to time zone 3 which is when you are out at work for the day and probably don’t require the radiator to be
heating. Again your start time will default to 8am as this is the time your last time frame ended. If you are home for
5.30pm, then lets set this as the end time for this time frame. And select the temperature as a low you desire, lets say 14
degrees as an example, again press done. You will notice the bar along the bottom of the screen shows different colours
for each time frame.
Make sure time zone 1 is highlighted in grey and the start time should be set as default to 00:00am. Leave that as it as as
you need to complete an instruction for every hour of the day for the cylcle to be complete.
Now Click on end time. Remember most people will not want their heating on high through the nigh time which is the zone
that we are currently setting, so your end time will be when you want the radiator to next come on. Lets say you want the
heating to come on a7 7am, for this timing zon 12am –7am, this will be your end time. Select 7am (or your chosen time,
remembering the adaptive start function feature) then press ‘accept’
Again click the + button to move on to time zone 4. This will be when you are home from work and you
probably want to be nice and warm. Your start time should have defaulted to 5.30pm, your end time
will probably want to be around bed time, lets say this is 11pm, change the end time to 11am and click
on the instruction box to select your desired comfort temperature, eg 20 degrees. And select done.
You will now need to complete the day by pressing the + button to move on to time frame 5. This
should default to a start time of 11pm and an end time of 00:00, just click in your instruction box to tell
the radiator what temperature you want at this time. This is likely to be the same temperature as set in
time frame 1 as it is when you are in bed, so you can change this to instruct the radiator to come on at
just 14 degrees. To complete the 24 hour cycle.
You can now go on to set Saturday and Sunday as you see fit, in the same method to complete your weekly
cycle and press save, you should now see your device ‘sending consignment’ to the radiator.
You can now press the ‘back button’ in the top left, then the ‘heating’ button in the top left to go back to the
programmes screen. Where you can then set up a different radiator or multiple at a time.
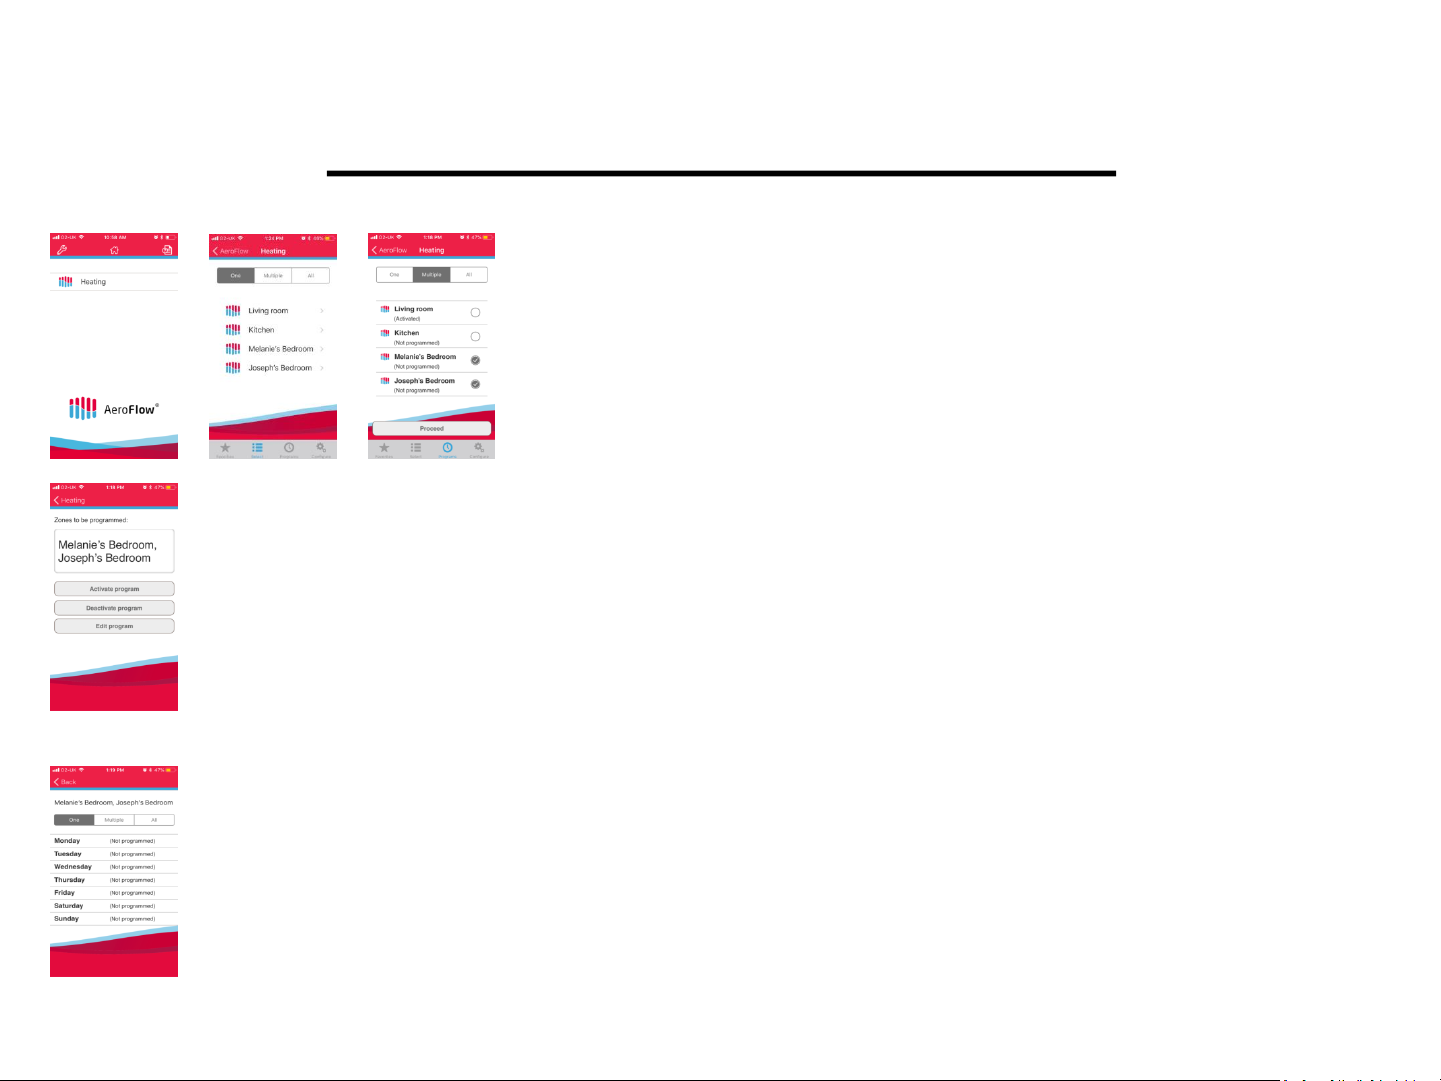
To set multiple rooms
Open the Aeroflow app, click ‘heating’, click ‘programs’ at the bottom of the screen,
make sure that the ‘multiple’ tab is highlighted in grey and click on your chosen
radiators from the list of radiators you have paired up on your devise, eg, Melanie’s
Bedroom & Joseph’s Bedroom.
Now Click proceed. You will then be presented with the following screen, where you need to press
‘edit program’
You can now select to either set each day separately, multiple days or all days the same. In this instance we will set
each day the same, please click on the ‘all’ tab at the top right. This will automatically take you to the ‘time frames’
screen.

You will see that time frame 1 is highlighted in grey. The start time should default to 00:00am, leave this as it is and click
in the end time box. This is to set the temperature from midnight to the next time change which is likely to be when you
wake up in the morning. Lets say you want the room to be warm for an hour when you get up then an hour before you
go to bed. Click on end time and change this to 8am or whatever time you wake up at, then click on the instruction box
and change this to the temperature you want the room to be while you are asleep in bed, eg 14 degrees by using the
red+ button or the blue –button accordingly. Then press done.
You can now move on to your next time zone by pressing the + button in the top right of the screen, you will now notice that
time frame 1 has turned to white and time frame 2 is highlighted grey to show this is the time frame that we are currently
working on. This time frame is now when you get up and want to be warm for an hour. The start time should have defaulted to
8am as this was the end time of time frame 1. Each time frame defaults to 1 hour so it should already say 9am, if you are
happy with this then go straight to the instruction box, if not, click end time and change it to suit you. In the instruction box,
you will want to increase the set point temperature to make the room warm for this time frame, so adjust this accordingly for
example 20 degrees, then click done.
You now need to move on to the next time frame by pressing the + button at the top of screen. Again you should see
that time frame 1 and 2 have now gone white and time frame 3 is highlighted in grey. This time frame is now when
you want the room at a set back temperature as you are probably not in it and you will next want it to change around
an hour before bedtime. Again the start time will default to the previous time frames end time so you should be able
to leave that. Go to your end time and change this to the time you next want your room to be warm, eg 9pm, then
press accept. Now go to the instruction and select your desired set back temperature of around 14 degrees or
whatever suits you and then click done.
Now click on to the next time frame which will be time frame 4, this is when you want the room to be warm again as
you go to bed. The stat time should have defaulted to the last time frames end time, so just click on the end time and
change this to the time you want the radiator to go back to your set back temperature, so maybe around 11pm and
then change the instruction to your comfort temperature of around 20 degrees.
Now click on to the next time frame, which should be time frame 5 now. Your start time should have defaulted to
your previous time frames end time, the end time should have defaulted to 00:00am, if it hasn’t, select it and change
it to this time to complete your full days 24 hour cycle. Change the temperature in your instruction box to your
desired set back temperature which we previously set at 14 degrees and then press save
You have now completed the time setting for your chosen rooms, on your chosen days for your chosen times and
temperatures. Repeat this process selecting as many or as few radiators, days and times as suits you.
Factory Re-set
Aeroflow Radiator
Press the OK button to illuminate the
screen first if needs be.
Press the OK menu
Use the arrow down button to scroll
down once to configuration and
press OK
Press the arrow down button 9 times
to get to ‘factory re-se’ and press ok
Follow the instructions on the
display, which just ask you to press
and hold the left button in for around
5 seconds.
Aeroflow Gateway Hub
Press and hold the inset button on the
back of the Aeroflow Gateway hub using a
paper clip or such like, for around 10
seconds. You will see a blue light appear,
keep the pin held in until the blue light
disappears and the red light begins to
blink, then release the pin
Uninstall the app, then re-install it again.

Trouble Shooting
Problem Possible Resolution
I can’t pair my radiator to the app.
Shut the app down then re
-open it and try again.
Have you screwed the antenna into the gateway?
Is there a green light on the gateway hub to show it has a working internet connection?
Is the mobile device on the same WI
-FI network? Mobile phones and tablets must be on the same WI-FI network that
the router is connected to
- not on its own 4g - check the WI-FI symbol is shown on your mobile device.
Have you downloaded the correct app and paired this to the gateway hub first
- once you open the app, you will be
prompted to press the inset button on the gateway hub to initialise installation
- this is just one short press with a
paper clip or such like.
Are both the radiator and mobile device in pairing mode at the same time? To put the app into pairing mode, click
heating, configure, enter the 'Aeroflow' password then click ‘add zone’, name this whatever you like i.e. 'Joseph's
bedroom' or 'living room'. Now click ‘add module’......the mobile device will now search for a signal to marry up with.
Quickly put the radiator into pairing mode by pressing the OK button once to bring the screen to life, then press OK
again to see 'programmes' press OK, press the arrow down button once to see 'configuration (the spanner icon,) press
OK, then press the arrow down button 7 times to get to 'install', press OK. The signals from the radiator and app will
now search for each other and you should get a successful notification on the radiator screen and the radiator is paired.
Make sure the router is not surrounded by electrical interference or signal blocking household objects such as, solid
walls and fridge freezers. Pull the router out from behind your TV and locate this centrally in the property, free from
obstructions.
Check the firmware on the radiator, in the configuration menu, scroll to ‘information’ to see the firmware number, this
should be V180601 or later.
Does the router have
an alternative ethernet port? How old is your router. does this need replacing?
Try uninstall the app, power cycle your phone, power cycle your router, then try again.
The App is not always picking up all of
the radiators
Shut the app down then re
-open it and try again.
Make sure these were paired in the first place.
Make sure the router is not surrounded by electrical interference or signal blocking household items such as solid walls
and fridge freezers. Pull the router out from behind your TV and locate this centrally in the property, free from
obstructions
Make sure you have no connectivity issues with your internet provider.
The radiator is reading the wrong
temperature
You are advised to calibrate all radiators after they have been installed for 24 hours. Using a separate
thermometer, measure the temperature within half a meter of the sensor probe (the bottom of the end panel
on the control end of the radiator, where the flex comes out.) Once you have confirmed the exact temperature
of the room at that level, you can calibrate the temperature that the radiator is reading in the ‘sensor probe
offset’ parameter of the configuration menu.
The radiator is heating when it
shouldn’t be and not heating when it
should be
Check that you have set this up correctly by selecting ‘see’ in the programmes parameter. Your weekly cycle must
be full. You must start and end the programming at 00:00 each day for the 7 days of the week. Re
-program if
necessary.
Check the temperatures on each time period are correct.
Check that you are in programming mode. Under the time on the home screen, you should see a picture of a
clock to show you are in programming mode. If you see a silhouette of a person, you are in manual mode. You will
need to go into the configuration menu and press the OK button when you see ‘programmes off’ to now say
‘programmes on’, then push the arrow up button and press ‘ok’ then check your programmes are set correctly by
viewing these in the ‘see’ parameter of the programme menu.
Check the correct time is set on the radiator.
Check the radiator is reading the correct temperature
–calibrate the sensor probe if you need to.
Please note; There is no ‘off’ setting when you are in the program mode. You simply select a designated
temperature for each time period, so if you don’t want the radiator to come on, you need to select a low
temperature that your room is unlikely to fall to. We would never recommend setting a temperature less than 5
degrees in your property though to prevent things from freezing over on cold days..
How can I use my radiator in manual
mode?
Go into the configuration menu, when you see ‘programmes on’ press OK to switch to ‘programmes off’ then
press the arrow up button, then OK, then the arrow up button and OK again. You should now be back on the
working screen and should see a silhouette of a person under the time symbolising that you are now in manual
mode. Here you can simply use the arrow up and arrow down buttons to increase or decrease your set point as
you wish.

My radiator is not achieving my set
point
Is your radiator sized correctly? If the radiator is not powerful enough to heat the space it is in, then you will need a
bigger or second radiator. We would suggest 100 watts per square meter on average insulation, 80 watts per square
meter on very good insulation and 120watts per square meter in conservatories or properties with poor insulation.
Check that your radiator is not positioned near or door or window that you open often as this will prompt the open
window feature to enable. If your radiator is positioned in a drafty area, this feature could also activate. To disable
this function, go into your configuration menu and scroll down to ‘Open window detection’ press OK so that this
says ‘Detection Off’ then press the arrow up key and OK to select back. Then press the arrow up and back again.
Please note positioning your radiator in a drafty area is not advised as this will still effect the temperature the
sensor is reading.
Is your radiator showing as calling for heat when it should be heating? You should see 3 wavy lines in the bottom
left of the screen. If these are on, is your radiator warm? Check all the way along the radiator to check for any
cooler spots. The edges may take a little longer to heat up.
How can I turn my radiator off?
Aeroflow radiators are not really designed to be turned off as such. You just need to programme the radiator to suit
your schedule. We would always recommend leaving your radiator on a minimum of 5 degrees in order to prevent
your home from freezing over on particularly cold days. Otherwise we rely on the thermostatic control and the timer
to look after your temperature requirements.
Please remember that the radiator will only ever begin to heat up if your room temperature is lower than your set
point. On warmer days, your radiator will not heat up if the temperature is naturally above your set point.
If you are thinking that you would like to turn your radiator off during the night or when you are out during the day,
just select a set point of somewhere between 5 and 10 degrees for these time frames. The radiator will then only
begin to heat should the temperature in your room fall below this, which is unlikely on most days.
If you are going on holiday, you can set your radiator to ‘holiday mode’. This simply put the radiator into your ant
-
frost
mode until you return. To select your ant
-frost temperature, select anti –
freeze in your configuration menu and select
your desired anti
-freeze temperature, we would suggest 5 degrees.
To set holiday mode, in the configuration menu, use the arrow down key to scroll to ‘Holiday’ press ok and then select
the number of days you are going to be away for, press OK and then enter the time you will be returning and press ok,
select the temperature you wish your room to be upon your return and then press ok. You should now see a suitcase
on your working screen with a number at the side of it to show how many days the radiator is off for. The radiator will
now go into your anti
-frost temperature until you return.
Table of contents
Other Electrorad Heater manuals


Popular Heater manuals by other brands


Nortek
Nortek Reznor 85 Installation and operating manual

Vortice
Vortice Thermologika Soleil Series Instruction booklet

EmaHome
EmaHome HPW-2000 instruction manual

Varma Tec
Varma Tec VARMA 303 Mobile operating instructions

UNITED
UNITED UHM-874 user manual

CHIEF
CHIEF Vulcan ADU CHH5404 Original instruction manual