Element TurboExtract User manual


QUICK START GUIDE2 FOR SUPPORT, VISIT ELEMENTELECTRONICS.COM/SUPPORT 3
WHERE TO FIND IMPORTANT
VACUUM INFORMATION
Keep this information
Write the model, type and serial number here:
Date of purchase (keep your receipt)
Model number and type
Serial number
Find these numbers on a label on the middle back side of the vacuum
cleaner. Refer to these numbers when ordering parts and accessories
or if service is needed.
REGISTRATION: To register your product just head on over to
elementelectronics.com/register
INSPECTION: Carefully unpack and inspect your new Element vacuum
cleaner for shipping damage. Each unit is tested and thoroughly inspected
before shipping. For instructions regarding any shipping damage, call the
Element support at 833.469.0875 immediately.
This Owner’s Guide provides important instructions
to prolong the life of your Element vacuum cleaner.
IMPORTANT SAFEGUARDS
When using an electrical appliance, basic precautions should always be
followed, including the following:
READ ALL INSTRUCTIONS BEFORE USING THIS VACUUM CLEANER
To reduce the risk of re, electric shock, or injury:
• Do not use outdoors or on wet surfaces.
• Do not leave vacuum cleaner when plugged in.
Turn off the switch and unplug the electrical cord
when not in use and before servicing.
• Do not allow to be used as a toy. Close attention
is necessary when used by or near children.
• Use only as described in this manual. Use only
manufacturer’s recommended attachments.
• Do not use with damaged cord or plug.
If vacuum cleaner is not working as it should, has
been dropped, damaged, left outdoors, or
dropped into water, call the Element Customer
Support at 1-800-282-2886.
• Do not pull or carry by cord. Do not use cord as
a handle. Do not close a door on cord or pull
cord around sharp edges or corners. Do not run
vacuum cleaner over cord. Keep cord away from
heated surfaces.
• Do not use extension cords or outlets with
inadequate current carrying capacity.
• Turn off all controls before unplugging.
• Do not unplug by pulling on cord. To unplug,
grasp the plug, not the cord.
• Do not handle plug or vacuum cleaner
with wet hands.
• Do not put any objects into openings. Do not use
with any openings blocked; keep free of dust,
lint, hair, and anything that may reduce airow.
• This vacuum cleaner creates suction and contains
a revolving brush roll. Keep hair, loose clothing,
ngers, and all parts of body away from
openings and moving parts.
• Do not place vacuum cleaner on furniture or
stairs as the brush roll may cause damage. Use
extra care when cleaning stairs. Place vacuum
cleaner on oor with the handle in storage
position while using attachments.
• Do not pick up anything that is burning
or smoking, such as cigarettes, matches,
or hot ashes.
• Do not use without dust cup, lter and
screen in place.
• Belt pulleys can become hot during normal use.
To prevent burns, avoid touching the belt
pulley when servicing the drive belt.
• Do not use to pick up ammable or combustible
liquids such as gasoline, or use in areas where
they may be present.
• Store your vacuum cleaner indoors in a cool,
dry area.
• Keep your work area well lit.
• Unplug electrical appliances before
vacuuming them.
• WARNING: This product can expose you to
chemicals including Styrene, which is known
to the State of California to cause cancer, and
Bisphenol-A, which is known to the State of
California to cause birth defects or other
reproductive harm. For more information go
to www.P65Warnings.ca.gov.
SAVE THESE INSTRUCTIONS
To reduce the risk of electric shock, this appliance has a polarized plug (one blade is wider than the
other). This plug will t in a polarized outlet only one way. If the plug does not t fully into the outlet,
reverse the plug. If it still does not t, contact a qualied electrician to install the proper outlet.
Do not change the plug in any way.
MOTOR
Do Not Oil the motor or the brush roll at any time. The bearings are permanently
lubricated and sealed.
WARNING
QUICK START GUIDE4 FOR SUPPORT, VISIT ELEMENTELECTRONICS.COM/SUPPORT 5
Click!
Click!
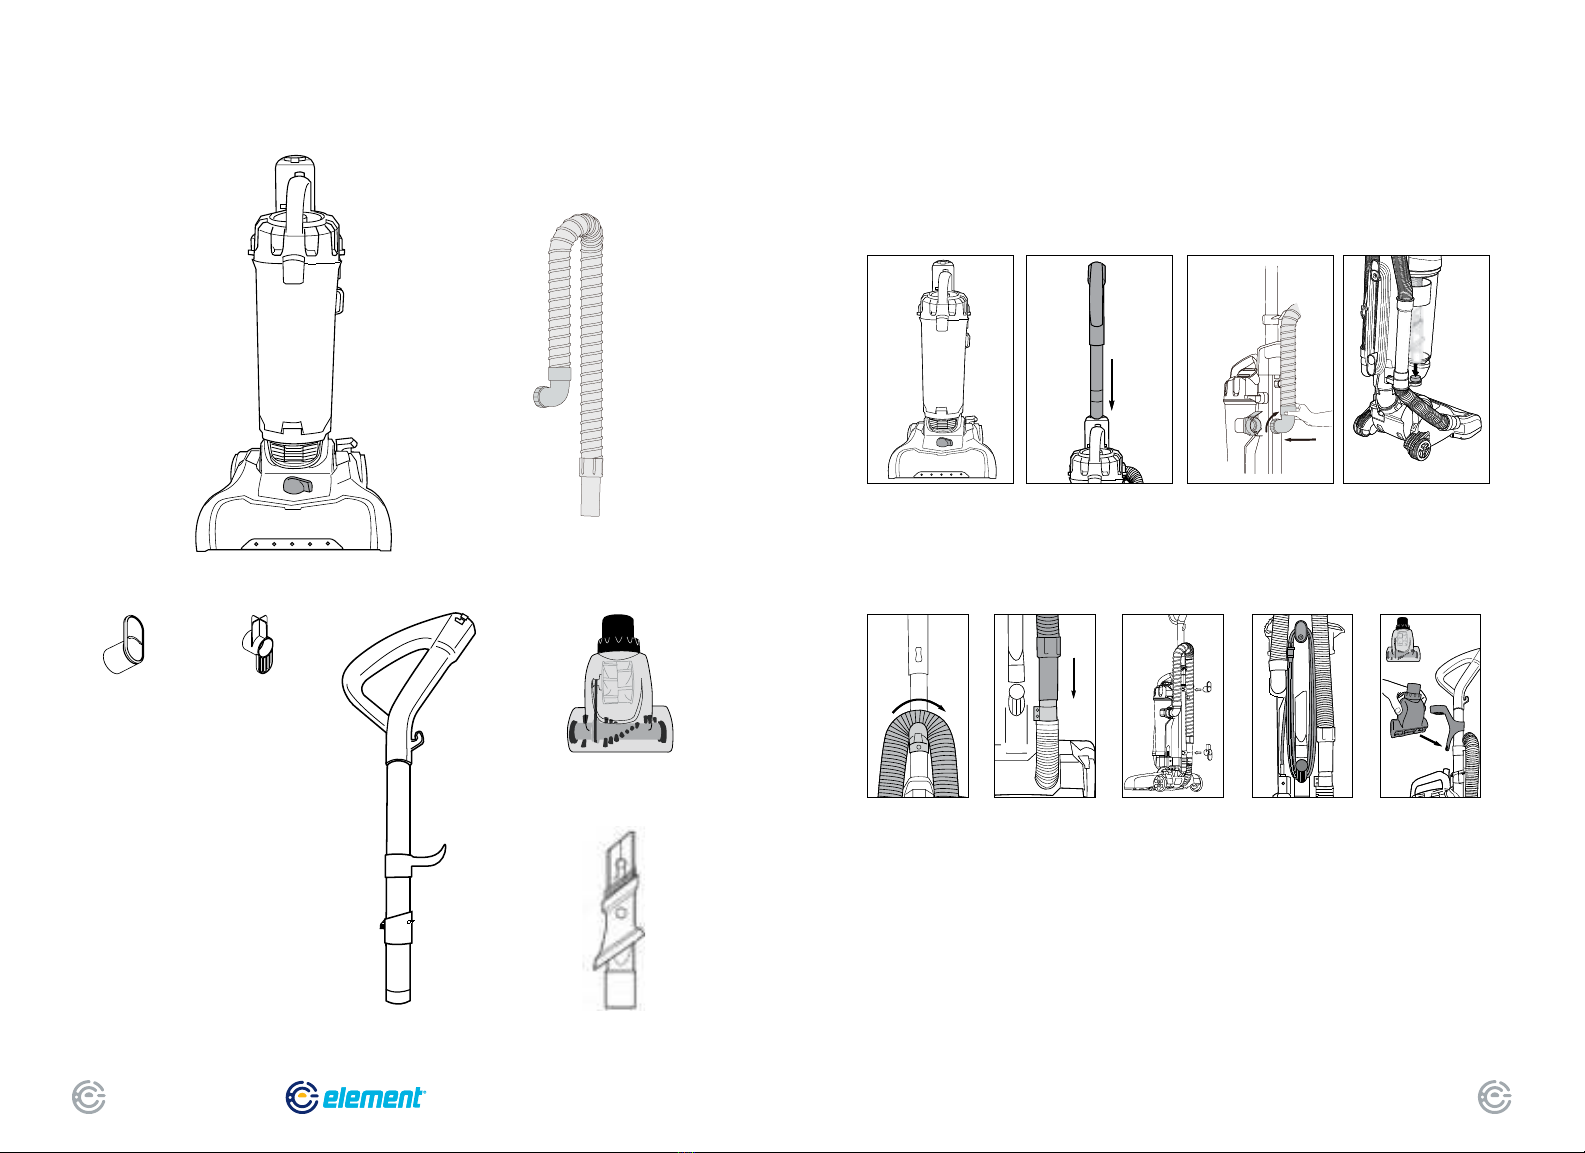
Vacuum cleaner with
dust cup.
Slide handle into top of
vacuum cleaner. Push
down until it clicks.
Insert bent end of hose
into opening at back
of dust cup. Twist hose
clockwise to lock.
Insert the 3-in-1
accessory into the
onpboard storage
reservoir as
shown above.
Loop hose over
hose retainer.
Push loose end
of hose securely
onto hose inlet.
Align upper
and lower cord
hooks and press
to snap in place.
Upper cord
hook should
rotate freely.
Wrap cord onto
upper and lower
cord hooks.
Store Pet
(H)airBrush on
front of handle.
Align brush
opening with
slot and push
to snap tool
into clip.
HOW TO ASSEMBLE
YOUR TurboExtract VACUUM
WHAT’S INCLUDED IN THE BOX
Hose
Upper Cord Hook Lower Cord Hook
Handle
Pet (H)airBrush Tool
3-in-1 Tool
Element TurboExtract Vacuum

QUICK START GUIDE6 FOR SUPPORT, VISIT ELEMENTELECTRONICS.COM/SUPPORT 7
To empty debris, press lever to
release bottom lid.
Step on handle release to
lower handle into position for
vacuuming oors.
Press release button and lift off
dust cup.
Step on power switch to turn
vacuum cleaner on. Step on
again to turn off.
Plug power cord into outlet. Turn height adjustment knob to
adjust from bare oors high
pile carpet.
HOW TO USE YOUR
TurboExtract VACUUM
Headlights
Brushroll cover
Height adjustment knob
XL dust cup
Dust cup latch
Dust cup lid
Carry handle
Dust cup release button
Pet (H)airBrush
Handle with want
Handle
release
pedal
Power switch
Cord clip
Hose retainer
Handle release latch
Upper cord clip
Hose
Lower cord wrap
Hose inlet
For lter maintenance instructions, see page 9
Washable
foam lter
XL dust cupFilter screen
Belt
Brushroll
TurboExtract vacuum
IDENTIFYING THE PARTS
OF YOUR VACUUM
Empty dust cup after every use.
Upper cord clip

QUICK START GUIDE8 FOR SUPPORT, VISIT ELEMENTELECTRONICS.COM/SUPPORT 9
Click!
Click!
Click!
Close bottom lid until it
clicks.
Press release button and lift
off dust cup.
Hold dust cup over wastebasket
and press lever to release
bottom lid. Debris will empty.
Grip tabs and lift out lter screen.
Twist bottom of lter screen
counterclockwise to unlock and
pull apart. Shake off dust. Rinse
screen and dust cup. Dry all
thoroughly. Reassemble screen,
twist clockwise to lock.
Pull dust cup latch to lift up
dust cup lid.
Lift out foam lter and
shake off dust. Rinse
foam lter and
dry thoroughly
Close cover until it clicks.Align tab on lter screen with
slot on back of dust cup and
drop into position.
Reinstall foam lter
HOW TO USE YOUR
TurboExtract VACUUM
HOW TO USE
YOUR ACCESSORIES
• Place vacuum in upright position.
• Turn height adjustment knob to
highest position.
• Pull up on hose connection to release hose
end from hose inlet (Fig. 1).
• Push end of hose into top of handle and
twist clockwise until it clicks (Fig. 2).
• Press handle release latch and pull out
handle with wand (Fig. 3).
• To attach accessories, push desired
tool onto end of wand (Fig. 4).
1
3
2
4
Pet (H)airBrush
Use to remove pet hair from stairs,
carpet and upholstery.
3-in-1 Tool
For vacuuming in narrow
and hard-to-reach places
Empty dust cup after each use
Clean dust cup lters monthly
Warning: Never operate vacuum cleaner without
foam lter, lter screen and dust cup in proper position.
Caution: When using tools,
always place handle in
upright position. Make sure
vacuum cleaner is turned off
while attaching tools.
QUICK START GUIDE10 FOR SUPPORT, VISIT ELEMENTELECTRONICS.COM/SUPPORT 11
1
3 4
2
正面反面
正面反面
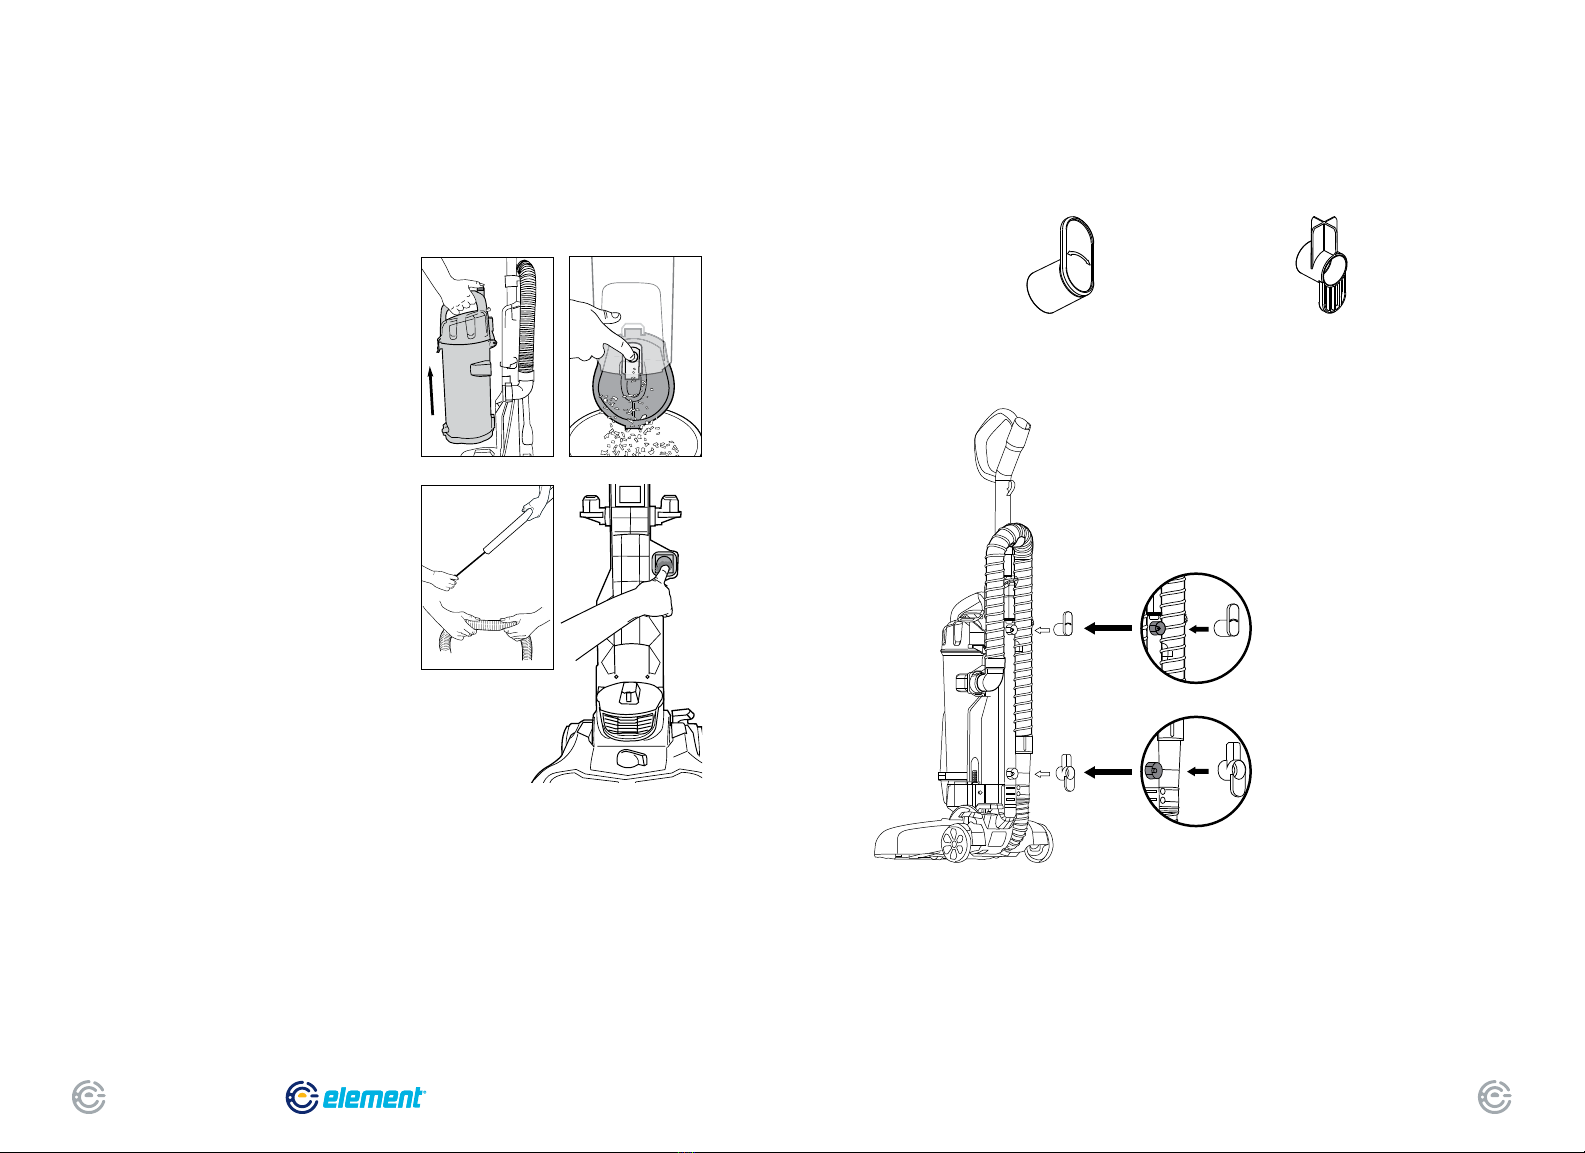
HOW TO INSTALL
THE CORD HOOKS
HOW TO CLEAR
A BLOCKAGE
If vacuum is not cleaning oors, or if there is
no suction at end of the hose, check to be
sure the air path is not blocked.
• Press release button and lift off
dust cup (Fig. 1).
• Empty debris. Hold over wastebasket
and press lever to release bottom lid
(Fig. 2).
• Check lter and lter screen.
Remove any debris and shake off dust.
(See maintenance instructions on page 9.)
• Loosen end of hose.
• Use a rod or similar blunt implement to
clear a blockage in wand or hose. Flex
hose to loosen debris (Fig. 3). Use
caution if there is any risk that glass
or nails could have become imbedded
in hose.
• Use nger to check for debris in air path (Fig. 4).
• Reinstall lter and lter screen inside dust cup
and position dust cup onto vacuum cleaner.
Warning: Never operate vacuum cleaner without
foam lter, lter screen and dust cup in proper position.
Caution: Make sure vacuum
is turned off and power
cord is unplugged.
Step 1: Align the upper cord hook
with the upper connector. Push until
it snaps into place. Ensure the cord
hook can rotate freely.
Step 2: Align the lower cord hook
with the lower connector. Ensure
the rounded edge of the cord hook
is pointing downward, as shown.
Push until it snaps into place.
This cord hook should not rotate.
Upper Cord Hook Lower Cord Hook

QUICK START GUIDE12 FOR SUPPORT, VISIT ELEMENTELECTRONICS.COM/SUPPORT 13
HOW TO REPLACE
BRUSHROLL OR BELT
HOW TO MAINTAIN
BRUSHROLL
3 4
• Step on handle release
to lower handle.
• Turn vacuum face down on oor.
• To avoid unnecessary service
calls, check brushroll for debris.
• Use scissors to clip heavy
threads or strings.
Caution: Make sure vacuum
is turned off and power
cord is unplugged.
Close cover and twist collar
to lock.
Grasp collar and twist to unlock
cover. Lift cover up.
With cover open, use ngers
or small brush to clear
accumulated pet hair
from bristles.
• Step on handle release and lay
vacuum cleaner face down.
• Use Phillips screwdriver to remove
6 screws from brushroll cover
(Fig. 1). Lift off cover. Refer to
Fig. 7 for location of screws.
• Rotate right end of brushroll
and lift out (Fig. 2).
• Lift out left end of brushroll.
• To replace belt, position new belt
around motor shaft (Fig. 3).
• Loop new belt around brushroll
shaft at left end of brushroll (Fig. 4).
• To reposition brushroll into base,
pull belt down and insert left end of
brushroll rst. Align brushroll end cap
with slot so it ts into position (Fig. 5).
Press right end of brushroll into position.
• To replace brushroll cover, align
slot on cover with tab (Fig. 6) and
snap cover into place. Replace 6
screws (Fig. 7).
Caution: Make sure
vacuum is turned off
and power cord
is unplugged.
3
2
1
4
6
5
5 6
1 2
QUICK START GUIDE14 FOR SUPPORT, VISIT ELEMENTELECTRONICS.COM/SUPPORT 15
TROUBLESHOOTING
YOUR VACUUM
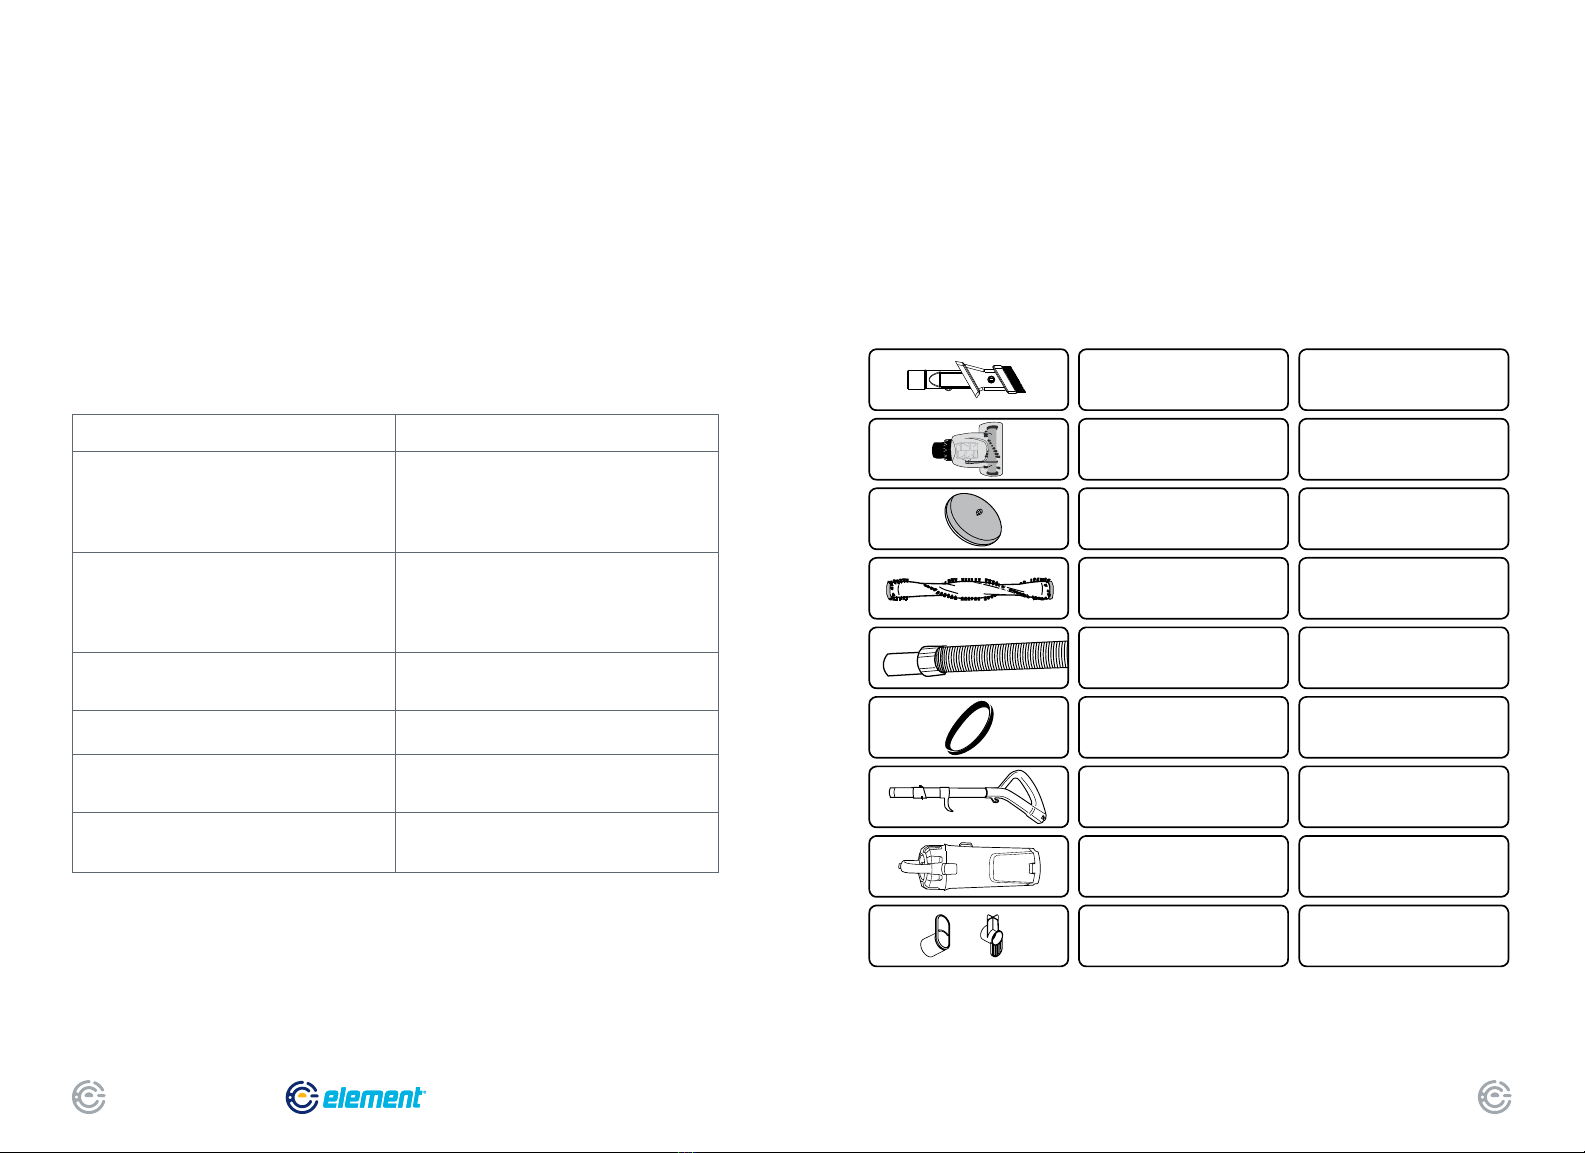
ORDER REPLACEMENT
PARTS FOR YOUR VACUUM
Notice: Thermal cutoff
This vacuum cleaner has a special thermostat that protects the vacuum in case of motor
overheating.
If the vacuum suddently shuts off, proceed as follows: 1) Push the power switch to off and unplug the
vacuum. 2) Check the vacuum for a possible source of overheating such as a full dust cup, blocked hose
or clogged lter. If these conditions are found, x them and wait at least 30 minutes before attempting
to use the vacuum. 3) After the 30 minute period, plug the vacuum back in and turn on the switch. If the
vacuum still does not work, call the Element support at 833.469.0875.
Problem Solution
Motor will not start • Push plug securely into outlet, try another outlet
or check circuit breaker.
• Step on power switch to turn vacuum on.
• See detailed “thermal cut-off”
instructions above.
Vacuum cleaner does not clean oors • Empty dust cup, clean and/or change lter.
• Clean or replace lter regularily to
maintain suction
• Check vacuum height adjustment knob position.
• Clean brushroll if needed. Page 12.
No suction at the end of the hose or want. • See other solutions above.
• Remove clogs from the hose or
wand that restrict the airow. Page 10.
Burning smell; brushroll will not turn. • Check brushroll for debris.
• Replace broken or out of shape belt. Page 13.
Vacuum is hard to push • Adjust vacuum height knob to a higher position.
• Check brushroll for debris and clean if needed.
Page 11.
Pet (H)airBrush will not turn • Check turbo brush for debris. Page 12.
To order replacement parts, contact Element support
at 833.469.0875 or visit elementelectronics.com
Image Part Name Part Number
3-in-1 tool
Pet (H)airBrush
Washable foam lter
Brushroll
Hose
Belt
Handle
XL dust cup
Upper and lower hooks
A0105
A0104
A0101
A0102
A0106
A0107
A0108
A0109
A0110

ELEMENT APPLIANCE
LIMITED WARRANTY (CONT.)
(e) commercial use of the Product, or use of the Product for anything other than single-family household
or residential use; or (f) modication of the Product or any part of the Product.
This Warranty is made to the Original Purchaser only and does not cover Products sold AS IS or WITH
ALL FAULTS. The Warranty is invalid if the factory-applied serial number has been altered or removed
from the Product. This Warranty is valid only in the United States, and only applies to Product if it was
purchased and serviced in the United States. The addition of equipment or features to the Product that
are not manufactured or recommended by Element could affect the intended function of the Product,
and therefore may void the Warranty. Furthermore, the exposure of the Product to chemicals, heat, cold,
humidity, or other elements can affect the Product components, and therefore, the Warranty does not
cover discoloration, fading, cosmetic changes, rust, or any damages or failure related to any such items.
The Warranty is contingent upon the proper use, maintenance, and care of the Product. The Warranty
may be void if the Product has been used in a manner contradictory to, or in violation of, the terms of the
user’s manual, warnings, or instructions accompanying the Product.
THIS WARRANTY IS MADE IN LIEU OF AND SUPERSEDES ALL OTHER WARRANTIES OR CONDITIONS OF
MERCHANTABILITY OR FITNESS FOR A PARTICULAR PURPOSE OR GENERAL USE, WHETHER EXPRESS,
IMPLIED, COLLATERAL, STATUTORY, OR PROVIDED BY COMMON LAW, THE UNIFORM COMMERCIAL
CODE, OR OTHERWISE. ELEMENT FURTHER DISCLAIMS ALL WARRANTIES AFTER THE END OF THE
WARRANTY TERM DEFINED ABOVE. NO OTHER EXPRESS WARRANTY OR GUARANTY GIVEN BY ANY
OTHER PERSON, FIRM, OR ENTITY WITH RESPECT TO THE PRODUCT SHALL BE BINDING ON ELEMENT.
REPAIR, REPLACEMENT, OR REFUND OF THE ORIGINAL PURCHASE PRICE, AT ELEMENT’S SOLE DISCRE-
TION, ARE THE EXCLUSIVE REMEDIES OF THE CUSTOMER.
ELEMENT SHALL NOT BE LIABLE FOR ANY INCIDENTAL OR CONSEQUENTIAL DAMAGES CAUSED BY THE
USE, MISUSE, OR INABILITY TO USE THE PRODUCT. THESE INCLUDE, BUT ARE NOT LIMITED TO, ANY
DAMAGES IN THE FORM OF LOST PROFITS, LOSS OF USE, LEGAL FEES, ECONOMIC LOSS, PERSONAL
INJURIES, OR ANY OTHER DAMAGES CAUSED BY CIRCUMSTANCES BEYOND THE CONTROL OF ELEMENT.
NOTWITHSTANDING THE FOREGOING, ELEMENT’S AGGREGATE LIABILITY TO ANY CUSTOMER SHALL
NOT EXCEED THE ORIGINAL PURCHASE PRICE OF THE PRODUCT. THIS WARRANTY SHALL NOT EXTEND
TO ANYONE OTHER THAN THE ORIGINAL CUSTOMER WHO PURCHASED THE PRODUCT, AND IS NOT
TRANSFERRABLE. NO PERSON IS AUTHORIZED TO ALTER, EXTEND, OR WAIVE THIS WARRANTY OR
ANY OF ITS TERMS OR CONDITIONS.
Some states do not allow the exclusion or limitation of incidental or consequential damages, or allow
limitations on warranties, so the above limitations or exclusions may not apply to you. This Warranty
gives you specic rights, and you may have other rights, which vary from state to state. The exclusions
and limitations to the Warranty apply to the maximum extent permitted by law and unless restricted or
prohibited by law. Where any term of this Warranty is prohibited by applicable law, it shall be null and
void, but the remainder of this Warranty shall remain in effect.
PLEASE CONTACT THE RETAILER FROM WHOM YOU PURCHASED THE PRODUCT FOR CUSTOMER
SERVICE OR TO CONFIRM PROCEDURES FOR WARRANTY SERVICE.
In the event you wish to contact Element, please direct all correspondence to:
Element Appliance Company, LLC
appliance@elementelectronics.com
(833) 250-6588
https://elementelectronics.com/appliances
ELEMENT APPLIANCE
LIMITED WARRANTY
Model Names/Numbers Subject to Limited Warranty:
Element TurboExtract EV01AB96GB
(the “Products” or “Product” when referencing a singular product herein)
This Product, as supplied and distributed in new condition, is warranted by Element Appliance Company,
LLC (“Element”) to the original purchaser of such Product who purchases the Product from an authorized
Element retailer (the “Original Purchaser”) against defects in material and workmanship under proper
use, maintenance, and care according to the owner’s manual, warnings, and instructions accompanying
the Product (the “Warranty”) as follows:
*PLEASE NOTE – Proof of purchase evidencing the date of purchase by the Original Purchaser from an
authorized Element retailer (“Valid Proof of Purchase”) is required for all Warranty service. The express
Warranty set forth herein is subject to all terms and conditions set forth below.
1. WARRANTY SERVICE:
A. ONE-YEAR WARRANTY: Except as provided in subpart 1.B below, for a period of one (1) year from
the date of purchase by the Original Purchaser (the “Warranty Period”), if the parts or components
covered by this Warranty are determined by Element or Element’s authorized service provider to be de-
fective in material or workmanship, Element will, at its sole and absolute discretion and option: (i) repair
the defective part or component at no charge to the Original Purchaser, (ii) replace the defective Product
with a new Product of similar or better quality, at no charge to the Original Purchaser, or (iii) refund the
documented purchase price paid by the Original Purchaser (excluding tax) to the Original Purchaser upon
return of the defective Product as directed by Element. After the Warranty Period expires, the Original
Purchaser must pay for all parts, components, shipping and handling, labor, and replacement costs asso-
ciated with the Product or any part or component thereof, regardless of any defects in the Product or any
part or component thereof.
B. LIMITED EXTENDED WARRANTY THROUGH PRODUCT REGISTRATION: If and only if the Original
Purchaser registers the Product at www.elementelectronics.com within ninety (90) days of the date of
purchase by the Original Purchaser, then the Warranty Period discussed in subpart 1.A. above shall be
extended an additional one (1) year to a new Warranty Period equaling two (2) years from the date of
purchase by the Original Purchaser. If the Product is not registered as provided for in this subpart 1.B,
then the standard one-year Warranty Period set forth in subpart 1.A shall apply.
C. TIMING AND PROCEDURE: Before Warranty service can commence, the Original Purchaser must
contact either (i) the retailer from whom the Original Purchaser purchased the Product, or (ii) Element di-
rectly, in either case for problem determination and service procedures. Valid Proof of Purchase evidenc-
ing that the Product is within the Warranty Period MUST be presented by Original Purchaser in order to
obtain the requested Warranty service. Please have your model and serial number available, along with
your date of purchase of the Product. To remain eligible for Warranty service, Original Purchaser may not
return the Product or any part or component thereof to the retailer or Element without Element’s prior
written consent.
2. EXCLUSIONS AND LIMITATIONS TO WARRANTY SERVICE
The Warranty covers manufacturing defects in materials and workmanship of the Product encountered
in the normal, non-commercial use of the Product, and does not cover (a) damages or malfunctions
resulting from improper or unreasonable use or maintenance, abuse, negligence, failure to follow instruc-
tions contained in any written materials that accompany the Product, deterioration by reason of excess
moisture, corrosive atmosphere, lightning, power surges, connections to improper voltage supply, unau-
thorized alteration, or other external causes such as extremes in temperature or humidity, modications,
scratches or discoloration; (b) improper or incorrectly performed repairs by service providers not autho-
rized by Element; (c) transportation, shipping, delivery, pickup, insurance, installation, or set-up costs;
(d) ordinary wear and tear, cosmetic damage, or damage due to acts of nature, including but not limited
to, water, oods, wind, storm, tornado, earthquake, or re, or due to damage caused by extraordinary
impact events, such as dropping, crushing, demolition or other extraordinary damage;

QUICK START GUIDE18 FOR SUPPORT, VISIT ELEMENTELECTRONICS.COM/SUPPORT 19
LET’S REGISTER
YOUR PRODUCT
It’s super easy, just head on over to
elementelectronics.com/register
WE’RE HERE
TO HELP
elementelectronics.com
1.888.842.3577
customerservice@elementelectronics.com
Find resources and get help with product setup,
connecting devices, technical issues,
downloading manuals and more!
BENEFITS OF REGISTERING
YOUR PRODUCT:
Support
Get assistance
quickly by
pre-registering
your product.
News & Offers
Take advantage of the
latest news and special
offers from Element.
We’re available 24 hours a day, 7 days a week
www
Updates
Stay current with
important product updates
and notications.
2 YEAR
WARRANTY
Warranty
Receive a 2 year
warranty with
product registration*

Bring it home.TM
This manual suits for next models
1
Table of contents
Other Element Vacuum Cleaner manuals


