- 23 -
Èesky PROGRESS PC7160, 7170, 7175, 7180, 7185
D
D¨
¨L
LE
E×
×I
IT
TÁ
ÁB
BE
EZ
ZP
PE
EÈ
ÈN
NO
OS
ST
TN
NÍ
ÍU
UP
PO
OZ
ZO
OR
RN
NÌ
ÌN
NÍ
Í
تádnì si tuto pøíruèku prostudujte.
ØPøed pou÷itím spotøebièe zkontrolujte, zda napájecí napìtí vaší elektrické instalace odpovídá napìtí
uvedenému na typovém štítku spotøebièe.
ØNezapínejte spotøebiè, jestli÷e se vám zdá nìjak porouchaný, nebo má poškozený pøívodní kabel nebo
síþovou zástrèku. Nepokoušejte se opravovat spotøebiè sami. V pøípadì opravy nebo potøeby náhrad-
ních díl¢ se obracejte na svého prodejce nebo na autorizované servisní støedisko.
ØKdy÷ spotøebiè nebudete pou÷ívat a pøed ka÷dým èištìním v÷dy odpojte zástrèku ze zásuvky.
Spotøebiè musí být odpojen ze zásuvky i v pøípadì jakékoli opravy.
ØNikdy nenechávejte zapnutý spotøebiè bez dozoru. Udr÷ujte spotøebiè mimo dosah dìtí.
ØTento spotøebiè je urèen jen pro pou÷ití v domácnosti. Pou÷ívejte ho v souladu s návodem k obsluze.
ØNikdy spotøebiè nepøemisþujte. Tahem za elektrický kabel. Nikdy zástrèku neodpojujte ze zásuvky
tahem za kabel.
ØNepou÷ívejte spotøebiè na mokrém povrchu ani nevysávejte kapaliny, bláto, popel a hoøící cigaretové
nedopalky. Nevysávejte ÷ádné silnì vznìtlivé ani výbušné látky nebo plyny.
ØNeodpojujte vysavaè ze zásuvky vlhkýma rukama.
ØNeprovozujte vysavaè pøíliš blízko zdroj¢ tepla a radiátor¢, kamen apod.
ØPøed vysáváním odstrañte prosím z podlahy velké a ostré pøedméty. Zabráníte tak poðkození hadice a
nádoby na prach.
N
NÁ
ÁV
VO
OD
DK
KO
OB
BS
SL
LU
UZ
ZE
E
ØPøed uvedením do provozu se pøesvìdète, ÷e filtry jsou nasazeny a jsou ve správné poloze.
ØPøed pou÷itím spotøebièe si odviñte dostateènou délku kabelu a pak teprve zástrèku zapojujte do
zásuvky. Pou÷itelnou délku kabelu vyznaèuje ×LUTÁ znaèka. ÈERVENÁ znaèka oznaèuje mezní délku,
za kterou nesmíte kabel odvíjet.
ØStisknìte tlaèítko hlavního vypínaèe a vysavaè zapnìte. Po zapnutí vysavaèe je dosa÷eno maximál-
ního výkonu asi po 1-2 vteøinách.
ØKdy÷ chcete pøívodní kabel navinout, stisknìte nohou tlaèítko navíjení a kabel rukou pøidr÷ujte, aby
švihem nezp¢sobil nìjakou škodu.
ØHladina hluku: 83dB
Ú
ÚD
DR
R×
×B
BA
A
V
VY
YP
PR
RA
AZ
ZD
D§
§O
OV
VÁ
ÁN
NÍ
ÍO
OB
BS
SA
AH
HU
UN
NÁ
ÁD
DO
OB
BY
YN
NA
AP
PR
RA
AC
CH
H
Vysavaè zapínejte pouze pokud je náboba na prach vlo÷ena do vysavaèe.
ØOdejmìte nádobu na prach pou÷itím tlaèítka otevírání na dr÷adle (obr.20.).
ØOdejmìte filtraèní sadu stiskem tlaèítka (obr.21).
ØVyprázdnìte obsah nádoby na prach (obr.22).
ØVlo÷te sadu filtru zpìt do oddílu pro nádobu na prach (ob.21).
ØVlo÷te opatrným vtlaèením nádobu na prach zpìt do vysavaèe dokud nezapadne (obr.20).
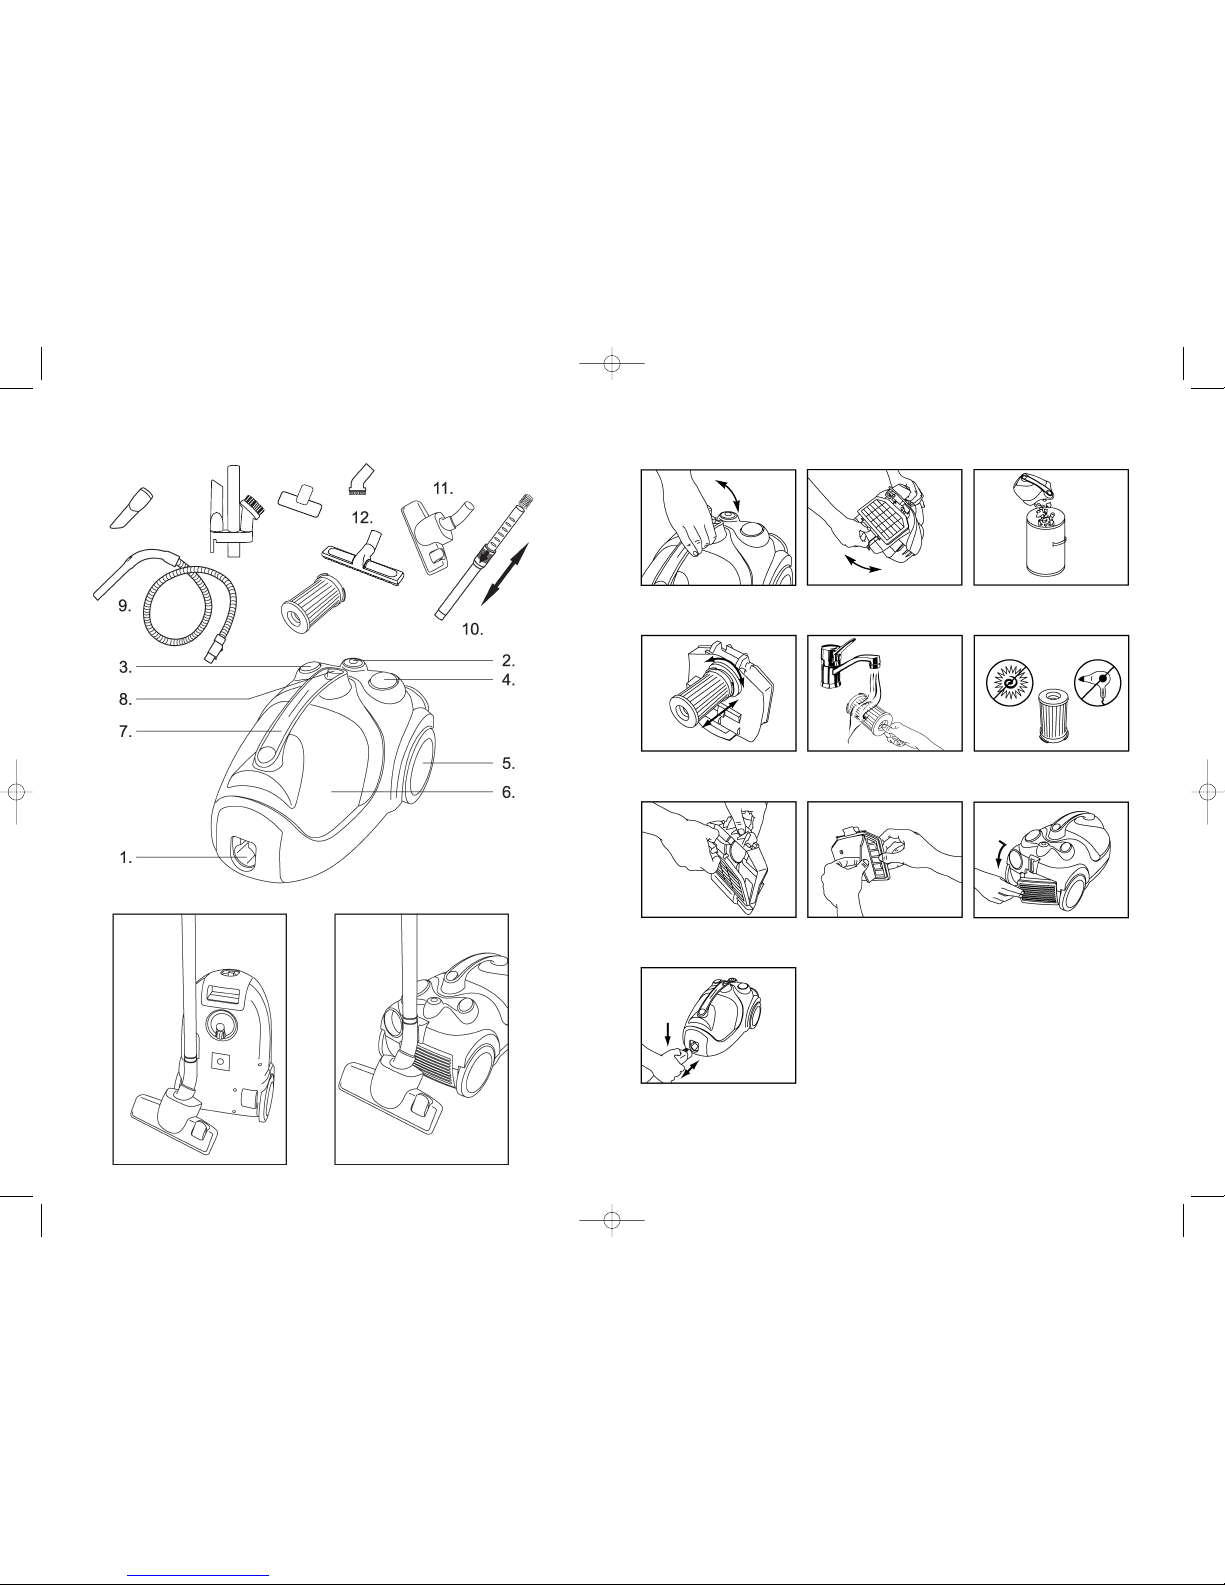
P
PO
OP
PI
IS
S
1. Vstupní otvor sání
2. Elektronický indikátor filtru
3. Hlavní vypínaè
4. Tlaèítko navijáku kabelu
5. Koleèko
6. Nádoba na prach
7. Pøenášecí dr÷adlo
8. Tlaèítko otevírání nádoby na prach
9. Hadice
10. Kovová teleskopická trubka
11. Kombinovaná podlahová hubice
12. Hubice na hladkou podlahorou krytinu
(PC7185)
13. Ðtìrbinová hubice
14. Hubice na èalounìní (PC7175)
15. Kartáè na prach
16. Kazetový filtr
17. Dr÷ák p÷ísluðenství (PC7180, PC7185)
18. Vertikální parkovací poloha
19. Horizontální parkovací poloha
- 4 -
REPLACING THE FILTERS
Ø
The dust container must be emptied if the window of the electronic filter indicator is illuminated when the cleaner is operating at maximum
power and the nozzle is raised from the floor.
Ø
Filters should be replaced at least twice a year or when they become visibly soiled.
Ø
Always operate the cleaner with filters installed to avoid reduced suction.
Ø
Disconnect from electrical outlet before changing the filters.
Replacing the cartridge filter
Ø
Remove the dust container by using the open button on the handle (fig. 20).
Ø
Remove the filter set by pushing the button (fig. 21).
Ø
Remove the cartridge filter by turning it counter-clockwise (A) and pull it out (B) (fig. 23).
Ø
Rinse it under tap water (fig. 24).
Ø
Air dry for approximately 24 hours, to ensure it is completely dry before re-using. Avoid direct sunlight and extreme drying circumstances (fig. 25).
If you wish to use your appliance while the cartridge filter is drying, you may use the extra cartridge filter inserted in the packaging box.
Ø
Insert the cartridge filter into its place (B) and turn it clockwise (A) (fig. 23).
Ø
Insert the filter set back into the dust container.
Ø
Insert the dust container back into the cleaner by pressing it down until it clicks.
Cartridge filter reference number: ET 407 133 054/4.
Replacing the motor filter
Ø
Remove the dust container by using the open button on the handle (fig. 20).
Ø
Remove the filter set by opening the button (fig.21).
Ø
Remove the filter with grill from its holder (fig.26).
Ø
Remove the filter from the grill (fig. 27).
Ø
Put a new filter into the filter grill (fig. 27).
Ø
Put the filter with grill back into its place (fig.26).
Motor filter reference number: ET 407 133 055/1.
Replacing the exhaust filter
Ø
Open the filter grill to remove the exhaust filter (fig. 28).
Ø
Take the filter out of its place.
Ø
Put a new filter into its place, then close the filter grill (fig. 28).
Micro filter reference number: ET 407 133 056/9 (depends on the model).
HEPA filter reference number: ET 407 133 057/7 (depends on the model).
OPERATING THE HOSE IN/OUT OF THE SUCTION INLET (fig. 29)
Ø
To connect the hose into the suction inlet push it until it clicks.
Ø
To disconnect the hose from the suction inlet push the button at the end of the hose.
FILTER INDICATOR LIGHT
Ø
Before commencing cleaning, plug the cleaner in and turn it on (without the hose attached to the cleaner ).
If the light is on, clean the filter.
Ø
If the light is not on, attach the hose and all the other necessary attachments and commence cleaning.
Ø
The light will flicker on and off whilst cleaning. This is normal.
PROTECTING THE ENVIRONMENT
Ø
Attempt to recycle packaging material and old appliances.
Ø
The cardboard packaging can be placed in the waste paper collection.
Ø
Deposit the plastic bag made of polyethylene (PE) at the PE collection point for recycling.
Recycling the Appliance at the end of its life
Ø
The plastic components all carry a material identification marking so that, like the other materials, they can recycled at the end of the life of
the appliance.
Ø
Please inquire with your local authority.
Blocked air flow and dirty filters
Ø
The cleaner stops automatically if a blockage occurs in the nozzle/tube/hose or if the filters are blocked with dirt.
ØDisconnect from mains and allow the cleaner to cool for 20-30 minutes. Remove blockage and/or clean filters.
Ø
Restart the cleaner.