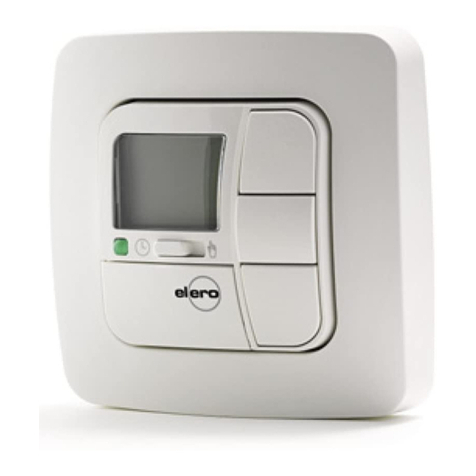
elero AstroTec-915ac User manual

Nr.18 100.5601/0606
AstroTec-915
309104 01
Operating instructions
Please keep these instructions in a safe place.
USA
Timer ist preprogrammed
elero
elero USA
10827 Alder Circle
USA-Dallas
Texas 75238
info@eleroUSA.com
elero GmbH
Antriebstechnik
Linsenhofer Str.59–63
D-72660 Beuren
info@elero.de
www.elero.com

Contents
USA-2
Contents
USA-1
USA
Safety instructions ........................................USA- 3
Instruction to the user ....................................USA- 4
Explanation of displays and buttons .....................USA- 5
General information .......................................USA- 6
Designated use ............................................USA- 6
Wall holder installation ...................................USA- 7
Initial operation ...........................................USA- 8
Factory settings ...........................................USA- 8
Light sensors ...............................................USA- 9
Explanation of functions ..................................USA- 9
Manual/Automatic sliding switch ....................USA- 9
Transmission control light, Operating mode ........USA- 9
OK button, +/- button, MENU button, RESET button
USA-10
Time/date ..............................................USA-10
Programme ............................................ USA- 11
Astro, Astro evening, Individual ......................USA-12
Week, Block, Individual, Idle period ..................USA-13
Switching time, Offset ................................ USA-14
Holiday setting, End limit ............................USA-15
Intermediate position,Ventilation/Reverse,
PROG 1 + 2 .............................................USA-16
Language selection, Astro shift, City selection,
Longitude/latitude/time zone,
Automatic summer/winter time changeover .......USA-17
Expert mode............................................USA-18
Programming radio channel settings ....................USA-19
Programming transmitter/channel...................USA-19
Programming additional transmitters ...............USA-20
Deleting individual transmitters .....................USA-20
Deleting all transmitters..............................USA-20
Programming...............................................USA-21
Overview of menu .....................................USA-21
Date and time settings................................USA-21
Programme (Setting control commands and idle periods)
PROG 1 Astro (Astro function + Idle period vb)
Week/Block 1/2/Individual ............................ USA-22
PROG 1 Astro evening (Astro evening function
+ Idle period vb) Week/Block 1/2/Individual........ USA-23
PROG 1 Individual (Individual switching times vb)
Week/Block 1/2/Individual ............................ USA-25
PROG 2 Individual (Individual switching times vb)
Week/Block 1/2/Individual ............................USA-26
PROG 2 Offset (Evening DOWN control command for
adjustment to ventilation position) ...................
USA-28
Setting
Holiday function, Light sensor (HOLIDAY menu,
Sun/twilight sensor)...................................USA-29
Intermediate position,Ventilation/reverse, PROG 1 End
limit, PROG 2 End limit (time/position programming)
USA-30
English GB, Astro shift (Language selection,
Astro shift) .............................................USA-32
City selection, Expert mode (longitude, latitude,
time zone) .............................................USA-33
Automatic summer/winter time changeover........USA-34
Function
Roller shutter/blind selection, Running time,
EXPERT mode, Initial operation .......................USA-35
Technical data ..............................................USA-36
Battery replacement ......................................USA-36
Cleaning ....................................................USA-36
Troubleshooting ........................................... USA-37
General declaration of conformity ....................... USA-38

Safety instructions
USA-3 USA-4
Instruction to the user
USA
Important safety instructions!
Always observe the following instructions.
• For use in dry rooms only.
• Use unmodified elero original parts only.
• Keep persons away from the systems guide
track.
• Keep children away from controls.
• Always comply with national stipulations.
• Dispose of used batteries properly.
Replace batteries with identical type (LR 03/AAA)
only.
• If the system is controlled by one or more
devices,the system guide track must be visible
during operation.
•The equipment contains small parts that could
be swallowed.
Warning!
This equipment has been tested and found to comply with the
limits for a class B digital device,pursuant to part 15 of the FCC
Rules.These limits are designed to provide reasonable protection
against harmful interference in a residential installation.This
equipment generates, uses and can radiate radio frequency energy
and if not installed and used in accordance with the instructions,
may cause harmful interference to radio communications.
However, there is no guarantee that interference will not occur in
a particular installation. If this equipment does cause harmful
interference to radio or television reception,which can be
determined by turning the equipment off and on, the user is
encouraged to try to correct the interference by one or more of
the following measures:
•Reorient or relocate the receiving antenna.
•Increase the separation between the equipment and receiver.
•Connect the equipment into an outlet on a circuit different from
that to which the receiver is connected.
•Consult the dealer or an experienced radio/TV technician for
help.
Operation with non-approved equipment is likely to result in
interference to radio and TV reception. The user is cautioned that
changes and modifications made to the equipment without the
approval of manufacturer could void the user's authority to
operate this equipment.

USA-6USA-5
USA
General information/Designated use
General information
The AstroTec-915, delivered from the factory with current date and
time settings (GMT), automatically controls the drive at the astro
times (sunrise and sundown).
The AstroTec-915 can be operated manually at any time.
The easy-to-install light sensor allows the AstroTec 868 to be
extended to include a convenient sunshade function (shading
plants and furniture).
Designated use
The AstroTec-915 may only be used to control roller shutter and
venetian blind systems.
Explanation of displays and buttons
Function
Astro
UP
DOWN
Digital display
Days (Mon.-Sun.) min
Programme
Time/date
Text line
Setting
31
AstroTec-868
MENU -
Reset
OK OK button
+button
–button
MENU button
Reset button
Explanation of displays and buttons
Buttons under the cover
Explanation of displays and symbols
Transmission
control light
Cover
Manual/automatic
sliding switch
DOWN button
STOP button
UP button
31
min
S
1 2 3 4 5 6 7
LR03 (AAA)
LR03 (AAA)
Connector
plug
Programming
button P
Battery

USA-8USA-7
USA
Initial operation/Factory settings
Initial operation
To activate the AstroTec-915 timer, touch any button on the device.
To select the language required use the +/- buttons and confirm
your selection with the OK button.The AstroTec-915 is now in
automatic operating mode.
Factory settings
TIME/DATE: – Current GMT and current date
PROGRAMME: – ASTRO WBLOCK WIDLE PERIOD (1-5)
v06:30 HRS
bNo default idle period
IDLE PERIOD (6,7)
v08:00 HRS
bNo default idle period
SETTING: – HOLIDAY OFF
– light sensor SUN 05 sunlight value
(if light sensor is connected)
– PROG.1 END LIMIT, LONDON
– SUMMER/WINTER ON
FUNCTION: – ROLLER SHUTTER,EXPERT MODE OFF
Note! Press the RESET button (with a ballpoint pen or similar
object) to restore the factory settings of the AstroTec 868.
Exception: Function,language and city menu levels.
Installation
Wall bracket installation
• Before installation in the required assembly position,check that
the transmitter and receiver are functioning properly.
• Fix the bracket onto the wall with the two screws provided.
Note: Radio sets transmitting at the same frequency can lead to
interference in the reception.
It is to be noted that the range of the radio signal is
restricted by legislators and planning regulations.

USA-10USA-9
USA
Explanation of functions
+/- buttons
The following operations are possible using the + and - buttons:
MENU button
By pressing the MENU button, you can see an overview of the
menu or the operating mode.
The values currently displayed are not saved.
RESET button
When the RESET button is pressed (with a ballpoint pen or
similar object), the AstroTec reverts to the default setting.
Exceptions: Function,language and city menu levels.
Time/date
TIME/DATE
This menu is used to set the time and the date.
•Menu Wchange value
•Automode Wrequest information
• + button Wnext automatic switching time v
• – button Wnext automatic switching time b
+button and OK button Wastro time v
–button and OK button Wastro time b
Light sensors/Explanation of functions
Light sensors
Note: If you wish to connect a light sensor to the AstroTec 868, the
instructions provided with the light sensor must be followed.
Explanation of functions
MAN/AUTO sliding switch
In the“MAN ”sliding switch setting,only manual command
controls are executed.
In the“AUTO ”sliding switch setting,manual and automatic
command controls are carried out (e.g. shade function,time,astro
function,...)
Transmission control light
A radio signal is indicated when the transmission control light
comes on.
If the UP,STOP and DOWN buttons or programming button Pon the
transmitter are held for a longer period, the transmission control
light will go out after 3, 6 and 9 seconds.This function is a counting
aid.After 12 seconds the transmission control light will go out
completely.
If the batteries are low, the transmission control light flashes during
the transmission process.The transmitter power and/or radio range
is reduced when the batteries are low. If the transmission control
light no longer lights up when a button is pressed,the batteries
have to be replaced.
Operating mode
The time is shown in the display.
OK button
When the OK button is pressed, the values currently displayed are
saved.

USA-11 USA-12
Explanation of functions
ASTRO
The AstroTec-915 automatically controls your roller shutters or
blinds at the pre-set sunrise and sunset times.These times are
used as guidelines.
09:00 Time
07:00 Time
05:00 Time
Close
19:00 Time
22:00 Time
16:00 Time
Dec. Jan. Feb. Mar. Apr. Jun
May Jul. Aug. Sept. Oct. Nov. Dec.
Sunset
Sunrise
Astro
function
Winter time Summer time Summer time Winter time
Winter time
Summer timeSummer time
Winter time
09:00 Time
07:00 Time
05:00 Time
Close
19:00 Time
22:00 Time
16:00 Time
Sunset
UP
switching
time
Astro
evening
Winter time Summer time Winter time
Summer time
Summer time
Winter time Summer time Winter time
Dec. Jan. Feb. Mar. Apr. Jun
May Jul. Aug. Sept. Oct. Nov. Dec.
ASTRO EVENING
Shutters are raised according to the set switching time.
Shutters are lowered according to the astro function.
INDIVIDUAL
Triggers the UP and DOWN control commands according to the
switching times you have set.
USA
Explanation of functions
Programme
PROGRAMME
The PROGRAMME menu allows you to set various switching times:
1.PROG1
• Astro ,astro evening,individual
o Week (1-7)
o Block 1/2 (1-5 and 6,7)
o Individual (1,2, 3,4, 5,6, 7)
2.PROG 2 (e.g.lunch break)
• Individual
o Week (1-7)
oBlock 1/2 (1-5 and 6,7)
o Individual (1,2, 3,4, 5,6, 7)
• OFFSET

USA-13 USA-14
USA
Explanation of functions
SWITCHING TIME
Automatic switching times for roller shutters and blinds to be
raised and lowered.
OFFSET
An additional switching time bcan be programmed using the
OFFSET menu.This depends on the PROG 1 switching time b
(max. +/- 240 mins.).
For example:
astro time b:20:00
Offset b:+60 mins.
The roller shutter moves to the intermediate position at 20.00 hrs
and to the lower end limit at 21.00 hrs.
Close
19:00 Time
22:00 Time
16:00 Time
Sunset
Offset + 60
Astro
Winter time
Summer timeSummer time
Winter time
Explanation of functions
WEEK
Using the WEEK menu,you can set the same switching times from
Monday – Sunday (1-7).
BLOCK
Using the BLOCK menu, you can set two blocks.
Block 1:sets the switching times for Monday – Friday (1-5).
Block 2: sets the switching times for Saturday and Sunday (6,7).
INDIVIDUAL
Using the INDIVIDUAL menu, you can set separate switching times
for every day of the week.
IDLE PERIOD
Prevents the roller shutter from moving up or down too early
because of the astro function.
For example:
Astro time v:5:30
Idle period v:6:30
The roller shutter does not move up before 6:30.
Astro time b:17:00
Idle period b:19:30
The roller shutter does not move down before 19:30.
09:00 Time
07:00 Time
05:00 Time
19:00 Time
22:00 Time
16:00 Time
Sunset
Sunrise
Idle period
Idle period for opening
Idle period for closing
Close
Dec. Jan. Feb. Mar. Apr. Jun
May Jul. Aug. Sept. Oct. Nov. Dec.

USA-15 USA-16
Explanation of functions
INTERMEDIATE POSITION
The intermediate position is a position of the roller shutter/blind
between the upper and lower limits that can be freely selected.
This position can also be reached from the upper position after
programming.
Press the DOWN button twice in rapid succession to move to the
intermediate position.
When the system is in venetian blind mode,it is also possible to pro-
gramme a reverse position.In this case,this command will be auto-
matically executed following the intermediate position command.
VENTILATION/REVERSE
The ventilation/reverse position is a position of the roller shutter/
blind between the upper and lower limits that can be freely selected.
Using this function, you can raise the shutter from the lower end
limit until the ventilation slits are open.The slats of the blind will be
turned.
Press the UP button twice in rapid succession to move to the ventila-
tion/reverse position.
PROG 1/PROG 2
PROG 1 END LIMIT/PROG 2 END LIMIT
With the setting PROG 1 END LIMIT/PROG 2, the drive moves into the
lower limit position according to an automatic control command b
executed via the menu level PROG 1/PROG 2 END LIMIT.
INTERMEDIATE POSITION
With the setting PROG 1/PROG 2 INTERMEDIATE POSITION, the drive
moves into the pre-set intermediate position according to an
automatic control command b.
VENTILATION/REVERSE
With the setting PROG 1/PROG 2VENTILATION/REVERSE POSITION,
the drive first moves into the lower limit position and then into the
ventilation/reverse position according to an automatic control
command b.
USA
Explanation of functions
SETTING
The SETTING menu gives you the following options:
• HOLIDAY
• SUN (when sensor is connected)
• TWILIGHT SETTING (when sensor is connected)
• INTERMEDIATE POSITION
• VENTILATION/REVERSE
• PROG 1 (END LIMIT, INTERMEDIATE POSITION,
VENTILATION/REVERSE)
• PROG 2 (END LIMIT, INTERMEDIATE POSITION,
VENTILATION/REVERSE)
• TEST MODE
• Language (ENGLISH GB)
• ASTRO SHIFT v
• ASTRO SHIFT b
• City (LONDON)
• LONGITUDE
• LATITUDE
• TIME ZONE
• SUMMER/WINTER (automatic clock adjustment for
daylight saving changes)
To set a function, press the OK button until you come to the
required menu level.
HOLIDAY SETTING
The holiday setting simulates an occupied house while you are on
holiday.
If the function is activated (ON), the roller shutter/blind varies
randomly from the programmed times (max. + 30 mins.).
END LIMIT
The end limit is the point where the roller shutter/blind is in the
upper or lower position.
Only when EXPERT
MODE is ON.
k

USA-18
USA
USA-17
Explanation of functions
FUNCTION
This mode is intended for qualified electricians only!
(Will only appear when the operating device is disconnected)
The FUNCTION menu gives you the option of setting the following
functions:• ROLLER SHUTTER/BLIND (select either shutter or blind)
• RUNNING TIME
• EXPERT MODE
• INITIAL OPERATION (for service purposes)
EXPERT MODE
If selecting the city (EXPERT MODE OFF) is not precise enough,you
can make a fine adjustment by setting the degrees of longitude and
latitude (EXPERT MODE ON).
Explanation of functions
Language (ENGLISH GB)
You can select your national language.
ASTRO SHIFT
With the astro shift setting, the astro time vand astro time bcan
be shifted independently of one another (max. +/- 120 mins.).
City (LONDON when the language is set to ENGLISH GB)
This allows you to precisely adapt the astro function to your location.
It is important to select a city for the astro function.Select the city
nearest to where you are located.
LONGITUDE/LATITUDE/TIME ZONE (only when EXPERT MODE is ON
You can find out your coordinates, for example,with the aid of an
atlas.
SUMMER/WINTER
SUMMER/WINTER describes the automatic clock adjustment for
daylight saving changes.If the default setting is ON, the
AstroTec-915 adjusts itself automatically.
09:00 Time
07:00 Time
05:00 Time
Close
19:00 Time
22:00 Time
16:00 Time
Sunset
Sunrise
Astro-
verschiebung
Öffnen, z.B. 1 Stunde nach Sonnenaufgang bei Astroverschiebung von + 1h
Winter time Summer time Summer time Winter time
Winter time
Summer timeSummer time
Winter time
Dec. Jan. Feb. Mar. Apr. Jun
May Jul. Aug. Sept. Oct. Nov. Dec.

USA-20
USA
USA-19
Programming additional transmitters/
Deleting transmitters
Deleting individual transmitters
Disconnect the fuse – and reconnect after a few seconds.
1. Press the following buttons simultaneously:
• Programming button P(on back of device)
• STOP button (on front of device)
2.Keep these two buttons pressed until the LED goes out briefly
(approx. 3 seconds).
Deleting all transmitters
Disconnect the fuse – and reconnect after a few seconds.
1. Press the following buttons simultaneously:
• Programming button P(on back of device)
• UP button
• STOP button
• DOWN button
2.Keep all of these buttons pressed until the LED goes out.
on front of device
k
Programming additional transmitters
To programme additional transmitters in one receiver, please proceed
as follows:
1. Press the UP,DOWN and programming button Pon a transmitter
that has already been programmed in the receiver until the LED
goes out.
2. To define the keyboard layout, press the UP button on the handheld
transmitter as soon as the shutter/blind begins to move upwards
(after approx.1 second).
The shutter/blind will come briefly to a halt.
As soon as the shutter/blind begins to move again,press the
DOWN button on the handheld transmitter.
The shutter/blind will come to a stop.
The transmitter or this channel has been successfully programmed.
Programming radio channel settings
Programming radio channel settings
Programming transmitter/channel
Prerequisite: The drive must be installed.
1. With pre-installed electric receivers, the fuse must be
disconnected and reconnected after a few seconds.
The drive will then remain in programming mode for
approximately 5 minutes.
2.Position yourself in front of the roller shutter/blind with the
AstroTec-915 in your hand
LR03 (AAA)
Programming button P
3.Press programming button P
on the back of the device
briefly.The shutter/blind will
automatically begin to move
up and down.This will hap-
pen for approximately 2
minutes.
4. To define the keyboard layout,press the UP button of the
AstroTec-868 (located on the front of the device) as soon as the
shutter/blind begins to move upwards (after approx. 1 second).
The shutter/blind will come to a halt briefly.
As soon as the shutter/blind begins to move again,press the
DOWN button on the AstroTec-915.
The shutter/blind will come to a stop.
The AstroTec-915 has been successfully programmed.

USA-21 USA-22
USA
Programming
PROGRAMME
PROG1/ASTRO WEEK (Astro function for week + idle period vb)
PROG1/ASTRO BLOCK (Astro function for block 1/2 + idle period vb)
PROG1/ASTRO INDIVIDUAL (Astro function for individual + idle
period vb)
OK
+/-
OK
PROGRAMME
PROG 1
ASTRO WEEK IDLE PERIOD v
PROGRAMM
OK
OK OK OK OK
OK
+/– +/– +/– +/–
IDLE PERIOD b
1. Press the MENU button.
2. To select the PROGAMME menu,press the
+button until PROGAMME appears.
3. Confirm by pressing OK.PROG1 appears.
4. Confirm by pressing OK.
5. Press the +button until the ASTRO menu appears.
6. Confirm by pressing OK.
7. Now select the PROG1 ASTRO function you require using the
+/- buttons:
ASTRO BLOCK
Press +/- for the BLOCK menu level (BLOCK 1 (1-5),
BLOCK 2 (6,7)).All further entries now refer to BLOCK 1 (1-5) and
BLOCK 2 (6,7).
Confirm by pressing OK.
ASTRO INDIVIDUAL
Press +/- for the INDIVIDUAL menu level (1,2,3,4,5,6,7).
All further entries now refer to each individual day of the week.
Confirm by pressing OK.
Programming
Main menu (Overview of the menu)
1. Press the MENU button until TIME/DATE appears.
2. To select further menus,press the +/- buttons.
3. Press the MENU button to switch to operating mode.
/-
++
Operating mode
FUNCTIONSETTINGPROGRAMM
TIME/DATE
PROG1 PROG2
+/– +/– +/–
+/–
MENU
TIME/DATE (to set the time and date)
1. Press the MENU button until TIME/DATE appears.
2. By pressing OK,you get to the TIME menu level.
3. Now set the current time using the +/- buttons.
4. If the time is set correctly, confirm by pressing OK.
5. Repeat the above procedure for the settings YEAR, MONTH and
DAY. TIME/DATE appears.
6. Press the MENU button to switch to operating mode.
KO
OK
/-
TIME/DATE
TIME YEAR MONTH DAY
TIME/DATE
OK OK OK OK
OK
+/– +/– +/– +/–

USA-23 USA-24
USA
Programming
4. Confirm by pressing OK.ASTRO EVENING appears.
5. Confirm by pressing OK.
6. Now select the PROG1 ASTRO function you require using +/- :
ASTRO EVENING WEEK
Press OK for theWEEK menu level (1-7). All further entries now
refer to every day of the week.
Confirm by pressing OK.
ASTRO EVENING BLOCK
Press OK for the BLOCK menu level (BLOCK 1 (1-5),
BLOCK 2 (6,7)).All further entries now refer to BLOCK 1 (1-5)
and BLOCK 2 (6,7).
Confirm by pressing OK.
ASTRO EVENING INDIVIDUAL
Press OK for the INDIVIDUAL menu level (1,2,3,4,5,6,7).
All further entries now refer to each individual day of the
week.
Confirm by pressing OK.
7. Now set the SWITCHING TIME vusing the +/- buttons.
Confirm your entry by pressing OK.
8. Now set the IDLE PERIOD busing the +/- buttons.
Confirm your entry by pressing OK.
9. Press the MENU button to switch to operating mode.
Programming
ASTRO WEEK
Press +/- for theWEEK menu level (1-7). All further entries
now refer to every day of the week.
Confirm by pressing OK.
8. Now set the IDLE PERIOD vand IDLE PERIOD busing the
+/- buttons.
Confirm each entry by pressing OK.
9. Press the MENU button to switch to operating mode.
PROGRAMME
PROG1/ASTRO EVENING WEEK
(Astro function evening for week + switching time v+ idle period b)
PROG1/ASTRO EVENING BLOCK
(Astro function evening for block 1/2 + switching timev+ idle period b)
PROG1/ASTRO EVENING INDIVIDUAL
(Astro function evening for individual + switching time v+ idle
period b)
OK +/-
OKOK
v
OK
PROGRAMME
PROG 1
ASTRO
EVENING WEEK SWITCHING
IDLE PERIOD b
PROGRAMME
OK
OK OK OK
OK
OK
+/–
1. Press the MENU button.
2. To select the PROGAMME menu,press the
+button until PROGAMME appears.
3. Confirm by pressing OK.PROG1 appears.

USA-26USA-25
USA
Programming
INDIVIDUAL INDIVIDUAL
Press +/- for the INDIVIDUAL menu level (1,2,3,4,5,6,7).
All further entries now refer to every individual day of the week.
Confirm by pressing OK.
8. Now set the SWITCHING TIME vand the SWITCHING TIME b
using the +/- buttons.
Confirm each entry by pressing OK.
9. Press the MENU button to switch to operating mode.
PROGRAMME
PROG2/INDIVIDUAL WEEK (Individual switching time bvfor week)
PROG2/INDIVIDUAL BLOCK (Individual switching time bvfor block1/2)
PROG2/INDIVIDUAL INDIVIDUAL (Individual switching time bvfor
individual day)
+/-+/-
K
b
v
PROGRAMME
PROG 2
INDIVIDUAL WEEK SWITCHING SWITCHING
PROGRAMM
OK
OK OK OK OK OK
+/–
+/–
1. Press the MENU button.
2. To select the PROGAMME menu,press the
+button until PROGAMME appears.
3. Confirm by pressing OK.
4. Press the +button.PROG2 appears.
5. Confirm by pressing OK.
6. Press the +button until INDIVIDUAL appears.
7. Confirm by pressing OK.
Programming
PROGRAMME
PROG1/INDIVIDUAL WEEK (Individual switching time vbfor week)
PROG1/INDIVIDUAL BLOCK (Individual switching time vbfor block 1/2)
PROG1/INDIVIDUAL INDIVIDUAL (Individual switching time vbfor
individual day)
+/-+/-
K
v
b
PROGRAMME
PROG 1
INDIVIDUAL WEEK SWITCHING SWITCHING
PROGRAMM
OK
OK OK OK OK OK
+/–
+/–
1. Press the MENU button.
2. To select the PROGAMME menu,press the
+button until PROGAMME appears.
3. Confirm by pressing OK.PROG1 will appear.
4. Confirm by pressing OK.
5. Press the +button until INDIVIDUAL appears.
6. Confirm by pressing OK.
7. Now select the PROG1 INDIVIDUAL function you require using the
+/- buttons:
INDIVIDUAL WEEK
Press +/- for theWEEK menu level (1-7). All further entries now
refer to every day of the week.
Confirm by pressing OK.
INDIVIDUAL BLOCK
Press +/- for the BLOCK menu level (BLOCK 1 (1-5),
BLOCK 2 (6,7)).All further entries now refer to BLOCK 1 (1-5) and
BLOCK 2 (6,7).
Confirm by pressing OK.

USA-27 USA-28
USA
Programming
PROGRAMME
PROG 2/OFFSET (e.g.shutters are lowered to ventilation position in
the evening)
OK
OKOK
PROGRAMME
PROG 2
OFFSET OFFSET
min b
PROGRAMM
OK
OK OK OK
+/–
1. Press the MENU button.
2. To select the PROGAMME menu,press the
+button until PROGAMME appears.
3. Confirm by pressing OK.
4. Press the +button until PROG2 appears.
5. Confirm by pressing OK.
6. Press the +button until the OFFSET menu appears.
7. Confirm by pressing OK.
8. You can set the time for the DOWN control command to be
triggered separately using the +/- button (max. +/- 240 mins,
depending on PROG1 SWITCHING TIME b).
Confirm your entry by pressing OK.
9. Press the MENU button to switch to operating mode.
Note: Using the SETTING menu level,you must enter the switching
time of the intermediate position and select PROG2
VENTILATION for the position of the end limits.
Programming
8. Now select the PROG2 INDIVIDUAL function you require using
the +/- buttons:
INDIVIDUAL BLOCK
Press +/- for the BLOCK menu level (BLOCK 1 (1-5),
BLOCK 2 (6,7)).All further entries now refer to BLOCK 1 (1-5) and
BLOCK 2 (6,7).
Confirm by pressing OK.
INDIVIDUAL INDIVIDUAL
Press +/- for the INDIVIDUAL menu level (1,2,3,4,5,6,7).
All further entries now refer to every individual day of the week.
Confirm by pressing OK.
INDIVIDUELL WOCHE
Press +/- for theWEEK menu level (1-7). All further entries now
refer to every day of the week.
Confirm by pressing OK.
9. Now set the SWITCHING TIME vand the SWITCHING TIME b
using the +/- buttons.
Confirm your entry by pressing OK.
10. Press the MENU button to switch to operating mode.

USA-30USA-29
Programming
SETTING
INTERMEDIATE POSITION,VENTILATION/REVERSE,PROG1 END LIMIT
(Time/ position programming)
See
previous page
INTERMEDIATE
POSITITION VENTILATION
(REVERSE)
PROG 1
END LIMIT
OK
PROG 1
INTERMEDIATE
POSITION
PROG 1
VENTILATION
see
next page
OK OK
+/– +/– +/–
+/–
OK
OK
You have confirmed the
HOLIDAY/LIGHT SENSOR menu levels.
INTERMEDIATE POSITION will appear.
1. You can set the switching time to move to the INTERMEDIATE
POSITION using the +/- button.The switching time is indicated in
a few seconds or you can move to the INTERMEDIATE POSITION
from the upper end limit using the UP/DOWN button.
2. Confirm by pressing OK.
3. You can set the switching time to move to VENTILATION/REVERSE
using the +/- button.The switching time is indicated in a few
seconds or you can move to the VENTILATION/REVERSE from the
lower end limit using the UP/DOWN button.
4. Confirm by pressing OK.PROG1 END LIMIT appears.
5. You can select PROG1 END LIMIT, PROG 1 INTERMEDIATE
POSITION and PROG1VENTILATION/REVERSE using the
+/- button.
6. Confirm your selection by pressing OK.
The function PROG1 END LIMIT has now been set.
Please read on for further programming options using the
SETTING menu.
USA
Programming
SETTING
HOLIDAY,LIGHT SENSOR (Holiday OFF/ON,sun/twilight setting)
SETTING HOLIDAY
HOLIDAY ON
LIGHT
SENSOR
CONNECTED ?
SUN
TWILIGHT
OK
OK
OK
+/–
+/–
+/–
OK
see
next page
1. Press the MENU button.
2. To select the SETTING menu,press the
+button until SETTING appears.
3. Confirm by pressing OK.HOLIDAY ON/OFF will appear.
4. You can set the holiday function to ON or OFF by pressing the
+/- button.
5. Confirm your selection by pressing OK.
Note: This dialog window will only be displayed if a light sensor is
connected to the device.
You have confirmed the holiday function.SUN will appear.
The value set is displayed.
6. You can reset the sunlight setting by pressing the +/- button.
(The two digits on the left of the display show the current
light value.)
7. Confirm your entry by pressing OK.
To set the TWILIGHT SETTING, follow the same procedure as for
SUN.
The SUN/TWILIGHT function has now been set.
Please read on for further programming options using the
SETTING menu.

USA-32USA-31
USA
Programming
SETTING
ENGLISH GB/ ASTRO SHIFT vb
(Language,astro shift)
See
previous page TEST MODE
ON/OFF
ENGLISH GB
ASTRO
SHIFT v
OK
see
next page
OK OK
+/– +/– +/–
OK
+/–
ASTRO
SHIFT b
Note: The TEST MODE menu level will only be displayed if a light
sensor is connected to the device.
You have confirmed the PROG2 END LIMIT menu level.
TEST MODE ON/OFF will appear.
1. You can activate or deactivate theTEST MODE (ON/OFF) using
the +/- button.
2. Confirm by pressing OK.ENGLISH GB will appear.
Note: To exit from TEST MODE,press the OK button in operating
mode.
3. You can set the language required using the +/- button.
4. Confirm the language selected by pressing OK.
ASTRO SHIFT vwill appear.
5. You can set the required astro shift v(max. +/- 120 mins.) using
the +/- button.
6. Confirm by pressing OK.ASTROSHIFT bwill appear.
Programming
SETTING
PROG 2 END LIMIT (Time/ position programming)
See
previous page see
next page
PROG 2
END LIMIT
PROG 2
INTERMEDIATE
POSITION
PROG 2
VENTILATION
OK
OK
OK
+/–
+/–
Note: This dialog window will only be displayed if a time is set in
PROG2.
You have confirmed the PROG1 END LIMIT menu level.
PROG2 END LIMIT will appear.
1. You can select PROG2 END LIMIT, PROG2 INTERMEDIATE
POSITION and PROG2VENTILATION/REVERSE using the
+/- button.
2. Confirm your selection by pressing OK.
The function PROG2 POSITION has now been set.
Please read on for further programming options using the
SETTING menu.

USA-34USA-33
USA
Programming
Note: These dialog windows (LONGITUDE, LATITUDE,TIME ZONE)
are only displayed when the EXPERT MODE in the function
menu is ON.
3. You can set the degrees LONGITUDE using the +/- button.
4. Confirm by pressing OK.LATITUDE will appear.
5. You can set the degrees LATITUDE using the +/- button.
6. Confirm by pressing OK.TIME ZONE will appear.
7. You can set theTIME ZONE you are in using the +/- button.
Confirm by pressing OK.
The TIME ZONE function has now been set.
Please read on for further programming options using the
SETTING menu.
SETTING
SUMMER/WINTER (Automatic clock adjustment for daylight saving
changes)
See
previous page
SUMMER/WINTER
ON
SUMMER/WINTER
OFF
SETTING
OK
+/–
OK
You have confirmed theTIME ZONE function.
SUMMER/WINTER will appear.
1. You can switch SUMMER/WINTER on or off using the +/- button.
2. Confirm your selection by pressing OK.
3. Press the MENU button to switch to operating mode.
Programming
7. You can set the required astro shift b(max. +/- 120 mins.) using
the +/- button.
8. Confirm by pressing OK.
The function ASTRO SHIFT bhas now been set.
Please read on for further programming options using the
SETTING menu.
SETTING
(City,EXPERT MODE (LONGITUDE, LATITUDE,TIME ZONE))
LONDON EXPERT
MODE
ON/OFF
LONGITUDE
LATITUDE
TIME
see
next page
See
previous page
OK
+/–
OK
OK
OK
+/–
+/–
OK
You have confirmed the function ASTRO SHIFT b.
The city selected (LONDON) will appear.
1. You can set the nearest town using the +/- button.
2. Confirm by pressing OK.LONGITUDE will appear.
(If you prefer to define your location more precisely, you can do so
by setting the degrees longitude and latitude.)

USA-35 USA-36
USA
Technical data/Battery replacement/
Cleaning
Nominal voltage 3 V DC
Battery type 2 x LR 03 (AAA)
System of protection IP 20
Permissible ambient temperature 0 to +55 °C
Type of installation Wall-mounted
Radio frequency 915,3 MHz
Technical data
Battery replacement
1. Remove the batteries.
2. Insert the new batteries
properly.
LR03 (AAA)
LR03 (AAA)
-
-
-
-
Note: The batteries must be
replaced within one
minute.When changing
the batteries, ensure
that no buttons are
pressed.
Cleaning
Clean the device with a damp cloth only.
Do not use a cleansing agent since this could damage the plastic.
Programming
FUNCTION (only when the operating device is disconnected,only for
qualified electricians)
ROLLER SHUTTER/BLIND,DRIVE CONTROLLER/ GROUP CONTROLLER,
RUNNING TIME
(Selection of shutter/blind, selection of the drive controller/ group
controller, running time of the roller shutter/blind)
+
OK
FUNCTION
ROLLER SHUTTER/
BLIND
OK OK OK
+/– +/– +/–
DRIVE CONTROLLER/
GROUP CONTROLLER RUNNING
TIME Operating
mode
OK
1. Press the MENU button.
2. To select the FUNCTION menu,press the
+button until FUNCTION appears.
3. Confirm by pressing OK.ROLLER SHUTTER/BLIND will appear.
4. You can select either roller shutter or blind using the +/- button.
5. Confirm by pressing OK.RUNNING TIME will appear.
6. You can set the required running time using the +/- button.
(Default setting:120 seconds).
7. Confirm by pressing OK.EXPERT MODE ON/OFF will appear.
8. You can make the setting you require using the +/- button.
9. Confirm your selection by pressing OK.INITIAL OPERATION will
appear.
10. Confirm by pressing OK.
11. Press the MENU button to switch to operating mode.

USA-37 USA-38
General declaration of conformity:
The company elero GmbH hereby declares that the AstroTec-915
is in conformity with the basic requirements and other relevant
provisions of the Directive 1999/5/EC.
Troubleshooting/
General declaration of conformity
Troubleshooting
Problem Cause Remedy
The sun and twilight No light sensor is Check the light sensor,
parameters cannot be connected or the light connecting cable and
changed and/or are sensor and/or the connector plug.
not displayed. connecting cable
is faulty.
Roller shutter does No end limit position is Set the end limit
not move to the end set. position using the
limit. setting menu
PROG1/2.
Transmission control Batteries are low. Replace batteries.
light is flashing.
Transmitter doesn’t Power supply was Press RESET button.
respond following interrupted for Check settings.
battery replacement. too long.
USA
Troubleshooting
Troubleshooting
Problem Cause Remedy
Drive is not Faulty connection. Check the connection.
functioning.
Drive is not 1. Batteries are low. 1. Replace batteries.
functioning.
Transmission control 2. Batteries are inserted 2. Remove batteries
light is not and re-insert
illuminated. correctly.
Drive is not 1.Receiver is outside 1.Reduce the distance
functioning. the radio operating to the receiver.
Transmission control range.
light is illuminated. 2.Transmitter has not 2.Programme the
been programmed transmitter.
into the receiver.
Astro programme 1. Date is incorrect. 1.Set correct date.
doesn’t function
properly. 2. Wrong city or wrong 2.Set correct city
latitude/ or exact degrees
longitude setting. latitude/longitude.
3.Holiday function is 3.Switch holiday
switched on. function off.
4.Astro shift is set. 4.Adjust astro shift.
The AstroTec-915 does The sliding switch Move the sliding
not carry out the is set to manual . switch to automatic.
switching commands.
The AstroTec-915 Holiday function is Switch holiday
does not carry switched on. function off.
out the switching
commands precisely.
Table of contents
Other elero Timer manuals

