RainPoint HTV113FRF User manual

USER MANUAL
Model No. HTV113FRF
1-Zone Water Timer
Sma Garden Irrigation System
+
Web: www.rainpointonline.com
Email:seice@rainpointus.com
WhatsApp: +1 626-780-5952
US Free Hotline(English): +1 833-381-5659
(MON-FRI 9�30 AM-5�30 PM PST)
EU Free Hotline(English Deutsch): +44 800-808-5337
(MON-FRI 9�00 AM-5�00 PM CET )

1. INTRODUCTION
1.1 Product Oveiew
1.2 Specication
1.3 Product Features
2. CONNECTION AND INSTALLATION
2.1 Timer Connection
2.2 Timer Installation
3. APP FEATURES AND FUNCTIONS
3.1 Device Home Page
3.2 Basic Setting
3.3 Plan Setting
3.4 Statistics
3.5 Manual Watering
4. TROUBLESHOOTING
5. NOTES
6. WARRANTY POLICY
7. FCC STATEMENT
8. CUSTOMER SUPPORT
01
01
01
02
03
03
05
07
07
08
10
11
11
15
17
17
18
19
CONTENT

1. INTRODUCTION
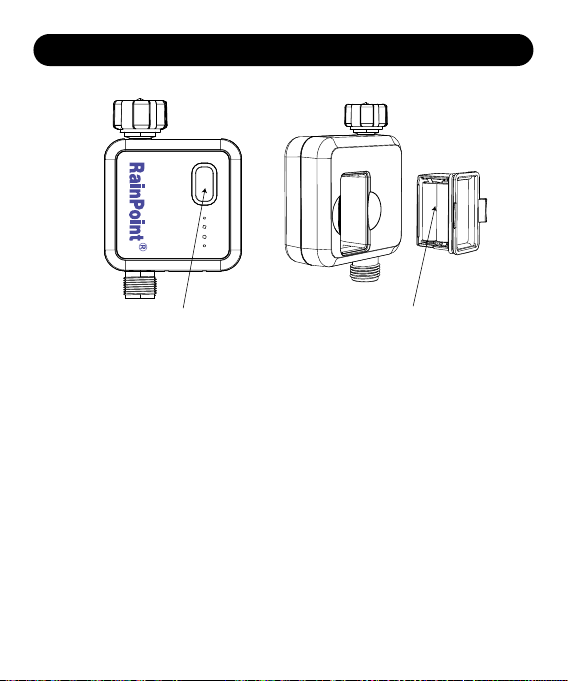
Batte CoverOperation Button
1.2 Specication
• 1"or 3/4" inlet thread and 3/4" outlet thread
• Working water pressure: 0.5~8 bar (7- 116 PSI)
• Flow rate: 5 ~35 L/Min (1.32~9.25GAL/Min)
• Wateringduration: 1 min ~ 12 hrs
• Waterproof level: IP54
• Working temperature: 3℃~50℃(37℉~ 122℉)
• Communicated by Wi-Fi 2.4G
• Up to 60 m connecting distance depending on obstacle between gateway
and timer
• Powered by 4* AA batteries (Not included)
1.1 Product Oveiew
- 01 -

1.3 Product Features
• Wi-Fi remote controlled
• Build-in ow meter with leaking ale function
• Track water ow rate
• Review water consumption histo
• 2 watering methods: Irrigation mode or Cycle & Soak
• Set watering plan by water usage
• Voice controlled via Google Assistant and Amazon Alexa
• Monitor the watering progress according to the soil temperature and
humidity from soil sensor
• Auto sta or stop watering base on soil moisture level
• Water usage correction function on APP
2. CONNECTION AND INSTALLATION
- 02 -
Tips:
Please scan the QR code or search the
link to access the video to easily and
quickly view the operational details of
the device.
Video Address: http://bit.ly/3jgJQVA

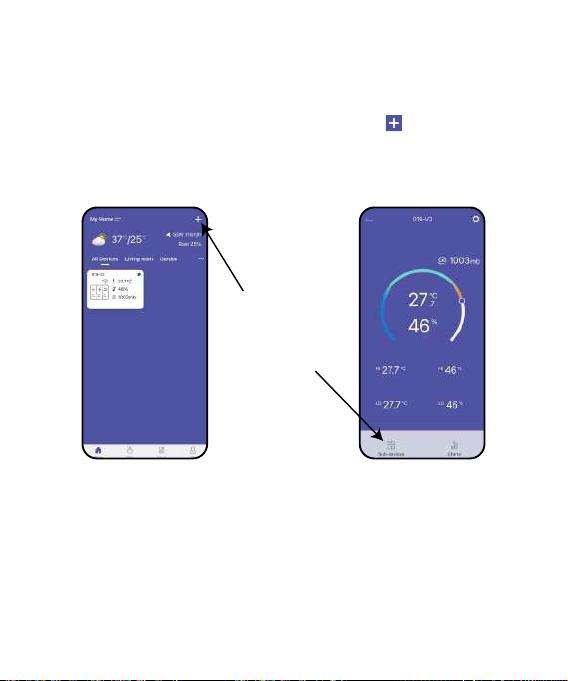
1. After the hub is successfully connected. select the button on the top
right corner of the APP home page to add device, or you can go to the
hub’s home page and use"Sub-devices" to add devices.
2.1 Timer Connection
This device is a sub-device, please connect the hub of Rainpoint Sma+
series before connecting this device.
- 03 -

3. Firstly inset 4*AA 1.5V Alkaline batteries (NOT included). Next long press
the reset button for 5 seconds until the indicator quickly blinks in red.
Then select"NEXT" on the APP and sta searching devices.
2. Find"1-ZONE Water Timer"or the icon to add HTV113 1-ZONE
Water Timer.
- 04 -

4. Keep the timer and the hub close to each other so they can connect
automatically.
5. Besides that, you can also hold the button to reset and reconnect if you fail
to connect for the rst time.
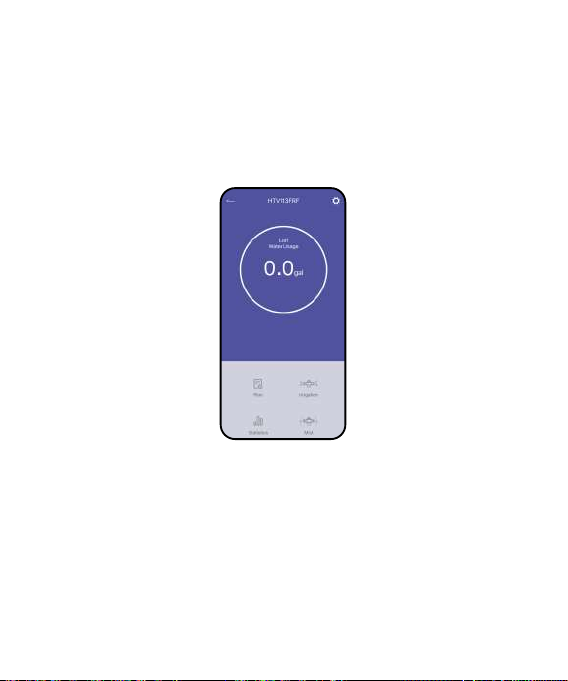
6. After successfully connecting, the last water usage value will display in the
middle of the hub’s screen. The next watering plan time will display as well
after creating plans.
- 05 -

- 06 -
2.2 Timer Installation
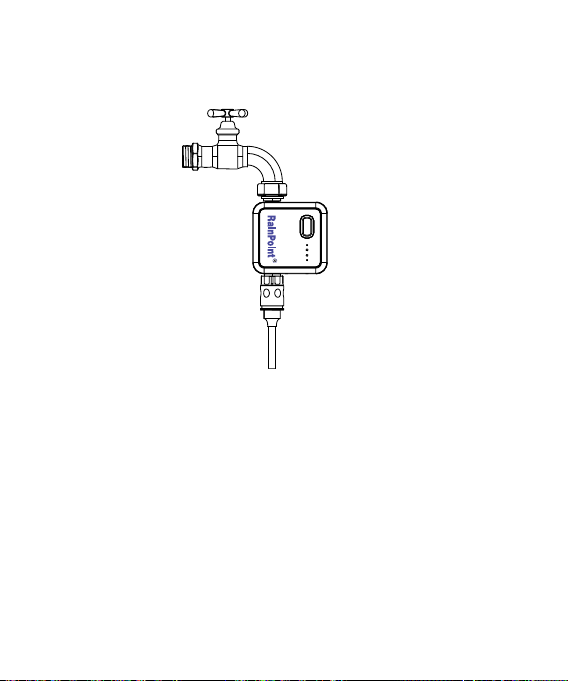
1. Install the timer veically on the tap.
NOTE:
1. Please t to install the timer veically on the tap, not at an angle or
horizontally.
2. Please do not install the timer in a underground valve box to get a better
connection with Wi-Fi.

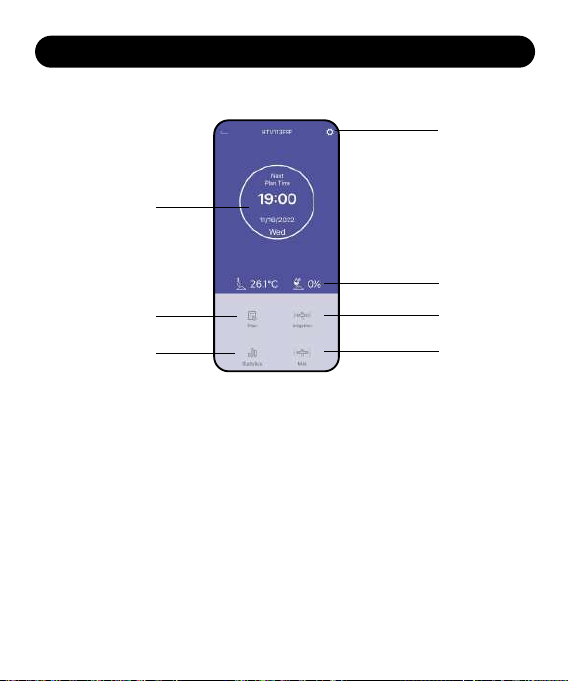
1. Setting: Basic settings for the water timer
2. Next Plan Time & Last Water usage
3. Soil temperature& moisture: Show the data of the soil if you pair the timer
with the soil sensor
4. Plan: To create and manage watering plans
5. Statistics: Check the water usage data in bar cha
6. Irrigation Mode: Manual watering in irrigation mode
7. Cycle & Soak: Manual watering in misting mode
3.1 Device Home Page
3. APP FEATURES AND FUNCTIONS
1
2
3
4
5
6
7
- 07 -

3.2 Basic Setting
Find the icon on the top right corner of the APP home page to "Settings "
page. In the basic settings, you can check and manage the device information,
such as name, inteace and description. There are also some advanced settings
you can Set up for the specic functions:
Cycle & Soak: Set the mist time and inteal time for manual misting mode.
Default Duration Time: Set the default watering duration for manual
irrigation mode.
- 08 -

Pair the Soil Sensor: Pair with a soil sensor to display the data on the
home page and activate the "Stop irrigation plan humidity" function.
Stop irrigation plan humidity: Set a "stop watering" value of the soil
moisture to protect the plants from over watering. All the plans will be
stopped once the soil moisture gets over the valve, and will go back to work
when the moisture return below the value.
Water Usage Correction: Correct the error when your water usage collection
is not accurate.
- 09 -

3.3 Plan Setting
Select Plan and sta to create a new auto-watering plan.
Set a watering mode rst:
Press the icon on the top right corner of the "Irrigation Plan" page to set
irrigation plan.
Irrigation Mode: Normal watering mode with basic sta time, duration and
frequency.
Cycle & Soak: Special mist time and inteal period that can intermittent quick
watering.
- 10 -

Sta Time: Set the time that the plan stas.
There are two way to stop watering: Duration or Water Usage
Duration: set a watering duration for irrigation plan.
Water Usage: set both a water consumption limit value and a limited time.
Repeat: Set the watering frequency for your plans.
- 11 -

After nish setting, press the top right button save your plan and you will
see a plan oveiew appears in the list. Use the button on the right to turn
on or o the plan. Up to SIX plans that can be created.
There is also a Plan Calendar for checking the oveiew of all the plans’
schedule.
- 12 -

3.4 Statistics
Select Statistics to review your daily or monthly water usage that go
through this timer.
3.5 Manual Watering
3.5.1 Irrigation Manual Mode
Select Irrigation in the home page to manually turn on a tempora irrigation
plan with a settable time.
- 13 -

3.5.2 Cycle & Soak
Select Cycle & Soak in the home page to manually turn on a tempora misting plan
with a settable time. It is able to change the mist time and inteal time by
press the time value.
Note: When you turn on manual watering, if there is a plan running now or
there will be a plan staing during your manual water time, the schedule
will be skipped for this time.
- 14 -

4. TROUBLESHOOTING
Problem Possible Factors Some Solutions
Can't turn on
/o the valve
Inaccurate
water ow
meter
Timer can't
Connect
1. Low batte.
2. Impurities in water
inlet.
3. Unstable network or
delayed response.
1. Inaccurate statistics.
due to tilted mounting
angle.
2. Low or erratic water
pressure from the tap.
1. Unstable WIFI
network.
2. Long distance from
the hub.
3. Timer not in pairing
state.
1. Replace fresh batteries.
2. Regularly clean the lter
po of impurities to avoid
disruptions in use.
3. Wait a while and t again.
1. The water timer needs to
be installed perpendicular
to the ground and it is
recommended that it is not
installed at an angle to
avoid aecting the water
count.
2. Normal error values for
water counts ± 5%.
1. Check that the WIFI
network environment is
working.
2. Close to hubs and routers
when connected to
irrigation timers.
3. Re-pair the timer: Press and
hold the timer button until
the white light ashes
rapidly to indicate pairing.
(Or remove the device from
the homepage and
reconnect).
- 15 -

Problem Possible Factors Some Solutions
Hub can’t
connect
Plan not
executed on
time
1. Not using 2.4GHz
WIFI.
2. Incorrect WIFI
password.
3. Distance between
sensor and hub is too
far.
1. Impurities in water
inlet lter.
2. Rainfall delay
parameters are set.
3. In a low power state,
the timer goes into a
low power protection
state and does not
execute the schedule.
Irrigation duration/pe
riod is not set with
parameters.
1. Conrm 2.4GHZ WIFI
connection.
2. Conrm that the WIFI
password has been entered
correctly.
3. Stay closer to the hub while
connecting.
1. Inlet impurities need to be
cleared regularly so that
they do not clog up and
inteere with the irrigation
program.
2. Check that the rainfall delay
parameter is set.
3. Replace fresh batteries.
Check that the irrigation
duration/period is not set
with parameters. (Note
12H/24H).
If you need more help about the product or anything from us, please
contact us by
US: 1-833-381-5659 (EN)(MON-FRI9�30AM-5�30PMPST)
EU: +44 800-808-5337 (EN DE)(MON-FRI9�00AM-5�00PMCET)
Email:seice@rainpointus.com
- 16 -

•Please make sure to use 2.4GHz band WIFI to connect to this product.
•Do not mix old and new batteries or dierent types of batteries.
•Please install the timer veically to avoid valve body damaged and
inaccurate water ow meter.
•Under freezing temperatures, timers should be removed from the faucet
and stored indoor to avoid potential freezing damage.
•Please clean lters regularly and replace if it is worn in order to prolong
working life of timer.
RAINPOINT provides a 3-year limited warranty on this product against
manufacturing defects in materials and workmanship.
- 17 -
5. NOTES
6. WARRANTY

This device complies with Pa 15 of the FCC Rules. Operation is subject to
the following two conditions:
(1) This device may not cause harmful inteerence, and
(2) this device must accept any inteerence received, including inteerence
that may cause undesired operation.
FCC Warning: Any changes or modications not expressly approved by the
pay responsible for
compliance could void the user’s authority to operate this equipment.
Note: This equipment has been tested and found to comply with the limits for
a Class B digital device, pursuant to Pa 15 of the FCC Rules. These limits are
designed to provide reasonable protection against harmful inteerence in a
residential installation. This equipment generates, uses, and can radiate radio
frequency energy and, if not installed and used in accordance with the
instructions, may cause harmful inteerence to radio communications.
However, there is no guarantee that inteerence will not occur in a paicular
installation. If this equipment does cause harmful inteerence to radio or
television reception, which can be determined by turning the equipment o
and on, the user is encouraged to t to correct the inteerence by one of
the following measures:
• Reorient or relocate the receiving antenna.
• Increase the separation between the equipment and the receiver.
• Connect the equipment into an outlet on a circuit dierent from that to
which the receiver is connected.
• Consult the dealer or an experienced radio/TV technician for help.
Note: The manufacturer is not responsible for any radio or TV inteerence
caused by unauthorized modications to this equipment. Such modications
could void the user’s authority to operate the equipment.
- 18 -
7. FCC STATEMENT:
(FCC ID:2AWDBHTV113FRF)
Table of contents
Other RainPoint Timer manuals

RainPoint
RainPoint ITV101P User manual

RainPoint
RainPoint ITV201P User manual

RainPoint
RainPoint TTV103WRF User manual

RainPoint
RainPoint TTV203WRF User manual

RainPoint
RainPoint ITV205 Installation guide

RainPoint
RainPoint TTV102B User manual

RainPoint
RainPoint ITV205 User manual

RainPoint
RainPoint ITV105 User manual

RainPoint
RainPoint HTV213FRF User manual

RainPoint
RainPoint TTV102B User manual