ELFRI S6006 Series User manual
S6
File: IS6_0009_00 Rev.00
Date: 10.07.2017
0407-CPR-055
(IG-154-2005)
UNI EN 1155
Fermo elettromagnetico per Porte Tagliafuoco /
Electromagnetic Fire Doors Holder / Elektromagnetische
Verriegelung für Brandschutztüren / Ventouse électro-
magnétique pour porte coupe-feu / Retenedores
electromagnéticos para puertas corta fuego
IT - ISTRUZIONI DI MONTAGGIO
Installazione e manutenzione vanno eseguite da personale specializzato
1. Mantenere pulite le superfici metalliche e maneggiare con cura.
2. Rimuovere la cover come illustrato in figura A.
3. Fissare l’elettromagnete alla parete con 4 tasselli e viti adeguate alla natura ed al materiale della parete stessa ed alla forza dell’elettromagnete.
4. Fissare l’ancoraggio alla porta con 4 viti appropriate e regolare l’inclinazione del disco parallelo all’elettromagnete. Per la posizione, profondità dei fori
e lunghezza delle viti, far riferimento al catalogo tecnico della porta in questione.
5. Collegare la linea elettrica all’apposito morsetto dell’elettromagnete rispettandone la polarità (+ e -). Utilizzare cavi elettrici con isolamento e sezione
secondo le norme vigenti.
6. Verificare la tenuta della porta all’elettromagnete. Non tirare con forza la porta, ma agire sull’apposito pulsante per sganciarla e richiuderla.
Prodotto adatto solo per uso interno. Sono vietate alterazioni e/o modifiche. Questo prodotto non contiene sostanze pericolose
EN - ASSEMBLY INSTRUCTIONS
Installation and maintenance by qualified personnel only
1. Keep cleaned the metal surfaces and handle with care.
2. Remove the cover as shown in figure A.
3. Fix the electromagnet to the wall with 4 wall anchor and screws suitable for the nature and for the material of the wall, also according to the holding
force of the electromagnet itself.
4. Fix the keeper plate to the door with 4 appropriate screws and adjust the angle of the disc parallel to the electromagnet. For the position, depth of
the holes and length of the screws please refer to the technical catalogue of the door concerned.
5. Connect the power line to the terminal of the electromagnet respecting the polarity (+ or -). Use electric wires with insulation and section according to
official regulations.
6. Check that the electromagnet properly withholds the door. Do not pull the door; please act on the appropriate button to release and to close it.
Product suitable only for indoor use. Alterations and/or modifications are forbidden. This product contains no dangerous substances.
DE - MONTAGEANLEITUNG
Installation und Wartung sollen von qualifiziertem Personal durchgeführt werden
1. Die Metalloberflächen sauber halten und mit Sorgfalt umgehen.
2. Entfernen Sie den Deckel wie in Abbildung A dargestellt.
3. Fixierung des Elektromagneten an der Wand mit 4 Schraube und Dübel, passend auf das Material der Wand und dem Gewicht des Elektromagneten.
4. Fixierung der Halterung auf der Türe mit 4 passenden Schrauben und passen Sie die Neigung der Halterung parallel zu dem Elektromagneten. Für die
Position, die Tiefe der Löcher und die Länge der Schrauben, hinweisen Sie bitte auf den technischen Katalog der besagten Türe.
5. Verbinden Sie die Zuleitung mit den passenden Klemmen des Elektromagneten. Respektieren Sie die Polarität (+ oder -) Verwenden Sie elektrische
Kabel mit Isolierung und Querschnitt gemäss den Vorschriften.
6. Überprüfen Sie die Dichtigkeit des Elektromagneten. Ziehen Sie nicht mit Kraft an der Türe, sondern agieren Sie auf dem entsprechendem Knopf um zu
lösen und schliessen.
Dieses Produkt eigenet sich nur für den Innenbreich. Umbauen und/oder Veränderungen sind verboten. Diese Produkt enthält keine gefährliche Stoffe
FR - INSTRUCTIONS DE MONTAGE
Installation et manutention effectués par du personnel qualifié
1. Protégez les surfaces métalliques et manipuler avec caution.
2. Retirez le couvercle comme illustré à la figure A.
3. Fixer l’électro-aimant au mur avec 4 vis et chevilles appropriées pour la nature et le matériau du mur et par rapport à la force de maintien de l’électro-
aimant.
4. Fixer la contre plaque à la porte avec 4 vis appropriées et ajuster l’inclination du disque en parallèle par rapport à l’électro-aimant. Pour la position, la
profondeur des trous et la longueur des vis se référer au catalogue technique de la porte.
5. Raccordez la ligne d’alimentation à la borne sur l’électro-aimant et respectez la polarité (+ ou -). Utilisez de fils électriques avec isolation et section
conformément au règlement en vigueur.
6. Vérifiez que la porte est bien retenue par l’électro-aimant. Ne tirez pas la porte; utilisez le bouton pour la libérer et la fermer à nouveau.
Produit uniquement pour une utilisation en intérieur. Altérations et/ou modifications sont interdites. Ce produit ne contient pas des substances
dangereuses.
ES - INSTRUCCIONES DE MONTAJE
Instalación y mantenimiento realizado por personal especializado
1. Mantener limpias las superficies metálicas y manejar con cuidado.
2. Retire la tapa como indica en Figura A.
3. Fijar el electroimán a la pared con 4 clavijas y tornillos adecuados para la naturaleza y para el material de la pared y en relación con la fuerza de retención
de l’electroimán.
4. Fijar el anclaje a la puerta con 4 tornillos adecuados. Ajuste la inclinación del disco paralelo respeco al electroimán. Por la ubicación, profundidad de los
agujeros y longitud de los tornillos, consulte el catálogo técnico de la puerta en cuestión.
5. Conectar la línea de alimentación al terminal colocado en el electroimán y obeservar la polaridad (+ o -). Utilizar cables eléctricos con aislamiento y
sección de acuerdo con la legislación vigente.
6. Controlar que la puerta está correctamente retenida por el electroimán. No tire la puerta; utilizar el botón para liberarla y cerrarla de nuevo.
Producto adecuado sólo para uso en interior. Están prohibidas alteraciones y/o modificaciones. Este producto no contiene sustancias peligrosas.
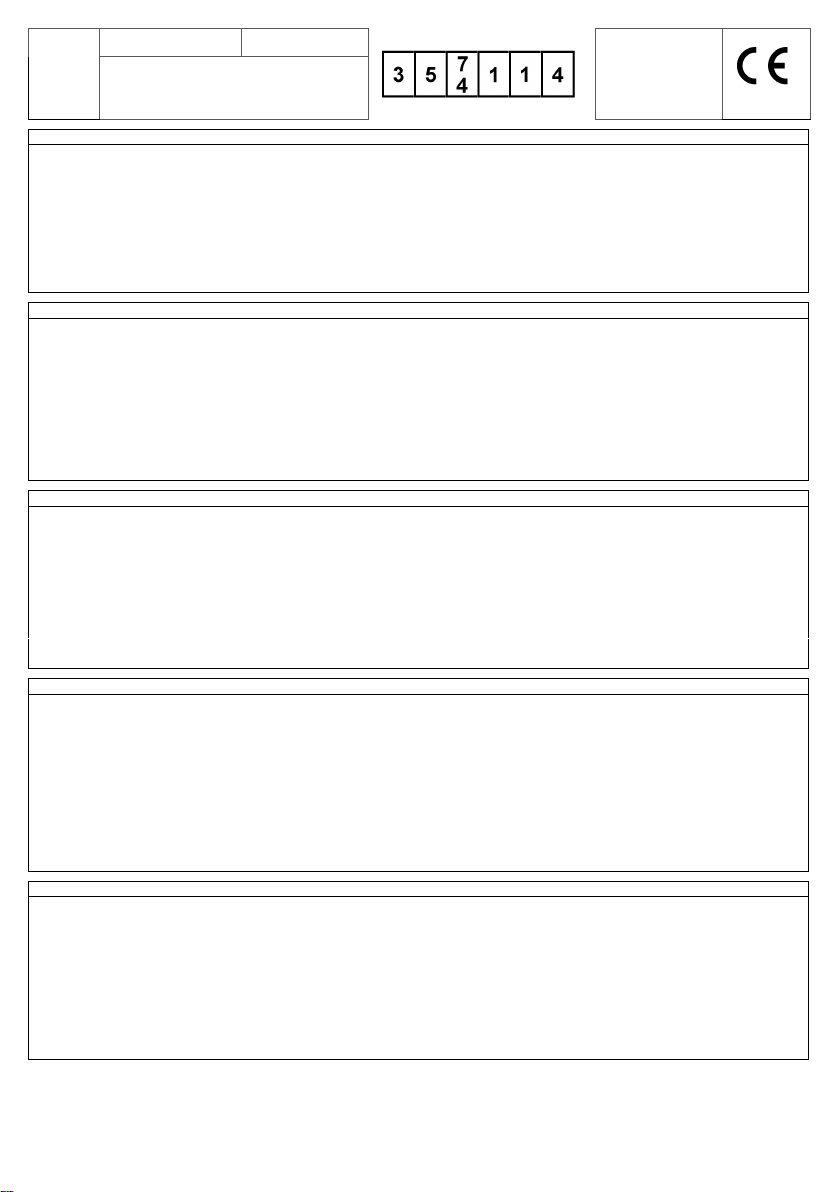
Art.
A
B
C
D
E
F
G
S6006x
68
84
30
50
52
52
φ 6
Art.
A
B
C
D
E
F
G
S01060
65
65
46
55
50
50
φ 6
S02060
65
65
20
55
52
52
φ 6
Quote in mm / Dimensions in mm / Größe in mm / Dimensions en mm / Dimensiones en mm
Art.
12 Vdc
24 Vdc
48 Vdc
IP
Forza / Capacity / Dichtungskraft / Force / Fuerza
S6006x
120 mA
60 mA
30 mA
20
500 Newton
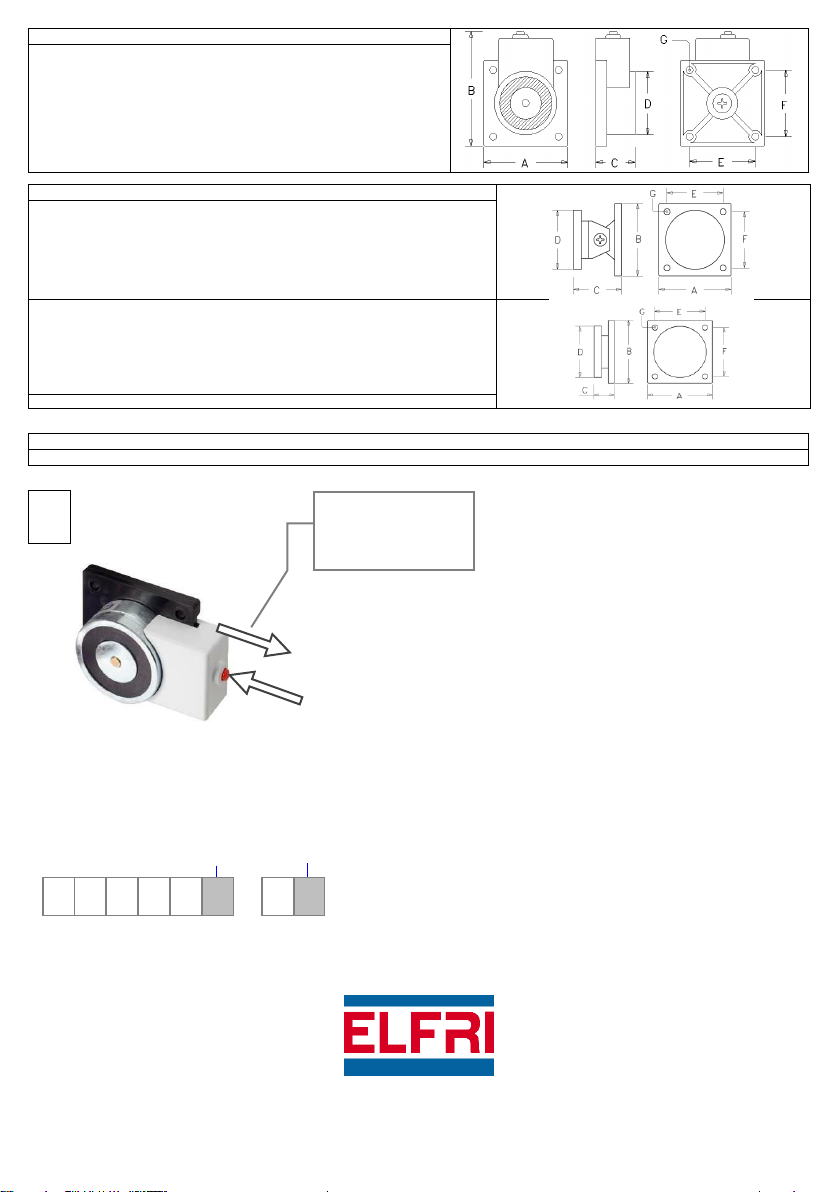
A
Premere per togliere tensione
Push to take off current
Drücken Macht zu schneiden
Appuyez pour couper l’alimentation
Pulse para cortar la energia
Alimentazione Ancoraggio
Power supply Keeper plate
Stromversorgung Halteplatte
Alimentation Contre plaque
Alimentación Placa de anclaje Alimentazione / power supply / Stromversorgung / alimentation / alimentación
0 = 24 V 1 = 12 V 2 = 48 V
0
1
0
6
0
0
6
S
_
ELFRI srl Via Friuli, 9 Z.I. 33050 Gonars (UD) - Italy | tel. +39.0432.931425 | tecn[email protected] | www.elfri.com
Sfilare la cover
Remove the cover
Ziehen Sie zu entfernen
Tirer vers le haut pour enlever
Tirar hacia arriba para remover
This manual suits for next models
2
Table of contents
Other ELFRI Door Lock manuals


