Locinox FREE VINCI LFKQ X2L User manual

USER GUIDE ENGLISH
FREE VINCI
LFKQ X2L


• Asmanufacturerofthisproduct,weguaranteethatwehave
takenallthenecessarystepsinorderforthisproducttocomply
withthecurrentsafetyrequirements.
Copyright
Copyright©2014Locinox.Allrightsreserved.
ThisproductincorporatescopyrightprotectedtechnologythatisprotectedbyanumberofEU
patentmethodclaimsandotherintellectualpropertyrightsownedbytheLocinoxCorporation
andotherrightholders.
Use of this copyright protected technology must be authorized by the Locinox Corporation.
Reverse engineering or disassembly is prohibited. No part of this publication can either
be reproduced, communicated, transcribed, stored in a retrieval system or be translated
into any language in any form or by any means, whether electronic, mechanical, magnetic,
optical, chemical, manual or otherwise, unless explicit written consent has been given by the
copyrightholder.
Notice
Thecontentsofthispublicationissubjecttochange.Thecompanyreservestherighttoalterthe
contentsofthispublicationatanytimeandwithoutnotice.Thecontentsofthispublicationmay
containinaccuraciesortypographicalerrorsandissuppliedforinformationaluseonly.
Technical Support
Ifyourequireanyadditionalinformationorassistanceduringtheinstallation,pleasecontactyour
dealer,whowillbeabletoprovidethelatestinformation.Alternatively,youcanvisittheLocinox
websiteformoretechnicalinformationore-mailuson[email protected]

ENGLISH
4
Manual - English
1. Introduction
ThankyouforchoosingaLocinoxmechanicalcodelockwithfreeexit!Pleasereadthefollowing
instructionsthoroughlybeforemountingtheFreeVinci.Enclosedyouwillndallrelevantuser
informationconcerningtheFreeVinci.
2. Package contents
Pleasecheckifyourpackagecontainsthefollowingitems:
Pleasecontactyoursuppliershouldanyoftheaboveitemsbedamagedormissing.
1Mechanicalcodelockwithfreeexitforswinggates
23006C/2(Aluminiumhalfclub)&3006R/2(Aluminiumhalfknob)
3Codescrews,green(2x)
4Covercaps(2x)
5Allenkey(3mm)(1x)
2
3 4 51

ENGLISH
5
3. Components
Thedrawingbelowshowsthenamesofthemostimportantcomponents.Thisdrawingcanbeused
asreferencethroughoutthemanual.
A
B
C
D
H
E
F
G
I
J
4. Specications
• The Free Vinci is a 100% mechanical code lock, which does not need a battery nor
electricitytofunction.
• The code lock is equipped with a single-side operational code panel. This enables you to
workwithanentrancecodeandaquickfree-exithandle.
• Attheentranceside,thehandleisblockedbymeansofthecodepanel.Uponenteringthe
correctcode,thehandleisreleasedandyoucanretracttheself-latchingboltbymeansofthe
handle.
• The code panel is protected by a polyamide cover. This prevents dust and rain from
penetrating.
• Thequalitycodelockwasdesignedinaveryuser-friendlymanner.Changingthecodesetting
isveryeasy.A4to6-digitentrancecodecanbesetbymeansoftheadditionalcodescrews.
• Thelockisequippedwithasecuritypressplatewhichrulesoutdetectionofthesecretcode
byputtingpressureonthehandle.Afterthecorrectcodehasbeenenteredandthegatehas
beenopenedwiththehandle,thecodeisautomaticallyreset.
ARainanddustcover
BCodepanel
CResetbutton
DHalfhandle3006C/2
EHalfhandle3006R/2
FSelf-latchingbolt(D)
GSpacertube
HHexheadsocketscrew
IClosingcover
JCoverscrew
180°
± 3/4”
Gap adjustment Left/Right hand changing

ENGLISH
6
5. Prole preparation
Determinethecorrectpositionofthelockinthegateframe.Themountingholescanbeprepared
bymeansofthedrawingbelow.
NOTE!Theholeoftheself-latchingbolt,needstobelarger(Ø1”)atthebackofthegateframe
thenatthefront(Ø3/4”mm).ThisallowsyoutottheFreeVincieasilyintothegateframewhen
aminimumdistance(4-3/8”)betweenthegateframeandtherstgatebarisrequired.
6. Changing the codepanel to the entrance side
BeforemountingtheFreeVincitothegate,checkifthecodeentrysideisatthecorrectsideofthe
gate.Ifnot,followtheinstructionsbelowtochangethecodepaneltotheentrancesideofthegate.
8-9/16”
4-23/32”
5-9/16”
13/16”
MIN. 4-3/8”
1-1/4”
2x Ø5/8”
2x Ø3/8”
Ø3/4”
Ø1”
3-5/8”
4”
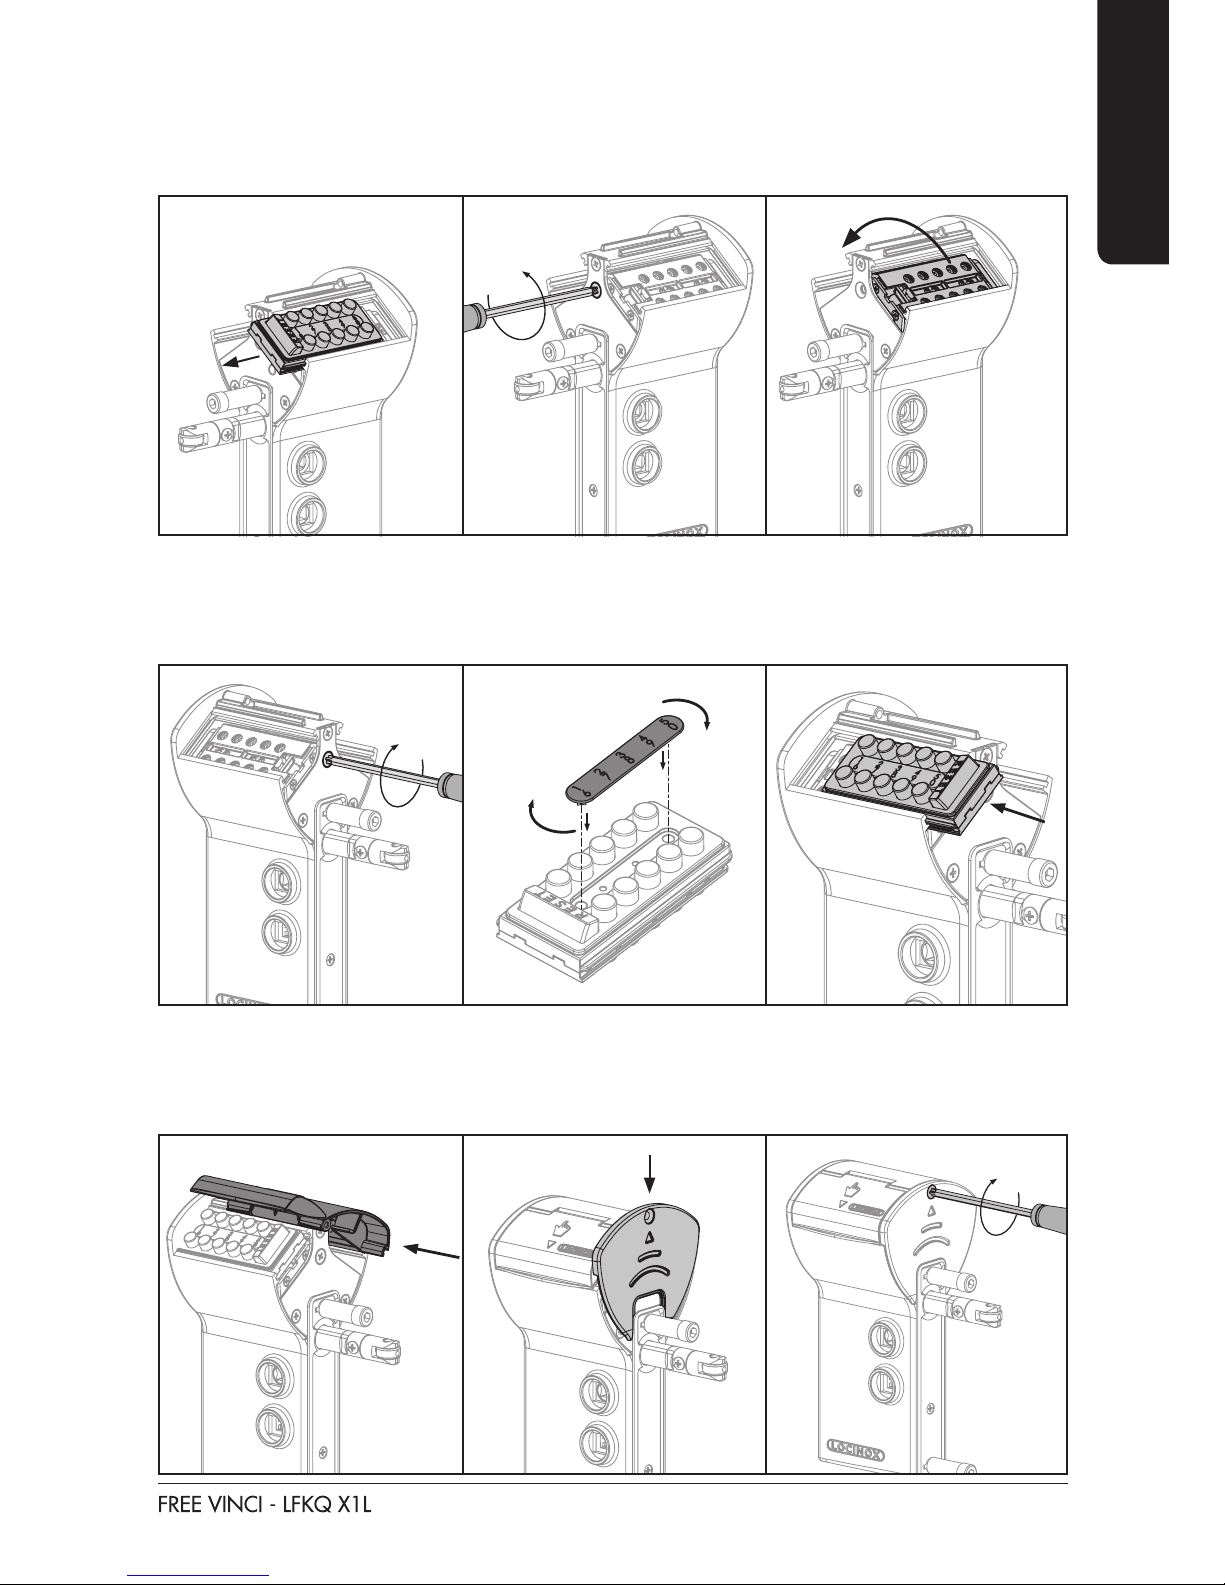
Step1: Removetheclosingcover.
Firstremovethecoverscrewandthenslideouttheclosingcoverandthedust-&raincover.
ENGLISH
7
Step2: Switchthecodemechanismtotheotherside
Slideoutthecodepanel.Loosenthecodemechanismscrewandipthecodemechanismtothe
otherside.
Step3: Remountthecodepanel
Tightenthecodemechanismscrew.ChangethepersonalcodefollowingtheinstructionsinChap-
ter7,Codesetting.Withthenumericplateinthecorrectposition,youarereadytoreplacethe
codepanel.CAUTION!Theresetbuttonalwaysneedstobeonthelatchboltsideofthelock.
Step4: Reinstallthecovers
Afterinsertingthecodepanel,inserttheDustandRainCoversothecoveropensoverthecode
panel.SlidetheClosingCoverintopositionandtightenthescrew.CAUTION!Werecommend
youtestthelockfunction(seechapter10Operation)beforemountingthelock.
ENGLISH
8
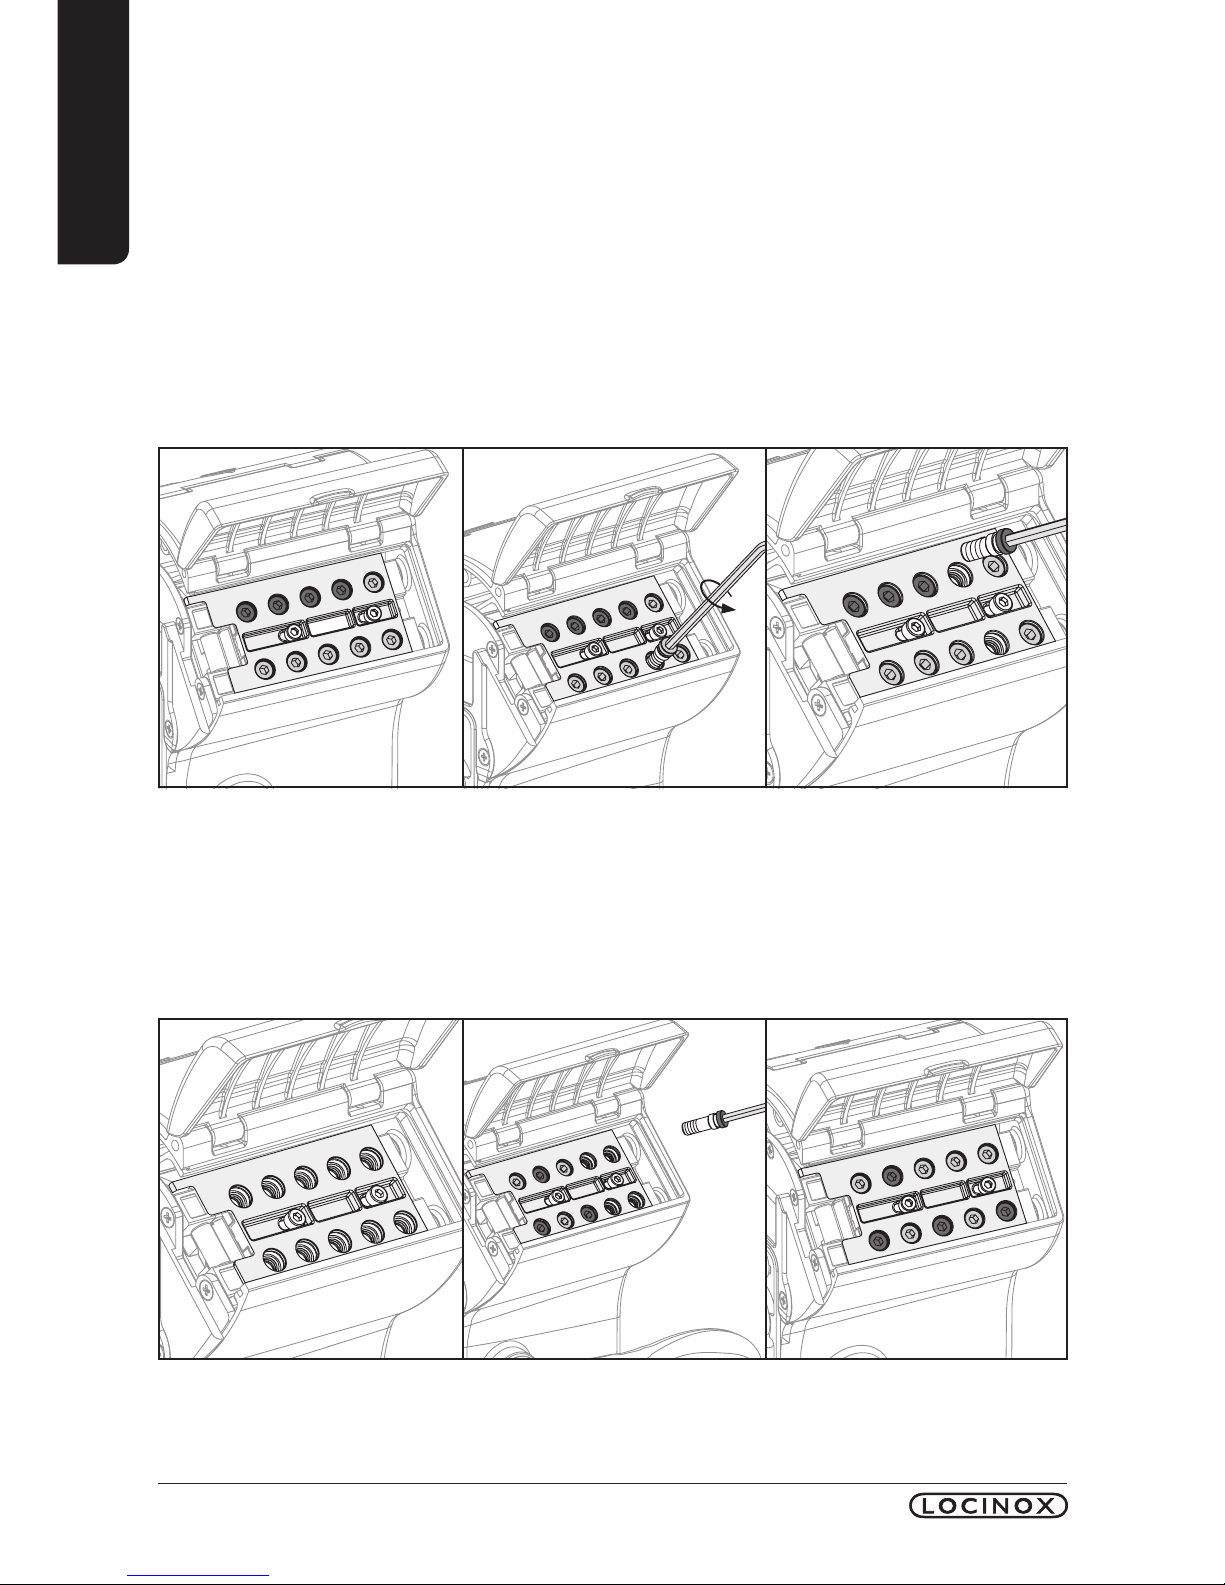
Step2: Setyourpersonalcode
Insertthegreencodescrewsinthepositionyouwantyourpersonalcodetobe.Filltheremaining
holeswiththeredscrews.Allholesmustbelledwithascrew.Tightenthescrewsdownsothey
arermlyseated.
7. Code setting
Because of security reasons, the Free Vinci is developed in such a manner that the code
can only be changed when it is not mounted. The default setting of the code is 1-2-3-4.
Thestepsbelowexplainhowyoucanmodifyyourownpersonalcodeinafastandsimplemanner.
TheFreeVincienablesthesettingofa4to6-digitcode.
Step1: Removetheclosingcoverandcodepanel.
Afterremovingthecodepanel,youwillndthered(stop)andgreen(go)codescrews.Fromthe
factory,thegreenscrewsareautomaticallysetinposition1-2-3-4,asshown.Removeallcode
screwsfromthecodemechanismwiththeenclosedAllenkey.

ENGLISH
9
8. Mounting the handles
NOTE!Thehandleatthetoppositionisthecodeentrancehandleonthesecuresideofthegate.
Thebottompositionisforthefreeexithandleonthe“safe”sideofthegate.
CAUTION!Installthehandleshaftsothatthehandle’ssetscrewtightensintothespreaderside
oftheshaft.
9. Turn the rollerbolt to match the closing direction
CAUTION!BeforemountingtheFreeVincitothegate,checkiftherollerboltisinthecorrect
position.Ifnot,removethescrewsandturntherollerbolt.
NOTE!WerecommendLoctiteBLUEthreadlockerfortherollerboltmountingscrews.Tightenthe
screwssecurly.
180°
ENGLISH
10
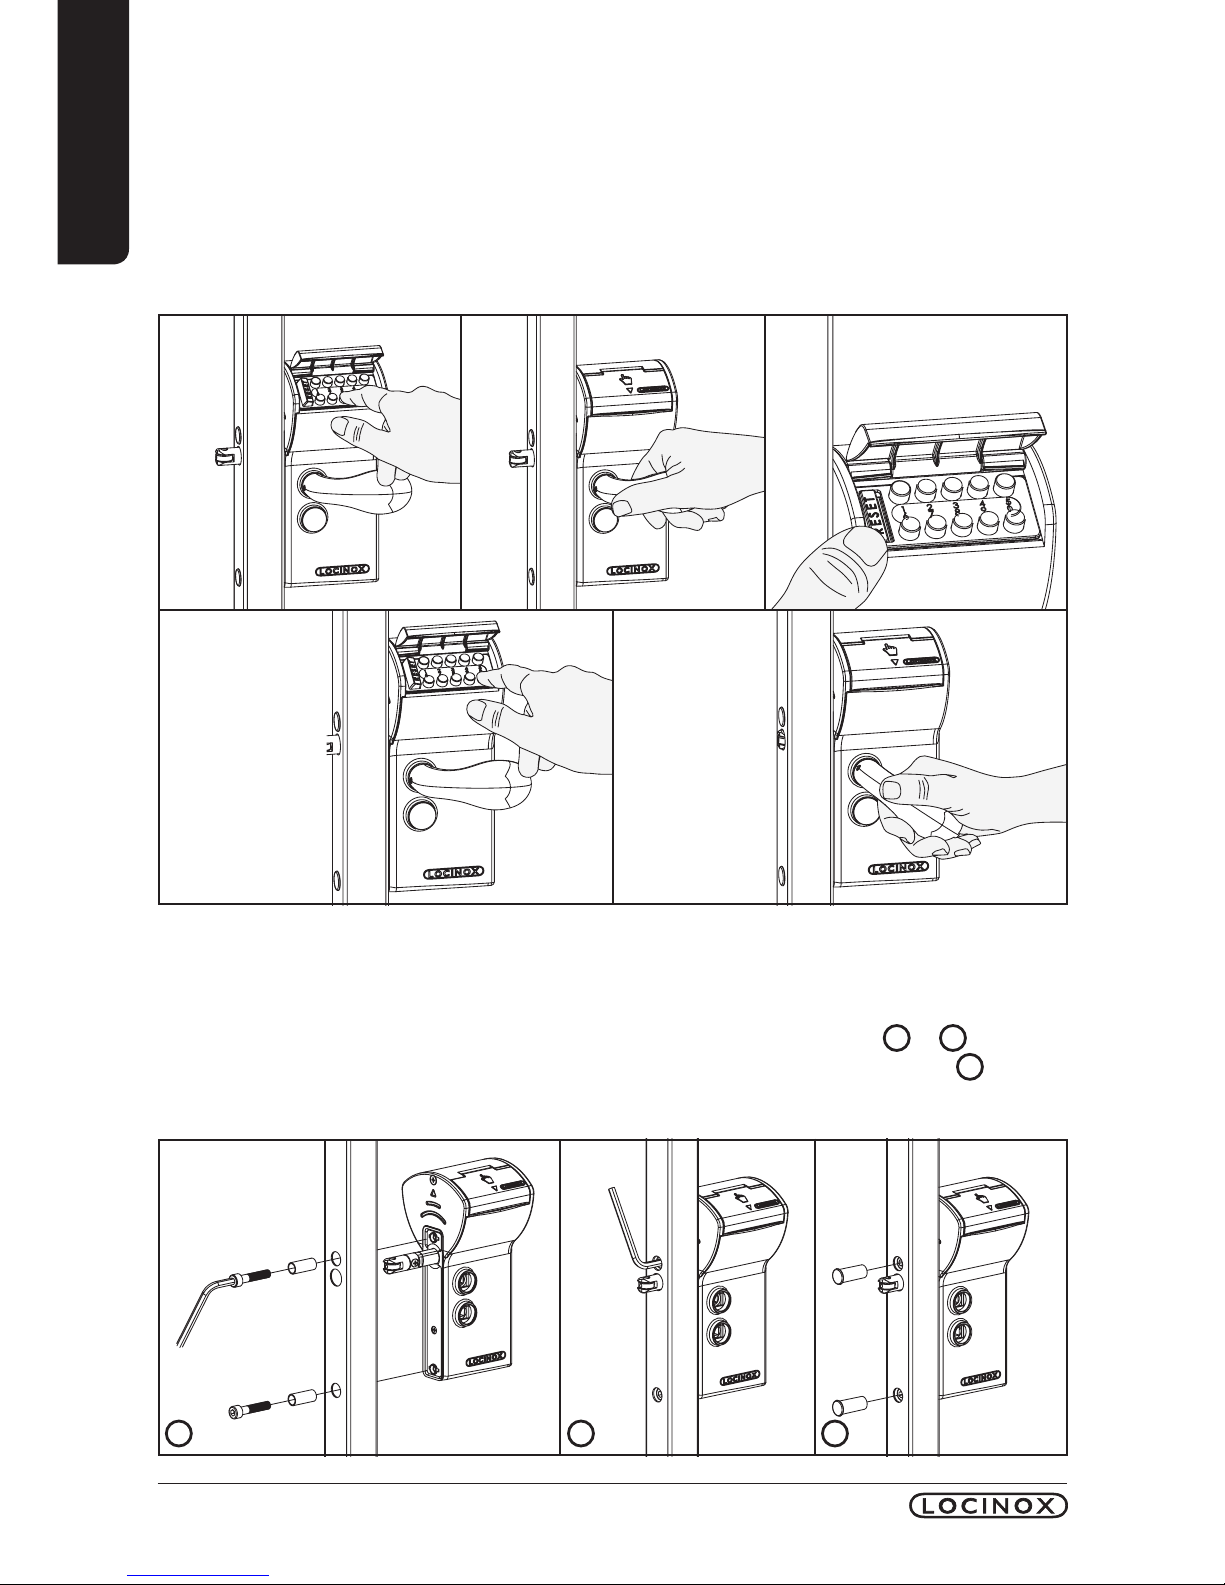
10. Operation
Enterafalsecodeinordertotesttheresetfunction.Drawing A Afterhavingenteredanincorrect
code,thehandleremainsblocked.Drawing B Nowpresstheresetbuttonandenterthecorrect
code.Drawing C & D. Thehandlecanbemovedafterenteringthecorrectcode.Thiswillretract
thelock’sself-latchingbolt. Drawing E. Afterusingthehandle,thecodeisautomaticallyreset.In
doingso,thecodeneedstobeenteredeachtimeinordertoopentheFreeVinci.
11. Mounting the Vinci
Aftertestingtheoperationofyourlock,theFreeVincicanbemountedontothegate.Thefast,easy
andtypicalLocinoxmountingisexplainedbelow.Firstslidethespacertubesoverthehexhead
socketscrewsandmountthelockontothegateprolebyusingthehexkey. 1& 2.Tighten
thehexheadsocketscrewsandcovertheholeswiththeenclosedplasticcovercaps. 3
A B C
D E
1 2 3
Other Locinox Door Lock manuals


