Elgento E23001 User manual

INSTRUCTION MANUAL E23001
1Litre Juicer
Afx
stamp
Here
TO:
CUSTOMER SERVICES DEPARTMENT.
ELGENTO.
SUTTON HOUSE,
BERRYHILL ROAD,
FENTON,
STOKE ON TRENT,
STAFFORDSHIRE,
ST4 2NL.

Safety Information
Technical Support
If you require technical support or in the unlikely event that your purchase is faulty
please telephone our Helpline for immediate assistance.
0871 221 3619
This product is guaranteed for 12 months from the date of the original purchase.
If any defect arises due to faulty materials or workmanship the faulty products must be returned
to the place of purchase. Refunds or replacement are at the discretion of the Retailer .
The following conditions apply:
The product must be returned to the retailer with the proof of purchase.
The product must be installed and used in accordance with the instructions contained in this
instruction guide.
For domestic purposes. ONLY.
It does not cover wear and tear, damage, misuse or consumable parts.
PFD has limited responsibility for incidental or consequential loss or damage.
Valid in the UK and Eire only.
Technical Specication.
Guarantee.
Product Code E23001
AC: 220V~ 240V 50Hz
Power 600W - 700W
Sutton House,
Berryhill Road,
Fenton
Stoke on Trent
Staffordshire,
ST4 2NL.
Parts Identication
1. Food pusher
2. Upper housing cover
3. Pulp collector
4. Lock arm
5. Main housing
6. Switch
7. Stainless steel mesh lter
8. Mesh lter holder
9. Juice outlet tube
10. Juice collector
Please read this instruction manual carefully before using
Attention to the following safety points is recommended:
Always place the machine on a at level surface before using.
Always check the mains supply is same as machine’s rated voltage
If the supply cord is damaged, it must be replaced by the manufacturer or its service agent or a
similarly qualied person in order to avoid a hazard.
Please do not use any accessories or components not supplied with this machine
Make sure the whole machine is correctly assembled before using
During use, prevent the power cord and plug from touching any sharp edges or heating source.
This appliance is not intended for use by children or the inrm unless they have been given
supervision or instruction concerning use of the appliances by a person responsible for their
safety.
Children should be supervised to ensure that they do not play with the appliance.
This products is only for fruit and vegetable juicing Only. Other food material may damage the
machine
Do not put your hand inside the food pusher during while the machine is in use
Mesh lter is sharp, do not use hands to clean it directly, a brush or glove is needed.
Do not use this machine with nuts or frozen foods.
During the rst use, a slight odour may be noticed. This is due to preservative oils used inside
the machine used during manufacture.The odour will disappear after a short time of use.
Always ensure that power lead is disconected from the mains supply when you clean
the machine. or when assembling / Dis assembling
Do not immerse the main housing (with electrical parts) in any liquid during cleaning. Only use
damp cloth.
Do not put accessories into a dish washer.The high water temperature can cause
the transparent component parts to fog over after time.
Please save these instructions

Electrical safety
Class 1 Conguration
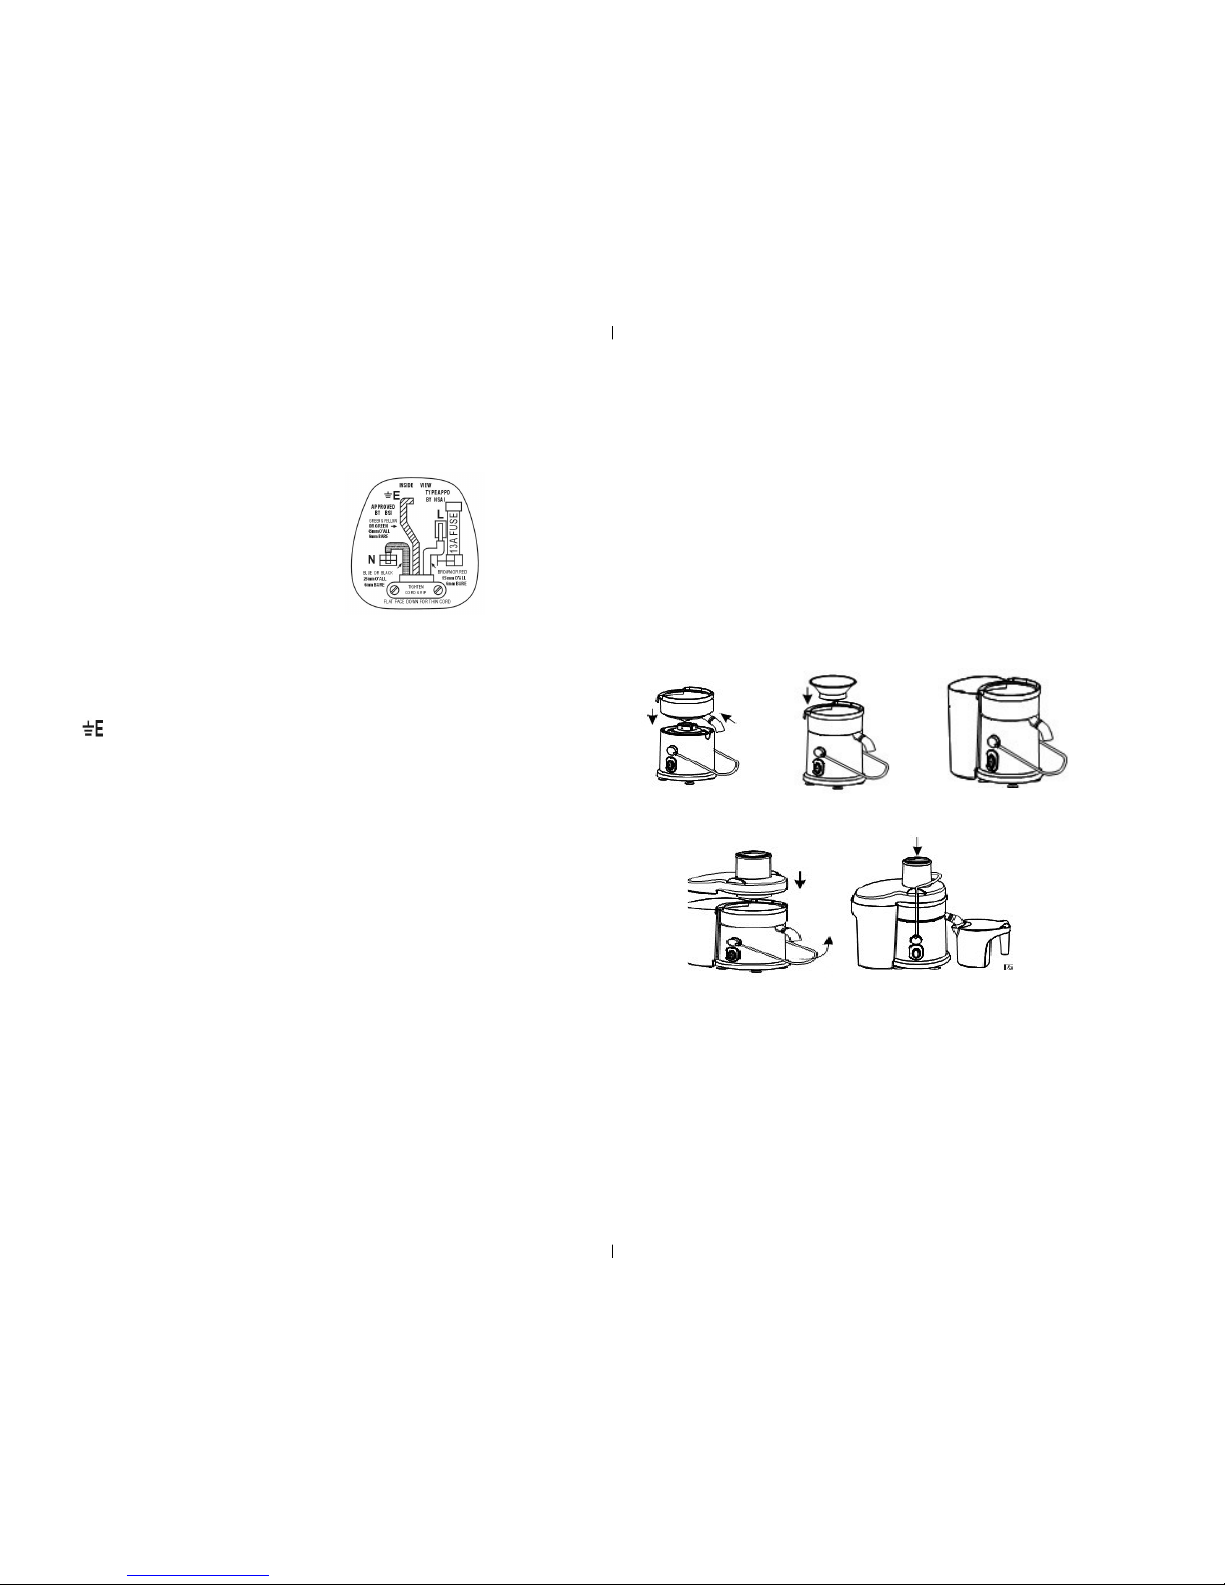
The wires in the mains lead are coloured in accordance with the following code:
GREEN/YELLOW: EARTH (E)
BLUE: NEUTRAL (N)
BROWN: LIVE (L)
Class 1 Conguration
As the colours of the wires in the mains lead of this appliance may not correspond
with the coloured markings identifying the terminals in your plug, proceed as follows:
• The wire which is coloured GREEN & YELLOW (or coloured GREEN) must be
connected to the terminal in the plug which is marked with the letter “E” or by the earth
symbol
• The wire which is coloured BLUE (or coloured BLACK) must be connected to the NEUTRAL
terminal which is marked with the letter “N”.
• The wire which is coloured BROWN (or coloured RED) must be connected to the LIVE
terminal which is marked with the letter “L”.
Always ensure that the Mains Cord is xed into the plug through the Cord Guard or Cable
Clamp, (plug wiring diagram above), and that the Cord Guard screws are tightened to clamp
the cord (outer sheath and inner coloured wires) into position in the plug. Make sure that
the plug top is also tted securely.
This appliance must be protected by a 13 Amp fuse in a 13 Amp type (BS1363) plug. Should you
need to replace the fuse, use only a 13Amp ASTA approved BS1362 fuse (13A).
OPERATIONAL GUIDELINES
It is important to ensure the correct Plug Adaptor is used when operating in a country not using
the UK 13 Amp socket system. If in doubt, consult a qualied electrician.
Please wash the food contact parts thoroughly in warm soapy water. Rinse and dry completely.
The juicer is equipped with a number of safety interlocks that prevent it from being powered up
if it is assembled incorrectly, so please take some time to familiarise yourself with the assembly/
dis-assembly of the machine. It's much easier to do when there is no juice in there!
1. put the machine on at stable surface and ensure switch is in “0” (off) position
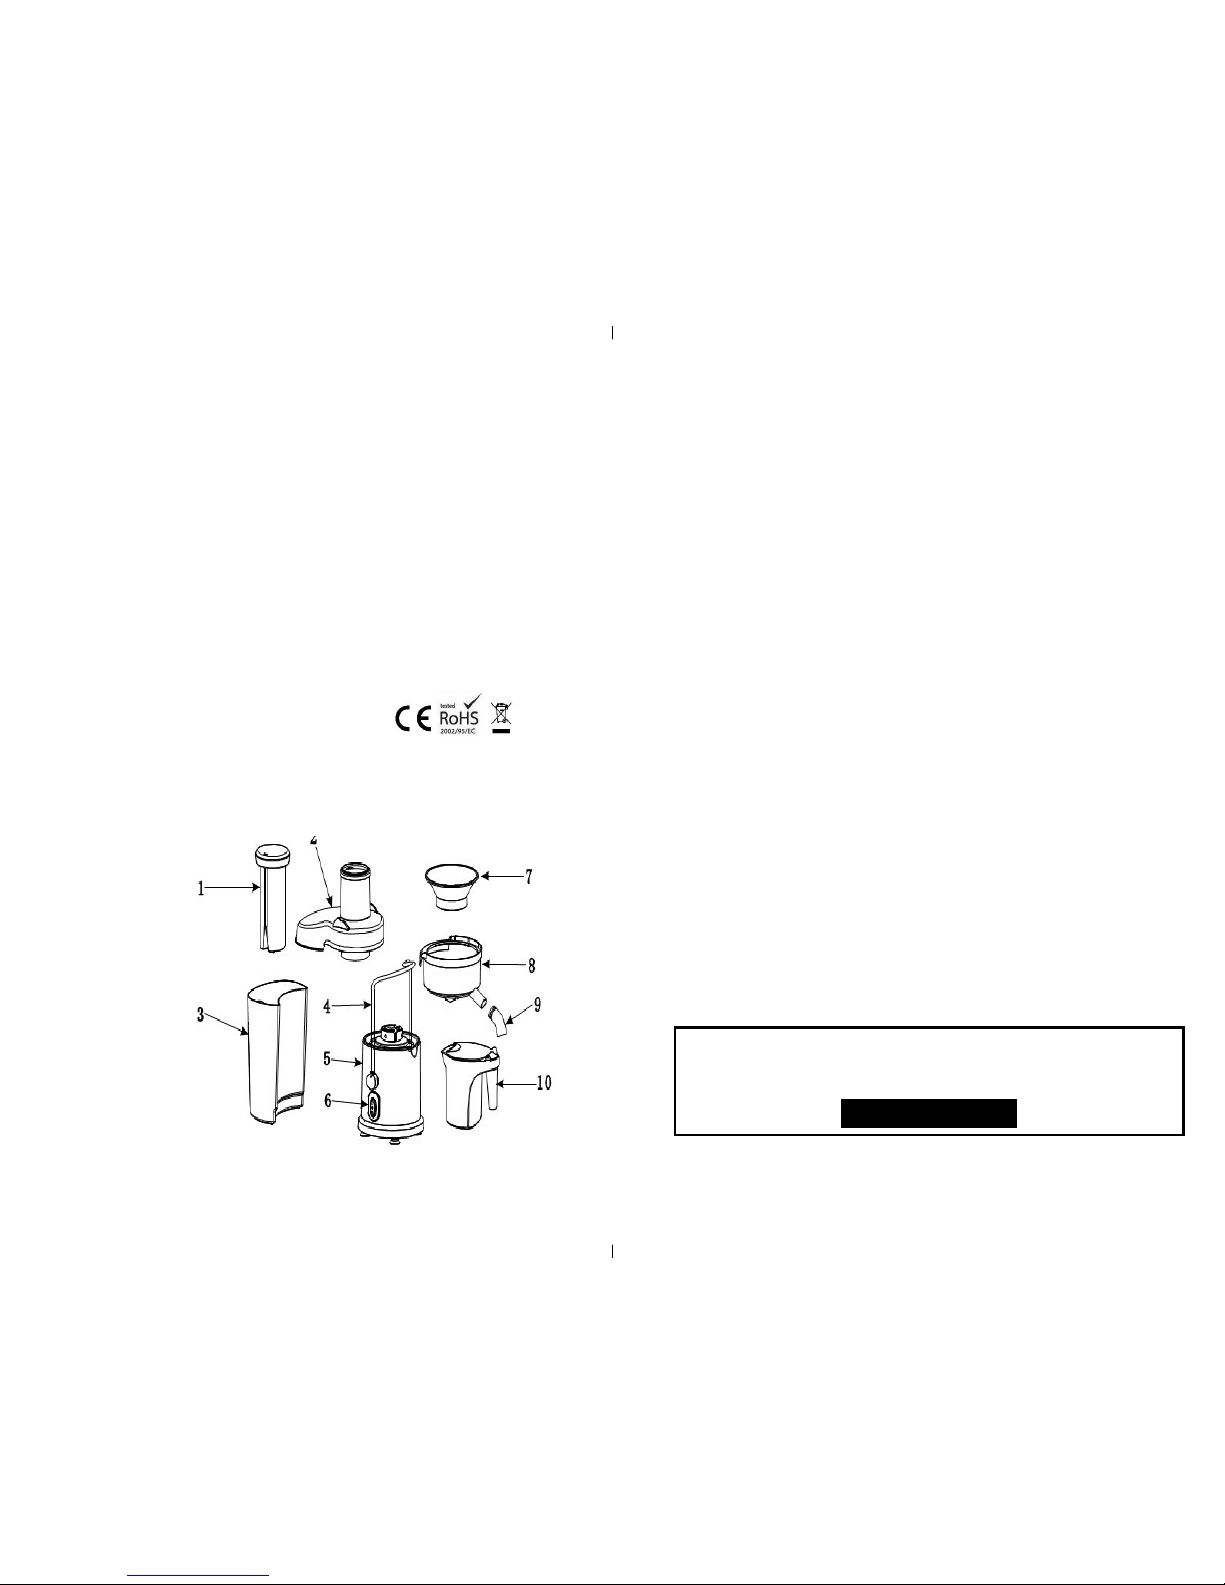
2. Assemble the juice outlet tube (no.9) on lter holder (no.8), then assemble the lter holder
(no.8) on the main housing (no.5) (pic 1)
3. Assemble the stainless steel mesh lter (no.7) on the drive axis evenly, make sure the lter
is assembled properly, try to rotate the lter softly to make it move smoothly. (see the pic2)
4. Put the pulp collector (no.3) into position on left side of the machine.(pic 4)
5. Put the upper housing cover (no.2) on the main housing (no.5), use left hand to press the
cover and right hand to bring the lock arm into position. (pic 5)
6. Put the juice collector in position, and then connect juicer to mains supply
7.Your juicer is now ready for use. (pic5)
(PIC1) (PIC2) (PIC3)
NOTE: all food should be completely clean before juicing.
As a general rule, only put through fruit or vegetable material that you would normally eat.
For example: you wouldn't normally eat orange peel, so peel oranges before putting them
through. the juicer
BANANAS CAN'T BE JUICED DUE TO THEIR STRUCTURE
(PIC5)
Before use
(PIC4)

Speed Function
Reference:
A. For fruits with more water (like watermelon, tomato, orange), it’s better to use “i”
speed
B. For fruits with less water source (like apple, pear), it’s better to use “ii” speed
C. If you're not quite sure about the fruit character, use “ii” speed.
NOTE:
1.The machine is designed for maximum 2 mins for each juicing session. This should be more
than adequate. If the machine has been in constant use for more than 2 mins, allow to cool for
5 mins before re-starting.
2. Do not overload the machine. Severe slowing of the motor is a sure indicator of this.
3. During working, use the food pusher to press the food and extract more juice. You shouldn't
need to push too hard.
4.When the juicing session is complete, switch off the machine and unplug from the mains
before dis-assembly.
“0” OFF
“1” LOW SPEED
“II” HIGH SPEED
Cleaning and Maintance
Always switch off and unplug the machine before cleaning.All non-electrical, removable parts can
be cleaned with warm soapy water. Be sure to rinse and dry these parts thoroughly before stor-
ing the machine away.The outside of the machine can be cleaned with a soft cloth moistened
with a mild detergent solution.
•Notes: If the juicer hasn't been used in 3 days or more, it's good hygiene to clean it again before
use.
•Do not use abrasive or chemical cleaners
•Do not immerse the electrical parts in water
•Don't put the transparent plastic parts in the dish washer. You're OK with the stainless steel
mesh though.
There are as many recipes as there are fruit combinations. Here's a good one to get you started:
2 apples
1 lemon
25mm slice of ginger root
Keep the skins ON the apples for avour. Remove the peel from the lemon but try to retain
some of the pithy material between the skin on the fruit as it contains a lot of the avour of
the fruit. Same goes for most citrus fruits. Feed in the 1st apple, then the ginger root, then the
lemon, then the 2nd apple.
Recipes
Pick me up juice recipe
Ingredients:
•1 grapefruit
•1 orange
•1 hard pear
•1 yam
•1 apple
Citrus sunshine juice recipe
Ingredients:
•1 pink grapefruit
•2 oranges
Early bird juice recipe
Ingredients:
•1 apple
•1 tomato
•2 carrots
•1 orange
•1/2 lemon
Rise n' shine juice recipes
Ingredients:
•1 orange
•1 tangerine
•1 pink grapefruit
Golden morning juice recipe
Ingredients:
•8 carrots
•1 orange
•1/2 lemon
Directions:
For all recipes, remove peel from citrus, leaving as much white skin on as possible
(for added nutrients).
Add ingredients to juicer.
All fruit stones must be removed

Like to nd out more? Visit www.GrownGreen.info
Responsible Transport:
This product was made in China. Most things are. But when
we brought it over here, we shipped it on a container ship,
along with 10,000 containers of other things. It may not be
fast, it takes about 4 weeks, but it’s the greenest way of doing
it.
100% Recyclable:
All the cardboard in this packaging is 100% recyclable. If you
can’t think of a good use for the box as it is, please fold it at
and put it out with your other recycling. If you don’t have
regular collections, it can be taken to any cardboard recycling
area or even used in your composter. Now you can play your
part!
Paperless Design:
We started thinking about how to make this packaging
“Green” from the very beginning,
and thought that using as little paper as possible would be
a good idea. So the whole design process was carried out
online.We didn’t post anything, kept printouts to a minimum
and let technology take the strain.
Sustainable Packaging:
The trees used to make the card board for this box all come
from sensitively managed forests. Since 2006, the people that
made the cardboard for this box have planted over 700,000
acres of trees. On top of that, the whole manufacturing
process is ISO14001 approved.
Your recipies

Imported & Distributed throughout the U.K.By PFD. ST4 2NL | www.elgento-products.co.uk
Declaration of Conformity
We PFD Ltd Declare that this product conforms to all the following
product legislation
In accordance with the following directive(s):
2004/108/EEC.The Electromagnetic compatibility Directive
2006/95EC.The LVD directive (LowVoltage Directive)
2002/95/EC. The RoHS. Directive. (Restriction of Hazardous substances Directive)
1935/2004/EC Materials & Articles in Contact with Food. (LFBG section 30, 31 & 35)
Peter Bowden
Quality Assurance Manager
Sutton House, Berryhill Road, Fenton, Stoke-On-Trent,
Staffordshire, ST4 2NL.
IMPORTANT
This warranty is invalid if alterations have been made to this certicate
promotions from PFD
and it’s associated
companies please tick this box
Model no:
Serial no:
Batch no:
Name:
Address:
Post Code
Date Purchased:
E-mail Address:
Dealer Stamp/Details:
Disposal of Unit
Disposal instructions for electrical items in accordance with the WEEE directive.Appliances
bearing the symbol shown here may not be disposed of in domestic rubbish.You are required
to dispose of old electrical and electronic appliances like this separately. Please visit www.
recyclemore.co.uk, or www.recylcenow.co.uk for access to information about the recycling of
electrical items.The WEEE directive, introduced in August 2006, states that all
electrical items must be recycled, rather than taken to landll. Please arrange to take this appli-
ance to your local Civic Amenity site for recycling, once it has reached the end of its life..
Table of contents