Elisa intuition User manual
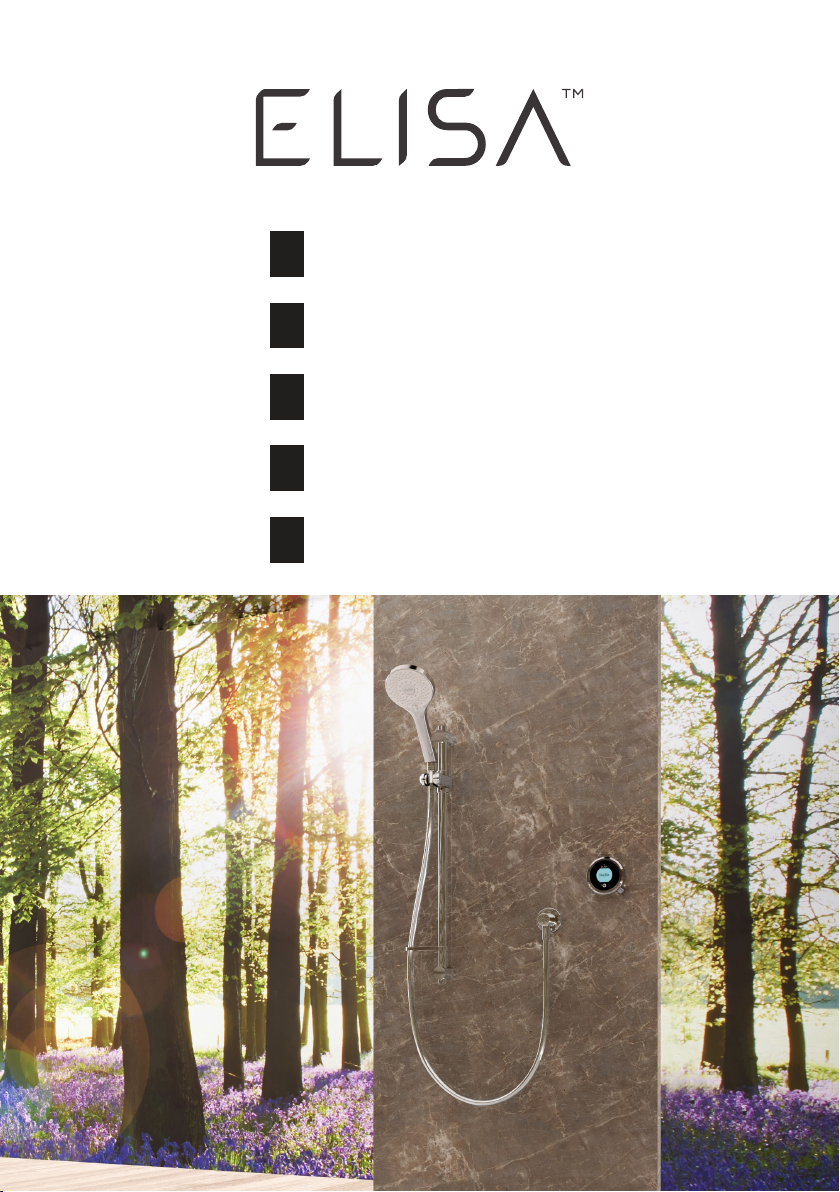
Intuition™
Intuition™
Intuition™
Intuition™
Intuition™
UK
DE
FR
PL
NL
User Guide
Bedienungsanleitung
Guide d'utilisation
Gebruikershandleiding
Gebruikershandleiding

UK
Contents
2 Safety Information
3 The Intuition™ Controller
3 Get Smart Connected
4 Quick Start
5 Wake up and Language Display
6 Switching On and Off
7 Adjusting the Temperature
8 Adjusting the Flow
9 Selecting your Outlet
10 Adjustable Head
11 Fixed Head
12 Settings
14 Configuring your Outlets
15 Caring for your Shower
16 Shower Troubleshooting
20 Have you Registered?
20 Need Help?
Safety Information
This appliance can be used by children aged from 3 years
and above and persons with reduced physical, sensory or
mental capabilities or lack of experience and knowledge if
they have been given supervision or instruction concerning
use of the appliance in a safe way and understand the hazards
involved. Children shall not play with the appliance. Cleaning
and user maintenance shall not be made by children without
supervision. For further information regarding the installation
of your product, refer to the Smart Shower Installation Guide.
Declaration of Conformity
Aqualisa Products Limited declares that the SmartValve and
supplied controller, in conjunction with pairing remotes and
diverter, complies with the essential requirements and other
relevant provisions of the Low Voltage Directive (2014/35/
EU), the EMC Directive (2014/30/EU) and the RED Directive
(2014/53/EU).
2
UK
10 Adjustable Head
11 Fixed Head
12 Settings
14 Configuring your Outlets
15 Caring for your Shower
16 Shower Troubleshooting
20 Have you Registered?
20 Need Help?
LEVER
Menu access
confirm a selection
BEZEL
Rotary
temperature
control
TOUCH SWITCH
On/Off
PROXIMITY
SENSOR
ACCENT
RINGDISPLAY
Intuition™ Controller
GET SMART CONNECTED
Unlock the potential of your shower; from water consumption analysis to
enhanced user functions. Keep up to date with latest features for the Aqualisa
app and voice activation by visiting the Aqualisa website.
Download and open the free Aqualisa app. If you have any trouble
downloading the Aqualisa app, check aqualisainternational.com/smartapp
for device compatibility.
SMART SPEAKER SETUP
Once the above has been completed go to the app for your smart speaker
and follow their instructions to add the shower to your devices.
3

UK
Quick Start
WAKE UP, POWER ON
AND POWER OFF
SHOWER ON
TEMPERATURE FLOW SELECT OUTLET*
Push and hold lever for over
3 seconds then release when
desired outlet icon appears.
Adjust during
showering only.
Adjust before or
during showering.
* Divert models only
You can prepare your temperature and outlet before you switch on the
shower, or adjust with ease while showering.
4

UK
The controller has a proximity sensor, so as you approach or move your hand
towards the controller, the display wakes up and is ready to go.
Wake-up
The proximity sensor detects
any object directly in front,
at approximately 0.5m
away from the controller.
0.5 metres
For information on languages available and how to reset the language display
on the controller, refer to separate literature supplied or visit
aqualisainternational.com
Language Display
5
UK
The controller features a secondary method to turn the shower off.
This is done using the lever: joggle the lever down until the flow is set
to ECO, then joggle the lever down three more times in succession.
39
Hello
Warming
39
Get
Ready
39
Push Lever
Your
shower was
9:20
Goodbye
Push lever
to power o
water turns off
Switching On and Off
ENDING YOUR SHOWER
Touch the power symbol for approximately 1 second, then push the lever
when prompted, to confirm and end the shower.
STARTING YOUR SHOWER
To activate the controller, use the proximity sensor, or touch the power symbol
until the screen wakes up, then push and release the lever to start the shower. The
Get Ready screen will appear on the display. After a moment the target
temperature will flash until it is reached. It will then display the thermostatically
controlled temperature.
water turns on
As a safety feature, the SmartValve has a maximum run time of 20
minutes. The flow can be stopped and started at any time by following
the instruction on this page.
This can be enhanced by activating and using the free Aqualisa app.
See pages 3 and 16 for details.
6

UK
TIP: This is your Home screen.
When in any of the Menu or
Settings screens, you can easily
return to the home screen by
turning the temperature bezel.
42 35
43
Warming Cooling
34
TEMPERATURE FEEDBACK DISPLAY*
Adjusting the Temperature
From the Home screen you
can adjust the temperature at
any time, before or during
showering, by turning the
bezel.
Turn clockwise to increase the
temperature. While the temperature
is adjusting the screen will flash
and the display will show
Warming. When the desired
temperature is reached, the display
will stop flashing.
Turn anti-clockwise to decrease
the temperature. While the
temperature is adjusting the
screen will flash and the display
will show Cooling. When the
desired temperature is reached,
the display will stop flashing.
* Very small changes in temperature may not result in Warming or Cooling messages
showing, only the temperature value will change.
7
UK
Emerency Stop: When the flow settin is at ECO, jole the lever
down 3 times in succession to turn the shower off.
Flow
MED MAX
Flow 39
FLOW FEEDBACK DISPLAY
After adjusting the flow, the display will return to the temperature Home
screen after a few seconds.
From the Home screen you
can adjust the flow during
showering, by moving the
lever left or right.*
*Flow cannot be adjusted when in Settings mode, or when the shower is awake and
not flowing.
Adjusting the Flow
Note: the change in flow will vary depending on the water system pressure
and the configuration of the pipework. For further information, refer to the
trouble shooting section and the Important Information section in the Smart
Shower Installation Guide.
8

UK
Drench
Shower
Push and hold for
over 3 seconds Release lever when
desired outlet icon appears
Selecting your Outlet Divert models only
From the Home screen, you can
alternate between outlets by
pushing and holding the lever
for over 3 seconds and releasing
when the desired outlet icon
appears. This can be done upon
starting the shower, or during
showering.
OUTLET ICONS
By default your controller
will show the Shower
icon as the primary outlet
and the Drench icon as
secondary. To change, go
to Settings menu,
Configure Outlets (page
14).
9
UK
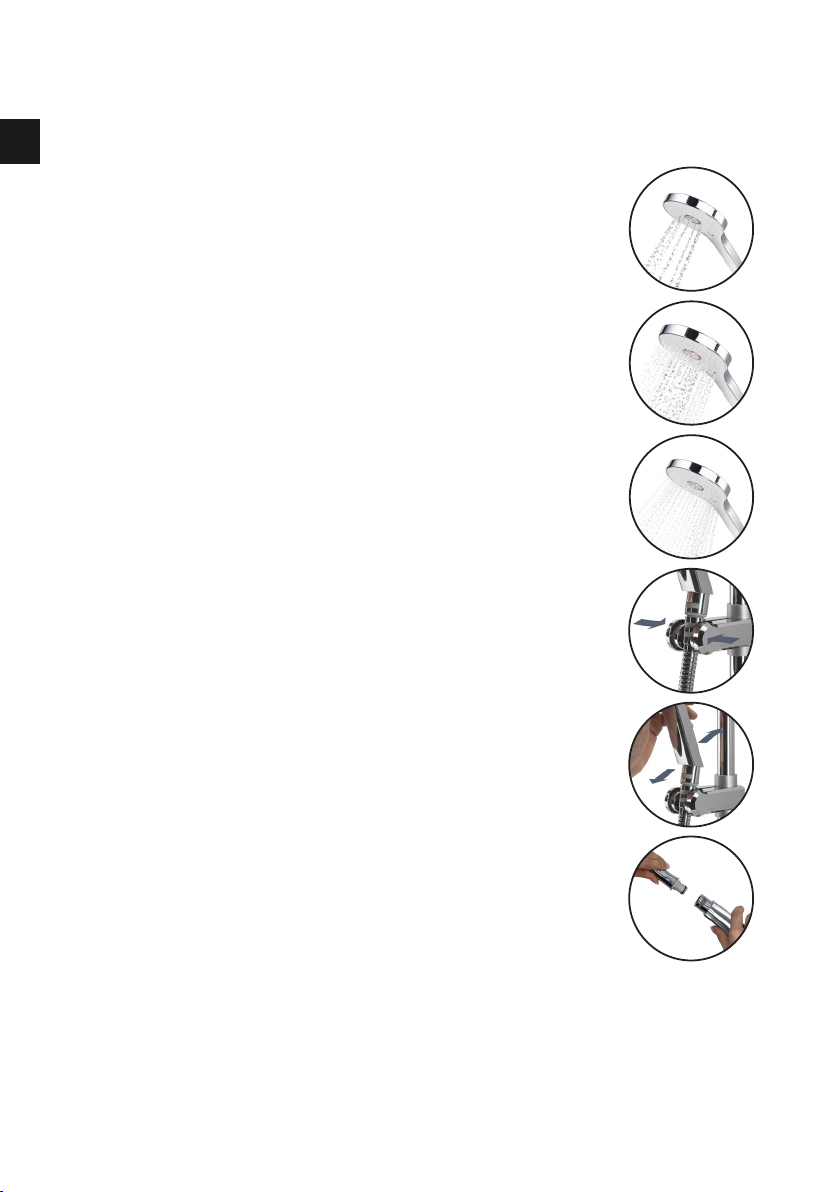
Adjustable Head
To avoid water dripping from the shower head
after use, we advise to tilt the head back to allow
residual water to drain out.
The above recommendation applies to both
adjustable and fixed shower heads.
Rotate the spray plate lever clockwise or
anticlockwise to select the desired spray pattern.
To select the preferred height for the shower head,
squeeze the side levers together to allow the
handset holder to move up or down the rail.
Angular adjustment is made by carefully but firmly
pulling forwards or pushing back the shower head
against the ratchet in the holder.
Removing the shower head: with the hose still
attached, disengage the pivot clip by pushing
in the outer grey button located on the front of
the shower head (near to the hose connection).
Remove the spigot from the bottom of the handset
by using the hose to pull clear. To reattach: ensure
the hose washer is in the correct position, tighten
the threaded spigot into the hose using a suitable
spanner, taking care not to over-tighten. Reinsert
the spigot into the handset and engage the pivot
clip prior to placing the handset into the handset
holder.
Vita™ Head
3. Outer
2. Middle
1. Inner
10

UK
The angle of the fixed shower head can be
adjusted. The shower head is mounted on
a multi directional ball joint to allow for
minor angular adjustment in any direction
by carefully holding the shower head and
moving the head to the desired angle.
To avoid water dripping from the shower
head after use, we advise to tilt the head
to allow residual water to drain out.
Note:. do not force the angle of the head
beyond its natural stopping point.
Fixed Head
11
UK
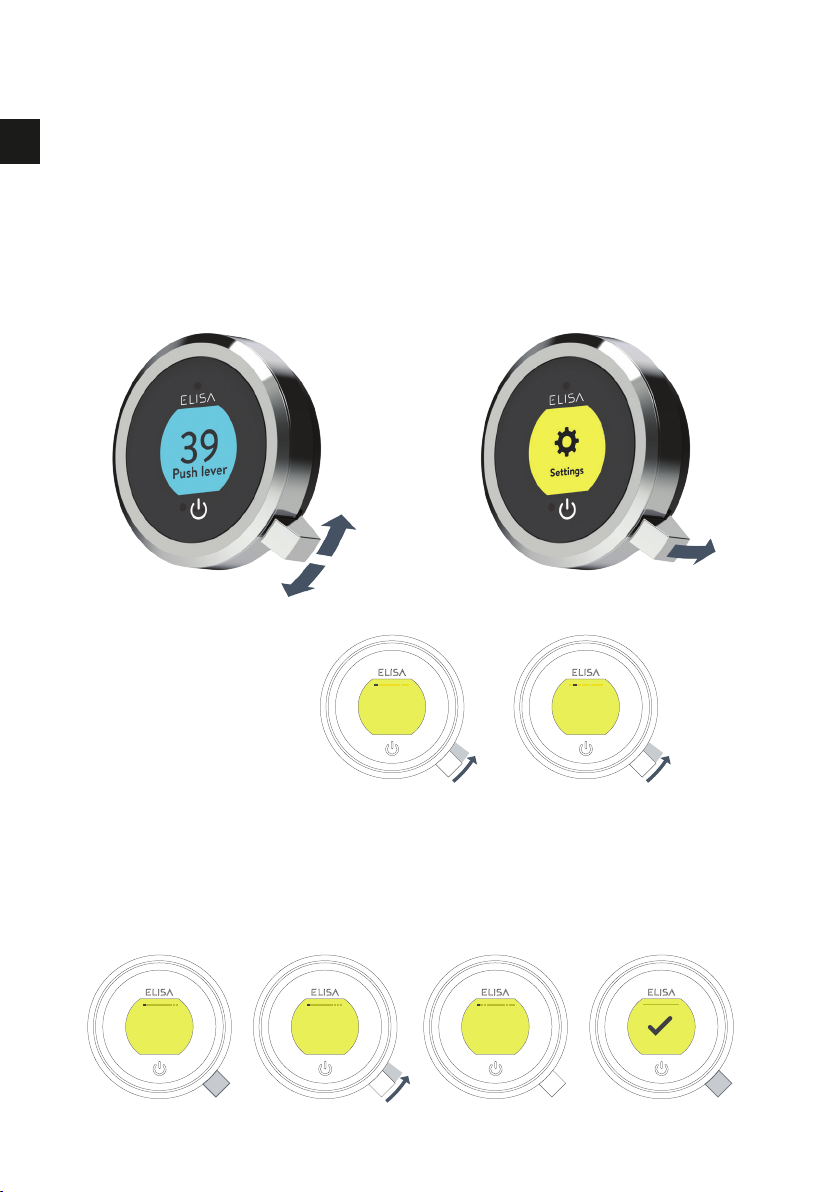
SETTINGS
Auto Wake up Wifi
Auto Wake up
EDITING A SETTING
To change a setting, push the lever. Move the lever left or right to choose your
preference, (the active setting is in darker type) and push the lever to confirm.
A tick will briefly appear to confirm your choice.
Settings
Intuition™ features optional settings to enhance your shower.
To enter Settings, from the Home Screen, move the lever left or right until the
Settings screen appears. Push the lever to enter. Access to the settings menu
is only available when water is not flowing.
BROWSING THE SETTINGS
MENU
When in the Settings
menu, move the
lever left or right to
browse.
Auto Wake up
ON OFF
Auto Wake up
ON OFF
HOME
12

UK
Settings
Configure outlets
CONFIGURE OUTLETS
This setting enables
you to choose the
icons that represent
your outlets, and
change the primary
outlet. (See page 14
for details).
Pair a remote
PAIR A REMOTE
If you have
purchased a remote
control, please refer
to the separate
instructions supplied.
Auto Wake up
AUTO WAKE UP
This setting allows
the Wake Up feature
to be turned off. This
may be required if
you have a small
shower enclosure,
and the controller is
permanently active.
Factory default: ON.
Factory
reset
Firmware update
About My Q
FACTORY RESET
Reset all setting to
factory default,
including resetting the
controller language
display. Refer to
separate literature
supplied or visit
elisabathrooms.com
for more information.
FIRMWARE UPDATE
This setting should
only be used under
advice from Elisa
Customer Service or
by a trained service
technician.
WIFI
To connect to the
Aqualisa app and
enable shower
functionality using
your personal
smart devices.
ABOUT MY
CONTROLLER
For Elisa Service
Technician use.
Wifi
13

UK
OK
Configuring your Outlets
When you enter this setting you will first be asked to
switch on the shower. You will then be prompted to
confirm if the outlet running is the desired Primary
Outlet.
Next, move the lever left or right to browse icons.
Push the lever to select the icon that matches your
installation.
When you have selected the icons, your choice
will be confirmed with OK.
This setting enables you to choose the icons that
represent your outlets. If you have multiple outlets,
you can also select the most commonly used, this is
known as the primary outlet. Water will divert to this
outlet unless you select otherwise.
NB: Only available with divert models. You can not configure outlets whilst
the shower is in use.
Primary Outlet?
YES NO
OK
Choose an icon
Configure Outlets
YES NO
14
UK
Cleaning tip: to keep your shower effortlessly clean, we recommend
drying all shower components with a soft cloth after use.
Caring for your Shower
Over time, your shower may be affected by hard water scaling. To keep your
shower working effectively, we recommend that you clean your shower regularly.
Your product should be cleaned using only a soft cloth and washing up liquid.
The bath system ‘click clack’ waste plug mechanism (if applicable) should be
kept clear of debris to ensure the plug maintains a watertight seal. The plug can
be unscrewed and removed to check and clean the mechanism.
Cleaning the shower head
To reduce the need for chemical descaling in hard water areas, your shower head
incorporates a ‘clear flow’ system, whereby any scale build-up can be broken
down by gently rubbing the flexible tips of the jets during use. This procedure
should be completed regularly, as often as once a week in some hard water
areas, as scale build-up can affect the spray pattern and cause the shower to
perform poorly. Failure to descale the shower head can affect the internal seals
and may affect the warranty. Should descaling of the head using a cleaning
agent become necessary, remove the shower head fully and immerse in a mild
proprietary descaler (e.g. vegetable based or plain white vinegar). Cleaning and
maintenance should not be undertaken by children without supervision by a
person responsible for their safety.
DO NOT USE ABRASIVE CLEANERS. It is imperative that descaling
is carried out in accordance with the manufacturer’s instructions,
substances that are not suitable for plastics and electroplated surfaces
must not be used.
Changing water system?
If switching from a gravity-fed water system to a mains pressure system (e.g.
Combination boiler) you will need to change your SmartValve. Contact a
member of our Customer Service team for further information.
15

UK
Shower Troubleshooting
Symptom Possible cause Action
Controller
unresponsive -
No Lights /
Blank
Power supply turned
off to SmartValve Check power supply is turned on - Green power
light should be illuminated on the SmartValve.
Additionally check the following 2 action points.
Controller
displaying
“Preparing,
please wait….”
for longer than 2
minutes
Loss of
communications Check data cable connections are making good
contact and are fully inserted and that there is no
visible damage. Power reset the SmartValve.
Check that the wiring schematics are as
per installation instructions in the Smart
Shower Installation Guide. Power reset the
SmartValve.
Pump noisy and
low / no flow Air lock (for Gravity
fed systems only) For models utilising an adjustable head kit;
disconnect the handset from the hose, see Head
section on page 10, lower the hose into the
shower tray or bath, set the temperature to fully
cold and then start the shower. As the water
starts to flow and increase in volume gradually
increase the temperature. If the flow starts to
splutter, stop moving the temperature control
until the flow again stabilises, then continue to
move the dial towards the hottest setting.
Restriction in the
waterway Check for debris in the inlet filters of the
SmartValve, diverter and Fixed Head connection
washer. Must be conducted by a qualified person.
NOTE: The water supplies MUST be isolated when
checking the inlet filters.
Blocked or kinked
hose liner Where a flexible hose is fitted, unscrew the
shower hose from the outlet connection and turn
the shower on.
Auto wake up
(proximity) not
activating
Auto wake up turned
off Go to Settings menu and ensure Auto wake up is
ON. See page 14 for instructions.
Flow does not
change when
adjusted with
lever
Combination boiler
output does not meet
the flow demand
Check with boiler manufacturer for specification
details.
SmartValve
is set to ECO mode Refer to Setting Water System Mode section in the
Smart Shower Installation Guide. Ensure mode is
set to normal or ECO gravity setting.
Seasonal conditions During the cooler months the mains water
temperature drops and this will reduce the
performance of combination boilers. Check with
your boiler manufacturer for details.
16

UK
Symptom Possible cause Action
Low / no flow Seasonal conditions See previous point.
Incorrect
SmartValve fitted If water supplies are gravity fed, the PUMPED
SmartValve must be used (unless a separate
stand alone pump is being utilised). Refer to the
Smart Shower Installation Guide.
Water supply issue For the Standard SmartValve - Ensure water is
turned fully on at the mains and at the servicing
valve in the supply.
Ensure isolation valves are fully open.
Mixed water supplies For standard SmartValve- ensure hot and cold
supplies are from the mains water supply.
Restriction in the
waterway See same cause in 'Pump noisy and low / no flow'
symptom.
Blocked or kinked
hose liner Where a flexible hose is fitted, unscrew the
shower hose from the outlet connection and turn
the shower on.
Incoming mains water
pressure or flow too low
(Standard SmartValve
only)
After confirming that the filters are clear, check
with the local water authority.
Separate, stand alone
pump not activating
(Standard SmartValve
only)
Ensure sufficient flow to activate the flow
switches of the pump. Refer to IMPORTANT
INFORMATION section in the Smart Shower
Installation Guide.
SmartValve pump
not activating Refer to Setting Water System Mode section
in the Smart Shower Installation Guide, ensure
mode is set to Normal or ECO Gravity setting.
SmartValve
is set to ECO mode Refer to the above point.
Unable to
adjust or control
temperature
Reversed inlet water
supplies (i.e. Hot supply
feeding cold inlet and
vice-versa)
Ensure correct water supply to specified inlet
connection of the SmartValve.
Fluctuating
water
temperature
Incorrect setting on
Logic Module of
SmartValve
If hot water supply is from a combination boiler-
the Logic module mode MUST be set to COMBI.
Refer to Setting Water System Mode section in
the Smart Shower Installation Guide.
Airlock in water
supplies (for gravity
fed systems only)
See “Air lock” in Possible Cause section on
page 16.
17

UK
Symptom Possible cause Action
Fluctuating
water
temperature
(continued)
Hot water temperature
too high Ensure hot water supply temperature is below
65ºC (minimum 55ºC for stored water and 50ºC
for combination boilers).
Communications issue Check data cable connections and that there is
no visible damage.
Combination boiler
unable to meet
demand
Check if another outlet in the property is being
used at the same time.
Check that the hot water temperature is stable at
another high flowing outlet (e.g. bath hot tap - run
at maximum flow rate), additionally run a cold
outlet at 1/3 of a maximum flow rate. If the same
issue is evident on these outlets, contact your
boiler manufacturer.
Temperature
too low Low hot water
temperature Check that domestic hot water temperature is
a minimum of 55ºC for stored water and 50ºC
for combination boilers.
Logic Module
temperature setting
too low
Maximum temperature is set to a factory default of
45ºC. To adjust refer to the important information
section (Safety Information) and Controller
Commissioning Instructions in the Smart Shower
Installation Guide.
Temperature too
low - Controller
temperature
ready display
does not stabilise
Hot water supply issue Check another hot water outlet to ensure that hot
water is available.
Mixed water supplies Water supplies MUST be from the same source:
MUST NOT be gravity hot and mains cold.
Unbalanced water
supplies For mains fed systems the cold and hot feeds
should be as evenly balanced as possible -
especially for HP unvented systems.
Combination boiler
unable to meet demand See same cause in 'Fluctuating Water
Temperature' symptom.
Temperature
too hot Seasonal conditions In the warmer months, the mains water
temperature can rise to ambient level. The
SmartValve always blends a mix of both hot and
cold supplies therefore the output temperature at
fully cold (controller setting) will always be higher
than the incoming cold water supply.
Temperature
too hot Seasonal conditions
(gravity fed systems
only)
For installations which utilise a cold water
storage supply (gravity fed system), the ambient
temperature in the loft can rise to above 40ºC.
In turn, this warms the stored water. Check by
running a cold tap that is supplied from the water
storage. N.B. Kitchen taps are normally fed from
the mains water system.
18

UK
Symptom Possible cause Action
Maximum
temperature
setting is not to
your preference
Settings need
adjusting Refer to section 'Temperature too low', possible
cause 'Logic module setting too low'.
Controller remains
illuminated after
switching shower
off
Poor cable connection Check data cable connections are making good
contact, are fully inserted and that there is no
visible damage.
Object within range
of proximity sensor
and activating Auto
Wake-up
Refer to Settings section for guidance on
disabling this function.
Water flows from
incorrect outlet
(divert models
only)
Outlets not configured Refer to User Guide: Settings Section -
Configuring your Outlets on page 14.
Unable to
configure outlets
in Settings menu
Communications issue Check that 2m patch lead is connected between
SmartValve and diverter. Refer to Wiring
Diagram Section in the Smart Shower Installation
Guide.
Outlets not configured Turn off the power supply to the SmartValve,
leave isolated for at least 2 minutes. Reinstate
power supply and then following instructions in
the Settings Menu complete a Factory Reset, then
proceed to Configure Outlets.
Water dripping
from outlets
after use
Water retention in
shower heads Refer to pages 10 and 11.
Descale shower heads to clear spray jets.
High pressure (unvented)
water system requires
servicing
Check the user guide for the hot water system to
verify symptoms and where required arrange for
servicing.
Flow shuts
off by itself Maximum run time
exceeded or end of
duration reached in app
timer setting
Refer to pages 6.
For further information and advice refer to Smart Shower Installation Guide or
contact the Customer Helpline.
Language
incorrect on
controller display
Controller
incorrectly
commissioned
Refer to separately supplied literature
or visit aqualisainternational.com
19

UK
Have you Registered?
Our products are manufactured to the highest standards. In the unlikely event
that something goes wrong, we want all our customers to be protected, which
is why we give you a totally free of charge 2 year parts and labour
guarantee*. You can easily increase your FREE guarantee to 5 years simply
by registering your product. Please keep your receipt to validate your
guarantee. Please see our website for full terms and conditions.
*Subject to terms and conditions
Need Help?
You can find Frequently Asked
Questions at aqualisainternational.com
Speak to our Customer Service
team on +44 1959 560009
Or email us at
csinternational@aqualisa.co.uk
Register your guarantee instantly at
www.aqualisainternational.com/guarantee
20
Other manuals for intuition
1
Table of contents
Languages:
Other Elisa Bathroom Fixture manuals


Popular Bathroom Fixture manuals by other brands

Triton
Triton ENVI installation instructions

Rubi
Rubi SAKAI RCH91D2S installation manual

Reece
Reece MILLI EXO TOILET ROLL HOLDER quick start guide

noken
noken 100287079-N408090008 installation instructions

VOXORT
VOXORT VENUS 238041C Installation instruction

Reginox
Reginox Ohio REG-OHIO-L-50X40T-SS-CNFP user manual

BELLOSTA
BELLOSTA Plisset Diamond 4200/E Installation instruction

Hans Grohe
Hans Grohe Croma Showerpipe 220 1jet 27222000 Instructions for use/assembly instructions

Goodiy
Goodiy Cuadro 501834111 instruction manual

miseno
miseno MNOSA216CP manual

T&S
T&S B-0870 Series Installation and maintenance instructions

Gedy
Gedy G-HIBISCUS HI32 Assembly instructions


