Elisa incite User manual

User Guide
incite™

2 Safety Information
3 The Inicte™ Controller
3 Get Smart Connected
4 Single Outlet Controller
5 Dual Outlet (divert) Controller
6 Setting Flow Rate
7 Wired Remote
8 Adjustable Head
9 Bath Overow Filler
& Fixed Head
10 Caring for your Shower
11 The ShowerMe App -
Helpful Information
12 Connecting to the App
16 App Troubleshooting
17 Shower Troubleshooting
21 Have you Registered?
22 Need Help?
Incite™ Controller*
SWITCH
ON/OFF/DIVERT
LED DISPLAY
BEZEL
ROTARY
TEMPERATURE
CONTROL
*Dual Outlet (divert) controller shown for illustrative purposes.
Safety Information
This appliance can be used by children aged from 3 years
and above and persons with reduced physical, sensory or
mental capabilities or lack of experience and knowledge if
they have been given supervision or instruction concerning
use of the appliance in a safe way and understand the
hazards involved. Children shall not play with the appliance.
Cleaning and user maintenance shall not be made
by children without supervision. For further information
regarding the installation of your product, refer to the Smart
Shower Installation Guide.
Declaration of Conformity
Aqualisa Products Limited declares that the SmartValve
and supplied controller, in conjunction with pairing remotes
and diverter, complies with the essential requirements
and other relevant provisions of the Low Voltage Directive
(2014/35/EU), the EMC Directive (2014/30/EU) and the RED
Directive (2014/53/EU).
GET SMART CONNECTED
Unlock the potential of your shower; from water consumption analysis to
enhanced user functions. Keep up to date with latest features for the
ShowerMe app and voice activation by visiting the Elisa website.
Download and open the free ShowerMe app. Find instructions on page
11“Connecting to the App”. If you have any trouble downloading the ShowerMe
app,check elisabathrooms.com/smartapp for device compatibility.
SMART SPEAKER SET UP
Once the above has been completed, go to the app for your smart
speaker and follow their instructions to add the shower to your devices.
See page 11
Contents
2 3

Whilst the shower is in use, if the 2nd outlet button is pressed,
the 1st outlet will automatically stop and the 2nd outlet will start.
Depending on system pipe runs, there may be a slight outlet
temperature change when switching between outlets.
Single Outlet Controller
1. Turn the temperature dial to the required setting.
2. Press the ‘Start/Stop’ button on the controller to turn the shower on.
3. The white LED display will ash until the selected temperature has been
reached. When the LED display is constant, step into your shower and
enjoy!
4. The temperature may be adjusted whilst in the shower.
5. Press the ‘+’ (boost) on the controller to increase the ow of the shower
when desired.To turn ‘Boost’ off, press the button again at any time.
Note: the strength of the boost will vary depending on the water system
pressure and the conguration of the pipework. For further information,
refer to the trouble shooting section and the Important Information
section in the Smart Shower Installation Guide.
6. Press the ‘Start/Stop’ button on the controller to turn the shower off.
BOOSTTEMPERATURESTART/STOP
Adjust before
or during shower
Increase ow rate during
shower
As a safety feature, the SmartValve has a maximum run time of
20 minutes.The ow can be stopped and started at anytime by
pressing the ‘Start/Stop’ button.
This can be enhanced by activating and using the free
ShowerMe app. See pages 3 and 11 for details.
Dual Outlet (divert) Controller
1. Turn the temperature dial to the required setting.The temperature can be
adjusted at anytime by turning the dial.
2. Press the desired outlet button on the controller to turn the shower on.
3. The white LED display will ash until the selected temperature has been
reached.
4. When the LED display is constant, your shower is ready to use.
5. Press the active button to turn the shower off.
Adjust before
or during shower
Outlet can be switched
whilst showering
Choose either outlet
upon starting
As a safety feature, the SmartValve has a maximum run
time of 20 minutes.The ow can be stopped and started at
anytime by pressing the ‘Start/Stop’ button.
This can be enhanced by activating and using the free
ShowerMe app.
See pages 3 and 11 for details.
CHANGE OUTLETTEMPERATURESTART/STOP
4 5

DUAL OUTLET (DIVERT)
Wired Remote
SINGLE OUTLET
1. Press the ‘Start/Stop’ button on the remote to
turn the shower on.
2. The white LED display will ash until the
selected temperature has been reached.
When the LED display is constant, step into
your shower and enjoy!
3. Press the ‘Start/Stop’ button on the remote or
main controller to turn the shower off.
1. Press the wired remote button to turn the
shower on.
2. Water will ow from the primary outlet as
determined during the ‘Wired remote setup’
procedure. Refer to Wired Remote Installation
and User Guide.
3. If required, push and hold the button for 2
seconds to stop the 1st outlet and start the
2nd outlet.
4. The white LED display will ash until the selected
temperature has been reached.
5. When the LED display is constant, your shower
is ready to use.
6. Press the remote or active button on the
controller to turn the shower off.
Setting Flow Rate
1. Ensuring the SmartValve is powered, but
without any outlets owing, enable ‘Setup’
mode by rst turning the temperature dial to
full cold. Press and hold both buttons together
for 5 seconds.
The LEDs will ash twice quickly and
once slowly to indicate the controller
is in 'Setup' mode.
2. When in ‘Setup’ mode, both outlet ‘Start/Stop’
button LEDs ash slowly to indicate ow is set
to LOW FLOW mode. Quickly ashing LEDs
indicate ow is set to HIGH FLOW mode.
3. Press the relevant ‘Start/Stop’ button to
change the outlet ow as required.
HIGH FLOW mode - quick ashing LEDs
LOW FLOW mode - slow ashing LEDs
4. To save the desired settings and to exit ‘Setup’
mode, press and hold both ‘Start/Stop’ buttons
together for 5 seconds until both LEDs remain
on steady, without ashing.The LEDs will turn
off as soon as the ‘Start/Stop’ buttons are
released indicating all settings have been
saved and ‘Setup’ mode has been exited.
FOR DUAL OUTLET (DIVERT) CONTROLLERS ONLY
Your Incite™ dual outlet controller has a High ow or Low ow function
available. Please note the factory default setting is Low ow on both outlets.
To change the outlet ow rate settings, follow the instructions below.
6 7

The angle of the xed shower head
can be adjusted.The shower head
is mounted on a multi directional
ball joint to allow for minor angular
adjustment in any direction by carefully
holding the shower head and moving
the head to the desired angle.
Note: do not force the angle of the
head beyond its natural stopping point.
Fixed Head
Bath Overow Filler
1. Push the waste cover to engage the
plug tting.
2. Push the waste cover again to
disengage the plug.
Do not leave the bath ller running
unattended.Although the overow
will remove excess water once the
bath is overlled, this may not be
sufcient to prevent the bath from
overowing (depending on system
conditions).
Adjustable Head
To avoid water dripping from the shower head
after use, we advise to tilt the head back to
allow residual water to drain out.
The above recommendation applies to both
adjustable and xed shower heads.
Rotate the spray plate lever clockwise or
anticlockwise to select the desired spray pattern.
To select the preferred height for the shower
head, squeeze the side levers together to allow
the handset holder to move up or down the rail.
Angular adjustment is made by carefully but
rmly pulling forwards or pushing back the
shower head against the ratchet in the holder.
Removing the shower head: with the hose still
attached, disengage the pivot clip by pushing
in the outer grey button located on the front of
the shower head (near to the hose connection).
Remove the spigot from the bottom of the
handset by using the hose to pull clear.
To reattach: ensure the hose washer is in the
correct position, tighten the threaded spigot
into the hose using a suitable spanner, taking
care not to over-tighten. Reinsert the spigot into
the handset and engage the pivot clip prior to
placing the handset into the handset holder.
Vita™ Head
3. Outer
2. Middle
1. Inner
8 9

Cleaning tip: to keep your shower effortlessly clean, we
recommend drying all shower components with a soft cloth after
use.
Over time, your shower may be affected by hard water scaling.To keep
your shower working effectively, we recommend that you clean your shower
regularly.
Your product should be cleaned using only a soft cloth and washing up
liquid.The bath system ‘click clack’ waste plug mechanism (if applicable)
should be kept clear of debris to ensure the plug maintains a watertight
seal.The plug can be unscrewed and removed to check and clean the
mechanism.
Cleaning the shower head
To reduce the need for chemical descaling in hard water areas, your shower
head incorporates a ‘clear ow’ system, whereby any scale build up can be
broken down by gently rubbing the exible tips of the jets during use.This
procedure should be completed regularly, as often as once a week in some
hard water areas, as scale build up can affect the spray pattern and cause
the shower to perform poorly. Failure to descale the shower head can affect
the internal seals and may affect the warranty. Should descaling of the
head using a cleaning agent become necessary, remove the shower head
fully and immerse in a mild proprietary descaler (e.g. vegetable based or
plain white vinegar). Cleaning and maintenance should not be undertaken
by children without supervision by a person responsible for their safety.
DO NOT USE ABRASIVE CLEANERS. It is imperative that descaling is
carried out in accordance with the manufacturer’s instructions,
substances that are not suitable for plastics and electroplated
surfaces must not be used.
Changing water system?
If switching from a gravity-fed water system to a mains pressure system (e.g.
Combination boiler) you will need to change your SmartValve. Contact a
member of our Customer Service team for further information.
Caring for your Shower The ShowerMe App
HELPFUL INFORMATION - BEFORE YOU START
Download and open the ShowerMe app on your personal smart device
and follow the instructions to create Your Home prole before continuing
with this section.An instructional video and information on compatible
devices are available by visiting elisabathrooms.com
Refer to the troubleshooting section of this guide for guidance and
advice.
For Wi set up,the SmartValve must be powered, but the shower must
not be in use.
Tapping on the settings symbol whilst in the shower tab will
navigate you to a menu where you will nd the Handy Hints section.
The ShowerMe app utilises the Instabug platform;
this tool can be used to:
Report an issue, suggest an improvement,or ask a
question. If you experience problems connecting
your shower, or with the app functions, then an
Instabug report can be raised.To trigger the
Instabug service either shake your smartphone
from side to side or tap on the message bubble
then simply follow the instructions.
Support on error messages and troubleshooting.
Setup guide
A walkthrough guide on setting up the
App and connecting the shower.
Voice activation
Once the ShowerMe app is set up and the shower
connected you can link your smart speaker.
View the step-by-step guide on how this is done.
App support
&ERROR MESSAGES
INSTABUG
10 11

6 7
4 5
1
2 3
Connecting to the App
THE STEP-BY-STEP INSTRUCTION ON CONNECTING THE SHOWER
Connecting to the App
THE STEP-BY-STEP INSTRUCTION ON CONNECTING THE SHOWER
12 13

The LEDs will ash slowly to indicate the SmartValve
is connected to the ShowerMe app and will switch
to being solid to indicate a successful connection
to your selected Home Wi.
A successful connection message will provide
conrmation in the ShowerMe app journey and
the LEDs on the controller will turn off to indicate
that the shower is ready for use.
If the timer setting is adjusted within the ShowerMe app, then the
shower will run for the newly set duration, overriding the default
maximum run time. Note: the water ow will stop at the end of
the timer.
The ShowerMe app gives you the capability to operate your
product remotely using your mobile device. It is the responsibility of
the user to ensure that it is safe to remotely activate the water ow.
Elisa recommend that baths and showers in operation are not left
unattended.
If connection is unsuccessful a message will appear in your
ShowerMe app. Redo the steps or refer to app trouble shooting
on page 16 or at elisabathrooms.com/smartapp
8 9
10 11
Connecting to the App
THE STEP-BY-STEP INSTRUCTION ON CONNECTING THE SHOWER
14 15

Error/Message Suggestions and Checks
“Could not connect to
the shower”
If a serial number is displayed, tap on Try Again. If no serial
number displayed tap on Cancel and then go through the
process again, ensuring that the below suggestions are followed.
“Network unavailable”
Or
Wi drops when
connecting to the
QSVC
Note:The setup process requires good signal strength between
your phone and the SmartValve (not the shower controller).
Close any running apps on the phone before commencing.
Turn off the mobile data connection in the phone’s settings.
Select "Keep WiFi Connection with No Internet" where and when
promoted.
Ensure that your phone / smart device is connected to the home
Wi network (try running a program or app that requires Wi
connection).
Close and re-open the ShowerMe app.
In the app journey ensure that QSVC is being selected and that the
password SmartShower is entered correctly- you do not have to wait
for connection conrmation,once QSVC has been selected wait a
few seconds and then return to the ShowerMe app.
Ensure that you are keying your SSID (home Wi) and password
correctly.
“The operation could
not be completed”
(when trying to start
shower)
Ensure your Wi is working.
Check that the shower operates using the main controller.
If the shower does not work via the main controller, check there
is power to the SmartValve (possibly tripped fuse / circuit or
accidentally switched off).
Turn power off to the SmartValve for a few minutes and then
reinstate.
Close any other running apps .
Primary Outlet Selection
(Divert Models only)
The primary outlet is set up during installation by utilising the
outlet switch on the diverter (see Diverter Outlet section in the
Smart Shower Installation Guide).
The switch position will determine the primary outlet for the main
controller and wired remote. Smart speakers (e.g.Alexa / Hey
Google) will always start the outlet which was last used.
When using the ShowerMe App: Outlet A is always the Primary
outlet regardless of the diverter switch position.
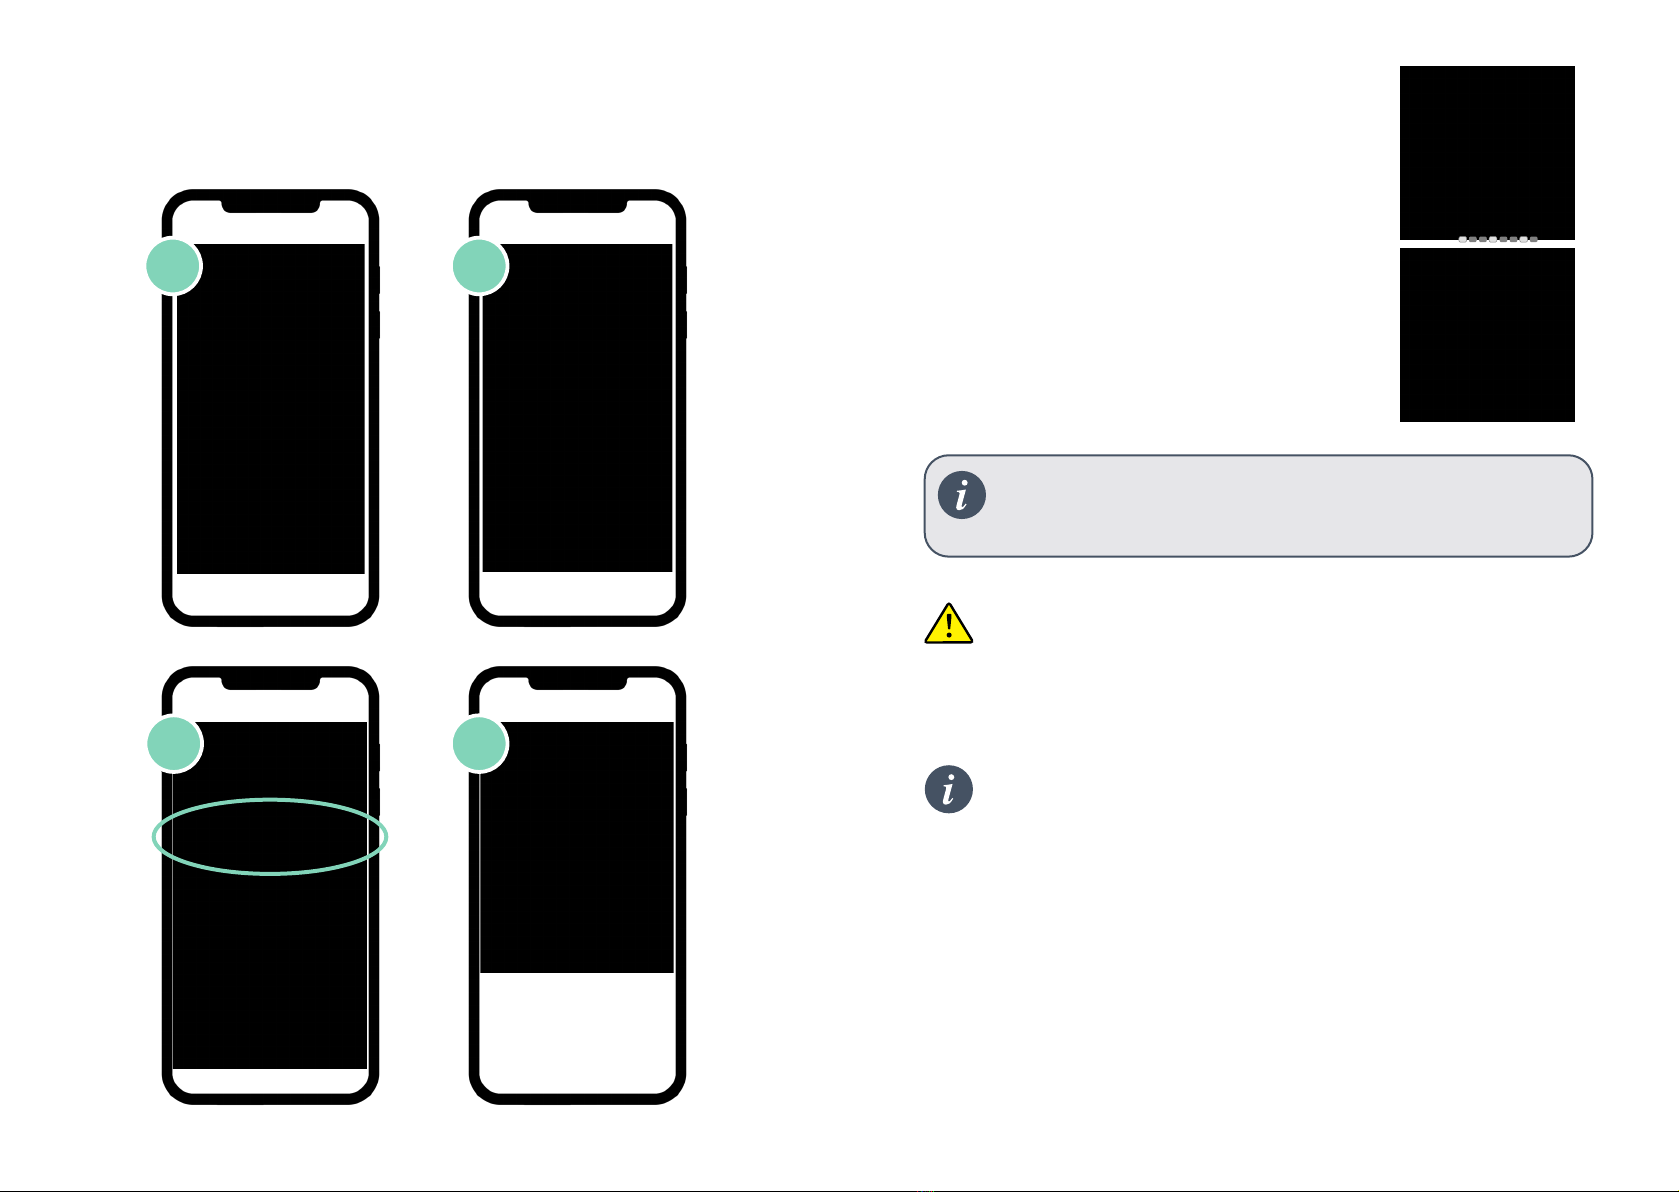
Locating the shower
serial number
From the Home Tab, select the SHOWERS tab, then choose the
shower to display the serial number.
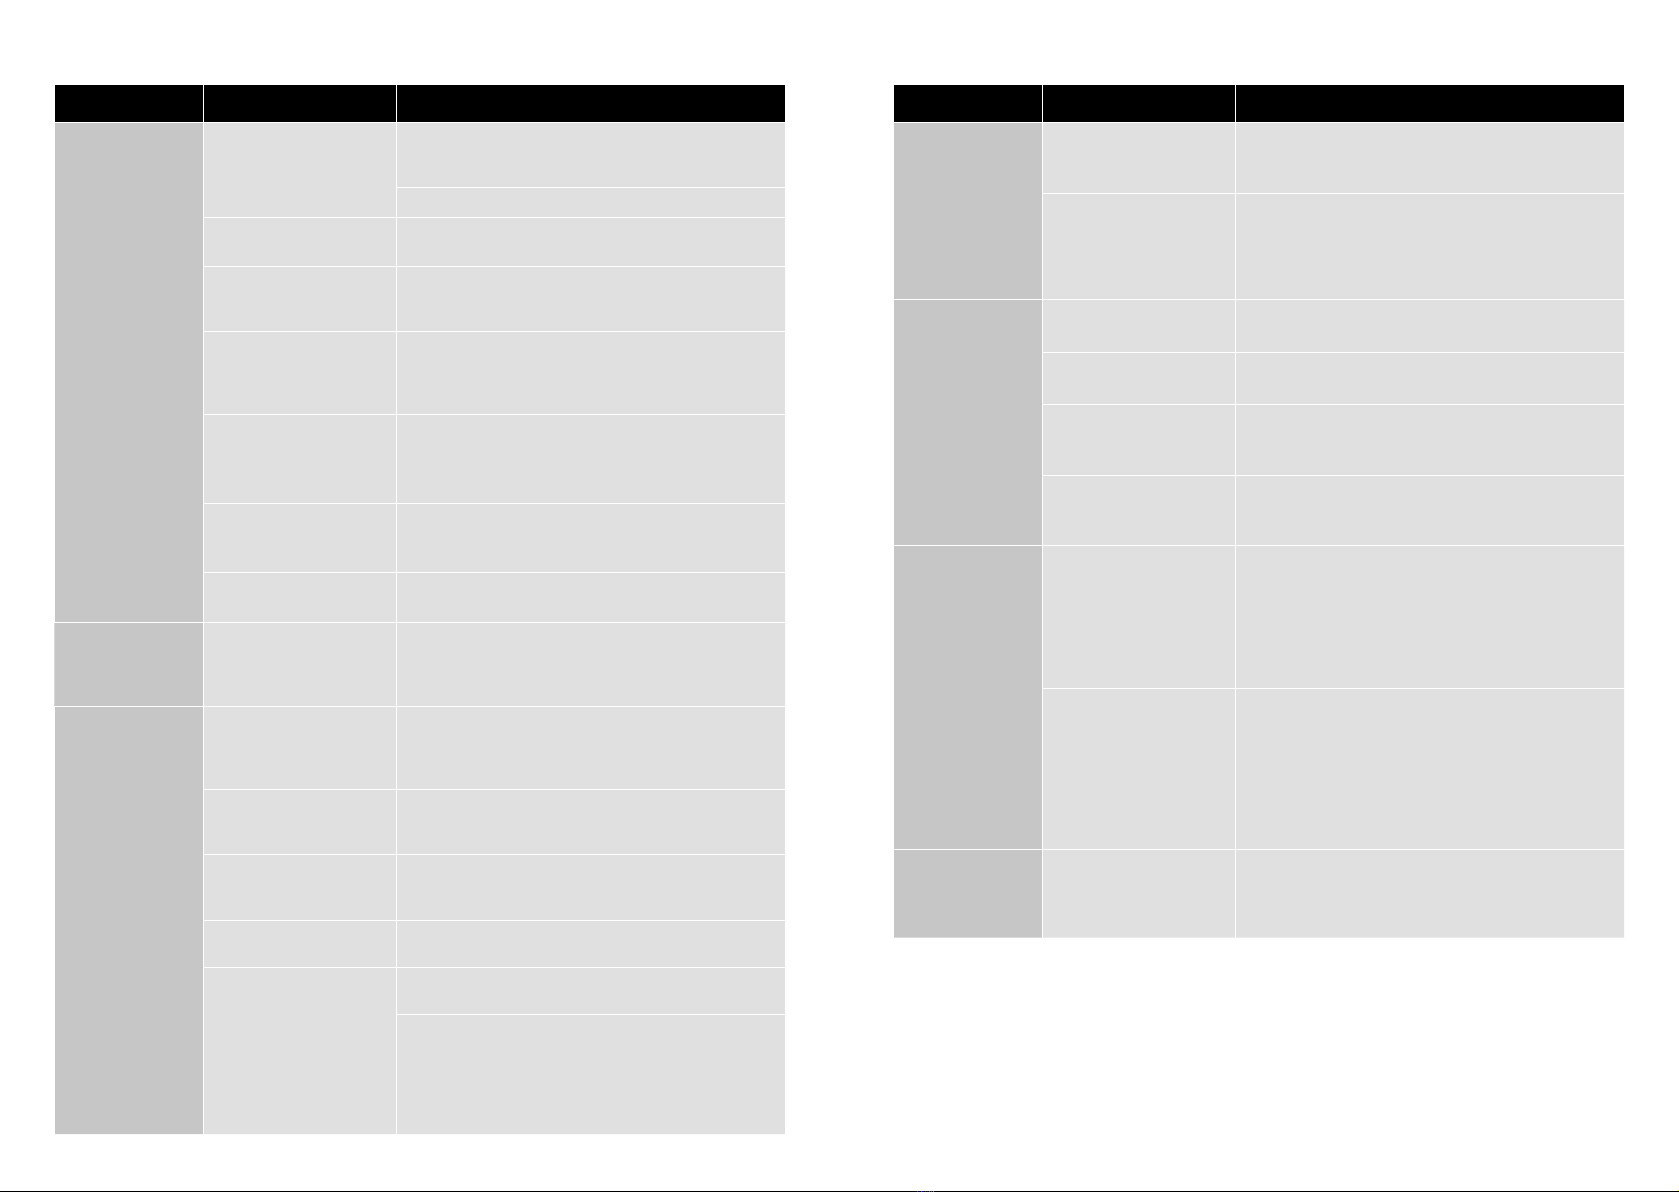
App Troubleshooting
For further assistance utilise the Instabug reporting platform - see details on page 11.
Symptom Possible cause Action
Controller
unresponsive -
No Lights / Blank
Power supply turned off
to SmartValve
Check power supply is turned on - Green power
light should be illuminated on the SmartValve.
Loss of
communications
Check data cable connections are making
good contact and are fully inserted and that
there is no visible damage.
Check that the wiring schematics are as per
installation instructions in the Smart Shower
Installation Guide.
Pump noisy and
low / no ow
Air lock (for Gravity fed
systems only)
For models utilising an adjustable head kit;
disconnect the handset from the hose, see Head
section on page 8, lower the hose into the shower
tray or bath. Set the temperature to fully cold
and then start the shower.As the water starts to
ow and increase in volume gradually turn up
the temperature. If the ow starts to splutter, stop
moving the temperature control until the ow
again stabilises, then continue to move the dial
towards the hottest setting.
Restriction in the
waterway
Check for debris in the inlet lters of the
SmartValve, diverter and Fixed Head connection
washer. Must be conducted by a qualied
person. NOTE:The water supplies MUST be
isolated when checking the inlet lters.
Blocked or kinked hose
liner
Where a exible hose is tted, unscrew the
shower hose from the outlet connection and
turn the shower on.
Boost button
does not
increase ow
Combination boiler
output does not meet
the ow demand
Check with boiler manufacturer for
specication details.
SmartValve
is set to ECO mode
Refer to Setting Water System Mode section in
the Smart Shower Installation Guide.
Seasonal conditions During the cooler months the mains water
temperature drops and this will reduce the
performance of combination boilers. Check with
your boiler manufacturer for details.
Low / no ow Seasonal conditions See above point.
Incorrect SmartValve
tted
If water supplies are gravity fed, the PUMPED
SmartValve must be used (unless a separate
stand alone pump is being utilised). Refer to
the Smart Shower Installation Guide.
Shower Troubleshooting
Refer to page 16 for App Troubleshooting.
16 17

Symptom Possible cause Action
Low / no ow
(continued)
Water supply issue For Standard SmartValve - Ensure water is turned
fully on at the mains and at the servicing valve in
the supply.
Ensure isolation valves are fully open.
Restriction in the
waterway
See same cause in 'Pump noisy and low / no
ow' symptom.
Blocked or kinked
hose liner
Where a exible hose is tted, unscrew the
shower hose from the outlet connection and
turn the shower on.
Incoming mains water
pressure or ow too low
(Standard
SmartValve only)
After conrming that the lters are clear, check
with the local water authority.
Separate, stand alone
pump not activating
(Standard
SmartValve only)
Ensure sufcient ow to activate the ow
switches of the pump. Refer to IMPORTANT
INFORMATION section in the Smart Shower
Installation Guide.
SmartValve pump not
activating
Refer to Setting Water System Mode section in
the Smart Shower Installation Guide. Ensure
mode is set to Normal or ECO Gravity setting.
SmartValve
is set to ECO mode
Refer to Setting Water System Mode section in
the Smart Shower Installation Guide.
Unable to
adjust or control
temperature
Reversed inlet water
supplies (i.e. Hot
supply feeding cold
inlet and vice-versa)
Ensure correct water supply to specied inlet
connection of the SmartValve.
Fluctuating water
temperature
Incorrect setting
on Logic Module of
SmartValve
If hot water supply is from a combination boiler-
the Logic module mode MUST be set to COMBI.
Refer to Setting Water System Mode section in
the Smart Shower Installation Guide.
Airlock in water
supplies (for gravity fed
systems only)
See “Air lock” in Possible Cause section on
page 17.
Hot water temperature
too high
Ensure hot water supply temperature is below
65ºC (minimum 55ºC for stored water and 50ºC
for combination boilers).
Communications issue Check data cable connections and that there is
no visible damage.
Combination boiler
unable to meet
demand
Check if another outlet in the property is being
used at the same time.
Check that the hot water temperature is stable
at another high owing outlet (e.g. bath hot
tap - run at maximum ow rate), additionally
run a cold outlet at 1/3 of a maximum ow rate.
If the same issue is evident on these outlets,
contact your boiler manufacturer.
Symptom Possible cause Action
Temperature
too low
Low hot water
temperature
Check that domestic hot water temperature is
a minimum of 55ºC for stored water and 50ºC
for combination boilers.
Logic Module
temperature setting
too low
Maximum temperature is set to a factory
default of 45ºC.To adjust refer to the important
information section (Safety Information) and
Controller Commissioning Instructions in the
Smart Shower Installation Guide.
Temperature too
low - Controller
temperature
ready display
does not stabilise
Hot water supply
issue
Check another hot water outlet to ensure that
hot water is available.
Mixed water supplies Water supplies MUST be from the same source:
MUST NOT be gravity hot and mains cold.
Unbalanced water
supplies
For mains fed systems the cold and hot feeds
should be as evenly balanced as possible -
especially for HP unvented systems.
Combination boiler
unable to meet
demand
See same cause in 'Fluctuating Water
Temperature' symptom.
Temperature too
hot
Seasonal conditions In the warmer months, the mains water
temperature can rise to ambient level.The
SmartValve always blends a mix of both
hot and cold supplies therefore the output
temperature at fully cold (controller setting)
will always be higher than the incoming cold
water supply.
Seasonal conditions
(gravity fed systems
only)
For installations which utilise a cold water
storage supply (gravity fed system), the
ambient temperature in the loft can rise to
above 40ºC. In turn, this warms the stored
water. Check by running a cold tap that is
supplied from the water storage. N.B. Kitchen
taps are normally fed from the mains water
system.
Maximum
temperature
setting is not to
your preference
Settings need
adjusting
Refer to section 'Temperature too low', possible
cause 'Logic module setting too low'.
18 19

Symptom Possible cause Action
Controller
remains
illuminated after
switching shower
off
Poor cable connection Check data cable connections are making
good contact and are fully inserted and that
there is no visible damage (this includes
installations where a wired remote is tted).
Water ows
from incorrect
outlet (divert
models only)
Pipe work congured
incorrectly
Refer to section: Diverter Controller Matrix in the
Smart Shower Installation Guide.
Primary outlet setting
not congured (for
remote control use
only)
Refer to section: Diverter Controller Matrix in the
Smart Shower Installation Guide.
Water dripping
from outlets
after use
Water retention in
shower heads
Refer to pages 8 and 9.
Descale shower heads to clear spray jets.
High pressure (unvented)
water system requires
servicing
Check the user guide for the hot water system
to verify symptoms and where required arrange
for servicing.
Flow shuts
off by itself
Maximum run time
exceeded or end of
duration reached in app
timer setting
Refer to pages 4, 5 and 15.
For further information and advice refer to Smart Shower Installation Guide
or contact the Customer Helpline.
Have you Registered?
Our products are manufactured to the highest standards. In the
unlikely event that something goes wrong, we want all our customers
to be protected, which is why we give you a totally free of charge 1
year parts and labour guarantee*.You can easily increase your
FREE guarantee to 5 years simply by registering your product. Please
keep your receipt to validate your guarantee. Please see our website
for full terms and conditions.
Register your guarantee instantly at
elisabathrooms.com/service-and-support/
register-your-guarantee
Register your guarantee
0800 408 4243
*Subject to terms and conditions
20 21

Need Help?
You can nd Frequently Asked
Questions at elisabathrooms.com
Speak to our Customer Service
team on 01959 560010
Use Live Chat at
elisabathrooms.com
Or email us at
enquiries@elisabathrooms.com
Instabug reporting platform for the ShowerMe app.
Accessed in the app by: Shaking your phone or
tapping on the message bubble.
See page 11 for details.
Notes
22 23

Please note that calls may be recorded for training and quality purposes.
The company reserves the right to alter, change or modify the product specications without prior warning.
® Registered Trademark Aqualisa Products Limited.
Q5598 Part No 705734 Issue 01 - Nov 21
The Flyers Way, Westerham, Kent,TN16 1DE
Customer Services: 01959 560010
REPUBLIC OF IRELAND
Sales enquiries: 01-864-3363, Service enquiries: 01-844-3212
elisabathrooms.com
Table of contents
Other Elisa Bathroom Fixture manuals
Popular Bathroom Fixture manuals by other brands

Kohler
Kohler Mira Elite SE Installation and user guide

Exclusive Heritage
Exclusive Heritage CL-10172D-WMTP installation guide

Swiss Madison
Swiss Madison Monaco SM-PS307 installation instructions

PEERLESS
PEERLESS Elmhurst PTT14265 quick start guide

Orbital Systems
Orbital Systems Shower Standard R2 PRE-INSTALLATION

CANTERBURY
CANTERBURY Z2225-29 quick start guide