Elitako DW12-001-230V User manual

DESCRIPTION
DATA MICRO +is a time switch designed to control any electrical installation.
Includes pulse programming from 1 to 59 seconds and up to 32 block memory
spaces. Automatic Winter – Summer official time adjustment.
INSTALLATION
ATTENTION: Electrical devices must be installed and assembled by authorized
installer.
VERY IMPORTANT: This time switch is protected internally against interference by
a safety device. However, particularly strong electromagnetic fields may alter its
operation. Such interference can be avoided by adhering to the following
recommendations during installation:
-The device should not be installed near inductive loads (motors,
transformers, contactors, etc)
-A separate power line is recommended (equipped with a network filter if
necessary)
-Inductive loads should be equipped with interference suppressors
(varistor, RC filter)
If the time switch is to be used in combination with other devices in an installation, it
is necessary to verify that no parasitic disturbances will be caused by the group.
MOUNTING: In cabinets provided with 35 mm simetric rail in accordance with EN
50022.
CONNECTION:
Connect according with the following schema:
STARTING UP AND PROGRAMMING
DATA MICRO +is already programmed with current date and time, and with the
official automatic Winter – Summer official time adjustment activated (last Sunday
in March and last Sunday in October).
Programming is based in menus (indicated by icons):
Programming: “ PROG”.
Clock setting: “ ”.
Winter / Summer official time change: “ “.
Holidays period programming: “ “.
RESET
Although the clock of the device is already programmed, if a RESET is needed
(blank display, inconsistent data, etc), press at the same time the four keys during 3
seconds. In this moment, the device loses all data and goes to clock setting mode,
directly to program year, month, day, day of the week, hour and minutes.
CLOCK SETTING
For clock setting, press key “OK” to access to the Menu and with keys ( ) and ( )
select icon ( ) and press “OK”. Display shows the year with the last two figures
blinking; update the year by pressing keys ( ) and ( ) and validate it with key “OK”.
The same operation should be made to update month, day, day of the week, hour
and minutes. By accepting minutes with “OK”, it automatically goes to normal
mode.
To change the time mode (24 h / 12 h am-pm) proceed as follows: accept year,
month, day and day of the week; while hour is blinking, press ( ) and ( ) at the
same time. After that, the time mode has change.
PROGRAMMING
To program the device, press “OK” to enter to the menu. By pressing again “OK”
the menu “PROG” is entered and the display shows the first programmed
switching. If no switching is programmed then - - : - - is shown. To program or edit
the desired switching press “OK” again, with keys ( ) and ( ) select the circuit and
type of switching: C1 OFF, C1 ON , (C2 OFF, C2 ON, C2 ON only in
model DATA MICRO 2). Validate with “OK” and introduce hour and minutes
desired, validating then with “OK”. Then select the days of the week that the
switching has to operate. With keys ( ) and ( ) place the blinking cursor on the first
day of the week that the switching has to operate and then fix it by pressing “OK”.
Repeat this sequence with the other days of the week when the switching has to
operate. For the days not desired, press ( ) to go down to the next day. After
programming all the days of the week, the display will show the next switching to
program.
SHORT TIME SWITCHING (PULSE) PROGRAMMING
If the selected switching is a Pulse ( ), after introducing hour and minutes
when the pulse starts, use keys ( ) and ( ) to program the length of the pulse (from
1 to 59 seconds). This length is shown in the digits of seconds (situated at the right
side and smaller than the digits of hours and minutes). Select the day(s) of the
week when the switching has to be programmed and validate with “OK”. After that,
press “C” to come back to normal mode. If “C” is not pressed, being in any mode,
after two minutes, the device returns to normal mode.
VIEWING PROGRAMMED SWITCHING
The programmed switching can be checked by entering again in menu “PROG”;
pressing key ( ) all the switching are shown in display, and after the last one, the
display shows - - : - -, if there is any free space and then it shows the number of
free spaces.
EDITING OR DELETING SWITCHING
Programmed switching can be edited or deleted in menu “PROG”, selecting with
keys ( ) or ( ) the switching to be edited or deleted. To edit it, proceed as in clause
PROGRAMMING and to delete it, keep pressing key “OK” and then press key “C”.
To delete all the switching without using RESET, go to the point where the display
shows the free spaces of memory, keep pressing key “OK” and then press key “C”.
The display will show 32, the total free memory spaces.
MANUAL OVERRIDE
In normal mode, pressing key ( C1), circuit C1 is activated or deactivated. The
same for circuit C2 by using key ( C2 ) (only in DATA MICRO 2 +).
If any manual override is executed, it is represented in display by symbol ( ).
The next programmed switching cancels the manual override and the symbol ( )
disappear from the display.
PERMANENT OVERRIDE
This option blocks all the programmed switching. In normal mode, keep pressing
key “C” and then press key ( C1 ) to activate the permanent position of circuit;
this situation is indicated in display with symbol ( ). After that, the state of the
circuit can be changed by pressing key ( C1 ).
To cancel permanent override keep pressing key “C” and then press key ( C1),
symbol ( ) disappear from display. The same for circuit C2 using key ( C2 ),
only in DATA MICRO 2 +.
WINTER / SUMMER OFFICIAL TIME CHANGE
Enter “menu” by pressing key “OK”; select option ( ) using keys ( ) and ( ),
validate with “OK”. There are the three following working modes:
AUTO: The clock is automatically changed on the last Sunday in March al 02:00
and the last Sunday in October at 03:00.
PRO: Allows to choose the date and time for the time change, programming first
the Winter – Summer change ( ) and then the Summer – Winter change ( ).
OFF: No time change will be made
HOLIDAY PROGRAM
This function allows to deactivate the circuits during a period of time up to 99 days.
After that, the programming continues as usual.
If user validates 0 days, the holiday period is cancelled and the device will work in
a normal way. If user validates a number o days different than 0, the device starts
immediately, so relays switch to OFF and programmed switching will not execute.
If the validated number of days is 1, the holiday period will finish at 23:59:59 of the
same day than validation. If the validation number of days is 2, the holiday period
will finish next day. And so on.
Display shows symbol ( ) during the holiday period.
Increment or move up
in menu
Circuit C2 override
(only Data Micro 2 +)
Move back in menu
Permanent override
(C+C1 ó C+C2)
C on fi r ms t he s elec tion
Starts menu
C2
C
C1
OK
MENU
Decrement ormove
down in menu
Circuit C1 override
Display
Programming
Circuit 2
(only Data Micro 2 +)
On / Off
On / Off
Day of the week
(1) Monday
AM / PM mode
Hour : Minute
Circuit 1
Permanent overrride
Override
Pulse
Holidays program
Summer / Winter time
Clock setting
123N
L
DATA MICRO +
123
N
L
456
DATA MICRO 2 +
Operating instructions DW12-001-230 V (DATA MICRO +)
DIGITAL WEEK TIME SWITCH
4960
SWITCHGEARSWITCHGEAR
TECHINCAL FEATURES
Power supply As indicated on the
device
Switching capacity: 16 (10) A / 250 V
Maximum recommended loads:
Inca ndescent lamps: 3000 W
Uncompensated fluorescent lamps 1200 W
Compensated fluorescent lamps 1200 W 150 F
Low voltage halogen lamps 1000 VA
Halogens (230 V) 2500 W
Low -consumption lamps 200 W
Contact type and material Changeover AgSnO2
Power consumption: 6 VA 1 circuit (aprox.1 W)
Action type: 1B, 1S, 1T and 1U
Memory spaces: 32
Type of switchings: ON
OFF
PULSE(from1to59s)
Switching accuracy: Bett er than 1 second
Operating accuracy: 1 s/ day at 23 ºC
Power reserve: 5 years (Lithium battery)
at 23 ºC
Operating temperature: - 10 ºC to + 45 ºC
Protection category: IP 20 according to
EN 60529
Protection class: II according to EN 60335
when mounted as
intended
Pollution situation: Normal
Sealable cover
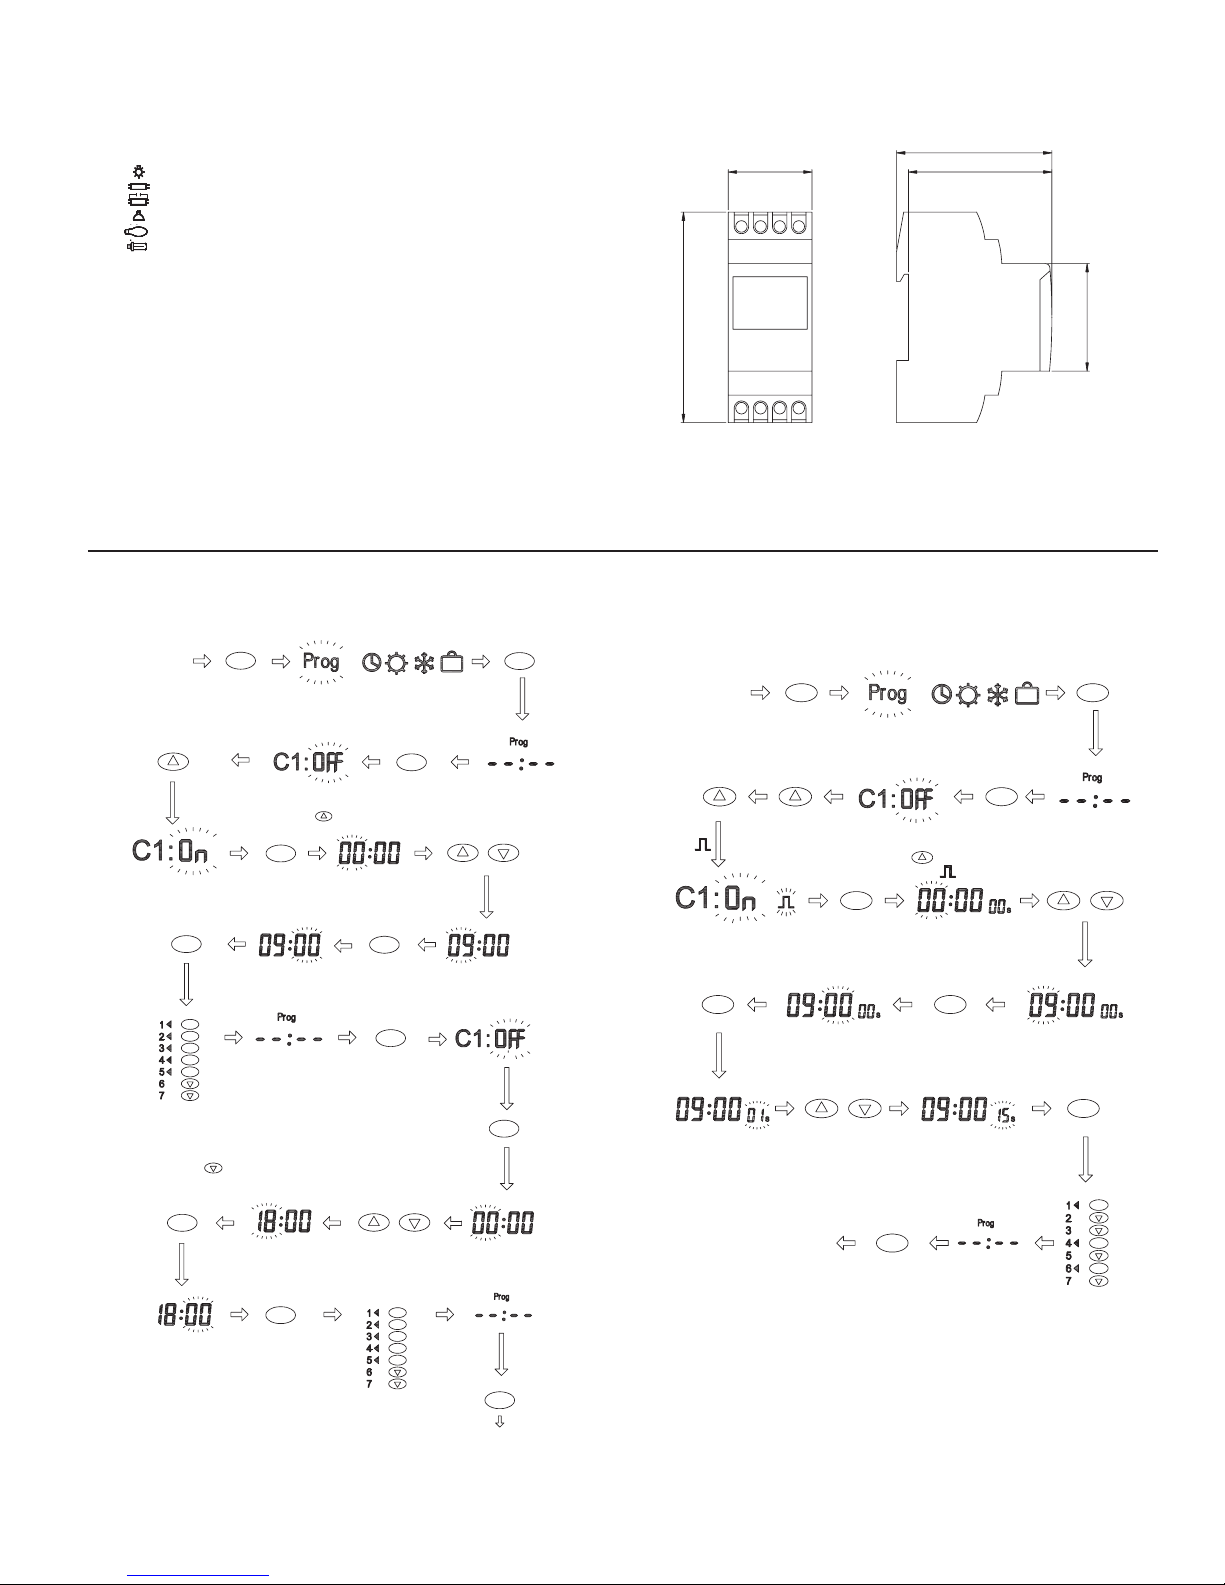
PROGRAMMING EXAMPLE
We want to connect a load from 09:00 to 18:00 from Monday to Friday.
(It is considered that there are no other programming).
DIMENSIONS
PULSE PROGRAMMING EXAMPLE
We want to connect a bell at 09:00 for 15 seconds at Monday, Thursday and
Saturday.
60
65
45
88
35
NORMAL
MODE
As we want to program an
activation, we press ( )
to change to ON
To program
hour
OK
OK
OK
OK
OK
OK
OK
C
OK
OK
OK
OK
OK
OK
OK
OK
OK
OK
OK
OK
OK
Select
desired
hour
To validateTo program
minutes
Select the desired
days of week by
pressing OK.
Not select by
pressing ( ).
To program
disconnection
To program
hour
Select desired
hour
To program
minutes
Program the days
of the week
If no more
switching has to
be programmed
NORMAL
MODE
NORMAL
MODE
As we want to
program a pulse,
we press ( ) to
change to ON ( )
OK
OK
C
OK
OK
OK
OK
OK
OK
OK
OK
Press to
see symbol
Program desired
hour
Program desired
minutes
Program pulse length in
seconds
Select the days
of the week
NORMAL
MODE


