EliteProAV Kestrel Tab-Tension CLR Series User manual
09242019JA 1 www.eliteproav.com
Kestrel Tab-Tension CLR® Series
Floor Rising Ceiling/Ambient Light Rejecting (CLR®/ALR)
Tab-Tensioned Motorized Screen
User’s Guide
IMPORTANT SAFEGUARDS
Read these instructions carefully and retain them for future use. If this product is passed to a third party, then
these instructions must be included.
Caution: The screen’s Black Bottom Drop is already set to its maximum drop distance. There is
NO extra Black Bottom Drop in the roller. Please be aware of this as it will void your warranty
with Elite ProAV™. Unapproved changes or modifications (except for cutting the power cord
for hardwire installations) to this unit are prohibited and will void your warranty.
•To avoid damaging the unit, do not use with any unauthorized accessories not recommended by the
manufacturer.
•Handle the unit carefully during transportation to avoid any damages.
•To ensure safe and reliable operation, direct connection to a properly grounded power source is advised.
•The power outlet supplying power to the unit should be close to the unit and easily accessible.
•Do not install the unit on uneven or inclined surfaces.
•Do not put heavy objects on the power cord and position it properly to avoid creating a trip obstacle.
•Never overload the power cord to prevent an electric shock or fire due to a loose contact or a short
circuit.
•There are not user serviceable parts in this unit. Do not attempt to disassemble this unit by yourself. No
one except authorized technicians can open and make repairs to this unit.
•Make sure the power source this unit is connected to has a continuous power flow.
•If there is need to use an extension cord, make sure the cord has an equal rating as the appliance to avoid
overheat.
•Do not handle the power plug when your hands are wet, or your feet are in contact with water.
Do not use this unit under the following circumstances.
•Disconnect the power cord under the conditions of heavy rain, wind, thunder or lightning.
•Avoid direct Sunshine, rain shower and moisture.
•Keep away from fire sources and high temperature to prevent this device from overheating.
•Cut off the power supply first before transportation or maintenance.
•Fully disconnect from the power supply when the unit is not in use for a long period of time, as should
be done with any other electric household appliance.
•To avoid possible injury and/or an electric shock, do not attempt to use the screen if there is obvious
damage or if there are any evident broken parts.
•Keep hands clear from the closing panels.
•Keep away from children when screen is in operation.
09242019JA 2 www.eliteproav.com
WARNING
Individual modifications to this product are prohibited and will void the manufacturer’s warranty. Please
contact the Elite ProAV Customer Service Team with any questions.
NOTE:
This equipment has been tested and found to comply with the limits for a Class B digital device, pursuant to
Part 15 of the FCC Rules.
The product settings are designed to provide reasonable protection against any radio interference within a
residential installation. If properly installed, the Kestrel Tab-Tension CLR screen may suffer from RF
interference from other home electronics.
Although radio interference affecting other household electronics is unlikely, the following steps can be taken
should RF interference occur.
.
✓Reorient or relocate the receiving antenna on the device that may be casing the interference.
✓Increase the distance between the screen and the interfering device’s receiver.
✓Connect the projection screen to another power source apart from the interfering device.
SCREEN MAINTAINANCE
Dust, dirt and scratches on the projection screen surface will affect the quality and performance of the
projection image. For optimal results we advise to pay attention to the following instructions.
1) The screen surface has a horizontal structure. DO NOT wipe the screen up and down or in a circular motion.
Wipe very gently when needed from left to right only.
2) Please clean the dust on the screen surface with a soft brush or microfiber cloth (rough towel or cloth may
damage the screen’s surface).
3) Gently wipe the screen with a lightly moistened microfiber cloth with mild soap diluted in water.
Notes:
The following precautions should be followed at all times to avoid damaging the material, which is
not covered under warranty.
▪Don’t touch the screen material to avoid leaving fingerprints. Use gloves when handling the material.
▪Don’t scratch the material, as it will leave permanent markings on the screen’s surface.
▪Don’t point to the screen material with a fingertip or other sharp objects to prevent damage to the
material.
▪Don’t use acetone, benzene, alcohol and any other organic solvents to clean the screen material. Using
such chemicals will permanently damage the screen.
09242019JA 3 www.eliteproav.com
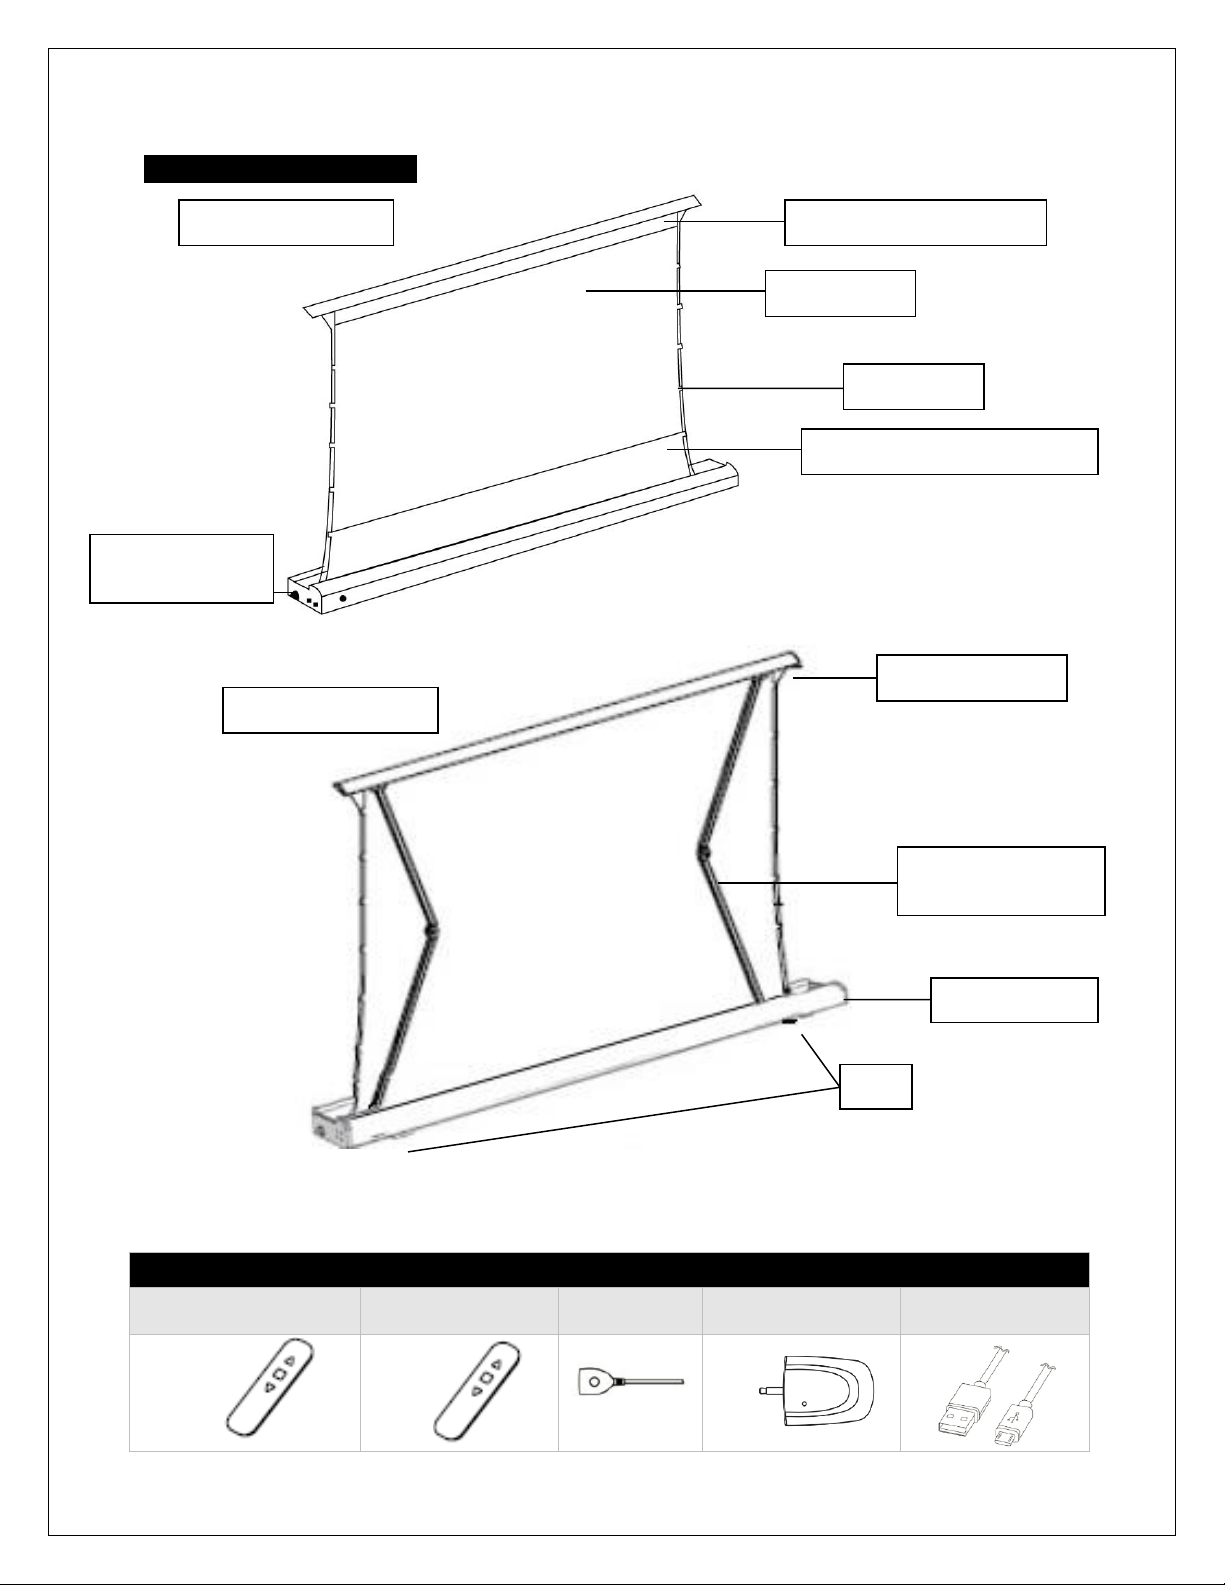
PARTS IDENTIFICATION
Note: Please always store the screen flat horizontally. Never store the screen in a vertical position as
it will permanently damage the screen’s structure and void the warranty.
Kestrel Tab-Tension CLR®Series | Controls and Accessories
A. Radio Frequency (RF)
Remote Control x1pc
B. Infrared (IR)
Remote Control x1pc
C. IR Eye
Receiver x1pc
D. Wireless 12-volt
projector trigger x1pc
E. Micro USB
Charge Cable x 1pc
White
Black
CLR Material
Bottom black masking border
Top black masking border
Power terminal/
Power switch
Tab/Strings
Cross-rising spring
scissor mechanism
Case/Housing
Closing Panel/Lid
Feet
Front of screen
Back of screen
09242019JA 4 www.eliteproav.com
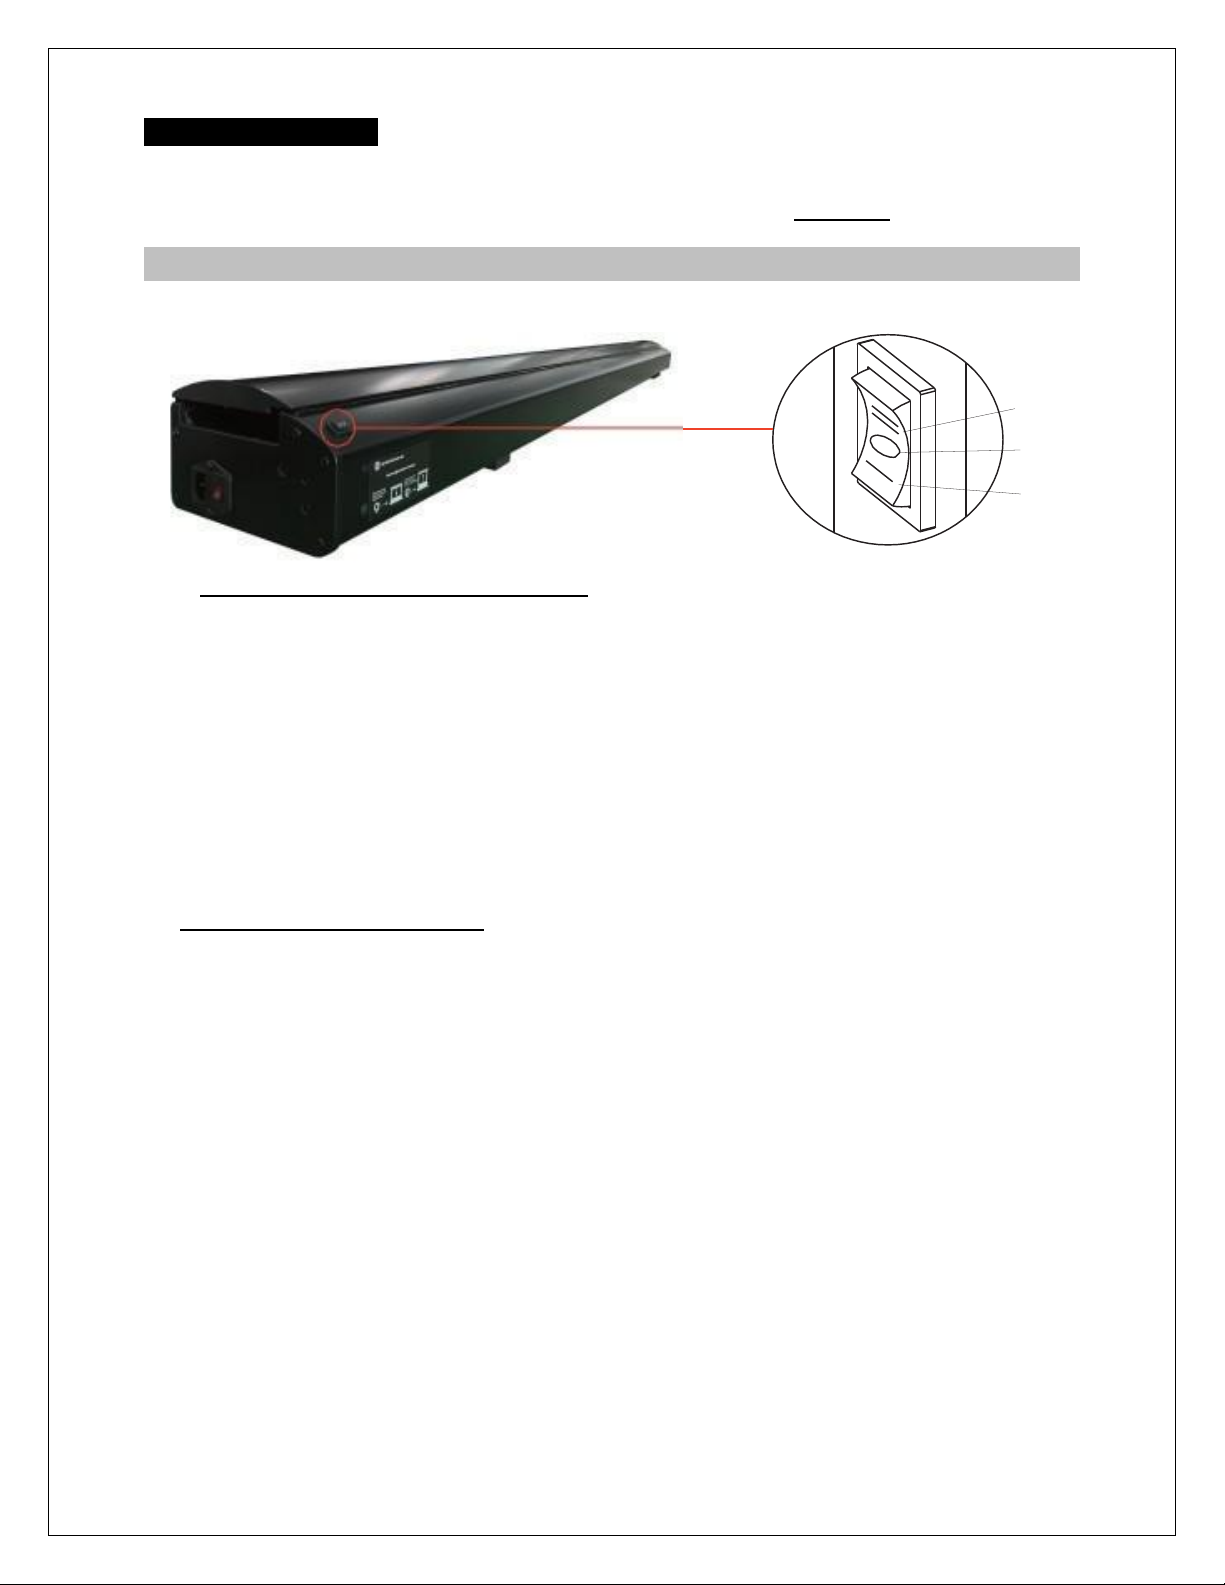
SCREEN OPERATION
Electric Current: Depending upon region, your Elite ProAV Screen will operation 110v, or 220v voltage.
1. After ensuring the power outlet & screen are compatible (voltage), plug the power cord into the power outlet.
2. Once the screen has power, you’ll be able to control it using any of the 4 methods described below.
4 ways to control your Kestrel Tab-Tension CLR®Screen
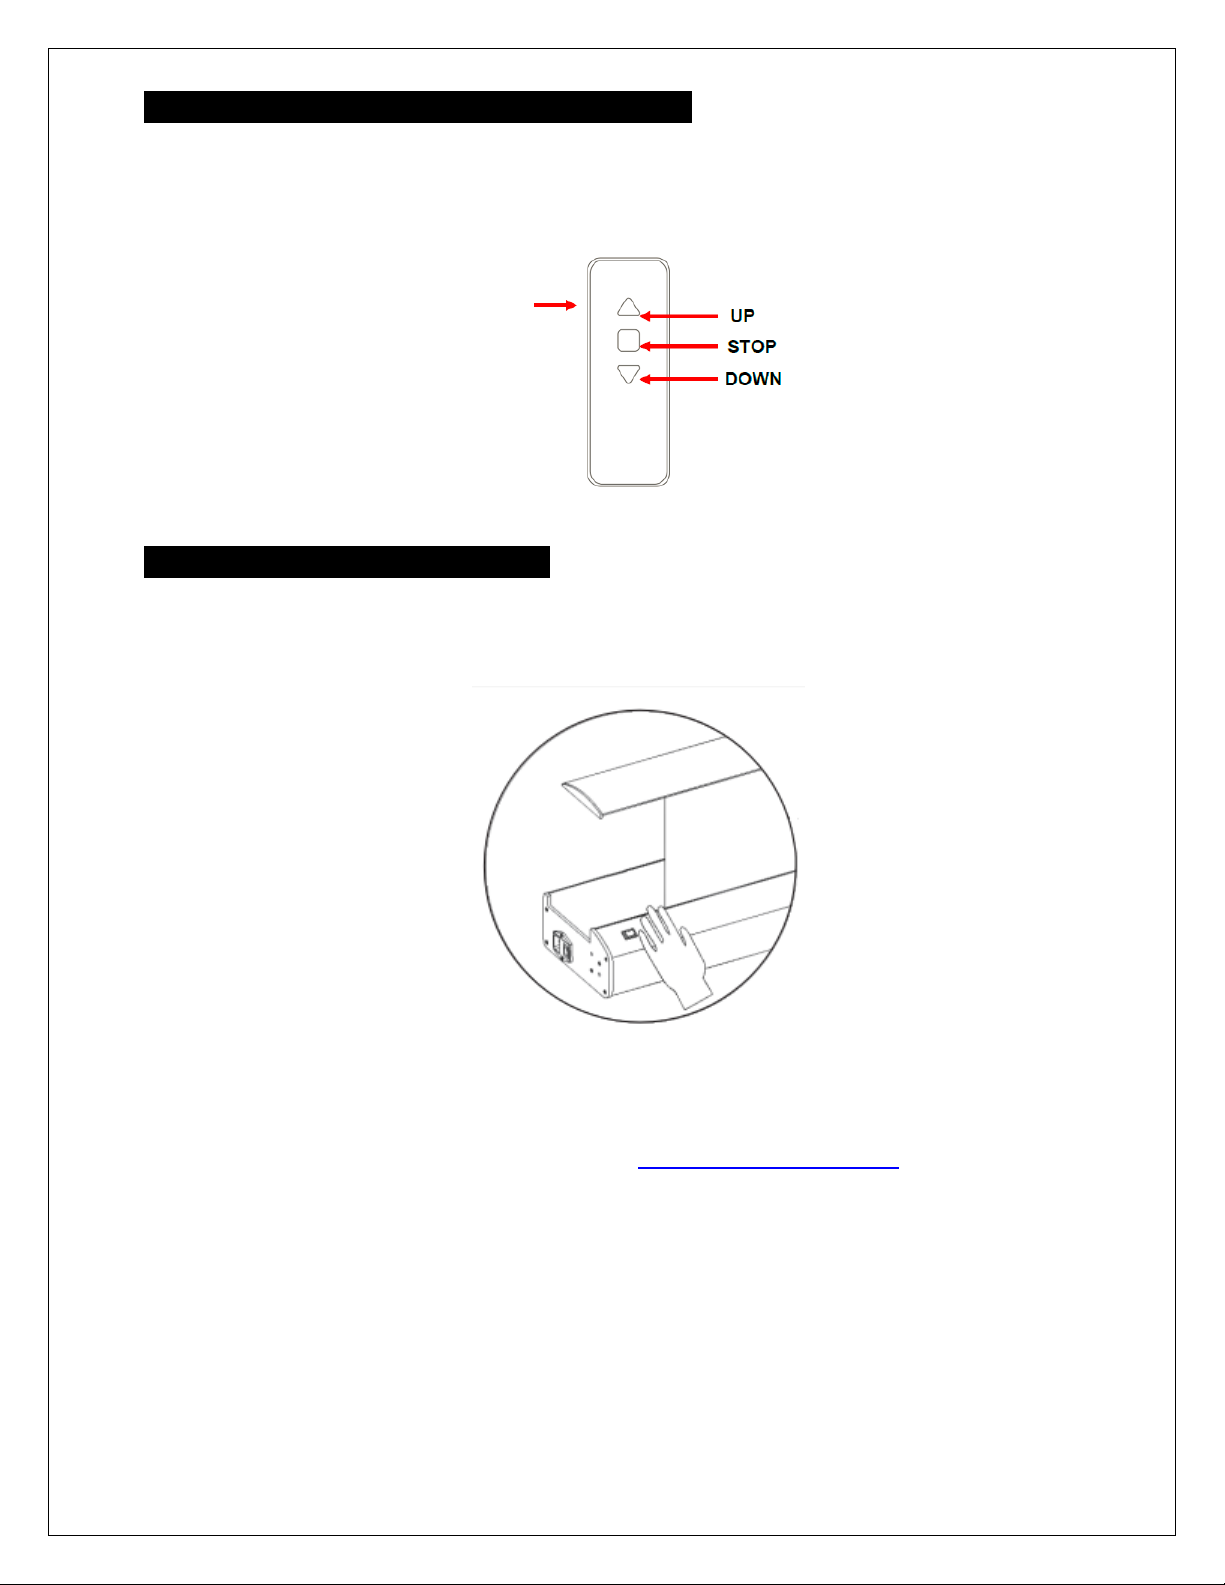
1. Manual Operation Switch: The left side of the screen's housing includes a UP/STOP/DOWN switch to
raise, lower and stop the screen without the use of the RF/IR remote.
Note: Please charge the remotes prior to first use. The IR&RF remotes are touch sensitive remote controls.
Make sure to place your finger directly in the center of the button when attempting to control your screen. You
will see a blue light flash above the buttons when used properly.
2. IR Remote Control (Item B/C): The IR remote (B) requires a direct line of sight through the screen’s IR
receiver. Put the IR Eye Receiver (C) in a suitable location free from obstruction. Then point the IR remote
to the IR Eye receiver to operate the screen.
3. RF Remote Control (Item A): The RF (A) remote is best used when the screen is concealed or when long
distance control is required. The RF technology therefore is more versatile as it does not require line of
sight to operate the screen.
4. Wireless 12 volt projector trigger: The wireless 12-volt projector trigger (C) can synchronize to your
projector’s power cycle for easy operation.
The trigger has been synchronized to your electric screen.
a. Connect the wireless 12V trigger into the projector’s trigger output port.
Make sure to enable this feature if needed in your projector’s menu settings.
b. Power ON the projector. The screen should raise (up) the screen automatically.
c. Power OFF the projector. The screen should descend (down) the screen automatically.
NOTE
➢When powering off the projector, assure it is completely powered off (ex. fan off), then the screen will
retract automatically.
➢If the motorized screen does not automatically drop or retract, repeat the process from step one.
Stop
Down
Up
09242019JA 5 www.eliteproav.com
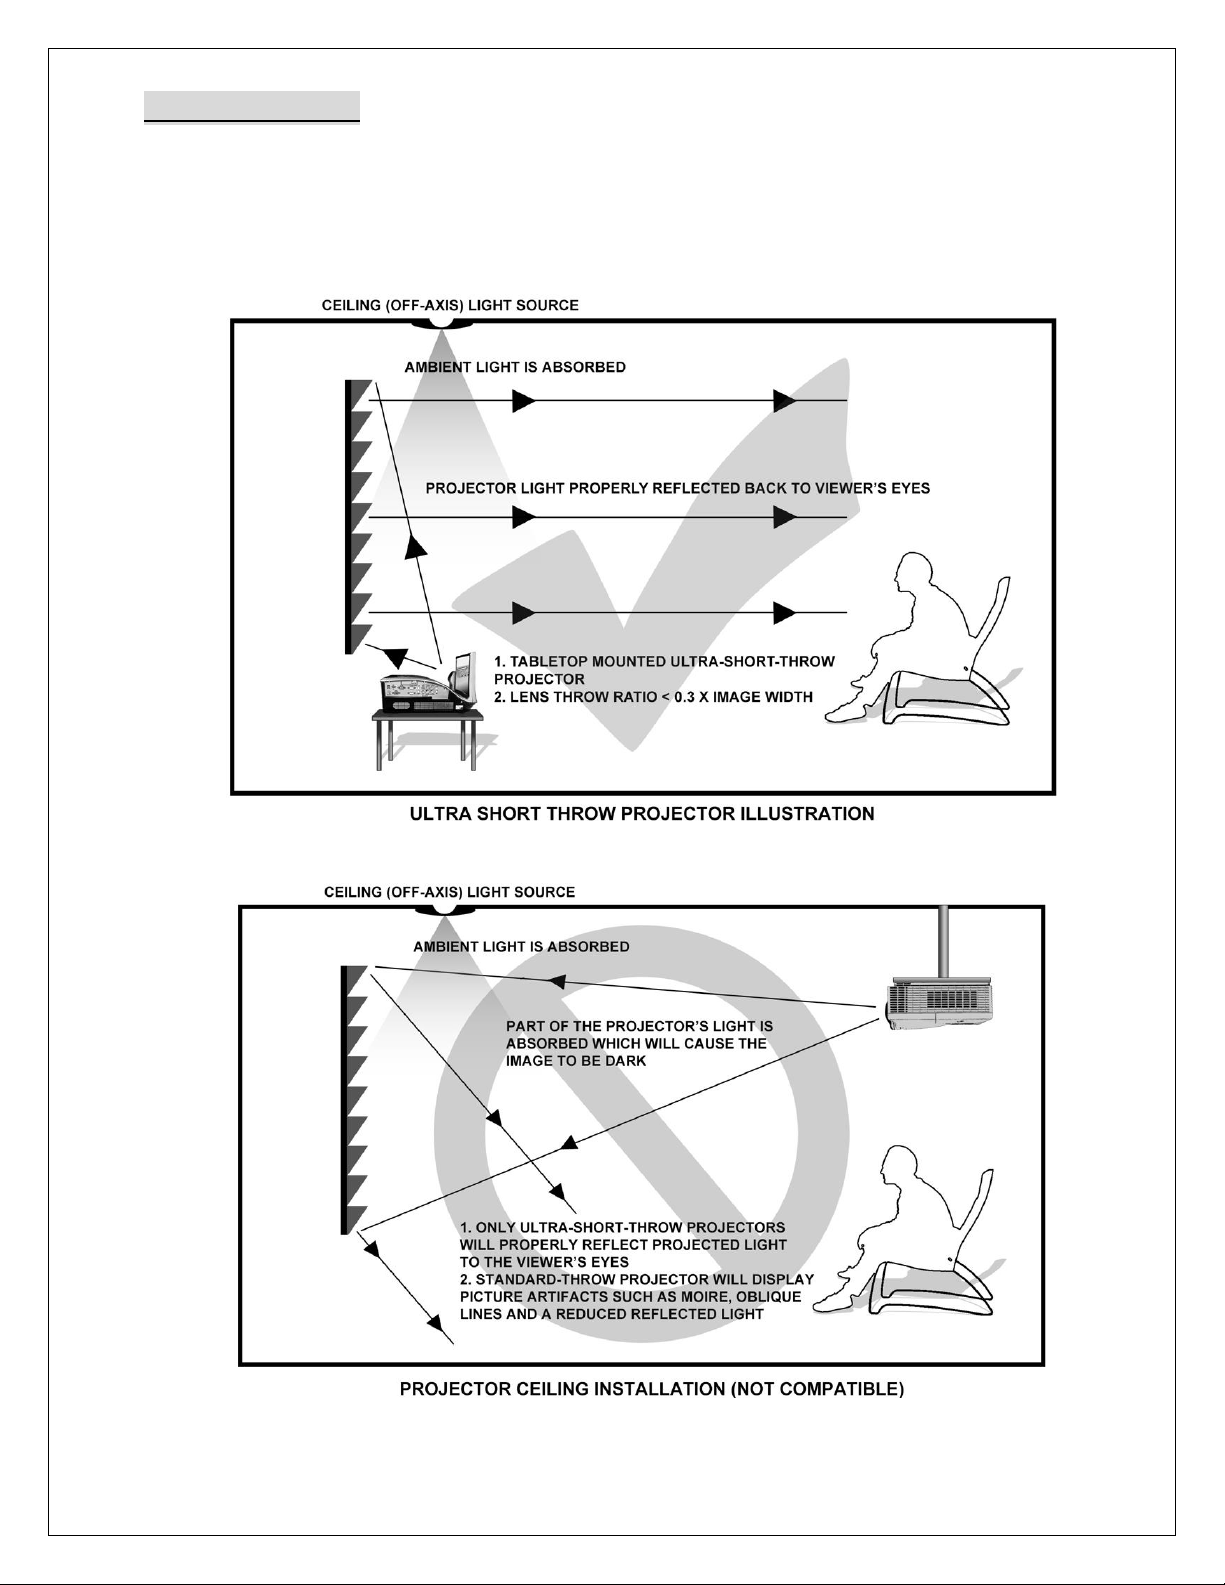
Notice to Installer:
Proper Projector Placement for StarBright CLR®. The StarBright CLR® is exclusively for table-mounted
ultra-short throw projectors as illustrated in example 1 below. Overhead placement or a standard projector will
make the image very dark, on account of the screen’s absorbent layer deflecting light that is not aligned with its
reflective angle.
Example 1: Proper Projector Installation
Example 2: Improper Projector Installation
Images are not up to scale and are for illustrations purposes only.
09242019JA 6 www.eliteproav.com
CHARGING THE RF/IR REMOTE CONTROL
Charge the RF or IR remote by plugging the Micro USB Charging cable (Item E) into any USB power source
and into the left side of your RF or IR Remote Control. While charging, you will see a solid red light above the
touch sensitive buttons. For your convenience, you may use the remote while it charges. Note: The red light
may dim while charging.
ANTI-PINCH SAFETY FEATURE
Prevent injury or damage to the screen when an object interferes with the screen’s descent during its operation.
The screen is equipped with an anti-pinch safety feature which prevents the closing panel/lid to stop when it
detects an object
For more information, technical support or your local Elite ProAV Screens
contact, please visit www.eliteproav.com
Charging port
Table of contents
Other EliteProAV Accessories manuals

Popular Accessories manuals by other brands


Silver Mountain Target
Silver Mountain Target T-SOLO Quick setup guide

FrSky
FrSky FAS7 ADV instruction manual

Acuity Brands
Acuity Brands sensorswitch SFR Series Programming instructions

Backyard Play Systems
Backyard Play Systems 5027 installation manual

TeleAdapt
TeleAdapt PowerHub E installation guide

Profile
Profile LONTANO manual


