Elk H0015-10229 User manual

elkhome.com
1
H0015-10229
Gabe Bar Cabinet
IMPORTANT
Read all instructions before assembling.
WARNING: To avoid damages, assemble the
product on a soft, clean surface.
CAUTION: Keep small parts out of reach of
children.
Before assembly, remove all parts and part
packages from carton. If anything is missing
or damaged, please contact the retailer from
which the product was purchased or contact
customer service, 800-613-3261.
PACKAGE CONTENTS AC
ASSEMBLY
IMPORTANT: It is recommended to place a blanket,
cardboard or other cushioning material on the oor to
prevent damage to oor and furniture piece.
1. Thoroughly clean all wood surfaces with a soft, dry
cloth before assembling.
2. Place one base frame (L) upright on oor on top of
cushioning material.
3. Hold one bar (G) so holes at each end of bar (G) are
facing inward. Insert one end of bar (G) over bottom
stem on one base frame (L). Ensure holes in bar (G)
align with holes in stem on base frame (L).
4. Hold one bar (G) so holes at each end of bar (G)
are facing inward. Insert one end of bar (G) over
top stem on the base frame (L) from step 3. Ensure
holes in bar (G) align with holes in stem on base
frame (L).
5. Repeat steps 3 and 4 to attach remaining bars (G)
to other side of base frame (L).
6. Place second base frame (L) upright on oor on top
of cushioning material. Position base frame (L) so
stems on base frame (L) are facing inward towards
bars (G) on rst base frame (L).
7. Insert stems on top and bottom of second base frame
(L) into ends of bars (G) on rst base frame (L).
NOTES:
Two-person assembly.
Approx. assembly time: 60 minutes
ANY QUESTIONS CALL: 800-613-3261
M-F 8:00AM-6:00PM ET
H
Parts Quantity
A LOCK WASHER 8
B FLAT WASHER 8
C HEX SCREW 6
D SCREW 6
E MACHINE SCREW 16
F HEX WRENCH 1
G BAR 4
H SHELF 1
K CABINET 1
L BASE FRAME 2
B
DE
G
L
K
F
LG
G
STEM
elkhome.com
2
H0015-10229
Gabe Bar Cabinet
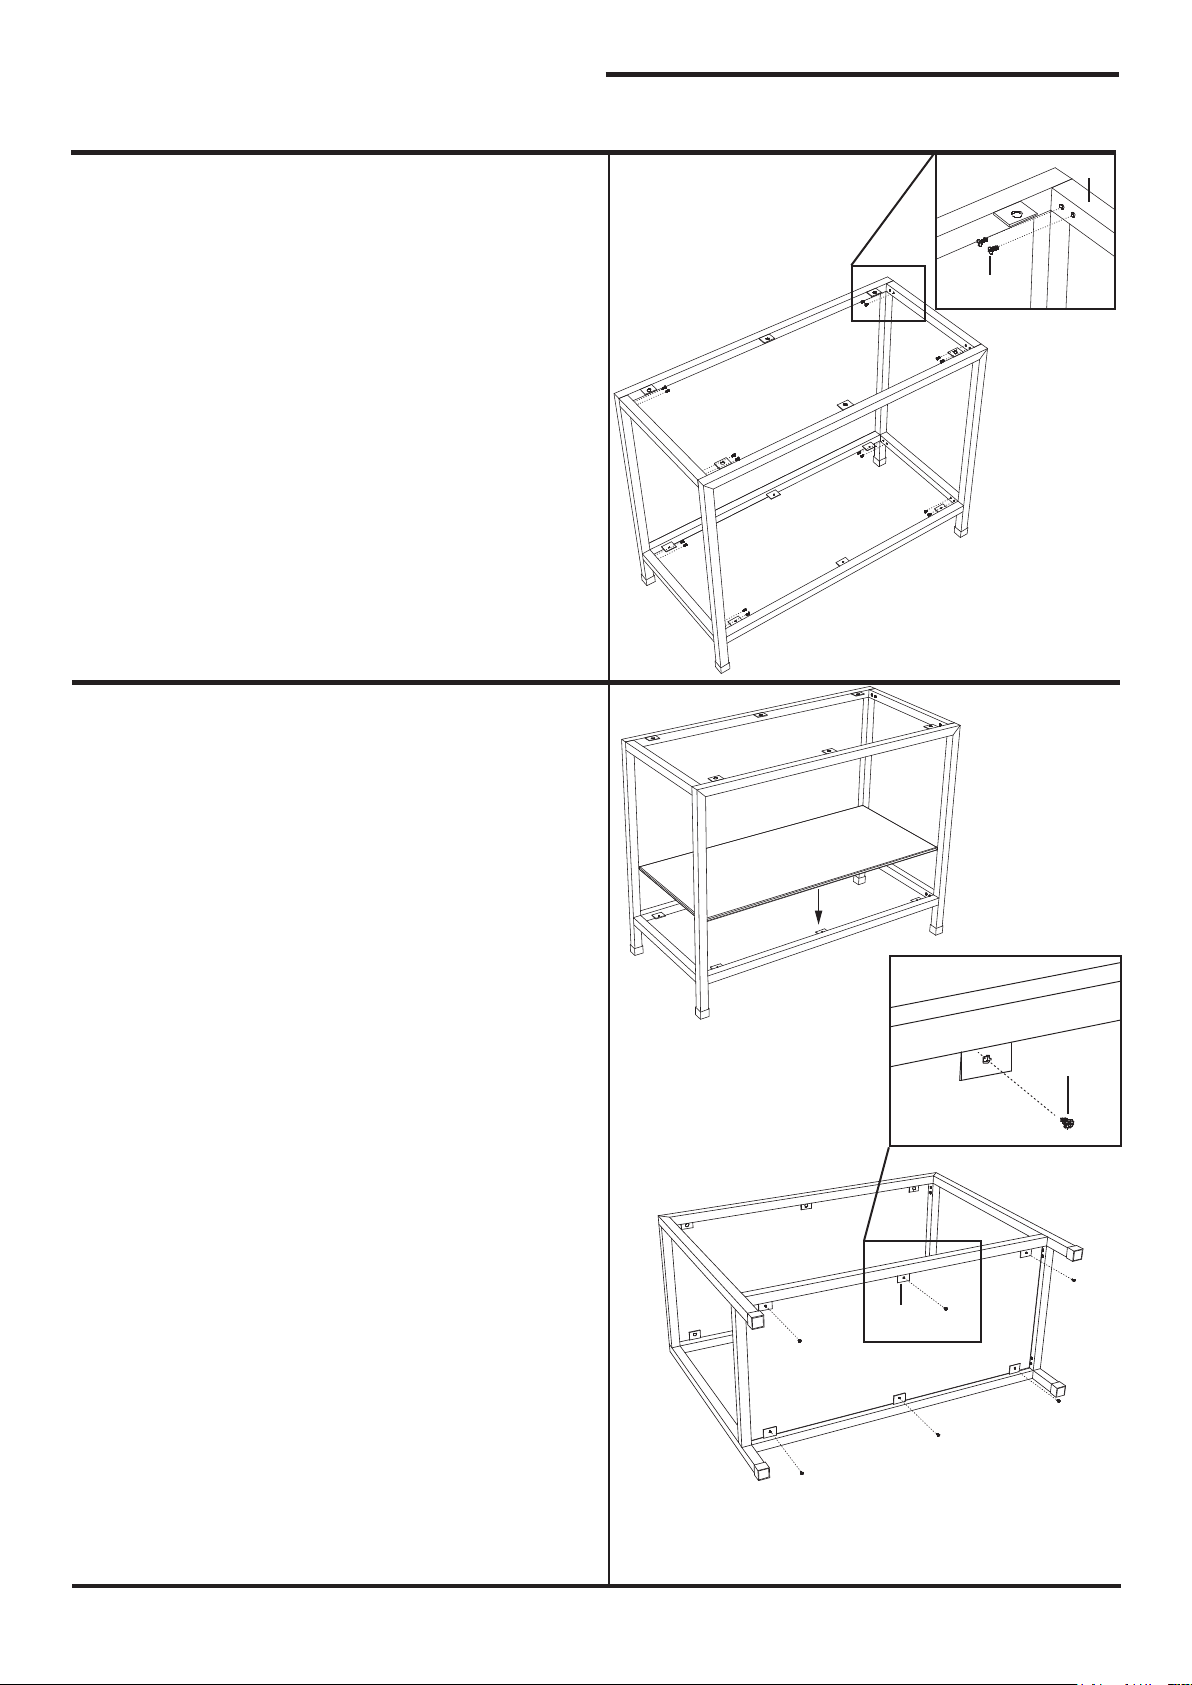
8. Align holes in bars (G) with holes in stems on base
frames (L).
9. Thread one machine screw (E) into each hole in
bars (G) and into holes in base frames (L). DO NOT
fully tighten machine screws (E). This will be done
after all assembly is complete.
G
E
10. Place shelf (F) on top of tabs on lower base.
11. Holding shelf (F) in place, carefully lower base
assembly to oor on top of cushioning material.
Place base assembly on long side.
12. Holding shelf (F) in place, thread one screw (D)
into each hole in tabs on lower base. DO NOT
completely tightens screws (D). This will be done
after all assembly is complete. F
D
TAB

elkhome.com
3
H0015-10229
Gabe Bar Cabinet
K
BASE
13. Place base assembly upright on oor on top of
cushioning material.
14. Carefully place cabinet (H) on top of base
assembly.
15. From underside of cabinet (H), align holes in
underside of cabinet (H) with holes in tabs along
top of base.
16. Slip one lock washer (A) then one at washer (B)
over the end of each hex screw (C).
17. Thread one hex screw (C) with washers (A/B) into
each hole in each tab and into holes in underside
of cabinet (H). DO NOT completely tighten hex
screws (C). This will be done after all assembly is
complete.
18. After all hex screws (C) have been installed, using
hex wrench (F), completely tighten all hex screws (C).
19. Completely tighten machine screws (E) and screws (D).
20. Carefully place bar cabinet into permanent
location.
BASE
E
BA
K

elkhome.com
4
H0015-10229
Gabe Bar Cabinet
IMPORTANT: During the life of the product,
periodically check all screws and xings to
ensure they are secure.
CARE AND CLEANING
• Before using, wipe with a clean, dry cloth.
• If furniture piece contains glass, clean glass
with cleaning products specied safe to use
on glass.
• Dust and clean furniture with a clean, non-
colored, lint-free cloth.
• Do not use any cleaners with chemicals,
solvents or harsh abrasives.
• Do not put hot items directly on furniture
surface.
• Do not place furniture in direct sunlight.
• Do not place furniture near heating or
cooling vents.
• Do not write on furniture without a padded
barrier to protect the surface.
• Do not place furniture outside. For indoor
use only.
• Any liquid spilled on the table should be
cleaned up immediately using a damp cloth.
• Avoid rubbing or scratching the surface
with rough or abrasive objects.
PLEASE KEEP INSTRUCTIONS FOR FUTURE
REFERENCE. MADE IN CHINA

elkhome.com
5
H0015-10229
Gabe Bar Cabinet
INSTRUCTIONS FOR LEVELING CABINET
These steps must be completed to ensure the doors
of the cabinet operate properly.
1. Position the cabinet in the desired location.
2. Place the level on the top of the cabinet along
the width (left to right) of the cabinet and adjust
the front adjustable leveling glides until the
bubble in the level is centered.
3. Place the level on the top of the cabinet along
the depth (front to back) of the cabinet and
adjust the rear adjustable leveling glides until
the bubble in the level is centered.
4. Check for plumb in both directions and adjust
the leveling glides if necessary.
TOOLS REQUIRED (NOT INCLUDED):
For cabinet with adjustable leveling glides:
• Bubble level
ADJUSTABLE
LEVELING GLIDE
BUBBLE LEVEL
Table of contents
Other Elk Indoor Furnishing manuals


Popular Indoor Furnishing manuals by other brands

Regency
Regency LWMS3015 Assembly instructions

Furniture of America
Furniture of America CM7751C Assembly instructions

Safavieh Furniture
Safavieh Furniture Estella CNS5731 manual

PLACES OF STYLE
PLACES OF STYLE Ovalfuss Assembly instruction

Trasman
Trasman 1138 Bo1 Assembly manual

Costway
Costway JV10856 manual


