Elpine 31367c User manual

31367c
Halogen
Heater
• Cool touch cabinet
• Instant, powerful, efcient
halogen heating
• 4 heat setting
400/800/1200/1600
• Safety tip-over switch
and thermal fuse
• Wide-angle Oscillation
function
• Slim line, compact,
lightweight construction
• High temperature
resistant plastic housing

USER INSTRUCTIONS Read all the instruction carefully before you use the
appliance and keep it for future use.
DO NOT TURN Heater UPSIDE-DOWN DURING OPERATION
CAUTION
• Remove the packing and make sure that the appliance is intact. In case of doubt do not
use the appliance and contact our after-sales service. Do not leave packaging materials
like bags and staples within reach of children.
• Before switching on appliance check if the electrical voltage and frequency of the circuit
correspond to those indicated on the appliance.
• The appliance has to be connected to a circuit according to the rules in force concerning
the national grid. The circuit has to be related to the nominal power of the appliance and
has to be provided with an earth –wire.
• Use the appliance only for the mentioned purpose, namely as a heater for domestic use.
Do not use it for any other application as it could get dangerous.
• The manufacturer is not responsible for any eventual damages caused by improper or
faulty use.
• The use of every electrical appliance calls for the awareness of some basic rules, such as:
• Never touch the appliance with wet or damp hands or feet.
• Never expose the appliance to atmospheric conditions (rain, sun, etc.)
• The appliance must be always placed on a at and stable surface.
• Switch the appliance off and unplug it before cleaning.
• When the appliance is not in use switch it off and unplug it. Remove the heater from any
area that childran are likely to palying.
• Do not use this heater in the immediate surroundings of a bath, a shower or a swimming
pool.
• Do not put the cable on the appliance when it still warm.
• A correct operation of the appliance is obtained when the Heater is installed vertically. Do
not switch on the heater near pieces of furniture, curtains, shelves, etc.
• Do not use the appliance near liquids or inammable matters.
• The appliance must not be located immediately below a socket outlet.
• In order to avoid overheating, do not cover the heater
• In case the power cord is damaged, send it to the nearest after sale service
recommended by the manufacturer for the replacement.
• This appliance is not intended use by persons (including children) with reduced physical,
sensory or mental capabilities, or lack of experience and knowledge, unless they have
been given supervision or instruction concerning use of the appliance by a person
responsible for their safety.
• Children should be supervised to ensure that they do not play with the appliance.
• Do not connect the appliance to extension cords or multiple outlets.
• Do not damage and do not kink the power cord.
• Before cleaning the appliance or carrying out any maintenance switch off the whole
system.
• If the appliance fails to work, switch it off. Do not atempt to repair. If any repair is required
please contact the after-sale centers approved by the manufacturer or an electrically
qualied technician. Ask for original replacement parts, otherwise safety of the appliance
can be compromised.
• Do not use this heater with a programmer, timer or any other device that switches the
heater on automatically, since a re risk exists if the heater is covered or positioned
incorrectly.
• Caution: This heater is not tted with an automatic thermostat. Do not install the heater
near the curtains and ammable materials.
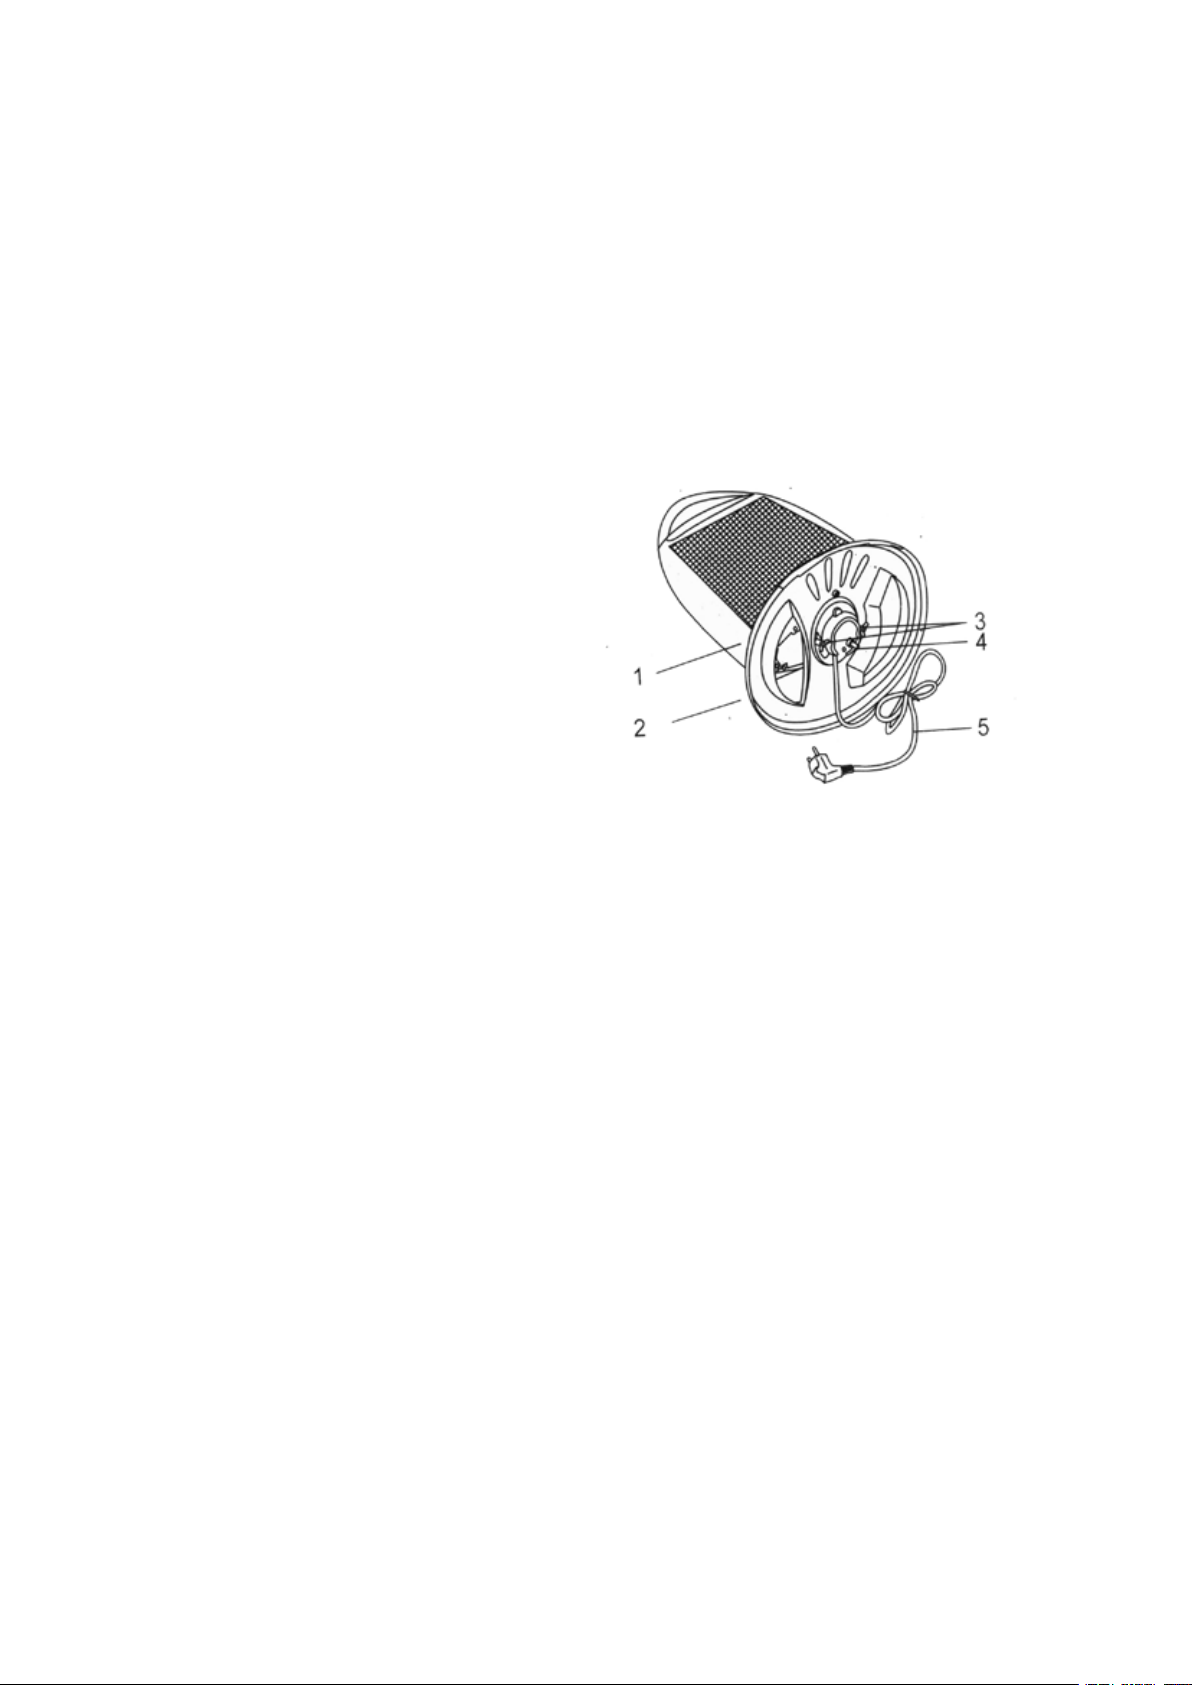
COMPONENTS
1- Body frame
2- Base plate
3- Buttery nut(2pcs)
4- Tip-over safety switch rod
5- Power cord guide
6- Power cord
ASSEMBLY
Assemble the body frame and the base plate together as the following sequences
• Remove the buttery nuts from the lower part of the body frame.
• Insert the power cord through the slot placed in the middle part of the basement and then
assemble the body frame to the base plate.
• Secure the body frame to the base plate by means of the two buttery nuts previously
removed. Insert the power cord through the suitable slots and then x it by the clamp.
OPERATION
Plug in the appliance. Check that the outlet has at least a 10AMPERAGE current carrying
capacity.
MODELS WITH SWITCHES
Select the speed by suitable switches. Press the oscillating switch to make the Heater
oscillate. Press it again to switch off the oscillating movement of the appliance.
The Heater can be activated manually by pressing the handle situated in the rear part of the
appliance.
SAFETY DEVICE
This appliance is provided with safety devices disconnects the appliance when the Heater
is tilted or when is tipped by means of a switch situated in the lower part of the Heater.

MAINTENANCE
The appliance needs only an external regular cleaning. After use and before cleaning always
unplug the appliance and wait till the item is cool. Clear the dust from the grills. Do not
clean the painted parts with emery our or solvents and use only a moistened cloth.
TECHNICAL DATA
Voltage: 220-240VAC 50Hz
Power consumption: 1600W (400+400+400+400)
Dimensions: 350*165*570mm
Weight: 3.0kg
WARNINGS
• Do not use the heater to dry your laundry. Never obstruct the intake and outlet grills
(danger of overheating).
• The heater must be positioned at least 100cm from furniture or other objects.
• Do not move this appliance while it is functioning, may result in overheating, or risk of re.
• The heater is tted with a safety device, which will switch off the heater in case of
accidental overheating (e.g. obstruction of air intake and outlet grills, motor turning slowly
or not at all). To reset, disconnect the plug from the power for a few minutes, remove the
cause of overheating then plug the appliance in again.
• Children should be supervised to ensure that they do not play with the appliance.
• Caution: Do not cover anything on your heater when in use.
• The heater must not be placed near a wall socket.
• This heater must not be used near a bath, shower or swimming-pool.
• Cleaning and user maintenance shall not made by children without supervision.
• This appliance is not intended for use by children and persons with reduced physical,
sensory or mental capabilities, or lack of experience and knowledge, unless they have
been given supervision or instruction concerning use of the appliance by a person
responsible for their safety.
CORRECT DISPOSAL OF THIS PRODUCT
This marking indicates that this product should not be disposed with other household
wastes throughout the EU. To prevent possible harm to the environment or human
health from uncontrolled waste disposal, recycle it responsibly to promote the
sustainable reuse of material resources. To return your used device, please use the
return and collection systems or contact the retailer where the product was purchased.
They can take this product for environmental safe recycling.

Halogen Heater 1600w
UK plUg rewiring
Your appliance operates on 220-240V-SOHz AC Mains and comes tted with a 3-pin
BSI Approved plug, so that it is ready for use by simply plugging into AC Mains.
Should you need to change or ret a plug, proceed as follows:
IMPORTANT:
The wires in the mains lead are coloured in
accordance with the following code:
BLUE : NEUTRAL (N)
BROWN : LIVE (L)
GREEN &YELLOW : EARTH (E)
As the colours of the wires in the mains lead
of this appliance may not correspond with the
coloured markings identifying the terminals in
you plug, proceed as follows:
The wire which is coloured BLUE must be
connected to the terminal which is marked with the letter “N” or coloured BLACK.
The wire which is coloured BROWN must be connected to the terminal which is
marked with the letter “L or coloured RED.
The wire which is coloured GREEN & YELLOW must be connected to the terminal
which is marked with the letter “E” or or coloured GREEN.
Always ensure that the Mains Cord is located into the Plug through the Cord Guard
or Cable Clamp, and that the Cord Guard screws are lightened to clamp the Cord
(outer sheath and inner coloured wires) in position in the Plug. Make sure the Plug
top is also tted securely.
This appliance must be protected by a 13-amp fuse in a 13-amp type (BS1363) plug.
Should you need to replace the fuse, use only an ASTA approved BS 1362 fuse.
Table of contents
Other Elpine Heater manuals


