Elpine 31077c User manual

Handheld
Steam Cleaner
Product images are for illustrative purposes only
• Pressurised steam removes tough grease
• Sanitize and cleans with steam
• No chemical required
• Swivel nozzle
• Insulated handle stays cool
31077c
a name you can trust!
User Manual for 31077c
Steam Cleaner
Table of Contents
Product Characteristics.......................... 1
Description of Structuring Parts............. 2
Safety Precautions ................................. 2
Preparations Before Use ........................ 3
Operating Instructions............................ 3
Functions................................................ 4
Maintenance Instructions ....................... 6
Household use just add water Tools Included
Sanitize bathroom Sanitizes & cleans with steam
Wrinkle remover Sweep the wall
Perfect for grease removal Sweep the glass

1
Product Characteristics:
Technically leading
This high-temperature and high-pressure steam is used for cleaning away any dirt/ stains
on floor boards, doors, windows and clothes.
The machine can also be used for killing bacteria on surfaces.
Steam can be generated due to automatic heating control. Continuous cleaning made
easy.
As no chemical agents are added, it is environment-friendly cleaning.
Safety Features
The machine will automatically disconnect the power supply and thus prevent heating
after the water has evaporated.
Fitted with sensitivity thermostat, 135 C high-temperature steam is available.
The safety valve has automatic pressure release function. .
Fitted with 3-pin power plug. To BS1363/A
Durable
The machine has an aluminum boiler body with extra-thick inner wall.
As the shell is made from high strength quality plastic it is anti-corrosion.
Energy-saving
The design of specially made heating tubes and boiler body ensures heating efficiency
with energy-saving.
Easy to use
With the range of cleaning accessories supplied, the machine can be assembled and
disassembled easily.
2
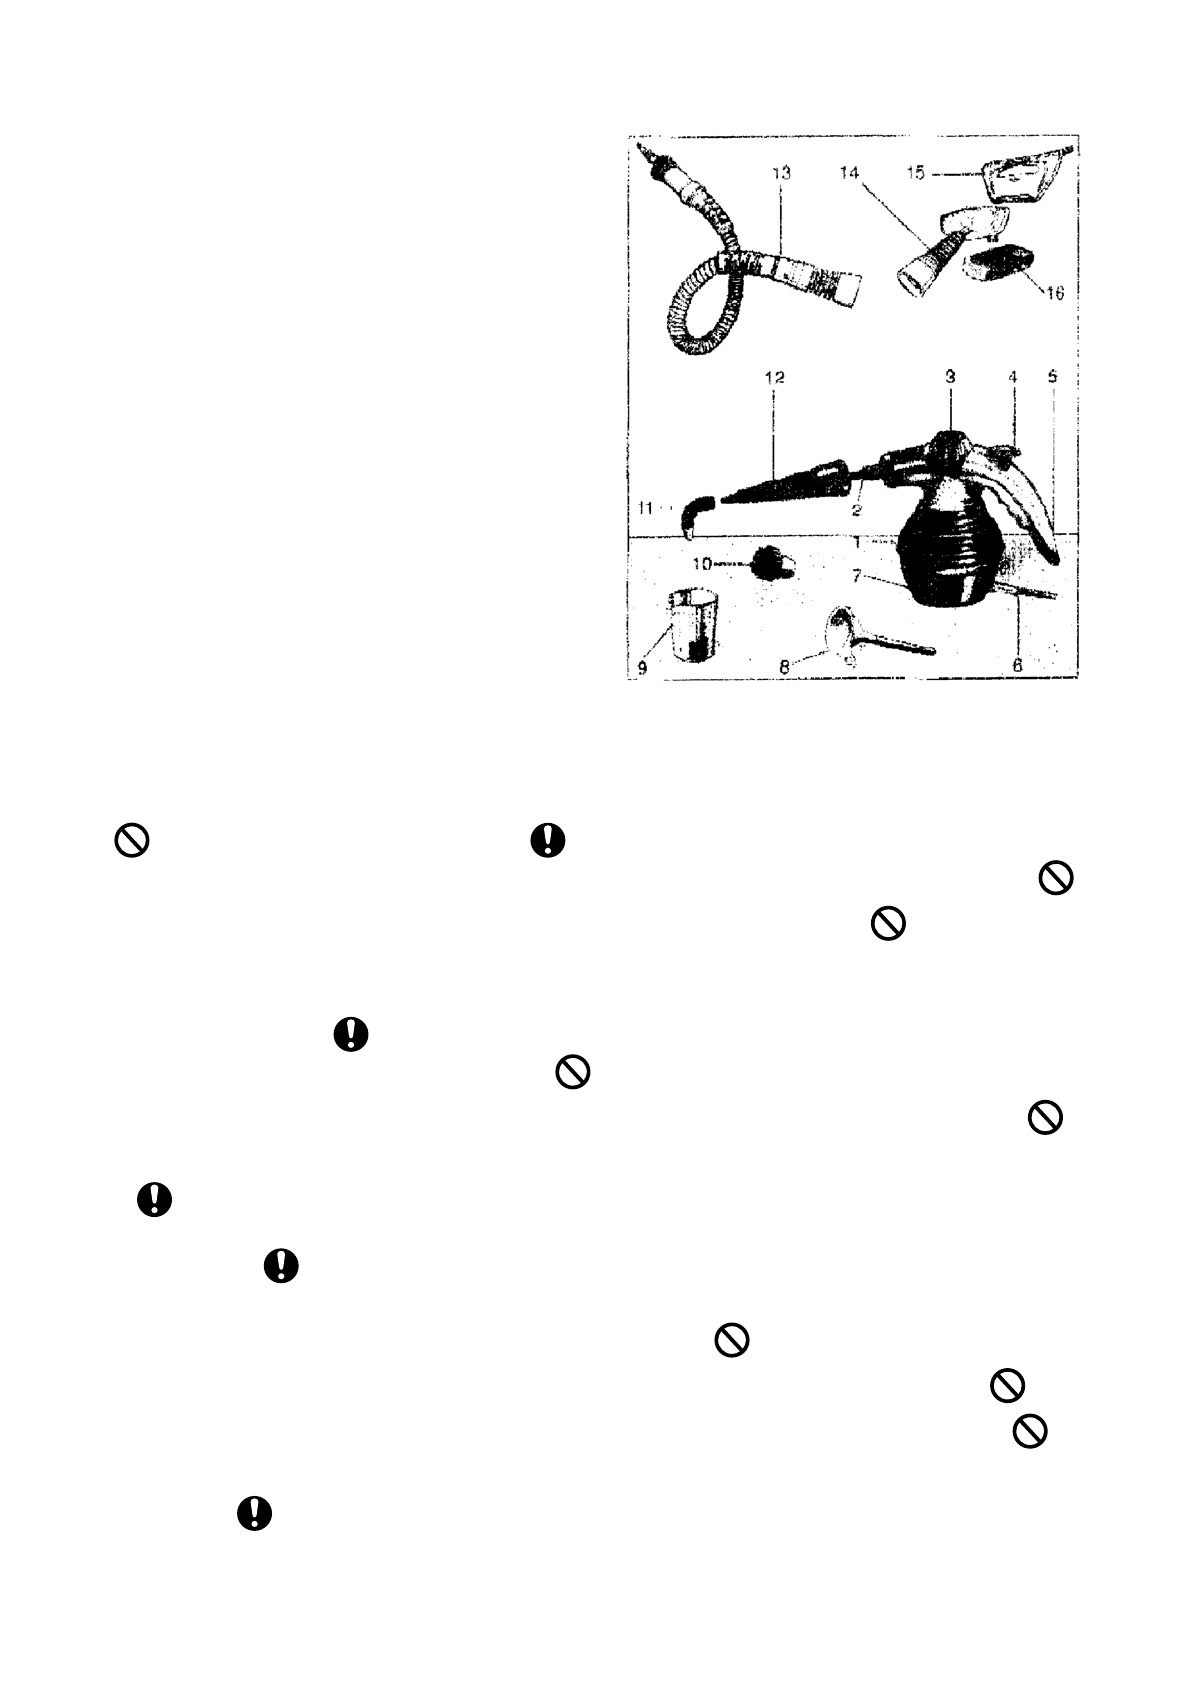
Description of Structuring Parts
1.Body
2.Short spray nozzle
3.Safety cap
4.Steam button
5.Handle
6.Power cord and plug
7.Power Indicator
8.Funnel
9.Measuring cup
10... Spray cup with round brush
11... Bent spray nozzle
12... Long spray nozzle
13... Extended connecting spray nozzle
14... General spray nozzle
15... Spray nozzle for door/window
16... Towel sleeve
Safety Precautions
This icon represents “Danger” This icon represents “Warning”
1.Do not allow children to use this machine, or to be near machine when in operation
2.Do not immerse power cord or power plug in water or other liquids.
3.The power cord and power plug should be in good condition. Any signs of damaged or
defective to the power cord or plug must be repaired by a qualified electrician before
use can continue.
4. This product is for domestic use only.
5. Do not turn on power supply until the tank contains the appropriate level of water.
6.Power supply used should comply with the product requirements of the manufacturer.
7. Never over fill the tank with water. Ensure the safety cap of the tank is fully tightened
before use.
8.The machine body must not be inclined at more than 45 degrees during use, in order to
prevent uncontrolled spraying of boiling water/steam.
9. Do not direct the steam towards persons, animals or other electrical products.
10... Before refilling water, or cleaning, disconnect power supply and allow cooling.
11. Do not use any cleaning agent/de-scaler in the tank, as this could cause damage to
the tank.

3
Preparations Before Use
• Read the User Manual carefully and keep for future reference.
• Check the accessories supplied with the machine.
Accessories supplied with the machine
Name Funnel Measuring cup Spray cup with
hairbrush Towel sleeve Long spray cup
Qty 1 1 1 1 1
Name Spray cup for
door/window
Spray cup with
round brush Bent spray cup User Manual Spray cup of
connecting pipe
Qty 1 1 1 1 1
Technical Specification
Rating of power supply: AC/220-240V~50Hz, tted with 5 AMP fuse.
Tank capacity: 250ml
Max capacity of water cup: 175ml
Rated power: 900W
Steam pressure:0.25MPa~0.42 MPa
Injected steam capacity: 28g/min
Temperature controller: functioning temperature: 135 C
Fusser: functioning temperature: 169 C
Overall dimension: 285×145×225mm
Net weight: 1.36kg
Operating Instructions
1.Unpack the product, check the accessories and documents supplied with the product
and make sure that the product and accessories are not damaged.
2.Before use, please read this User Manual carefully. The steam cleaner is for domestic
use only.
3.First, place the steam cleaner on a level platform, push down the safety cover, unscrew
the safety cap anti-clockwise, and then install the funnel. As following chart :
(I)
(II)

4
4.Take 175ml clean water with the measuring cup, and add the water into the tank. (Max.
capacity of the tank is 250ml. Do not overfill the tank as some space must be left in the
tank for expansion). Re-install the safety cap and tighten it in position
5.Check the power supply and socket, and confirm they comply with the requirements
given in the User Manual. Then turn on the power supply.
6.About 4 minutes after power supply is turned on, steam is ready. At this time lightly
press the steam button and check whether steam is sprayed out of the nozzle. (Do not
aim the spray nozzle at other persons or objects).
7.If there is steam sprayed out, please install suitable accessories according to your
needs after you release the button.
Functions
Disinfection and sterilization:
Install the long spray cup on the short spray nozzle and aim the spray at the area that
needs disinfecting, and then press down the steam button. High-temperature steam can
kill bacteria.
Cleaning the clothes
Install the spray cup with hairbrush on the short nozzle, and then mount the towel sleeve.
Aim the spray at the hung clothes, and press down the steam button and move the
hairbrush up and down as well as to the left and to the right at the same time. Then stains
can be removed from the clothes.
Cleaning doors and windows
Install the spray cup with hairbrush on the short spray nozzle, and then install the spray
cup for door/window on it. Aim the spray at the door/window, and press down the steam
button and move the hairbrush up and down as well as to the left and to the right at the
same time. Then stains can be removed from the door/window.
Cleaning the floor boards
Install the extended spray cup on the short spray nozzle. Then install bent spray cup or
round spray cup. Aim the spray at the floor/wall area requiring cleaning, and press down
the steam button to remove the dirt and stains.
Installation of Accessories
1.... How to install the spray cup with hairbrush
Hold the pipe section of the spray cup with hairbrush in your hand, align the arrow on the
spray cup with the single-line mark on short spray nozzle on the machine body, and insert
the spray cup in position. Rotate the spray cup in clockwise direction, and align the arrow
on the spray cup with the double-line mark on short spray nozzle on the machine body,
as shown in Figure 1. Fix the spray cup on the machine body. To remove the spray cup
with hairbrush, please rotate the spray cup inversely (anti-clockwise) as shown in Figure
2, and align the arrow on the spray cup with the single-line mark on the machine body.
Then the spray cup with hairbrush can be pulled out.

5
(I)
(II)
2.... How to install spray cup with round brush or bent spray cup
For direct installation on short spray nozzle, aim the spray cup with round brush or bent
spray cup at the top of spray nozzle, as shown in Figure 3, and push the spray cup
upwards until it is in position. As the short spray nozzle and spray cup are positioned
in six directions, the angle and direction can be adjusted during the installation. Or,
first install long spray cup and then the spray cup with round brush or bent spray cup.
The long spray cup is installed in the same method as the installation of spray cup with
hairbrush. The spray cup with round brush or bent spray cup and long spray cup is
installed in the same way as the installation of the short spray nozzle.
(III)
3.... How to installation of spray cup for door/window
First install the spray cup with hairbrush on short spray nozzle as shown in Figure 4 and
Figure 5, install the two small hooks of the spray cup for door/window onto suspension
lugs of the spray cup with hairbrush, and then trigger the big hook of the spray cup, and
push the spray cup for door/window up and secure it onto the body of the spray cup with
hairbrush.
(IV)
(V)

6
Refill water during operation
1.Unplug the power cord and disconnect the power supply
2.Press down the steam button to release the pressure until no steam is present.
3.Slowly unscrew the safety cap but do not remove it, and residual steam will be
discharged slowly until no steam comes out. Then place the machine in a cool place to
cool it down for about five minutes. Finally, completely remove the safety cap.
4.Use the funnel and measuring cup to refill with a suitable quantity of water.
5. Re-install the safety cap onto the machine body and tighten it in position.
After the machine is used
1.After the cleaning machine is used, unplug the power cord and disconnect the power
supply.
2.Press down the steam button to release the pressure until no steam is ejected.
3.Slowly unscrew the safety cap but do not remove it and residual steam will be
discharged slowly until no steam comes out. Then place the machine in a cool place to
cool down for about five minutes. Finally, completely remove the safety cap.
4.Empty the residual water in the tank and clean the external surface with a dry cloth.
5.Finally, re-install the safety cap onto the machine body and tighten it in position.
1.This appliance is not intended for use by children.
2.Keep away from Children during use.
3.The filling aperture must not be opened during use.
4. WARNING: Danger of scalding.
Applicable Standards: EN60335-1
7
Handheld
Steam Cleaner
• Pressurised steam removes tough grease
• Sanitize and cleans with steam
• No chemical required
• Swivel nozzle
• Insulated handle stays cool
B20 3BT
31077c
a name you can trust!
Table of contents


