ELRO Royale XL Touch Screen User manual

BC3000 Manual Version: 5
BABY MONITOR ROYALE
XL TOUCH SCREEN
Home is not a place, it’s a feeling
BC3000

- 2 -
Table of contents
English......................................................................................................................................... -0- 3 -
Deutsch.........................................................................................................................................- 18 -
Nederlands....................................................................................................................................- 34 -
Français.........................................................................................................................................- 50 -

- 3 -
English - Instruction manual
Properties .......................................................................................................................................- 4 -
Box content.....................................................................................................................................- 4 -
Camera overview ............................................................................................................................- 5 -
Monitor overview ...........................................................................................................................- 5 -
Monitor symbols.............................................................................................................................- 5 -
Getting started................................................................................................................................- 6 -
Linking the monitor and the camera...............................................................................................- 6 -
Control buttons...............................................................................................................................- 7 -
Menu page......................................................................................................................................- 7 -
ELRO Babycam app .........................................................................................................................- 8 -
Android smartphone...................................................................................................................- 8 -
iOS smartphone ........................................................................................................................- 11 -
Reset password.........................................................................................................................- 14 -
Frequently asked questions (FAQ) ................................................................................................- 15 -
Technical specifications ................................................................................................................- 15 -
Safety and conformity...................................................................................................................- 15 -
Service and contact.......................................................................................................................- 17 -
Go to www.elro.eu to download the latest version of this instruction manual!

- 4 -
Properties
•2,4 GHz FHSS + Wi-Fi dual mode technology.
•Expandable up to 4 cameras, single (1), split (2) or quad (4) monitor screen.
•Language selection: English, German, French, Spanish, Italian, Dutch.
•Camera with night vision.
•Responsive to sound.
•Lullabies, night light and temperature display.
•2-way audio: talk back to the camera via monitor or via smartphone.
•5 "/12.7 cm touch screen monitor.
•Panorama (left-right) + tilt (up-down) + digital zoom at a distance.
•iOS and Android app.
Box content
1Wireless camera.
2Mounting bracket.
3Wireless monitor.
4Charging station for monitor.
5Adapter (2 x).
6Screws and plugs.
7Instruction manual.

- 5 -
Camera overview
1IR sensor & LEDs for display in poor
to no lighting conditions.
2Microphone.
3Temperature sensor, the measured
ambient temperature is displayed
on the monitor.
4Speaker.
5Antenna.
6Connection for the power adapter.
7On/off switch.
8Reset button to reset the camera or to change
camera mode.
9Link button to add an extra camera.
Monitor overview
1Antenna: sends and receives signals to or from the camera.
2Sound bar: indicates the sound level which is detected by the camera.
3Connection for the power adapter.
4"/12,7 cm TFT LCD screen.
5Microphone.
6On/off button: press this button for approximately 4 seconds to turn the monitor on/off.
7Speaker.
8Table stand.
9Lithium battery, remove the plastic strip before use.
Monitor symbols
1Signal indicator: indicates the strength of the signal that is received from the camera.

- 6 -
2Digital clock: shows the time
that is set on the monitor.
3Camera display indication.
4Night light on/off.
5When using the application
on your smartphone, this
symbol is white.
6Zoom mode, indicates the
zoom factor, to 1.5 times and
2 times.
7Monitor speaker. When
white, the speaker is off.
When grey, the speaker is on.
8Battery status:
•Flashing red: the battery is dead.
•Red: the battery still has a quarter charge.
•1 bar of white: the battery still has half a charge.
•2 bars of white: the battery is still 3 quarters charged.
•4 bars of white: the battery is fully charged (the adapter is not connected).
•4 bars of white and lightning bolt: the battery is fully charged (adapter is connected).
•Lightning bolt icon: the adapter is connected.
9Temperature display of the room in which the camera is placed.
10 Timer with alert signal for feeding times.
11 Quad mode: press this button to switch to quad mode. When two cameras are linked, there is
a split mode (two displays). If more than two cameras are linked, there are four displays. Up
to a maximum of 4 cameras can be linked. You can choose the audio per camera.
12 Speaking: hold this button to talk through the camera.
Getting started
1The monitor must be fully charged via the adapter or the charging station before use. With
the adapter, the camera always has to be connected to a power outlet.
2Place the camera in the desired position. You can place the camera on a table/cabinet or
attach it to the wall using the mounting bracket.
3Press the on/off button for approximately 4-5 seconds to turn on the monitor.
4Slide the on/off switch to the ON position to turn on the camera.
Linking the monitor and the camera
The monitor and camera are already paired. Pairing is only necessary for an additional camera. If
this is the case, follow these steps:

- 7 -
1Turn on the monitor.
2Turn on the camera.
3Touch the screen and press the button in the lower left corner of the monitor.
4Press the icon and select the camera channel 2, 3 or 4 in order to pair the camera.
5Press the [PAIR] button (underneath the camera) within the 30 second countdown period.
6If the monitor has successfully paired with the camera, it will automatically switch to the
display of this camera.
Control buttons
By tapping any position on the
screen, the control buttons will
appear. If nothing is done for 10
seconds, the monitor will
automatically switch off.
1Menu page: the monitor
and camera settings can be
adjusted here.
2Volume louder or softer.
3Zoom mode, indicates the
zoom factor, zoom 1.5 times
or 2 times.
4Press the icon with the musical notes to activate 1 of the 3 lullabies. Select the song or 'All' (all
3) to play them in the room where the camera is located.
5Navigation control to pan the camera remotely (left/right) or to tilt it (top/bottom).
Menu page
1Connect/pair: 3 additional
cameras can be paired.
2VOX, set the sensitivity of
the to be detected sound
levels.
3The current time, date and
timer can be set here.
4Language setting for the
monitor, there are six
options: English, German,
French, Italian, Dutch and
Spanish.

- 8 -
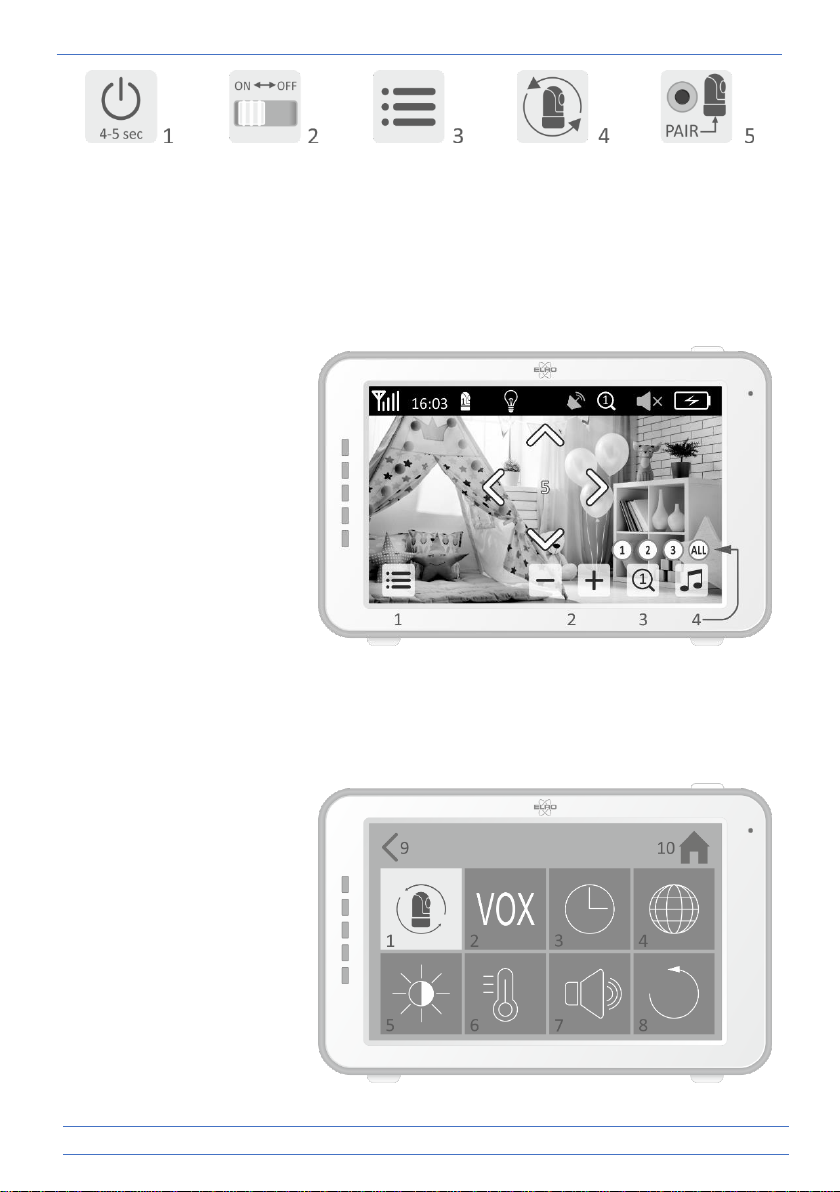
5You can adjust the brightness of each individual camera.
6Celsius or Fahrenheit setting and temperature alert limit for the high and low temperatures.
7Volume control of each individual camera and the alarm.
8Factory settings, reset the monitor to factory settings.
9Back to the previous page.
10 Back to current actual image display (Live View).
ELRO Babycam app
Go to the Google Play Store or Apple App Store to download the ELRO Babycam app and install it
on your smartphone. We advise you to turn off the monitor when installing the ELRO Babycam
app. To connect the camera to the ELRO Babycam app, you need to connect the adapter and set
the switch to the ON position first. The Wi-Fi signal that is transmitted by the camera should then
be connected to your smartphone. You can only connect the camera with 2,4 GHz Wi-Fi (5G Wi-Fi
is not possible). If you have an Android smartphone, follow the steps under “Android smartphone.
If you have an iOS smartphone, follow the steps under “iOS smartphone”.
Android smartphone
1Press the reset button until the night light underneath the camera flashes 3 times.
2Then, briefly press the reset button 1 time, the night light will quickly flash.
3After 10 seconds, briefly press on the reset button 1 time, the night light will start to flash
slowly.
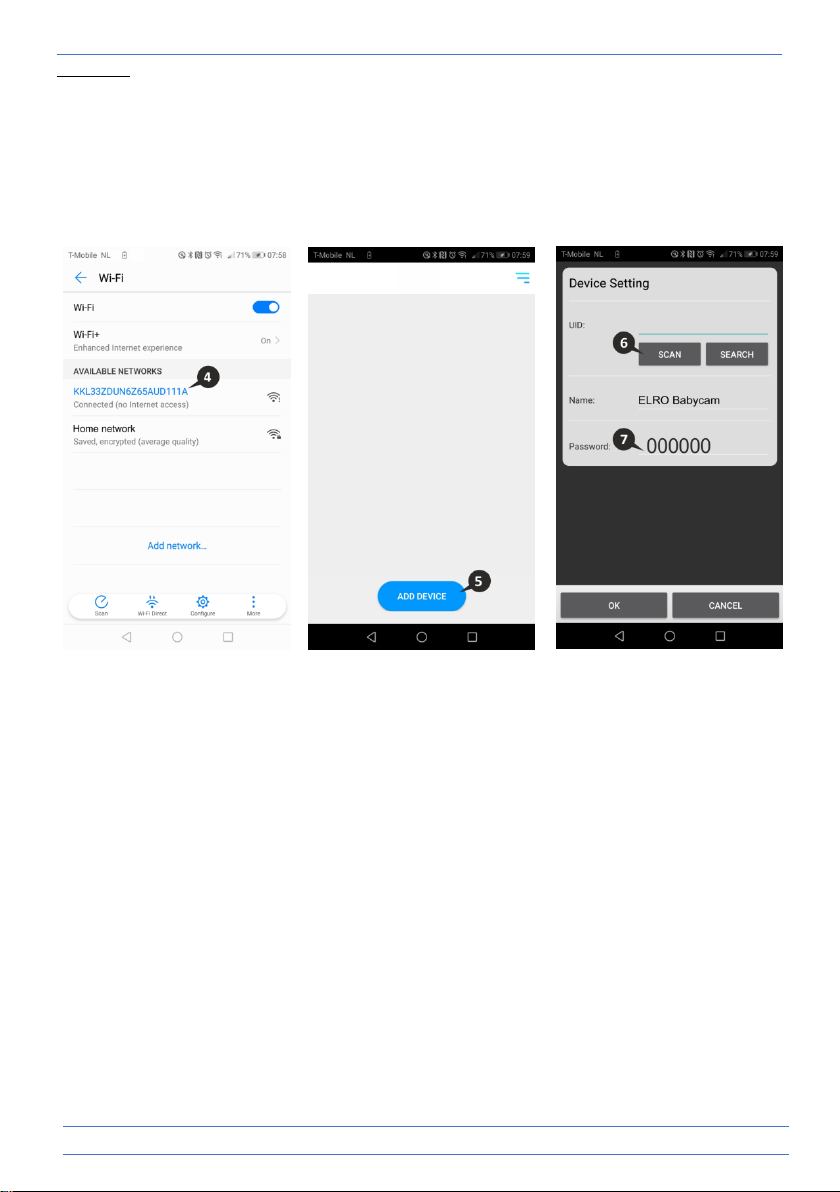
4Now go to the Wi-Fi setting of your smartphone and connect the Wi-Fi signal from the
camera, ending on - - - - - 111A, with your smartphone (Comment: This network does not
have access to the internet. If you are asked to switch to a different network, choose to
cancel).
5Open the ELRO Babycam app and connect the camera by selecting "ADD DEVICE".
6Then scan the QR code, which you will find on the bottom of the camera.
7At "Password“, please enter 000000 and select ”OK".
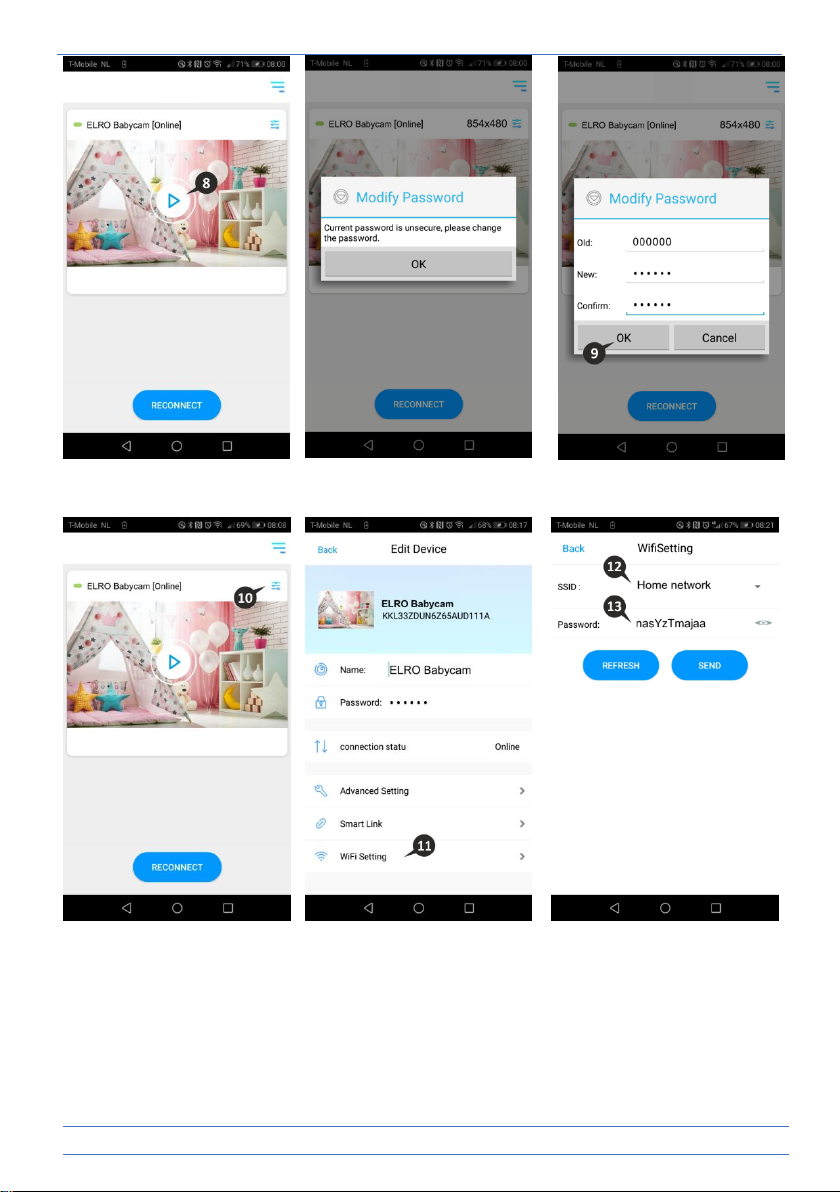
8The camera will now come online and can be opened.
9You will be asked to change the unsafe password 000000, select “OK”. Fill the old and new
password and select “OK”. The new password should contain at least 6 characters, one
uppercase letter, one lowercase letter, one digit and one special character (choose from:
~`@#$%^*()_-+=|{}[].?/).
10 Go to camera settings.
11 Select “Wi-Fi setting” to change the Wi-Fi Setting of the camera to your own network.
12 At SSID, select your own network (Home network).
13 Enter the password of your own network here and select "SEND". By selecting the eye symbol
on the right side, you can see what you are typing. After selecting "SEND", the camera stops
transmitting its Wi-Fi signal. The night light at the bottom of the camera stops flashing slowly,
then lights continuously, after which 3 short flashes follow to close.
14 Next, you will be asked to close and reopen the app.
15 Swiping from left to right or from top to bottom allows you to point the camera in the desired
position (Pan/Tilt adjustment).

- 9 -
Comment
If, for some reason, it has not been possible to connect the camera to your smartphone and then
the app to your network, start again at the beginning of this chapter. Disconnect the camera from
the power by first turning the switch to the OFF position and then removing the adapter from the
power outlet.

- 10 -

- 11 -
iOS smartphone
1Press the reset button until the night light underneath the camera flashes 3 times.
2Then, briefly press the reset button 1 time, the night light will quickly flash. After 10 seconds,
briefly press on the reset button 1 time, the night light will start to flash slowly.
3Now go to the Wi-Fi setting of your smartphone and connect the Wi-Fi signal from the
camera, ending on - - - - - 111A, with your smartphone (Comment: This network does not
have access to the internet. If you are asked to switch to a different network, choose to
cancel).
4Open the ELRO Babycam app and select "QRCode".
5Then scan the QR code, which you will find underneath the camera.
6At "Password“, please enter 000000 and select ”Save".
7The camera will now come online and can be opened. You will be asked to change the unsafe
password 000000, press “OK”.
8Fill the old and new password and press "OK". The new password should contain at least 6
characters, one uppercase letter, one lowercase letter, one digit and one special character
(choose from: ~`@#$%^*()_-+=|{}[].?/).
9Use "Back" to return to the Device List and tap (i) to go the camera settings.
10 Press “Wi-Fi Setting”to change the camera to your Wi-Fi network.
11 At SSID, enter the name of your own Wi-Fi network.
12 Enter your network password. By selecting the 'eye' symbol on the right-hand side you will be
able to see what you are typing. Then, select "SEND". After selecting "SEND", the camera will
stop transmitting its Wi-Fi signal. The night light on the bottom of the camera will stop
flashing slowly, then light continuously, after which 3 short flashes follow to close. You will be
asked to close and reopen the app.

- 12 -
13 Swiping from left to right or from up to down allows you to point the camera in the desired
position (Pan/Tilt adjustment).
Comment
If, for some reason, it has not been possible to connect the camera to your smartphone and then
the app to your network, start again at the beginning of this chapter. Disconnect the camera from
the power by first turning the switch to the OFF position and then removing the adapter from the
power outlet.

- 13 -

- 14 -
Reset password
If you have forgotten your password, please follow the steps below:
1Press and hold the reset button at the bottom of the camera for 1-2 seconds (warning: if you
press the reset button for more than 3 seconds and the led starts flashing, you have to start
again at chapter “ELRO Babycam app”). The password will be reset to the default password
000000.
2Close the ELRO Babycam app and open it again.
•For iOS:
oClick in the Device List on the settings button (i). Replace the black dots by the
default password 000000 and click on “Back”.
oOpen the camera. You will receive a message that the current password is unsafe
and has to be changed. Press ok.
oFill in the default password 000000 and your new password. Your new password
should contain at least 6 characters, one uppercase letter, one lowercase letter, one
digit and one special character (choose from: ~`@#$%^*()_-+=|{}[].?/).
•For Android:
oFill in the default password 000000 when a notification pops up and click on
confirm.
oOpen the camera. You will be asked to fill the default password 000000 and your
new password. Your new password should contain at least 6 characters, one
uppercase letter, one lowercase letter, one digit and one special character (choose
from: ~`@#$%^*()_-+=|{}[].?/).

- 15 -
Frequently asked questions (FAQ)
Are you having problems with the installation of this device? Please visit www.elro.eu/faq to get a
quick answer to your question. Here you will find the latest version of the instruction manual,
answers to frequently asked questions (FAQ) and detailed installation videos.
Technical specifications
System
Frequency
2.4 GHz (Wi-Fi) 2.4 GHz (FHSS)
Transmitter power
17dBm (FHSS), 15+/-1dBm (Wi-Fi)
RX sensitivity
- 88dBm (FHSS), - 89dBm (Wi-Fi)
Spread
FHSS, Wi-Fi
Modulation
GFSK, 502.11g/n | GFSK, 802.11g/n
Data speed
4Mbps (FHSS), Wi-Fi (802.11b/g/n), Wi-Fi (802.11b/g/n)
Wireless range
100 m open range (camera to monitor).
Camera
Image sensor type
1/4" Colour CMOS Image Sensor
Effective pixel
1280 (H) x 1024 (V)
Image resolution
High max. 1.7 Mbps (10fps@1280 * 720)
Low max. 0.7 Mbps (10fps@854 * 480)
Lens
3.95 mm F2.2 F2.2
Viewing angle (diagonal)
55° (FOV)
IR LED / night vision range
5m 940nm
Adapter
5V DC 1A
Operating temperature
-10 ~ 40°C -10 ~ 40 ° C
Monitor
LCD size
5 "/12.7 cm touch panel
LCD resolution
800 x 480
Adapter
5V DC 1A
Operating temperature
-10 ~ 40 °C/14 °F ~ 104 °F
Humidity
0% ~ 85%
Rechargeable lithium battery
3,8V / 2500mAh
Safety and conformity
Warnings
•Choking hazard; keep connection cords and small parts out of the reach of children.
•Do not place camera and connectors within a distance of 1.5 meters from the cradle/box.
•Never use extension cables together with AC adapters, only use the AC adapters supplied.
•Adult persons required for assembly/installation.
•This product is not intended to replace good supervision of children. You must regularly
monitor your child's activities, as this product will not help alert parents of a child's quiet
activities.
•Read and follow all instructions/warnings in this manual before using this product.

- 16 -
•This product is for indoor use only.
•Do not use the camera or monitor near water, bathtubs, damp basement/rooms, etc.
•This product is not intended for use as a medical monitor and its use may not be used to
replace adult supervision.
•The camera detects normal sound levels within a range of 2 to 3 meters from a child. If the
child moves out of this range, the camera may not be able to detect sounds from him or her.
•It is essential that you check the operation when first installed and then regularly afterwards.
•Check the reception regularly. Test the monitor before use and after changing the location of
the camera.
•The casing of the camera and monitor may not be opened.
•To avoid overheating, you need to keep away the product and the AC adapters from direct
sunlight and heat sources such as radiators, furnace, cooking appliances (e.g. stoves and
ovens) and other heat-producing apparatus (e.g. amplifiers, televisions and stereos).
•Ensure good ventilation of the product during use. Avoid contact with pillows and furniture
that can block the ventilation.
•Only use the AC adapters supplied with the product, as other adapters can damage the
product.
•Connect the adapters only to the standard household current (100~240 volts AC)
•Place the AC adapters and avoid bottlenecks to prevent damage.
•Do not touch the exposed end of the net cord of the net adapter when this is connected to
the power outlet.
•Images and sounds are transmitted by the product via the public ether and can be picked up
by other devices.
•Although the transmission distance is 100 m or more (open space), it may vary depending on
obstacles between camera and monitor.
•Note: If you use the system to monitor a young child, do not place the camera where the child
can get to the camera.
•If the monitor is only used with the battery and this is almost empty, it can affect the image
and/or sound. Connect the AC adapter and the battery will automatically charge.
•The transmission range of the wireless signal can become weaker if there are heavy obstacles
such as a concrete, brick or metal wall between the camera and the monitor, or if there are
several Wi-Fi routers and devices in your area.
•To avoid interference with the RF signal, keep your mobile phone at a distance of at least 1
meter from the camera and the monitor.
•Explosion hazard if the battery is replaced by the wrong type.
•Dispose of used batteries as instructed.
Simplified EU Declaration of Conformity
Hereby, ELRO Europe declares that the radio equipment type BC3000 Baby Monitor Royale is in
compliance with Directive 2014/53/EU. The full text of the EU declaration of conformity is available
at the following internet address: www.elro.eu/doc.

- 17 -
Symbols
The WEEE symbol means that this product and its batteries must be disposed of
separately from household waste. When this product reaches the end of its lifetime, take
it to a designated waste collection point nearby to ensure safe disposal or recycling.
Protect the environment and public health, deal with natural resources responsibly!
By affixing the CE mark on a product, the manufacturer declares that the product meets
all legal requirements for CE marking and can be sold throughout the EEA.
Please visit www.elro.eu for the warranty conditions of this product.
Service and contact
In order to ensure that we can provide our customers with the best possible service as quickly as
possible, we ask you to take the following into account:
For questions about the installation, use or operation of this product:
•Go to www.elro.eu/faq to get a quick answer to your question. Here you will find answers to
frequently asked questions, detailed installation videos and the latest version of the manual
for this product.
•Can't find a solution via the website? Please leave a question via the product page or mail to
[email protected]. We will help you as soon as possible.
For all other questions:
•Mail to [email protected]. We will answer your questions as soon as possible.
This product is produced by:
ELRO Europe
Postbus 9607 - Box E800
1006 GC Amsterdam
The Netherlands
www.elro.eu
✓

- 18 -
Deutsch –Anleitungshandbuch
Eigenschaften................................................................................................................................- 19 -
Lieferumfang.................................................................................................................................- 19 -
Kameraübersicht...........................................................................................................................- 20 -
Monitorübersicht..........................................................................................................................- 20 -
Monitorsymbole ...........................................................................................................................- 20 -
Inbetriebnahme ............................................................................................................................- 21 -
Monitor und Kamera verknüpfen .................................................................................................- 21 -
Bedientasten.................................................................................................................................- 22 -
Seitenmenü...................................................................................................................................- 22 -
ELRO Babycam App.......................................................................................................................- 23 -
Android-Smartphone ................................................................................................................- 23 -
iOS-Smartphone........................................................................................................................- 26 -
Passwort vergessen...................................................................................................................- 29 -
Häufig gestellte Fragen (FAQ) .......................................................................................................- 30 -
Technische Spezifikationen...........................................................................................................- 30 -
Sicherheit und Konformität...........................................................................................................- 30 -
Service und Kontakt ......................................................................................................................- 32 -
Unter www.elro.eu können Sie die neueste Version dieses Anleitungshandbuchs herunterladen!

- 19 -
Eigenschaften
•2,4 GHz FHSS + Wi-Fi Dual Mode-Technologie.
•Auf bis zu 4 Kameras erweiterbar, mit einfachem (1), geteiltem (2) oder
Quad-Bildmonitor (4).
•Sprachauswahl: Englisch, Deutsch, Französisch, Spanisch, Italienisch, Niederländisch.
•Kamera mit Nachtsichtfunktion.
•Geräuschsensor.
•Schlaflieder, Nachtlicht und Temperaturanzeige.
•2-Weg-Audio: Sprachübertragung zur Kameraeinheit über Monitor oder Smartphone.
•5'' / 12,7 cm Touchscreen-Monitor.
•Panorama- (links-rechts) + Neigungsfunktion (oben-unten) + digitaler Zoom mit
Fernsteuerung.
•iOS- und Android App.
Lieferumfang
1Kabellose Kamera.
2Montagehalterung.
3Kabelloser Monitor mit 5” / 12,7 cm (Bildschirmdiagonale).
4Monitor-Ladestation.
5Adapter (2 x).
6Schrauben und Stecker.
7Anleitungshandbuch.

- 20 -
Kameraübersicht
1IR-Sensor & LEDs zur Wiedergabe bei
schlechten Lichtbedingungen oder
Dunkelheit.
2Mikrofon.
3Temperatursensor, die gemessene
Umgebungstemperatur wird am
Monitor angezeigt.
4Lautsprecher.
5Antenne.
6Anschluss für das 5V 1A-Netzteil.
7Ein- und Ausschalter.
8Reset-Taste, um die Kamera zu resetten oder den
Kameramodus zu ändern.
9Verbindungsknopf zum Verknüpfen weiterer Kameras.
Monitorübersicht
1Antenne zum Senden und Empfangen von Signalen an oder von der Kamera.
2Geräuschpegelanzeige, der von der Kamera empfangen wird.
3Anschlüsse für das 5 V 1 A-Netzteil.
45" / 12,7 cm TFT LCD-Bildschirm.
5Mikrofon.
6Ein- / Ausschalter, halten Sie diese Taste etwa 4 Sekunden lang gedrückt, um den Monitor ein-
/ auszuschalten.
7Lautsprecher.
8Tischständer.
9Lithiumbatterie, Plastikstreifen vor Gebrauch entfernen.
Monitorsymbole
1Signalanzeige, gibt die von der Kamera empfangene Signalstärke an.
2Gibt am Monitor eingestellte Zeit an.
3Kamerawiedergabe.
4Nachtlicht an und aus.
This manual suits for next models
2
Table of contents
Languages:
Other ELRO Baby Monitor manuals