ELTEX RR-10 User manual

IP address:192.168.0.1
Username:admin
Password:password
Wi-Fi signal repeater
RR-10
User manual
Firmware version1.2.0

RR-10 wireless signal repeater. User manual
2
Contents
1 Device description......................................................................................................................4
1.1 Purpose.........................................................................................................................................4
1.2 Device specification .....................................................................................................................4
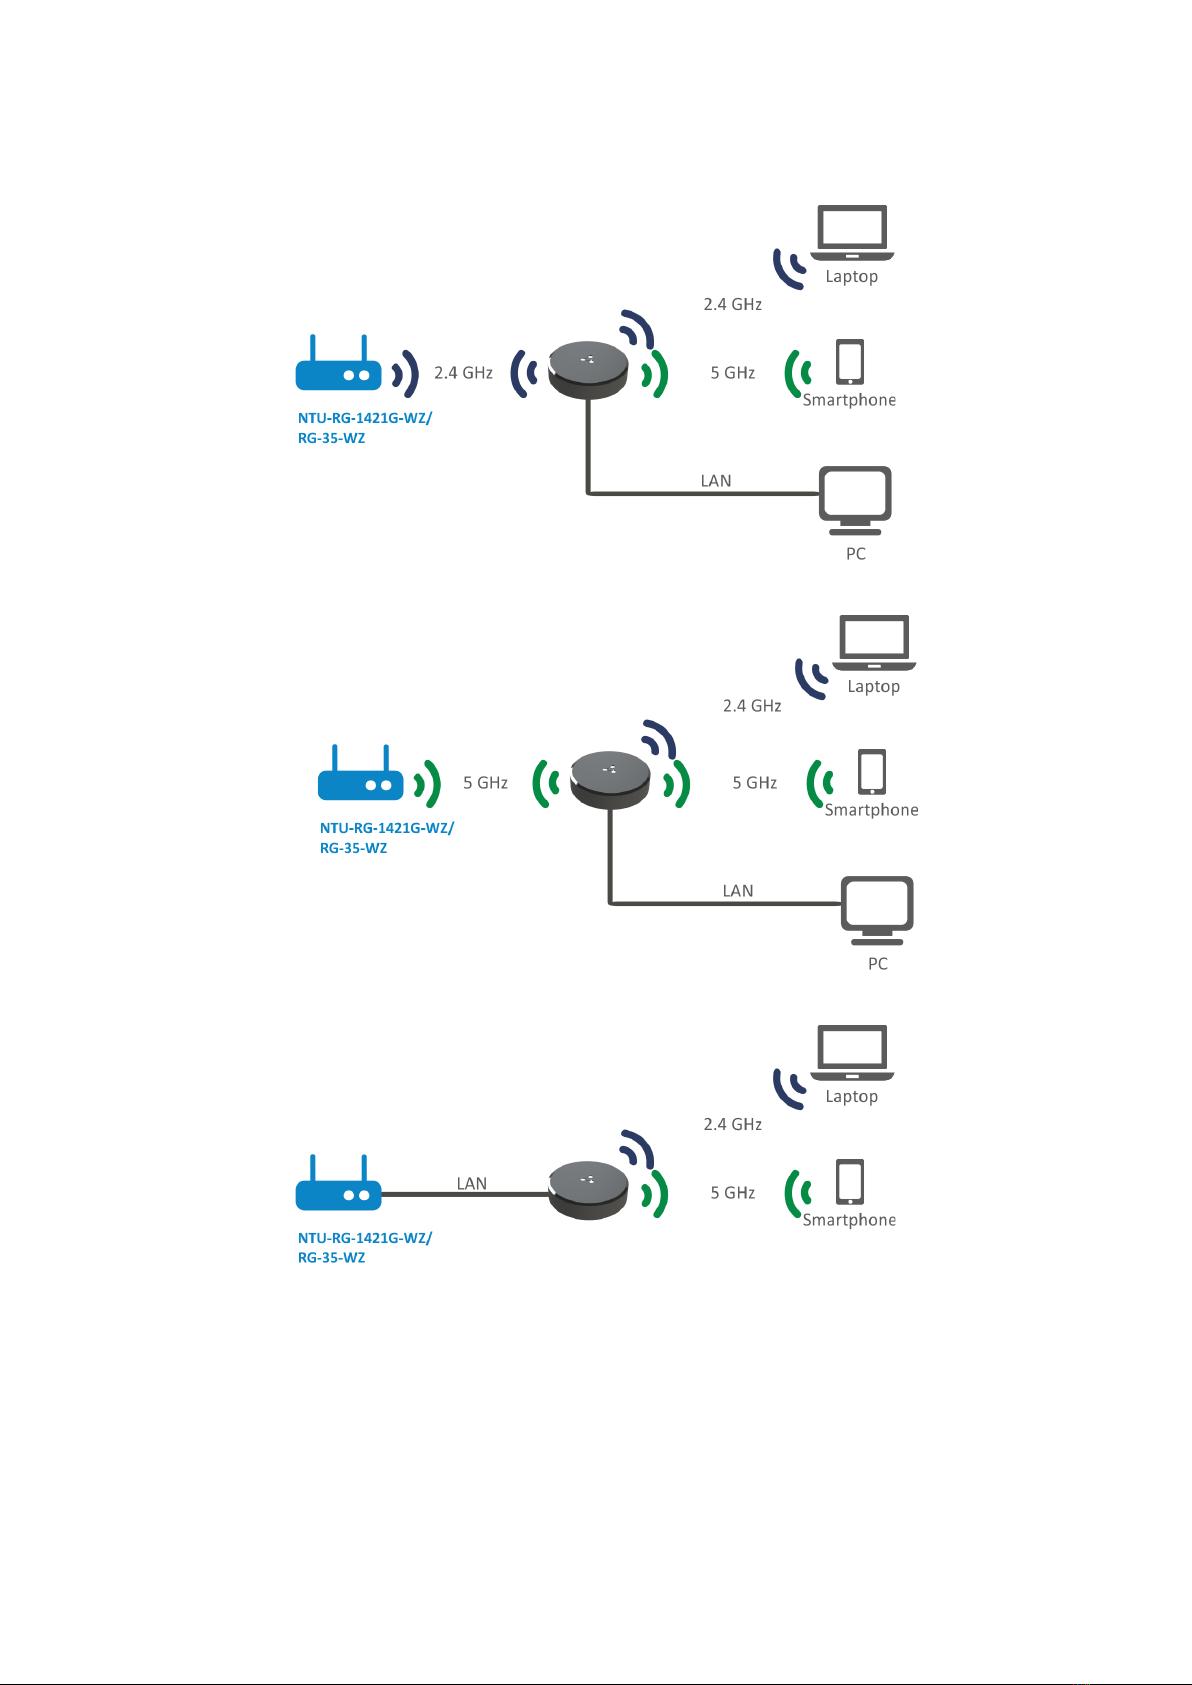
1.2.1 Connection diagrams for RR-10 ........................................................................................... 5
1.2.2 RR-10 use case:...................................................................................................................... 6
1.3 Technical features........................................................................................................................6
1.4 Design ...........................................................................................................................................8
1.4.1 Front panel of the device. State indication ......................................................................... 8
1.4.2 Rear panel of the device. LAN connection indication ......................................................... 8
1.4.3 Bottom panel of the device .................................................................................................. 9
1.5 Resetting to factory settings......................................................................................................10
1.6 WPS button management .........................................................................................................10
1.7 Delivery package ........................................................................................................................10
2 Installation order .....................................................................................................................11
2.1 Safety rules.................................................................................................................................11
2.2 Installation recommendations..................................................................................................11
2.3 Connecting RR-10 to a network.................................................................................................12
2.3.1 Method 1. UsingWPS button.............................................................................................. 12
2.3.2 Method 2. Via web interface in repeater mode.................................................................. 12
2.3.3 Method 3. Via web interface in access point mode ........................................................... 14
2.4 EasyMesh agent mode ...............................................................................................................15
2.4.1 Connecting to EasyMesh network using WPS button ....................................................... 15
3 Device management via the web interface ..........................................................................17
3.1 Getting started ...........................................................................................................................17
3.2 Device control panel ..................................................................................................................18
3.3 Repeater mode...........................................................................................................................19
3.3.1 The «Status» tab.................................................................................................................. 19
3.3.2 The «Wi-Fi» tab .................................................................................................................... 21
3.3.3 The «Network» tab .............................................................................................................. 25
3.3.4 The «System» tab ................................................................................................................ 26
3.4 EasyMesh agent mode ...............................................................................................................28
3.4.1 The «Status» tab.................................................................................................................. 28
3.4.2 The «EasyMesh» tab ............................................................................................................ 29
4 Problems and solutions...........................................................................................................30

RR-10 wireless signal repeater. User manual
4
•
•
•
•
•
•
•
•
•
1 Device description
1.1 Purpose
RR-10 – universal wireless signal repeater designed to expand the coverage area of wireless networks and
amplify Wi-Fi signal. The device allows you to eliminate blind spots and optimize the performance of your Wi-Fi
network.
With support for IEEE 802.11n/ac standards, RR-10 repeater provides high data transfer rates and is capable to
provide high-quality multimedia transmission of 4K content. The use of MIMO technology and internal
antennas makes RR-10 a universal solution for expanding your home network.
RR-10 supports EasyMesh technology and can be used in EasyMesh network as an agent.
1.2 Device specification
The device is powered by an external 5.3V adapter from 220V power network.
Interfaces:
LAN: 1 port of Ethernet RJ-45 10/100/1000BASE-T;
WLAN: IEEE 802.11b/g/n 2.4 GHz and 802.11a/n/ac 5 GHz.
Functions:
Support for WPA/WPA2 encryption standards;
Support for WMM;
Support for WPS;
Wireless Multicast Forwarding;
Support for Wi-Fi IEEE 802.11a/b/g/n/ac/k/v;
MIMO 2x2;
EasyMesh.

RR-10 wireless signal repeater. User manual
5
1.2.1 Connection diagrams for RR-10
2.4 GHz repeater:
5 GHz repeater:
Access point:

RR-10 wireless signal repeater. User manual
6
1.2.2 RR-10 use case:
1.3 Technical features
General parameters
Processor Realtek R TL8197F S -V G
Clock frequency 1 GHz
RAM 128 MB
ROM 16 MB
Operating system Linux 3.10
LAN Ethernet interface parameters
Number of interfaces 1
Connector type RJ-45
Data rate, Mbps 10/100/1000, autonegotiation
Agent in EasyMesh network
When used with the RG-35-WZ router (firmware version 2.2.0 or later), the RR-10 repeater will act as
an EasyMesh agent after being configured via WPS.

RR-10 wireless signal repeater. User manual
7
Standards BASE - T
Wireless interface parameters
Number of antennas 2
Antenna type internal
Standards 802.11 a/b/g/n / ac/k/v
Frequency range 2412-2472 MHz
5180-5320 MHz
5660-5825 MHz
MIMO 2. 4 MHz 2х2
5 MHz 2х2
Modulation 2,4 MHz: DSSS, CCK, BPSK, QPSK, 16QAM, 64QAM
5 MHz: BPSK, QPSK, 16QAM, 64QAM, 256QAM
Data transfer rate 802.11b: up to 11 Mbps
802.11 a: up to 54 Mbps
802.11 g: up to 54Mbps
802.11 n ( HT 20): up to 144Mbps
802.11 n ( HT 40): up to 300Mbps
802.11 ac ( HT 80): up to 866Mbps
Maximum transmitter output power 12.4 GHz: up to 18 dBm
5 GHz: up to 20 dBm
Receiver sensitivity 2.4 GHz: up to -98 dBm
5 GHz: up to -96 dBm
Security WPA (TKIP+AES), WPA2 (TKIP+AES), WPA/WPA2
(TKIP+AES)
Control
Remote control web interface
Access restriction by password
Physical specifications
Power external 5.3V DC, 2Аpower adapter
Maximum power consumption 7 W
Range of operation temperatures from +5 to +40°C
Relative humidity at 25°C up to 80%
Dimensions (Diameter x Height) 100 x 23 mm
Weight 85 g
1The value of the maximum output power will vary according to the rules of radio frequency regulation in your
country

RR-10 wireless signal repeater. User manual
8
1.4 Design
RR-10 wireless signal repeater is implemented in a plastic case with dimensions ofØ100 x 23 mm.
1.4.1 Front panel of the device. State indication
Front panel of RR-10
Description of front panel LED indicators
#LED LED status Device state
1 LED shows the device
operation status
Solid red The device is launching (1 minute max.)
Red, flashing rapidly The device is updating/reseting
Red, flashing slowly The device is turned on, there is no connection to the
access point (router)
Green, flashing rapidly The device is connecting to an access point (router)
through WPS technology
Green, flashing slowly The device is connected to an access point (router), no
access to the Internet
Solid green The device has been connected to an access point
(router) and has access to the Internet
1.4.2 Rear panel of the device. LAN connection indication
Rear panel of RR-10

RR-10 wireless signal repeater. User manual
9
#Rear panel element Description
1 Button for client connection via the WPS protocol
2 LAN 10/100/1000BASE-T (RJ-45) port for connection to external networks
3 LEDs LAN connector indicators
4 5v DC Connector for power adapter connection
LAN connection indication
LED status Device state
Only green lights The connection is established at 10/100 Mbps
Green and orange lights The connection is established at 1000 Mbps
Flashes green The process of packet data transmission through LAN interface
1.4.3 Bottom panel of the device
Bottom panel of RR-10
Description of bottom panel controls
#Bottom panel element Description
1 F Button for reseting to factory settings

RR-10 wireless signal repeater. User manual
10
•
•
•
1.5 Resetting to factory settings
To reset the device to factory settings, press and hold the «F» button for more than 3 seconds until the
indicator on the front panel flashes red.The device will automatically restart within 5 seconds, and the
indicator will light up red. When the device is ready, the indicator flashes red slowly.
1.6 WPS button management
The device supports connection to the router Wi-Fi networks via WPS. To configure the connection, activate
the WPS function on the router and press and hold the WPS button on the back of the device for 3 seconds.
After that the device will connect to the router automatically. Connection to the router takes no more than two
minutes. In case the connection is not successful, try again and make sure that the WPS function on the
repeater was activated no later than 2 minutes after the WPS function was activated on the router.
1.7 Delivery package
RR-10 standard delivery package includes:
RR-10 wireless signal repeater;
230/5.3V 2.0A power adapter;
Device quick configuration guide.
By default, the DHCP server is running on all interfaces;
LAN interface address is 192.168.0.1;the subnet mask is 255.255.255.0;
the username/password for access via the web interface: admin/password.
Configuring with WPS technology as a client is only available for non-configured devices. Before
using the WPS button, you must reset the device to the factory settings.
After configuring the device, a DHCP client is launched on all interfaces.

RR-10 wireless signal repeater. User manual
11
1.
2.
3.
4.
1.
2.
3.
4.
a.
b.
c.
d.
e.
2 Installation order
2.1 Safety rules
Do not install the device close to heat sources or in rooms with temperature below 5°C or above 40°C.
Do not use the device in places with high humidity.
Do not expose the device to smoke, dust, water, mechanical vibrations, or shock.
Do not open the device case. There are no user serviceable parts inside.
2.2 Installation recommendations
Before you install and enable device, check the device for visible mechanical defects. If defects are
observed, you should stop the device installation, draw up corresponding act and contact the supplier.
If the device has been exposed for a long time at a low temperature, it must be left to stand for two
hours at room temperature before use. After a long stay of the device in conditions of high humidity, let
it stand under normal conditions for at least 12 hours before switching on.
The device should be installed horizontally in compliance with safety instructions.
During the device installation to provide Wi-Fi coverage area with the best characteristics take into
account the following rules:
Install the device in the area where the wireless network of the router is securely received;
Minimize the number of obstacles (walls, roof, furniture and etc.) between RR-10, router and other
wireless network devices;
Do not install the device near (about 2 m) electrical and radio devices;
It is not recommended to use radiophone and other equipment operating on the frequency of 2.4
GHz, 5 GHz in Wi-Fi effective radius;
Obstacles in the form of glass/metal constructions, brick/concrete walls, water cans and mirrors
can significantly reduce Wi-Fi action radius.
In order to avoid components overheating and device malfunctioning, do not place objects on the
device.

RR-10 wireless signal repeater. User manual
12
1.
2.
3.
2.3 Connecting RR-10 to a network
To extend Wi-Fi coverage area, connect RR-10 to the network of your access point (or router).
2.3.1 Method 1. UsingWPS button
Connect RR-10 to 220V power network through the power adapter near the Wi-Fi router (or access point)
you want to connect to. Wait until LED start flashing red.
Press WPS button on the Wi-Fi router.
Press and hold WPS button on RR-10 untill the indicator start flashing green. When RR-10 is connected
to the Internet, the indicator will turn off.
2.3.2 Method 2. Via web interface in repeater mode
1.Connect RR-10 to 220V power network through the power adapter near the Wi-Fi router (or access
point) you want to connect to. Wait until LED start flashing red.
2. Connect to the repeater using smartphone or PC through Wi-Fi or Ethernet cable.
a. Through Wi-Fi: connect PC or smartphone to a Wi-Fi network of the repeater —RR-WiFi-XXXX
(whereXXXXis the last 4 characters of RR-10 MAC address, the MAC address is written on the label
on the device case).
b. Through Ethernet cable (only for PC): connect LAN port of the repeater to LAN port of your PC
using Ethernet cable.
3. Open a web browser and type the address of the device to URL bar — http://rr.loc/ илиhttp://
192.168.0.1 .
4.Enter username and password to the authorization window. Default username and password areadmin
andpassword correspondingly. Click «Log in».
The way of WPS connection may vary for different routers. Please, read the manual for your
router.
Usually, you have 2 minutes after pressing WPS button on the router to press WPS on RR-10
for successful connection.
By default, the repeater copies the name and Wi-Fi settings of the network to which it will be
connected in both ranges: 5 GHz and 2.4 GHz. If necessary, you can change the name and Wi-Fi
network settings via the web interface.
When connecting to the RG-35 router with the firmware version 2.2.0 or later the RR-10 repeater will
be automatically configured as an agent in the EasyMesh network. In the EasyMesh network all
network parameters are synchronized between the controller and agent.

RR-10 wireless signal repeater. User manual
13
5. The «Wizard» window will appear. Set a username and password to access the repeater web interface.
Click «Next».
6. In the list that appears, select your Wi-Fi network and click on the line with its name.

RR-10 wireless signal repeater. User manual
14
1.
2.
a.
b.
3.
4.
5.
6.
7.
8.
9.
7. Specify a password for your Wi-Fi network, as well as the name of the repeater network, then click
«Connect». When repeater is connected to the Internet, the indicator will light green.
2.3.3 Method 3. Via web interface in access point mode
Connect RR-10 to 220V power network through the power adapter near the Wi-Fi router (or access point)
you want to connect to. Wait until LED start flashing red.
Connect to the repeater using smartphone or PC through Wi-Fi or Ethernet cable.
Through Wi-Fi: connect PC or smartphone to a Wi-Fi network of the repeater —RR-WiFi-XXXX
(whereXXXXis the last 4 characters of RR-10 MAC address, the MAC address is written on the
label on the device case).
Through Ethernet cable (only for PC): connect LAN port of the repeater to LAN port of your PC
using Ethernet cable.
Open a web browser and type the address of the device to URL bar —http://rr.loc/orhttp://192.168.0.1.
Enter username and password to the authorization window. Default username and password are admin
and password Click «Log in».
Go to the page «Wi-Fi» - «Extended Network». Set the required network name (SSID), security mode,
password, channel and channel width for an extended 5 GHz and 2.4 GHz network. Click «Apply».
In case of connection via Wi-Fi, reconnect to the repeater using the extended Wi-Fi network parameters
configured in point 4. In case of connection via Ethernet cable, you should skip this point.
Update the device web interface page in the browser. The «Wi-Fi» - «Extended Network» page with
updated parameters will be loaded.
Go to the «Network» page. In the network settings, set «Attain IP Address Automatically». Click «Apply».
Connect the LAN port of the repeater via an Ethernet cable to the LAN port of your router. When repeater
is connected to the Internet, the indicator will light green.
By default, the repeater copies the name and Wi-Fi settings of the network to which it will be
connected in both ranges: 5 GHz and 2.4 GHz. If necessary, you can change the name of the network
in the last step of the wizard, as well as change the name and settings is available later through the
web interface on the page «Extended Network» in the «Wi-Fi» tab.
EasyMesh network configuration via web interface is not available in firmware version 1.2.0. It is
necessary to use the method of connection via WPS.

RR-10 wireless signal repeater. User manual
15
2.4 EasyMesh agent mode
When using the RR-10 repeater together with the RG-35 router it is possible to operate in EasyMesh agent
mode.
2.4.1 Connecting to EasyMesh network using WPS button
1.Connect RR-10 to 220V power network using power adapter next to EasyMesh controller (RG-35 router).
Wait until LED start flashing red slowly.
2. Ensure that RG-35 has EasyMesh controller mode enabled. Press the WPS button on RG-35.
3. Press and hold WPS button on RR-10 untill the indicator start flashing green. When repeater is
connected to the Internet, the indicator will light green.
4. The RG-35 web interface will display changes in the EasyMesh network topology:
5. Changing agent name will be available in repeater web interface:
EasyMesh network configuration via Ethernet cable is not available in firmware version 1.2.0.
You have 2 minutes after pressing WPS button on the RG-35 router to press WPS on RR-10 for
successful connection.

RR-10 wireless signal repeater. User manual
16
In EasyMesh agent mode the repeater will copy the name and Wi-Fi network parameters from the
EasyMesh controller separately for the 5 GHz and 2.4 GHz bands. In the EasyMesh network, the
parameters that are changed on controller, are synchronized between the controller and agent.
Please note that in EasyMesh agent mode the web interface will automatically change under
EasyMesh. Changing Wi-Fi parameters on the repeater will not be available. All changes in Wi-Fi
parameters should be made on the EasyMesh controller.

RR-10 wireless signal repeater. User manual
17
•
•
3 Device management via the web interface
3.1 Getting started
1. To start, you need to connect the device through LAN or Wi-Fi interface:
Wireless connection (Wi-Fi):
Connect your PC, phone or tablet to the device Wi-Fi network ( RR-WiFi-XXXX , where XXXX – last 4
characters of RR-10 MAC address);
Wired connection (LAN):
Connect your PC to the device using an Ethernet cable.
2. Open a web browser, enter the address of the device.
If connection is successful, web interface window with request form with user name (login) and password will
be displayed on a browser.
3. Enter login and password .
4.Click the «Log in» button. The «Wizard» page will open in the browser window.
Factory device address: http://rr.loc/ , IP address: 192.168.0.1, subnet mask: 255.255.255.0
If you connected to a Wi-Fi network with an already configured repeater, make sure that you are
connected to the repeater and not to the access point (router), otherwise access to http://rr.loc will
not be available.
Factory default: login – admin, password – password.
If the device was already configured, the «Status» page will open. The «Wizard» page is only available
on a device with factory default settings.

RR-10 wireless signal repeater. User manual
18
1.
2.
3.
4.
5.
6.
3.2 Device control panel
All changes to the device settings are made using the «control panel» tabs located at the top of the web
interface and links to pages located on the left side of the web interface.
Main elements of the web interface
Top horizontal tab menu.
Button for changing a web interface language.
Buttons for restarting the device and exiting the web interface.
The left vertical menu of the selected tab.
The main device settings field corresponding to the selected page from field 4.
Buttons for applying or cancelling configuration changes on the page.

RR-10 wireless signal repeater. User manual
19
1.
2.
3.
4.
3.3 Repeater mode
In the repeater mode, the web interface displays 4 tabs.
3.3.1 The «Status» tab
3.3.1.1 The «Network Map» page
This tab displays information on the device's wireless interfaces and wireless clients that are connected to the
device.
The «Uplink Connection» block contains information about the networks to which the repeater is connected for
their expansion.
The «Extended Network» block contains information about the repeater's access points. Repeater clients are
connect to this network.
The «Clients List» block contains information about wireless clients connected to the repeater.
Information on connection to the access point (router) in the range of 5 GHz or 2.4 GHz.
Basic information on the «Extended network» parameters in the 5 GHz band.
Basic information on the «Extended network» parameters in the 2.4 GHz band.
List of the device's wireless clients.

RR-10 wireless signal repeater. User manual
20
3.3.1.2 The «Device Information» page
This page displays information about the device.
3.3.1.3 The «Monitoring» page
This page displays information on the status of wired and wireless interfaces, received and sent packets and
data bytes.
Other manuals for RR-10
1
Table of contents
Other ELTEX Repeater manuals