elvita CGS3540V User manual

User manual
Electric cooker
CGS3540V

Thank you
for your trust and the purchase of our product. This user manual is
supplied to help you use this product. The instructions should allow you
to learn about your new product as quickly as possible.
Make sure you have received an undamaged product. If you do find
transport damage, please contact the seller from which you purchased
the product, or the regional warehouse from which it was supplied.
Language: en-GB, Publication date: 2020-09-07
This document and its content, including written material and images, are the property of Elon Group AB. You may not
copy, reproduce, modify, republish or distribute this document or any of its content without express written permission
from Elon Group AB. © 2020, Elon Group AB. All rights reserved.

Contents 3
© 2020, Elon Group AB. All rights reserved.
CONTENTS
SAFETY 5
Admonitions .............................................................................................................................. 5
Safety for children and people with disabilities........................................................................ 5
General safety........................................................................................................................... 5
Safety labels.............................................................................................................................. 6
Disposal..................................................................................................................................... 6
GETTING STARTED 7
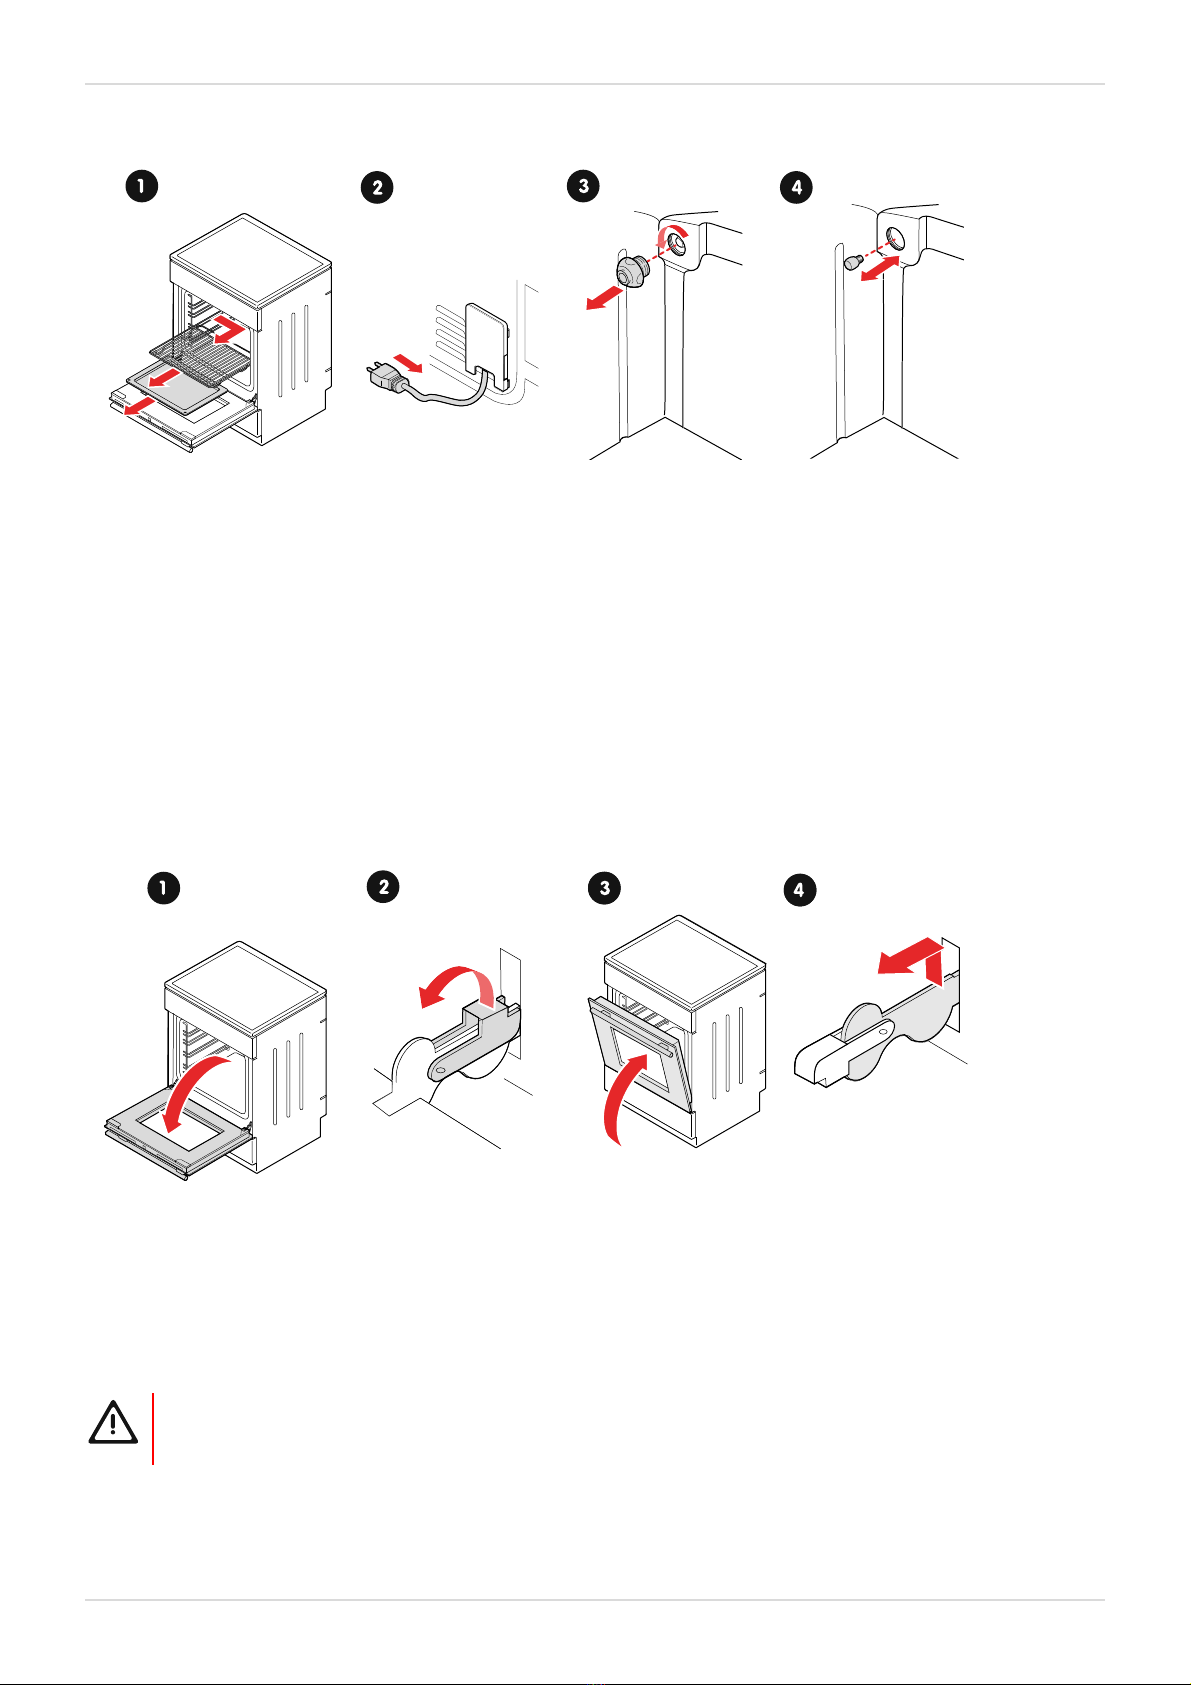
Installation................................................................................................................................. 7
Before you use the cooker ........................................................................................................ 7
Hob overview ............................................................................................................................ 7
Cooker controls ......................................................................................................................... 7
Open the door lock ................................................................................................................... 8
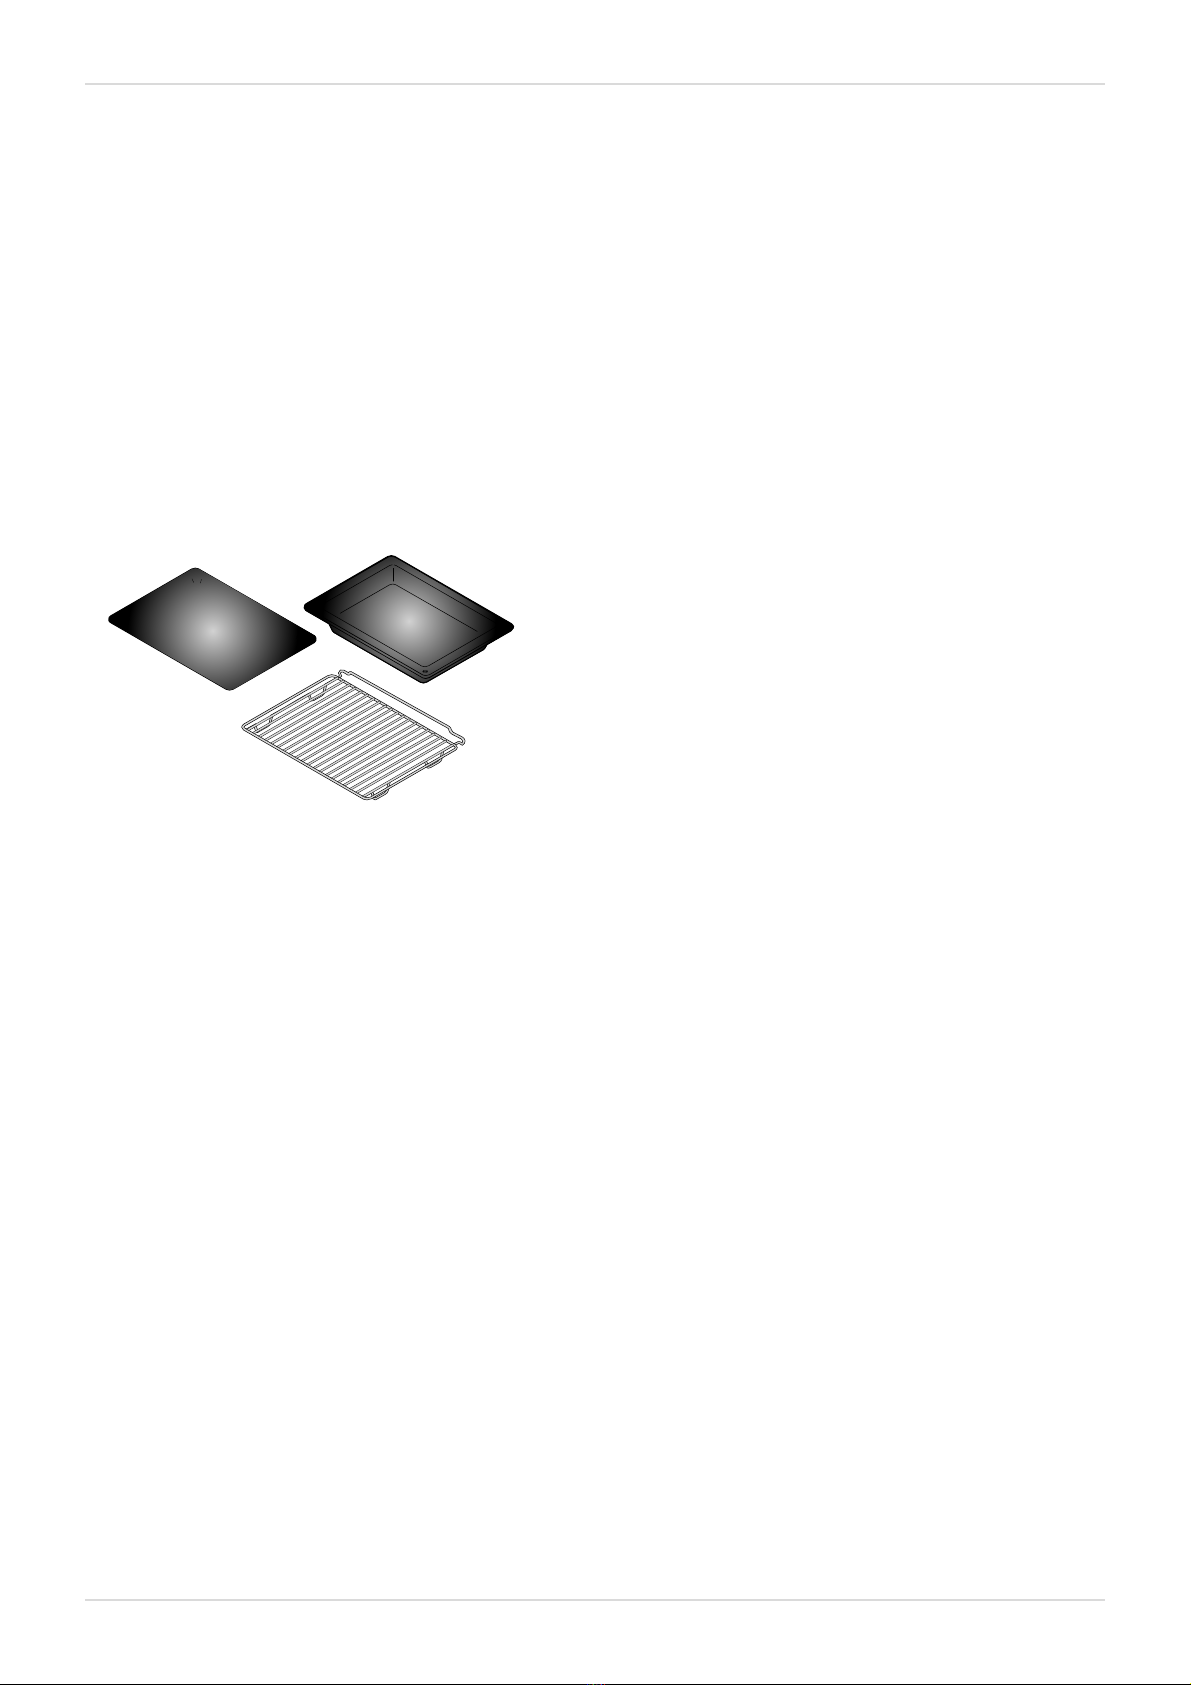
Accessories................................................................................................................................ 8
COOKING WITH THE HOB 9
Hob surface............................................................................................................................... 9
Suitable cookware .................................................................................................................... 9
Turn on and off the cooking zones ........................................................................................... 9
Save energy .............................................................................................................................. 9
COOKING WITH THE OVEN 11
Cooking modes ......................................................................................................................... 11
Top heater............................................................................................................................................ 11
Bottom heater...................................................................................................................................... 11
Top and bottom heater ....................................................................................................................... 11
Grill ....................................................................................................................................................... 11
Large grill ............................................................................................................................................. 11
WaterClean.......................................................................................................................................... 11
Turn on and off the oven........................................................................................................... 11
Change oven temperature........................................................................................................ 12
Change oven cooking mode..................................................................................................... 12
Oven cooking mode guide........................................................................................................ 12
Wire guides ............................................................................................................................... 13
Grilling recommendations......................................................................................................... 13
Roasting recommendations ...................................................................................................... 13
Baking recommendations......................................................................................................... 13
CLEANING 15
Clean the hob surface............................................................................................................... 15
Clean glass surfaces ................................................................................................................. 15
Clean stainless steel surfaces ................................................................................................... 15
Clean enamel surfaces ............................................................................................................. 15
Clean plastic parts and lacquer-coated surfaces ..................................................................... 16

4 Contents
© 2020, Elon Group AB. All rights reserved.
Clean the oven .......................................................................................................................... 16
Use the WaterClean programme.............................................................................................. 16
TROUBLESHOOTING 17
General troubleshooting ........................................................................................................... 17
Oven troubleshooting................................................................................................................ 17
Replacing parts ......................................................................................................................... 17
Replace the oven light bulb ................................................................................................................ 17
Replace the oven door........................................................................................................................ 18
Remove and install the oven door glass pane .................................................................................. 19
Remove and install the wire guides ................................................................................................... 19
Power cord wire connections ............................................................................................................. 20
INSTALLATION 21
Cooker placement..................................................................................................................... 21
Secure the cooker to a wall ...................................................................................................... 21
Adjust the height of the cooker................................................................................................. 22
Level the cooker ........................................................................................................................ 22
Connect the mains power......................................................................................................... 23
APPENDIX 24
Specifications ............................................................................................................................ 24
EU directives and standards...................................................................................................... 24

Safety 5
© 2020, Elon Group AB. All rights reserved.
SAFETY
Carefully read the instructions before you install and use the product. Save the instructions and keep them near the
appliance for future reference.
Admonitions
WARNING!
Used when there is a risk for personal injury.
CAUTION!
Used when there is a risk for damage to the appliance.
NOTE!
General information that you should be aware of.
Helpful tips that you may find useful.
Safety for children and people with disabilities
WARNING!
• Keep children younger than 8 years old away from the product unless continuously supervised.
• Only let the following groups use the product if they are supervised or if instructions are provided to them
about how to use the appliance in a safe way. They must understand the hazards involved.
– Children. (Children younger than 8 years old must be continuously supervised.)
– Persons with reduced physical, sensory or mental capabilities.
– Persons with lack of experience and knowledge.
WARNING!
• Do not let children play with the product.
• Do not let children clean the product without supervision.
WARNING!
Only use hob guards designed or recommended by the manufacturer. The use of inappropriate hob guards
may cause accidents.
General safety
WARNING!
Do not use the product for other purposes than cooking, for example room heating.
WARNING!
Always supervise the cooking process continuously.

6 Safety
© 2020, Elon Group AB. All rights reserved.
WARNING!
Risk of fire!
• Do not store items on the cooking surface.
• Do not store combustible, explosive, volatile or temperature-sensitive items (such as paper, dish cloths,
plastic bags, cleaners or detergents and spray cans) in the oven's storage drawer, as they can ignite
during over operation and cause a fire.
• Unattended cooking on a hob with fat or oil may result in a fire.
Never try to put out a fire with water. Instead turn off the product and cover the flame with, for example, a
lid or a fire proof blanket.
• Make sure the air vents are never covered or obstructed in any way.
WARNING!
Risk of burns!
• Cookware and accessible parts of the product may become very hot during use. Be careful not to touch
hot parts.
• The oven door may become very hot during operation.
• Do not place metal objects like knives, forks, spoons, or lids on the cooking zones, as these objects can
become very hot.
WARNING!
Risk of electric shock!
• If the cooking surface is cracked, turn off the product immediately and disconnect it from the mains. Do not
use or touch the product.
• Keep power cords of other appliances at a safe distance so that they are not caught in the oven door, as
the cords may become damaged and cause short-circuit.
CAUTION!
Do not line the oven walls with aluminium foil. Aluminium foil prevents air circulation in the oven, hinders the
cooking process, and ruins the enamel coating.
Safety labels
These safety labels can be found on the product.
Caution! Risk of tilting.
Warning! Stabilising means must be installed to prevent tipping.
Disposal
Dispose of packaging in an environmentally-friendly manner.
This appliance is marked in compliance with European Directive 2012/19/EU, Waste Electrical and Electronic
Equipment (WEEE). The symbol on the product or on its packaging indicates that this product should not be
treated as household waste. Instead it shall be handed over to the applicable collection point for the
recycling of electrical and electronic equipment.
By ensuring this product is disposed of correctly, you will help prevent potential negative consequences for
the environment and human health, which could otherwise be caused by inappropriate waste handling of
this product. For more detailed information about recycling of this product, please contact the relevant
municipal body in charge of waste management, your household waste disposal service or the store where
you purchased the product.

Getting Started 7
© 2020, Elon Group AB. All rights reserved.
GETTING STARTED
Installation
See section "Installation", page 21.
Before you use the cooker
1. Remove all transport packaging and equipment from the cooker.
2. Clean all accessories and utensils with warm water and regular detergent. Do not use any abrasive cleaners.
3. Turn on all cooking zones on to the maximum power for 3 to 5 minutes without any cookware on them.
As the cooking zones heat up, some smoke may appear on the cooking hob surface. By heating up the hob once
before using it for the first time, the your hob becomes more resistant from dirt sticking onto it.
4. Heat up the oven without food to 275°C for 60minutes. Ventilate the room as the cooker will omit the characteristic
smell of a new appliance.
WARNING! Make sure all packaging remnants have been removed from the cooking compartment.
Hob overview
A. Front left cooking zone
B. Rear left cooking zone (rapid)
C. Rear right cooking zone (rapid)
D. Front right cooking zone (rapid)
Rapid cooking zones use more power and can heat up quicker than other cooking zones.
Cooker controls
Turn the selectors to control the cooker.
A. Front left cooking zone power selector
B. Rear left cooking zone power selector
C. Oven cooking mode selector
D. Operation indicator light (yellow)
E. Temperature indicator light (red)
F. Oven temperature selector
G. Rear right cooking zone power selector
H. Front right cooking zone power selector

8 Getting Started
© 2020, Elon Group AB. All rights reserved.
Lights
The operation indicator light is on when the oven or one of the hobs are on. The temperature indicator light turns on when
the oven heats up and turns off when the oven has reached the selected temperature.
Open the door lock
The oven door locks automatically when you close it.
1. Push the door lock gently to the right with your thumb.
2. Pull the oven door while still pushing the door lock.
Accessories
The cooker is supplied with some useful accessories to improve your cooking experience.
Shallow trays For baking pastries or as a drip tray.
Extra deep tray For roasting large amounts of vegetables and meat or preserving food.
Grid For grilling meat or fish.

Cooking with the hob 9
© 2020, Elon Group AB. All rights reserved.
COOKING WITH THE HOB
Hob surface
Here is some advice on how to use and maintain the hob surface.
WARNING!
Risk of fire! Overheated fat and oil may ignite. Never leave cooking with fat or oil unattended.
• Make sure the cooking zone and the bottom of the cookware are clean and dry before use to ensure better heat
conduction and prevent damage.
• Do not place wet cookware or lids covered in steam on the cooking zones. Moisture may damage the cooking zones.
• Do not cool down the hot cookware by placing it on the cooking zones that were not in use. The condensed water that
appears under the cookware bottom may aid corrosion.
NOTE!
Prolonged use of the cooking zones may case may discolour the edge of the cooking zone. Such
discolouration does not affect function and is not covered by warranty.
Suitable cookware
For the best results and to prevent damage, make sure you use suitable cookware.
• Use quality cookware with a flat and stable bottom.
• Make sure the cookware bottom fits the diameter of the cooking zone.
When purchasing cookware, note that the indicated diameter usually refers to the upper edge or the
lid, which is normally larger than the diameter of the bottom.
• Cookware made of tempered glass, with a special ground bottom can be used if its diameter fits the cooking zone.
Cookware with larger diameter may crack due to thermal tension.
Turn on and off the cooking zones
1. Rotate the knob to turn on the cooking zone.
You can set the heating power in steps from 1 to 6.
2. Turn off the cooking zone by rotating the knob to 0.
Turn off the cooking zone 3 to 5 minutes before the food is ready to make use of the residual heat
and save energy.
NOTE!
Cooking zones indicated with a red dot in the middle are rapid cooking zones. Rapid cooking zones use more
power and can heat up quicker than other cooking zones.
Save energy
Here are some tips on how you can save energy.
• Make sure the cookware bottom fits the diameter of the cooking zone. If the cookware is too small, a part of the heat is
lost and the cooking zone may be damaged.
• Use cookware that fits the amount of food you are cooking. Using larger cookware than required consumes more
energy.
• When possible, cover the cookware with a lid.
• If a dish takes long time to cook, use a pressure cooker.

10 Cooking with the hob
© 2020, Elon Group AB. All rights reserved.
• Vegetables, potatoes, and so on, may be cooked in a smaller amount of water. The food will cook just as well, as long
as the cookware is tightly closed with a lid. After bringing the water to a boil, reduce the heat to a level that just suffices
to maintain a slow simmer.

Cooking with the oven 11
© 2020, Elon Group AB. All rights reserved.
COOKING WITH THE OVEN
• Use dark, black silicon coated or enamel coated baking trays. They transmit heat better.
• Cooking many types of pastries one after another saves energy since the oven is already hot. Heating an oven that has
cooled down uses more energy.
• Steam can sometimes form on the inside of the oven during cooking. The steam may condense on the door and the lid
of the cooker. This is normal behaviour and does not affect the operation of the cooker. Wipe of any condensed water
with a cloth.
• If you leave the dish in the oven after it has finished cooking steam may evaporate from it and condense on the front
panel and the oven door.
You can turn off the oven about 10 minutes before the end of the cooking process. This will save energy
as the already built up heat is used.
Cooking modes
Top heater
Use this oven mode to brown the upper side of food (final browning). The top heater will radiate heat on the
upper side of the food. Recommended temperature: 180°C.
Bottom heater
Use this oven mode to brown the lower side of food. The bottom heater will radiate heat on the lower side of
the food. Recommended temperature: 180°C.
Top and bottom heater
Use this oven mode to cook meat or pastry that can only be baked or roasted at a single height level. The
top and bottom heaters will radiate heat evenly in the oven. Recommended temperature: 200°C.
Grill
Use this oven mode to grill small amounts of open sandwiches, beer sausages or to toast bread. Only the
grill heater is on when using this mode. Recommended temperature: 230°C.
Large grill
Use this oven mode to grill small amounts of open sandwiches, beer sausages, meat or to toast bread. The
grill heat and the upper heater are both on when using this mode. Recommended temperature: 230°C.
WaterClean
Use this oven mode to remove stains and food residues from the oven. Only the bottom heater will radiate
heat. The programme takes 30 minutes. Recommended temperature: 70°C.
Turn on and off the oven
1. Turn the oven mode selector to any of the cooking modes to turn it on.
2. Turn the oven mode selector to 0to turn it off.

12 Cooking with the oven
© 2020, Elon Group AB. All rights reserved.
Change oven temperature
Select a suitable temperature for what you are cooking.
1. Turn the temperature selector clockwise to increase the temperature or anticlockwise to lower the temperature.
CAUTION! Do not turn the selector below the zero position. This can damage the thermostat.
The temperature range is 50-275°C.
Change oven cooking mode
Select the suitable cooking mode for what you are cooking.
1. Turn the cooking mode selector clockwise or anticlockwise to switch between the available modes.
The cooking mode can also be changed during cooking.
Oven cooking mode guide
Find the most suitable oven cooking mode for your needs by using the following table.
Cooking method Food type Oven cooking mode
Roast Meat
Grill
Open sandwiches, beer sausages
Open sandwiches, beer sausages, meat
Brown
Upper side of food
Bottom side of food
Bake Pastries on a single level
Toast Bread

Cooking with the oven 13
© 2020, Elon Group AB. All rights reserved.
Wire guides
Wire guides allow you to choose between 4 different levels when you insert a grid or a tray into the oven. The
levels/guides are counted from the bottom and up.
The oven is safe to use both with and without the guides.
CAUTION!
Do not place baking trays or other cookware on the bottom of the oven.
Grilling recommendations
Use these recommendations when grilling.
WARNING!
Only use the grill with the oven door closed.
WARNING!
Use oven mitts or meat tongs. The grill heater, grid, and other oven accessories get very hot during grilling.
• Preheat the grill for about 5 minutes before you use it.
• Observe the food regularly. The food may burn quickly because of the high temperature.
• Smear the grid with oil to prevent the meat from sticking when grilling directly on it. Use the 4th guide.
• Insert the drip tray in to the 1st or 2nd guide.
• Make sure there is enough liquid in the tray when using a baking tray. Otherwise the food may burn.
• Turn the meat.
• Clean the oven, the accessories, and the utensils when you have finished grilling.
Roasting recommendations
Use these recommendations when roasting.
• Use enamel coated, tempered glass, clay, or a cast iron pan or tray.
NOTE!
Do not use stainless steel trays. They strongly reflect heat.
• Use enough liquid when cooking to prevent the meat from burning.
• Cover the meat to keep it juicy.
Baking recommendations
Use these recommendations when baking.
• Preheating is recommended.
• You can bake biscuits and cookies in shallow baking sheets on several levels (second and third) at the same time.

14 Cooking with the oven
© 2020, Elon Group AB. All rights reserved.
NOTE!
The biscuits or cookies on the upper baking sheet may be ready sooner than the ones on the lower one.
• Always place the baking trays on the grid. Remove the grid if you are using the supplied baking sheet.
CAUTION!
Do not insert the deep baking tray into the first guide.
• Make biscuits of similar thickness to make sure that they brown evenly.
• Baking accessories may change form as they get hot. This does not affect their functions and they will return to their
original form when they cool down.

Cleaning 15
© 2020, Elon Group AB. All rights reserved.
CLEANING
Make sure to clean your product regularly to make it last longer and keep a good appearance.
WARNING!
Do not let children clean the product without supervision.
WARNING!
Risk of electric shock!
• Before cleaning, disconnect the product from the mains.
• Do not use steam cleaners or high pressure cleaners to clean the product, as this may result in electric
shock.
CAUTION!
Always wait for the product to cool down before cleaning.
Clean the hob surface
• Clean the area around the cooking zones with hot water and some washing-up liquid. For stubborn dirt, use a steel
wool pad soaked with detergent. Then rinse and wipe dry.
• Clean and maintain the cooking zones with regular cleaners and commercially available conditioners. If the cooking
zone is slightly warm, the cleaner penetrates the pores more efficiently.
NOTE!
Always clean the cooking zones after use. Liquids containing salt, boiled-over liquids and moisture can
cause damage.
• The cooking zone rims are made of stainless steel that may take on a yellowish hue after some time of use. Clean the
rims with with regular metal cleaners. Do not use aggressive dishwashing accessories as they may cause scratches.
Clean glass surfaces
Clean glass surfaces with equipment and agents intended for cleaning glass, mirrors, and windows.
CAUTION!
Do not use rough abrasive cleaners or sharp metal scrapers as they could crack the surface and cause the
glass to break.
Clean stainless steel surfaces
Clean stainless steel surfaces with a mild detergent and a soft sponge that will not scratch the surface.
CAUTION!
Do not use abrasive cleaners or cleaners containing solvents as they may damage the surface.
Clean enamel surfaces
Clean enamel surfaces with a damp sponge. Remove fatty stains with warm water and special detergent for enamel.
CAUTION!
Do not clean enamel surfaces with abrasive cleaners or tools as they may cause permanent damage.

16 Cleaning
© 2020, Elon Group AB. All rights reserved.
Clean plastic parts and lacquer-coated surfaces
Immediately remove any stains on plastic parts and lacquer-coated surfaces with a soft non-abrasive cloth and some
water. You may also use cleaners and cleaning tools intended for plastic and lacquer-coated surfaces. Follow the
manufacturer's instructions.
CAUTION!
Do not use abrasive cleaners, abrasive tools, or alcohol-based cleaners.
Clean the oven
Clean the oven cavity regularly.
CAUTION!
Do not lean against the open door when cleaning the oven cavity. Never stand on the open oven door and do
not let children sit on it. The oven door hinges may be damaged under excessive load.
CAUTION!
Do not use abrasive agents. They will scratch enamel coated surfaces.
• Clean the oven walls with a damp sponge and detergent. Use a special enamel detergent for burned stains.
• Wipe the oven dry carefully after cleaning it.
• Clean the wire guides and telescopic guides using a conventional detergent.
CAUTION!
Do not clean the telescopic guides in a dishwasher.
• Clean the oven utensils with a sponge and detergent. You can use special detergents for rough stains or burns.
Use the WaterClean programme
Use the WaterClean programme to easily remove stains and food residues from your oven.
CAUTION!
Make sure the oven has cooled down before you start the WaterClean programme.
1. Turn the cooking mode selector to .
2. Turn the temperature selector to 70°C.
3. Pour 0.6 l water into a baking tray and place it in the lower guide.
4. Let the programme run for 30 minutes. The food residues will soften.
5. Clean the oven enamel walls with a damp cloth.

Troubleshooting 17
© 2020, Elon Group AB. All rights reserved.
TROUBLESHOOTING
You can solve many minor problems with help from the troubleshooting information. If the problem persists, do not try to
repair the product in other ways than mentioned in this manual.
WARNING!
Risk of electric shock!
• Do not attempt to perform any repairs yourself. Tampering with the product and non-professional repair
may cause injury or damage to the product. It also makes the warranty invalid. Instead, contact a service
technician.
• Do not replace the power cord yourself. If the power cord is damaged, it must be replaced by the
manufacturer or authorised technicians to avoid hazard.
General troubleshooting
Use this table to solve general problems with your cooker.
Problem Solution
The main fuse in your home trips often. Make sure the power of all switched-on appliances does
not exceed the capacity of the power mains in your home.
Contact a service technician.
Oven troubleshooting
Use this table to solve problems with your oven.
Problem Solution
The oven lighting does not work. section "Replace the oven light bulb", page 17
The food is undercooked. Make sure you have selected the right temperature and
cooking mode.
Make sure the oven door is closed.
Replacing parts
Replace the oven light bulb
When the light bulb breaks, replace it with a halogen light bulb G9, 25W.
WARNING!
Risk of electric shock! Before replacing the light bulb always disconnect the product from the mains.
NOTE!
The light bulb is not covered by warranty because it is a consumable item.

18 Troubleshooting
© 2020, Elon Group AB. All rights reserved.
1. Remove the grid, guides and trays.
2. Disconnect the cooker from the mains power.
3. Remove the bulb cover.
4. Replace the bulb.
WARNING! Use protection when you remove the old light bulb to avoid burning yourself.
CAUTION! Do not damage the enamel surface.
5. Install the cover.
6. Connect to cooker to the mains power.
Replace the oven door
Remove and replace the oven door if it is broken or if you need to remove the oven door glass pane. See section "Remove
and install the oven door glass pane", page 19.
1. Open the oven door fully.
2. Fold the latches of the door hinges.
3. Fold the door to a 15° angle so that the latches fit together with the door hinges.
4. Remove the door: pull out the hinges from the openings.
Install in the reverse order.
WARNING!
Make sure the hinge latches are correctly placed in the side laths of the door before you install it. This prevents
the hinges from suddenly closing, which can injure you or the damage the door.

Troubleshooting 19
© 2020, Elon Group AB. All rights reserved.
Remove and install the oven door glass pane
Remove the oven door glass pane if it is broken or if you want to clean it.
1. Remove the oven door from the appliance (section ).
2. Lift the supports a little and pull them out.
3. Lift up the lower end of the glass pane and remove it.
Install in the reverse order.
NOTE!
The markings (semicircle) on the door and the glass pane should overlap.
Remove and install the wire guides
Use this procedure to remove and install the wire guides.
1. Pull the bottom side of the guides out from the oven wall.
2. Pull out the guides from the holes at the upper side.
Install the guides in the reverse order.

20 Troubleshooting
© 2020, Elon Group AB. All rights reserved.
Power cord wire connections
If the power cord is damaged it must be replaced immediately.
WARNING!
• Do not replace the power cord yourself. If the power cord is damaged, it must be replaced by the
manufacturer or authorised technicians to avoid hazard.
• The electrical installation must follow local regulations.
• Use a 4×1.5 mm2cord marked H05VV-F 4G1.5 or better.
NOTE!
Repair or any warranty claim resulting from incorrect connection or use of the product shall not be covered by
the warranty.
The following illustration shows the power cord wire connections, see A for how to install the bridges and B for how to
connect the cable wires.
Other manuals for CGS3540V
1
Table of contents
Other elvita Cooker manuals

elvita
elvita CIS5623V User manual

elvita
elvita CCS4640V User manual

elvita
elvita CKP1121V User manual

elvita
elvita CGS3640V User manual

elvita
elvita CCS46231V User manual

elvita
elvita CCS46403V User manual

elvita
elvita CCS4623V User manual

elvita
elvita CCS46234V User manual

elvita
elvita CGS3740VN-E1 User manual

elvita
elvita CCS4640X User manual

elvita
elvita CGS3540V User manual

elvita
elvita CCS47232V User manual

elvita
elvita CGS3640V User manual

elvita
elvita CCS4640XN User manual

elvita
elvita CGS36235V User manual

elvita
elvita CCS47232V User manual

elvita
elvita CCS46231V User manual

elvita
elvita CCS4541VN User manual

elvita
elvita CCS4541V User manual

elvita
elvita CGS3640VN-E1 User manual