EME Self-Monitoring Blood Glucose System User manual

EME
Self-Monitoring Blood Glucose System
User’s Manual
Please read this User’s Manual thoroughly before
using your blood glucose meter

Dear EME SMBG System Owner,
Thank you for using the EME Self-Monitoring Blood Glucose (SMBG) System. We designed this system to be
dependable, easy-to-use, compact, lightweight and portable to help you monitor your blood glucose on a
regular basis.
Please read this manual thoroughly before you begin testing. This manual provides you and your diabetes
care team with important information and step-by-step direction to use the EME Self-Monitoring Blood
Glucose System. To start testing quickly, you can also refer to the Quick Reference Guide.
Thanks again for choosing the EME SMBG.
Intended Use
The EME Self Monitoring Blood Glucose Test System is intended for the quantitative measurement of
glucose in venous whole blood or fresh capillary whole blood from fingertips, palm and forearm. Testing is
done outside the body (In Vitro diagnostic use). It is indicated for self-testing (over the counter [OTC]) by
persons with diabetes, or in clinical settings by healthcare professionals, as an aid to monitor the effectiveness
of diabetes control.
1. Normal control solution is included with the system.
2. Low control solution and High control solution are available. For purchase, please
contact your healthcare provider.
Standard Accessories
Your new EME Blood Glucose meter and accessories work together to measure the amount of glucose in
your blood. The system includes:
Optional Accessories
• EME Blood Glucose Meter
• Alkaline Battery (2 ct.)
• Glucose Test Strips (10 pcs)
• Lancets (10 pcs)
• Lancing device
• AST Lancing Device Cap
• User’s Manual
• Quick Reference Guide
• Test Strip Instructions
• Self-Test Log Book
• Normal Control Solution
• Glucose Control Solution Instructions
• Carrying Case
• Low Control Solution
• High Control Solution
Why is it so important to test blood glucose regularly?
Testing your blood glucose regularly can make a big difference in how you manage your diabetes every day.
We have made this SMBG system as simple as possible to help you use it regularly. Your meter is easy to
use, and you can adjust the lancing device for your comfort.
Do you need help?
If you have questions or need assistance, please contact your healthcare provider.
Although the EME SMBG System is easy to use, you may need to consult with your
healthcare professional (this may be your doctor, pharmacist or diabetes nurse educator)
for instructions on how to use the system. Only the correct use of the system will ensure
accurate results.

Important Information about Your New Meter
EME blood glucose meter is designed and approved for testing fresh capillary whole blood samples from
your fingertips, palm and forearm. The meter is for in vitro diagnostic use ONLY (for testing outside the
body). It should not be used to diagnose diabetes.
EME blood glucose meter can only be used with EME Blood Glucose Test Strips. Other test strips will
give inaccurate results.
Testing is not valid for neonatal blood specimens.
Do not disassemble the meter as this may cause damage to the components resulting in incorrect
readings. Disassembling the meter will also void the warranty.
Always keep the meter clean and store it in a safe place. Protect the meter from direct sunlight to ensure
a longer lifespan.
You should not store the meter and test strips in a car, bathroom, or refrigerator.
Keep the meter, test strips and lancing device away from children and pets.
You should not test critically ill patients with home-use blood glucose meters.
Incorrect results may occur when performing the test. If you believe you are not feeling well, please
contact your healthcare professional.
Remove batteries if the meter will not be used for one month or more.
Please dispose device according to the local rule of the disposition of electronic device / accessory
waste.
Warning for potential biohazard: Healthcare professionals using this system on multiple patients should
be aware that all products or objects that come in contact with human blood, even after cleaning, should
be handled as if capable of transmitting a viral disease.
Consult with your healthcare professional before testing on your palm or forearm.
Do not touch the strips with wet hands.
Do not use expired strips (the expiration date is shown on the bottle.)
Do not bend, cut or twist the strips.
Altitude up to 3,048 meters above sea level has no effect on readings.

Health-Related Information
If you are experiencing dehydration, frequent urination, low blood pressure, shock or hyperosmolar
hyperglycemic nonketotic coma (HHNKC), you may get a test result that is lower than what your blood
glucose really is. If you think you are dehydrated, call your doctor right away.
If you have followed the steps in the user’s manual, but still have symptoms that do not seem to match
your test results, or if you have questions, please contact your healthcare provider.
Please read your test strip instructions carefully for additional health-related information.
Warning for potential biohazard
Healthcare professionals using this system on multiple patients should handle all products or
objects in contact with human blood carefully to avoid transmitting viral disease, even after
cleaning.
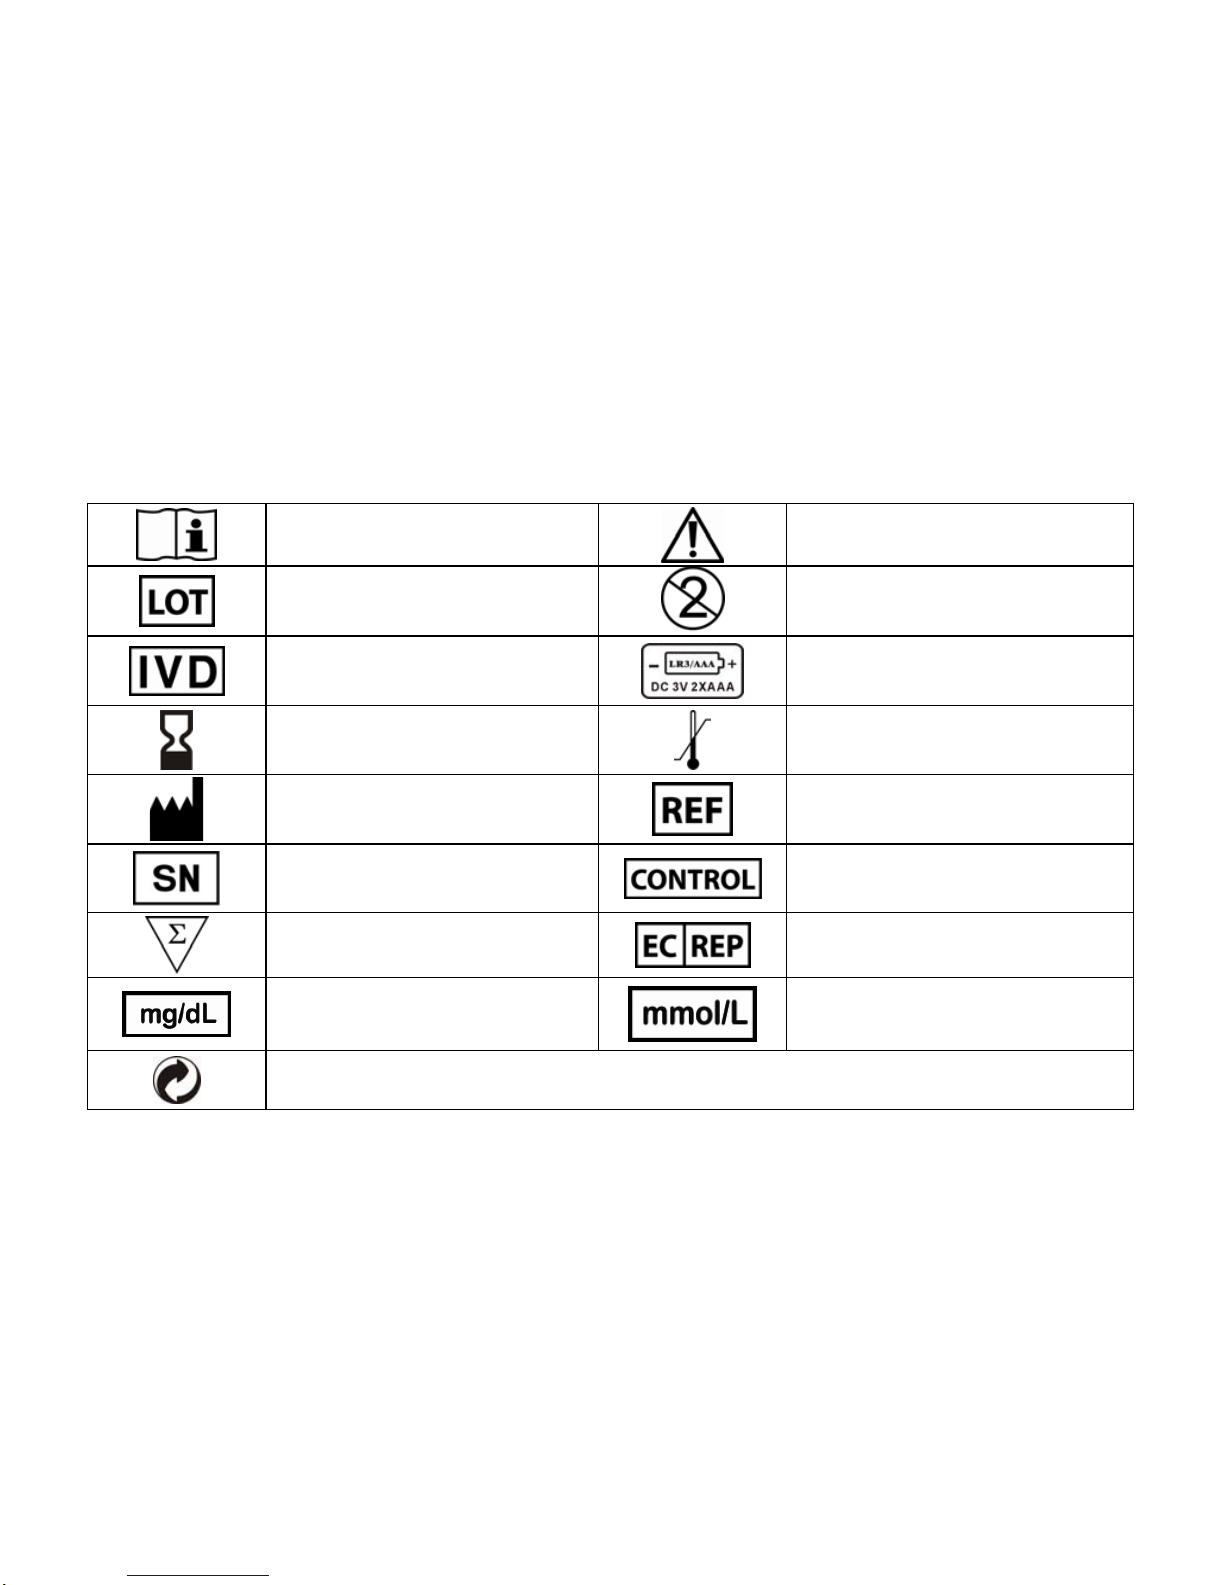
Explanation of Symbols
Consult instructions for use Caution
Batch code Do not reuse
In vitro diagnostic medical
device 1.5V(AAA) x 2 batteries only
Use by Temperature limitation
Manufacturer Catalogue number
Serial number Control
Sufficient for Authorized representative in the
European Community
Blood glucose test result in
mg/dL Blood glucose test result in
mmol/L
Green Dot / Duales System Deutschland GmbH (DSD)

Separate collection for WEEE- Waste of electrical and electronic equipment
This product meets the requirements of Directive 98/79/EC in vitro diagnostic medical
devices
Explanation of Symbols (continued)
Discard 6 months (180
days) after opening
Large LCD screen
Hypo alarm Keep away form sunlight
5-seconds result
0.6 μ L blood volume
Alternative site testing
Human-factor flow
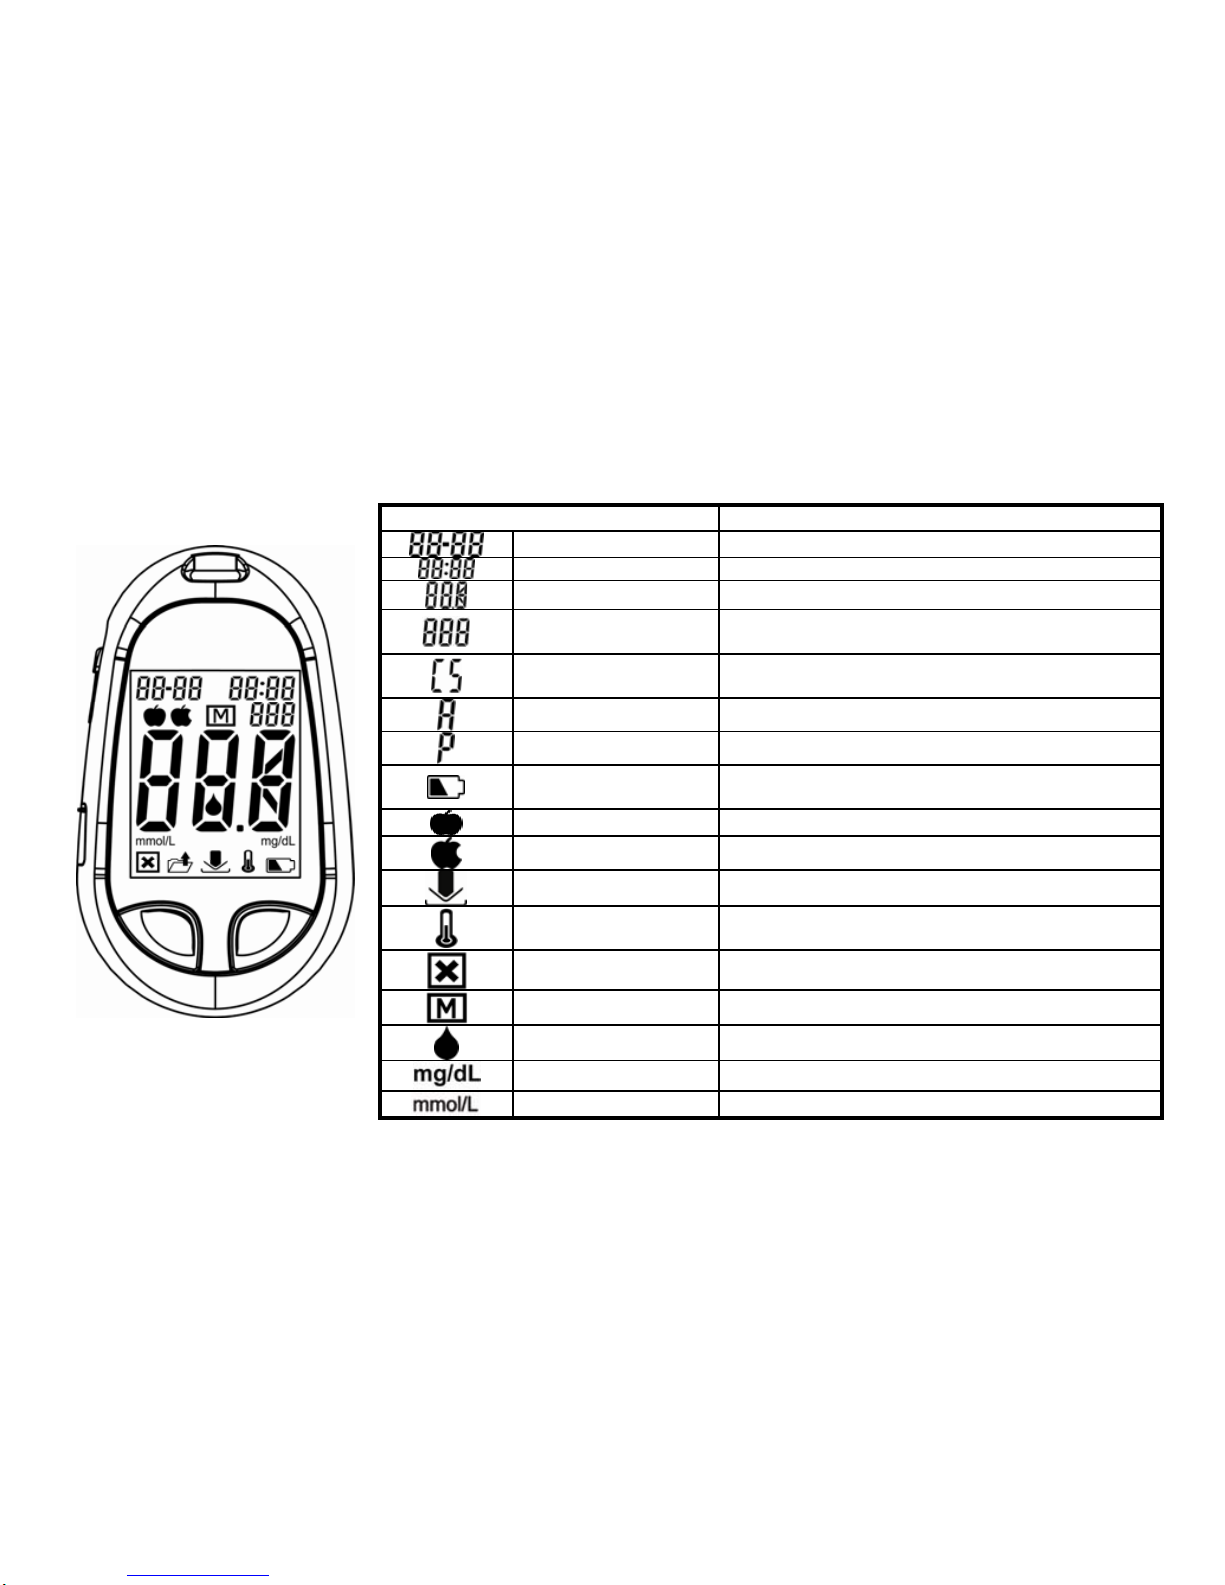
Explanation of Meter Symbols
Folder Symbol Meaning
Date Show the moment of month and day.
Time Show the moment of time.
Te s t r e s u l t Show the test result.
Record/Average display Tracking all the test results or average of /14/30/90
days.
Control Solution Control Solution test and the result is not included
in the memory.
AM Indicate before noon
PM Indicate after noon
Batteries status When the battery symbol appears, prepare new
batteries for installation.
AC = ante cibos Indicate before meal
PC = post cibos Indicate after meal
Insert strip Insert the test strip to test blood glucose.
Thermometer When the thermometer icon appears, the
temperature is too high or too low.
Error The meter system is in fault.
Memory Show the memorized results
Apply blood Apply blood to the test strip
Glucose unit The testing unit of blood glucose is mg/dL.
Glucose unit The testing unit of blood glucose is mmol/L.

Table of Contents
Chapter 1: Understanding Your Meter ….......................................................................................................13
The EME Blood Glucose Meter …..............................................................................................................13
The EME Accessories.................................................................................................................................14
Inserting Batteries.......................................................................................................................................15
Setting The Time and Date.........................................................................................................................16
Using EME Blood Glucose Test Strips ......................................................................................................17
Chapter 2: Control Solution Testing..............................................................................................................18
Why Run a Control Solution Test ...............................................................................................................18
About The Control Solutions ......................................................................................................................19
Running a Control Solution Test ................................................................................................................20
Understanding Control Solution Test Results ............................................................................................22
Chapter 3: Testing Your Blood Glucose .......................................................................................................24
Using the Lancing Device .........................................................................................................................24
Inserting a Lancet into the Lancing Device ................................................................................................25
Running a Blood Glucose Test with Blood from Your Fingertips................................................................27
Alternative Site Testing (AST)……...…………………………………………………………………………….30
Running a Blood Glucose Test with Blood from Your Forearm ……..........................................................32
Running a Blood Glucose Test with Blood from Your Palm ……...............................................................33
Discarding Used Lancets …......................................................................................................................34
Understanding Your Test Results……………………………......................................................................35

Unusual Test Results…..............................................................................................................................35
Symptoms of High or Low Blood Glucose.................................................................................................36
Comparing Your Meter Result to a Lab Results ….....................................................................................37
Chapter 4: Meter Memory, Setup …...............................................................................................................38
Memory, Storing Test Results …................................................................................................................38
Viewing Test Results …..............................................................................................................................39
Chapter 5: Maintenance and Troubleshooting ….........................................................................................40
Inserting Batteries …..................................................................................................................................40
Cleaning Your Meter...…………………………………………..…….............................................................41
Cleaning Your Lancing Device...………………………………………...........................................................41
Maintenance and Testing ...........................................................................................................................42
Screen Messages and Troubleshooting ….................................................................................................43
Chapter 6: Technical Information …..............................................................................................................46
Specifications ….........................................................................................................................................46
Limitations…...............................................................................................................................................47
Device Information ….................................................................................................................................49
Warranty ...................................................................................................................................................50
13
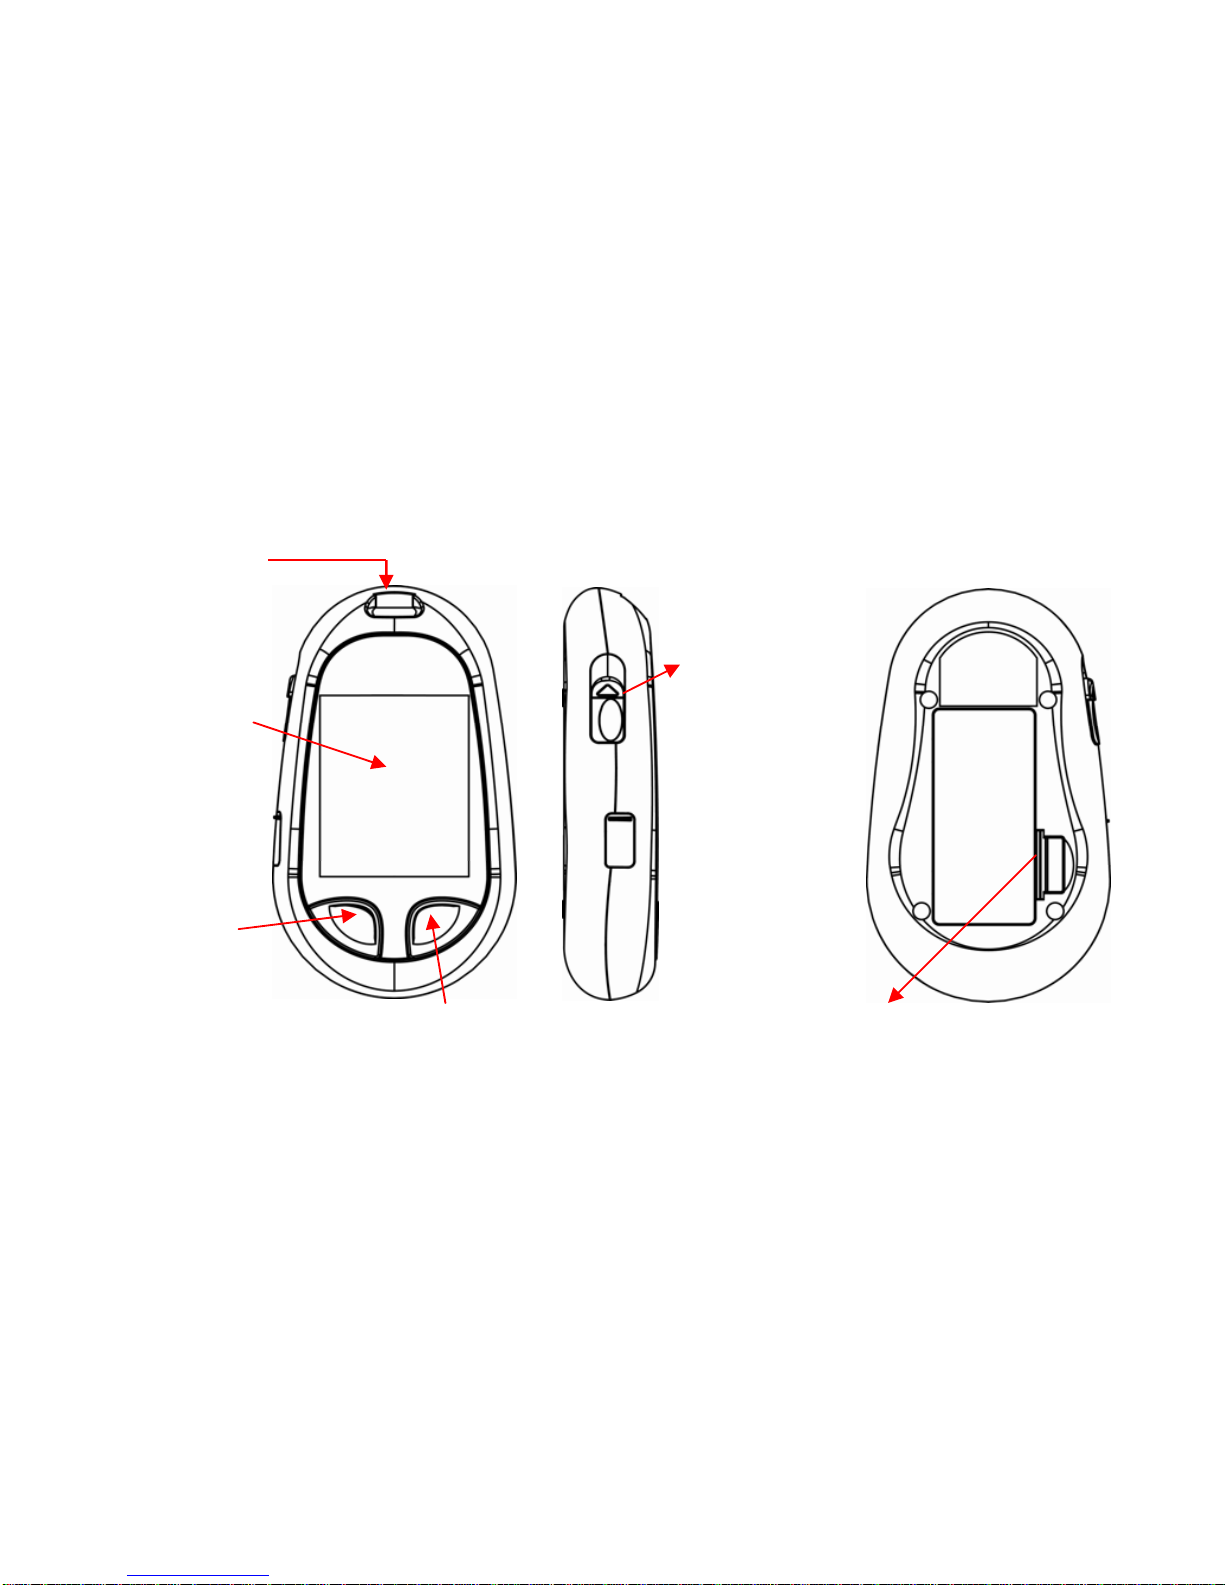
Chapter 1: Understanding Your Meter
The EME Blood Glucose Meter
Test Strip Slot-
Insert test strip
here.
Strip Ejector-
Push the Strip
Ejector to
remove the strip.
Display-
Shows results,
messages, and
results stored in
memory.
Left ()
Buttons-
Press to enter
memory, adjust
setting, and
scroll through
results. Battery Door-
Flip open the battery door by
pushing the tab in the direction of
the arrow and pulling the door up.
Right ()Buttons-Press to
turn the meter on, confirm
setting, and scroll through
results.

14
The EME Accessories
Blood Glucose Test Strip
Test Strip Bottle
Control Solution Bottle Lancing Device
Strip Insert
Direction
Reaction area
Hand Hold
Area
Blood collection
area
Electrode
Expiration
Date
Trigger button-
Press the trigger
button to activate
the lancing device
Carrie
r
-
Insert the lancet
into the carrier
Adjustable tip-
Select the
desired
penetration depth
Hub-
Unscrew or
Recap the Cap.
Sleeve-
Hand Hold
Area
A
ST
Lancing
Device Cap-
Use this
transparency
cap for AST
testing
Sliding barrel -
Pull on until it clicks
and then release to
enable lancing
device.
15
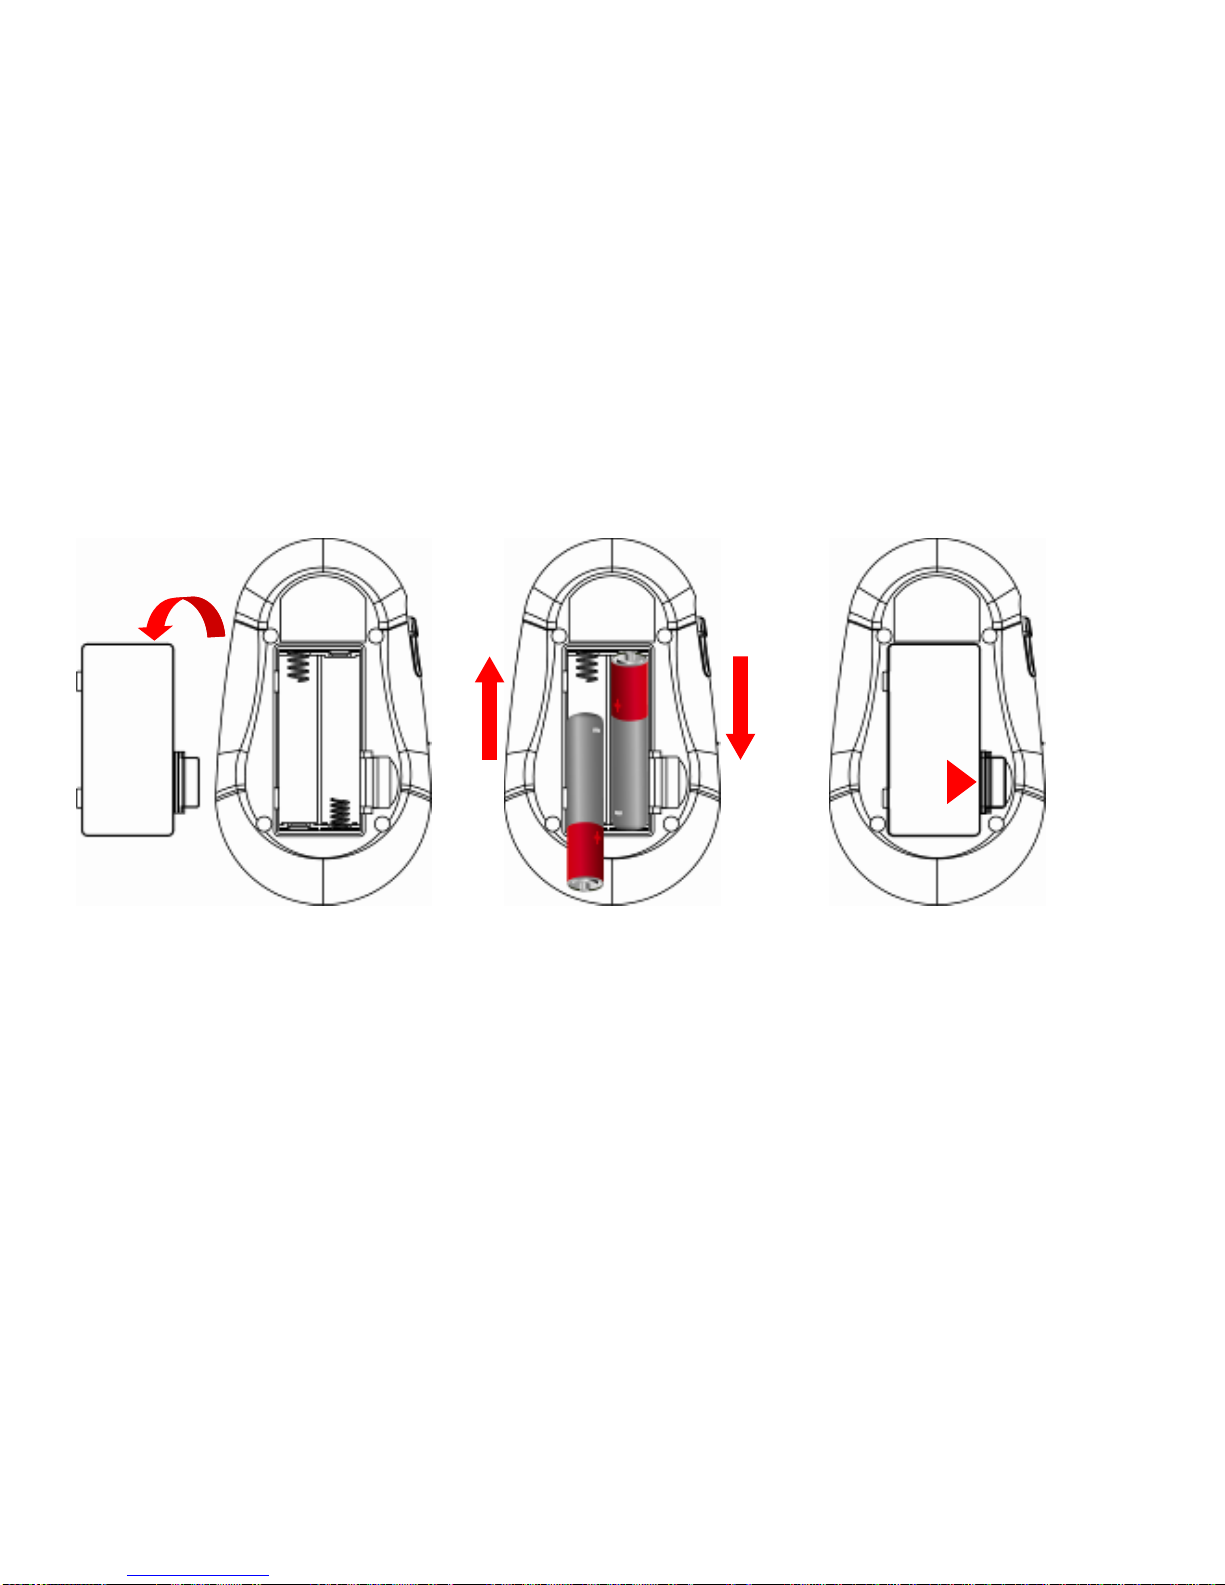
Inserting Batteries
1. Open the battery door on the
back of the meter by pushing
the tab in the direction of the
arrow and pulling the door up.
3. Put the battery door back in
place and snap it closed.
The meter turns on
automatically.
2. Insert two batteries and the
meter beeps.

16
Setting The Time and Date
Setting the current time and date in your meter is important if you use the meter memory.
3. Repeat step 2 to set the date and
time. The flashing field is the one
you are currently setting. (A=AM,
P=PM)
1. Press (right button) to
turn the meter on.
2. The display shows the last
2-digit of the year that flashes at
the top of display as well. Press
(left button) to adjust the year
and press (right button) to
confirm the setting.

17
Using EME Blood Glucose Test Strips
Use only with EME Blood Glucose Meters.
Run a control solution test every time you open a new box of test strips (See Chapter 2 "Control Solution
Testing.")
Keep the test strips in their original bottle.
After you take a test strip out of the bottle, tightly close the bottle immediately. This keeps the test strips
dry.
Use the test strip within three minutes after taking it out of the bottle.
The strip is for single use only. Do not reuse it.
Record the date you open the test strip bottle. Be sure to check the expiration date on the test strip bottle.
The test strip is good for 6 months from the date the bottle is opened or until the expiration date on the
bottle, whichever comes first.
Store the test strip bottle and your meter in a cool dry place.
Store the test strips between 2°C ~30°C (36°F - 86°F). Do not freeze.
Do not apply blood or control solution to the test strip before you insert it into the meter.
Do not touch the test strip with wet hands. Do not bend, cut, or twist the test strips.

18
Chapter 2: Control Solution Testing
Why Run a Control Solution Test
We recommend that you run the EME control test because it lets you know that your meter and test strips are
working properly to give reliable results. You should run the control solution tests when:
You use the EME Blood Glucose Meter for the first time.
You open a new bottle of test strips.
You think the meter or test strips may be working incorrectly.
You drop the meter.
You have repeated a test and the test results are still lower or higher than expected.
You are practicing the test procedure.
Professional users are instructed to follow federal, state, and local guidelines.

19
About The Control Solutions
Use only with EME test strips.
Write the date you opened the control solution bottle on the bottle label. The control solutions are good
for three months from the date the bottle is opened or until the expiration date on the bottle, whichever
comes first.
Do not use a control solution that is past the expiration date.
Control solutions can stain clothing. If you spill it, wash your clothes with soap and water.
Close the bottle tightly after every use.
Left over control solution should not be added back into the control bottle.
Store control solution at room temperature, between 2°C~30°C (36°F - 86°F). Do not freeze.
If you would like to purchase EME Control Solutions, please contact your healthcare provider.
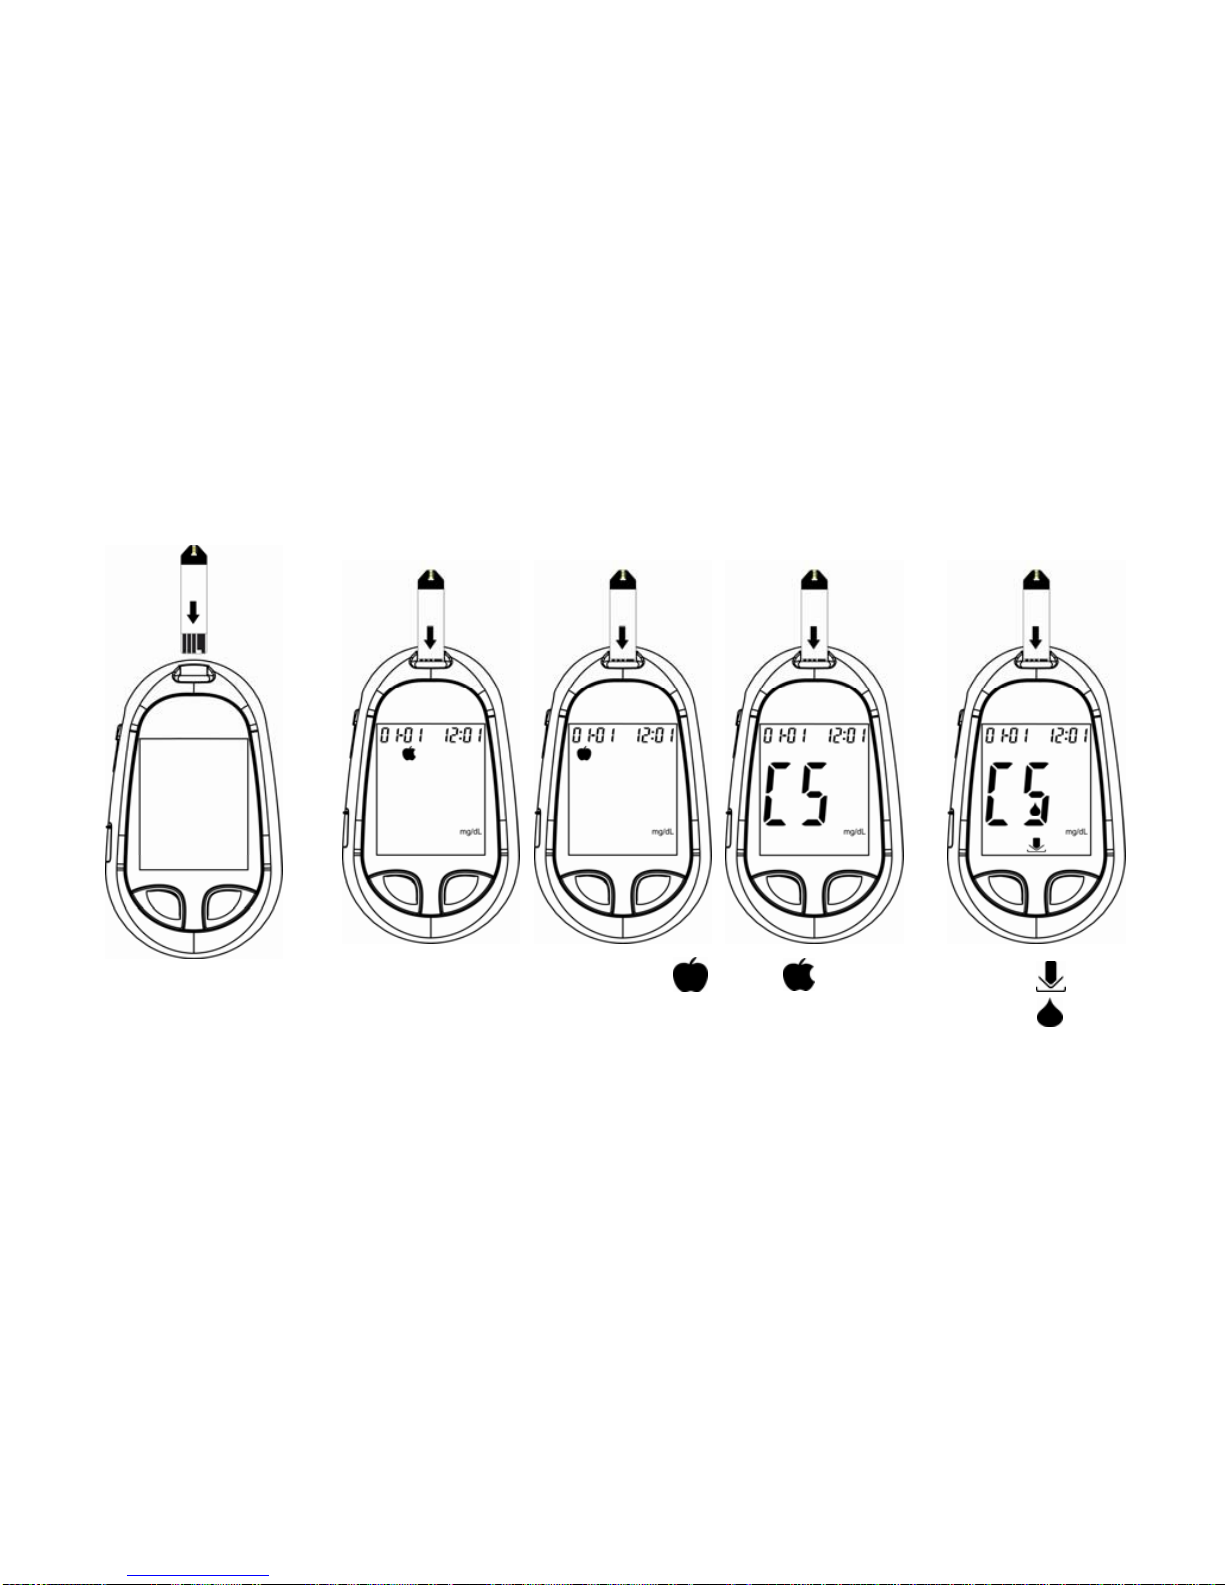
20
Running a Control Solution Test
You need the meter, a test strip, and control solution.
1. Put a test trip into the
meter as the direction
of the arrow on the test
strip. The meter turns
on automatically.
2. Press (left button) to set (AC), (PC)
or CS Mode, then press (right button) to
confirm the setting.
3. The icons (insert
strip) and (apply
blood) show
themselves.
This manual suits for next models
1
Table of contents
Other EME Blood Glucose Meter manuals


