Emerson Research iP100 User manual

OWNER’SMANUAL
iP100 (WhiteColor)
iP100BK (Black Color)
iP100PK (PinkColor)
Visitourweb siteatwww.emersonradio.com
The PerfectPortableSpeakerSystem...
withStereo Radioand DigitalAlarm Clock
and iPod®Docking Station
Made forall iPod®modelsincluding iPod®nano,iPod®shuffleand iPod®mini
R
iP100_050307.p65 3/5/2007, 10:0410

1
TO PREVENT FIRE OR SHOCK HAZARD, DO NOT USE THIS PLUG WITH AN
EXTENSION CORD, RECEPTACLE OR OTHER OUTLET UNLESS THE BLADES
CAN BE FULLY INSERTED TO PREVENT BLADE EXPOSURE. TO PREVENT FIRE
ORSHOCKHAZARD,DONOTEXPOSETHISAPPLIANCETORAINORMOISTURE.
IMPORTANTSAFETYINSTRUCTIONS
1.) Read these instructions. Keep these instructions. Follow all instructions. Heed all warnings.
2.) Do not use this apparatus near water.
3.) Clean only with dry cloth.
4.) Do not block any ventilation openings. Install in accordance with the manufacturer’s instructions.
5.) Do not install near any heat sources such as radiators, heat registers, stoves, or other apparatus
(including amplifiers) that produce heat.
6.) Do not defeat the safety purpose of the polarized or grounding-type plug. A polarized plug has two
blades with one wider than the other. A grounding type plug has two blades and a third grounding
prong. The wide blade or the third prong is provided for your safety. If the provided plug does not
fit into your outlet, consult an electrician for replacement of the obsolete outlet.
7.) Protect the power cord from being walked on or pinched particularly at plugs, convenience
receptacles, and the point where they exit from the apparatus.
8.) Only use attachments / accessories specified by the manufacturer.
9.) Unplug this apparatus during lightning storms or when unused for long periods of time.
10.) Refer all servicing to qualified service personnel. Servicing is required when the apparatus has
been damaged in any way, such as power-supply cord or plug is damaged, liquid has been spilled
or objects have fallen into the apparatus, the apparatus has been exposed to rain or moisture,
does not operate normally, or has been dropped.
11.) This appliance shall not be exposed to dripping or splashing water and no object filled with liquids
such as vases shall be placed on the apparatus.
12.) Use only with the cart, stand, tripod, bracket, or table specified by the
manufacturer, or sold with the apparatus. When a cart is used, use caution
when moving the cart/apparatus combination to avoid injury from tip-over.
13.) Do not overload wall outlet. Use only power source as indicated.
14.) Use replacement parts as specified by the manufacturer.
15.) The product may be mounted to a wall only if recommended by the manufacturer.
16.) Upon completion of any service or repairs to this product, ask the service technician to perform
safety checks.
!
CAUTION
RISK OFELECTRICSHOCK
DONOTOPEN
The lightning flashwitharrow-
head symbol,withinan equi-
lateraltriangleisintended to
alertthe usertothe presence
ofuninsulated‘dangerousvoltage’
withinthe product’s enclosure
thatmaybe ofsufficient
magnitude toconstitutearisk
ofelectricshock topersons.
The exclamation pointwithin
an equilateraltriangleisin-
tended toalertthe userto
the presenceofimportant
operating and maintenance
(servicing)instructionsin
the literatureaccompany-
ing the appliance.
WARNING:TOREDUCETHE
RISK OFELECTRICSHOCK
DONOTREMOVE COVER
(ORBACK),NOUSER
SERVICEABLEPARTSINSIDE
REFERSERVICINGTO
QUALIFIEDSERVICE
PERSONNEL.
CAUTION
The Caution Marking maybe located at the bottom enclosure of the apparatus.
iP100_062806.p65 28/6/2006, 9:43

2
……….For Your iPod®
Thank you for purchasing this iPod®Compatible Portable Stereo System
from Emerson Research. This compact portable system features a built in
iPod®docking station so you can play your iPod®through the speakers of
this system when you are in the mood to share your music with others, or
when you simply do not want to use earphones. In addition, when this
system is connected to an AC outlet with the included AC adapter it will
also recharge the battery of any ‘dockable’ iPod®. We have even included
two separate inserts so that every ‘dockable’ iPod®currently available (as
of January 2006) will fit correctly in the docking area.
This system also includes an AM/FM Stereo Radio with digital station
frequency display for more precise tuning, and a digital alarm clock that
can wake you to the radio or an electronic buzzer.
Finally we have also included an auxiliary input jack so that you can also
connect non-dockable iPod®such as the first generation models, or the
iPod®Shuffle, or even other brands of MP3 players and portable CD players
to this system. The required connection cable is included of course.
We have taken great care to ensure this system was in perfect working
order when it left our factory.
If you experience any problems with the set up or operation of this system
please do not return it to the retail store. Call the Emerson customer service
hotline, toll free, at 1-800-898-9020 Monday through Friday, between the
hours of 9:00 AM and 5:00 PM Central Time.
Again, thank you for purchasing this iPod®compatible portable stereo
system from Emerson Research.
iPod® isatrademarkofAppleComputerInc., registeredintheU.S.and othercountries.
iP100_050307.p65 3/5/2007, 10:042

3
IMPORTANTNOTES
•Operatecontrolsand switchesas
described inthe manual.
•Beforeturning on the power,make
certainthatthe AC/DC adapteris
properlyinstalled.
•When moving the set, be suretofirst
disconnectthe AC/DC adapter.
•Avoidinstalling thisunitinplaces
exposed todirectsunlightorcloseto
heatradiating appliancessuchas
electricheaters,ontopofotherstereo
equipmentthatradiatestoo much
heat, placeslacking ventilation or
dustyareas,placessubjectto
constantvibration and/orhumidor
moistareas.
FCC Information
Thisequipmenthasbeen tested and found tocomplywiththe limitsforaClass B
digitaldevice,pursuanttoPart15 ofthe FCC Rules.Theselimitsaredesigned to
provide reasonableprotection againstharmfulinterferenceinaresidential
installation.Thisequipmentgenerates,uses,andcan radiateradiofrequencyenergy
and,ifnotinstalledand usedinaccordancewiththeinstructions,maycauseharmful
interferencetoradiocommunications.However,thereisno guarantee that
interferencewill notoccurinaparticularinstallation.If thisequipmentdoescause
harmfulinterferencetoradioortelevision reception,whichcan be determined by
turning the equipmentoff and on,the userisencouraged totrytocorrectthe
interferencebyone ormoreofthe following measures:
•Reorientorrelocatethe receiving antenna.
•Increasethe separation between the equipmentand receiver.
•Connectthe equipmentintoan outleton acircuitdifferentfromthattowhich
the receiverisconnected.
•Consultthe dealeroran experienced radio/TVtechnician forhelp.
ThisdevicecomplieswithPart15 ofthe FCC Rules.Operation issubjecttothe
following twoconditions:
(1)Thisdevicemaynotcauseharmfulinterference,and
(2)Thisdevicemustacceptanyinterferencereceived,including interference
thatmaycauseundesired operation.
Changesormodificationsnotexpresslyapproved bythe partyresponsiblefor
compliancecouldvoidthe user’s authoritytooperatethe equipment.
iP100_062806.p65 28/6/2006, 9:43

4
Unpacking And SetUp
• Remove the main unit, the AC adapter, the accessory auxiliary device
connection cord, and the 2 iPod®adapters from the carton, and remove all
packing material from the main unit. We recommend that you save the carton
and packing material in the event that the unit ever needs to be returned for
service. Using the original carton and packing material is the only way to protect
your unit from damage during shipment.
• Remove any descriptive labels or stickers from the top or front panels of the
unit but do not remove any labels or stickers from the back or bottom panels.
• Remove the “dummy iPod®” display card from the docking area and discard it.
PowerSources
Thissystemisdesigned tooperateon 6“C”batteries,notincluded,oron normal
120VAChousecurrentwiththe includedACadapter.Inaddition,thisunitrequires
2“AA”batteriesforthe clock and alarmmemoryback up.Werecommend that
you useawell-knownbrand ofalkaline batteriesforlongestlifeand best
performance.
Attempting tooperatethissystemfromanyotherpowersourcemaycausedamage
tothe system,and suchdamage isnotcovered byyourwarranty.
PREPARATIONFORUSE
BatteryPrecautions
•Replacementofbatteriesmustbe done byan adult.
•Donotmixoldand newbatteries.
•Donotmixalkaline,standard(carbon-zinc)orrechargeable(nickel-cadmium)
batteries.
•The supplyterminalsarenottobe short-circuited.
•Non-rechargeablebatteriesarenottobe recharged.
•Exhausted batteriesaretobe removed.
•Onlybatteriesofthe equivalenttype aretobe used.
•Batteriesaretobe inserted withthe correctpolarity.
•Disposeofbatteriesproperly.Donotdisposeofbatteriesinfire.The batteries
mayexplode orleak.
iP100_062806.p65 28/6/2006, 9:43
5
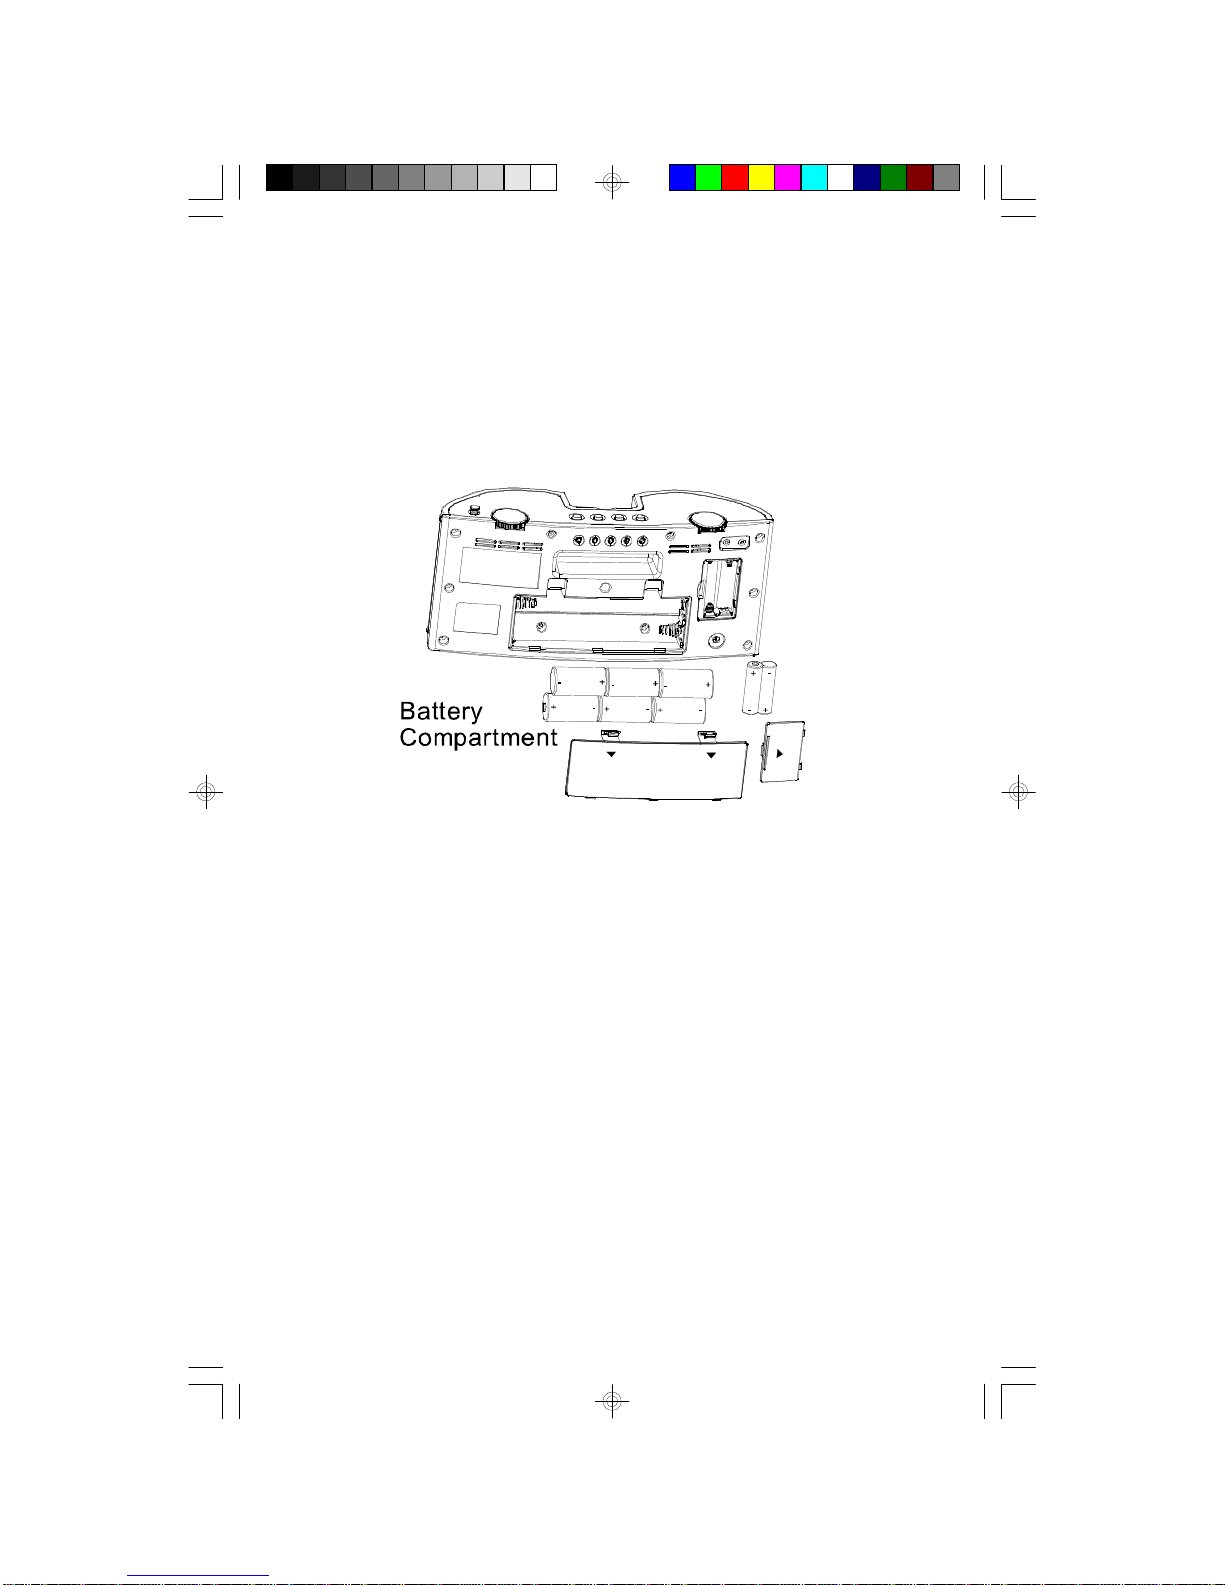
BatteryInstallation
The batterycompartmentsforthe 6“C”batteriesand 2“AA”batteriesarelocated
on the back panel.Toopen the batterycompartmentcoverspress the doorlocking
tabsinthe direction ofthe arrows.Removethe doorsand insertthe 6“C”and 2
“AA”batteriesintheirrespectivecompartments.Besurethe batteriesareinstalled
correctlyaccording tothe polaritymarkingsinthe batterycompartments.If the
batteriesareinstalled incorrectlythe unitwill notwork.
Afterinstalling the batteriesreplacebothbatterycompartmentcoversand make
surethattheylock securely.
Battery Replacement
When the sound output becomes weak and distorted during battery operation it is
probably time to change the 6 “C” batteries. Try operating the system with theAC
adapter. If the sound is normal with theAC adapter this confirms that the batteries
are weak and should be replaced as soon as possible. If exhausted batteries are
left in the unit they may eventually leak and cause damage to the unit. When
changing the 6 “C” batteries always change all 6 at the same time and do not mix
different types of batteries such as alkaline, carbon-zinc, and nickel cadmium.
The 2 “AA” batteries are only used for maintaining the clock and timer memory
and therefore they will probably last longer than the 6 “C” batteries. Two fresh
alkaline “AA” batteries should provide back up power for the clock and timer for a
period of 12 months.
OPEN
OPEN
O
P
E
N
iP100_062806.p65 28/6/2006, 9:43
6
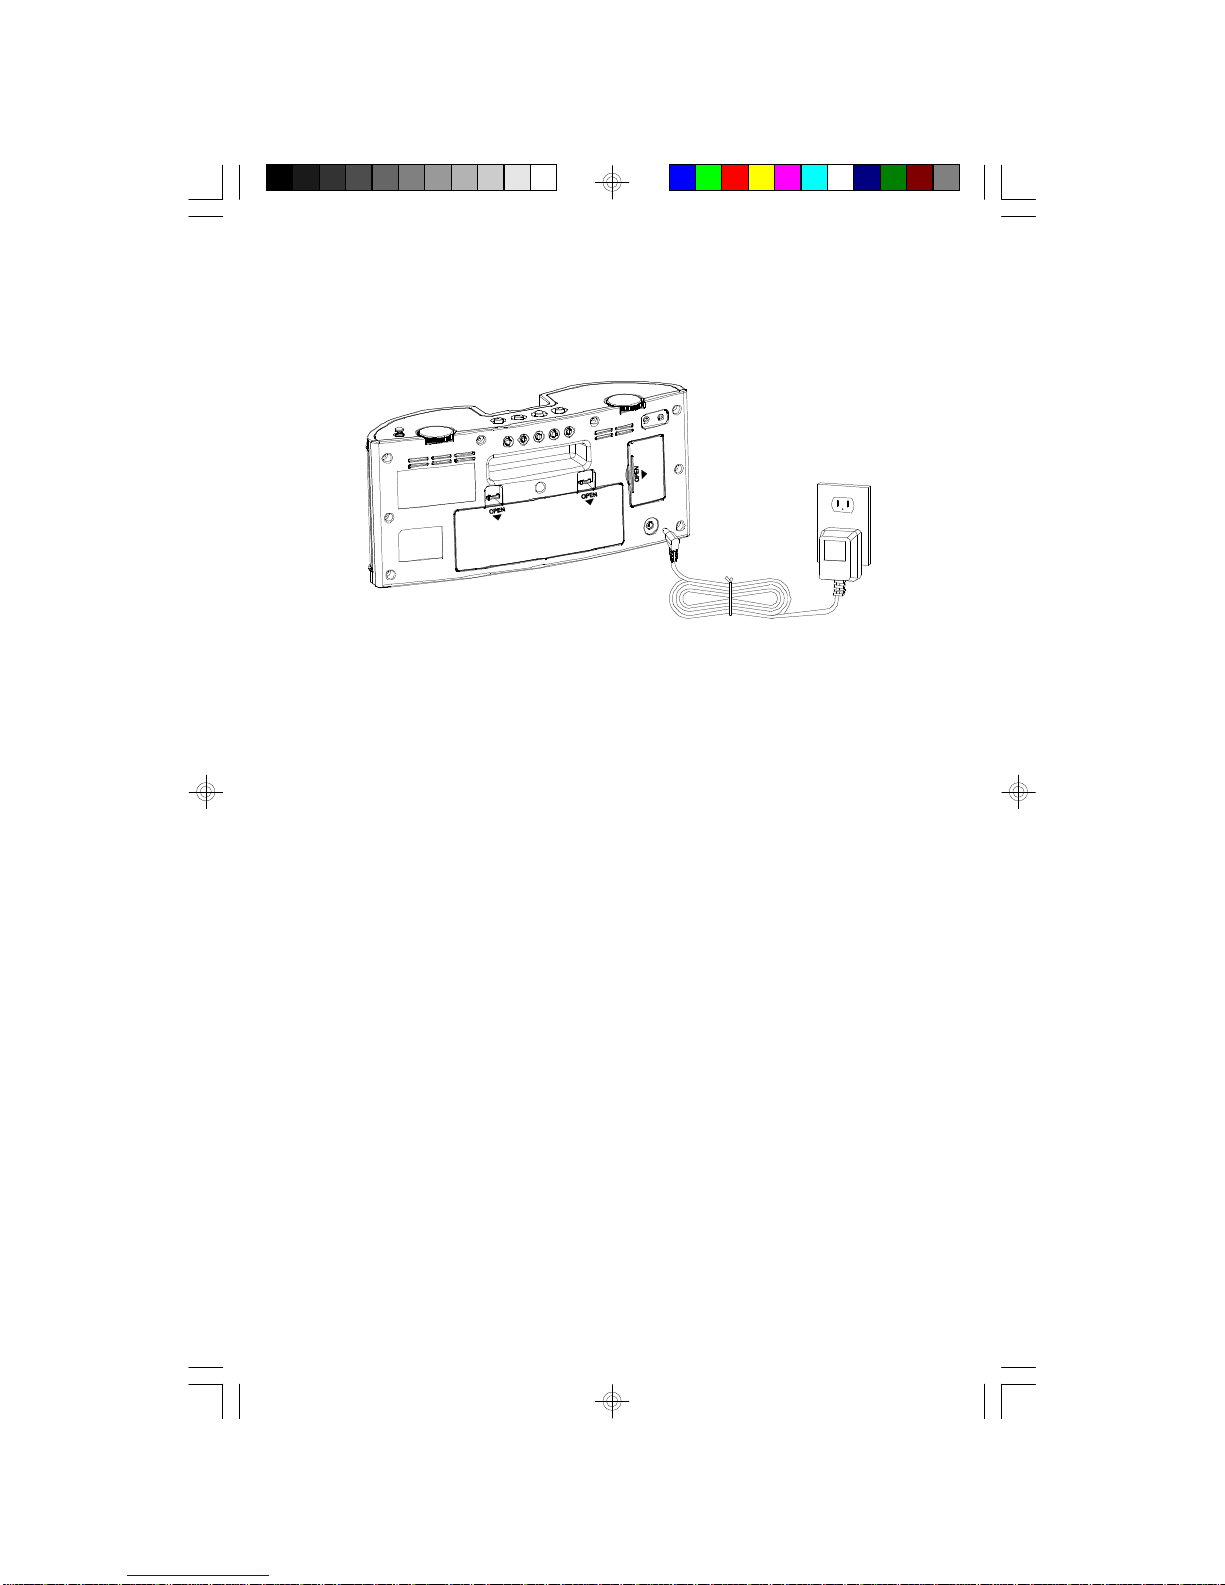
Using The AC Adapter
Connect the small female plug of the AC adapter to the DC Input Jack on the back
panel. Connect the housing of theAC adapter to your 120V AC outlet.
When the adapter is connected to the unit the AC power source is selected
automatically, even if there are batteries in the battery compartment. Note: In
order to operate the unit on batteries the AC adapter must be completely
disconnected from the DC Input Jack on the back panel.
NOTES:
• The housing of the AC adapter may become warm during operation. This
is normal.
• To reduce the risk of electric shock never connect or disconnect the AC
adapter while your hands are wet.
Protect Your Furniture
This model is equipped with non-skid rubber 'feet' to prevent the product from
moving when you operate the controls. These 'feet' are made from non-migrating
rubber material specially formulated to avoid leaving any marks or stains on your
furniture. However certain types of oil based furniture polishes, wood preservatives,
or cleaning sprays may cause the rubber 'feet' to soften, and leave marks or a
rubber residue on the furniture. To prevent any damage to your furniture we strongly
recommend that you purchase small self-adhesive felt pads, available at hardware
stores and home improvement centers everywhere, and apply these pads to the
bottom of the rubber 'feet' before you place the product on fine wooden furniture.
iP100_062806.p65 28/6/2006, 9:43

7
1. VOLUME Control
2. Button
(ON/OFF/ALARM ON)
3.DBBS Button
4.FUNCTION Button
(i
5. FM AUTO /AM Button
6. TUNING Control
7. FM Antenna
8. Left Speaker
9. LCD Display
10.FM Stereo Indicator
11.Power Indicator
12.Right Speaker
13.ALARM ON/OFF Button
14.ALARM SET Button
15.TIME SET Button
16.MINUTE Button
17.HOUR Button
18.AUX IN Jack
19 PHONES Jack
20Battery Compartment
21.Backup Battery
Compartment
22.
23.
POWER Mode
Pod / AUX Buzzer ,
RADIO)
AC Adapter Jack
iPod holder(2 inserts)
LOCATION OF CONTROLS AND INDICATORS
1 32 7
6
5
4
13 141516 17 1819
89
10 11 12
20 21 22
OPEN
OPEN
OPEN
®
23

8
Radio mode
1. Band Indicator (AM/FM)
2.
Clock/Timer Mode
3.Alarm On Indicator
4.Time/Alarm Time Display
Radio Frequency
11
44
33
Fig 1
Fig 2
LCD DISPLAY
FM
MHz
.
AM
.
ALARM
22
OPERATING INSTRUCTIONS
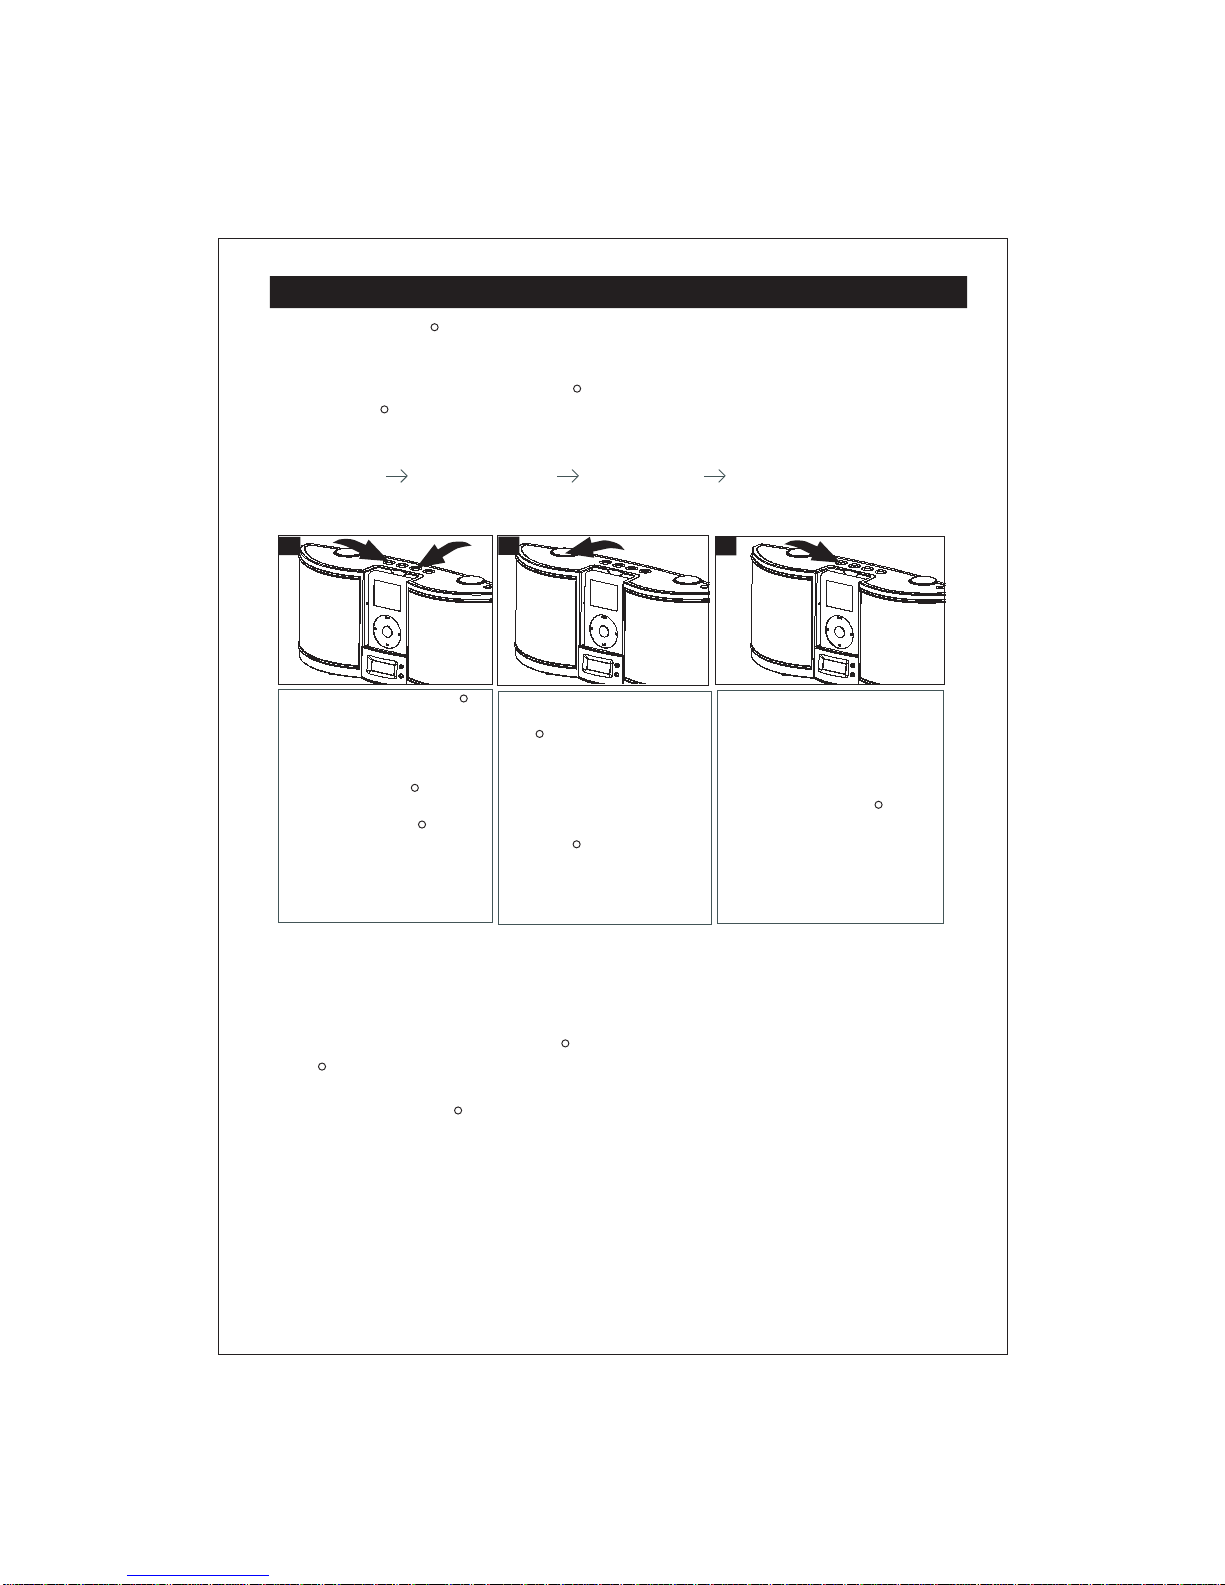
SETTING THE CLOCK
Make sure the POWER switch
is set to the ‘Off’ position. The
time or alarm time cannot be
set or
adjusted while the unit
is ‘On’.
Press and hold the TIME SET
button. While holding the TIME
SET button press the HR SET
button to adjust
the hour.
While holding the TIME SET
button, press the MINUTE
SET button to adjust the
minute. Release all buttons
to complete time setting.
2
3
12 3
OPEN
OPEN
OPEN
OPEN
OPEN
OPEN

OPERATING INSTRUCTIONS (CONTINUED)
9
1
L
NOTE: To prevent any interference between your iPod and the radio in this unit,
your iPod should be switched 'Off' when listening to the radio.
ISTENING TO THE RADIO
23
Set the POWER button to the
‘On’
position, the display
lighting
turns on.
Set the FUNCTION button
to
the Radio position. The display
will change from time to radio
frequency. Set the
BAND
selector to the desired
band,
AM or FM Auto.
Rotate the TUNING control
until
the display shows the
desired
AM or FM station
frequency. Turn the TUNING
control clockwise to
select
higher numbered frequencies
or counter-clockwise to select
lower numbered frequencies.
The FM STEREO indicator will
light when you tune to an FM
Stereo station.
1
Rotate the VOLUME control to
increase or decrease the
volume level. If you want to
increase the bass response
s
et the DBBS button to the
‘On’ positon.
Note: If you are listening to
music that contains heavy
bass at high volume levels the
sound may become distorted
if the DBBS switch is set to the
‘
On’ position. If this occurs
set the DBBS switch to the
‘Off’
position, or reduce
the
volume level.
1
When you are finished listening
set the POWER button to the
‘
Off’ position. The display
changes from radio frequency
to correct time and the display
lighting goes off.
45
R
R

OPERATING INSTRUCTIONS (CONTINUED)
Docking and Charging Your iPod
This system is designed with the same 30-pin connector found in all iPod docks. By
simply connecting your iPod to the docking station on the front panel of this system
you can play your iPod through the speakers of this system. And you can also
recharge the battery in your iPod .
Note: Recharging is only possible when you are using the system with the included
AC adapter. Your iPod battery will not be recharged when you are operating this
system on battery power.
To accommodate all models of dockable iPod we have included two different adapter
/ inserts to ensure that your iPod will fit properly in the docking station.
Note: We have not provided adapters for the iPod nano or the 5G iPod models with
video capability. The iPod docking station in this system follows the Apple Universal
Well design. If you are using an iPod nano or a 5G iPod with video capability please
use the adapter that was supplied with your iPod . That adapter will fit properly in
the docking station of this system.
Refer to the chart below to select the proper adapter / insert for your particular model
of dockable iPod . Note: If you have a earlier non-dockable iPod , or an iPod Shuffle,
please refer to the next section to connect you device to the Auxiliary Input jack.
iPod inserts
Your unit comes with 2 removable inserts to ensure your iPod fits properly
in the dock on the front of the system.
1. Place the proper adapter / insert into the docking station. The iPod 30-pin
connector should fit through the opening in the bottom of the insert.
2. Gently press the insert into the dock until it is properly seated.
3. With your iPod in the Power ‘Off’ mode carefully place it into the insert.
Note: Remove any accessory case or “skin” from your iPod before inserting
it in the dock.
4. To remove or replace an insert, first remove your iPod from the dock. then
grip the insert and gently lift it upward and out of the dock.
R
R
R
R
R
R
R
R
R
R
R
R
R
R
R
R
10
R
R
R
R
R
R
AAAA
*
***
iPod version
iPod size
*
R
R
AAAA
Use the adapter supplied
with your iPod
R
inimG3G4
045110 0402
BGBGBGBGBG
0302
BGBG
otohp
060342060402
BGBGBGBG
6
4
BG
BGBGBGBG
2
G
0
B
3
G
5Gonan
MENU
MENU
MENU
1
BG
Small
Adapter
Large
Adapter
R
Playing your iPod
Important
To prevent distortion during iPod playback you should go to the Main Menu
of your iPod , select the Settings Menu page, select the EQ Setting, and make
sure that the EQ function is set to "Off".
(Main Menu Settings Menu EQ Setting Select “Off” )
11
OPERATING INSTRUCTIONS(CONTINUED)
After inserting your iPod
in the dock as described
above, set the POWER switch
of this system to the ‘On’
position, and the FUNCTION
switch to the iPod position.
I
f necessary, release the HOLD
switch on your iPod and turn
it on.
Select the song or album that
you wish to play on your
iPod using the click-wheel
navigation controls as usual.
Use the VOLUME control on
this system to increase or
decrease the speaker volume
level. The volume control on
your iPod has no effect on
the speaker volume level.
When you are finished listening
press the POWER button to
turn this system ‘Off’. The
display lighting will turn off.
If you are using the AC adapter,
the charging indicator will
appear on your iPod display.
1
Important Note
To prevent damage to your iPod we recommend that you do not play your
iPod when you are carrying this system around as a portable. The system
should be placed in a stable, secure position before connecting and
operating your iPod .
23
R
R
R
R
R
R
R
R
R
R
R
R
OPERATINGINSTRUCTIONS(CONTINUED)
12
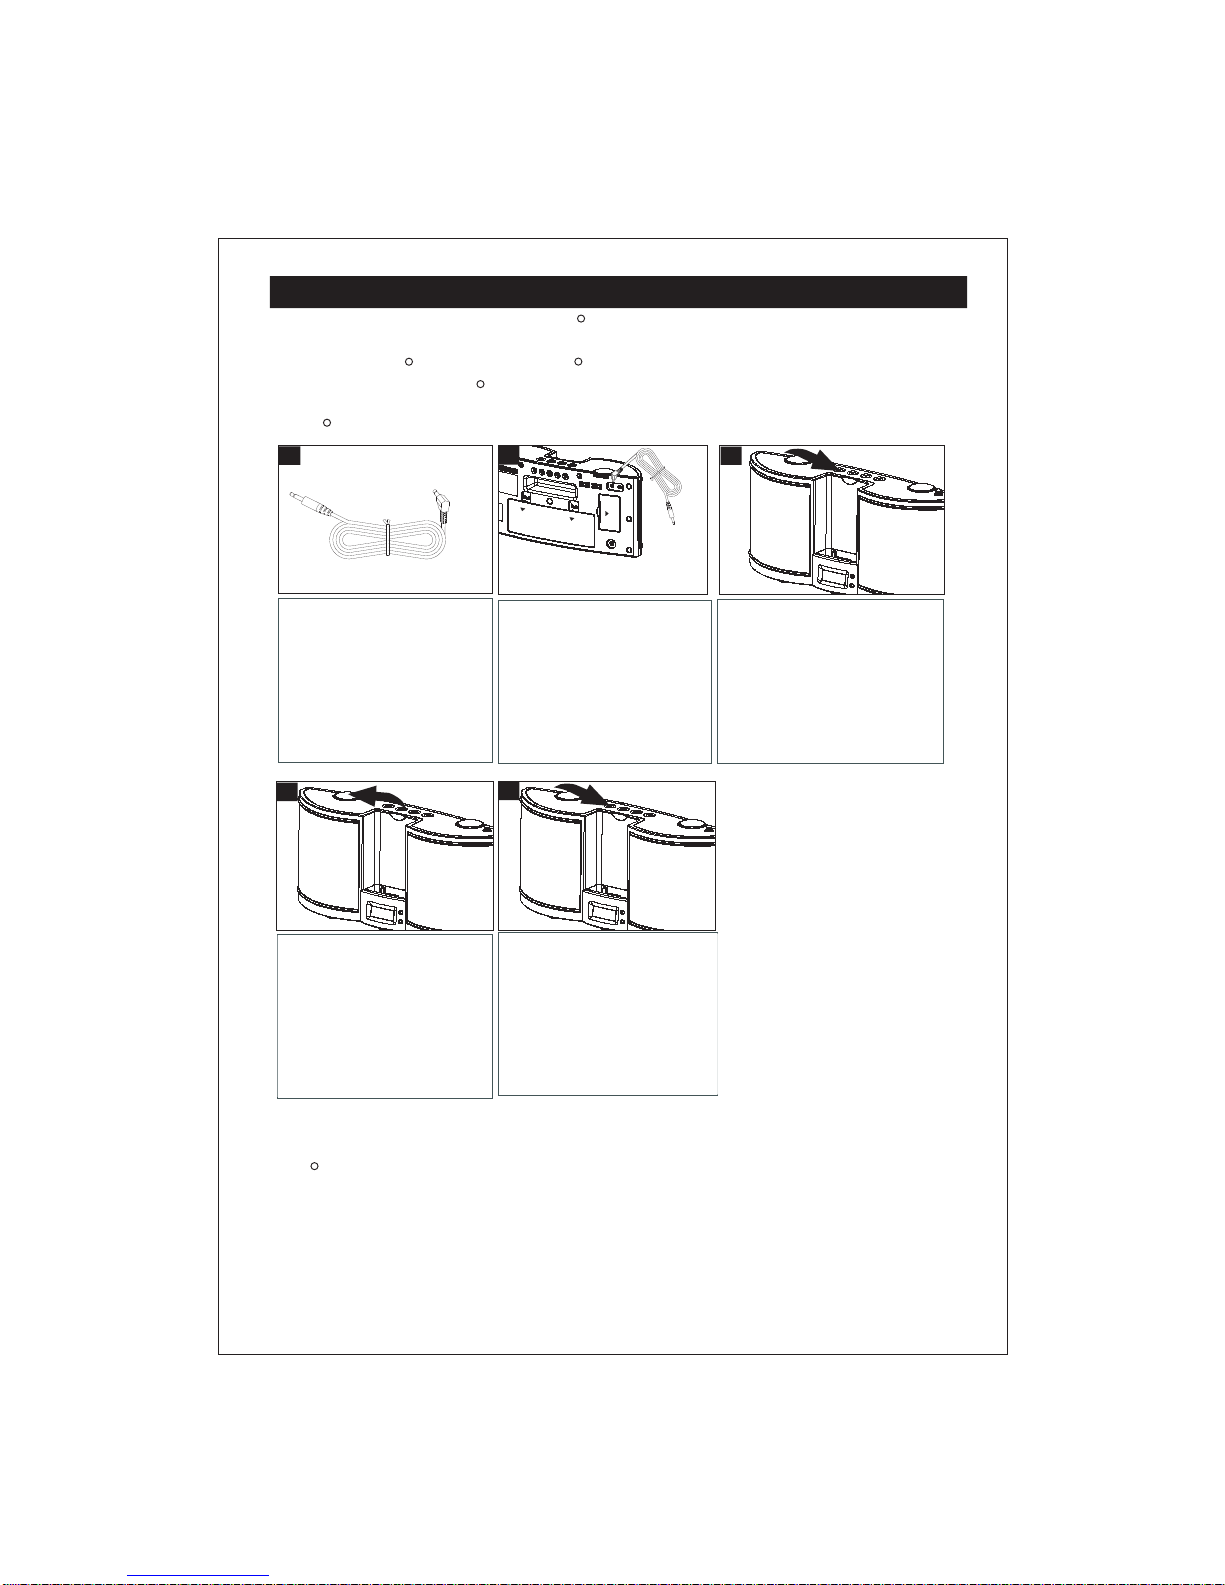
Connectoneendofthe
3.5mmstereocableintothe
auxiliaryinputjack(AUX)
locatedonthebackofthe
unit,andotherendtothe
headphoneorlineoutjack
onyourportableaudio
device.
Usethecontrolto
adjustthesystemvolume.
Youmayneedtoadjustyour
devicevolume,too.
Locate the stereo connection
cable supplied with this system.
Set the POWER button to the ‘On’
position and the FUNCTION button
to the AUX position. Also turn on
your external
portable audio
player.
VOLUME When you are finished listening
set the POWER button to the
‘Off’ position. Remember to shut
off the power to your portable
audio player as well.
Important Note
Remember to disconnect the stereo connection cable from the Aux Jack before inserting an
iPod in the docking station.
R
RR
R
R
R
Listening To A Non-Docking iPod Or Other Portable Music Player
Some early iPod models and the iPod Shuffle do not include the 30-pin docking connector
found on most other iPods . We have provided an Auxiliary Input Jack on the back panel of this
system and included a stereo connection cable so that you can still connect non-docking
iPods , other MP3 players, or personal CD players to this system.
123
45
OPEN
OPEN
OPEN

13
Press and hold the ALARM
SET
button to enter the alarm
Time setting mode. The front
panel display will change from
current time to alarm time.
Note: The POWER switch must
be set to the ‘Off’ position to
adjust the Alarm time.
While continuing to hold the
ALA
RM SET button press
t
he HOUR button repeatedly
until the display shows the
desired wake-up hour. Be
sure to observe the AM/PM
indicator to confirm that you are
setting the alarm time correctly.
Press the ALARM ON/OFF
button to activate the alarm.
The ALARM indicator on the
front panel will turn ‘On’.
Set the FUNCTION selector
to the desired alarm mode,
Radio or Buzzer.
1
4
1
1 12 13
1
4
While continuing to hold the
ALARM SET button press
the MINUTE button repeatedly
to se the desired wake-up
minute. When the desired
wake-up time appears on the
display release all the buttons.
SETTING THE ALARM
OPERATING INSTRUCTIONS(CONTINUED)
N
E
P
O
N
E
P
O
NEPO
N
E
P
O
N
E
P
O
N
E
P
O
N
E
P
O
N
E
P
O
N
EPO
N
E
P
O
N
E
P
O
NE
P
O
N
E
P
O
N
E
P
O
NE
P
O
AM
.
AL ARM
AM
.
AL ARM
AM
.
AM
To stop the alarm sooner,
press the ALARM ON/OFF
button once. The alarm stops
immediately but the alarm
indicator remains ‘On’ and the
alarm will turn on again on the
following day. To deactivate
the alarm so that it does not
repeat on the following day
press the ALARM ON/OFF
button once more. The alarm
indicator goes ‘Off’.
1
5
At the selected time the unit will turn
on to the Radio or Buzzer.
The Radio will play for one hour and
then shut off automatically.
The Buzzer alarm will continue for 3
minutes and then stop.
IMPORTANT!
Even though the buzzer sound
stops after 3 minutes the power
remains ‘on’ for an additional 57
minutes until the alarm time is over.
During this period you cannot turn
the power ‘off’ by just pressing the
POWER ON/OFF button.
To turn the power ‘off’ immediately
you must first press the
ALARM ON/OFF button to shut off
the alarm, then press the
POWER ON/OFF to shut the power
‘off’ completely.
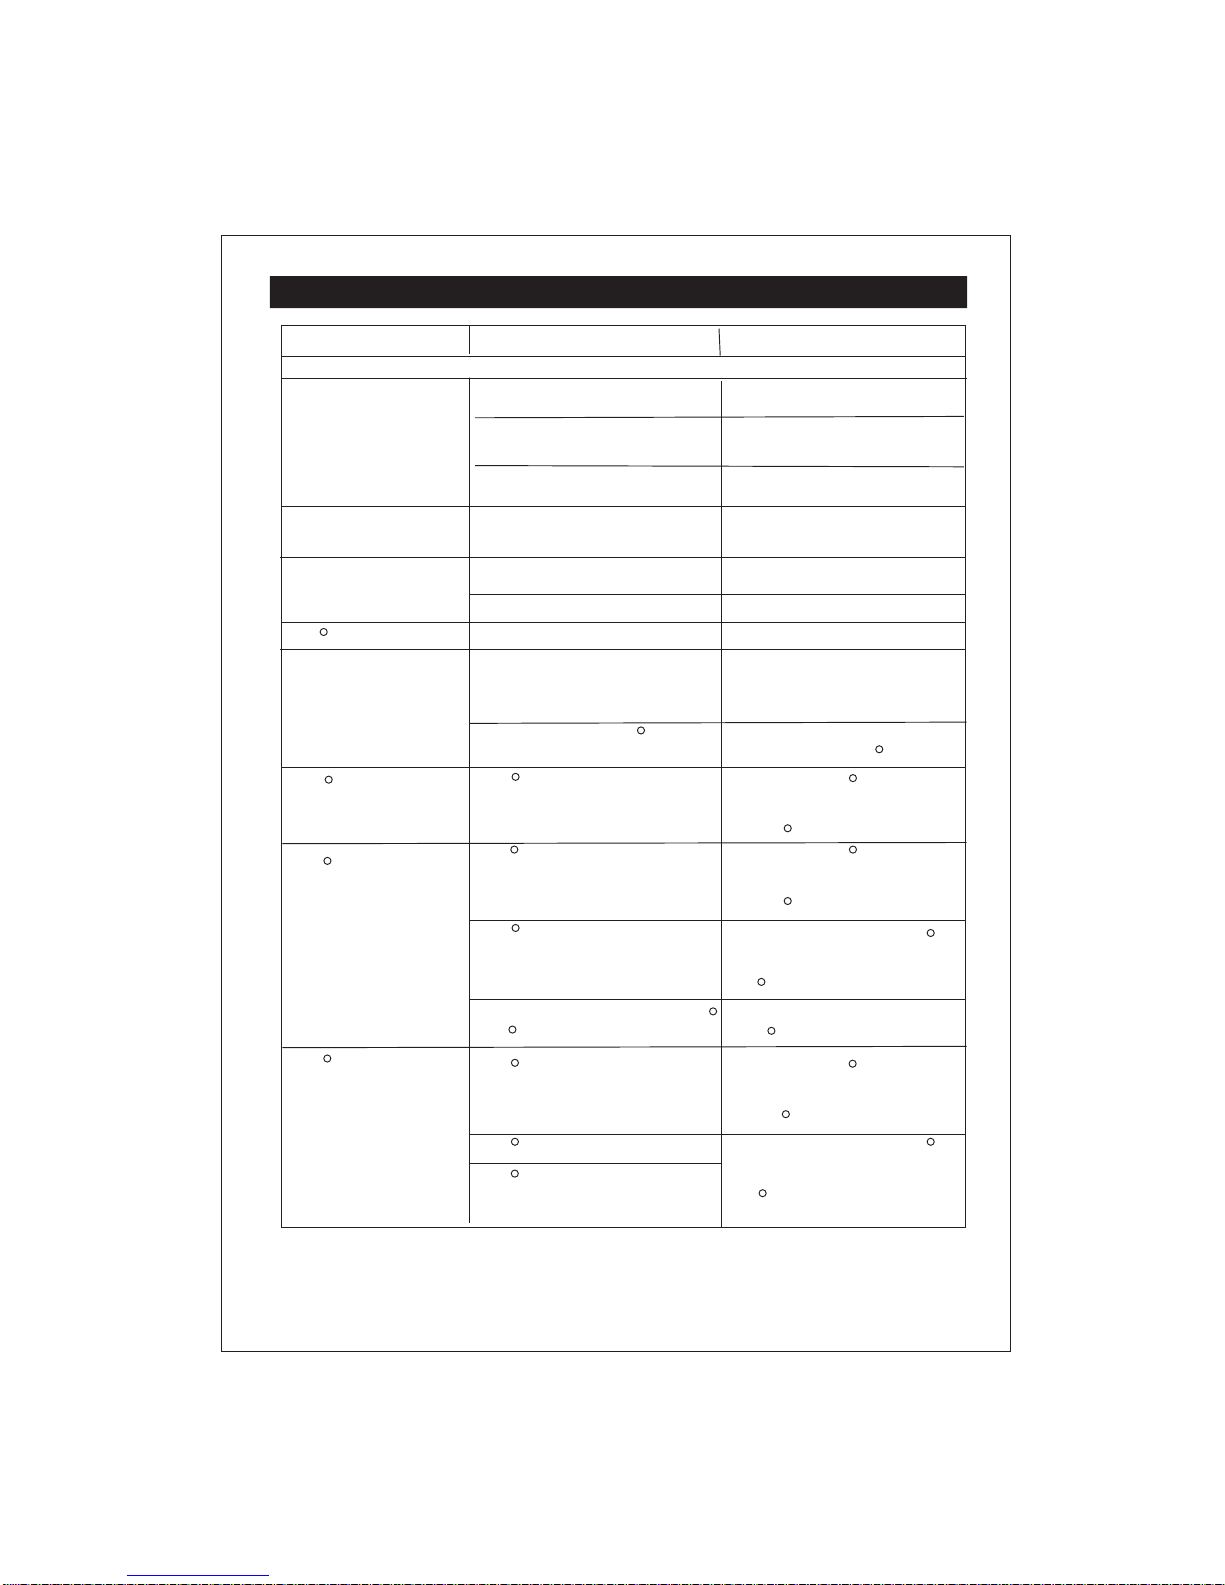
Symptom Possible Cause Solution
Radio
Noise or sound
distorted on AM or
FM broadcasts.
FM STEREO indicator
does not light
Station not tuned properly for AM
or FM.
FM: Rod antenna is not extended.
Retune the AM or FM broadcast
station.
Extend FM Rod antenna.
Reposition the unit until
best reception is obtained.
AM: The bar antenna is not
positioned correctly.
AM or FM, no sound
iPod Player
The BAND switch is not set to FM
position.
Function switch is not set to RADIO.
Set the BAND switch to
FM ST. Position
Increase Volume
Volume at minimum.
Unit does not respond
(no power)
Set the Function switch to
RADIO.
AC adaptor is not plugged into a
wall outlet or the connector is not
plugged into the power supply jack
on the back of the unit.
Plug the AC adaptor into a wall
outlet and plug the connector
into the supply jack on the unit.
TROUBLESHOOTING GUIDE
R
R
R
iPod does not dock
porperly
Using no or wrong iPod insert
Make sure the dock insert is the
proper fit for the iPod
iPod did not install properly
Remove the iPod from the dock
and check for obstruction on the
connections in the dock and on
the iPod ,Then reseat it in the dock
iPod does not respond
to the unit
iPod is not installed properly
Remove the iPod from the dock
and check for obstruction on the
connectors in the dock and on
the iPod Then reseat it in the dock
iPod is locked up
Please make sure your iPod is
working properly before docking
into the unit. Please refer to the
iPod manual for details.
Using first or second generation iPod ,
iPod Shuffle or other devices.
This unit cannot control those
iPods or other devices.
iPod did not charge up iPod is not installed properly
Remove the iPod from the dock
and check for obstruction on the
connectors in the dock and on
the iPod . Then reseat it in the dock
iPod is locked up/frozen
iPod battery has problem
Please make sure your iPod is
working properly before docking
into the unit. Please refer to your
iPod manual for details.
14
R
RR
R
R
R
R
R
RR
R
R
RR
R
R
R
R
R
R
R
R
CAREAND MAINTENANCE
If thecabinetbecomesdusty,wipeitwithasoftcloth.Ifthe cabinetbecomes
smudged ordirty,clean itwithasoft, slightlydampened cloth.Neverallow
wateroranyliquidtogetinside the cabinet.
Neveruseanyabrasivecleanersorcleaning padsasthesewill damage
the finishofyourunit.
TOFIND THELOCATIONAND PHONE
NUMBEROFYOUR NEARESTSERVICE
CENTERPERMITTEDTOPERFORM
WARRANTY...
CALL TOLL FREE:1-800-695-0098
SERVICE
FORCUSTOMERSERVICE,PLEASE WRITETO:
Emerson RadioCorp.,
ConsumerAffairsDept.,
5101 Statesman Drive,
Irving,TX75063.
FORADDITIONALSET-UPOROPERATINGASSISTANCE
PLEASE CALL:
1-800-898-9020
15
R
iP100_050307.p65 3/5/2007, 10:047

LIMITEDWARRANTY
Emerson RadioCorp.warrantsmanufacturingdefectsin originalmaterial,including
originalpartsand workmanship, undernormaluseand conditions, foraperiod of
ninety (90)daysfromthedateoforiginalpurchasein theU.S. With yourdated
proofofpurchase, wewill providerepairservice atno chargeforlaborand partsat
an authorizedDepotRepairFacility, orreplace theproductin ourdiscretion. For
repairorreplacement, pack yourunit in apadded box, encloseyourcheck or
money orderpayableto Emerson Radio Corp. in theamountof$9.00 (notrequired
by Californiaresidents)to covershipping and handling costs, and encloseacopy
ofyourproofofpurchase. Send yourunit to:
Emerson Radio Corp.,
5101 Statesman Drive,
Irving, TX75063.
Thiswarranty doesnotcoverdamagefromnegligence, misuse, abuse, accident,
failureto followoperating instructions, commercialuse, rental, repairsby an
unauthorized facility, orproductspurchased, used, serviced ordamaged outside
oftheUnited States.
THISWARRANTYGIVESYOU SPECIFICLEGALRIGHTS,ANDYOU MAY
ALSOHAVEOTHERRIGHTSWHICHVARYFROMSTATE TOSTATE.
AU898M
The Serial Number can be found on the back cabinet. We suggest that you record
the Serial Number of your unit in the space below for future reference.
Model Number: iP100 / iP100BK / iP100PK
Serial Number:
16
iP100_050307.p65 3/5/2007, 10:048

EMERSON
PartNo.16-3006
705-04 Printed inChina
R
iP100_050307.p65 3/5/2007, 10:049
This manual suits for next models
3
Table of contents
Other Emerson Research Portable Speakers manuals


