Emerson Research fYi iP105BK User manual

OWNER’SMANUAL
Visitourweb siteatwww.emersonradio.com
Portable Stereo Speaker System
with AM/FM Digital Tuner
and Digital Alarm Clock
Made forall iPod®modelsincluding iPod®nano,iPod®shuffleand iPod®mini
iP105BK
R
iP105_052207.p65 22/5/2007, 11:3730
1
TO PREVENT FIRE OR SHOCK HAZARD, DO NOT USE THIS PLUG WITH AN
EXTENSION CORD, RECEPTACLE OR OTHER OUTLET UNLESS THE BLADES
CAN BE FULLY INSERTED TO PREVENT BLADE EXPOSURE. TO PREVENT FIRE
ORSHOCKHAZARD,DONOTEXPOSETHISAPPLIANCETORAINORMOISTURE.
IMPORTANTSAFETYINSTRUCTIONS
1.) Read these instructions. Keep these instructions. Follow all instructions. Heed all warnings.
2.) Do not use this apparatus near water.
3.) Clean only with dry cloth.
4.) Do not block any ventilation openings. Install in accordance with the manufacturer’s instructions.
5.) Do not install near any heat sources such as radiators, heat registers, stoves, or other apparatus
(including amplifiers) that produce heat.
6.) Do not defeat the safety purpose of the polarized or grounding-type plug. A polarized plug has two
blades with one wider than the other. A grounding type plug has two blades and a third grounding
prong. The wide blade or the third prong is provided for your safety. If the provided plug does not
fit into your outlet, consult an electrician for replacement of the obsolete outlet.
7.) Protect the power cord from being walked on or pinched particularly at plugs, convenience
receptacles, and the point where they exit from the apparatus.
8.) Only use attachments / accessories specified by the manufacturer.
9.) Unplug this apparatus during lightning storms or when unused for long periods of time.
10.) Refer all servicing to qualified service personnel. Servicing is required when the apparatus has
been damaged in any way, such as power-supply cord or plug is damaged, liquid has been spilled
or objects have fallen into the apparatus, the apparatus has been exposed to rain or moisture,
does not operate normally, or has been dropped.
11.) This appliance shall not be exposed to dripping or splashing water and no object filled with liquids
such as vases shall be placed on the apparatus.
12.) Use only with the cart, stand, tripod, bracket, or table specified by the
manufacturer, or sold with the apparatus. When a cart is used, use caution
when moving the cart/apparatus combination to avoid injury from tip-over.
13.) Do not overload wall outlet. Use only power source as indicated.
14.) Use replacement parts as specified by the manufacturer.
15.) The product may be mounted to a wall only if recommended by the manufacturer.
16.) Upon completion of any service or repairs to this product, ask the service technician to perform
safety checks.
!
CAUTION
RISK OFELECTRICSHOCK
DONOTOPEN
The lightning flashwitharrow-
head symbol,withinan equi-
lateraltriangleisintended to
alertthe usertothe presence
ofuninsulated‘dangerousvoltage’
withinthe product’s enclosure
thatmaybe ofsufficient
magnitude toconstitutearisk
ofelectricshock topersons.
The exclamation pointwithin
an equilateraltriangleisin-
tended toalertthe userto
the presenceofimportant
operating and maintenance
(servicing)instructionsin
the literatureaccompany-
ing the appliance.
WARNING:TOREDUCETHE
RISK OFELECTRICSHOCK
DONOTREMOVE COVER
(ORBACK),NOUSER
SERVICEABLEPARTSINSIDE
REFERSERVICINGTO
QUALIFIEDSERVICE
PERSONNEL.
CAUTION
The Caution Marking maybe located at the bottom enclosure of the apparatus.
iP105_052207.p65 22/5/2007, 11:371

2
iPod® isatrademarkofAppleComputerInc., registeredintheU.S.and othercountries.
……….For Your iPod®
Thank you for purchasing this portable speaker system for your iPod®by
Emerson Research. This compact system is perfect for those times when you
want to share the music with your friends, or when using ear buds or headphones
is not convenient.
This system includes a digital tuning AM/FM stereo radio with 40 preset station
memories, and a full featured digital alarm clock that can wake you to the radio, a
buzzer, or even to youriPod®. It is compatible with all dockableApple iPod®models,
and will also charge the batteries of all dockable iPod®models when the system is
operated on AC power. We've even included an Auxiliary Input jack so that you
can connect an iPod®shuffle, older non-dockable iPod®models, other brands of
MP3 players, or a personal CD player.
This model also features a large clear acrylic, hinged cover to protect your iPod®
from raindrops or splashes. You can control the key functions of your iPod®without
opening the protective cover.
Every component in this system was in perfect working order when the system left
our factory. If you experience any problems with the set up or operation of this
system please do not return it to the retail store.
Please call the Emerson Customer Service Hotline, toll free, at 1-800-898-9020,
Monday through Friday from 9:00 AM to 5:00 PM Central Time. One of our
technicians will try to trouble shoot and solve your problem by phone.
The serial number of your system is located on a label on the bottom cabinet.
Please take a moment now to locate this number and write the number in the
space provided on the warranty page of this manual. This number provides
information regarding the date of manufacture of your unit. You may be asked to
provide this number when calling for customer service.
Once again, thank you for purchasing this portable iPod®speaker system from
Emerson Research.
iP105_052207.p65 22/5/2007, 14:492

3
IMPORTANTNOTES
•Operatecontrolsand switchesas
described inthe manual.
•Beforeturning on the power,make
certainthatthe ACpowercordis
properlyinstalled.
•When moving the set, be suretofirst
disconnectthe ACpowercord.
•Avoidinstalling thisunitinplaces
exposed todirectsunlightorcloseto
heatradiating appliancessuchas
electricheaters,ontopofotherstereo
equipmentthatradiatestoo much
heat, placeslacking ventilation or
dustyareas,placessubjectto
constantvibration and/orhumidor
moistareas.
FCC Information
Thisequipmenthasbeen tested and found tocomplywiththe limitsforaClass B
digitaldevice,pursuanttoPart15 ofthe FCC Rules.Theselimitsaredesigned to
provide reasonableprotection againstharmfulinterferenceinaresidential
installation.Thisequipmentgenerates,uses,andcanradiateradiofrequencyenergy
and,ifnotinstalledand usedinaccordancewiththeinstructions,maycauseharmful
interferencetoradiocommunications.However,thereisno guarantee that
interferencewill notoccurinaparticularinstallation.If thisequipmentdoescause
harmfulinterferencetoradioortelevision reception,whichcan be determined by
turning the equipmentoff and on,the userisencouraged totrytocorrectthe
interferencebyone ormoreofthe following measures:
•Reorientorrelocatethe receiving antenna.
•Increasethe separation between the equipmentand receiver.
•Connectthe equipmentintoan outleton acircuitdifferentfromthattowhich
the receiverisconnected.
•Consultthe dealeroran experienced radio/TVtechnician forhelp.
ThisdevicecomplieswithPart15 ofthe FCC Rules.Operation issubjecttothe
following twoconditions:
(1)Thisdevicemaynotcauseharmfulinterference,and
(2)Thisdevicemustacceptanyinterferencereceived,including interference
thatmaycauseundesired operation.
Changesormodificationsnotexpresslyapproved bythe partyresponsiblefor
compliancecouldvoidthe user’s authoritytooperatethe equipment.
iP105_052207.p65 22/5/2007, 11:373

4
Unpacking and Set-Up
• The display carton contains the main unit, the AC power cord, and 5 separate
dock adapters for use with older iPod®models. Make sure that all the
components are removed from the carton and that nothing is accidentally
discarded. We recommend that you save the carton and packing materials in
the event that your unit even needs to be returned for service. Using the original
carton and packing materials is the only way to protect your unit from damage
during shipment. If you do dispose of the carton of the carton and packing
materials please do so properly and recycle. Emerson cares about our
environment.
• Open the clear protective cover and remove the ‘dummy iPod’ from the iPod®
compartment.
Power Source
This system is designed to operate on 6 “C” batteries or 120V 60Hz AC house
current.
In addition, 2 “AAA” back-up batteries are required to maintain the clock, alarm
and tuner preset station memories in the event that the primary power supply is
interrupted.
PREPARATIONFORUSE
iP105_052207.p65 22/5/2007, 11:374
5
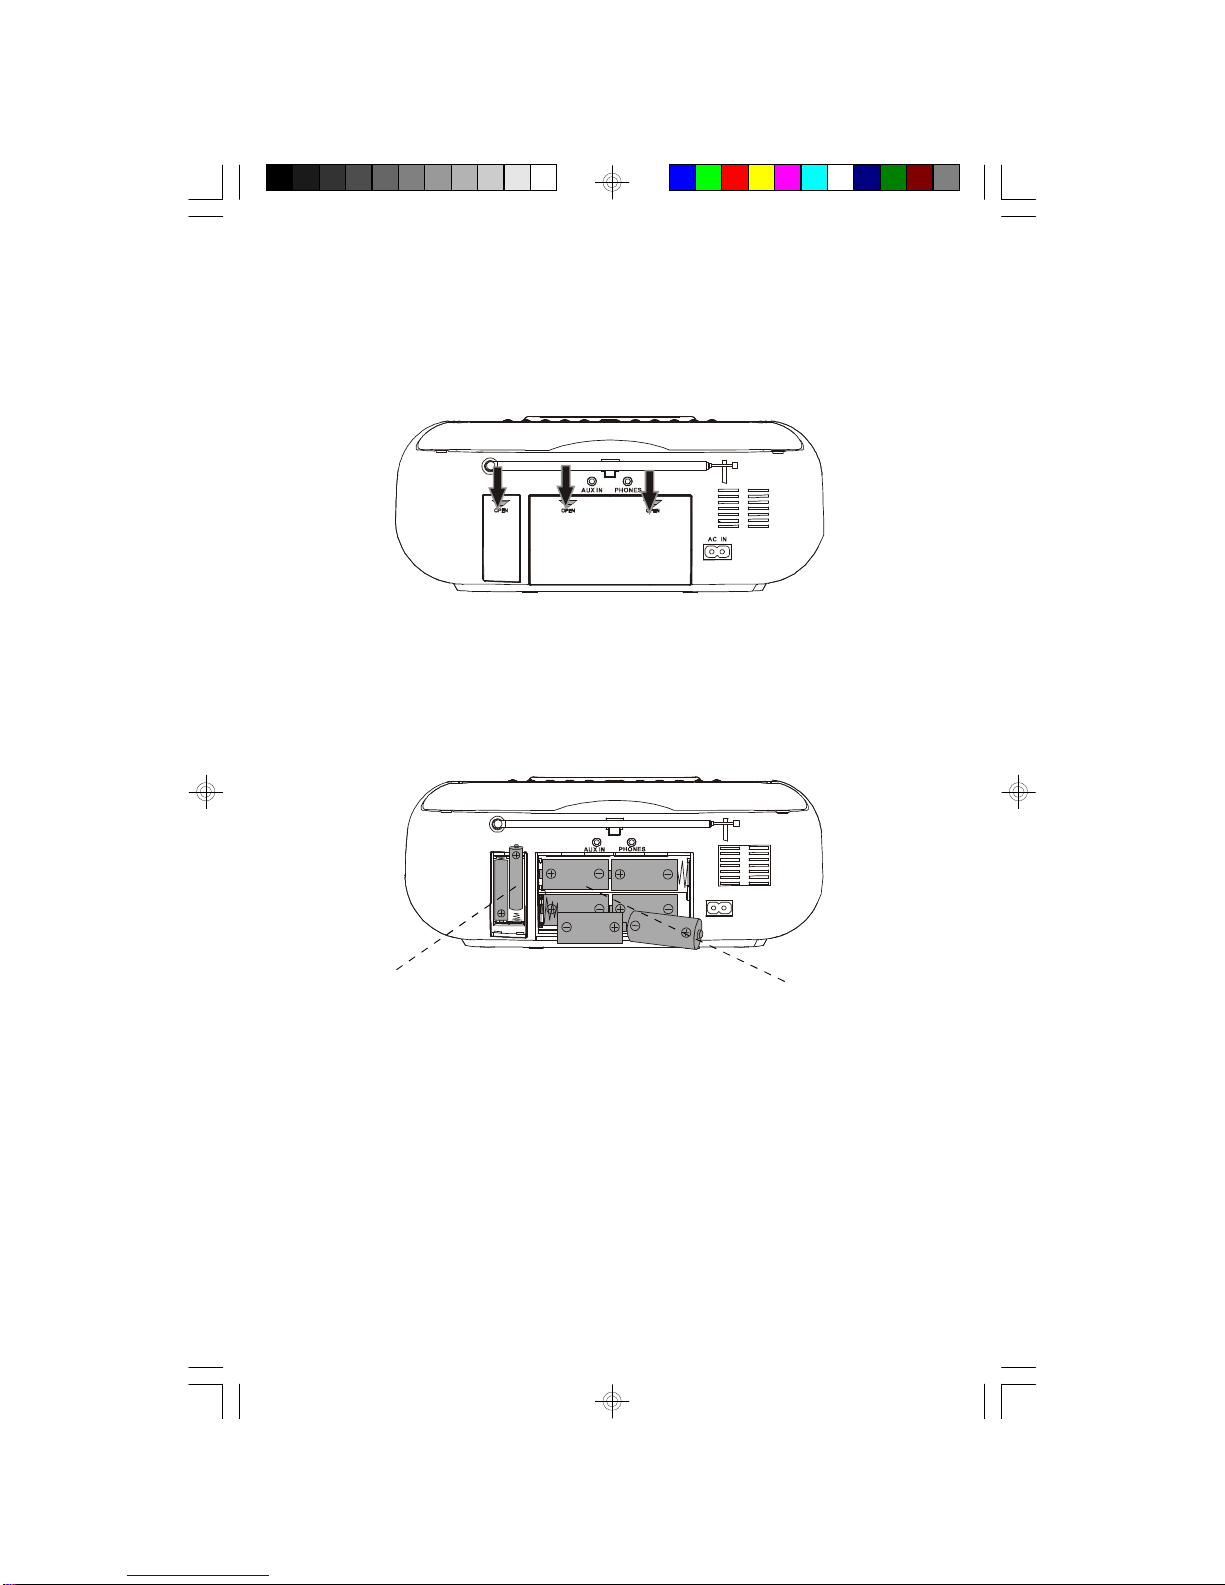
Installing The Batteries
There are two battery compartments on the back cabinet. Remove the battery
compartment covers by pressing down on the ‘arrow’ marks and sliding the covers
downward in the direction of the arrows as shown.
Install 6 “C” batteries in the main compartment as shown. Place the battery ribbon
into the compartment before inserting the batteries to make removing the batteries
easier.
Install 2 “AAA” batteries in the back up battery compartment as shown in the above
illustration.
NOTE: If the back-up batteries are not installed, the clock, alarm, and tuner
memories will have to be reset after every power interruption.
We recommend that you always use a well-known brand of alkaline batteries for
longestlife and best performance. Be sure to install the batteriescorrectly, according
to the polarity markings engraved on the cabinet. If the batteries are inserted
incorrectly the unit will not work.
(2 “AAA” Batteries) (6 “C” Batteries)
iP105_052207.p65 22/5/2007, 11:375

6
Replacing The Batteries
When the sound of the system becomes weak or distorted during battery operation
it is probably time to replace the 6 “C” batteries. The life expectancy of the batteries
depends on a number of factors including the temperature and the volume level at
which the system is operated. If the system is always played at or near the maximum
level, the batteries will become exhausted faster than if the system is played at low
to medium volume levels. Be sure to replace all 6 batteries at the same time and
do not mix different types of batteries, such as carbon-zinc, alkaline, and lithium
together.
If the system will not be used for periods of a few weeks or longer, it is a good idea
to remove the 6 “C” batteries. If exhausted batteries are left in the battery
compartment they may eventually leak, and the corrosion from leaking battery
fluid may cause damage to your unit. Corrosion damage from leaking batteries is
not covered by your warranty.
The 2 “AAA” back up batteries are only supplying power to the clock and tuner
memories so they will last longer than the 6 “C” batteries. We recommend replacing
the 2 “AAA” batteries every 12 months.
BatteryPrecautions
•Replacementofbatteriesmustbe done byan adult.
•Donotmixoldand newbatteries.
•Donotmixalkaline,standard(carbon-zinc)orrechargeable(nickel-cadmium)
batteries.
•The supplyterminalsarenottobe short-circuited.
•Non-rechargeablebatteriesarenottobe recharged.
•Exhausted batteriesaretobe removed.
•Onlybatteriesofthe equivalenttype aretobe used.
•Batteriesaretobe inserted withthe correctpolarity.
•Disposeofbatteriesproperly.Donotdisposeofbatteriesinfire.The batteries
mayexplode orleak.
iP105_052207.p65 22/5/2007, 11:376
7
Protect Your Furniture
Thismodelisequipped withnon-skidrubber‘feet’topreventthe productfrom
moving when you operatethe controls.These‘feet’aremade fromnon-migrating
rubbermaterialspeciallyformulated toavoidleaving anymarks orstainson your
furniture.Howevercertaintypesofoil based furniturepolishes,wood preservatives,
orcleaning sprays maycausethe rubber‘feet’tosoften,and leavemarks ora
rubberresidue on the furniture.Topreventanydamage toyourfurniturewestrongly
recommend thatyou purchasesmall self-adhesivefeltpads,availableathardware
storesand homeimprovementcenterseverywhere,and applythesepadstothe
bottomofthe rubber‘feet’beforeyou placethe producton fine wooden furniture.
Power Source
This system is designed to operate on 120V AC 60Hz house current only.
Connecting this system to any other power source may cause damage to the
system and such damage is not covered by your warranty.
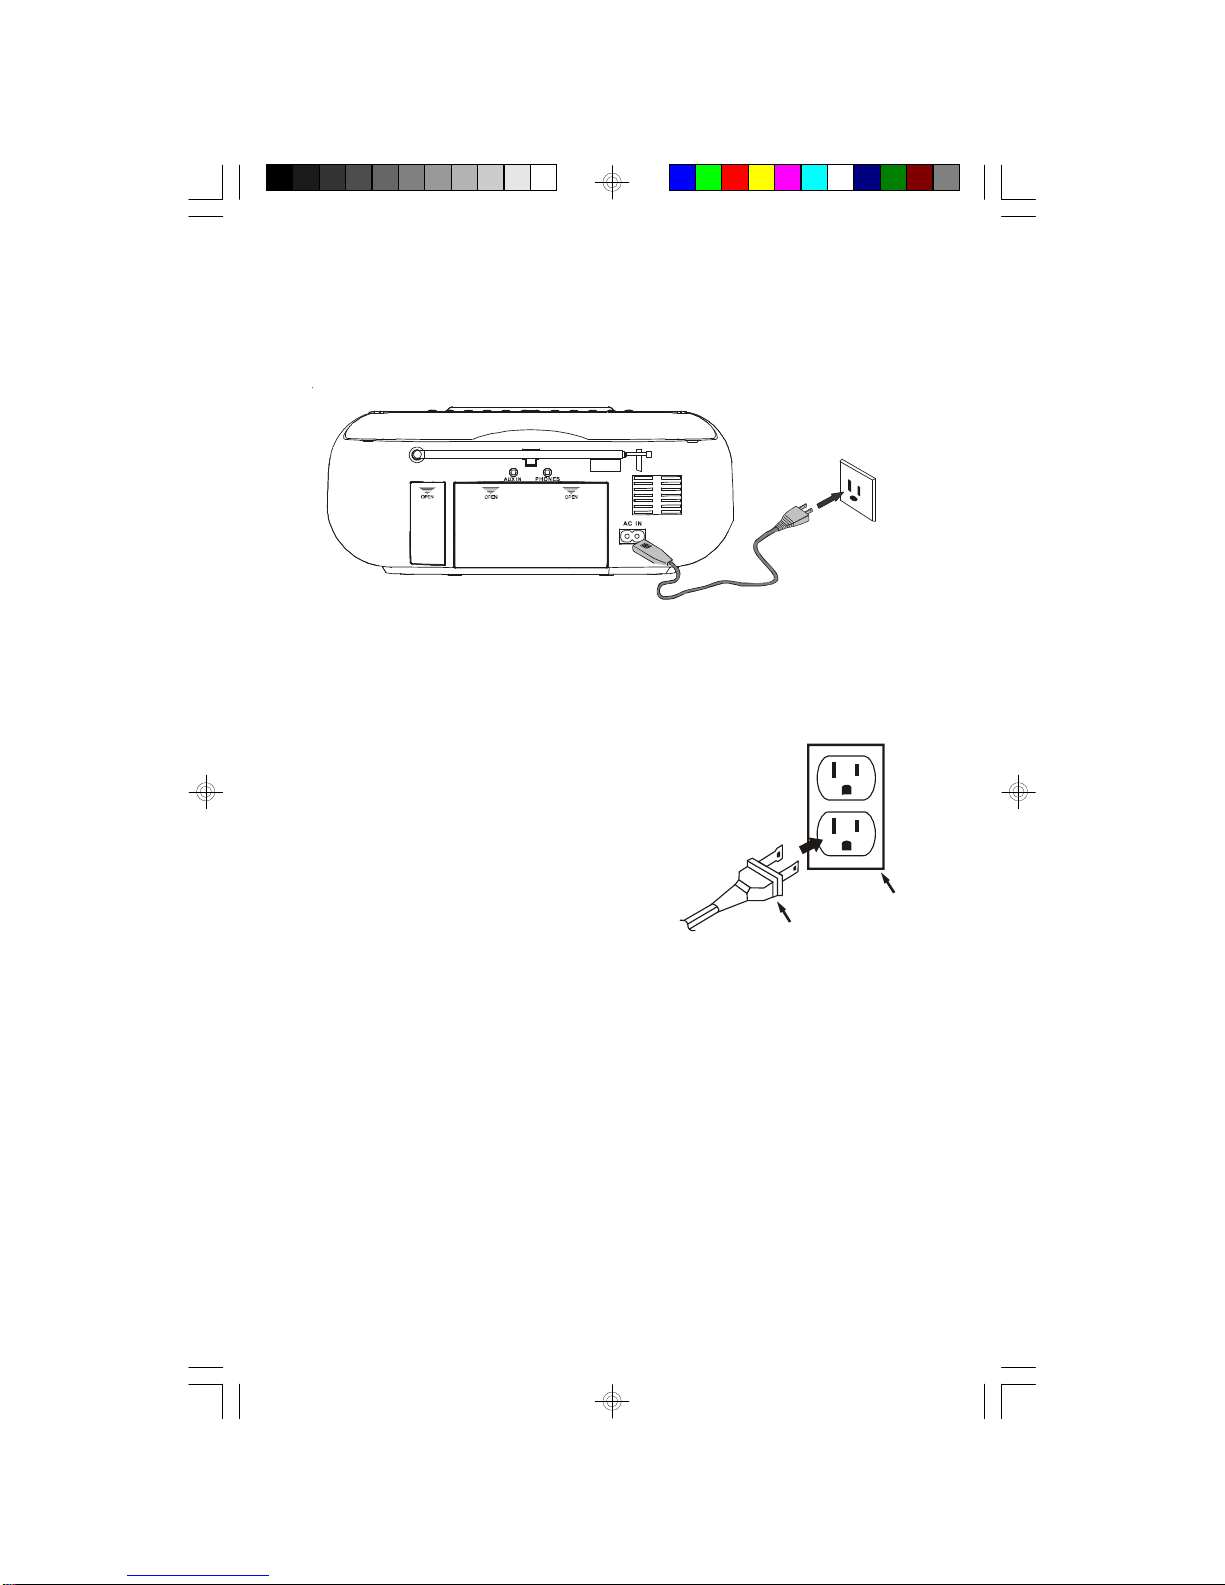
NOTE:The systemhasapolarized ACplug withone wide blade and one
narrowblade.The plug will onlyfitintomatching polarized ACoutlets.
Thisisasafetyfeaturetoreducethe possibility
ofelectricshock.If the plug will notfitinyour
ACoutlet, you probablyhavean outdated non-
polarizedoutlet.Youshouldhaveyouroutdated
outletchanged byaqualified,licensed
electrician.Donotfilethe wide blade on the
plug,orusean adaptertomakethe plug fitinto
youroutlet. Thisdefeatsthe safetyfeatureand
couldexposeyou toelectricshock.
AC Plug
AC Outlet
AC Plug
AC Outlet
iP105_052207.p65 22/5/2007, 11:377

8
LOCATIONOFCONTROLSAND INDICATORS
FrontPanel
Back Panel
11
2
3
17
4 5 6 7 8 9 10 11 12
13
14
17
15
16 18
19
20
iP105_052207.p65 22/5/2007, 11:378

9
1.) Speakers.
2.) Clear Protective Cover.
3.) Carrying Handle.
4.) POWER Button - Press to turn the unit ‘On’ or ‘Off’.
5.) FUNCTION Button - Press repeatedly to switch among iPod, AUX, and
RADIO modes.
6.) TIME SET/MEMORY Button - To set time in power ‘Off’ mode. Saves radio
stations in the memory in radio mode.
7.) ALARM/PRESET UP Button - To set alarm time and select theAlarm mode.
In radio mode, selects the desired preset station.
8.) PLAY/PAUSE-BAND Button - Press to start iPod®playback. Press again to
pause. Press and hold to shut iPod®‘Off’. In radio mode, to select between
FM and AM bands.
9.) SNOOZE Button.
10.) TUNING – ( /) / TUNING + ( /) Buttons - In radio mode, tunes
to the desired station. In iPod mode, skips tracks or performs high-speed
search. In power ‘Off’ mode, used to adjust the time; or press and hold to
display the seconds.
11.) X-BASS Button - To enhance the bass response.
12.) VOLUME – / VOLUME + Buttons - Used to adjust volume level.
13.) iPod®Dock - For all dockable iPod®models with 30-pin connector.
14.) MULTI-FUNCTION DISPLAY.
15.) Back Up Battery Compartment.
16.) AUX IN (Auxiliary Input) Jack - For connection of external audio sources.
17.) FM TelescopicAntenna.
18.) PHONES (Stereo Headphone) Jack.
19.) AC IN Power Cord Socket.
20.) Battery Compartment.
iP105_052207.p65 22/5/2007, 11:379

10
LCD Display
1.) Radio Band and Clock AM Indicator.
2.) iPod Select Indicator.
3.) RADIO Select Indicator.
4.) Radio Band FM Indicator.
5.) XBASS Indicator.
6.) FM Stereo Indicator.
7.) , , (Buzzer, Radio, iPod) Alarm Indicators.
8.) MEMORY Indicator.
9.) Volume Level (00-30), Radio Channel (1-20) Display.
10.) Volume Indicator..
11.) Clock, Radio Frequencies Display.
12.) Clock PM Indicator.
13.) AUX Select Indicator.
1
2
3
4 5 6 7
8
9
111213 10
iP105_052207.p65 22/5/2007, 11:3710

11
OPERATINGINSTRUCTIONS
• Regardless of whether you will be using the system on AC or battery
power, make sure that you have installed the 2 “AAA” back–up
batteries.
• If the system will be used on AC power make sure that the AC power
cord is properly connected to the socket on the back cabinet and to
your AC outlet. Make sure that your AC outlet is ‘live’.
• If the system will be used on battery power make sure that you have
correctly installed the 6 “C” batteries in the battery compartment,
and that the AC cord is completely disconnected from the AC socket
on the back cabinet.
Setting The Clock
The first time that the batteries are installed in
the unit, or the unit is connected to yourAC outlet
the front panel display will show “AM 12:00”.
The time will always appear on the display when the unit is in the power ‘Off’ mode,
the iPod mode, or the AUX mode.
NOTE: The time can only be set when the unit is in the power ‘Off’ mode with
the display back lighting ‘Off’. If the blue color display back lighting is ‘On’,
press the POWER button to turn the power ‘Off’ and then follow the steps
below.
iP105_052207.p65 22/5/2007, 11:3711
12
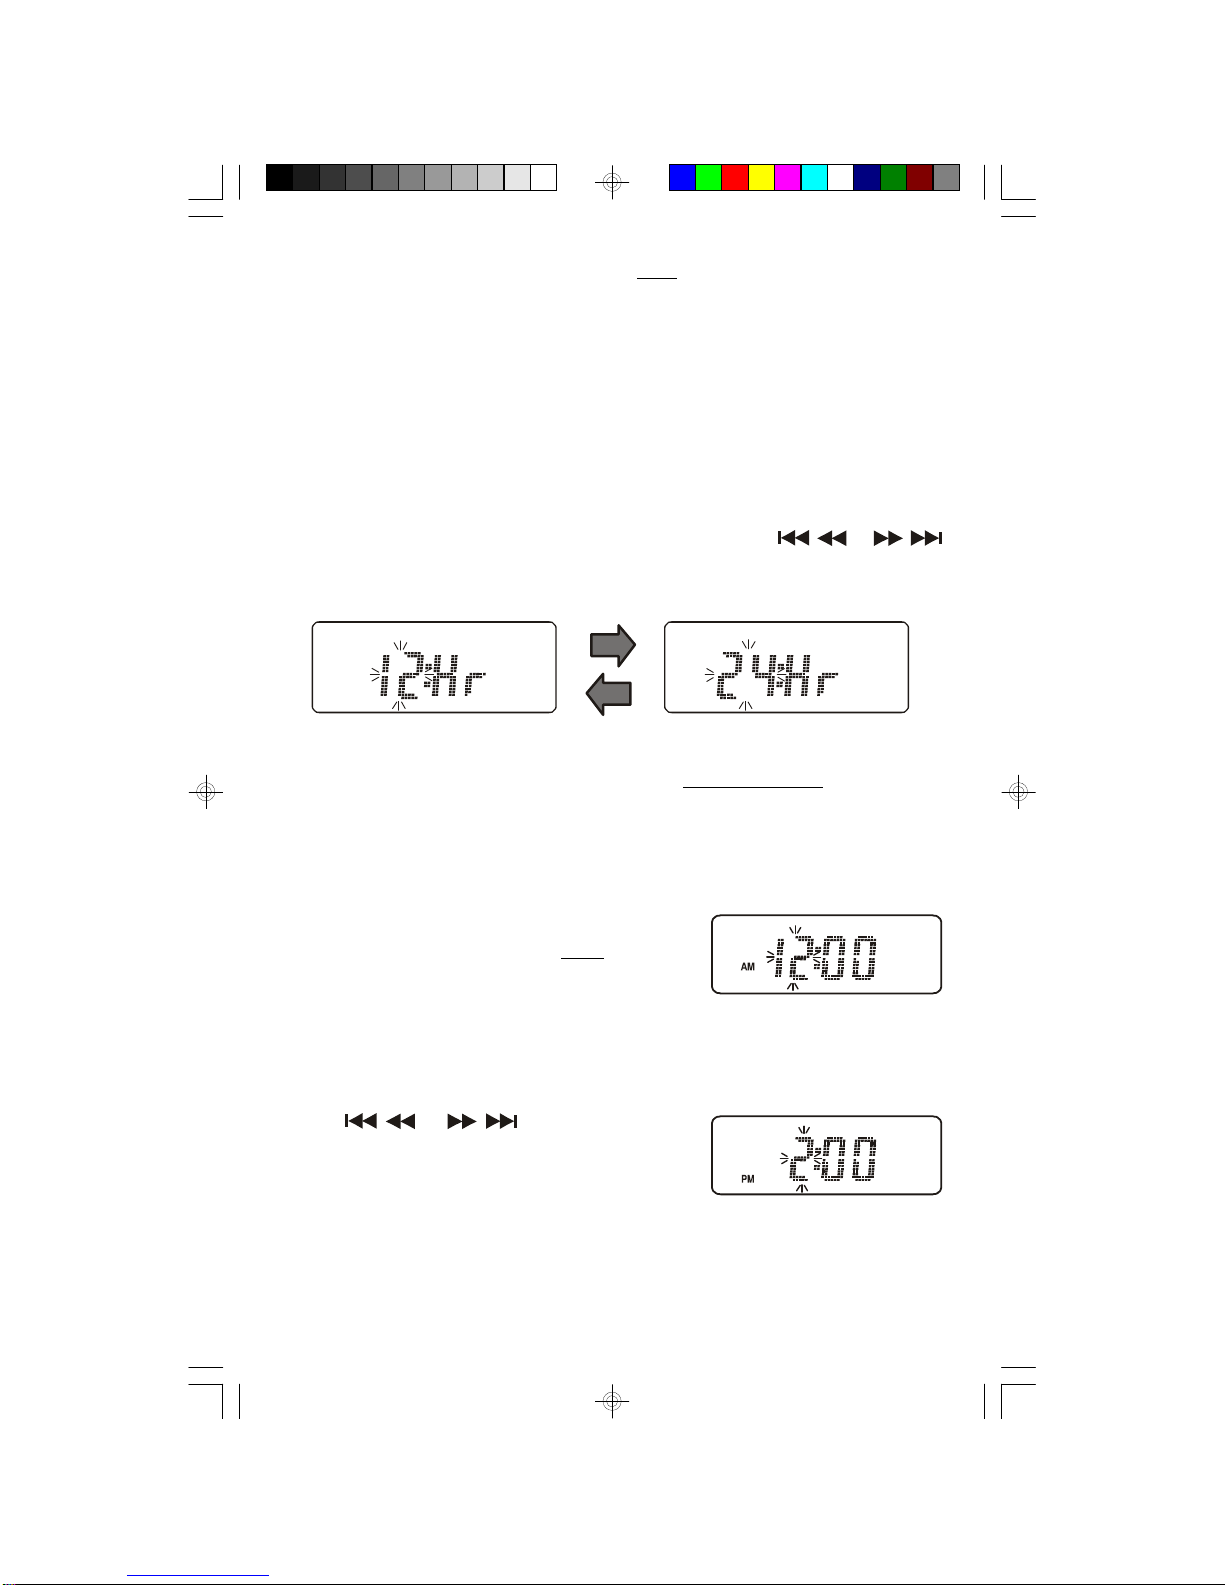
1.) Press the TIME SET/MEMORY button once. “12:Hr” appears on the display
and the “12” flashes. This indicates that the display is set for the 12-Hour format
with AM/PM indicators.
This is the factory default setting. You also have the option of displaying the
time in 24-Hour format, also referred to as “Military Time”.
In the 24-Hour format midnight is displayed as “0:00”, “1:00 PM” is displayed
as “13:00”, “6:00 PM: is displayed as “18:00”, etc.
There are noAM or PM indicators in the 24-Hour format. To switch between the
12-Hour and 24-Hour formats if necessary, press either the /or /
buttons while the “12” indicator is flashing.
NOTE: You must begin making adjustments within 5 seconds after pressing
the TIME SET/MEMORY button, while the display is flashing. If no
adjustments are made within 5 seconds the display stops flashing and
returns to the Time display.
2.) While the “12” indicator is flashing, press the
TIME SET/MEMORY button once more. The
hours and minutes display returns and the hour
digits flash.
3.) While the hour digits are flashing press either
the /or /buttons to move the
hour display back or forward to the correct hour.
Be sure to observe theAM/PM indicator to make
sure you have set the hour correctly.
iP105_052207.p65 22/5/2007, 11:3712

13
4.) Press the TIME SET/MEMORY button again.
The hour digit stop flashing and the minute digits
begin to flash.
Press either the /or /buttons to
move the display back or forward to the correct
minute.
5.) When the correct time is showing on the display
press the TIME SET/MEMORY button once
more.
The minute digits stop flashing and the clock
begins to run.
Onlythe colon ( : ) continues toflash. The flashing
colon acts as a seconds counter.
iP105_052207.p65 22/5/2007, 11:3713

14
Correct View Angle Incorrect View Angle
Display Viewing Angle – IMPORTANT
The display in this portable system is designed to be the clearest and most visible
when you are looking down at the display from above. If you are looking at the
display ‘head-on’, or looking up at the display from below, the numbers on the
display may seem to fade or may become completely invisible.
This is a common characteristic of all liquid crystal displays and is not an indication
of any problem with your unit. The display in this unit was designed to be clearest
when viewed from above.
iP105_052207.p65 22/5/2007, 11:3714

15
Listening To The Radio
1.) Press the POWER button to turn the power
‘On’. The display back lighting comes on and the
display appears as:
Press the BAND button to switch the radio
between FM and AM bands if necessary.
When listening to the FM band, raise the
telescoping FM rod antenna and extend it to its
full length.
2.) Tune to the desired station as follows:
• Automatic Tuning
Depress and hold the TUNING + / – buttons until the display begins to move,
then release the buttons. The display will move up or down and stop on the
next strong station. Repeat this procedure until the display stops on the
frequency of your desired station.
If it is an FM Stereo station the ((ST)) indicator
will appear in the display.
• Manual Tuning
Repeatedly press the TUNING + / – buttons to manually move the display up
or down to the exact frequency of your desired station.
NOTE: Use the Manual Tuning method to tune to weaker stations that
might be bypassed by the Automatic Tuning method.
3.) Press the VOLUME + / – buttons to adjust the
Volume to the desired level.
TheVolume Levelindicatorappears in the display
as you adjust the volume level. The adjustment
range is from “V 01” to “V 30”.
iP105_052207.p65 22/5/2007, 11:3715

16
4.) To increase the bass response, especially at
lower volume levels, press the X-BASS button.
The XBASS indicator appears in the display.
NOTE: if you experience any distortion
when listening to music with strong bass at
higher volume levels, switch the Bass Boost
circuit ‘Off’.
5.) When you are finished listening press the
POWER button to shut the power ‘Off’.
The display back lighting turns off and the display
changes from radio frequency back to the current
time.
Last Station Memory
The tuner remembers the last FM andAM station that you listened to before shutting
the power off. It will automatically return to that station the next time you turn the
power on and select the RADIO function.
iP105_052207.p65 22/5/2007, 11:3716

17
Antenna Information
FM - Raise the telescoping FM rod antenna and adjust its direction until you find
the position that provides the best reception.
AM - The AM bar antenna is inside the cabinet. IfAM reception is unsatisfactory try
turning the entire unit slowly until you find the position that provides the best
reception.
iP105_052207.p65 22/5/2007, 11:3717

18
Presetting Stations In The Tuner Memory
The tuner in this system has 40 preset station memories that allow you to store up
to 20 of your favorite AM and 20 of your favorite FM stations.
1.) Tune to the first station that you wish to memorize
by either theAutomatic or Manual method above.
Example: FM 93.5 MHz.
2.) Press the TIME SET/MEMORY button once.
The preset number “1” appears and the
MEMORY indicator ‘flashes’ indicating that you
can store your station in memory number 1.
3.) Press the TIME SET/MEMORY button once
more. The MEMORY indicatorstops flashing and
your station is stored in memory number “1”.
4.) Tune to the next FM station you wish to store and
press theTIMESET/MEMORY button. Thepreset
number “2” appears and theMEMORY indicator
‘flashes’.
• To store the station in preset memory number 2, press theTIME SET/MEMORY
button again.
• To store the station in a different preset memory number press the
ALARM/PRESET UP button to advance the display to the desired memory
number before you press the TIME SET/MEMORY button.
5.) Repeat Step 4 until you have stored up to 20 FM stations in the tuner memory,
then press the BAND button to switch to the AM band and follow the same
procedure to store up to 20 AM stations in the tuner memory.
NOTE: After you press the TIME SET/MEMORY you must enter a station in
the memory within 5 seconds while the MEMORY indicator is ‘flashing’. If the
MEMORY indicator stops flashing the station cannot be memorized. If this
occurs press the TIME SET/MEMORY button again and be sure to enter your
station in the memory within 5 seconds.
iP105_052207.p65 22/5/2007, 11:3718

19
Recalling Stations In The Tuner Memory
Turn the system ‘On’ and select the Radio function as usual.
Press theALARM/PRESET UP button repeatedly to scroll through all of the station
in the tuner memory.
Changing A Station In The Tuner Memory
Tune to the new station that you wish to memorize, press theTIME SET/MEMORY
button and then press the ALARM/PRESET UP button until the display is showing
the memory that you wish to change.
Press the TIME SET/MEMORY button once more. The new station is stored in
that memory and the previously stored station will be deleted.
iP105_052207.p65 22/5/2007, 11:3719
Table of contents
Other Emerson Research Portable Speakers manuals


